Transcripts
1. What's in This Class?: Welcome to my painting and
expressive color we class. My name is Tamas and we
are here to explore one of the most exciting parts of
watercolor painting colors. This session is part of my
color theory basic series to help you understand
colors better. You can paint dozens of
beautiful paintings with the instruction
of a good teacher without knowing
anything about colors, which is perfectly fine. But at some point, you might
want to understand what you are actually doing when putting your color
scheme together. Getting familiar with
the artist's color wheel is an ideal first
step in this journey. During this project,
we are going to paint an expressive
color wheel from the six basic watercolor paints that even the simplest hobby
watercolor palette includes. You will learn about the concept that is behind the color wheel, where it comes from,
and what its purposes. You will also learn about the
meaning of each color and what emotional response you can expect from the viewer
when using them. Working with colors
is fascinating, but it can be much more exciting with some
knowledge in your pocket. So I encourage you
to come with me and let's explore our
watercolor paints together. This will be the beginning
of an exciting journey. To make your own color wheel, you will need the
following tools. A sheet of watercolor paper. I'll be using an A four size, similar to the US letter size, Cold Pressed, 300 grams
watercolor paper. Graphite pencil for
drawing some guidelines, six base colors, yellow, orange, red, violet,
blue and green. Watercolor brushes. I'll be using a flat brush
for wetting the paper and the size 12 round brush
for applying the paints. But you can use whatever brush
you are comfortable with. For creating a special effect, I'll be using a straw, but you can also roll
up a piece of paper, creating a paper pipe
for the purpose. To provide flexibility,
I'll be using a drawing board that my watercolor paper
will be taped down too. You can also use a paper
board for the purpose. Other than that, you will need the common
watercolor supplies. In this case, two
water containers, a paper towel, and optionally a spray bottle
to dilute the paints. Whenever you are ready, I'll
see you in the first video.
2. Introduction to the Color Wheel: It's great to have you here. Let me say a few words about
what we are about to paint, where the concept
of the color wheel comes from and what
it represents. In the 17th century, an English physicist
and mathematician, Isaac Newton realized that
white light is composed of a spectrum of
colors which can be separated and refracted
through a prism. Can also see this in nature when a rainbow is
formed during rain. Water droplets in the
atmosphere act like little prisms
separating white light into its component colors. Newton arranged these
colors in a circle pattern, creating the first version
of the color wheel. The color wheel had become a fundamental tool
in art and design, helping artists and designers understand
color relationships, contrast and harmony,
eventually being able to create more effective and visually
more appealing designs that engage and inspire
their audience. Having a color wheel
on your desk or wall helps you get
familiar with colors. Creating your own by using your watercolor
paints is also fun. The expressive
painting style I've chosen requires
some quick actions, we'll be painting the color
wheel first in a row. Then we'll be talking about
the theory behind it.
3. Preparation: As you can see, I have my paper taped down
on a drawing board. During painting, we may
need to drive the paint on the paper by changing the papers position in
this three D space. This way, we utilize gravity, which will result in
a more natural look. If you don't have
this flexible option, you can tape down your
paper on your desk. That's fine too.
But in that case, you may have to use your brush
to drive the paint and you will get a different outcome,
which is totally fine. I'll be happy to see
your piece anyway. As a first step, let's create some guidelines for the
color wheel with a pencil. I'm using masking tape and
placing it somewhere in the middle of my page aligned both vertically
and horizontally. You can also use a
glass or a yogurt cup. An object around you that
has a circle base shape. Just make sure its
circle size is something like this relative
to your paper size. I'm using a graphite
pencil to draw the circle. Like so. We'll be painting the color
wheel outside of the shape. Now let's create some
markers inside with a label for each so we know
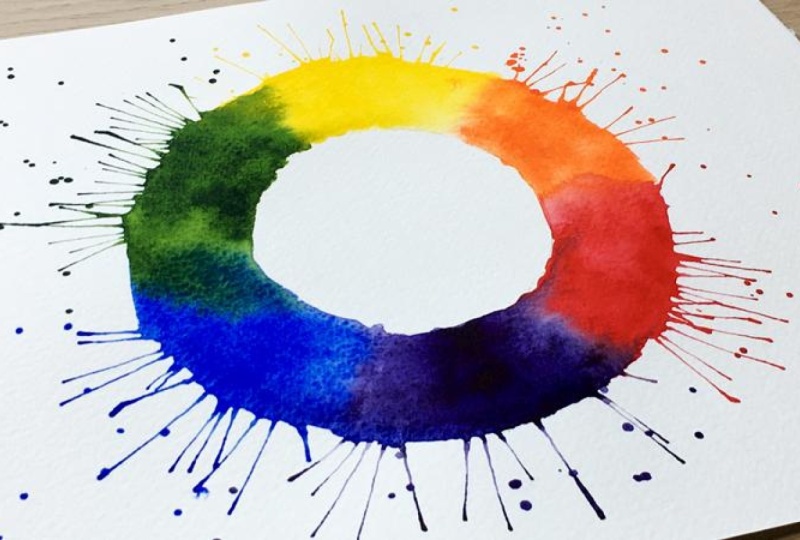
where to place our colors. We have to arrange six
different colors evenly. I'm placing the three
primary colors first, yellow, red and blue. Their arrangement is going
to form a triangle shape. Note that primary colors are the ones that cannot be
mixed from any other colors. I'm placing yellow
at the top Okay. Red over here and blue
on the other side. If you are already familiar
with the color wheel, you may have seen
other arrangements. This can be rotated
counterclockwise, placing red at the top, or you can mirror this and flip the location of
the blue and red. If you are already used
to a certain layout, feel free to use that one. If not, use the one I'm making. Now let's place the
remaining three colors from the visible spectrum, orange, violet, and green. Their arrangement will form a triangular shape
again, but upside down. Between yellow and
red, we find orange. Between red and blue,
we find violet. You may also find purple
referencing a similar color, but note that why violet is a natural spectral color
with its own wavelength. Purple is just a
human perceived color created by combining red
and blue in the eye. Finally, between
blue and yellow, we find green, which
is opposite red. Orange, violet and
blue are called secondary colors
because you can make them by mixing two
adjacent primary colors. By mixing yellow and
red, we get orange. By mixing red and
blue, we get violet. And by mixing blue and yellow, we get green, at
least in theory. In practice, throughout mixing, you can get surprising
results depending on what pigment and other
ingredients your paints contain. Nothing can compete with
your own experience using your own paints when we are talking
about color mixing. All right. Now, as I mentioned, we
will need to act kind of quickly when we paint our
expressive color wheel. The reason is that we need a
specific moisture level on the paper to get a nice
blending between our colors. Depending on the moisture
level of your room, water tend to evaporate quickly, so we will have a narrow
timeframe for doing our job. The thickness of your paper
can also affect the process. On thinner paper, you have to be modest with
the amount of water you use and try to be gentle
with your brush strokes. Otherwise, the wet
paper may be damaged. This is another reason why it's a good practice to tape
down your paper stretched. Otherwise, it will get bumpy. On a paper like that,
puddles can be created, which makes it hard to control the direction
of the pain flow. Good. Now, let's
make sure everything is set and our tools
are within reach. I have one container filled with clean water with a flat brush. That I'm going to use to wet
the empty paper surface, you are supposed to
keep this water clean. If you don't have a
flat brush like this, you can also use a
bigger size round brush, but make sure it's not
the brush you paint with. We will need to wet the paper with clean water several times, so it's best to use a separate brush only
for this purpose. Now I have a second
container that I'm going to use to rinse
my size 12 round brush. I actually paint
the colors with. Here comes my color palette. The six paints I'll be using cadmium yellow medium, orange, ruby for red, violet, tmarneblue and sap green. Note that you don't have to be using the exact same colors. There are plenty of
different paints available within a color family, so feel free to make
your own decisions here. Our goal is not to
paint perfect red or blue on our color wheel if
such a thing exists at all. As part of the preparation, I'm using a spray
bottle filled with water to activate the
six paints I mentioned. You can also drip a few drops of water into your pants by
using a small bottle. We will also need
a paper towel for cleaning our brush
before switching color. We want to keep our rising water as clean as possible throughout the painting process
so we can paint relatively pure colors
on our color wheel. Finally, let's not forget our straw that will be used
to create some cool effect. Awesome. I guess we are done
with the preparation phase.
4. Warm Colors: If everything is set,
we can start working. As a first step, let's create a wet ring around the guideline
using the flat brush. I'm dipping the brush
into the clean water and adding some water to the
paper, something like this. You don't have to be exact
or precise with following the guideline or shaping
a perfect circle outline. We prefer imperfection
in this project. We are about to paint
something abstract. You may need to visit a location twice as your paper is
soaking up some moisture. I'm tilting the paper so you can hopefully see
the moisture level here. It's pretty wet, but there are
no puddles on the surface. However, we are on the edge. Water control is one of the most important aspects
of watercolor painting, and it can be
pretty challenging. We need a wet surface to
let the paint flow nicely, but on the other
hand, too much water will make our paper bump. Later, we will probably need to add additional water
to the surface. So let's keep our flat brush and clean water ready
for another round. Very good. Now we can start painting. So let's wet our round brush. I'm going to start with the yellow paint and continue
clockwise color by color. I'm taking plenty of paint and doing a few brush
strokes like this, forming kind of a
triangle shape. I'm adding some extra paint to the outer edge and the center area where
my marker is located. Look at how
beautifully the paint is spreading on the
damp paper surface. In the meantime, I'm cleaning my brush
on the paper towel. If everything goes smoothly, that's all we need
for the yellow. Now I can rinse. Now, let's take our straw and blow some air on the outer edge on the
ring in radial direction. I guess I'm adding some
extra diluted paint to the surface so I can make
the splashes more dominant. This looks good to me. Don't worry if some paints penetrate into the
neighboring sections. They will blend nicely
with the adjacent colors. In the meantime, the time is ticking and the water is
evaporating from the surface. So I'm taking my flat brush with the clean water and let's maintain the moisture
level on the paper. I'm trying to avoid
the yellow paint. I already have some
bumps here and there, but it's not that dramatic. However, I have a small puddle at the blue section on the left. I didn't realize this
during recording. You want to avoid
that by lifting off the excess water with a
relatively dry brush. Now we can move on
to the next color. I'm taking my color palette, my round brush is clean, and I'm taking
some orange paint. Remember, orange is
a secondary color that can be mixed
from yellow and red. But for the sake of simplicity, I'm using an orange
paint out of the box. Its consistency is
something like milk, not too dense and
not too watery. This way, it can spread nicely, but your paper has to be damp. Otherwise, your paint
will stop moving. Not that too much
water would reduce the saturation or
in other words, the vibrancy of our paint. I'd like to have a
striking energetic look. In the meantime, I'm also
rotating the paper so I can hold my hand in a comfortable position
while I'm painting. If the moisture level
on the paper is ideal, the two colors will blend
nicely on their own. Watercolor paints are going to do their job if we let them. Okay, some extra paint has
been added to the edge. Now let's take a straw
and blow some air. Wonderful. We can move on to
the next color, which will be red
another primary color. I'm cleaning my brush, rinsing it in water and starting to apply my
red paint at the marker. Not too much, just
a few touches. It's easier to add more paint later than
remove the excess. And to make sure my
paint can spread nicely, I'm vetting the neighboring
surface with my flat brush. Here at the transition, I'm using some extra water on my brush so it can mix
easier with the orange. You can always rotate your board to influence
the direction of the flow. Some extra fluidity on
the edge and less blow. Oops, it's a bit too
much, but that's okay. If you need to, fill up
the empty space like that. Here, I have too much red, so I touch my paper towel with my brush to soak up some paint, and I'm gently driving the
paint back to its section. Like so. I guess I need a
clean and dry brush. And I'm lifting off the
unnecessary red from here. I'm trying to drive
back the red. It's supposed to be the
most intense at the marker. And if we are fine
with the result, we can clean our
brush and move on. O
5. Cool Colors: From now on, we have
to be extra careful. Make sure you don't touch the already painted
areas with your palm. It's so easy to smudge the
wet paint on the paper. Anyway, let's take
some violet paint. Violet is a very strong colour, so you have to be
careful with that. Let's strive the paint
by the board rotation. I'm cleaning my brush, and as usual, let's maintain the moisture
level on the empty area. Okay, my brush is
not wet enough, so it's actually soaking up
the pigments from the paper. This is not what I want. So I'm taking some extra
paint from the pen, dilute it slightly
with some water. Now we can make the splashes. Very good. Some dance while had
paint in the middle. Some more diluted
paint on the sides. And I guess we are done with it. Let's clean our brush. I think I'm adding some
more red over here. And I'm cleaning my brush again. I'm influencing the flow a bit. And we can move on to the blue, which is the primary
color again. Let's check the moisture level on the empty area real quick. It looks fine, so let's
apply the blue paint. What magnificent spreading. I'm barely touching the paper. There are no intense
brush strokes here. I'm just stepping. Some more dense
paint in the middle. I let me drive the flow towards the violet. However, in the meantime, you also want to watch your previous transition if it doesn't go wrong with
the current rotation. If you apply too much
water previously, it can be an issue now. Water control is not easy, so don't be discouraged
if things go south. With practice, you will get
better and better in this. All right. So extra
paint on the edge. And let's blow some air. So extra paint in the middle. And let's call gravity
again to do the job. I guess I need some
extra violet at the transition so I'm
cleaning my brush. And adding some diluted
paint over here. I'm cleaning my brush again and doing the
same with the blue. Nice. They will blend. It's
just a matter of time. H Oops, my blue is escaping in here. I'm using a clean and
relatively dry brush to stop it from happening. There are some violet
blood into the red area, but it's not that
bad, so I leave it. Maybe some extra violet over here. And some blue. I'm rotating my board in every angle so pigments
can mix nicely. All right. I guess we can complete our carol wheel
with the last colour, which will be the green. Let's not forget to
clean our round brush. You
6. Closing the Wheel: Now, as usual, I'm taking my flat brush and vetting
the empty surface. This time, I'm also adding
some water to the yellow area. This way, I'm reactivating the already dry yellow pigments so my green can blend
nicely with them. But I'm making these brush
strokes very gently. I don't want to relocate
the yellow pigments. I just want to activate them. At this point, I don't worry
about my flat brush anymore. It can absorb some
yellow pigments now. All right. I guess I'm using
my round brush from now on. I can make more precise
brush strokes with I'm showing you how
wet my surface is. As you can see, the
yellow pigments have been reactivated
successfully, so we can move on to green. I'm cleaning my brush. Actually, my rinsing water
is not that clean by now, so I'm using my other container with the clean
water from now on. And let's apply the green. Let's strive the paint
by the bold rotation. Extra paint on the edge, so we can make those splashes. Good. Some more paint to
the light surface. I. I'm cleaning my brush. And let's work on the
transition by dating the paper. I guess I need some extra
moisture over here. I'm cleaning my brush and adding some extra
yellow to the surface. You don't want to touch the
green at the transition. I think I'm painting over
the yellow area again. But as I'm moving towards right, I'm applying less
and less water. A at the yellow
orange transition, I'm actually using a
relatively dry brush. Note that in watercolor, pigments tend together at the border between your
wet and dry areas, creating a usually unwanted
effect after drying. So I'm trying to eliminate that harsh borderline rather creating a soft
transition in moisture. I guess the yellow section
will be just fine. Some dense green in the
middle at the marker. And I'm cleaning my brush. I find this area
lighter than it should, so I'm adding a slight
touch of green to that. One last touch at the yellow orange transition
with a clean brush. And I guess we can move
on to the last step, namely creating some eye catching
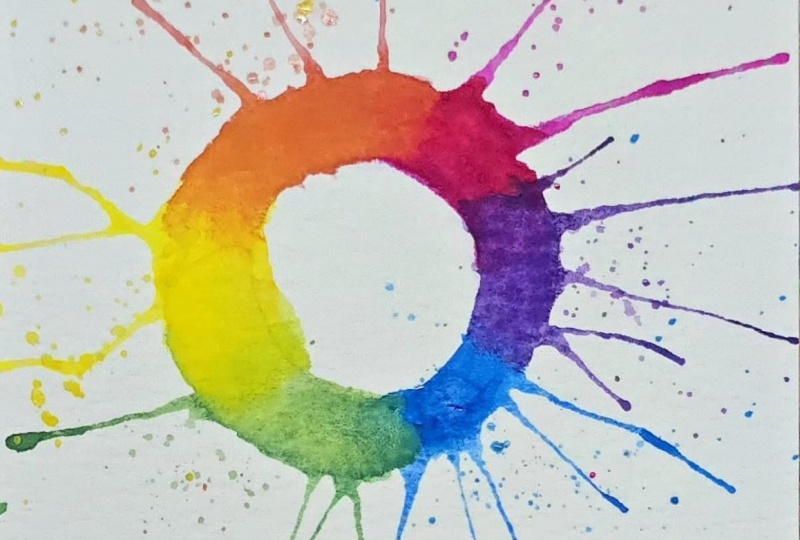
splatters for each colour.
7. Creating Splatters: Activate your paints on your callow palette with some
water again if you need to. Let's take our first color. I'm loading my brush
with some diluted paint. I'm holding my index finger like this and tapping the brush
on it to create the effect. To it some more diluted
paint if you need to. If you do this for
the first time, you might want to
test this technique on a scrap paper first. This looks good. I'm
rotating the paper. Cleaning my brush.
Raising it, of course. And moving on to the next color. The paint has to be well diluted in order to make
this effect easily. Awesome. I don't have to tell. You need to be extra careful from now on, because these splatters will take some time to
dry completely. Let's do this for all
colors one by one. If you want to, you
can alter the size of your splatters by using
different size of brush. You might want to cover your
table before doing this. Let's see one last colour. Okay. Gorgeous. As you can see, I
have a bump over here between blue and green and
it resulted in a puddle. I applied a little bit
more water than needed, but I don't want to touch
the surface anymore. I'm afraid it will just
throw in the natural look. I'd rather play with
the floor like this. Watch how my green
pigments are moving. I guess my expressive
color wheel is complete. How about yours? I hope you have also made one that you are satisfied with. Don't be disappointed if your
color wheel is not perfect. The goal wasn't to paint
some perfect artwork here. If the three primary
and the three secondary colors at the right
spots on your color wheel, the project has
fulfilled its purpose. I'm going to let this thing dry completely before I
remove the masking tape. See you in the next video.
8. Warm vs. Cool Colors: Now, let's talk about
the fascinating things that are behind the color wheel. We can divide the color wheel
into warm and cool sides. The term color temperature in art refers to the
perceived warmth or coolness of colors
used to create depth and atmosphere
or influence mood. Yellows, reds and
oranges are considered warm colors associated
with the sun and fire. They evoke energy, comfort, and heat, creating
a cozy atmosphere. On the other side, violets, blues and greens are considered cool colors associated
with water and sky. They evoke calmness
and serenity, creating a spacious atmosphere. You can also meet the term
relative temperature. It means that the color is warm or cool relative to others. For example, a blue like ultramarine that leans
toward violet is warm. While blues like serlem blue and cober turquoise leaning
toward green are cool. Similarly, a yellow like lemon that leans
toward green is cool, while a yellow like cadmium yellow leaning toward
orange is warm. If we know how to use warm
and cool colors together, we can create depth and
perspective on our artworks. Warm colors appear to
advance toward the viewer, while cool colors
seem to recede. Using warm colors in
the foreground and cool in the background enhances
the illusion of space. Furthermore, painters
often use warm colors to depict sunlight and cool
colors to represent shadows, adding realism to scenes.
9. Meaning of Colors: I Colors carry meanings. Colors have emotional aspect, but they can be cultural
and personal too. This is also called
color symbolism that is often a
cultural agreement. Having a basic understanding
of each color can help you to communicate effectively through
your artworks. So let's take primary and
secondary colors one by one and see their main properties and the associations that
have been linked to them. Note that associations
for a certain color are varied and sometimes
conflicting with each other. They often depend
on the context. Using colors deliberately,
thoughtfully, or consciously requires a lot
of knowledge and practice. Note that the following
lists are not complete, but they describe each
color pretty well. Let's see the three
primary colors first. Yellow is the most
visible color. It's ideal for warning
signs and alerts. It stimulates mental activity, encourages creativity,
and increases metabolism. Pale yellow can
enhance concentration. While yellow can create
a warm inviting feel, note that it's also the most
tiresome color for the eye, which can cause frustration,
irritation, if overused. Positive associations of yellow include sunshine, energy, joy, optimism, cheerfulness, intellect, idealism,
confidence, and friendliness. Yellow is magnificent,
expressive, ceremonial, deliberate,
and conscious. Negative associations
can be caution, danger, jealousy, cowardice,
deceit, or betrayal. Red is the warmest and
most energetic hue. Visually, it's the
most dominant color. It stimulates heart rate,
breathing, and appetite. It is capable of
raising blood pressure. Red attracts attention, making it ideal for
accents or signaling. It creates a powerful
visual focal point. Red triggers urgent, intense
emotional responses. Positive associations include
passion, love, joy, desire, sexual attraction,
energy, power, confidence, enthusiasm,
excitement, and heat. Light red and pink are
romantic and gentle. Dark red can communicate
seriousness, luxury, or rage. Orange red is
energetic and vibrant. Negative associations
connected to red are aggression, anger, war, cruelty, immorality, speed,
danger, caution, stop signs, fire trucks,
or danger warnings. Blue expands space and blue
objects recede in space. Blue causes the body to
produce coming chemicals, so it's a relaxing cleaning
and healing color. Its gray shades have
neutral effect. Positive associations
include summer sky, ocean, and flowers. Blue is fresh, clean, calm, patient, helpful,
inspiring, and spiritual. It can symbolize intelligence,
wisdom, and justice. It's used to convey
loyalty, trust, peacefulness, honor,
honesty, or masculinity. Blue can be classic, elegant, affectionate,
and sensual. Negative associations connected
to blue are depression, coldness, detachment, or apathy. Now let's see the three
secondary colors. Orange is energetic. It captures attention
and stimulates activity, creativity, and appetite. We often find them on food, fitness, and
children's products. Positive associations
include autumn, harvest, vitality,
warmth, energy, happiness, optimism,
confidence, enthusiasm, creativity, adventure,
and excitement. In Buddhism and Hinduism, orange represents holiness
and transformation. Vivid orange is
attention grabbing. It has high visibility. Sea traffic cones
and life vests. Peach and apricot are
soft, coming and friendly. Burnt orange and terracotta are earthy, grounded
and autumnal. Negative associations
connected to orange include
superficiality, arrogance, pride, melancholy, as
well as a cheapness, impatience, anxiety or stress. Violet combines the
calm stability of blue with the fierce
energy of red. Violet uplifts spirits, calming nerves, and
encourages creativity. Note that historically, this
dye was rare and expensive. Positive associations
that reflect this include royalty, nobility, luxury, power, wisdom, bravery, preciousness,
and sophistication. Violet also communicates
creativity, individuality, intuition, mystery, fantasy, spirituality, mindfulness
or meditation. Nowadays, it can
imply technology, innovation, and
high end branding. Light versions like lavender
and Lilac are romantic, delicate, sentimental,
nostalgic, and coming. Dark versions can symbolize wealth, luxury, or frustration. Negative associations
connected to Wilt include ambiguity, introversion,
moodiness, depression, arrogance, vanity, const,
pomposity, decadence, artificiality, over indulgence, impractility, or immaturity. Green is the easiest
color on the eyes. It helps digestion, reduces
anxiety, lifts mood. It is used for eco friendly, agricultural and health
related products. Positive associations
include plants, nature, growth,
fertility, youth, health, renewal, success,
honesty, harmony, balance, healing, freshness,
and sustainability. Bright green is associated with rebirth, springtime and energy. Dark green conveys wealth, prosperity,
stability, or safety. Olive green evokes nature, tranquility and elegance,
pare green implies peace.
10. What's Next?: All right. I hope you enjoy this introduction to
colors painting session. The color wheel is
just the beginning. It's a first step
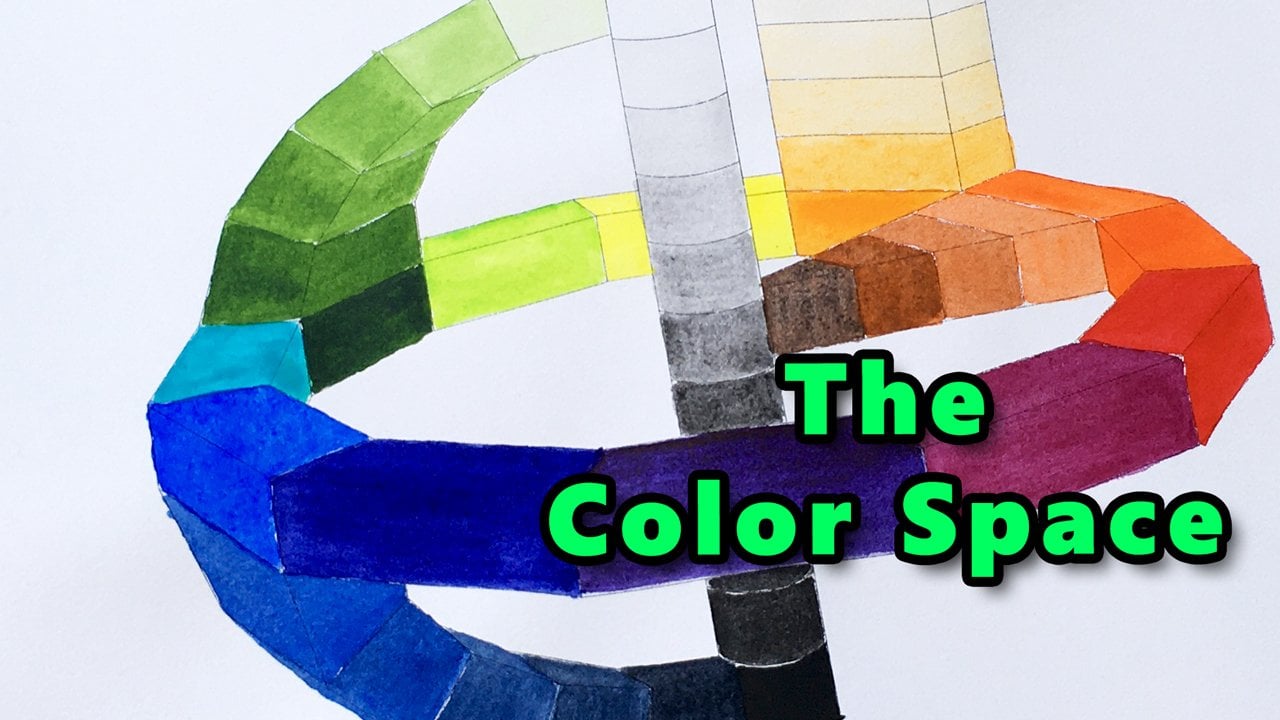
into the rabbit hole. In the next episode, we are going to paint a three
dimensional color space where you will understand the three main color properties, hue, saturation, and brightness, as well as how you
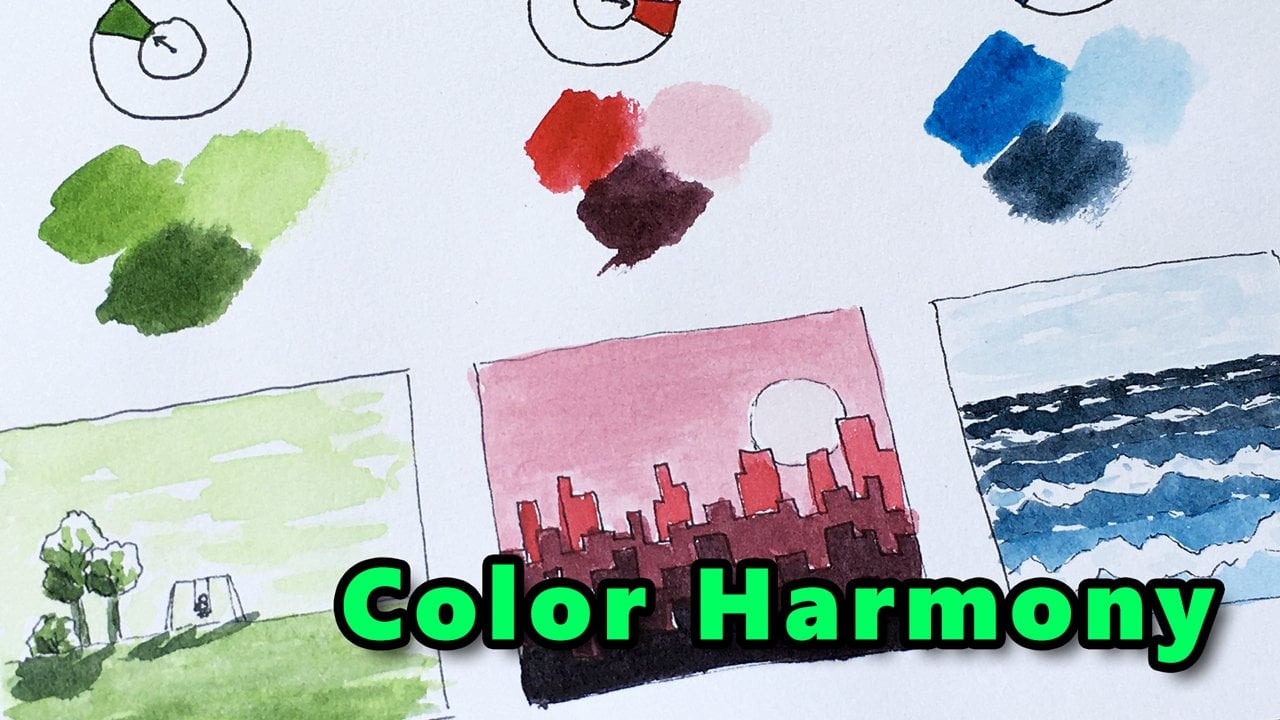
can manipulate them. In another class,
we are going to dive into color
harmony in a hands on style project where
we will paint plenty of mini thumbnails
with watercolor, so you will get to know the
basic color combinations that work just great together. Now I'd really like to see your interpretation
of the color wheel. So please upload your work in the project section
right below the video. If you find some joy
in this activity, please leave a review on the review tab below
the video player. Your feedback is important to
me and it can also provide information for other students about what they can
expect from this class. If you like my teaching style, I definitely have some more drawing and painting
lessons for you. Make sure you check them
out on my profile page. I hope you had a
good time with me. See you in another class.
 Tamas Benko, Drawing & Painting Classes