Transcripts
1. Welcome !: I work with many
different types of clay, but cold porcelain is
my favorite medium. I have been working with this clay for the
last ten years. It's very special to me, and I am sure that once
you start working with it, you will truly fall
in love with it, too. If you want to make professional
quality clay at home, using simple kitchen
ingredients, you are in the right place. Making your own clay is easy, fun, and very budget friendly. Hello, everyone.
Welcome to my class. My name is Mona, ugly
artist from India. And today, I'm very excited
to teach you how to make professional
cold porcelain clay right in your own kitchen. This clay is air drying, so you don't need a hot oven. It's very strong and flexible. You can use it to make
realistic plants and flowers, beautiful jewelry, and
many other art pieces. Everything you see
here on this table is made entirely from
cold porcelain clay. Look at these atoral figurines. The clock made with
food miniatures, claw on canvas,
miniature sucklins, earrings, fridge
magnet, key chain. From jewelry and
accessories to home decor, you can create almost
anything with this clay. I have no doubt that you will fall in love with
this magical medium, and you will be inspired to create more from the
very first piece. In this course, I will
share all my secrets. We will start with
the basic materials. I will show you the perfect
mixing and cooking method. You will learn the right
way to work with this clay and also discover
what different things you can create with it. I will also share the
essential dos and don'ts, my personal secrets to avoiding cracks and keeping
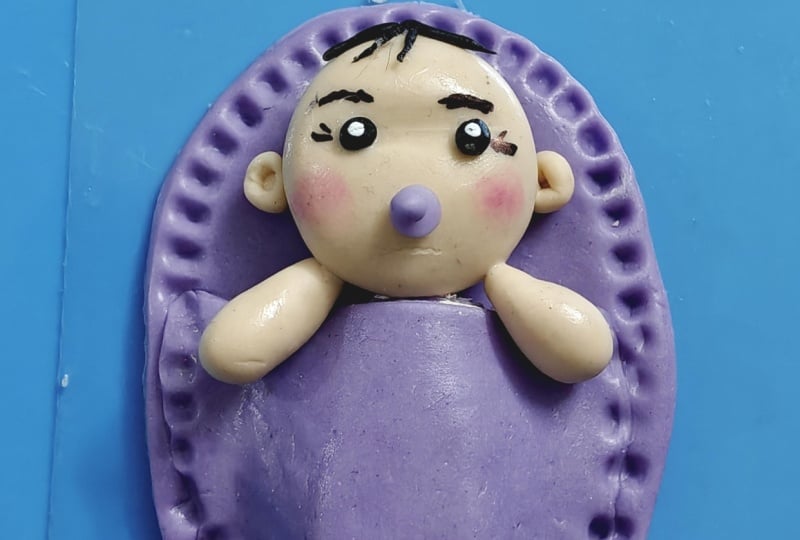
your work smooth. Then we will put
everything into practice by making this cute baby
fridge magnet together. I will guide you
through every step from the very first shape
to the final details. This class is perfect
for the bigners. By the end, you will
be able to make your own high quality clay
at home anytime you want. So let's get started.
2. Let's Check the Materials : Alright, let's get started
with the materials. Our main ingredient
is corn flour, also known as cornstarch. Next, we need wood glue, which forms the
base of our clay. For this project, I am using a high quality white PVA glue from the brand Pitlte
here in India. If you are joining me
from another country, just look for a
strong white PVA glue or a high quality wood glue. Make sure it has a thick consistency and high solid content
for the best results. In addition to that,
we'll need baby oil, which helps in making
the clay smooth and prevents it from
sticking white vinegar, which acts as a preservative
to prevent mold and keep our clay fresh for a
longer time glycrine. This is essential for adding elasticity and
flexibility to the clay, so it doesn't crack. Body lotion or cold cream, we use this while
needing to give the clay a soft and
professional finish. You will also need
a set of misn cups, a non stick pan. And finally, for the heating
and cooking process, you can use an induction
cooktop or a regular stove. So these are all the materials you need to make your clay. Along with learning how
to make the perfect clay, we will also learn
how to work with it by creating this cute
fridge magnet together. To bring this character to life, you will need a few
additional materials, acrylic colors, we will use blue and magenta to mix
a beautiful purple. For the skin tone, we will
blend orange and white. And, of course, we will need black for the eyes
and hair details. Sculpting tools, gabala some
ball tools, and a cutter. An oval shaped cutter is idle, but if you don't have one, a circular cutter
works just fine. Since we are making a magnet, you will need small magnets and some super glue
to stick them firmly. Now that we have all
our supplies ready, let's move to the next step.
3. The Perfect Mix - Ratios and Proportions : Let's roll up our sleeves and start mixing
our ingredients. We will start with the confl. We need 1.5 cups in total. I have mised out the first cup and putting it into a bowl. And here is the
remaining half cup. Now, take your nonstick
pan into this. We will add one cup
of white wood glue. As I mentioned, any high
quality PVA glue will work. I am pouring the glue
into the pan now. Now, to make sure we don't waste any glue left
in the misern cup, I am adding three teaspoon of glycerin directly into that cup. Any brand is fine. We add glycerin because it
acts as a plasticizer, giving the clay its elasticity and preventing it from
cracking once it dries. Next, we will add four
teaspoons of baby oil. You can use any good brand. Some people use vegetable oil, but you will get much better
results with baby oil. After that, we need six
teaspoon of white vinegar. This is crucial as it prevents fungus and mole from
growing on your clay. Now, give this mixture
a good stir in the cup so that all the
remaining glue mixes in and nothing goes to waste. Once it's well combined, pour it into the nonstick
pan with the rest of the glue and mix everything
until it's perfectly smooth. While I mix this, remember that this initial
blending of the glue, oil, glycine, and vinegar
is very important. We want a complete
uniform liquid before we even think about
adding the con flow. By mixing these wet
ingredients through the f, we ensure that the preservatives and the oil are
evenly distributed. It's time to add the cornflour. We will set aside the
half cup for litter, take the one cup of
cornflur and start adding it into the
liquid mixer slowly. While I continue mixing this
to a smooth consistency, let's talk a little bit about what cold porcelain actually is. Interestingly, despite its name, cold porcelain is
not real porcelain. Traditional porcelain requires
a high heat clean to bake. But this clay, which originated in Argentina and
South America is called coal because it's air dry and doesn't need
any firing at all. It was originally created as a budget friendly alternative
for artists to make delicate flowers and
intricate figurines that looks just like ceramic. Over the years, it
has become famous worldwide because of its durability and
incredible flexibility. You will notice the mixture starting to look
creamy and consistent. This cold mixing stays is the secret to avoiding any
grainy texture later on. Just keep stirring
with a steady hen. And there we go, as you can see, our battery is now
completely smooth and ready. All the ingredients
are perfectly blended. In the next video,
we'll move on to the most exciting part,
the cooking process.
4. The Cooking Phase: Now we have moved
to the kitchen. I have placed our nonstick
pan on the stove, set the flame to low medium. It's very important not to use high heat or the clay will burn. The most crucial part here is to keep stirring
continuously. Do not stop even for a second, as the mixer can
quickly stick to the bottom or form hard lumps. This process will take
four to 5 minutes. You might notice
a bit of steam or a slight smell as
the glue heats up. That's perfectly normal. However, I recommend working
in a well ventilated area or keeping a window open as some fumes are released
during the cooking process. While I am stirring, let's talk about what you can create
with this amazing clay. Cold porcelain is
incredibly versatile. It's the best material for
making life like flowers, delicate jewelry,
miniatures, charms, fridge magnets, and
even home decor items. Because it tries so
hard and smooth, your creations will look like
professional ceramic art. Many artists even use it for scrapbooking
embellishments because it can be rolled out so
thin without breaking. The possibilities
are truly endless. Keep a close eye on
the consistency. As we cope, the liquid better will slowly
start to thicken. Just stay patient and
keep that spatula moving. Oh Now, look closely at the texture. The mixture is starting to thicken and pull away from
the sides of the pan. This is a very crucial stage. You have to be extremely careful because if
you overcook it, even by a few seconds, the clay will turn rubbery
and too hard to work with. Remember, undercooked is okay, but overcooked is a disaster. Make starting to pull away from the aces and gather
in the center. It's time to act fast. Start scrapping the
side of the pen throughly to bring
everything together. See how it's forming
a ball in the middle. This is the exact moment
to turn off the heat. Don't wait any longer. We want it to be firm but
still soft and pliable. Our base is ready. Now it's time for the next
important step kneading. Let's move to the kneading
process while it's still warm.
5. Kneading and Storage - Keeping Your Clay Fresh: Now I'm taking the
mixture out of the pen. Right now, it looks
very messy and sticky, but trust the process. In a few minutes, it will
turn into a smooth dough, putting it on a clean flat
surface for kneading. Remember that half cup of
corn starch we keep aside. We will add this slowly. You might not all of it. Just add a little
bit at a time and keep kneading until it
feels like soft dough. The clay is still hot, but we need to start
kneading it right now. I'm doing it with my bare hands. If you want, you
can wear gloves, but I prefer to do it this way. It helps me feel the texture
of the clay much better, so I can know exactly
when it's ready. While I am kneading this clay, let's talk about how
to store it properly. This is the most important part. First, remember, the cold porcelain dries when
it touches the air. So you must never leave
it open on the table. Once you've finished kneading, wrap it tightly in plastic
wrap or cling film. Make sure there are no air
bubbles inside the wrap. After wrapping it in plastic, put it inside a zip lock bag, and then place it
airtight container. Double protection is always better to keep the
moisture inside. An important tip. Never store your
clay in the fridge. The cold temperature will change the texture and make it sticky. Always keep it at room
temperature in a dark, dry place like cupboard. If you store it this way, your clay will stay fresh and soft for three to four months. If it feels a little
hard after a few weeks, you can just knead it
with a tiny bit of body lotion or glue to
make it soft again. While kneading, if you feel the clay sticking to your hands, you can apply some body
lotion on your palm. You can also add a little bit of lotion directly into the clay. This helps to keep
the clay soft, gives it a smooth finish and makes the kneading
process much easier. I have been kneading for
about 3 minutes now. Look how smooth it is. Let me show you a test. I will pull it apart. See that it stretches and then breaks into
a teardrop shape. This means the clay is perfect. To check if the
consistency is right, take a piece of clay, roll it into a long shape. Now, bend it like a number seven at a 90 degree
angle. Look at this. The clay is holding
its shape perfectly, and it's not dropping. If your clay starts
to bend or drop down, it means the mixer is too loose. In that case, just add a little more conflur and knead it until it
can hold its shape. Now, I'm putting the clay in a poly bag while
it's still warm, but I will keep the bag open. This is very important
because the clay is warm. It will create the water pepper
or steam inside the bag. If we close the bag now, that water will make the
clay sticky and spoil it. We must keep the bag
open for some time. After the clay is
completely cool, we need to move it, take it out, and put it into a fresh dry poly bag or wrap
it tightly in cling film, and finally put it into
an airtight container. Let the clay rest for 24 hours. After one day, it
will be ready to use. In the next video, I will
show you how to make colors and make your clay
colorful. See you there.
6. Vibrant Clay - How to add & Mix Colours : In this video, I'm going to show you how to color your clay. This is our white clay. By mixing colors into, you can create any
shade you want. To color this clay, you can use oil color
or acrid colors. If you prefer, you can
also keep the piece white and paint it
later once it's dry. Now I'm taking a little bit of clay and mixing acrylic
colors into it. Whenever you want to
make a light shade, always add white acrylic color along with your main color. This is because this clay becomes slightly
transparent after drying. If you don't add white, the color will look
dull once it's dry. For example, here I am going
to make green colour clay, so I am adding white
acrylic color. And then the main
color that's green. As you can see, I'm mixing
the colors using my fingers. You can also wear
gloves if you want. When you add colors to the clay, you will notice that
the consistency become loose and very sticky. But don't worry this is normal. As you keep knitting it, the clay will slowly go back to its original perfect
consistency. However, if you still feel that the clay is too loose
even after knitting, you can add a tiny bit
of corn stars to fix it. I am adding a little
more green colour here because I want a
slightly darker shade. You should add your main color according to the shade
you want to achieve. Also remember that this clay becomes too shade
darker when it dries. Keep knitting until the color is completely mixed
into the clay. Now, look at this. Once the
color is fully blended, the consistency of the clay has returned to its original state. You can check it
by making a roll and testing the
teardrop consistency. Right now, it's a little bit
loose compared to before, but very soon it will reach that perfect consistency
just like it was earlier. So soft and so smooth. Now, take a Ziploc bag
and keep the clay in it, or you can wrap it
with cling film, and then later we will keep
it in an airtight container. Look at these. I am a red, purple, skin color, and brown. All the light colors,
I have added white. For the skin color, I used
orange and white for the red, I use red and white. For the purple, I use
blue, magenta, and white. And for the dark brown, I used it directly. No need to add white color. Now you know how to mix
colors in this clay. I will see you in
the next lesson. Let me go and wash my hands now. I always say, these paint
sin hands and nails are my colorful basis of this
creative adventure. What do you
7. From Clay to Creation - Baby Fridge Magnet ( Part -1 ): Now that we have
successfully made the clay, mix the colors into it, it's time to see how to
actually work with it. To make this easy for
you to understand, I'm going to create a
very cute baby charm. You can use this piece as a fridge magnet or
even a hanging. As we build this together, I will share all
the essential tapes for handling the clay correctly. As we start, you can see, I have prepared this purple
clay for the bas end outfit and this skin colour clay for the baby and black
for eyes and here. So let's begin our work. Before we start our work, you must ensure that your workspace and your
hands are perfectly clean. This is very important to prevent dust from
getting into the clay. As we work, make sure to keep some body lotion and
cons starch close by. You will also need an OHB sheet or a plastic sheet to work on. This is because if you work
directly on the table, the piece might get
demise when you try to move it later by using a sheet, you can easily pick up your work and move it to
another spot for dry. Additionally, you will
need some PVA glue. This is the same glue we
used to make our clay. I have just filled it into this small cone for easier use. Lastly, you will need your
tools and acrylic rollers, ball tool, a circular cutter, or a lid, a ruler or knife. All right. Now that our
workplace is clean, and we have OSP sheet, body lotion, and con
stars ready, let's begin. I'm taking the clay
out of the plybeg now. Remember to only take
out the amount you need and keep the rest tightly wrapped in a plybeg
or cling film. It's crucial to keep the unused
clay covered at all time. Now, before starting the procet, we must condition the clay. This means kneading it throughly for about
five to 6 minutes. This step is a must. It balance the ussure level, remove air bubbles, and make
the clay soft and smooth. While working with this clay, please make sure
not to work under a high speed fan or in
direct strong wind. Since this is an air-dry clay, the outer layer will
start drying very quickly if exposed too much air, which can cause cracks. Now our clay is perfectly
smooth and ready to work with. See the perfect drop
shape consistency. Now, I am dividing the
conditioned clay into two equal parts to make
two small size balls. I will keep one ball safely inside the polybg to
prevent it from drying, and we will start working
with the other one. First, I am giving this
ball an oval shape. I'm pressing it down with my
palm to flatten it slightly. Then using a roller, I will roll it out evenly. Take a look at the thickness. It should be around five Mm. Once it's rolled out flat, we will use a cutter
to get a clean shape. Before cutting, I have dusted the cutter with some cornstarch, so it won't stick to the clay. I am using a circular cutter. But since I need an oval
shape for this project, I am gently pressing
the sides of dusk cutter to turn
it into an oval. Now I will just press it firmly onto the clay to get
our perfect base. After cutting out
the first shape, put the remaining clay back into the polybg immediately
so it can be used later. Now, let's take out the
second ball of clay. We will repeat the
exact same process. Shape it into an oval, flatten it with your palm and then use the roller to
roll it out evenly. Just like before, I am pressing
the circular cutter to turn it into an oval and
cutting out our second piece. Again, make sure to save the leftover scraps
in your polybag. They will be perfect
for future projets. Now we have two
identical oval pieces. The bottom one will serve as the main base for our magnet, and the top one will be
used as the baby's blanket. I am using a ruler to cut this second piece
exactly in half. Now, I'm taking out
the skin colored clay. But before we start
working with it, here is a very important tip. Whenever you switch from
one clay color to another, make sure to clean
your hands throughly. If you are using a roller, clean those as well. Otherwise, tiny particles
from the previous color, like the purple we just used, can transfer and
stain your new clay. I'm conditioning
this skin colored clay to make it smooth. While I do that, let's
look at our purple base. I'm taking the bottom piece and placing the half cut
blanket piece on top of it. Take the ruler,
press it down very lightly just to
create an impression. This mark shows us exactly how much space we
have for the baby's body. Now, I have taken a small
amount of skin colored key, and I am shipping
it into drop shape. Let's check the size
against our base. Yes, this looks like
the perfect size. Now, we will secure
it using some glue. Apply a small amount of
glue and carefully place it onto the purple base once
it's positioned correctly, press it down gently to
make sure it sticks well. Now let's move on to the head. I'm taking a small portion of skin colored clay and rolling
it into a clean ball. Before finalizing, I will place it onto the body
to check the size. And yes, it looks just right. Here is a professional
tip for you. If you notice your
fingerprints or nail marks on the clay
while working, don't worry. Simply take a tiny
amount of body lotion on your fingertip and rub the surface of the
clay very slightly. This will smooth out
that texture perfectly, leaving it flat and
clean without any marks. Now we need to create the
impression for the baby's eye. To do this, I am using the
back of a paint brush. By pressing it gently into
the center of the face, we create a deep impression. If you find that the brush
is sticking to the clay, just apply a tiny bit of cornstarch or body
lotion to the brush. Once the initial mark is made, take a little body
lotion on your finger and gently rub the area
to keep it smooth. Now I am using a small
ball tool though you can also use the back of your paintbrush to
define the eye cavities. Later on, we will fill
these deep impression with black clay to create the
eyes or if you prefer, you can simply paint them
on ones that they strike. Creating these cavities
now gives the face a more three dimensional
and professional look stick the head. Now we will take
the half oval piece of purple clay that we prepared earlier and stick
it over the baby's body. First, apply a thin
layer of glue all around the edges off and
gently place it. Press it down along
the ages to secure it. This creates the blanket and covers the lower
portion of the body. After sticking it down, you might notice that
the ses look a bit rough from the initial
cutting to fix this. Take a tiny amount
of body lotion on your fingertip and slight
layer up the edges. This will smooth
them out perfectly, giving your project a very
neat and professional finish. Here, you can clearly see the difference between
the rough edges and how they become perfectly smooth after just a
little bit of rubbing. Remember, you only
need to rub it gently to get that clean nook. Now, let's make the hands, take two tiny pieces of clay and roll them
into small balls. We will shape these
into tear drops. Once the shapes are ready, apply a little glue and place the pointed part of the teardrop
at the baby's neck area. Stick both hands down carefully. Now, we are going to create a beautiful pattern on the s of the mattress
and the blanket. Before working on
the main piece, I'm practicing the pattern
on a scrap piece of clay. This is a great way to
get a feel for the tool. I am holding the ball
tool at a tilted angle, pressing it down, and then
gently pulling the clay. Now that we have practiced, let's start the pattern
on our Baby charm. Press the ball tool and
gently pull the clay. This motion creates a
lovely ruffle impression all around the blanket. As you can see, the impression
is much more prominent and defined on the double layer where the blanket
meet the matters. Although it looks slightly
different on the single layer, we will try our best to keep the pattern consistent
all the way around. Now let's talk about how
you want to use this arm. We would like to hang
it as a decoration, take a toothpick
and carefully poke a hole through the top part
while the clay is still wet. However, if you
want to use it as a fridge magnet, you
don't need a hole. We will simply wait
for the piece to dry completely and then stick a magnet to the
backside using glue. Now, let's make a
pacifier for the baby. I'm taking a tiny
piece of corpor clay, rolling it into a small ball and pressing it
gently to flatten it. I will stick this right where
the baby's mouth would be. To complete the pacifier, I am making another small
teardrop shape from the same purple clay and sticking it directly
on top of the flat piece. And there we go,
acute little pacifa. Now we are going to work
with a black clay as a rule. Always try to use black or dark brown clay at
the very end of your crosett. This ensures your
work stays neat and prevents dark particle from
sustaining the lighter clay. To make ice, I have
taken a tiny amount of black clay and rolled it into two very small
identical balls. I will apply a little glue into the cavities we created earlier. Using a toothpick,
I will carefully pick up the black balls
and press them into place. Next, we are going
to make the here. I am using the same
black clay for this. But as I mentioned before, you can also paint the
here on if you prefer. I am rolling the black clay into an extremely thin strands. This is the beauty of this clay. You can work on the finest, most delicate details
without any trouble. Now I will take
three tiny pieces of these strands and join them at a single point
using a toothpick. Once they are joined, I
will apply a tiny drop of glue onto the head and
carefully place the hair. This small detail adds so much character
to our baby charm. Now, I will show
you how to paint the baby's eyelashes and
eyebrow using a fine brush. But before that, we need to add the years a small
detail I almost missed. Since I was just working
with a black clay, I must be very careful. So I'm going to clean
my hands throughly. Once that's done, I will
see you in the next lesson where we will finish the years and the final painting details.
8. From Clay to Creation- Baby Fridge Magnet ( Part-2): All right. Let's make the ear. To do this, I have rolled
two tiny skin colored balls. I will press each ball
down to flatten it. Then using a ball tool, I will create a small cavity in the center for
a realistic look. After that, I will straighten one side to give it a D shape. Now, apply a little glue to the head where the
ears should be. And using a toothpick, carefully pick up the ear
and stick it into the place. We will follow the exact same
step for the second ear, flatten the tiny ball, create the cavity
with a ball tool. Straighten one side into
a D shape and attach it. Next, we need to add a soft
blush and some shading. For this, you can use soft pastels or even eyeshade or blush from your makeup cake. I'm taking a small amount on my brush and gently
applying it to the cheeks. If you accidentally
apply too much, don't try to clean
it while it's wet. Wait for it to dry completely, and then you can easily wipe off the excess
using a ear bud. To paint the eyebrows, eyelashes and eyelight, I am using a bit of bond
number and white. I am using a toothpick
for these fine lines, but if you are comfortable, you can use a triple zero
brush for even more precision. Now, let's bring
the eyes to life. I am placing a single
tiny white dot inside each black eyeball. These act as eyelights
or highlights, giving the eyes a
realistic reflective look. Now we just need to draw two tiny lines on
each side of eyes. I am making the small
strokes on one side of the eyeball to create the look of sweet, delicate eyelashes. I'm using toothpick for it. Once the lashes are done, I will add two very small light eyebrow
just about the eyes. And there you have it. Our baby charm is finally ready. Now, let's discuss how
to dry your piece. When working with this
cold porcelain clay, you must always opt
for slow drying. Most air dry clays requires
a lot of patience, and rushing the process can
lead to unwanted results. To ensure the best finish, let it dry naturally
at its own pace. Slow drying is a
secret to making sure your charm stays
strong and crack free. Remember, good things take time. The best way to do
this is to cover your piece loosely
with a thin cloth or a tissue paper and place it in a spot where it
can dry naturally. This allows a
masher to evaporate gradually without
damaging the surface. This piece will take
about three to four days to dry completely to touch. However, for the
varnishing stays, I recommend waiting a bit
longer dally about one week. This ensure that every
bit of moshre from the center has evaporated
before you seal it. So let's prepare
it for the weight. I have folded a tissue paper and covering the charm lightly, I will place it in a
safe spot away from direct sunlight or
strong drops of air. So all we have to do is wait
for it to cure perfectly. Let's be patient and give
it the time it needs. It has been six days, and let's take a
look at our project. As you can see, it's
now completely dry. While it actually dried
within four to five days, I gave it two extra
days just to be safe. This is important because we are going to
apply varnish now. Varnishing creates
a protective layer that shields a piece from
humidity and moisture, ensuring it stays exactly
like this forever. For this, I'm using
a spray varnish. It is very easy to use. You just need to make it a
quick spray. A quick tip. Please do this in an open
or well ventilated area because the spray can
release some fumes. I have placed a white paper underneath to catch
any overspray. Now, we just wait 10 minutes
and it will be ready. If you want to hang this these, you can simply pass a cord or string through the
hole you made earlier. However, I decided to turn
mine into a fridge magnet. So I'm taking two
small size magnets and attaching them to the back
using a super strong glue. And here we go. It's now ready to be
displayed on my fridge. Through this project, you have learned the fundamentals of working with this clay and
how to handle fine details. In the next video, we will do a quick revision of all
these points and go over the important dos and don'ts to keep in mind
for your future projects.
9. Essential Dos & Don'ts : Hi, everyone. After
our baby hum project, today we are doing a quick
recap of essential points. Let's go over the dos
and does of working with cold porcelain clay to ensure
your art lasts a lifetime. Always follow the
recipes strictly. Use the exact ingredients and proportions to ensure your
clay has the right strength. Do knead your clay thoroughly until it is completely
smooth and flexible. This prevents cracks later on. Always store your clay in
zip log or cling film, and place it inside an
airtight container. This keeps it fresh for weeks. If your clay feels a bit
stiff, add body lotion, PV blue or white acrylic color, and knead well to
make it soft again. Be patient. Wait at
least one full week for the piece to dry completely before
applying any morish. Don't work in large wedges. Don't take out all
your clay at once. Work in small wedges, and take only what you need. Keep the rest wrapped tightly. Don't place your work under a fen or in harsh
claret sunlight to dry. Always let it dry naturally
in a shaded area. Don't use water to smooth
the surface while working. Use a tiny bit of
moisturizer instead. Don't ever wash your
final piece with water. Even after varnishing, it's
not waterproof to clean it. Simply use a soft
dry brush or cloth. By following these simple tips, you will avoid common mistake and create beautiful
long lasting art.
10. Final Thoughts : Congratulations on
finishing this class. You have now mastered the art of making cold
porcelain clay at home. I am so proud of your progress, and I truly hope you enjoy this creative journey
as much as I did. Your feedback means
the word to me, so please take a moment
to leave a review. It helps other students
discover this class. Also, I would love
to see your work. Do upload photos of your creation to the
project gallery below, so I can see the beautiful
things you have made. To stay updated with my daily
tips and new tutorials, follow me at Mona HRT
Academy on Instagram, YouTube and Facebook. For those ready to take
their skills even further, make sure to explore my other
classes here on Skillshare. I have many projects
where we can use same cold porcelain clay
to create beautiful art. Keep creating, keep
experimenting, and I look forward to see you in my next class until
then happy crafting.
 Mona Arty, Clay Artist & Educator