Transcripts
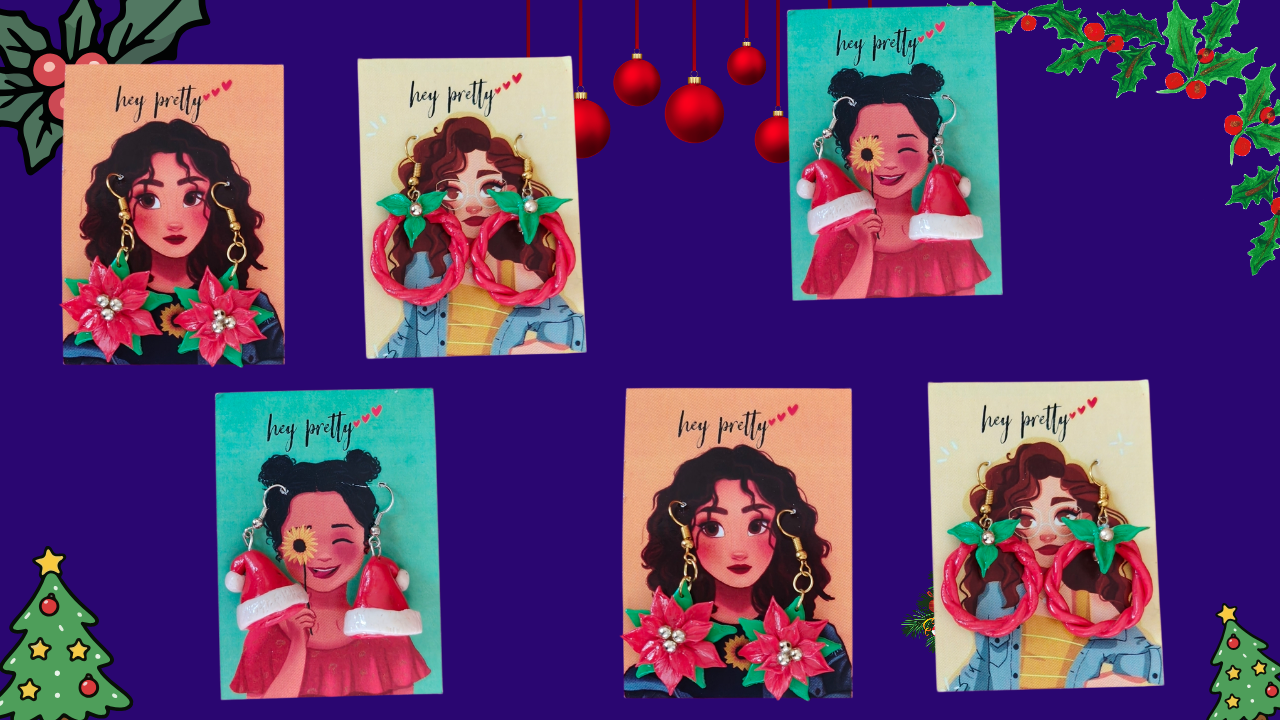
1. Welcome : The Hello, creative friends. I am Mona from India, and I am so excited
to welcome you to this special course on making beautiful
Christmas parings. As a clay artist who has been teaching online for
the past ten years, I love sharing simple yet stunning crafting
techniques with you. You can find more of
my work on Instagram, Facebook and YouTube
under the name Mona Arty. In this class, we are
going to dive into the festival sprit by creating fee gorgeous design
using air dry clay, the classic Poinsettia earrings, the elegant wreath earrings, and the adorable
Santa hat earrings. These projects are
designed to be easy to make and are perfect
for all skill levels, even if you are a beginner, best of all, you won't need any special or
expensive tools. So let's grab our clay and start crafting some
holiday sparkle. Mm.
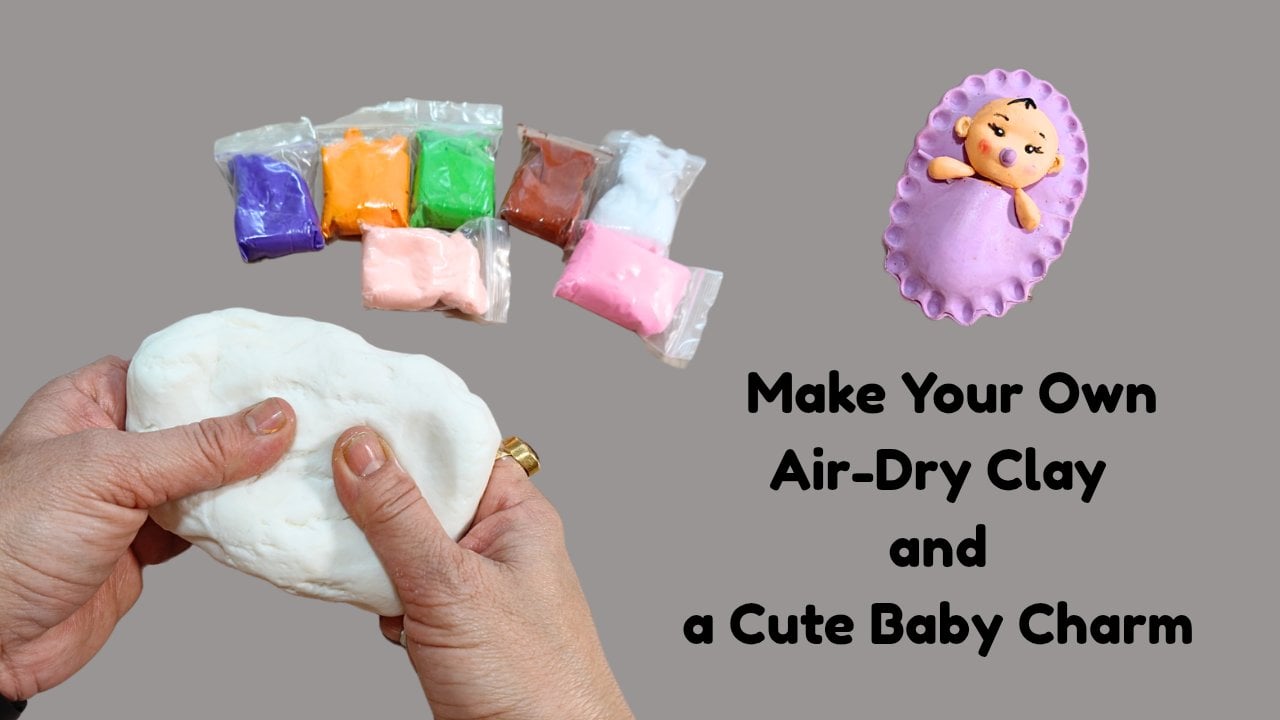
2. Let's Check the Materials : Let's now see what materials are required to make
these lovely earrings. These earrings are made
with air dry clay, so our main material
will be air dry clay. I have taken clay
in three colors, red, green, and white. It's cold porcelain clay. You can take any air dry clay that comes pre
mixed with colors. You can use super clay, cold porcelain, or any ready
made or homemade clay. Next, you need jumping, ear hooks, eye pin, and some golden beads. These are jewelry findings, then you will need glue. For glue, you can use
all purpose glue, fabric glue, or wood glue. These give the best
result with clay. Next to seal our work, we will need varnish. I have taken this decor varnish. It will create a
protective layer on our work and also add gloss. Next, we will need a few tools which include this texture tool. It's optional, a
knife, a paintbrush, a metal router, acrylic roller, nose flier, and a wire cutter. You will also need a
plastic sheet or OHB sheet, and a little bit of corn floor. That's all the material we need. So let's start making
our lovely earrings.
3. Poinsettia Earrings : So let's start by making the points at here
flour earrings. For this, I have taken
green colored clay. First, knead this clay well, which means you have to
do the conditioning. Conditioning helps to equalize the moisture level in the clay, making the clay very
soft and flexible. Also, the chances of cracks
appearing in it are reduced. Now, I have taken
an OHB sheet for the surface below on
which we will roll this. Although we can also
do it on a graft met, which is non sticky
surface, but later on, you have to pick up the earrings and place them elsewhere to dry. So we will place the clay on the OHB sheet and use an
acrylic roller to flatten it. We need to keep the
thickness around two M, not too thin and not too thick. You can see it here. After this, I have taken a
five petals flow cutter. You need to dust the
flour cutter in C floor. This is a small
tip to ensure that the cutter never sticks
to the clay and you get a very neat cut like
this. See here. We will use a knife to remove the excess clay and
clean up the ses. Next, we'll take a
toothpick and use it to make a hole on a petal,
leaving a little gap. In this hole, we
will later insert the jump ring once
the piece is dry. Now we will make the petals on top of this using
red colored clay. So first I'm conditioning
the red colored clay, that means I will
knead it for a while. See how soft and smooth it
has become after kneading. Now after this, we will take a small part of the
clay and form a ball, making this right now just to check the size of the petal, give it a drop shape,
then flatten it. And after flattening it, I am placing it on top of the green petal to
check the size. It's just a simple. This size looks
just right to me. Now, I will make the
rest of the balls in the same size I need to make
ten balls of this size. Five petals will be used on
each of the two earrings. So we need ten balls
of the same size, but I will make two
extra ball just in case any ball turnout to
be too small or too big. This way, we can skip it and use the next one or
simply use the best ten. After making all the balls, we will create petals from them. We will stick five petals, each onto the green petal
ear on both earrings. To prevent our clay balls from
drying out on the surface, in the meantime, I'm
covering them with a polypy. I will take out the
balls one by one. To shape the petal, first, give the
ball a drop shape. After that, you need
to flatten next, I will place the
petal on my fingertip and use a toothpick to
create a texture on it. First, I will place the
toothpick in the center, rotate it to the left side, then to the right side. You can see the
lovely wining effect that has appeared on it. After this, I will slightly pinch the
lower end of the petal. This one is the upper end and
this one is the lower end. Gently pinch it. Then we will apply glue onto the green petals and stick it. While sticking, make sure that the red petal is placed in
between the two green petals. This layer must be
placed in a way that every red petal is polition
between the green petals. Now, let's make the next one. We make the ball
in the same way, give it a drop shape,
and flatten it. Then we create the leaf
impression by using toothpake, place it in the center, then rotate it left side, and then right side. Pinch the lower end apply glue and stick it onto the green petal in
between two green petals. It might take you some time to make the first two
or three petals, but then you will
get the hang of it and be able to make
them very easily. So all the five red
petals are now attested. The white portion you
see here is all glue, which will become
transparent after drying. Now we need to slightly flatten the center
portion for this. I am using the backside
of a paintbrush. On the other earring,
we will also create the red colored layer on
the green petal base. Make all the five
petals in the same way. See, I have finished this one. The first layer was
our green petals. The second layer
was our red petals. Now the topmost layer also need to be made
with red petals. In this layer, we
also need to make five petals each
on both earrings. However, the size of
these petals will be slightly smaller than the
red petals we made earlier. Therefore, we will make the ball slightly smaller than
the previous one. The difference will
be very minor. You can see here. So let's make ten balls just like before. The rest of the
process is the same. We need to make the ball, give it a drop
shape, flatten it, create the winning impression with the help of a toothpick, and then stick on
the red petals. Pinch one end. When sticking them here, we again need to
make sure to stick them with the help of blue
onto the layer beneath. No like this. So let's continue and make
more petals in the same way. We need a total of ten
petals, five for each. In this way, the
topmost layer of five petals will be
attached to both earrings, and then we will use the paint brush to press
it down in the center. The first layer was
of green petals, then the second layer
was made with red, and the third layer is also
made with red colours. Now in center, we will stick some golden beads apply
glue at the center portion. And stick two to
three beats there. So our clay work is complete. Now we'll need to let it dry. To dry it, we will gently
cover it with a poly bag or a cloth and place it in an area where there is no strong weight or
direct sunlight. We need to dry it very slowly. Drying it slowly will
ensure that it dries evenly and the chances of cracks appearing
will be very low. It may take two to three
days to dry completely. So let's allow it to dry. So our earrings are
completely dry in three days. Look at the backside. It is also very neat and clean. You can finish it off
by sending it with sandpaper or scrapping it
with a knife if needed. Like this. Do very gently. A beat has come off, so I am sticking
it back with glue. Check the rest of
the beats as well. After this, we will take four jump rings
and two ear hooks. Two jump rings will go into one earring along
with the ear hook. Take your noseplier and use
them to open one jump ring. Insert the second jump ring and the ear hook inside it and then close this jump
ring using nosepler Now, open the lower jump ring and insert it into the
hole we made in the petal. Gently insert the jump ring into the hole and then use the
nose flier to close it. See our earring is ready. Now, we will do the second one. You can also insert the jump ring and the ear
hook in a different way. First, open one jump ring with
the help of the nosepler, then insert it into the
hole we made in the green petal and
close the jump ring. Next, open the second jump ring. And insert the jump ring
that is already inside the petal and the ear hook
into and then close it. So the ear hooks are now
attached to both our earrings. Now we will apply
varnish over them. The varnish will give
it a glossy finish and we also protect it from
humidity and moisture, ensuring the colors remains
exactly as they are. I am using decor varnisha, which is the gloss type. You can also use spray varnish. I have dispensed a
little bit of ish. I am applying a thin layer onto both earrings with
the help of a brush. Right now, it looks milky white, but after drying, it will
become completely transparent. Apply it to the
front side first. And when that is dry, apply it to the back side also. In this way, apply
it to both sides alternately and let them dry. And look, they are completely
dry in just 10 minutes. I applied wish to both sides, and now they have a,
beautiful, glossy finish. I am inserting them into a
lovely, pretty earring card. And, look, our Poinsettia
earrings are ready. What do you say?
Aren't they lovely?
4. Wreath Earrings : Next, we are going to
make wreath hearings. I have taken red colored clay and we need to
condition the clay. Condition it for a minimum
of four to 5 minutes. After this, we need to
make a ball from it, and then make a thin roll. Continues making
a long thin roll. Apply even pressure on it and
roll it with your finger. Keep rolling it
gently and slowly. The thinner and more
even the roll is, the more beautiful your
earrings will look. The length doesn't matter
too much here because we will use as much as we
need and cut off the axis. Keep rolling Now, we will fold it, pinch from both sides. Now Hold it from one side
and twist it gently. Do very gently. The center part will be loose, so you need to slowly make
the center part even as well. Now, we need to make
a small circle. For this, I have
taken a small bottle. Make sure to take a small size, or you can also
take a small cutter to use to make a perfect circle. So I will place this bottle in the middle and wrap
this clay roll around it using the best part
of the clay. Like this. But before that, I am
taking an OHB sheet, which is a plastic sheet, and I will form the circle
while keeping it on the sheet. I have placed the best
part around the bottle. Now, cutting the excess, but leaving a little extra so we can overlap
it at the joint. Now we will apply glue at the joint and while
overlapping it, we will press it
slightly and stick it. Then gently remove the bottle or whatever you use
to form the shape. The joint section will be the
upper part of this earring. Now, let's make the second one. In the same way, we need
to make a long thin roll. Roll gently. If you are having trouble making one long roll or if
you can't manage it, you can make two
rolls and join them. I am folding this long roll in half and pinch them
together at both ends. Now, just like before, I am twisting it from one side to create a
rope like texture. Do very carefully and pay attention to
the center portion, as you need to even
that out as well. Press both sides to
secure it after this. Place it on the plastic sheet again to form a circle around the bottle, just
like the first one. Choose the best
part of the roll. Cut the excess. Apply glue at the joint, overlap it, press it, adjust the shape, and
then remove the bottle. Now, we will let both
circles semi dry. It will take ten to 12 hours. So let's wait So after tw hours, look, they have become semi dry. They are not completely dry now. Now, I have taken an
epinearhk and nose plier, and a wire cutter. First, I have taken the ipin. I have applied glue
to the ipin and then we will carefully insert it at the joint where we overlap
and join the clay. Carefully inserted. While inserting, make sure that the loop's position is
parallel to the circle. It should be like this. Now we will cut the access
part from the bottom, leaving it just 1
centimeter long. Now take the ear hook. We will open the loop using the nose flier and insert it into the epi
and then close the loop. Now we will apply glue to this
1 centimeter part we left. And after that, I am attaching
a golden bead to it. Look. Now we will do the same thing
for the second earring. You can insert the ear hook into the iPan
beforehand if you want, open it with the
help of nose flier and insert the ear
hook, close the loop. Cut the extra length. Now apply glue to the epin and then carefully insert it
into our clay circle, making sure that the epin slope is parallel to the circle. Now apply glue to this
part and insert a bead. You can add golden bead or
white bead as you like. Now we will work with green
colored clay condition the clay and then make
six small size balls. We will be attaching three
leaves each to both earrings. Holding the ball
on my fingertip, I give it a drop
shape and flatten it. After flattening
it, we will make a leaf impression on
it using a toothpick. Move the toothpick
from left to right. Make both ends a little pointy. Now apply glue to the
joint and then stick the leaf We will make two more leaves
for this earring. Same way. Make a drop shape, flatten it, make impression
using toothpick. Make both ends a little pointy, apply glue, and then place it. It's just the pleasing. Now, the same way, make one more leaf. After sticking all
the three leaves, we will press the center lightly with the help of the
backside of a paintbrush. Adjust the position
of the leaves. So there is equal distance
between all the three leaves. Then apply glue in the center and we will stick the
golden bead here. This one is ready. Now we
will do the second earring. We will make the leaves in the same way from the
remaining three balls. Make impression, pise the ends, apply glue on the
joint, place the leaf. Press the center lightly and adjust the position
of the leaves. Apply glue and place
a golden bead there. So both of the earrings
are ready to dry. We need to dry them
slowly just like before, so place them in a spot where there is no strong
wind or direct sunlight. They will take about two days. So let's check them
after two days. And look, they are
completely dry. Now, we need to apply
varnish on them. And for the varnish, I have taken decor
varnish just like before. I am dispensing about four to
five drops onto a sheet and applying it onto the
earring with the help of a brush first on the front side, and once the front side is dry, then on the back side. Just a thin even layer. In this way, apply it to
both sides of both earrings. The bonish will
give our earrings a glossy finish and protect
from humidity and moisture. This varnish takes hardly ten to 15 minutes
to dry completely. So let's check them
after 10 minutes. All set. Our lovely
Christmas wreathearings are ready to sparkle. They are perfectly finished
and ready to wear or gift. How lovely.
5. Santa Hat Earrings : Next, we are going to make
Santa hat earrings for this. We will need red and white clay. I have taken some
red colored clay and I'm conditioning it. After conditioning it
for four to 5 minutes, I am making a roll from it. I'm dividing the roll
into two equal parts. Then take one piece
and make a ball. Now, give it a drop shape
to create the drop shape, apply a little pressure on
one side to thin it out. Now the bottom needs to be flat, so I pressed it down
on the surface. Now, we need to make it hollow. And for that, I am using a
pen on the broad portion, insert the pen and
gently rotate it, and it will become hollow. Or if you have a
specialized tool, you can use a tool like this. Next, place it on the
surface to flatten the base. Now, we will make the
upper tip a little more pointy and bend it to one side, just like a center head. Now we'll create a
white border here. But before that, let's make the second earring side
by side in the same way, make a ball, then
give it a drop shape. After making the drop shape, place it on the surface
to flatten the base. Make the upper tip pointy. Now using the tool
to make the bottom hollow gently insert
and rotate it. Place it back on the
surface to flatten it again and bend the
tip to one side. Now we'll compare both of them. The size and shape should
be the same for both. After this, we will work
with the white clay. After conditioning the
white colored clay, making two small balls from it, we are going to make these
balls look like pompoms. So I have taken a
wire texture tool and using it to create texture. I'm just pressing gently
to make it look like a pompom After this, we will make a small hole
on one side using a pen or a tool and then stick it onto the tip of
the head that we bend, apply little glue, and stick here Press it gently
and adjust the shape. Take the second ball. Make texture on it with the
help of the texting tool. Make a small hole in
the middle with a pen, toothpak or any tool, apply glue and
stick it on the tip of the center head.
Press it here. Now we are making the border
with white colored clay. Make a roll with it. Flatten it with the help
of an acrylic roller. Then cut a thin strip
using a metal scale. We will also create a
texture on this strip using the wire texture tool so that it looks like
a woolen strip. So gently press it and
create texture on it. After this,
straighten both sides of the strip with the
help of the scale. Now, apply glue to the
head or the backside of the strip and stick
it onto the base, the bottom part of the head. Here too, we will check the
overlap where the joint is, we will slightly overlap it. Apply glue, overlap the strip, and then cut the excess portion. Gently press and
plant the joint. If we don't overlap, a cap will appear after drying due to the slightly
shrinkage that occurs. So apply glue well at the joint, overlap it, and press
it firmly there. Now, let's work on the
second head in the same way. I made a roll of white clay and flatten the roll with the
help of an acrylic roller. I am applying the texture
now even before cutting. You can do it afterward as Now, use a knife or metal ruler scale to cut a straight, thin strip. After cutting the strip, apply glue to the backside of the strip and stick it
all around the head. Cut a little lexis, apply glue, overlap
the joint, press it. And so the center
heads are made. Now we will attach the
epin and ear hook. I have a silver hook and epin a loop is made
on the top of this. So we call this ipin, but this one is
golden and I want to attach a silver ipin
and a silver hook. But I don't have a silver ipin. I have a silver headpin, so I am using the nose player to create a loop on the
top of this headpin, and I will give it the shape of an ipin Just bend it carefully with the help of
nose flier and make a loop. So look here. Now, it's looking like Pin. I'm
cutting the head. Now, apply glue on it and carefully insert this
into the top of the head. In the same way, I have bent the second silver headpin to
give it an eye pin shape, and I have attached the
ear hook to it beforehand. Apply glue onto the pin and insert it into
our second earring. Now, we need to set these
aside to dry just like before, we need to dry this slowly. This might take a little
more time compared to the other two earring designs we made because these
are little thicker. So let's leave these to dry. It might take three to four days for them to dry completely. We need to remember to
place them where there is no strong wind or direct
heat. So let's wait. So these have dried
completely in three days. We have already inserted
the ear hook in one, and the other one is remaining, inserting the ear
hook into the loop, close it with the
help of the nosepler. Now, time to varnish them. So just like before, I have taken Decor varnish. Kd just five to six drops, apply it with a brush, thin and even layer. This milky white layer will become completely
transparent after drying and dry time is
just ten to 15 minutes. Apply it on both hearings
on all the sides. After varnish, you can hang
them on a paint brush and then place them in
a tape rule or in a cup or a stand like this
and leave them to dry. And look, our earrings are dry. Now, we are attaching
them to the earring card. You can see the glossy finish on them and how lovely
they are looking.
6. Final Words: And then bring us to end of
our Christmas hearing course. We have successfully created
three wonderful designs, the Poinsettia, the wreath
and Santa hat earrings. If you enjoyed this course, please take a moment
to leave a review. Your feedbacks help me create even better
tutorials for you. Now, it's your turn. I would love to see
your creations. So please share photos of your earrings in the
project section. Bye for now and wish you all a happy and creative holiday
season. Happy crafting.
 Mona Arty, Clay Artist & Educator