Transcripts
1. Welcome : Hi there. A very warm welcome. I am Mona from India, and I am absolutely thrilled to have you
joining me today. I have been a passionate clay
artist for over 30 years, and it's truly my happy place. And I have had a joy of sharing this wonderful art through my online classes with
students just like you. If you would like to
know more about my work, you can find me as Mona Arti on Facebook, Instagram
and YouTube. In this course, we are
going to dive into the delightful word of
clay miniature bakery. Get ready to create a variety of tiny mouthwatering treats
that look so real, you'll almost want
to take a bite and all craft it
beautifully from clay. This course is
designed for everyone, even if you have never
touched clay before. We will start with the basic and build up your
skills step by step. Here is just a little taste
of what's on our menu. First, you will master
foundation skills, learning about air dry clay, at colors and shape it. We even use simple tools
you can find at home. Next, we'll dive into
creating realistic textures from the flaky layers of a quasan to the soft
crumbs of a cake. Then we'll get sweet
with icing and topping discovering how
to craft beautiful glaze, sprinkles and tiny details. You will create a
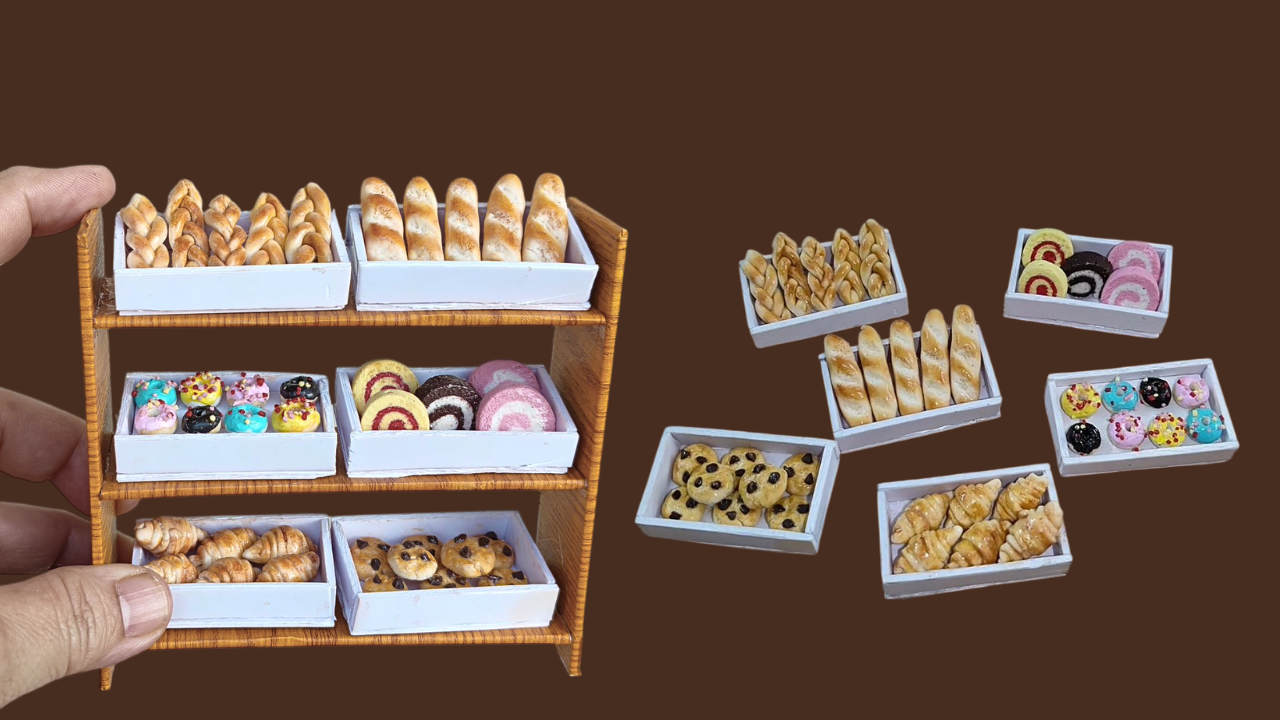
variety of miniatures, building a full bakery display, imaging tiny cakes, breads, cookies, and adorable doughnuts. And to really show them off, we'll also learn to create
miniature trays and a display rack to beautifully showcase all your
tiny creations. So if you are ready to
have fun wonderfully creative and build your
own miniature clay bakery, then this is the course for you. I can't wait to see
you inside the course. So let's start creating
some tiny magic together.
2. Let's Check Materials : Let's take a look
at the materials. Our main material
is air dry clay. We have used this clay to
make all our food miniatures. You should get a type of air dry clay where you
can premix the colors. You can mix in acrylic or oil colors to create
your on colorful clay. I am using acrylic colors. I have taken red, white, and lemon yellow. I also need a deep
brill purple to make the pink for cake slices and pink icing for
the doughnuts. If you have a light pink
paint, you can use it. Otherwise, I will make the light pink using deep brill
purple and white. And for doughnut icing, I'm taking teal blue. For cake slice, choco chips, and doughnut icing, we need
chocolate brown color. I will make it by
mixing burn umber, blue, and deep drill pubble. If you have a
chocolate brown paint available, you can use that. For sheating, we'll need chalk
pistols or soft pistols. Next, we'll need Decor vanish. We will use this varnish for glazing or to give our
piece a nice, shiny look. For glue, you will need an
all purpose glue and with it be 7,000 or a super
strong gorillla glue. We also need foam wood or
sunbood that's about two, two, three millimeter thick. We'll use this one to make
the trays and our rack. To give the rack a
texture wooden look, we will use self
adhesive vinyl sheets. You can just peel
and stick these. This is optional, of course, you can keep your rack
white if you prefer. You will also need
a little bit of conflate, just one spoon. For tools, you need
paintbrushes, scissors, knife, ruler, acrylic roller, a
toothbrush, and some toothpicks. So let's get started.
3. Know About Clay: So let's get started. Let's take a look
at our clay and make it colorful by
mixing in some colors. This is white air dry clay. When you get yours,
be sure to check the description to make sure that colors can be
premixed into it. This is very
important because for a realistic look in
food miniatures, the colors should be mixed into clay rather than applied on top. You can mix acrylic or oil colors into clay to
make any shade you want. I will be showing you how
to mix in acrylic colors. First, we'll make
some white clay. The clay is already white, but we'll still mix in
some white acrylic paint. Otherwise, after it dries, your piece will look dull. Look at this piece. I made
without mixing in white paint, so it's so dull and
look at this one, which was made with the
white paint mixed in. So let's mix the color now. I have taken a little bit of clay and I am adding
white paint to it. After adding the colors, you will need to fold
and knead the clay. This part can get
a little messy and the clay consistency might
feel a bit loose at first. But just keep kneading. It will go back to its
original consistency. If you don't want to get your hands dirty,
you can wear gloves. Just keep kneading. And, the clay's consistency is going back to the
way it was before. Once the clay is well knetted, we'll place it in
a zip lock bag. A and now let's move
on to our next color. Now we are making the yellow
clay for our cake rolls. I have taken some light yellow
and white paint for this. Whenever you make a
light colored clay, always be sure to
add white paint, or you can also just add yellow paint directly
to your white clay. I have added yellow
and little white. Now I am folding
and kneading it. Yes, looking a little messy, but just keep kneading, and it will go back to its original consistency
in a few minutes. If the clay feels too loose, you can add a little bit
of corn flour to it. Knead for about three
to 4 minutes and look, its consistency is just like it was before our yellow
clay is ready. We will put this in a Ziploc bag and move on to our next color. Now we are making the red clay. I am adding red acrylic
paint to the clay. We'll need this color
for the cake slices. I'm adding a little more color
as it looks a bit faint. Our red clay is ready. Now keep it in Ziploc bag. Next, we are going to
make some brown clay. We'll need this clay for cake slices and to
make chocolate chips. For this, I am using
three colors blue, deep rill purple,
and burn tumber. If you have a pre made chocolate brown paint,
you can use that. I'm adding all the three
colors little by little. I have used the most
burn tumber little blue. And then deep real purple. After adding the three
colors, mix it well. The clay feels too sticky, so I'm adding a little
bit of conflat. Its consistency is now
just like it was before. We'll also put this
in a Ziploc bag. In the same way I have made
pink colored clay for this. I have added Debril purple
and white to the clay. We'll need this for
the cake rolls. If you have a pre
made light pink, you can use that instead. Just like before, I
have added wine and deep prill purple to the clay and kneaded
it until it's ready. So in this way, our
five colors are ready, white, brown, yellow,
pink and red. Now, let's start
working with them.
4. Let's Make Trays: First, we are going
to make a tray. For this, I have
taken this sunboard. Its thickness is two, but you can also
use a three M one. Now let's look at the
measurement we will need. This base piece is five
by three centimeter for the side strips, we will need two pieces that
are five by 1 centimeter and two pieces for the other side that are
2.5 by 1 centimeter. In total, we need five pieces. First, we are going to
cut the base piece, which is by five by
three centimeter. I'm marking it with a pencil five centimeter along this side, and three centimeter
from this side. Once it's marked,
we will cut it out. You can use a craft
knife like this, or you can also cut
it with the scissors. This board cuts very easily. Next, we need the two
long side strips, which are five by
1 centimeter each. I'm marking a length of five centimeter and
with 1 centimeter each. Then we'll cut this out. This will give us
two side strips. Make sure to cut them perfectly straight with scissors
or raft knife. For the two remaining
side strips, the measurement is
2.5 by 1 centimeter. I will cut one more long
five centimeter strip. Then I will cut
that strip in half. Now, we are going to stick
these pieces together. For this, I am
using B 7,000 glue, which is a super
strong adhesive. You can use any other glue
you have or you can even use a hot glu gen stick on
the two long side strips. Then apply glue and stick the 2.5 by 1 centimeter
strips between them. This clue takes about five
to 10 minutes to dry. In this way, you can make
a total of six trays. In our next lesson, we'll start making miniature
food items for the tray. I'll see you in the next lesson.
5. Braided Bread : Let's start by making this
small miniature preded bread. I have taken some
white ear dry clay, take a piece of
clay and roll it, then divide it into
three equal parts. Now, roll each of these
parts into a thin, long strands of the
same thickness. Long and thin. Press the three strengths together at one end to make them stick to bring the right
strength over the center one, then the left strand
over the new center one. Continue this
process, alternating sides until your
braid is complete. Once you are done, pinch both ends to finish it. Cut off the excess clay. You can shape the ends
into a small triangle. Now, for shading, I'm
using soft pistols. I have taken a yellow aka
and a light brown color. We will use a craft knife to scrap some of the
yellow aka pistol. Then with a dry brush, I will gently apply the color all over the miniature
braided bread. Just gently apply
the loose powder. Once they're done, I
will scrap some of the light brown
pastel with a brush. I will apply this color specifically on the
raised part of the bread. This will make it look like the bread is a bit
more big and gristy. Let's make one more. I'm making three rolls
just like before. The length of the rolls can be a little different. That's okay. As we'll cut off
the access litter. However, make sure they all
have the same thickness. Pinch and press the three
rolls together at one end. Now, breed them the same way. We did the first one,
right over center, left over center, and so on. Continue breading
until this piece is the same length
as the first one. Once you are done, pinch the lower end and
cut off the excess clay. Check the size. Cut off the excess clay
to adjust the size. Then just like the first one, we will apply the yellow color. After that, light brown
color on the raised areas. Prepare four to five
pieces like this. Just checking the size, and they are looking good. Now, let them dry. You should put them
in a place with no direct or strong wind
and out of direct sunlight. This is because they
need to dry slowly. They can take one
to two days to dry completely, depending
on the weather. Look how beautiful they look. They are so realistic,
don't you think?
6. Baguette: Now let's make some
miniature baguet. For this, I have taken
some white air dry clay. I will divide it into
three equal size balls. We need to make about five
or six of them in total, but I'm just making
three for now. Now shape each ball into a roll. You can place it on the
tray to check the size. It should be about 3.5
centimeter in size. Go ahead and make the rest
of the rolls as well. Ength and thickness
should be the same. Now we'll add some
texture to the top, take a toothpick, and make three slanted
line on each roll. Spaced equally apart. Gently press the
toothpick to create the impression of these
lines on all the pieces. You might notice the rolls
have spread out a little bit, so just gently round them
again to adjust the shape. Next, using the same toothpick, we'll create some texture
inside the lines we just make. This will create a porous
texture just like a real paget. Take your time with this step, as it's what give our miniature
bread its realistic look. Now we are ready for the
pun part, adding colors. For this, we will use
our soft pistols. You need a yellow aka, scrap it with craft knife. Take light brown or
Indian red, scrap it too. With a dry brush, gently apply this yellow aka
color all over the bucket. This gives a warm
and even base color. Do very gently. Do the same on all the basis. Now, we'll do the same
with the light brown pisa. Use your brush to apply it specifically to
the raised areas. This adds depth and creates the look of a crispier,
more paked crust. Take your time with the shedding to get the perfect effect. After all the coloring is done, we'll also place these on
a flat surface to dry. Remember, we need
to dry them slowly. I'm so excited to see how
they will look on the tray. So I'm just going to place
them here to take a look. So three pieces here, and yes, a total of five pieces fit
perfectly in this tray. I can't wait to see
what we make next.
7. Cookies: Let's make some cookies. For this, I have taken
some white clay, and I also have some brown clay. I'm making a roll
out of white clay. And from this roll, we will make five or
six small pieces. Make a ball. Let's place on
the tray to check the size. Based on this, about
five or six will fit, and this size looks perfect. I am pressing all the pieces to flatten and set them
aside to dry a bit, since we want the final
texture to be a little rough. While these are
getting semi dry, let's make some chocolate
chips with a brown clay. You can either make a roll
and cut small pieces from it, or just cut the pieces
directly from the clay. Make a small ball. After making a ball, pinch it from the top, first pinch one side, then the other to create
a pyramid like shape. This will give you the
classic chocolate chip look. Make a small ball, pinch it from one side,
then from another. I'm making a slightly larger one so you can see the
process clearly. I have made a large ball, pinched it on one side, and now I'm pinching it
from the other direction. You should make yours
in a small size. This larger one is just
for demonstration purpose. Make 24 to 25 pieces like this. Three to four chocolate
chips for one cookie. We will let these
chocolate chips dry so they become
nice and hard. This way, we can easily insert them into cookies without
ruining their shape. I have some chips that I made earlier that
are already hard, and I will use those now. Now, let's go back to our white clay that
we flatten earlier. You can see it's gotten a
little rough and brittle, which is exactly the texture
we bond for our cookies. I am gently folding each
piece and shaping it into a ball just like a real
cookie and flatten it. I just the shape. You can see the crackle effect. I will take the
second piece and fold it gently roll it into a ball, then flatten it slightly, see the subtle crackle effect. I'm just placing them
to check their size. I get so excited about
seeing the final look of any project that I keep
checking them over and over. I'm so excited about
every project I work on. Do you feel the same way? Doing the same with all
the rest of the pieces. Now that we have made
all the cookies, we will begin the shedding, T yelloca, scrap it. Apply the powder with
brush on cookies, covering the entire surface. Do gently just like
we did on breads. Take time and do gently. Now it's time to stick our chocolate chips
onto the cookies. The chocolate chips
are hard now. We will stick about two to
three chips on each cookie. Just apply a little glue. Pick up chips one by one. Then gently press down. Since the chocolate chips
have hardened a bit, we don't have to worry
about ruining their shape. If we have applied the chips when they
were completely fresh, their shape could
have been ruined. Do this one by one
for all the cookies. They look so realistic
and tempting. I feel like I could
just eat them. Now, we need to place them on a flat surface to dry slowly. But I'm so excited to see how
they will look on the tray. So what's your verdict? Do you think these cookies
turn out perfectly?
8. Croissant: Now we are going
to make croissant. For this, I have taken
some white air dry clay, roll it into a ball
and flatten it. After making it into a square, I am rolling it out flat. Next, we'll cut a
rectangle from it. The length should be between
8.5 to nine centimeter. The width doesn't matter. After cutting the rectangle, we'll cut out some
triangular strips from it. For this, I have taken a ruler. This portion of the
strip should be about 1.5 to two
centimeter wide. This size will fit
well on our tray. We'll only need about four
to five pieces for this, but you can make
more if you'd like. Now take one strip. I'm making random vertical
lines all over it, gently pressing the ruler. Now take a toothbrush and make texture on the
strip by pressing it gently. After adding the texture, we will gently pull the strip to make it
a little thinner. Turn the strip over, so the texture side
is facing down. Then we will make
1 centimeter cut in the center of the broad end. After making the cut, we'll gently cut both portion
in opposite directions. Then we'll start rolling
it up from the wide end, we'll roll it just
like a real croissant. After rolling, just etches the ends a little
bit to shape them. I'm also adding a little
more texture with a ruler. Now, let's place
it on the tray to check the size.
It looks perfect. Now we'll make more croissant from the remaining
strips in the same way. First, we'll add texture to the strip with a ruler and
then with a toothbrush. Then we'll gently pull
the strip to stretch it, making sure it doesn't tear flip it over and use a knife to make
a cut on the broad end. Now, curl both parts in
opposite directions. After that, you are ready
to roll the entire strip up adjust the shape. Do the same thing with
all the remaining strips. We'll need about four to
five pieces in total. But I'm just making
four for now. Once all the quarantat will
begin the shedingF this, I will use yelloca, scrap it with knife. Using a brush, slowly apply
it over the entire surface. If you find it
difficult to hold it, you can insert it
onto a toothpick to make it easier to turn as
you apply the pastel powder. Next, we'll take light brown, scrap it, and mix it
with yellow ca powder. We'll apply this to the embos or raise part of the croissant. Applying the Indian
red or light brown will give the croissant
a nice baked look. This add a lot of
depth and dimension, which will make the
shape more distinct. Take your time in shedding. Do the same thing for all
the remaining pieces. Here is a quick recap. First, you insert our toothpick into the croissant to
make it easier to hold. While turning it, use
your brush to cover the entire surface with
a yellow Oca pistol. After that, take a mix of
the light brown and yellow. Apply to the raised areas
to add those fine details. Now I'm setting them on the
tray to see how they look. After they dry, they
will shrink a little. Four pieces can fit, but you can fit up
to five if you want. We will also dry these slowly, just like we did with all the
other pieces to dry them, cover them with a cloth, and place them somewhere where
they won't feel disturbed. Alright, I will see you
in the next lesson.
9. Cake Rolls : Now we are going to add some
more colors to our bakery. We'll be making some
colorful cake rolls in three different colors. For this, I have taken white, yellow, brown, red
and pink clay. First, I have taken
the yellow clay. Before we begin, just gently knead it in your
hands for a few seconds. This will make it
more pliable and easier to work with
once it's ready, roll it into a ball
and roll it flat. Keep the length six centimeter, cut the side and
make it straight. Keep the width two
centimeter and cut it. Now we have a
rectangle of six by two centimeter with a
thickness of two, two, three. Keep it aside. Take red clay. And rule it very thin. Same way, make strip of the same size six
by two centimeter. But make it thinner
than the previous one. Six centimeter length and
two centimeter width. Now place the red strip
on top of the yellow. The yellow is a little big, so just make sure the
edges are aligned. Now gently roll both layers
together to create a log. Use a toothbrush to gently tap the surface and
create some texture. After this, we'll set it
aside to become semi dry. Now I'm taking the pink
clay for the next one. Just like before, we'll roll it out and cut a strip with
the same dimension. For the cream part, I
am using white clay. We'll also roll the
white clay flat, keeping the thickness low. After rolling out
the white clay, cut a strip of the same
dimension two by six centimeter. Place the white strip on top
of the pink one and slowly, slowly roll them up together
just like we did before. Use a toothbrush to create a texture on this one, as well. Then we'll set it aside
to become semi dry. For the third one, we'll use
the chocolate brown clay, roll it out to make a two
by six centimeter strip. For the cream part, we'll take the white clay and cut a
strip of the same size. Make texture on the brown
strip using the toothbrush. Keep the white portion on the inside as you
roll it into a log. Now our three colorful
rolls are complete. Let them become semi dry before
cutting them into slices. Now, after about an hour, when they are semi dry, we are going to cut them. I have already cut one slice. I am cutting very
gently with a knife, slowly moving it back and forth without applying
too much pressure. Otherwise, the two
colors will blend together and look how
beautifully the slices cut. I am just treating the
back of the slice. So there's our yellow one. Now, we'll cut a slice from the pink roll in the same way. Slowly moving the knife back and forth without applying
too much pressure. Is the shape. Another one. Now, same we cut the
slices from the brown log. You will have three
slices from a log. Though we need four to
five pieces for our tray, but I have made some extra. So let's place them on the
tray to see how they look. You can arrange them
in any way you like. It's amazing how a
few simple steps can create something
so realistic. I hope you will give this a try. So meet you in the next lesson. Thank you.
10. Donuts : Next, we are going to make
some donuts for this. I have taken some white clay, and I am making equal
size balls from it. About six to eight balls
will fit on our tray. Gently roll a perfect ball, then take a paintbrush and use the back of it to make a hole in the center
of the doughnut. Make a hole in all the balls to give them a doughnut shape. Next, to make the sprinkles
for the doughnut, we'll use the same colorful clay we used for the cake slices. First time taking
the yellow clay and rolling it very thin. It should be just like a thread. Keep rolling it
slowly and gently. Make it thin just like a thread. Then I will make a roll of the pink clay and
then the red clay. Well let these thin
rolls dry completely. Now that they are
completely dry, we'll use cisars to
cut them very finely. Take time to do this step. Cut as finely as you can. And, all of our colorful
sprinkles are ready. Now we'll do some
shading on the donuts. For this, I'm using
yellow soft crystal, scrap it, and apply
it with a brush. Do this the exact same way as we did for our other
bakery products. Do on all the nonans. Next, we'll make
the icing for this. I have acrylic paints. I have Debril purple
and white to make pink, lemon yellow, teal blue. And for the chocolate color, I am going to use
burn tumbo and blue. If you already have a dark
brown or chocolate pin, you can use that I have also
taken clear gloss varnish. This will give icing a glaze
like finish and thin it out. I have a little bit
of corn flour too. So let's start making the icing. I am taking teal
blue color first. It's a bit of an unusual color, but I think it will look great and add a unique shade
to our miniature bakery. I am taking a little
bit of teal blue, and to lighten it, I
will add some white. Add a little corn flour. This will give our
rising some volume. We will mix it well and then add some varnish to thin it out and give it a
nice shining glaze. You will want to
apply the icing right away because it will
set within minutes. So after mixing everything
well, take a doughnut. Use a toothpick to hold
the doughnut steady by placing it in the
hole with a brush, apply the icing to only the
top part of the doughnut. Keep the sprinkles close by. Same on another piece. Sprinkle them on top. They will stick to the
icing on their own. We can pick up any
extra sprinkles that fall and use them later. So our blue donuts with
sprinkles are ready. Now I'm making the pink icing. For this, I have taken Depril
purple and white paint. If you have a light pink paint, you can use that directly. After mixing these two colors, add a little bit of cornflur and a little
bownish mix it together. Now, hold the doughnut
steady with a toothpick. With a brush, we will apply the pink icing to only the
top part of the doughnut. Immediately after applying it, add the sprinkles on top, the sprinkles will
stick on their own. Move to the next color. Now we are making yellow icing. I have taken a
light yellow color, but you can use any shed
of yellow you like. I have also added some cornflow
and varnish to the mix. Mix it all well, then apply it to the doughnuts
in the same way. At the sprinkles on top. Now we are making dark
chocolate colour. I have taken Debril purple, blue, and burn tumber. You can also use
just burned dumber, as it's quite similar
to a chocolate colour. Mix the colours together. And in the same way add cornflur for volume and
varnish to mix it all well. After mixing, apply
icing to the donuts. And at the sprinkles. So we have made
our doughnuts with four different types of
icing and sprinkles on top. Now, let's set them on the tray. When we place them on the tray, they aren't very big, so
they won't be as visible. As you can see, they are at the same level
as the tray is. So to raise the base
of the tray a little, we are going to stick a piece of foam board that's the
same size as the base. First, I have added
two thin strips to the bottom to raise
the height even more. Then sticking a piece of
foam board on top of them. Let's check. Since they
are still delicate, I'm just carefully
picking them up. Looking good. Now we'll leave
all the donuts to dry. Oh.
11. Glazing : All of our creations
are now completely dry to give them a
more realistic look, we will apply a glossy, oily finish to some of them. We want to use this on
the pieces that would naturally have an oily sheen
like freshly baked breads. For this, we'll use
our decor varnish. If you don't have this
specific decor varnish, you can use any clear
gloss varnish you have. So we will apply it
only on our croissant, braided bread, and Burget. Focus the application on the raised part to create
a beautiful glaze effect. When you apply the monish, it will look a little milky
white, but don't worry. It will try to be
completely transparent. This takes about ten
to 15 minutes to dry. So let's wait for it
to completely dry.
12. Setting in the Trays : Our food items are all
complete and ready. Now we'll stick
them onto the tray. Before you start sticking, first arrange them to see
what kind of layout you want. Let's start with the bugget. One point of the bugget will rest on the
surface of the tray, and the other will on
the trays corner es. To secure it, we will
apply super strong glue on these two points and place the bugget in this
standing position. Place and stick all the bugget
pieces in the same way. This will dry within
five to 10 minutes. Next, we'll stick the braded
bread in the exact same way. We did the bucket
bread by applying glue to two points and
setting them on the tray. Oh about five to six pieces will fit. If you'd like, you can make
and place another row in front of this one.
Next, the cookies. I made some extra cookies
to make our tray look full. We'll stick these down by applying a single drop
of glue on each one. I'm adjusting them with a toothpicke so the glue
doesn't get on my hands. After setting one
layer on the tray, I will place three or
four more cookies on top. This will tate another layer of cookies and make
the tray look full. So let the glue dry.
Next croissant. On each quisan apply a drop of glue to the one point that
will touch the surface. Use a toothpick to help
set it on the tray. Set all of them one
by one with ease. Next up the cake rolls. We will keep them
a little tilted. I'm starting by sticking
yellow and pink one. For yellow cake slice, then I will stick the pink one next to
it with a small gap. In the next row, a
chocolate colour one will go in the center. And then we will repeat the
yellow and pink pattern. This way, all three
different colours of cake rolls are
arranged on our tray. Now for the doughnuts, apply a drop of glue to the
one point that will touch the surface and set them. So all of our food items
have been set on the tray. The glue will also be dry
in five to 10 minutes. Now, move to the next lesson.
13. Making a Display Rack: Now it's time to make a display rack for our
bakery items for this. I have taken the same sunboard that we used to make the tray. I have got five pieces
from the sunboard each measuring 11 centimeter in length and 3.5
centimeter in width. All the five pieces
are of same size 11 centimeter by 3.5 centimeter. I have also taken
woodprint vinyl sheet. It's a peel off sheet. You just have to
peel the backside and stick it on the
sunboard pieces. If we apply it, the pieces will get a realistic
wood texture. And this is optional. Of course, you can keep your
rack white if you prefer. Placing the sunboard
piece on the vinyl sheet, we need to cover the
sunboard from three sides, so cut the vinil
sheet accordingly. The length of the sunboard
is 11 centimeter, so I'm cutting the vinyl
sheet 1 centimeter longer, making it 12 centimeter. And a width of ten centimeter is enough to
cover the piece completely. So cut the sheet. So we have 12 centimeter by
ten centimeter vinyl sheet. Now, let's peel off the sheet. Do carefully. Do very carefully. And after peeling, carefully place the sunbard in the
center of the sheet. At the top, where
there is excess, we will make a cut
on both sides. We can carefully
remove the corners. Then we will fold the top side down and fold in
the sides as well. Press it to remove air bubbles. Press from all sides. The side with the joint
will be our inner side, and this will be the outer side. Any excess material on the
verticals we will cut off. This piece is covered
from three sides. The bottom side will
rest on the surface, so there is no need to cover it. These will be our two
vertical sides for the wreck. We will cover the other
piece in the same way. Peel off the vinyl
sheet. Do carefully. Place the piece on top according to our
previous measurement. We can cut on the top xs to
remove the corner piece. Then fold it. Fold the top
portion, and then sides. Press it down well.
The sides are covered. And these are our
two vertical sides. Now, for these three shells, we don't need to cover the two ends and that will be stuck to
the standing sides. Just cover the remaining
part all the way around. The vinyl pieces we will use for these shells will be 11
by ten centimeter each. So the length is the same
as the sunboard piece. Cut the piece, peel off, place the sunboard piece on top, and carefully wrap it. Press it down well to
get rid of any bubbles. Cut the excess from both ends. We will make the rest of the three pieces
in the same way. So I have prepared
these three pieces too. Now it's time to
join these pieces. Let's take our two
vertical sides and make marking to
stick the shells. From the bottom end, make a mark at 1 centimeter. This is where our lowest
shelf will be placed. Then from that 1
centimeter mark, measure up by 4 centimeters. This is for our middle shelf
and make another mark. It's for the top shelf. Make sure to mark
both vertical sides carefully with a pencil, so our shelves look
perfectly straight. Use a ruler and
mark with pencil. Now we will stick the shells. I have taken super strong glue and I am applying it on
the marking we just made. Then we will place
the shells on top. I have laid the
vertical side down. For support, you can place something there or
just hold it in place for about a minute
placing trace for the support. Stick the third shelf. Hold it for a few seconds. Now we will stick the
other side on the top, apply glue at the marketplace. Match it and stick it. It's now in a lying
down position. Let's let this dry.
14. Arranging Trays in the Rack: Now we will set
everything on the rack. I'm placing the Braided bread and bugget on the top shelf. Colorful doughnuts and
key rolls in the middle one and cookies
quisan at the lower. So instead of keeping
the trees flat, if we raise them
slightly from the back, they will be much more visible. So to do this, I have got
some small strips of sunbood and I'm sticking two strips
onto the back of each tree. These strips will act as a stand to raise the
trees from one side. First, I will place one strip, then another on top of it. I am using the same
super strong glue. So let's check. Tell me, doesn't it look better
now than before? So just in the same way, we will keep sticking
two strips onto the back side of all
the remaining tray to raise them from behind. Now, let them dry for
five to 10 minutes. So the strips on the back
of our tray have dried. We will stick them
onto the rack now. We will set them in the same
arraigement we plan earlier. Just keep applying glue on the strip and stick the
trays on one by one. After sticking all of them, we will wait about
five to 10 minutes for the glue to dry. And then our miniature
Clay Bakery rack is ready for display. Tell me what you think.
Love to hear from you.
15. Final Words : Well, we have reached
the end of our course, but it's just the beginning of your miniature art adventure. And I truly hope you had as much fun creating these tiny treats as
I did teaching you. You have learned
to make such cute and realistic miniature
bakery items. I really hope you enjoyed this course and are proud of
the work you have created. Now, for the most
important part, I am very excited to
see everyone's work. So please upload photos of your finished project
to the project section. By sharing your creation there, you will not only inspire
me but also other students. And yes, please don't forget to leave a
review for the course. Your honest feedback
means a lot to me. So thank you so much. Thanks for your creativity, hard work, and support. I hope to see you soon in another course until
then happy crafting.
 Mona Arty, Clay Artist & Educator