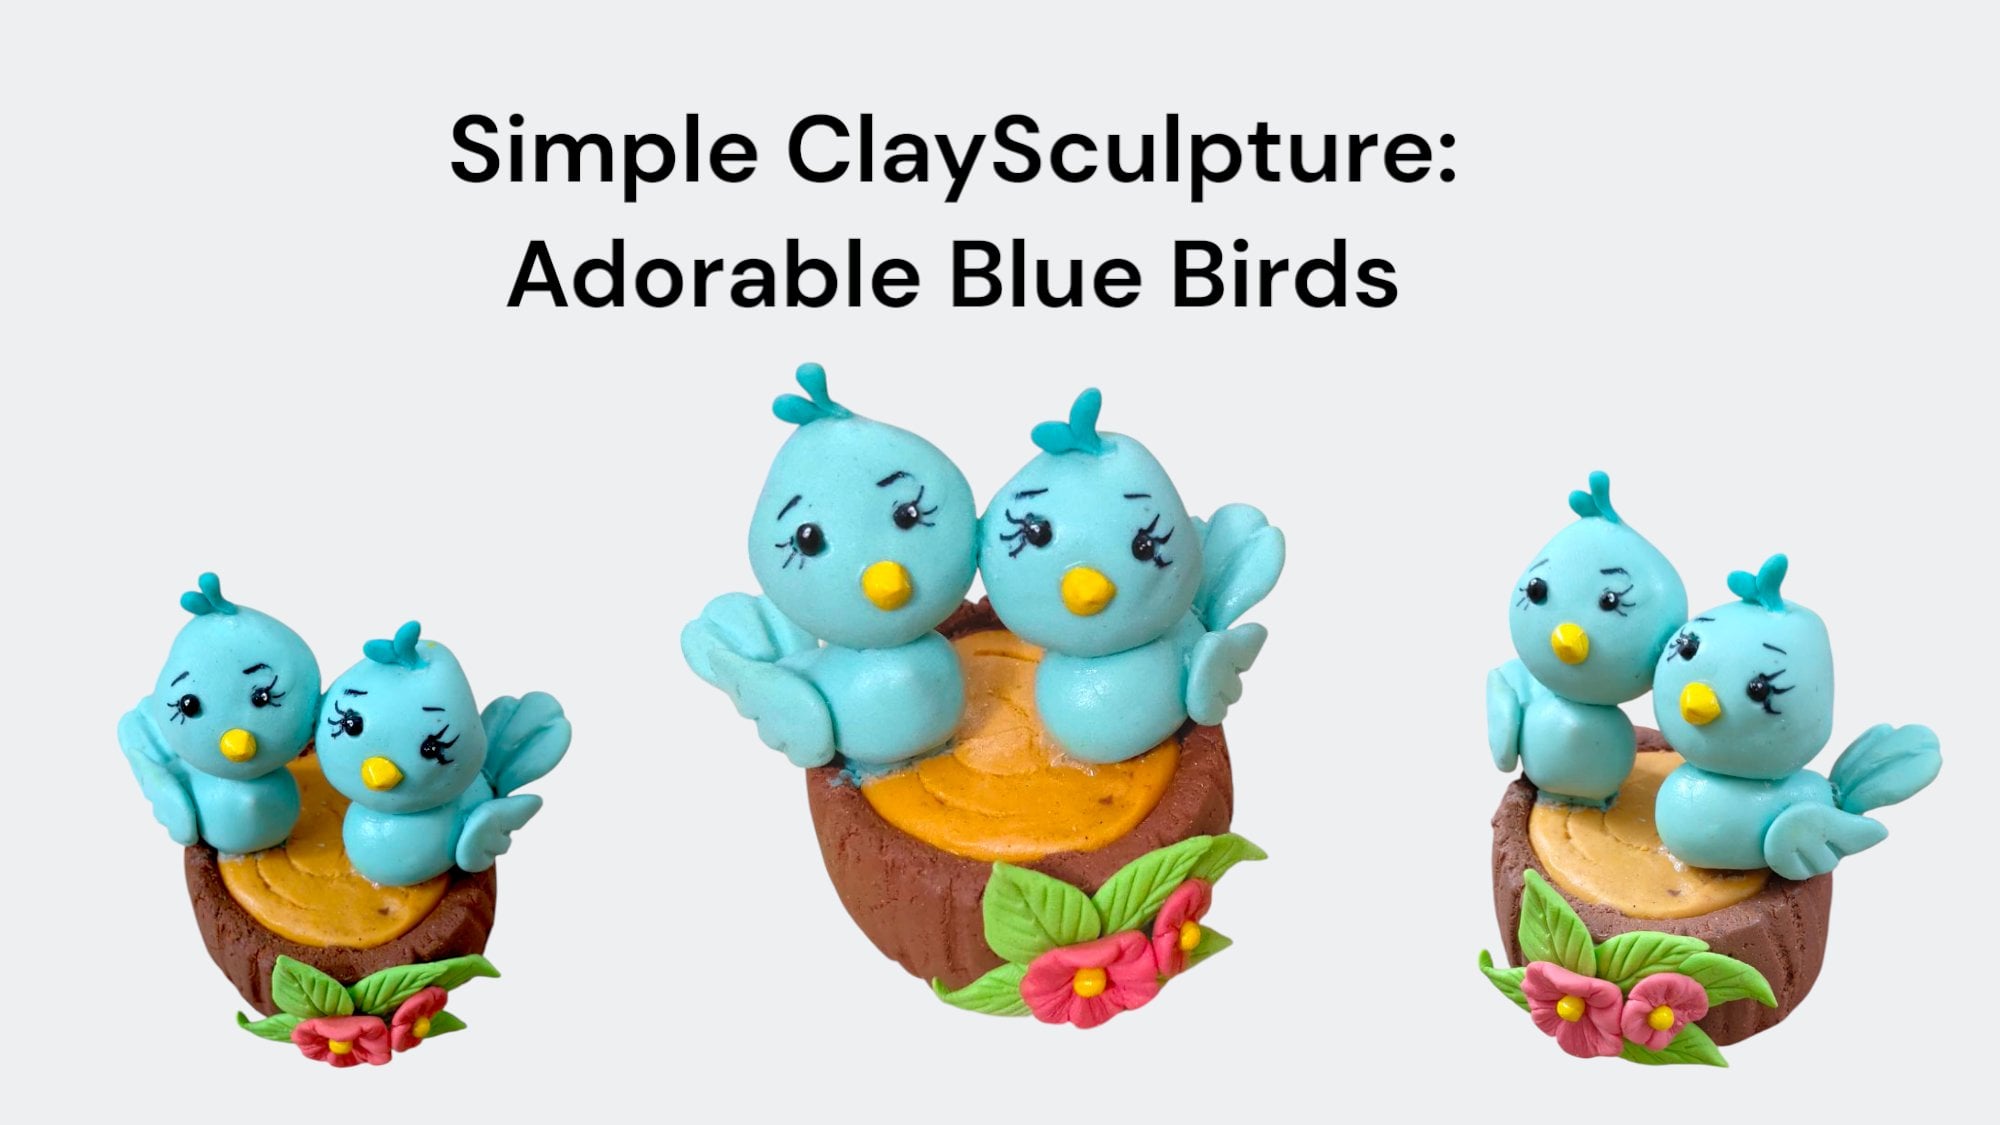
Transcripts
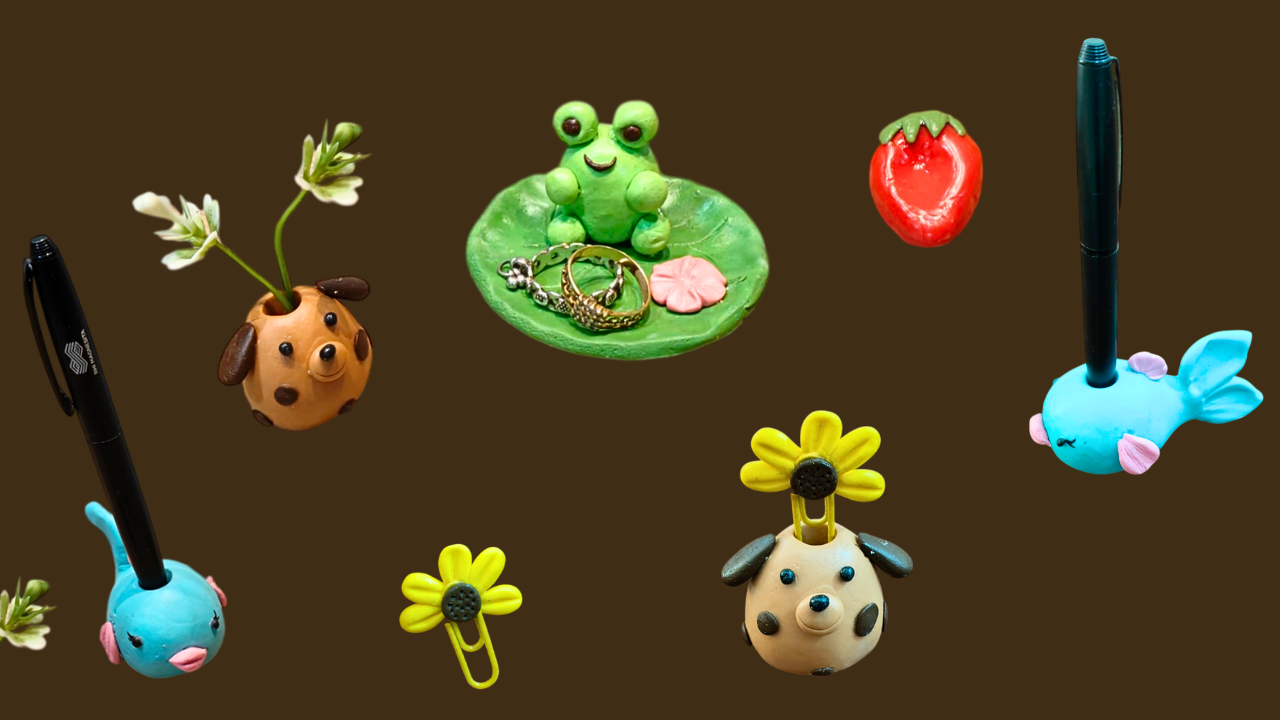
1. Welcome !: Hello, everyone, and
welcome to my new course. I am Mona, a clay
artist from India, and I am so excited to
have you here today. In this class, we are going
to create a series of adorable desk bodies to
brighten up your workspace. The best part, we are
using cold porcelain clay, which is an amazing medium
that you can easily make right at home using
simple kitchen ingredients. If you are new to this
medium, don't worry, I have a dedicated cold porcelain making
course right here. In that course, I have shared everything in detail
from how to cook and prepare the clay
to the secrets of conditioning it and
mixing in vibrant colors. I highly recommend
checking that out first, so your clay is perfect
for our projects today. This is a completely
beginners friendly course. Even if you have never touched clay or done any art
and craft before, you can easily follow along. You don't need any special tools or expensive molds
for this class. We will be using
simple everyday items like toothpake rulers, and even our fingers to
shape our creations. In this journey, we
will learn how to make a cute frog
on a lotus leaf, acute bunny cable holder, a sweet strawberry worry stone, decorative flour paper clip. Our loyal friend Dotty, the dog and a unique
fish pen holder. If you would like to see more of my daily creation tutorials
and behind the scene work, you can follow me on
Instagram and Facebook. Also, don't forget to subscribe my YouTube channel
Mona RD Academy, where I share even
more crafting magic. We have a lot of fun
projects lined up, so grab your clay and let's start turning your desk
into a creative Wonderline.
2. Let's Check the Materials : Let's take a look
at the materials we will need for our project. Now, you might see a lot of
items on my table right now, but please don't
feel overwhelmed. As a beginner, I completely
understand that you might not have every single
tool or material ready yet. As we go through the list, I will be sharing easy alternative
for almost everything. While I have some
basic tools here, they are definitely
not mandatory. I will show you how to get the same professional results using simple household items. Don't worry about
having a perfect kit. Just bring your
creativity and let's see how we can make these projects
work with what you have. Our star material for this
course is air dry clay, especially this homemade
cold porcelain. If you want to learn how
to make this exact clay, I have a dedicated course available right here
on this platform. This clay is absolutely perfect for delicate work
like jewelry making and creating intricate flowers because of its smooth
texture and durability. The best part, you
can make it right in your kitchen using very
simple kitchen ingredients. In that course, I
have also shared essential tips on how
to handle the clay, how to keep it fresh, and the best techniques for
mixing in colors flawlessly. Now, let's talk about how
to make our clay colorful. You can use either
acrylic colors or oil colors for this.
Both work beautifully. I will be using these
bottled acrylic colors. In this project, I am
using green shade for the leaf and for the frog,
lighter shade of green. But don't worry if you don't
have this specific color, you can easily create your
own by mixing a bit of green with yellow and white to get that
perfect light tone. For the flan, I am using pink by mixing pink
with a bit of white. We can create a lovely
soft light pink. For our bunny, we
definitely need white clay. Now, even though the
clay is already white, I always recommend mixing in a bit of white acrylic color. The bunny is bow, I have prepared a lovely
lavender shade. To get this exact tone, I mixed white, purple, and just a hint of blue. Finally, for the eyes
and tiny facial details, I have some black color. Next up in our vibrant
strawberry for this, we will using a
rich red color for the fruit and green for
the stem on the top. Then comes our cute little
friend Dotty, the dog. To get that perfect
natural puppy tune, I have mixed some
burn sienna into the clay and for ears
and dots, bunumber. We also need a little bit of black for tiny nose and eyes. For our floral paper clap, I have mixed a yellow glove for the battles and burn dumber
for the center part. Finally, for our
fish pen holder, I have created a
stunning teal blue by mixing teal and white
color into the clay. If you don't have teal blue
in your kit, don't worry. You can easily make a similar
shade by mixing dark blue, a touch of green and white. This will give you a beautiful deep sea or teal blue tone. For the fish, fins and details, I have used a blend of
pink and white to get a soft rosy shade and we also
need black for the eyes. And that covers our
entire color palette. These are all the shades. We'll need to bring our
desk bodies to life. Now let's talk about adhesive. For cold porcelain, I recommend using a good
quality PVA glue, fabric glue or any
white all purpose glue. This will give you
the strongest bond and the best results. You will also need
some body lotion. It will prevent the
clay from sticking. For our frog project, we need a small glass
or plastic ball. This will help us to
give our lotus leaf that perfect curved
shape as it dries. When it comes to cutting, I am using a circular
cutter for the leaf. But if you don't have
one, no problem at all. You can use the lid of any jar or bottle as a makeshift cutter. Similarly, if you don't have
a specialized clay roller, you can simply use a marker pen to roll out your clay smoothly. It's all about being
resourceful with what you have. Moving on to our shipping tools, I have a few basics
here like a ruler, toothpick, cotton bids,
and popsicle stick. I also use ball tools and
silicon tool for the detailing. However, please note that
these are completely optional. If you don't have a
professional toolkit, don't worry at all, to create a cavity
or a hollow space, you can simply use your
fingers to press down or use the back of a paintbrush to create
the same effect. It works just as well. For our floral project, make sure to have
paper clip ready. We will be transforming this ordinary clip into
beautiful floral bookmark. As you can see, we
are mostly using everyday items that you
probably already have at home. Once we finish
shipping our projects, we need to let them
dry correctly. You will need some soft cloth or tissue paper to loosely
cover your pieces. This protects them
from dust and ensure they dry slowly and evenly,
which prevents cracking. After our projects
are completely dry, we need to seal them to
ensure they last a long time. For the strawberry,
I will be using UV resin to give it
that ultra glossy lo. For this, you will need the UV resin liquid
and a UVAm to cure it. However, please note that UV resin is completely optional. If you don't have
it, you can achieve a similar high gloss surface by applying multiple coats
of spray varnish. For all our other desk buttes, I will be using a
simple spray bonish if you don't have spray varnish, you can also use liquid brush on varnish or
any other sealer you prefer. The goal is to give your buddies a nice shine and protect
them from dust and moshure. Use whatever you have available, the result will
still be amazing. Now that we have all our
materials and tools ready. It's time to get our hands messy and bring these
characters to life. I hope you have gathered
everything you need. Clear your desk, find
a comfortable spot, and let's start our
creative journey with our very first project.
3. Frog on Leaf : Welcome back. In our
desk buddies course, the first character we
are going to create is this adorable little
frog with a flower. Not only is he super
cute to look at, but he's also functional. You can use him
as a ring holder. He's going to look absolutely charming sitting on your desk. Let's dive in and get started. For this proset, I am using four different
colors of clay. First, we have deep
green for the leaf base. Then I have picked a
lighter shade of green, especially for the frog's body, pink for the flour. For the eyes and the mouth, I'm using brown clay. You can go with any dark
brown shade you prefer. In addition to the clay, you will also need
a small glass bowl. We will using this
to place our leaf inside to help it hold its shape while we were now that we have our materials
ready, let's begin. To start, I have taken the
green clay for our leaf. The first thing I'm doing
is conditioning the clay. This simply means I am
kneading it throughly to ensure the moisture level is perfectly even throughout. The more you
condition your clay, the softer and
smoother it becomes, making it much
easier to work with. Once it's ready,
roll the clay into a neat ball and flatten it
slightly with your palm. Now I am using a roller to flatten it out into
an even circle. Next, take a circular cutter and cut out a clean circle
from the sheet. You can adjust the diameter
of this circle depending on how big or small you
want your desk body to be. Now to add the
details of our leaf, I'm using a silicon tool
to create the impressions. If you don't have
one, don't worry, you can easily use a toothpick
to get the same effect. We are going to
draw lines starting from the center and
moving outwards, similar to the veins
of lotus leaf. I'm making these lines slightly curved to give it a
more natural look. I will be making about six
of these lines in total. Feel free to keep the
pattern a bit random. Nature isn't perfect and a slightly irregular pattern will actually make your
leaf more realistic. After finishing the
six main veins, I have added some smaller sub veins to give the
leaf more detail. As right now our leaf
is a perfect circle. We want to give it a more
natural organic look. To create wavy as, I am using a ball tool. I have dipped the tool
in a little bit of confloor to prevent it
from sticking to the clay, gently press and push
the tool outwards along the *** As you can see, this make the as
slightly wavy and ruffle giving it that beautiful
natural lotus leaf shape. Right now the leaf
is completely flat and we want it to have a
more natural cup shape. To do this, take your glass bowl and dust a little bit of
cornfloor inside. This prevents the clay from
sticking to the glass. Now carefully lift the leaf and place it right in
the center of the bowl. By letting it rest here, the aces will naturally
curve upwards, mimicking the shape of
the bowl as it dries. Now, let's move on to our
star of the show the prom. To make the prom, I am
using a lighter shade of green compared to the
one we used for the leaf. Just like before, I am starting
by conditioning the clay. After knitting it
for a few moments, it will become perfectly
soft and smooth, making it much easier to
shape without cracks. It's the same process
we did earlier. Make sure it's nice and
pliable before we start. Keep a small part of clay
aside in a poly bag. Now we will roll the rest
clay into a smooth ball, then we'll gently shape it into a simple O shape for
the frog's body. Before we go any further, let's place it into our lotus
leaf to check the size. This is very important step. You want to make sure
the frog isn't too big. There should be sufficient
space left around the frog so that you can easily place your rings or jewelry
on the leaf later. This size looks perfect. Since this is a simple shape, we don't need to add
much body detail. Let's take the small piece of
clay we set aside earlier. Let's pinch off two small pieces and roll them into two
tiny balls for the eyes. Let's place them on the
body to see how they look. Once you are happy
with the eyes, we'll move on to the next part. We will take two
more pieces of clay and roll them into two
small balls for the hands, and finally, we'll prepare the last two balls for the legs. By doing it this way, we can adjust the size
of each part as we go. Now let's grab some glue to
start assembling our frog. First, I'm attaching the two
small balls for the hands. I'm placing these
on the front of the body slightly
towards the sides. Make sure they are
at the same level, so our frog look balanced. Next, we'll take the
other two balls and attach them just below the
hands to create the legs. We are keeping it very
simple and clean. No extra detailing
is needed here, just the smooth round shapes. Now let's focus on the eyes to give our frog some personality. We are making eyeballs
using brown clay. Roll two tiny even balls, much smaller than
the green ones. Now take the two green
balls we prepared earlier using a small ball tool, gently press into the center of each greenbll to
create a small hollow. Apply a tiny drop of glue and carefully stick the
brown or black balls inside. Once the eyeballs are set, we will apply a little
more glue and stick the completed eyes right
onto the top of the head. Position then slightly
apart to give our frog that signature
cute and white eyed look. Now our little friend is really
starting to come to life. Now let's give our frog
a friendly expression. For the mouth, I am using the same brown clay
we used for the eyes. Take a tiny bit of it and roll it into a very thin
delicate string. Once you have your thin roll, you can use a ball tool or even just your fingertip to gently bend it
into a small cuve. This will create a sweet
little smile for our frog. Now apply a tiny bit of blue and carefully stick the
smile onto the face, positioning it right between
the eyes and the hands. It will give him the
most adorable look. Our frog is finally smiling and ready for
his final details. Now that our frog is ready, it's time to attach
him to our lotus leaf. First, apply a smaller amount of glue onto the leaf surface. Carefully pick up your frog and place him to
one side of leaf. We are intentionally
setting him off center to ensure
there is plenty of open space remaining
on the leaf for you to place your rings
or other small treasure. With our frog comfortably
settled on his leaf, let's add one final touch. We are going to
create a charming little fro using some pink clay. This will really brighten up our desmdy and
complete the look. After conditioning our pink clay to make it soft and smooth, let's roll a small
piece into a neat ball, gently press it down to
flatten it into a small disc. Now take a ruler. We are going to create
five equal partition by pressing the as of
the ruler onto the clay. Be very careful here. We only want to
create an impression, not cut all the way
through the clay. These five marks will serve
as the guide for our petals. Next, take a toothpick, align it with the
marks on the Ss and gently push the clay
inwards towards the center. As you do this for
all five sections, you will see the distinct shape of a flower starting to immerse. This simple technique give us beautiful defined
petals in no time. To give our petals a
natural spread out look, place the tip of
the toothpick right in the center of the flow, rule it from side to side. This will spread the
clay slightly and create beautiful natural looking vein
sepression on every petal. Repeat this for each of the
five sections one by one. Once you have found
out all the petals, take your ball tool
and press firmly into the very center of the flower to create
a small hollow. Finally, apply a tiny
drop of glue onto the lotus leaf near our frog and carefully stick
the flour into the place. Our adorable scene
is now complete. Now that our testbd is complete, it's time for the most important step, the
drying process. To ensure the best results, we must let the piece dry
slowly and naturally. Remember, when working with
clay, patience is the key. Avoid the temptation to use a hair dryer or place
it in direct life. I am covering it with a cloth, keeping it in a cool shaded
area will help it dry evenly. Now let's give it the time
it needs to set perfectly. It's been five days and our
piece is now completely dry. You will notice how
the leaf has held its beautiful curved
shape perfectly. Because we dried it
inside the glass bowl, the edges have lifted naturally
instead of staying flat. Now to give it a
professional finish, we are going to apply varnish. This won't just add
a lovely shine, I also create a protective layer against humidity and
changing weather, making our creation
more durable. I am using a spray
varnish today because it's very easy to
use a quick tip. Always spray from a
slight distance and make sure you are in a
well ventilated open area. It's also highly
recommended to wear a mask for safety
while spraying. Let's apply the code and
wait for about 10 minutes. Look at that beautiful
glossy finish. Our lotus leaf desk buddy is finally ready to hold your
favorite rings and jams.
4. Bunny Cable Holder: Hi, everyone. Welcome back. In this lesson, we
are going to create this incredibly
cute little bunny. But this isn't just
a regular figurine, it's designed to view functional helper
for your workspace. This adorable bunny
will sit right on your desk and securely hold
your mobile charging wire, keeping your cable
organized and tangle free. It's a perfect blend of
cuteness and utility. Grab your clay and
let's get started on making your very own
functional deck companion. For this, I am using
cold porcelain clay. I have already mixed in some white acrylic paint to get that perfect
solid white ase. Now I am throughly
conditioning the clay. We want to knead
it well to ensure the texture is incredibly
soft and smooth. Make sure your work
area is clean. Once the clay is ready, I'll take a small
portion and place the rest into a polybg
to keep it fresh. Let's start by rolling our first piece into a
smooth crack free ball. Now, starting with our ball, we are going to shape
it so that it's broad at the base and
slightly narrow at the top. Once you have that shape, give it a very gentle press
to flatten it just a bit. To get a truly
professional finish, take a tiny bit
of body lotion on your fingertip and gently
rub it over the surface. This helps to smooth
out the clay perfectly and ensure that no
fingerprints are left behind. Next, let's prepare the pace. I am using a ball tool to mark the placement
for the eyes. Apply a tiny bit of
pod lotion to the tip of your ball tool so
it doesn't stick. Press the tool gently to create two small even holes
at the same level. Now check the stability of the
body on your work surface. If it feels a bit wobbly, give the base a
slightly gentle press against the flat surface, your bunny stands
firmly on its own. Now, let's create the feet. Take two equal sized pieces of white clay and roll them into
two small teardrop shapes. Give them a slight
press to flatten them. We will position them so that the narrow ends
meet at the back while the broader
front part point towards forming a soft V shape. This provides stable
base for our boy. To make sure the body stays bonded to the
feet permanently, we'll use a mechanical
join, take a toothpick, and break off two small pieces, apply glue insert
these into each foot. Next, we'll create some texture
on the bottom of the body and top of the fee by making a criss cross
pattern with toothpick. This scoring method
combined with glue, creates a much stronger bond. Now, carefully insert the body
onto the toothpick pieces. If the body leans backward, just place a small bottle behind it for temporary
support until it sets. Now, let's create those
signature long bunny ears. Roll two small balls of
clay into long drop shape. Use your ball tool
to press along the center of each drop
to create a long cavity, giving the ear a
carved cup shape. Before touching them, take a circular cutter and make a small cut at
the base of each ear. Apply a little glue and position these
ears right on top of the head touching each other at the base for
an adorable look. Next, we'll create the arms
that will hold our cable roll two equal pieces into long drop shapes and
flatten them slightly. Attach these to the sides of the body and bring them
forward towards the chest. Make sure there is just
enough space between the hands so that your
cable can rest securely. Once you have checked the size and position from all angles, give them a final press. If the arms are dropping, just scrumble up
a small piece of tissue paper and tuck it
underneath for support. Now let's bring our bunny
to life with its eyes. I am using two tiny
balls of black clay, apply a tiny drop of glue inside the eye sockets
we made earlier. Using a toothpick, carefully place the black balls
into the holes, press them in gently. Now let's create the nose and whiskers using a
very simple trick. Start by rolling a
tiny thin piece of black clay into small
cylindrical roll. Now using your cutter, make a small slit or cut at
the bottom end of the roll, it splits into two thin strands. Gently turn these two parts
in opposite directions, curving them slightly outwards. This single piece acts as both the nose at the top
and whisker at the bottom. Apply a tiny drop of
blue and position it right between the eyes
just a little lower down. Give it a gently press to
stick it into place and you will see your bunny's face instantly light up with
a cute expression. Now, let's add some
charming details using our purple clay. First roll two tiny
equal size ball. We are going to place
these right on the cheeks, apply a tiny drop of blue, stick them on, and give them a gently press to
flatten them slightly. This gives our bunny
a sweet blushing. Next, let's create
a cute little bow. Roll out a small piece of purple clay and flatten
it into a thin strip. We only need a piece about 1
" in length to form the bow, bring both ends of
the strip towards the center and overlap
them slightly. Now take your toothpick and press down on both side
of that center joint. This will narrow the
middle section and create natural looking crises
or folds on the sides. Just like that, you have
a perfect tiny bow shape. Now, let's attach
our cute purple bow, apply a small amount of glue right in the
center of the head between the two ears and
firmly stick the bow in place. To finish the look, roll an extra tiny purple ball and place it in the
center of the bow. Use your ball tool to
give it a gentle press. This add a beautiful three
D detail to the center. As I mentioned before, I am placing some crumbled
tissue paper under the arms for support to keep them in place
while they are soft. Now, the most important
part, the drawing process. To prevent any
shrinkage or cracks, you need to let the
clay dry slowly. I am loosely covering the
bunny with a layer of tissue paper to control
the moisture release. Make sure to keep it in a spot away from direct
sunlight or strong fins, as fast drying can cause
the clay to sprit. It will take about
five to six days to dry completely
and become solid. Patience is the key here. It's been about five to six days and our bunny is completely dry. As you can see, there are absolutely no creates and the clay has become
solid and hard. Now, to give it a
professional touch, we are going to apply a varnish. This warm just give our bunny
a beautiful glossy finish, but it also creates a
protective layer that shields the clay from
moisture and humidity, making it last much longer. For this, I am using an
acrylic spray monise. It's very easy to apply. You just need to
spray it evenly from a slight distance,
covering all sides. A quick tip, always do your spraying in a
well ventilated area, and if possible, we are
a mask for extra safety. Once it's dry, our cute
desk body will be ready to shine and here it is. After 10 minutes, the monishs completely dry and
our cute little bunny is officially ready
to decorate your desk and hold your wires
perfectly in per place. I hope you enjoyed creating this functional desk
body as much as I did. It's a perfect little
companion to keep your workspace
tidy and cheerful. Thank you so much
for joining me in this lesson and I will
see you in the next one.
5. Strawberry Worry Stone : Hello, everyone.
Now we are going to craft a beautiful strawberry
shaped worry stone. A worry stone is used
for stress relief. Simply rubbing the
surface with your thumb can help ground you
and lower anxiety. So let's get started. For this project, I have taken
some red and green clay. The first step is to
condition the clay. You will need to knead it
thoroughly for a few minutes. This makes the clay much
easier to work with. Ensure the moisture level is consistent and most importantly, prevent any cracks
from forming later on. Once the clay is
soft and smooth, roll it into a neat ball, then give it a drop shape. Now, place a plastic sheet
on your work surface, put it on top and
gently flatten. Next, take a small amount of body lotion on
your fingertip. We'll use this to smooth out the *** and refine the curve. Keep in mind the bottom of this worry stone
should stay flat, but the sides and top
should be softly cocked. After adjusting the shape, use a bit more lotion to press and move your thumb
right in the center. This creates a signature
thumb group or cavity. Be sure to smooth out the
sides of the cavity as you go so the transition looks
seamless and beautiful. Now, let's check the bottom again and give it
a slight taper. We want to make it
a bit more pointed, so the classic strawberry
shape becomes clearly visible. Now we'll create
the green statin or the leaves at the top. Take a small amount of green
clay and knead it well. Make a tiny ball, then use your finger to press and flatten it
into a small circle. To create the leaf detail, I am using a small casar
to make triangular cuts. About four to five cuts around the edges to give
it a natural low. Press it and make it
a little thinner. Once you are happy
with the shape, apply a small amount of glue and carefully place
the green stem on top. Adjust the placement until
it looks just right. Gently press it down to flatten it so it doesn't look
too bulky or as. I have trimmed any excess from the bag so the size is perfect. Finally, we need to let it dry completely before we
start the paint details. I'm covering the
piece gently with a loose tissue paper and placing it in a spot away from
direct sunlight or draft. It might take about four to
five days to dry completely. We'll check back then to finish our strawberry
burry stone. It's been about five to six days and our piece is
now completely dry. To give it a professional
finish and extra durability, we are going to apply
a UV resin coating. I'm taking some UV resin here and applying it evenly
over the surface. I am using a popsicle stick. Just make sure it reaches
every edges for a smooth lo. Once the resin is evenly set, we'll place the stone under a UVM for about three
to 4 minutes to cure. There you go, as you can see, the sin has dried perfectly, leaving a beautiful,
smooth and glossy finish. Your strawberry
worry stone is now finished and ready
to sit on your desk.
6. Dottie - The Mini Dog Planter: Hi, everyone. In this lesson, we are going to create this absolutely adorable
mini dog planter whom I have named Dottie. What makes Dottie so special
is his functionality. You can place tiny
artificial birds or real mini flowers inside him to add a touch of nature
to your workspace. He is the perfect
little companion to keep on your desk and
brighten up your day. Let's get started and
bring Dottie to life. For this process, I have prepared three different
shedes of clay. For our main body color, I have created this
beautiful light brown by mixing Bnciana, white, and a touch of
rhumb into the clay. Further details, I have
mixed burn tumbo into the clay and finally a
small amount of black clay, which we will need for the eyes. Let's start with the
light brown clay. I am opening it up and
conditioning it throughly. As I have mentioned in
our previous lessons, conditioning is a must. It ensure the clay is
flexible and smooth, giving us a perfect finish
without any cracks. I started by rolling our light brown clay
into a smooth wall. Now I am gently pinching
the top to make it slightly narrow while keeping
the bottom part broad. I will place it on my work surface and
give it a light press. This flatten the base and ensure our little dog stays
stable and upright. Once the shape is adjusted,
take a paintbrush. You can apply a
little body lotion to the handle so
it doesn't stick. Gently insert the handle into the top and rotate it
in a circular motion. This creates a cavity where we will later place our flats. As you can see, the
surface currently looks a bit uneven with
some fingerprints. To fix this, take
little body lotion and simply rub the surface
gently using your finger tip. After a bit of rubbing, it becomes silky smooth. Next, let's create the mouth. I have taken a small piece
of same brown clay for this, make a ball, flatten it, place, and check the size. It's looking perfect. Now
we will make a smile on it. I am using a small round cutter, but I'm only pressing half
of the circle into the clay. This creates a perfect
adorable smile for our tote. Now let's attach the mouthpiece, apply a tiny bit of glue, place it on the face, and give it a slightly press to make sure it's
securely bonded. Next we'll move on to the ears. I am using the dark
brown clay for this. Start by rolling two
equal size ball. Then shape them into slightly tear drops
and flatten them out. Apply some glue to both sides of the head and fix the
ears in the place. Positioning them slightly
lower on the sides will give our dog that
cute droppy eared look. To add some character, we are going to create
some random spots using the dark brown clay. Simply roll tiny balls of different sizes and flatten
them onto the body. They don't have to
be perfect circles, irregular shapes actually look
more natural and artistic. Just scatter them around until you are happy
with the pattern. Feel free to add a
few more dots on the back side as well to keep the pattern
consistent all around. Now it's time to create
the eyes and the nose. For this, we'll use
our black clay, roll out two equal sized
ball for the eyes. Then roll one more
ball that is just a little bit bigger than the
eyes. This will be our nose. Apply a tiny drop of
glue and carefully place two small balls for
the eyes and the slightly larger
one for the nose. Once you are happy
with the loam, we need to let our dotty dry. Depending on the
weather and humidity, it can take about
four to five days to dry completely
and become solid. I'm checking back after four
days and as you can see, our dog planter is now
completely dry to give it a beautiful glossy finish and create a protective layer. We are going to apply varnish. I personally prefer using
an acrylic spray varnish because it's incredibly easy to use and provide
an even coating. However, feel free to use
any other varnish you have. Simply spray it from a slight distance to
cover all sides evenly. I will only take about
10 minutes to dry. And we are done, as you can see, the varnish is dry perfectly, leaving behind a beautiful
professional sheen. Now comes the most exciting
part bringing Dottie to life. I am carefully arranging these tiny colorful
artificial flowers into the cavity we created and
look how adorable he looks. This little planter is
the perfect way to add a pop of color and personality
to your workspace, whether it's on your study
table or your office desk, Dottie is ready to
keep your company and keep your decks
looking cheerful. I hope you enjoy this project. It's amazing how a
little bit of clay and some imagination can create such a functional piece of art. Thank you for joining
me and I can't wait to see your versin of
Dottie in the project gallery. See you in the next lesson.
7. Flower Paper Clip : Moving forward in our course, we are going to create this incredible cute
flower shaped paperclip. It's not just for
organizing your documents, it's designed to
double as this decor. Even when you are not
using it for your papers, you can actually
insert it into Dotty, the dog planter we just made. This way, your paper clip stay organized and look like a beautiful bouquet
on your table. Let's get started and add some flon charm
to your workspace. For this project, I
am using yellow clay, brown clay, and a standard
metal paper clip. First, I will take the yellow clay and
start conditioning it. Once it's soft and ready, I am going to roll it into
five small equal sized ball. Next, shape each ball
into a tear drop or drop shape and then
flatten them slightly. To give them a more
realistic look, I am using a toothpick to create a single impression right down
the center of each piece. These will be our flower petals. Once all the petals are ready, arrange them in a
semicircular pattern, making sure the narrow ends meet and touch each
other in the center. Now we'll take a small
piece of brown clay, roll it into a ball and press it down to form
the center of our flour. Now let's assemble everything, apply a small amount of glue right in the center
of our flour petals. Place the metal paper
clip over the glue. And then take the
small brown clay ball and press it firmly on top. By doing this, we are
effectively locking the paper clips between the yellow petals and
the brown center. This ensure it stays securely in place with no
chance of falling out. To add a bit more detail, I'm using a toothpick to create tiny dots on
the brown center, giving it a natural
textured look. And there we have it, our custom flour paper clip. Just like our other projects, we need to let it dry slowly. It usually takes about
one to two days to dry completely depending
on the thickness. Checking back after two days, our flour paper clap is now
completely dry and ready for the final finish to give it that beautiful glossy shine
and a protective coating. I am using the same spray boise that we used for our
previous projects. Just apply an even
coat and let it set. Here we go, the
bonishs completely dried and our floral
paper clip is finished. Doesn't it look lovely? It's amazing how a
simple metal clip can be transformed into
something so charming. Now you can use it to organize your important
documents or simply tuck it into the dottys head to create a blooming flower
effect on your desk. It's a perfect way to make your workspace feel more
personal and creative. I hope you had fun making
this little bloom. Don't forget to experiment with different colors
for your petals. See you in the next lesson.
8. Fish Pen Holder : Next up in our
desk buddy series, we are going to create
this adorable fish, but this isn't just
a decorative piece. It's actually a pen holder. It's designed to sit beautifully on your office desk
or study table, keeping your favorite pen
right where you need it. Whether you are signing important documents or just
sketching this little fish will make sure your pen is always organized
and ready for action. It's perfect combination
of creativity and utility. Let's dive in and start crafting our functional aquatic friend For our fish, I have prepared
teal blue clay by mixing teal blue and
white acrylic color. I also have some pink clay for the fins and black
clay for the eyes. Let's start with
a teal blue clay. After conditioning it throughly, I am rolling it
into a smooth ball. Now gently pull one side to create a slight tear
drop or drop shape. Next, place it on
your work surface. About two centimeter
below the pointed top, use your finger to gently
roll and press the clay. This will thin out
that specific area separating the main
body from the tail. The pointed part at the
top will naturally become the tail while the broader part in the front forms a main body. Now let's focus on the tail. Take that pointed
part we created earlier and flatten it out
gently with your fingers. Next, using a ruler
or a craft knife. Make a small cut right through the center
of the pointed tip. This divides the tail into
two distinct sections. Use your thumb and finger to press and smooth these parts. To add some beautiful texture, I'm using the handle
of a paint brush. If you remember from
our frog making course, we use the same technique to create texture on
the flower petals. Simply press and roll
the brush handle over the tail surface to create
those delicate wvylines. Now, let's perfect the surface. Just like before, I am taking
a tiny bit of body lotion on my fingertip and gently
rubbing it over the clay. This process helps
fingerprints disappear, leaving behind a beautiful
silky, smooth finish. To create the space for our pen, take a standard pen and apply a little body lotion to the
end so it doesn't stick. Gently insert it into
the head portion of our fish and rotate it
slowly in a circular motion. We are using the same
technique here as we did in our previous project to
create a perfect size cavity. Now, let's create
the fins for this. I am using a vibrant pink clay. Start by rolling a small
piece into a neat ball, shape it into a tear drop or
drop shape, then flatten it. To add details, we will create the texture
using a toothpick. Just like we did before, place the toothpick in
the center and rotate or press it slightly to form
those fine textured lines. Repeat the exact
same process for the second fin, roll the ball, shape it into a drop, flatten it, and add the
texture with your toothpick. Once both fins are ready, apply a little glue and stick them onto both
sides of the body. Now we are going to add
the fin on the top. I am taking a small piece of pink clay and shaping
it into a tiny log, flatten it out gently
and just like before, use a toothpick to create
that beautiful texture. To make it look more natural, use the toothpick to push
the *** inwards slightly, creating a lovely wavy effect. Apply some glue on
the top of the body, starting just behind
the pencavity. Carefully stick the
dorsal fin in place. Now, let's at the
facial features. I have rolled two tiny balls from the black
clay for the eyes. Simply apply a dot of glue
on both side of the head. Fix the eyes in the place. Next, we will create the
lips using the pink lay. Rule a small piece
into a log shape, then flatten it out. Using a ruler or a craft knife, make a small horizontal
partition in the center. Now, here is the trick, pinch both corners and press
them slightly inwards. This technique makes the lips pop and give a
perfect pouty shape. To ensure they fit perfectly
onto the rounded head, use the handle of
your paint brush to give the back of the
lips a slightly curve. Apply some glue and stick them onto the
front of the fish. Our fish now has so
much personality. Now that our fish is complete, we need to let it dry thoroughly because the
body is a bit thick, it will take some time
to dry completely. To prevent any cracks and
ensure an even finish, I am going to cover
it loosely with a soft cloth or a tissue paper. We need to be patient and wait for about five or six days. Make sure to keep it in a pool dry place away
from direct sunlight. This slow drying
process is a secret to making your clay project
durable and crack free. It's been five days and
although the fish fell dry, I decided to give
it one extra day just to be absolutely sure. Now, it is completely
dry and solid. To bring out the colors
and protect our work, it's time to apply the varnish. I am using my favorite
spray varnish again, holding the can at
a slight distance. I am giving the fish and
even coating from all sides. This will dry in just
about 10 minutes. Now that the monish is set, I had a sudden creative
thought, eye lashes. I think adding some
delicate lashes will give our fish an even more
charming and cai look. I am using a very fine
brush to carefully draw two tiny curved lashes on the
outer corner of each eye. He see how much of a difference that makes. It instantly adds
so much expression. Now, fish is officially
ready, it's shiny, it's study, and it's waiting
to sit on your desk. Now, it's your turn. I would love to see the colors and expression you
choose for your fish. Please upload a photos of your finished project
to the gallery below so we can all see your
wonderful creation. Thank you.
9. Final Note: Congratulations. You
have successfully completed the desk
buddies course. Together, we have transformed our workspace from
ordinary to extraordinary. Let's take a quick look at
everything we have created. We started with adorable frog on a lotus leaf bringing a
touch of nature to our desk. We made the helpful
bunny cable holder to keep our tech organized. We added sweetness with the
strawberry worry stone. We crafted the floral
paper clip and our favorite spotted
friend Dotty the dog. And finally, we finished with our charming fish pen holder. I hope these lessons
have not only taught you the technical skills of
working with cold porcelain, but also inspired you to see the creative potential
in everyday objects. Don't forget to share your entire desk body collection
in the project gallery. Seeing your unique version of these characters is the
best part of my day. Thank you so much for
choosing this course and for letting me be a part of your creative journey
before you go, I have a small request. If you enjoyed creating
these desk buddies with me, please take a moment to leave a review and share
your feedback. Your honest reviews
help me improve and also help other students
discover this creative journey. Whether it's a quick
star rating or a few words about
what you love most, I truly value your input. Keep crafting, keep smiling, and I will see you in my
next course. Happy crafting.
 Mona Arty, Clay Artist & Educator