Sculpting Nature: 3D Air Dry Clay Flowers on Canvas
 Mona Arty, Clay Artist & Educator
Watch this class and thousands more
Watch this class and thousands more
Lessons in This Class
-
-
1.
Welcome !
1:53
-
2.
Materials
1:24
-
3.
Coloring the Canvas
1:36
-
4.
Sculpting Leaves
1:54
-
5.
Making Veins on leaves
3:18
-
6.
Shading the Leaves
1:29
-
7.
Arranging leaves on Canvas
4:20
-
8.
Let's Make Sunflower
3:25
-
9.
Shading the Sunflower
2:27
-
10.
Making Berries
3:12
-
11.
Crafting White Flowers
3:45
-
12.
Sealing the work
2:54
-
13.
Celebrate Together: Display Your Projects & Connect
0:49
-
-
- --
- Beginner level
- Intermediate level
- Advanced level
- All levels
Community Generated
The level is determined by a majority opinion of students who have reviewed this class. The teacher's recommendation is shown until at least 5 student responses are collected.
47
Students
--
Projects
About This Class
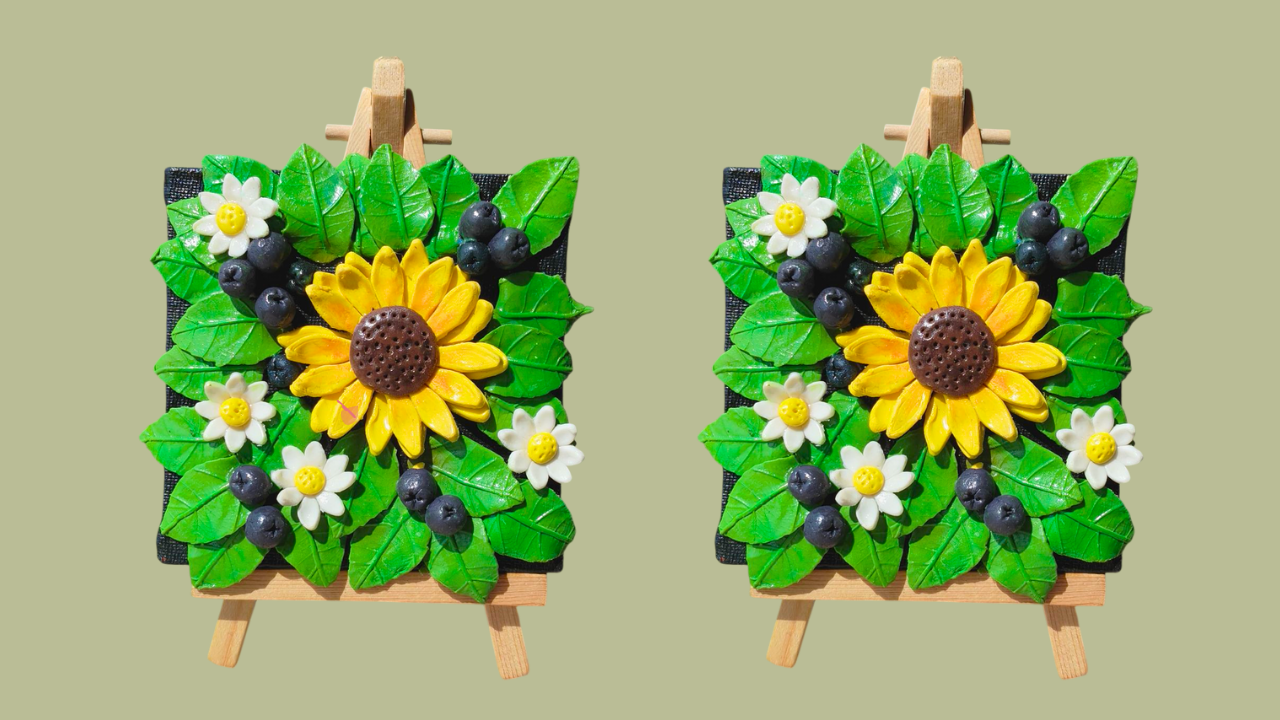
Sculpting Nature: 3D Air Dry Clay Flowers on Canvas
Unleash your creativity and transform a simple canvas into a beautiful, three-dimensional garden! In this beginner-friendly Skillshare class, you'll learn how to sculpt stunning flowers and natural elements using versatile air-dry clay, then bring them to life with vibrant colors on canvas. Get ready to add unique texture and personalized charm to your home decor with your own handmade art.
Why Take This Class?
-
Beginner-Friendly: No prior sculpting or painting experience is needed! This course is designed specifically for those new to air-dry clay and canvas art, guiding you step-by-step from start to finish.
-
Create Unique Wall Art: Move beyond flat paintings and learn to add incredible 3D texture to your artwork. You'll create a piece that truly stands out and becomes a focal point in any room.
-
Explore Air Dry Clay: Discover the magic of air-dry clay – it's easy to work with, requires no special equipment like a kiln, and dries to a hard finish, making it perfect for home crafting.
-
Relax and Get Creative: Enjoy a calming and rewarding artistic process. This class is a wonderful way to de-stress, focus your mind, and create something beautiful with your hands.
-
Learn Versatile Techniques: The skills you learn for sculpting sunflowers, daisies, leaves, and blueberries can be applied to create countless other floral and botanical designs in the future.
What Will You Learn?
In this engaging and accessible course, you will learn essential techniques to sculpt and arrange your clay botanicals on canvas. Specifically, we'll cover:
-
Air Dry Clay Basics: How to condition, roll, and prepare your clay for sculpting.
-
Sculpting Sunflowers: Step-by-step guidance on forming the distinct petals and textured centers of a beautiful sunflower.
-
Crafting Daisies: Learn to create delicate daisy petals and charming centers.
-
Making Realistic Leaves: Techniques for shaping various leaf forms and adding natural veining.
-
Adding Blueberries: Simple methods for sculpting tiny, spherical blueberries to complement your floral arrangement.
-
Assembling on Canvas: How to securely attach your dried clay pieces to a canvas, creating a cohesive composition.
-
Pain
-
Shading & Finishing: Tips and tricks for shading your clay elements with vibrant colors and applying protective finishes to ensure your artwork lasts.
By the end of this class, you'll have a gorgeous, multi-dimensional piece of floral art, along with the confidence and skills to continue exploring the exciting world of air-dry clay on canvas!
Meet Your Teacher

Hi there! I'm Mona, a dedicated clay artist from India, with a lifelong passion for art. My journey into the world of clay began in my childhood, and over the years, I have grown to specialize in creating a wide array of beautiful pieces, including 3D murals, sculptures, realistic clay food miniatures, and delicate figurines. From lifelike flowers and plants to serene fountains, I pour my heart into every creation, making sure each piece tells a unique story.
In addition to my work with clay, I also create and teach the art of making realistic food-shaped candles.
I also enjoy speed painting, where I express my creativity through rapid brushstrokes, creating stunning artwork in a short amount of time.
Since 2016, I have had the privilege of teaching... See full profile
Hands-on Class Project
Your Project: Your 3D Clay Botanical Canvas
Ready to bring your canvas to life with incredible texture and vibrant color? Your project for this class is to create your very own Air Dry Clay Floral & Leaf Canvas featuring beautiful sunflowers, daisies, leaves, and blueberries. This is your chance to combine sculpting with canvas art, creating a unique, multi-dimensional piece for your home or as a thoughtful gift.
What You'll Create:
Using the techniques learned in class, you will:
-
Sculpt Your Botanical Elements: Create individual air-dry clay sunflowers, daisies, various leaves, and clusters of blueberries. Focus on forming their distinct shapes and adding any desired textures.
-
Arrange Your Composition: Once dry, plan and securely attach your sculpted pieces onto your chosen canvas. Experiment with different layouts to create a balanced and visually appealing floral arrangement.
-
Shading on Your Masterpiece: Bring your clay botanicals to life with Shading. Focus on adding details to make your flowers, leaves, and blueberries pop.
-
Finish & Protect: Apply a suitable sealant to your finished artwork to protect the clay and paint, ensuring your beautiful 3D canvas lasts for years to come.
Share Your Blooming Art!
We can't wait to see your unique clay botanical canvases! Please upload the following to the Project Gallery:
-
A clear, well-lit photo of your finished Air Dry Clay Floral & Leaf Canvas. Show off your amazing 3D texture and vibrant colors!
-
(Optional, but encouraged): Share photos of your process! Did you experiment with different flower shapes? Show us your clay pieces before painting, or a snapshot of your canvas layout.
-
A brief description of your project. Tell us about your creative choices, what inspired your arrangement, or any techniques you particularly enjoyed (or found challenging!).
By sharing your project, you'll not only inspire fellow students but also get to celebrate your own incredible artistic achievement!
Class Ratings
Why Join Skillshare?
Take award-winning Skillshare Original Classes
Each class has short lessons, hands-on projects
Your membership supports Skillshare teachers
Learn From Anywhere
Take classes on the go with the Skillshare app. Stream or download to watch on the plane, the subway, or wherever you learn best.