Transcripts
1. Textured Patterns in Affinity Designer & Fresco: Are your vector patterns
looking a little flat? Maybe you're struggling to make your patterns feel lively
and full of depths. That's why I created
this course. Together, we will learn how to create automated patterns with a flexible vector base and
different texture elements. In this course, we will be drawing a repeat pattern
from start to finish, mainly affinity designer with
optional Adobe Fresco tips. Both softwares are for free, so there's no subscriptions
and no extra payments. You will learn how to
bring your patterns to life using textures
from vector brushes, from the pixel persona, and from custom assets. This class comes with
unique free resources. We have special vector based
textures created all by me and curated color palettes to make your patterns
richer and more vibrant. Let's jump in and start
creating together.
2. Getting Started: Hello, affinity fans,
and welcome to class. Finally, we are dealing
with some texture in affinity and I really hope that you will enjoy this course. What do you need to start? Of course, you need any
version of Affinity Designer. It could be V one, V two, or lately they also released V three about
that in a few seconds. You can use the iPad version
or the desktop version. All those versions are for free, by the way, as of October 2025. I will be doing my demonstration
as always on the iPad, and also something optional
is to use Adobe fresco, which is also available for
the iPad, and it's for free. There will be a special lesson dedicated to Adobe
fresco where I am explaining why I like to
mix and match both softwares. And then, of course, you
need a drawing pencil. I will be drawing on the iPad, so I am using my Apple Pencil. For my demonstration, I'm using the following Affinity
Designer version. I am drawing on
my iPad in V two, Version two, 2.6 0.4. As of October 2025, this is when I started
recording this course. You may have heard that we have a brand new version of affinity, the Affinity Studio,
which will be probably referred to as the new V three, which
is Version three. It was officially
released on October 30, 2025 and currently
is just for desktop. It gives you a whole
studio experience where you can combine the
vector persona, the picture persona,
and the layout persona, affinity designer, photo and
publisher in just one app. Right now, when I'm recording, it's actually already
November 2025. I heard some information
that the iPad version is coming only around
the middle of 2026. This is why for
this course and for a few next courses to come, I will be sticking to my
old iPad version V two, which is completely fine. You will recognize
this new affinity by the new affinity logo. Now they brand
themselves as affinity, I think affinity by Canva. Because they merged
with Canva last year, it's a new logo on a
bright green background. If you would like
to find out more about this new Affinity
Studio update, I have a dedicated video
on my YouTube channel, and you can also read about
it on my official blog, for example, on Substack. Again, this new Affinity
V three version is completely for free. You can download it from the official affinity
website first, like I said, for
your desktop only. No, back to the course
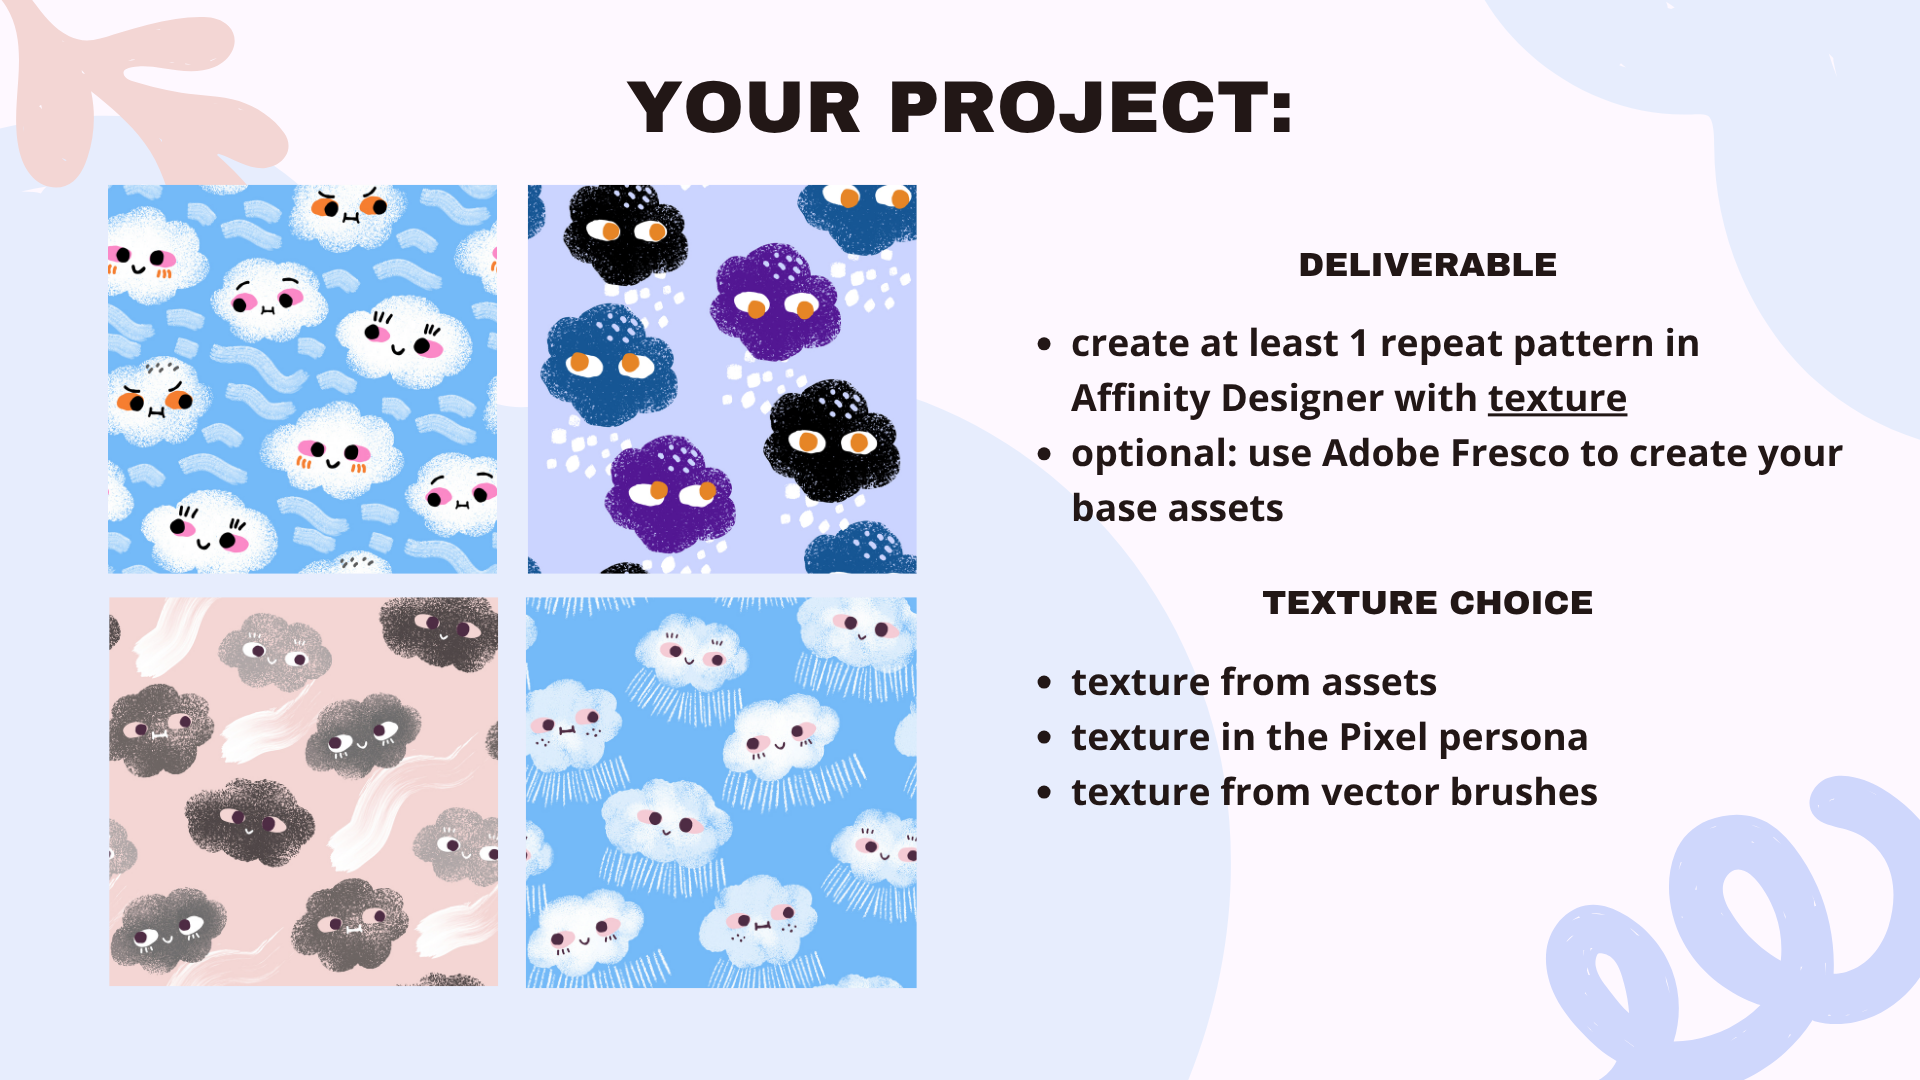
about our project. So our deliverable
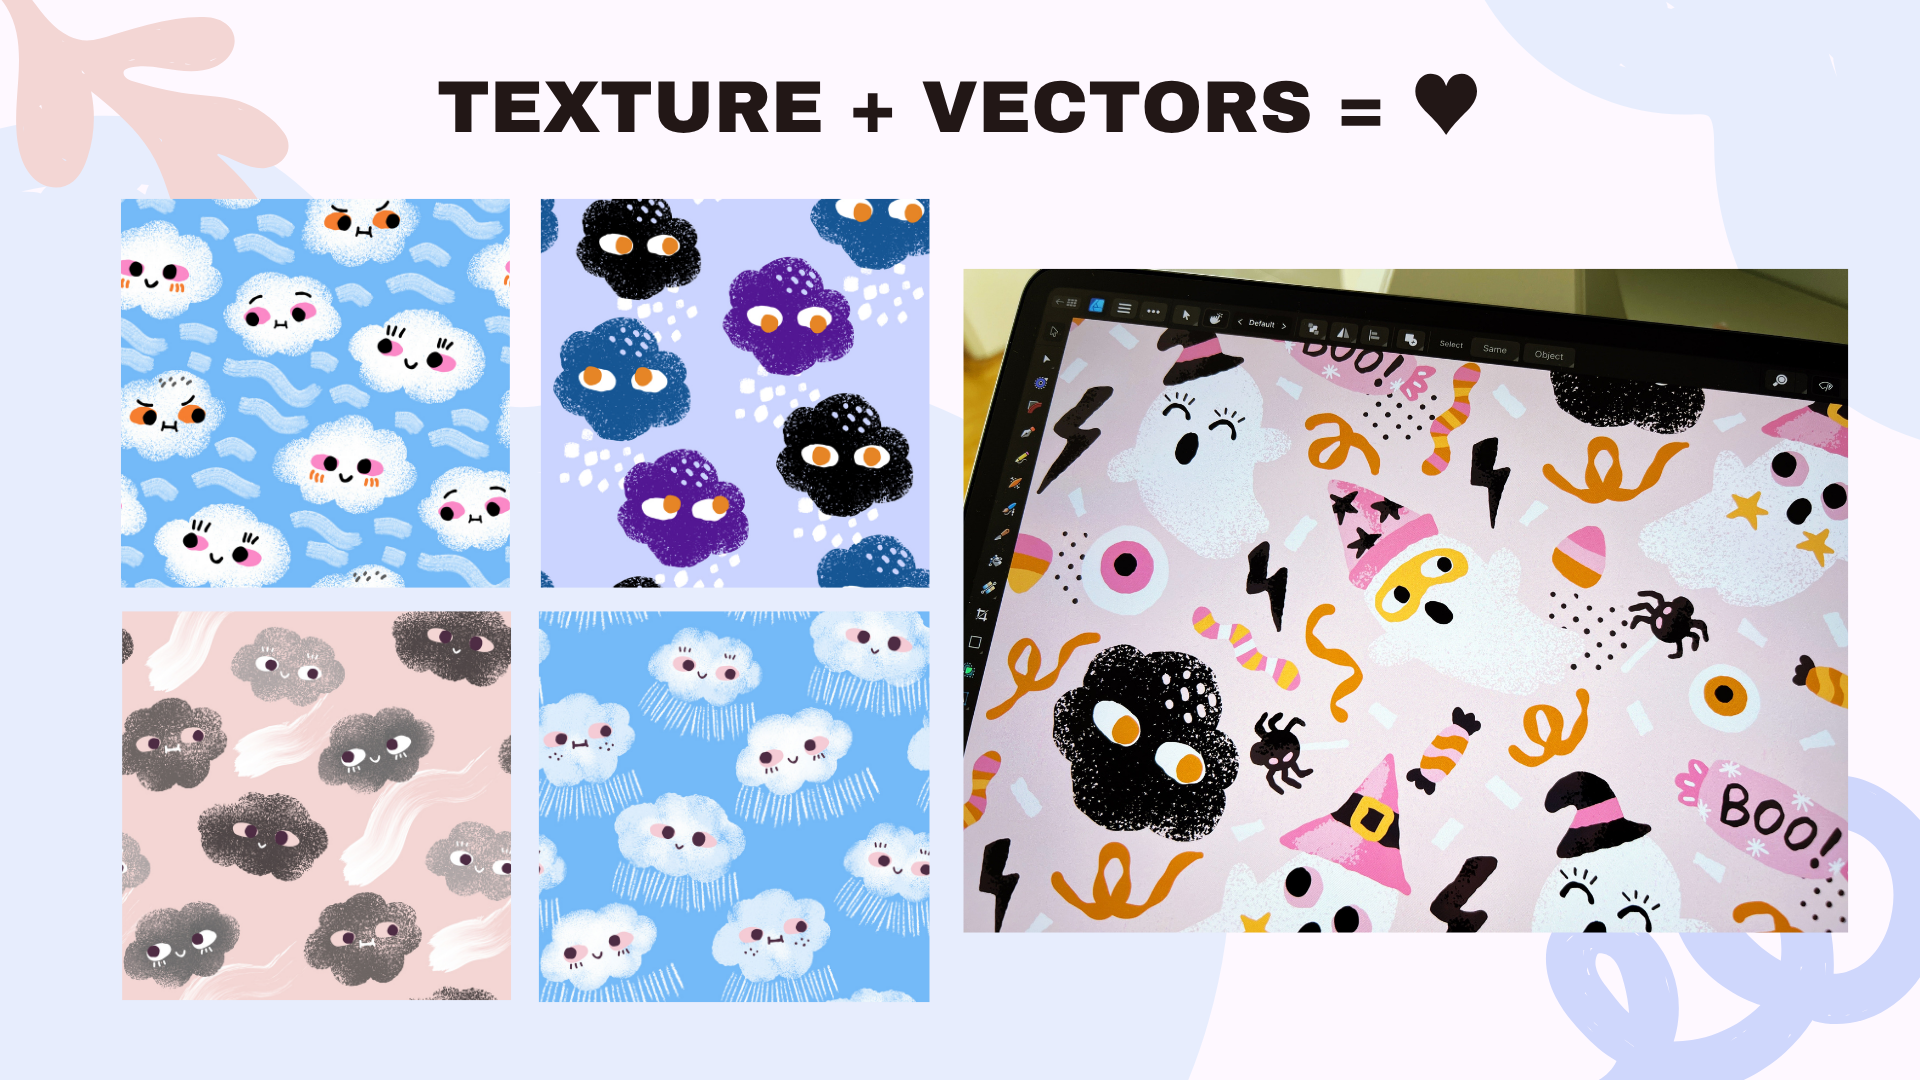
will be to create at least one repeat pattern in affinity designer that
will have texture. So the keywords here are, it has to be an
affinity designer. I don't care which
version you're using, and it has to have some
elements of texture. I did the combining vector with pixel based or
raster based elements. It's completely optional
to also use Adobe Fresco to create our base
vector assets. I will show you step by step
how I do that and there are a few really cool advantages
because Adobe Fresco has something that affinity designer
doesn't have maybe yet. That's why I like
to mix and match both because it gives me
a very unique outcome. I have texture underlined
because it's really important. It's the core thing that I would like to
teach in this course. We have a few texture
choices for this course. We will be, for example,
experimenting with adding in texture to our patterns
that come from assets, and they can be also
vector based assets, which they have their
own flexibility that we will be talking and the second type of
texture is texture coming from the pixel persona
because Affinity Designer, lets us combine vectors with
pixels in one software. So we will be talking
about, for example, characteristics of
pixel elements, its limitations, but
also its advantages. And last but not least, there's texture that you can get from using vector brushes. We will chat about the
properties of vector brushes, where to use them,
how to use them, and how to create multiple
pattern variations for more efficiency in
your pattern design work. I think that this course is for more intermediate students. So prior beginner
experience with affinity or with Fresco
will be very handy. I have beginner friendly
courses about Affinity Designer and I have also a free a
playlist on my YouTube channel, like starter lessons
into the iPad interface. But I would like
to underline that all my courses are usually
very beginner friendly, and I am sure that you
will be able to follow along and learn as you go. If you're active
on social media, you can go, for example, to share your final
work on Instagram, and then you can use the
hashtag magical vectors. And if you're in one of our Facebook affinity
support groups, you can post it there
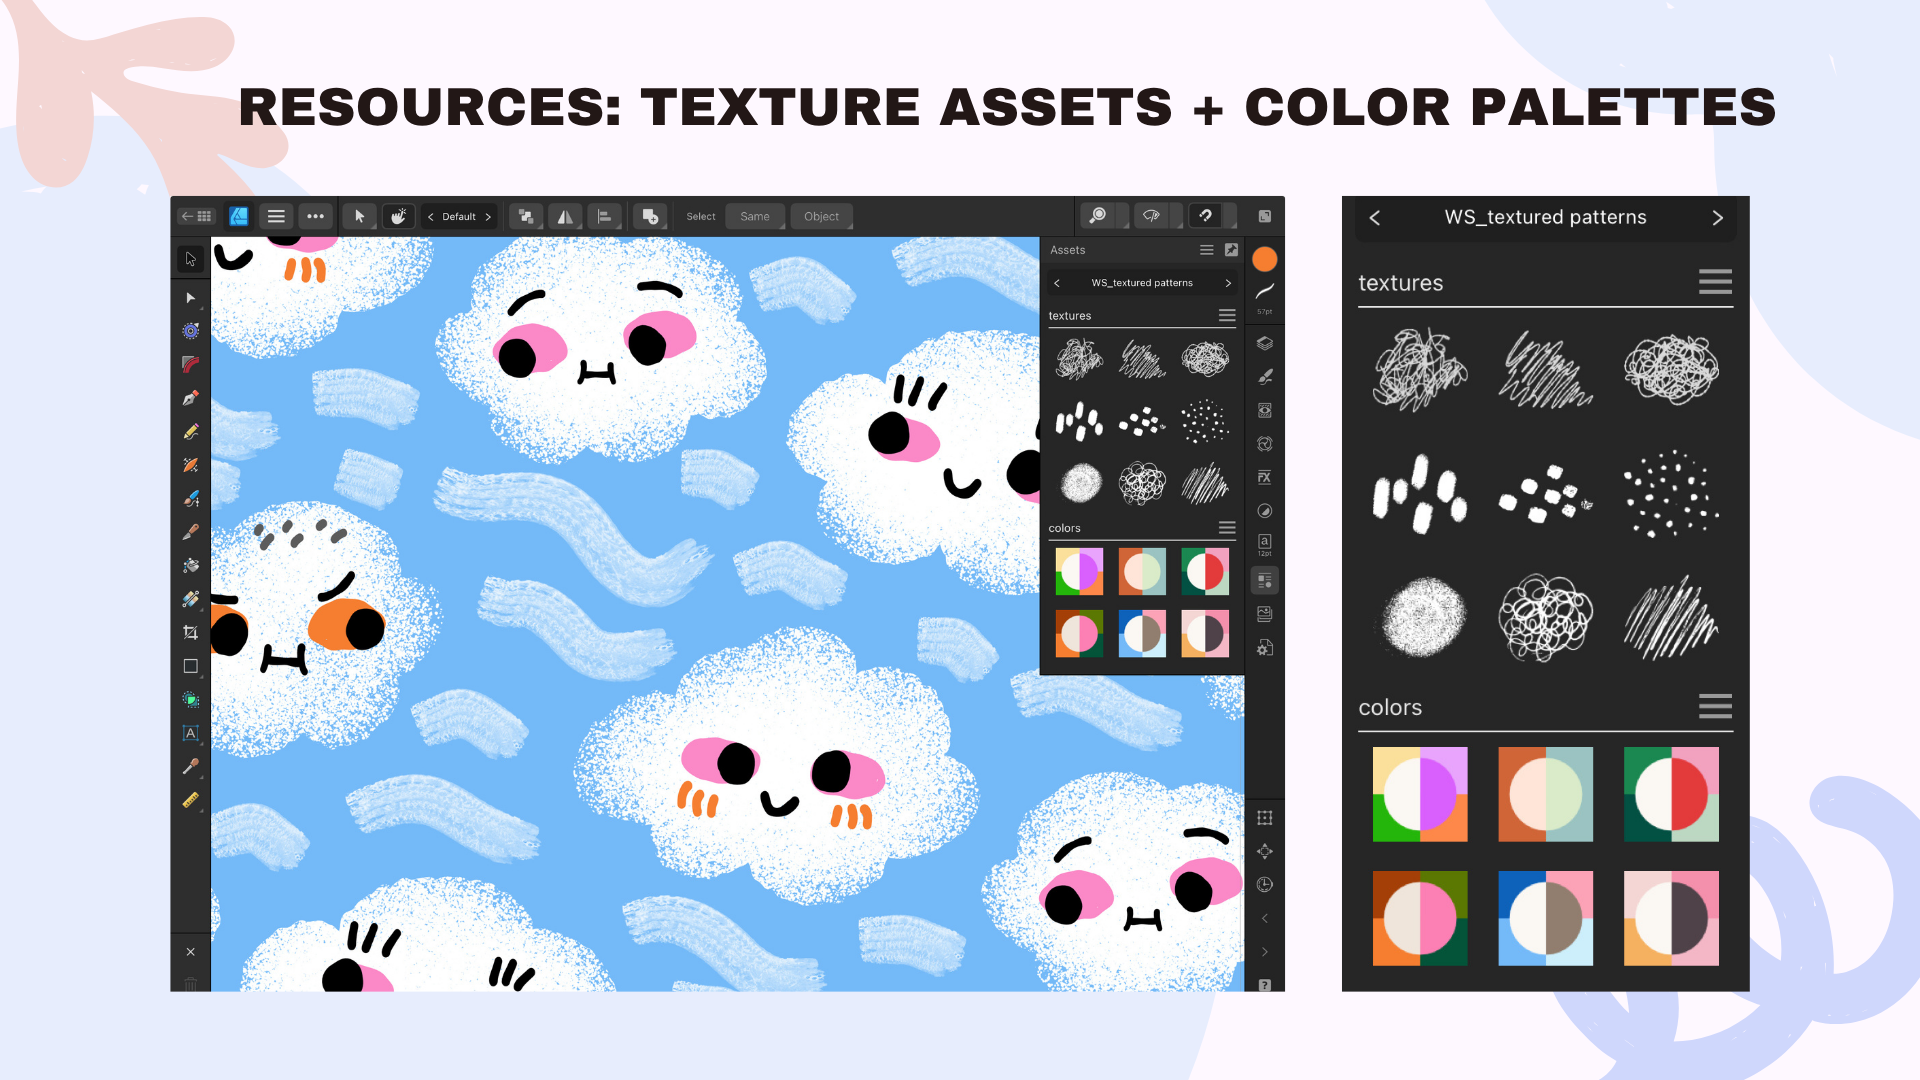
and ask for a critique. Don't forget that this course comes with a few
unique resources. You can download
a new assets set, which will contain
special texture assets. They're all vector based, and also a few color
palettes to choose from. Regardless whether you're using the iPad version or
the desktop version, this has to be downloaded
on Skillshare, will be under projects
and resources. And if you're taking
this course on Gum Road, it will be part of the course somewhere ready
to download for you. And then you have to save it to your device
storage, for example, on the iPad or on your
desktop computer, and you have to go
to the assets studio and import them from the place
where you save them from. And then it's going
to be very easy. They will magically show
up in your asset studio and you can use those assets without worrying about any copyright
infringement. You can use them for
personal projects, as well as for
commercial projects. I would only like to ask
you if you are replicating the exact same pattern
that I'm creating, not to use it for sale. Don't put it please
on Spoonflower or red bubble or sell it to clients because it's still
my intellectual property, but you are more than welcome to copy it exactly the
way I do it for learning purposes so that we can do it step by step and speed
up your learning process. Thank you so much for taking my course and happy creating. I can't wait to see
what you come up with. A
3. Texture vs Software Choice: This lesson, I would
like to give you a quick introduction into the
software that is out there. I would love to
explain why I use Affinity Designer and why I also like kind of combining
techniques in between software in particular
Affinity with Adobe Fresco. And we will talk about
the vector versus texture options in those types of software that I am using. I you probably have
taken my classes before. I'm a big fan of
Affinity Designer. There are two kind of methods
of creating patterns. There's the live
pattern preview. I have a free tutorial about
it on my YouTube channel, I created also
dedicated tutorial for Affinity creative sessions if you would like to
have a look at it. It's also a very valid method of creating patterns
in Affinity. But over time, I created my automated templates
for pattern design. For example, templates for Half-Drop Repeat or my
favorite diamond repeat. And this is what I like
using because it's very easy and you create
your pattern in no time. And then it's very oh, let me show you the view of
this pattern, for example, it's very easy to move around your elements and
to see that you're creating your
pattern in real time and you're able to
see if everything is spread out evenly. And then what you export is just the original
canvas shape. This will be your pattern tile. I know that a lot
of people are also using Procreate to
create patterns. So here you have a sneak
peek into my Procreate. I use it exclusively
for sketching. I even have some client
projects lined up here. I like my textures brushes. I used to well, I kind of tried creating
patterns and Procreate, but I didn't like
this technique. I think I was too much
afraid that I would make a mistake when I'm
creating my repeat. And then there
will be a conflict because it is all raster. Based then maybe
I'll have an issue with the quality of the
pattern at the end. And switching to Affinity was a really great choice for
me because it happened in my career that a client wanted to purchase something that I
created like two years ago, and I was able to adjust
the file very easily in Affinity because most of the artwork that I
do is vector based. So I will be
sketching Procreate, and if you have Procreate,
we can do that together. So we can sketch our
assets for the pattern and Procreate. But that's it. We will not be focusing on
patterns and Procreate. And then why do I also
mix up Adobe Fresco? There will be separate
lesson about that. It's because I really
like creating assets, vector assets in here. And this is where we
kind of segue into the topic of vectors
versus texture. When you click here onto the brushes studio in
Affinity in Adobe Fresco, then you will see that
there are pixel brushes, but when you scroll down, there's also vector brushes. So just like Affinity Designer, this is where we have two types
of software for the iPad. That have both vector personas and Pixel Persona sort of
built into the software. In Affinity Designer,
when you click on the Affinity Designer logo here, you see the designer
Persona is for vectors. And then when you
switch to pixels, you have a few other tools
that show up on the side, and this is where you can
play with Pixel brushes and add raster based textures which can really add
interest to your patterns. And then another thing
in Affinity or actually, Adobe Fresco is that some of those brushes are really
handy, really unique. It's something that
Affinity Designer doesn't have yet that
we'll also discuss. In the next lessons to come, they have vector
brushes that work as a form of a blob brush. So you create your vector
shapes, let's make this. Yeah, this is how I
create my assets. You create them as a
vector shape that has only fill but doesn't
have a stroke, which is the outline,
and they have blob brushes with very unique outline textures, so to say. So if you would like
to avoid very smooth, polished vector shapes, you could consider creating
some of your assets. They're kind of messy
because later on, I clean them up in Affinity. We will do the same together. They add more interest, and this is why the
trade off is that, okay, you have to work
between the two softwares. But the big advantage is that you can create
something unique. And recently, I had a client
contacting one of my agents. They noticed one of the
artworks that I created. I think I drew some dinosaurs, and they were created
with those brushes in Fresco with this uneven outline. And I thought no
one would notice that in the end, but they did. And I was able to negotiate a book deal with
them to illustrate a book. So sometimes walking
this extra mile, taking the extra
effort can pay off, especially if you're
into exploring, developing your style further. And Fresco, as of, I think, 2025 is for free, so you don't have to pay
for this software at all. And Affinity will be
soon for free, as well. There will be an
announcement soon. So you will be able to use all the advantages
of Affinity Designer outside of the
subscription model. I am discussing here the iPad options because I
love creating on the iPad. I also have an explainer video about it on my YouTube channel. So I will not be discussing why I don't create patterns in Adobe Photoshop or
Adobe Illustrator. I had to use it for work to edit some final
files for my clients, but it's just my
personal opinion. I really don't like it. I don't think it's intuitive at all. I like Affinity and I wish all the publishers and licensing clients
actually switched to Affinity or accepted it more readily and now that
it will be so accessible, maybe they will take
that into consideration. So we said that we have Vctors
and pixels in Affinity, and we also have Vctors
and Pixels in Fresco. So we will be
creating our pattern between those two softwares. Some further examples here, I created a greeting
card design. I was working on a vector base. So if I click on that kitty,
you will see the nodes, you will see the anatomy of a vector shape with nodes that
are very easily editable. I'm able to change the
color of this cat, just to show you
very, very fast. Recoloring is super easy. But when you have a look
at the head of this cat, you will see that there's a pixel layer that
is clipped inside. The details, if I zoom in, you will see they are
made out of pixels. And in this way, I am combining the best things
out of the two worlds, so to say, the same
on the flowers, the same on those leaves. And this particular greeting
card design also drew attention of my agent because texture really,
really adds interest. Another example is this
Halloween illustration. There's a mixture
here of a vector bay. So again, from the node tool, this whole pumpkin, or
the CD is a vector shape. We also have this
orange texture, for example, if we
open the pumpkin, we have even a few pixel layers, which can also work in
different blending modes. For example, this
shadow layer here is the base color of
the pumpkin set to multiply with
a lower opacity. And then this little
highlight is normal. And somewhere here, I also have screen
blending mode over here, for example, to add a
little bit of light. Now, something that
Fresco doesn't have. That's why even if I create my assets in Fresco for
the interesting outline, I still export everything to Affinity Designer
because Affinity has something very unique
namely vector brushes. For example, if we go
back to the node tool, this little item here, it might seem like it's again, a pixel based shape. But this is actually a curve. A curve means it's
a vector shape. From the node tool,
I'm also able to recolor very, very fast, very easy and change the shape of this
decorative element. This is, of course, I'm
showing you an example from just an
illustration for kids. But this is something
that you can also apply for pattern design. For example, here, that's
my test pattern here. Here you can also see an
automated template for Affinity, and we can, for example, go to this shape here
and we can see it's actually made with
a vector brush. But it does look like as if it was basically
made with paint. I think it's a gouache brush. So to sum up, those are all the
options that we have. I think that Affinity is the most powerful software
out there that allows you to utilize both vector shapes as well as raster
texture to sum up also, there's vector shapes which are super scalable, very
easily editable. There are Pixel layers. So we have the Pixel Persona
and the designer persona, which can be combined
in one software. Adobe to compare has separately Adobe Illustrator for vectors and Photoshop
for raster based design, Affinity has everything.
It's like two and one. And the third thing
is that we have those unique vector
brushes which will be also experimenting
with during our class. And this is why I
recommend that you create the pattern with
me in Affinity Designer. Previously, I taught patterns focusing mainly just
on vector shapes. It doesn't mean that
they are simpler. You can still play with layers
of color to create depth. But most of the courses
that I released so far kind of focus
on vectors up to 100%. That's why this new
class introduces a new approach where we will be able to experiment a little bit, get out of our comfort zone, and also see how pixels
behave in Affinity Designer because there are
a few things that you have to take into
account technically, and we will be
discussing all that.
4. Inspiration, Sketching, Colors: In this video, we
will talk about the inspirations
for our pattern, how to choose your motives. We will also chat about the
class resources, your task, and how to basically brainstorm or maybe create a
mood board for your pattern. And then finally, we
will be sketching the assets that will
build our pattern. So something that I
would really like to underline as we go through
this course is to really, really focus on your needs. So ideally, if you
have a portfolio, maybe you have a website or you have your own
shop, let's say, your own spoon flower
or on red bubble or you're selling maybe assets or patterns from the
creative market, I would like you to treat
this course as an exercise, especially if you're
learning from the start how to apply
textures to your patterns. So on one hand, this will be an exercise, but
on the other hand, have it at the
back of your head, so to say, that it
should serve your needs. So for example, you might be someone who's
creating patterns for kids. Then just have a goal in your mind that this will be for your kids
patterns portfolio. But also you could focus on the seasonality,
seasonal patterns. For example, agents,
potential clients. They look on a regular basis for seasonal patterns that is spring versus summer versus
autumn or fall and winter, or we will be creating
like a weather pattern. It could be with snow, it could be with wind, it could be with rain. And depending also what
color palette you choose, it could reflect
exactly those seasons. Let's have a look, for
example, at this one. It's a pattern that
could be for kids. It's also pastel, but I might also adjust the
colors so that it feels more autumny or it
feels more like for winter. And for the class resources, I will be also giving you some elements that will help
you to create your patterns. So for starters, your task is to create a pattern
in Affinity Designer. So I would like to ask you that your end pattern tile is
created in Affinity Designer, ideally for the iPad. But as you know, most of the
steps that I'm showing here, you will be also
able to replicate those steps on the desktop
version of Affinity Designer. Now, optionally, you can choose Adobe Fresco to create
your vector assets, your vector shapes.
It's just an option. I warmly encourage
you to take a look at the Fresco video so that you can hear about the
advantages of using those blob brushes in Adobe
Fresco, it's for free. And then I would like
to ask you to create your pattern by using
vector elements. So I would like your base to be still vectors for
the scalability and for the flexibility, and must a must must
must for this class is to decorate it with
different textures. Again, create a repeat pattern Affinity Designer optional
using Adobe Fresco. You have to use vector shapes
with different textures. What kind of texture elements
can you choose from? So you have a choice of using Pixel layers with pixel based texture
that will be clipped, for example, to
your vector base. You can also try using
vector brushes with me. They're really fun. They look
like pixel based textures, but they're super super scalable
and much more flexible. And you can also use
pre saved assets. Example, here in this document, I will go somewhere
to the site to show you what I have
prepared for you. In the class resources, there will be, again, a folder. It's going to be called WS Veronika Stallac
textured patterns, and I will be giving
away for you to use to experiment with textures
that are vector based, but they look as if they were really drawn
with traditional media. So for example, this one here, if I drop it onto my canvas when you zoom in or you
go to the Node tool, you will see that it's
actually a vector shape. Again, it will be
very easy to scale it without any quality loss, it's built of a lot of very, very tiny vector shapes. But you see it has all
those speckle elements. When you zoom out, it actually
looks as if it was made with some sort of a
charcoal brush, I think. This one, the same. If we click on the Node
tool and any of the shapes, you will see it's
actually a vector shape. But yeah, some elements can be also
moved here separately, but it's a vector asset. Everything is vector based. So all those textures
will be made available. This is a fun one. This one is a little
bit scratchy. Again, when you zoom in, it
imitates traditional media. Those are textures that
I created by myself. So there's no
copyright infringement when you're using them, feel free to use it for personal
and commercial purposes. It's just not allowed to
sell them in your own shop. So this is still my
intellectual property, but I hope that you will
have fun using them. Then you probably know it
from my previous classes. Actually, let's rename that. This will be prepared neatly for you when you're ready
to download them. I have a few, for example, let's take this one, insert. I have a few color palettes. This is the one that I like
the most for the wintertime, but also for kids patterns, it's a little bit cool tone, so it's very good for the
winter season type of patterns. And the advantage of it
is that, for example, if we take this
soft texture here, we can just sample the colors very easily here
from the color studio and this sampler tool or whatever
it is called. Super easy. So I got into the
habit of saving my color palettes in this way because then you can save
it as vector assets. You can just put it next
to whatever you're working on and you can scale it up so that it's a
little bit bigger and recoloring is very, very easy. So it's the same blue pattern, but I have a few that offer
different types of colors. If you would like to choose
a pattern that is more, I think this one is
called vibrant spring. You don't have to
necessarily create a pattern that is just
for autumn or for winter. I have one for spring. I think this one is it's like
a pastel Halloween exactly. Like the one that I used
for those ghosts here. And this one is very
good for Christmas. I think this is my classic exactly classic
Christmas, color palette. This one is mainly for autumn. It's also a little bit
pastel, let's say. It's called this one
is for the summer. I think I was creating a desert or Arizona inspired illustrations
for one client, and I saved up this color combo. So, have a look at those color
palettes, download them. You probably remember how to do that from the asset
studio over here. You go to the
Hamburger menu here, the three horizontal lines, and then you have to add to
the category by importing it. Import category.
Those have to be saved onto your iPad
storage and for that, I really like using
just the Files app. Here I have a dedicated
folder for all my assets. They have this
extension dot AF Assets and then all you got to do
from Affinity Designer, you have to import them first. So you have to click
on Import category, and then you have to find the folder where you
saved your assets, and then you just click on them and they get
imported in no time. So I'm not going to
do that. You can also complete this by adding additional subcategories and you can edit them in your own
way. It's very, very handy. And when we select
all those things that I just put on my workspace here, when we delete
them, we still have them at our disposal
in the library, feel free to use them as well. Now, depending what kind of pattern you would
like to create, I would first like you to
identify your target season, or you can just follow the project that I will
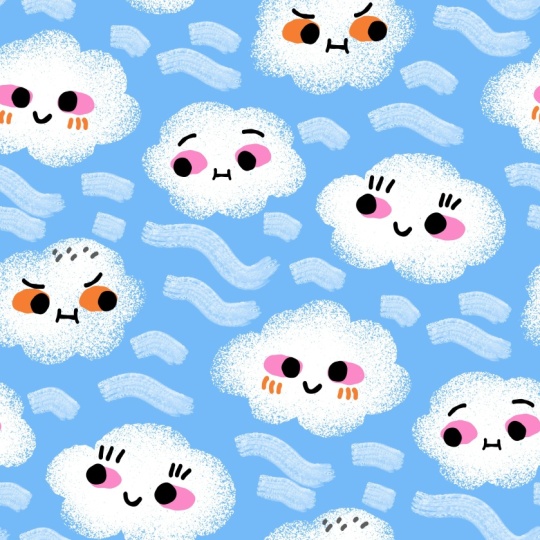
be doing in this class, namely I will be doing those
kind of snowy rainy clouds. But you can go for
any type of season. Feel free also to use Pinterest for this
initial inspiration. For example, if you
type in maybe something like autumn colors because if you type in autumn
or fall patterns, you will get very specific
ideas by artists, and you might be tempted to, you know, to copy it and
we shouldn't do that. Autumn colors may
be something like weather because I will
suggest that for our project, we do draw some
sort of clouds so that we experiment texture. And you just have a
look what's out there. Maybe you see uh
if I want to have a good seasonal pattern for
autumn for my portfolio, maybe I can combine
those clouds. First of all, the colors
will have to be different, a little bit more orange, a little bit more olive green. There are also some other colors that you can try out here. You can screenshot them, and maybe I can combine
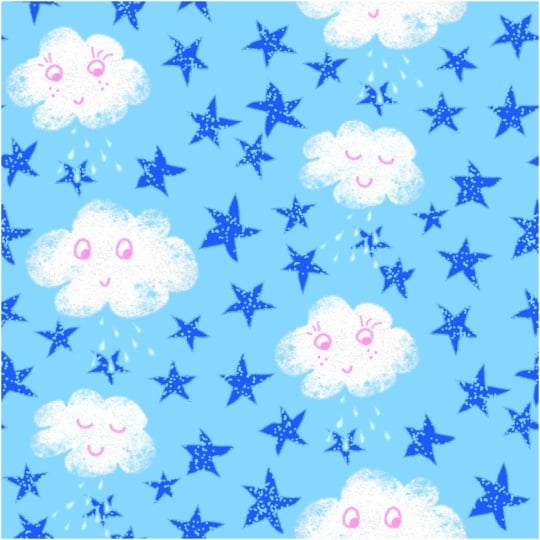
it with raindrops. I also have here we will, of course, doing this together. But one example here, is to change it to raindrops. You can also include
completely different assets. This one might be for kids for bedtime instead of rain or snow, you can make stars. This one is with rain again. This one is with snow in pink, also very nice for kids. This is part where you can brainstorm either through
Pinterest or Google Images. And then when you
decided on your season, so to say, then you can go to the tool that you will
be using for sketching. And because I will be doing
everything digitally, I would like to do my
sketch in Procreate. You can also use a completely
traditional notebook, and when you're done
with your sketching, you can just snap a photo. So from the layers panel, I'm going to hide this
and make a new layer. You can use your favorite brush, but I like using
just a big, large, soft brush that looks
kind of like a pencil, and then I make it bigger. And then I would still recommend that you draw
with me some clouds. I would like you to sketch at least three
different cloud shapes because then we will
be tracing them, drawing them in Adobe Fresco, if you wish also to proceed
with me to Adobe Fresco. They might have
silly faces as well. They might have eyes. Maybe
they're a little bit Kawaii. It also depends on your styles. This is just an example. If it's for kids, maybe they have different
facial expressions, or maybe they have no faces at all because you're creating
a pattern for adults. Perhaps raindrops as well. We can also use
texture brushes in Adobe Fresco for
simple lines or maybe also want to remember
to create a few star shaped decorative elements
that will imitate snow. And anything else that you would like to kind of brainstorm, you can fit it onto
your Canvas here. By the way, my Canvas
is 3,000 Pixel square. So if you're using Procreate, you just have to hit
the Plus button. And if you don't have the size, then you click this
plus folder here. This is where you can
input your dimensions. For example, 3,000 Pixel square. And depending on
your iPad model, you will have a different
number of maximum layers. But I'm going to cancel because my Canvas is already created. I have a bunch of sketches
in my Procreate app. I treat it as my
digital sketchbook. So something from
our pinchers board was that there were some
berries or some leaves. You can imagine, for example, that there's some wind blowing, but also maybe the wind carries
different leaves types, and you will not be obliged to vectorize all those
ideas that you have here, but at least you will have them not to forget
them, you know? So fill out the canvas. Maybe another type of snow that I can create
with the blob brush. It can also be on one
layer. It doesn't matter. I also like using different colors so that
it's more visible. That was the previous
sketch that I created. I wanted whimsical clouds
that look a little bit goofy. I needed a reminder, I would like to create something for wind like a symbol for wind and some elements that will be both seasonal and also
for different occasions. If I use some stars or maybe even create also an extra
acid with a rainbow, then it will be fantastic
decorative elements for my kids parents portfolio. And I also wanted to
experiment over here just so that you understand what
I did in this sketch. I have a cloud shape, and I just reminded myself that I would like to
make some scratchy, scratchy elements, so to say, that maybe I will be able to clip inside of
my vector shape. So this was basically like some sort of a mental
shortcut that I did. So now your task is to
create your own sketch. Pay attention to the fact
that I'm very loose here. I'm not very precious. I'm
not overdoing my sketches. That's why I'm also
using a brush with a very fluffy pencil
like texture, be loose and jot out all
the ideas that you have. Because in the end,
when I move to Fresco, you don't have to create all the assets from
your sketch, so to say. This is just to
jot out your idea. And again, a word of warning, for example, if I type
in autumn pattern, be careful to use those search terms to look for inspiration because chances are that
when this refreshes, exactly, you will get
patterns by other creators. So it's not my goal for you, you know, to copy anything. Maybe you can take
a look at what others are doing just
to do a little bit of a market research to kind of really reassure
yourself that yes, this is the colors direction that you would like
to go towards too, but rather avoid typing
in autumn pattern or winter pattern
because you might get too similar to some
other artists, and the goal is to create
something original. Okay, so now we know our task, and we created a sketch
for our repeat pattern.
5. Base Assets in Adobe Fresco: So meanwhile, I saved up my two messy sketches from
Procreate into my Photosap. You just have to go to
this wrench tool icon, and then you share
image, for example, as JPEC and you save
it to your folder. And it's right here,
I will be able to import it now to Adobe Fresco. Of course, if you prefer
not to use Fresco, you can move directly
to Affinity Designer. But Fresco is for free now and let me show you the advantages of creating your preliminary vector assets in Adobe Fresco. First, we need to
start a new document, like in Procreate, I will create a canvas of 3,000 Pixel square. We go to custom size. I have it pre saved. But
maybe let's go back. You just have to input the Pixels data over here
and under print size, you can change 72 DPI to 300. This canvas is created now, we can open it and we also have this gray workspace area around just like an
Affinity Designer. Now we have an icon here
to import an image, at image, and then photos so this is where
I have my two sketches. I will choose this original
sketch that I created before. And then by default, it's going to fit into the Canvas in Adobe
Fresco, we hit done, and then we can go here to extra settings for our
layers properties, and we can change the
blend mode to multiply. Plus, we can lower the
opacity just a little bit. So this icon here shows
us our layers panel. We can also reshuffle the layers by dragging
them up and down. So I can, for example, drag
this sketch right underneath. Here in the upper left
corner, we have our brushes. We can choose from
pixel brushes, but we will be skipping those. They're also live brushes. They behave kind of like real
watercolors and real oil. It's really, really cool, but it's probably something
to test out later. And here we have Vector Brushes. I also have a folder
from Frankin tone. I'm using Frankin ton brushes, which also have very
interesting line textures. But for the purpose
of our class, I would really highly
recommend that you test out under Vector
Brushes the jitter brushes. There are three brushes in here, all of which are
marked as my favorite. You can also star
them. Light jitter, medium jitter, and heavy jitter. So if, for example, select
this heavy jitter brush, here we see this black
circle is our color studio. I would recommend that
we test out our colors, our shapes in gray scale. So by default, my sketch
from Procreate had those blue, purple,
grayish colors. And it also says
here that it pulled colors from that
image image 1580. So sometimes it's
actually useful to import an image that already has the
colors that you want. Then they will be kind of automatically imported
here to Adobe Fresco. But here under the color wheel I will be basically
moving around the very left edge of this square so that I create
my assets in gray scale. It has a lot of advantages, one of them being simplicity. I can later recolor
everything in Affinity Designer when I know what kind of color
palette I'm using. And if I'm using, for example, black color or very dark gray, I can also focus on identifying if the shapes
that I like are good because we'll be kind of working like with gray scale silhouettes. Over here, this
number will allow you to modify the
size of your brush. This is smoothing.
I keep it at half. I don't really need extra
smoothing for my assets. And this last option here is also meant to allow you to
manipulate the brush further, but I'm not going to do that. I want to use the
brush as it is. So we had this jitter
heavy Jitter brush, and now on a separate layer, we are able to test it out. We can always click on this
number and make it bigger. And if we make a smaller
brush and create a circle, you will see that it's
a little bit more jagged because a smaller brush will accentuate the
texture much more. And if I create, for example, a circle shape with a
bigger brush size here, then it will be a
little bit more chunky. To see that in action, we move to the filter, which is this bucket
icon here to the left. And without changing the color, we just fill the shapes in. So that you see what I mean? If your brush size, let's go back to the brush icon, it should remember by default, the previous brush
that we were using. If we make our brush smaller, the outline will be a
little bit more detailed, jagged, a little bit more I don't even know
how to say it tiny, and this bigger brush will
give us a chunkier shape. And again, this is the advantage of working in gray scale. I can also click on
this sketch and click on the eye icon to make it invisible by working
in gray scale, darker gray colors are black. We can see the
silhouette better, and we can see if
we like this shape better with a smaller brush
or with a bigger brush. Going back to the brushes, there's also medium jitter. So if I keep it
roughly in the middle, you will see it's
a little bit Yep. It's a little bit softer, but it still has this
uneven line around. Remember to go back
to this brush here. If you would like
to draw and you forget to switch from the
bucket icon to the brush icon, it will ask you if you
really want to fill it up, or it will fill up
your entire canvas. And you saw I tapped twice on the screen to return
to the previous view. Back to our brushes,
the light jitter, I modified the shape to be
more or less in the middle. If I fill it up
with this packet, you will see it's also uneven
but a little bit less. So the most dramatic
effect will come from the heavy jitter
with thinner brush, chunkier shapes from the heavy jitter
with a bigger brush, more subtle effects will
be with the medium jitter, and the most subtle one, but still quite uneven will
be with the light jitter. I'm not recommending and I'm
not sponsored by anyone, but I'm not recommending
to buy any extra brushes, but in case you want to see the other ones from Frankintun, this is this Monodorian brush. Let's take a look. Yeah,
it's also quite jittery, but I don't know
if it's that much different from the free brush. Maybe when it really comes to drawing more details
within our illustration. But for the shape outline, I don't think it's
really necessary to buy special brushes. There's like a hatch
brush that has very bleedy texture, so to say. So if I fill it up and zoom in, you will see it's
as if the ink was bleeding through our
canvas as our paper. But when you zoom out, you
don't really see that. I think the most
dramatic effects come from those two,
which are for free. Medium jitter and heavy jitter. Now, if I click on this layer, I can delete it or
I can clear it. So I would like to clear it. Once I select the layer, it will have this blue outline. Not that you make
mistakes and you draw on a layer where
you don't want to draw. So I selected my sketch, and I re click the
icon to bring it back. What I would
recommend is that we start with the shapes
of our clouds. So I'm going to keep a
relatively dark gray, and I'm going to go
for heavy jitter, but maybe a little bit chunkier. So not too small, a
little bit bigger. And first, I'm going to
draw all my cloud shapes. So I'm doing this to be really sure that the
shape is closed. I'm going to focus on different cloud
shapes before I close them with a fill color because it basically helps
me to save time. Again, I'm not being very, this one go removed, but
it's okay. We can fix that. I'm not focusing
on being perfect. When all the shapes are there, I go to the bucket
tool, to the fill tool, and I fill it up and I can also, of course, make sure that the sketches on top
so that I see everything. So the clouds, it's important
that they're not touching. As long as they
are not touching, they will be recognized
as a separate acid. So now I hit the plast to
create a completely new layer, and moving along
this left line here, I make it lighter so that I can create the
whites of the ice. And now I will switch to
medium jittery because I want less of a dramatic
effect on the eyes. Keeping it more or less in the middle when it
comes to the size. This one is really
goofy. So you don't have to fill your
shapes with the bucket. You can just color them in as if you were just drawing
with a marker, so to say. As long as they
are not touching, those two eye whites will be recognized as two
separate vector shapes. So now this one, and this
is why it's so meditative, I wish that Affinity had
those types of blood brushes, maybe they will be
introduced with the new versions because it really imitates
this real drawing that you're also
doing in Procreate, for example, but with the advantage that the base
is still vector based. Now, a new layer for the eyes, and I'm going to use maybe even black for the features
on the clouds, keeping the same
medium jitter brush. You see, those circles
are not perfect. They're not as if we were
using the Affinity shape tool. Suck, suck, suck. This is so cute. Of course, feel free to draw any other
features that you might need. The thing is, you should draw whatever you
think will be handy because drawing it will just give you more
elements at your disposal. But it doesn't mean that
you have to use it. So maybe you want to draw some extra facial
features on your clouds. If you're not drawing
faces on your clouds, then maybe you would like to
draw just some extra shapes. I will focus on features, actually, another smile here. Maybe also eyelashes here. So I have the blacks of the eyes and some extra features with the smiles on this layer, and then on a
separate layer with a slightly lighter
but still dark gray, you can also draw
some extra things which are just for you. You don't have to use them. And like I said, if you're using if you're not drawing
faces on the clouds, maybe at least some texture
dots that you can use. They're also very uneven and they can look
very interesting. I don't think that for me,
this will be so useful. I'm going to maybe just
keep this one cluster here. So if we switch off our sketch, we have our clouds
in gray scale, and gray scale also helps us to better evaluate
those shapes. Bringing back the sketch, making sure I create another layer. This one and one
layer, by the way, will be one group when we
export it to Affinity. So now on this one layer, we have a slightly lighter
gray just for me visually, so that it's more helpful. I can draw my
imperfect raindrops. And I actually learned when people were looking at my
children's book portfolio that publishers are really interested in imperfect shapes. Okay, another layer maybe
for the wind, but this time, I would like to switch
for the heavy jitter for obvious reasons,
more texture. Yes, but maybe let's
make it even bigger. So those lines, they
will imitate the wind. It will be in one
folder and a new layer. And I would like to
make the same element, but with the medium jitter, just to have a choice so that
later on I can just choose. New layer hitting plus. Staying with the medium jitter, I would like to create the shapes of snow,
those snow stars. Okay, this will
be in one folder. Your sketch is not set
in stone, so feel free, like you see to add in some extra elements that you
come up with spontaneously. And for the stars, I will make it maybe a
little bit smaller. And instead of
manually drawing them, I will just draw the
outlines of those stars. They can also have
different shapes. Just make sure that they're
closed because now we go to the fill tool and we
fill those shapes. Ah, so this is just
a reminder for me that I wanted to experiment
with some scratchy texture. So I'm going to go
to the heavy jitter. Maybe make it a little bit smaller and on a
separate layer so that all that texture is gathered
for me in a separate folder. Still making sure that whatever I'm drawing is not
touching anything else. I think at this point, I can go to the sketch and turn it off. I'm drawing, maybe
let's do it separately. So plus because it will be then divided into
a separate folder. This type of scratchy
texture, perhaps, and another one that
is a little bit more. Circular maybe. Those will be my
experimental textures, which you will see when we
export everything to Affinity. It will be vector based, so it will give us
all the scalability. Okay, I think we are done. Those are our unique
vector assets. Again, you can use Affinity
from the very start, but look how great this is. And you could still try to
replicate it in Affinity, but I really adore those brushes. The
software is for free. And yeah, I think it
looks very unique. So in the next lesson, I will show you how to import
these to Affinity Designer. I hope that you like this
part of the exercise.
6. Fresco to Affinity Designer Export: Now we are ready to export our vector assets
to Affinity Designer. We can also hit here this
area to rename our documents. I'm going to just name
it fluffy clouds. I think too, because I already had one sketch made before safe. And as you're working
on any Fresco file, you can again hit this arrow here and you can save it
again to save your progress. Now, there's an export icon here in the upper right corner. Then we go to publish an export. So we want to export as and we want to change
the format to PDF. Pa. PDF is a very unique
format that enables to save both the properties of vectors and pixel
based elements. I also combines the
two worlds together. That's why we choose PDF. And now we want to hit
Export and we will be saving this document somewhere
on our iPad storage. For all my files, I'm using the Fils
app here on my iPad. And I have a special folder. I think I named it just Exports, and this is where I will send this document too. So Export. Now, save to Files and we'll connect with the Fils
app on the iPad. Yeah, exactly. I have a special dedicated
folder called Exports, but you can save it anywhere onto your
iPad, then I hit Save. Export is complete and
then we can hit done. And also whenever you go
back to the homepage, so in the upper lift corner, we had this little house icon, then your progress will be saved automatically whenever you go back to that homepage. So now we exported everything to our
external files folder. And this was, for example, the file that I
worked on previously, as I was making a
test for this course, all you got to do is click Open document and then
locate your folder. So I have here fluffy
clouds number two. We keep 300 DPI and
color profile RGB, we simply click Okay, and then everything is
loading to Affinity Designer. When we go to the Node
tool and for example, hit this cloud shape, it's all vector based.
I love victors. So one thing that we have to
do from the folders here, the layers panel is to make sure that
everything is sorted out and grouped properly
and sometimes merged. So I'm going to go from the top, and the top is usually
the last thing that I drew in Adobe Fresco. So this texture here, one thing that we
can do is we can go to the Boolean
operations up here, and we can select on
the entire folders level ad so that everything
is merged together. So it's not a folder anymore. It's one single shape. And I also like to go
to the color studio, and switching from HSL sliders. In this case, I go
to my gray sliders, and I just suggest I still
keep working in grayscale. I have a whole article 0N my
blog about the advantages of first creating a
gray scale and then choosing your color palette and making your color choices. It actually really,
really helps me to save time and to make better
color decisions later on. So this texture is done. You can also rename
it whenever you want to rename a group or a layer. On the iPad, you have a gesture
when you're swiping with your Apple pencil to the left and then a
special menu opens, and here you can also rename it. For example, I can rename
it to scratchy texture, and I can actually
also include it in the class resources in the assets folder
that I showed to you. So textures Hamburger menu
from the textures subcategory, add asset from selection. And I can add it as my
vector acids right away, which I can use for this project or any other project
in the future. So this is edited. Now
I go to my next shape. Which one is it?
It's this texture. I would also like to merge it. So there are a few shapes. Every time Apple Pencil was not touching the
screen anymore in Fresco, it created a separate shape. You can leave it
like that because if you go to the MOV tool, you can keep moving
those separate objects. But if you're happy
with it as it is, you can go to the entire group
level from the move tool, Bolling operations here and add. Something like scratchy, pencil, texture, and I will
choose my recent color, which is this lighter gray, just for me visually. I will add it as
my vector asset, add asset from selection. We're doing a little
bit of admin, a little bit of
housekeeping here, and we are on one hand, preparing our assets for the pattern that we
will be creating, but we are also building
our library of assets that we can then use
for any project, any illustration, any other
pattern or client work. So that's already the type of work that pays
off in the long run. Again, this one is created
from two different shapes. From the group level, I
would like to merge it. I select Add again. And because vectors are so easy to recolor from
the color studio, I just select the light gray, and I add acid from selection to save it for any future projects. And I make it invisible
because I just want to focus on the elements
that still need editing. Okay, those stars, I'm not
going to save them as assets. I just want to make sure
that they really separate, but also complete shapes. So sometimes one element is made out of two elements that should be merged together, but here everything looks good. We can also recolor
it a little bit to another gray rename layers. So swiping to the left stars
just for my own reference, and I'm going to
make it invisible. Now we have those. I'm going to swipe and
rename it to snow stars. You don't have to
rename your layers if it's going to save you time. I just want to be tidy for the purpose of
this class, I guess. And over here, you
see that each of those stars is made of
one, two, three elements. I'm going to select those
elements and merge them from the Bollin operations menu add so that it's only one shape that I will be then
able to move around. Because if I click
just on this one, I will be moving just
one arm of the star. Luckily, they're already sorted in the way I was drawing them, so this is going
to be very easy. When you have a layer selected, it changes from black to
this dark navy blue color, and then I swipe to the
right to select it. And then to merge it, we're
refreshing our iPad gestures. Another way is to use
the two finger tap. So you select the first layer, and then the last layer
and the entire selection. So if I wanted to
select everything, I mark the first layer
with a two finger tap, last layer, and everything is
selected at the same time. So just refreshing
the gestures for you. But these are so small. It's just three layers that I can also do
that quickly manually. And each of those
stars is unique. It has a hand drawn feeling even though
they look similar. They still look much more
unique as if I just built it from the geometric tool that are available here
in Affinity Designer. Making them a
little bit lighter. That's why when we were
creating an Adobe Fresco, it really didn't matter that we were using
the gray scale. It's just to be quick and dirty and then to get
to the real work, which is editing, saving,
tiding things up. Okay, those are two lines. I'm gonna rename it to win Soft. And I'm going to keep it
separately because maybe I would like pea
from the move till maybe I would like to kind of reshuffle those lines freely. That's why I keep them.
I don't merge them. I just keep them in the
folder as they are. I'm going to make it invisible. This one will be with
jittery, the jitter brush. Again, each of those lines
will be kept separately. I'll make it invisible. Now, here we have S, some of those drops, they're built of two
different shapes. See? Those need to be merged with
the bullion operation add. I'm just trying to locate
which of these also need merging this one. Mm hmm. Okay, here I see
something to add. Again, I'm keeping each of those raindrops because
now that they're merged, if I'm within the folder, anywhere in this
raindrops folder, anywhere I click,
from the move tool, I'm able to move them around. So handy. So this will be
rain making it invisible, and now we have our clouds left. So for starters, this is the folder with the
shapes of the clouds. From the group level, I click the group icon and
I ungroup them. Now, for the eyes, I would like to pair the eyes
that belong to one cloud. So I'm selecting the pair
that I want to pair or group, and then I group it. The same. This is one group, Copela. And this is one group, and now I also want to
ungroup all the eyes. Okay. Over here, up, I'm going to use the gesture
with two finger tap. I have the eyelashes on one cloud that I
want in one group, and I'm not merging them because I still want to have
the flexibility to be able to move them around individually, maybe delete one. Okay, the smile stays. The eyes will be one group. And now I go one by one. Okay, these are the eyebrows. What do we have here? When I select it here
from the Layers panel, you should also
see the selection over here. Double checking. Okay. Those can be
grouped as well. And these eyes, as
well as a pair, the smile stays individually. Now, this one, this
one is a whole smile. I don't need those separate
items to move them around. I want to stay I want for
them to stay as they are. So those three layers, those three curves, I will
go again to merge them. And it's just one layer, it's more convenient
and the remaining es here and the entire folder
with those features, I would also like to ungroup
it, release it, so to say. Now, what do we have
left? The extras. See, just the extra details. I think those belong. I can also slightly
change their color. Those can be grouped. I can also take it out
of this group manually. And now what we have left
here are the freckles, which are already in this group because we remove
the other detail. Oki dooki. Now we have to merge it by the cloud, so to say. So it doesn't matter where we are here on the layers panel, we have to be on the move tool. And from the outside
of our white canvas, we have to make our selection. You will see that
the selection will have I think it's a blue outline with a
slightly blue fill, and everything has
to be selected. You see it also gets
selected here in the layers panel by
changing the color. And then we go to
the group icon, we group it, and
this star is ready. The same. So we cannot stay on this cloud that
we just created. We have to click
somewhere else where we have the other elements
that need to be sorted out anywhere else. And then from the outside
from the Move tool, we have to make sure that
everything is selected. You can double check it
by making it visible, invisible to make sure that
your selection is correct. And now this last cloud and now I select everything and
I bring it together. If you want to deselect, you either hit this X
symbol or you click, for example, you tap with
your Apple pencil somewhere outside of your canvas
on the gray area. And now from the move tool, you see whatever we
grouped can be rescaled. If you want to keep
the proportions, you have to keep one finger
on the screen of your iPad. So those are the advantages
of working on the iPad. If you want to change the shape, you're not holding the finger, but if you want to
retain the proportions, one finger on the screen, can move these around, and
as long as they are grouped, for example, although
snow stars are grouped, I can keep either moving
them or re scaling them or recoloring
them at the same time. Those clouds can
also be renamed, for example, Cloud, number, number one, number
two and number three, but I will skip this step. So we built our assets, our jittery assets
in Adobe Fresco. We exported everything as a PDF and then opened everything
in Affinity Designer. We sorted everything out,
and as we were going, if there were useful
assets or useful textures, we also practice saving
them to our assets library. Now we have our assets ready. We are not coloring
yet because we haven't decided on the color
palette of our pattern. The next step will be to choose our repeat type for our pattern, to choose a template or to build a template with
me from scratch.
7. Repeat Type: Diamond Template: I so our vector
assets are ready, and now we can start choosing our template or
building our template. I would recommend that
we go either with a Half-Drop Repeat
or a diamond repeat. I also have a few
pattern templates saved to my iPad storage. For example, here I
have some full drop or a standard repeat, template. Here's a brick repeat. But the ones that I use most commonly is either
half drop or diamond. For example, this is my
diamond repeat template, and this is what I would
recommend that we do together. So if I go to the shape
and I select this shape, you will see that we will be building the pattern
within a diamond shape. And the reason for that why
I prefer the diamond repeat. If we open this
pattern, for example, it's also built from a
diamond repeat template. So to prove it to you, I have my guide over here. See, we have a
shape of a diamond. When we make it invisible, this guide that helped me
to build this pattern, we will just end up with
our original pattern tile. And then when we export it, it will already be in
a standard repeat, but it was built using
half drop repeat. So for example, this
latest grayish cloud, it is repeated sort of at a diagonal in a half
drop repeat manner. But the pattern tile that is
the final pattern tile that is exported is in
a standard repeat. So if we are testing the
pattern, for example, here, I tested the pattern
with a bitmap fill, it will be kind of in
the correct order. So there are really no issues with this
diamond repeat pattern. Now, I have, of course, a
dedicated class how to build diamond repeat automated
pattern template, and I will make this
template available in the class resources for those of you who would
like to save some time. Or perhaps you have taken some
of my previous classes and you already have this
template somewhere saved up or somewhere
in your iPad storage. For those of you who are
new to this technique, I would like to show you
quickly how I create this automated
pattern template for the diamond repeat pattern type. First, we have to go to New
to create a new document, and then I usually work on a canvas of 4,000 Pixel square. So this is just like
a portfolio document that I pre created before. You can also change
your document your document units here. We make sure we have pixels, 4,000 pixels square, 300
DPI and RGB color format. Usually printers
for pattern design, except RGB and a lot
of POD shops such as Red Babble and Pun
flower actually prefer the RGB color format. Nothing under margins and bleed, so this is not marked, so there's no margins or
bleed and very important, we do not create an artboard
with automated patterns. If we created an artboard, this would be marked and this little round switch would
shift to the right. We have to make sure
that it's not selected and then we hit to
create our new document. From the shape tool, we're making sure we are on the rectangle tool and to
create a perfect square, we have to put one
finger on the screen. This is our perfect square. Let's also on my
Halloween color palette, let's choose this hot pink for the fill and maybe we can
keep the outline black. But we can go to the stroke
studio and we can make it at least five points so
that this line is thicker. We also have to make
sure that we have this cap line selection
at the middle so that the line of the
square runs exactly through the middle of our
stroke because there's also the option to do it on the
outside or on the inside, so we just have to make sure
it's aligned in the center, that our stroke is
aligned in the center. Next, we have to make sure that our snapping magnetic
snapping is on. And then from the move
tool, we have to position. You see, I have those
guiding lines that tell me that everything snapped
perfectly into place. So a green line will show up and also a red
line will show up that will help me to make sure that everything is really aligned to this
upper left corner. Then as I want to retain
the shape of the square, I have to put one finger on the screen and snap
it to the other side and see also that those
alignment lines show up. Okay, so this is now aligned. Very good. Now we have
a perfect square. Next, we need to rotate it here. There's this, I don't know if I can call it a rotation handle. One finger on the
screen, 15 degrees, 30 degrees, 45 degrees. Now, still from the move tool, I'm going to position
it to this upper edge, so to say, of my canvas. Then I'm going to grab this
lower node and place it here. And this should have solved our right and our left corner. So now, this diamond is perfectly positioned
in the middle. Okay. It's so called a rectangle, but we created a diamond shape. Now, having this selected,
keeping this selection, we go to the symbol
studio and we have to change it into a symbol. Three vertical lines,
Hamburger menu, add symbol from selection, and it was actually good that I pre selected this
hot pink color because now I can really
double check that this is the shape that I want. Okay. We can also swipe to the left and rename it
as our pattern. Now from the move
tool, we have to make a few copies of this shape and place it to the
edges of our canvas. The white selection is
our original canvas and the whole gray area around
is just our workspace. When we want to export our work, the gray workspace area
will not be exported. Two fingers on the
screen to make a copy. See now I have a copy and I'm placing it to one
corner here and I'm looking exactly for those guiding lines that will help me to snap
that into place. Again, two fingers on the
screen, another copy, hoopla, and I'm placing it looking at my guiding
lines to the left. Now I can select
those two guys here. You see what is it?
Blue selection. I can make a quick copy at a
time of those two elements, two fingers on the iPad screen. And we make another copy. Now, in case you
don't want to use gestures the way I
did for the iPad, you can always have this one element that you
want to copy selected, and then you got to go to
the three dots menu here, and you just hit Duplicate, and then you create
another copy, but I'm going to
remove that because I copied everything
that I needed. Now, if you've taken other
automated pattern courses, you know about the preview mode. This little windshield
symbol, if you click on it, it will show you everything that is outside of your canvas. For the diamond repeat, I would recommend
that we also extend our pattern to those empty areas here so that we have
a better preview of our pattern when we
build it and we see how the pattern expands and
if it looks well balanced. I'm just going to grab one of the diamonds and
from the move tool, I prefer to use gestures, two fingers on my iPad screen, I make another copy. I place it here,
and it all snaps nicely in the guiding
lines, just confirm it. Another copy, and one
more. And one more. Each of those
diamonds will be like a mirror reflection of the diamond that we
have in the middle. Next, I select all the diamonds
that are on the outside. And I will only leave
this one diamond, the original diamond that I have in the middle
here of my canvas. Another thing that we
have to do is to set up our background so that we make sure there are
no white lines around. We select another
rectangle tool and we just draw Let's maybe see. We just draw a big
rectangle that has to be dragged somewhere outside. And you can also make it
bigger so that it really covers all the diamonds
that we just created. This one is not a symbol. So when you create a symbol, you see this orange line. Also here, this orange line to the left side indicates
that it's a symbol, and it will be
like a mirror copy of what we are creating. And I flip up to get
rid of the outline, and I choose just any
other color to show you that this will be a completely different color and will focus on
our background only, so I swipe to the left. And I name it background. And now, those guys here that I sorted out to a separate
group, I will ignore them. They will just
give me the repeat and they will give me a
preview of my pattern. All the work will be done on
this original this one here. I tried to show
you the selection. You see this faint blue line. Hopefully, this will be
just this middle diamond. We want to go to
the color studio, and we want to flip the fill
up so that there is no fill. And I'm going to change
the background color. Let's maybe bring
the color palette, this one, the wintry
color palette that I think I will be using. Let's change already
the background color, the fill area from
this eyedropper tool to either this blue or maybe the slight blue
so that we can see better. And now what is left is
just this black outline. You can still edit
it to your liking. So for example, if I want
to change its color, I just have to make
sure that I'm on this empty circle selected,
which is the outline. And on top of that,
so this is what I've been using so
far in my courses, but you can still edit it further by going
to the Stroke Studio, and you can change
it to a dotted line. And then over here, you
can increase the gap, for example, to two. Or three or four, and
the dash pattern, you can change it to zero, five, so it's a
little bit smaller. Let's maybe also
increase the gap. And now we have a guide
that looks like this. I know it's just cosmetic, but if this is something
that you would prefer, then you can also adjust
your guide in this way. And if you haven't
done this before, you can also save
this template to your iPad storage so that next time you don't have to
build it from scratch, but you can just
open it right away. And you do it in
the following way, you have to go to
this Hamburger menu. Experts template.
You can rename it. For me, I'm just going to
rename it as new diamond. I just want to show you because I already have one
template saved up, safe. I save everything
to my files folder, just like everything else. I created a dedicated
folder called templates. And you see all the
other templates are also here extension with the file extension dot A of template, and
I just hit Save. And if I would be to go back, maybe just close it with this X, meaning remove it
completely before I save. Next time around, I can either open document from template
or go to templates, find the folder where
I have my template, and then this is
this template that I just saved with you
called New diamond. When I'm working on it and
I'm building my pattern, I am not overwriting it. The original template
is still there. I can use it as many times as I want and will
always stay the same. I will choose now
some random assets maybe here that are
somewhere on my app just to show you how those
automated templates work. It's good to switch
off everything else at first and focus on this
original diamond in the middle. If I were, for example, to
insert this little monster here and show you how easy it is all we have to do is to place the asset inside
of the pattern folder. So maybe now let's
add another one. For example. This guy looks happy, and we again, have to
place it into the symbol. Since it's vector based, I can also rescale it as I
want and maybe one more. This one, everyone looks
happy because it's for kids. Now I can also rename this
diamond shape to guide, and I can make it invisible. You see, I can just switch
off the visibility. And then I can zoom zoom out to see if I'm happy
with what I created. I think I can add one more. So this would be my
pattern preview, and the fact I will
switch on the guides again that we positioned all
the other diamonds around. It gives us a good preview, so we focus not only on
our original pattern tile, but we can also expand
the pattern and see if, for example, anything
needs shifting. If you would like
to take a more in depth course about
automated templates, I have dedicated courses
that you can also check out. For example, there's
a huge class just about the diamond repeat.
8. Building the Pattern Base: Okay, so now I kicked out the assets that I just
used for my demonstration, I will be using the diamond
repeat pattern template. So first, we have to build
the base of our pattern. And for that, we need to take all the assets that
we built in Adobe Fresco. So I'm going to select
the first group, and with a double fingertap, I will select everything. Then I will go to the three
dance menu and click Copy. Everything is copied now. I'm leaving this
working document and I'm going to
my template here. I am hiding everything else and most likely the dimensions
will be a little bit off. I place myself somewhere on top and then again,
three dots, paste. When you import
something as a PDF, it might be that the
dimensions will be changed. The scale will be changed to preserve the shape
of our assets, one finger on the screen, and we just have to size it
a little bit down, which is, of course, not a problem because everything is vector based. So we size it down
so that everything fits the original canvas size. Now, I will also go to
the background layer. And from the fill area, I will change it to
another gray color. I would like to create
everything in gray scale because I will make my
color choices later on. I also have a bit of
a cheat sheet here. Those are all the pattern
images that I created before. This one is more pastel. I will just orientate myself by looking at something
that I created before. I will see if I will replicate this exact same pattern or if I'm going to
do something else. This one is with pixel
texture and vector brushes. I'll show you how I did that. This one is a little bit
more neutral pastel with vector brushes and the
same pixel based texture. And basically, those
clouds are the same. This is from my
Halloween collection. I created this
Halloween pattern full of super reciprocal texture,
especially on that ghost. And this spooky
cloud was part of my marketing mix also for my social media and I
built a pattern out of it. This guide is just
from our template. So feel free to replicate a similar cloud pattern with me or create something
completely unique. It might be another
form of a cloud or it might be even ghosts
or something else. The um what's the
most important thing. The most important
thing is that the base will be vector as you will see. This is our vector base, and then we will be
decorating our pattern further with different
texture types. We're practicing
textures in this course. This is the most important focus or objective of this class. I have all the assets,
but they're not part of the pattern yet. I like to again select everything and make it
invisible at a time. Then I like to work asset by asset when I sort things out. So for example, I am bringing back from the move tool now, the visibility of
this first cloud. From this preview mode, when I clip it, I
clip to Canvas. This whole square will be our final pattern tile and
I like to orientate myself still either within
this diamond shape or very close to
this diamond shape. Now, here we have our
pattern template symbol. You can see this orange
marking to the left. I'm taking this crowd, this
cloud and I'm putting it inside of my folder. Just like with the monsters. I can also shift the cloud a
little bit, maybe rotate it. I still like to go back to
the original pattern tile. Cloud number two. We have to bring it inside.
See it showed up. You can scale it up or down
without any quality loss, rotate it if you want to. Now I'm bringing back the rest to see if everything
is nicely balanced, but I will know more when I bring the
third cloud into the mix, and then I will also decide whether I need an extra element. Here we have a mirrored
repetition of this cloud. That's why I urge you to try to stay within this original
middle diamond shape. When we edit this cloud further, we will work on this cloud
and not on this cloud. Because this one,
if I tap on it, see, it belongs to this group
that we wanted not to edit. It belongs into some other
folder. It's just a copy. And of course, you can
keep editing in here, but I would rather
urge you to work with the original middle
diamond, so to say. Okay, now let's
see if it's really balanced because I think
I'm missing something. I think I will add
another cloud to the mix. Maybe rotate it a little bit, and then I'm going to
grab maybe this guy, two fingers on the screen, make a copy and then
from the alignment tool, I will flip it horizontally and just change the
angle a little bit. Now, I would like to select the ice of this
cloud and maybe shift them. They are grouped because we made all the entire grouping exercise was also for this
type of practicality, that the grouped elements
are easier to edit. I want this cloud
to look a little bit towards this cloud. I think I also want to
kick out those freckles. Creating all those
extra features, it's optional. You
can also delete them. Sometimes it's actually
better to keep things simple. The same because it's
a mirror reflection, this cloud of this cloud. This little element
here got also mirrored. I don't really
like how it looks, so I'm going to delete it here. And also from the move to this cloud could be
looking down a little bit, whereas, it's so
easy with vectors. Whereas this one can
look up or maybe towards Papa maybe towards
this goofy one here. And maybe we can
flip vertically. Oh, that's nice. See,
I'm improvising here. That's why, this one is so cute. A little bit kai. That's why it's good to keep some
elements separately. Though this mouth maybe I'll make it a
little bit smaller. So this guy is surprised and that one is a
little bit angry. Again, if you're
not sure if you're selecting the
copied item or not, just make sure that you're in this original pattern folder. And then when you select it, you see, this is my original. This is just a copy.
This is my original. This is just a mirrored copy so that the repeat is created. This is my original.
You see the selection. That means this is a copy. Yo. Okay. I think it's
spread out nicely. I can still resize it. And finally, I can also
make the guide invisible. All the other details, for example, if you already knew that you
want to use this rain, you can already start
kind of using it. So you can build
a few variations. For example, this rain here. I'm going to make a
copy of this rain, maybe resize it a little bit. See how that works. You can also move the
individual little drops. But again, to make sure that you're working
on the original, just tap the folder
that will show you which one is not a mirrored
copy and move there, making sure that you really have this original that
you wanted to edit. You can also remove some of the water drops if
you have too much, and then I can select all that rain that I just
put in that was created in Fresco and I can group it and
rename it as jittery rain, for example, from
the jittery brushes that I'm using, I can
make it invisible. I can first work on
some variations. For example, let's see
the option with the wind. Let's bring it back, make
it a little bit lighter. Again, working in gray scale. Now it's nice that we have
all the lines separately. Clicking somewhere
else, clicking again will help us
to select it to new. Clicking in,
reshuffling the lines. Now we can really
see that it was good that we kept those
lines as separate. You can also choose
those smooth wind lines. So when we were making
those variations in Fresco, it was for our
flexibility and you don't even have to use everything
for your pattern. You can create
pattern variations. For example, now, I'm
going to group that wind. I'm just showing you to 22. Or maybe jittery wind. I'm just showing you some tricks for more flexibility
and efficiency. So we have, for example,
one pattern with the wind, one with the rain. And now let's also bring
one with the snow. I'm not going to bother too much with reshuffling those elements
into different positions. I'll just place them roughly so that you see what I mean
with creating efficiency. This one will be Snow, and you can keep
refining this pattern. So we can also click from the move tool
within those stars, double click to select a star. And then you can just keep moving things around
and refining it, but I want to speed
it a little bit up. I just wanted to show you that we're creating just a base. We will be refining it
with vector texture, but I also want you to
create some variations. And this will be our
base pattern tile. And in essence, you could simply just recolor everything now
together with the background, and you would already
have your pattern. But of course, we
want to practice adding extra interest
into our patterns. So in the next lesson,
we start adding in all those juicy
textured details.
9. Texture: Vector Assets: Now, I wanted to
show you how to add an extra detail by using vector assets that
are already textured. So one way is to use those assets that you
create by yourself. So we can, for
example, bring back this scratchy texture that
we created in Fresco, I'm going to recolor it to this hot pink so that
you can see better. So you can, for example, create such textures
in Adobe Fresco, which you already
know how to do. Then export it as the PDF, sort it out, maybe
merge it together, and you have your own
scratchy, organic textures. And then you can bring
it into your symbol. And for example, let's take
the smiley cloud over here. This is the body of the cloud. You can just bring and clip
this scratchy texture inside, and I was clipped
inside and you will have texture that
is vector based. If I change it to black, you can also or to white, you will see what
I mean or blue. I just want you to see
it nicely on the camera, but I think you can
see it pretty well. And the same with this
texture here, scribbles. You can also clip them to
the body of the cloud. I'm going to change
it to hot pink. From the move tool, you
can change its shape, you can also make duplicates, what's it called more dense. You see? Now if you only wanted this
texture to be visible, there's a neat little
trick which we will be also using together
with pixel brushes. The textures here, I can group so that I can recolor
them in a good way. Now if I make this
invisible again. Now, when we go to the
body of the cloud, we can go to the field
tool and we can make the color of the body of the cloud the same
color as our background. Right now we're still
not choosing our colors. That's why it's this dull gray. But then we can bring
back the textures. Da. For example, we can
recolor it to white, and then we can go to the eye whites of the cloud
and we can make those pink. This is from my Halloween
colors, by the way, and we can do
something like this, maybe also recolor
the eyelashes. And see if we also
want to recolor this. We actually also
have a third one that we created together
in Adobe Fresco. This is an example
of using self made textures to clip to
your vector base. This is option number one and this is one very
psychedelic example. Now, in the resources, let's go back to our folder. I also created a
few textures that could look like snow or
they could look like rain. For example, this
can look like snow. You also have it
in your resources. You can just click on Insert. And we can switch off our jittery rain and we can put this I called
it scratchy dots. We can put this S, it's like texture that I also made with either
fresco or procreate. I don't remember anymore, but it's done by me
and it's very organic. It has all those speckles. And everything is vector based. You see? This is all vector shapes grouped together as one texture element. Then we can just
zoop make copies. And use the snow
throughout our pattern. I actually like
this really a lot. Just to repeat, we can clip our vector texture into shapes, but we can also use it outside. When you're looking
at the folder, have a look at all the other
textures that are included. Those textures
that you see here, they could be also
clipped inside. For example, this is a texture that is made with charcoal. We can see what's it
going to look like when we clip it to this angry cloud. This is the original. When I clicked on it, it
could selected. And now I call it fluffy base. I clip it to the shape
of this angry cloud. Wow. So cool. You can make it smaller, and then you can make copies or you can just make it bigger. Wow, this cloud is really angry. I'm also changing here, the ice into this hot pink. You can already do a
little bit of recoloring, especially if you already
know your colour palette, but I also want you to see the changes that I'm doing
on the video better. And then another texture
that I have here is this one here, let's maybe take it put
it into the symbol. It gets this orange line
and we're going to clip it, put it inside of this cloud. Okay, that also
looks interesting. Change the eyes to some pink. If we need more,
we can resize it, make a copy, make another copy, make another copy, and maybe also group it so that we can recolor
it more easily. Ah, and the body of the cloud, we can also change it to the
color of the background. The same with this
guy here, pla. I think I selected
everything to be gray, but I have to select the
body of the cloud, you see, and now and also those
detail elements, I will change it to the color of the background so that it
looks as if it was cut out. Now this guy, let's also
do something with him, maybe this scratchy texture that we created together
in Adobe Fresco, we put it into the symbol. We clip it inside of this cloud. And I would make it
a little bit more dense and with two fingers on my screen, I'm
creating copies. Sukuk, suck as many as you need. It imitates the
feeling as if you are also coloring everything with a pencil that actually
looks pretty cool. We can, of course, group everything so that we
can recolor it better. I'm going to the
body of the cloud and I'm changing it to the
background color so that things merge together and
I change the eyes to pink. And this is our pattern, and this is our pattern tile. This is just an example. It looks a little bit wonky, but this is how we
could add interest and texture by still not doing anything with pixels,
sticking to vectors. The big advantage is the scalability and the ability to recolor everything
super fast. I have another example of
things that you can also buy. And again, I'm recommending
Franken tune studio. We don't even know each other. But I keep recommending him. I have, garage elements, texture Peg volume two. I have some textures
that I bought because I also love
what he's doing. I think he's very talented, the owner of this studio, and if I buy brushes, it's usually from Franken tune. So it's an unpaid promotion. But they have, for example, those Grangi textures,
for example, this one. It's beautiful. You can use it in
the background of your pattern or you can
clip it to your Cloud, and they don't cost a lot. And as you know, if you would
like to save some money, you can make your
own textures or you can use the textures that
you get from my classes. So this is the first
scenario building a pattern with vector assets textures.
10. Texture: Pixel Persona: I Okay, but enough
of the vectors, let's start working with pixels. So first of all, I need
to save my document. The dots, save as, and then I'm going
to name it as. For me, it will
be fluffy clouds, three because I had
a few tests before, save and I save it to
my patterns folder. It's again, a dedicated
folder that I have in my files app. And now I would
still like to keep working on this pattern here, so I'm just going to swipe
to the left and make a copy. I'm going to shift
maybe this copy. Sure to the beginning, and then I'm going to save
it as fluffy clouds four. I will make a
variation because I'm not sure if I'm going to keep
the one that we did now, but maybe I would like
to get back to it, so I will work now
on a duplicate here. So I'm just going to
quickly open those clouds, select those vector textures
that I just clipped. There's the angry
cloud got omitted. And I'm going to bring
back their color. So first, I have to make
sure that all the clouds are selected here,
here, here, here. It's easy to do it
manually. It's okay. I'm keeping the pink because maybe things will
be more visible. I'm keeping this vector snow. But now, what we're
going to do is we will explore using
the Pixel persona. Right now we are in
the designer persona, but when we click on this logo, we can change to Pixel. So let's actually start
with the angry Cloud. We have to be in the designer persona to see that we
really selected it. If we're in the Pixel persona, there are a few limitations. For example, when I click
on the other Cloud, the selection is not visible. So just to make
sure where you are, you have to always
go back to designer. Locating the original, you can also clip your canvas to
see the original better, locate the original cloud, the body of this cloud. And then before I switch
to Pixel persona, I like to go right away
to this plus symbol. Pixel layer. We click on it. We create a new pixel layer, which is called Pixel, but it also has this pixel
symbol with a checkerboard to the left and I will already
clip it in, so to say. Then I move to Pixel, and we have pixel brushes here. We also have the MOV tool. Then the second option
are our pixel brushes. And the third option for now, what you have to
know is the eraser, and we can also choose the
same eraser just like in Procreate of the
same brush type. So we stay within our it's
called the paint brush tool. If you're not sure, there's
this little question mark that when you click on it, shows you the
entire menu and you can double check what
the tools are called. So from this paint brush, we can select our brush types, and when we click on
any title of the brush, you see all the pixel brushes
that are available here, and you might have
a little bit less. Normally, the default affinity folder starts with acrylics. I have a few more because I've been using this program
for a long time. There's a lot of, for example, this Frankin tune set is currently my favorite
pixel brush set. But again, you really don't have to buy
anything new because Affinity has a whole bunch of free brushes that come
with this program. So for example, acrylic, Basic brushes, they don't
have that much texture, so I would rather not
use it for building this pattern because we want to choose something
with more texture. Dry media is really cool. So let's stick to
the dry media now. For example, we can choose
this gritty crayon. And now that we have this
pixel brush selected, the most important thing or the most important
setting is this one here. You see, this is the
size of the brush. So we make it a
little bit bigger. We focus on the angry cloud, and the funny thing is that we pre select the
color of the pixel brush, not from the fill menu, but from the stroke menu. So right now it's pink. So if I start see drawing with this
brush, it will be pink. I want to bring it back, and I want to change it to white. And now I want to explore
these brushes and see how they will look that looks pretty
cool a little bit of texture. And especially if you're new, if you're very new
to those brushes, you're just starting out, you don't have your
favorite brushes yet. My big, big recommendation
so that you don't forget which brushes are your
favorite is to check that, okay, this one was
called gritty crayon. Go to your layers, swipe
to the left and take a note for yourself because it happened that I was experimenting with brushes, and then I chose a texture, and then I wanted
to replicate it, and I forgot gritty. What was that? Gritty,
see, I already forgot. Gritty crayon. I think I was saying that
you can take notes. So I wrote gritty notes. Gritty crayon. And now we can make it
invisible, go to the plus. Another pixel layer, and
now we can explore more. For example, we can go to I think Markers was
pretty interesting. We can choose. That's the thing. I don't know all
of these precious. I play around with their size, and I'm not really using
those settings here. That's nothing that you
need to know about for now. So it happens that I am
actually on the eraser. I have to make sure that it
goes back to the paint brush. Don't panic if there's
something that you don't see. It's probably because
your paint brush switched itself to the eraser.
Again, markers. Dry media. Let's find markers. Just the first marker
to test it out. Oh, this is really
nice and smooth and sometimes you can
layer them as well. This is just for you to test. I'm just going to take a
note that it's a marker. I will know that
it's the first one. I'm going to make it invisible. Another plus pixel layer and
22 from the brush studio, let's go to you
have it probably to pressure pixel shader brushes is something that you get if
you register with affinity. Let's go back and I also
urge you to save on a regular basis with
using the pixel persona because
sometimes on the iPad, it can crash and then you're
losing your progress. Maybe this will be
fixed in the future. I don't have it too often
that the program crashes, but if it crashes, it's when I'm using
the Pixel persona. So if you're happy with
something that you just created using
a pixel layer, please go back and three
vertical lines, just save it. Save your progress.
So as I was saying, when you are registering
with affinity, here you have your account. You are able, so you're
registering with your email, you are able to download
some free brushes. For example, the artista, Affinity Designer
brushes by Pixel Buddha. So Pixel Buddha,
that already implies that those are pixel
based brushes. And then you just
have to over here, there's this download button. You have to make sure you
download them, close. And next time you're
here in the Pixel persona again and you
go to your brushes. You are able to find them over
here pixel shader brushes. And that already
gives us a hint. Those will be great for
our purposes because they're basically
called shader brushes. For example, let's take this
noise brush number one. I think I tested it before. Making sure I have the
signs died I want. You see the circle, kind of gives you a hint how
big this brush is going. Ah, yes. And this is
the one that I want. And I remember it
because I took a note. So that was noise one. Pa. I clicked Cancel. I think noise one. Now, going back to
the designer persona, I want to go again
to the body of this cloud and make
sure it has the color of the background because now we have only the texture left. This is this great effect
that I wanted to teach you and all of a sudden, the outlines of our vector
shaped are becoming blurry. Now I can also inside
of this folder, check all the beautiful
textures that I created before. I can see which one
I like the most. You can also, of course,
zoom in zoom out. The problem is, actually,
it's an advantage, but it's also a
problem that a lot of them are really super cool. So you can leave all of
them for future reference, you don't have to delete them. But I think I will go
with the gritty one, which was from the
noise brush number one from this pressure
set by Pixel Buddha. Since I like it so much, back to the live dogs, it's safe because
with a pixel persona, something might
crash, hopefully not. From the designer persona, let's locate our next cloud. It's going to be this
one I'm going to zoom in so that I don't
make any mistakes. Plus pixel layer, now we go a
little bit faster, clip it, and now going to
the pixel persona, it should remember our
previous settings. We have white color,
noise brush number one, the same size. I'm going to make it a
little bit bigger because then this texture becomes even
more gritty, very pretty. I'm going to recolor the
body of the cloud later on. Or maybe now. Actually,
let's do it now. This one needs to be recolored to the color
of the background. Very good. Our next
cloud will be this one. I will show you a
different approach. First, we merge the body of our vector shape already to
the color of the background. Now plus pixel layer because then you can
see the defect better. We clip it. Now we go
to the pixel persona. The breast should be
remembered and now we can see even better how
much we want to leave. Maybe we just want
half of this cloud. But I still want those
shapes to be visible. Okay. I think I like this one. I'm going to go back and save it so that I'm really making sure I'm
not losing any progress. The last cloud, it got
selected, I zoom in. I change its color to the
color of the background. Now, plus pixel layer, clip Pixel persona, double checking white noise noise
the brush that we want, which is noise number one. D Oh, this is so nice. Even though I created such
patterns before, but I really, really like this effect,
and sometimes you cannot achieve this effect
just with vector brushes. So going back, saving
and just wanted to show you again that this is the exact technique that
I used on this pattern. So this is a ghost. Let's select this guy where. It's just my test. Two, two, let's select this ghost. You see, it's a vector base. I experimented with
different textures. This one is a little
bit more chunky and this one is a
little bit softer. The same with the cloud. This
time I use the color black. In this way, it
was super easy to create this texture clipped
into a vector shape. Now the previous technique is a little bit more graphic
as you can see, it is still scratchy. There's a texture element. It's not as smooth as
vectors usually are. But pixels, as you know, they feel softer, so to say. Now, let me talk about some
limitations of pixels. For example, recoloring is
much, much, much harder. For example, for those clouds, I would rather color again. If I wanted, for example, this guy, the angry
guy to be black, I would rather create
a new pixel layer, go to the pixel persona and
change the color to black. I think the brush was
remembered exactly, and I would rather do it again. Of course, then I have to
change the other elements so that his mouth is not
merging too much, maybe. This would be
actually interesting, going back to the designer persona just to see what
it would look like. For example, this
could be white. And maybe his eyes could be to to to something else like that. And now all of a sudden we have an angry black cloud
in our pattern. I think I'm going to
leave it like this. And I'm even starting to
like this gray background. Not everything has to be
super colorful like here. So one option is to recolor. There's another thing
I wanted to show you. I'm going to create
maybe duplicate copy. Make the original invisible. And now I'm going to
shift this cloud so that it gets cut by our
original campas, okay? And now two to two, we will go back to
this original shape. Delete all the
textures that we used, create a new pixel layer
so that I can demonstrate one challenge to you when
working with the pixel persona. Let's also zoom out. Theoretically, this cloud should repeat here also
the angry cloud. A here, you see, now what
happens when we want to work in the pixel persona and it gets cut outside of our
original canvas. We're still on black,
the brush is correct. We start to color in and
this is what happens. See, this is another limitation
of the pixel persona. If I wanted to fix that, does it mean that
this cloud can never be positioned outside
of the canvas? Of course, it can, but I'm going to delete it and
go back to the original one. Before I create anything with the pixel persona
that will be I mean, the original element
that we're working on. If I know it's going
to be cut out, I will first position
it somewhere within the original canvas size, then decorate it with my
pixel based elements, and then I'm going to
shift it because you see that this
texture is clipped, but it doesn't matter once
it is done, so to say. So this is let's
say one limitation. Another limitation would be
when drawing with the pixel persona outside of the
original pattern tile. For example, I create a
dedicated pixel layer, and let's switch off
over here the snow. Back to this pixel layer
that I just created. Let's switch to white. And let's take this
more scarce noise brush and make the snow like this. See, again, I cannot create
anything here outside. Of course, it will be mirrored. But maybe I can choose a sticker brush
to show you what I mean. If I wanted to create wind If I'm drawing within,
again, the brush. If I'm drawing within my original tile, then
everything is fine. But the moment I go out, see it's getting
cut so I'm going to go back with the
elements that were cut back to the
designer persona. This is this pixel
element that I created. If now in post production, so to say, I want to
move it, then it's fine. The problem, it will not
be cut when I'm moving it, but it will be cut
when I'm drawing it. So in the context of
creating repeat patterns, this matters if we want
to draw something in pixels outside of our
original pattern tile. To say this is very important. Going to remove that, bring back does Victor
snow that I wanted. And that's one limitation that I wanted to talk
about in this lesson. In the next video,
I will briefly talk about recoloring
our pixel elements.
11. Re-coloring Pixels: Okay, we continue chatting about the properties of pixel based elements
and affinity designer. So one way to recolor
is to draw it again. So I wanted to change this grumpy angry cloud
into a black cloud, because it's just
one simple element, I can still switch
between the colors because I didn't delete those textures here
on the layers. It was easier for me just
to grab my pencil again, create a brand new pixel layer, and to make it from scratch. Now I want to make a copy
of this cloud so that I don't destroy the other
cloud that I already like. There's another way to recolor our pixel layer
in affinity designer. We have to move back
to the Pixel persona. Then we have to select the color that we
would like to affect, and then we have to add. So when you click on
the question mark, it will give you the names of the other settings that
you have in this pixel view. We have to apply an adjustment. Over here, there's a whole bunch of options that I haven't explored too much yet myself because I mainly work
with vector elements. For example, you can
work on black and white, brightness and
contrast and some were here towards the middle
or even the end, you have the option to recolor. When you click on it,
you have this menu, which for me personally
is not super handy. You have to make create this adjustment and
then you have to clip it into your cloud. For example, lightness is on 0%. That's why it's
black. When we go up, you see that we make
something brighter. We can also increase or
decrease saturation. Here we can experiment
with the hue. For example, we can
make something green, maybe again lighter, maybe less saturated
to make it pastel. This is one way to recolor, but it's not as good as in
procreate, for example, where this menu so in
Procreate, for example, recoloring our pixels is
much easier because you just go to those adjustments menu
and you can, for example, choose hue saturation
brightness, and you can pump up the saturation or bring it
down to turn into gray scale. And I think it's a
little bit better. So I think it's something
to get used to. I find this a little
bit too small, and it only works, of course, if the pixel color is just one single color
that can be edited, so you cannot have I
mean, you can experiment, but I would rather split colors if I know that I want
to recolor them. There's no quality loss, so it's basically
just procreate, adjusting hue
saturation brightness. If you want to go back to it, remember that this is clipped
inside of this pixel layer. That's why there's an arrow that allows you to close
it and to open it. Then if you want to
get back to this menu, you just click on
those symbols here. You can, of course,
get rid of them and you can keep working on it. For example, you can
keep changing the hue. This one is a little
bit more minty. I actually like this one. Then this is something that you can keep as an alternative. Now I can go back to
the designer persona. Put it somewhere in the
place of this black cloud. Maybe this will be more subtle. Hide the black cloud, and now
we have another variation. I can also bring back
the color of the e to I think this is just pure black that
the other clouds have. And now the only difference is that it's a little
bit more minty. Maybe the mouth
and the eyebrows, I can also switch
them back to black. Now it's just this
black sheep type of angry cloud that is just a little bit
different in color. Maybe the eyes can be
just like those pixels, but I'll go to HSL sliders, make them a little bit darker. Maybe this could be interesting. I just wanted to sum up the limitations of
the pixel persona. Remember that if you would like to create a
new pixel texture, you have to draw
within your canvas. This is very important, otherwise, things
will be cut out. But you can also remember
that once this is created, if you go back to the
designer persona, we take this angry cloud, then you can move it non destructively and
everything will be okay. So this is all good. If
you want to recolor, you can either create just variations that you say
you don't get rid of them, and you create
each of them anew. Or you can use this, as you can see here,
this adjustment layer, which has to be clipped to
this pixel layer and then you can make your adjustments
by manipulating hue, saturation, brightness
or lightness, and even the opacity. Those are the
options. I think that patterns don't have to
be super elaborate or intricate and that's why I'm teaching this for
pattern design because it's technique that demands
a little bit of effort, but it's completely manageable. It means that the effects
are completely worth it, even if it takes
an additional step and that's why I wanted to
show you this technique. Now when it comes to
working on texture, let's also make sure
to save our file. Now, the one thing
that we have left is to discuss how we can enrich our patterns by using
vector brushes. This will be in the next lesson.
12. Texture: Vector Brushes: All right. So just
to quickly recap, we built our base
assets in Adobe Fresco. Then we were experimenting with vector based assets for texture. And then we were getting
to know a little bit better the pixel persona
and affinity designer. And in this lesson, it is time to learn a little bit more about vector brushes. I'm going just to open an
entirely new document. The size doesn't
matter so that I can show you vector
brushes separately. The vector brushes are available in this menu here under
the designer persona. First, you have to switch
to the vector brush mode. Then you can go to
the color studio, and you can also adjust the
color on the stroke side, just like for the pixel persona. Now, all the brushes that are available are super awesome
and therefore free, and there's a lot
to choose from. They look very similar
to the pixel persona. For example, by default, you will have acrylic
brushes and also here. In this section, you can change the size of your brush just like
in the pixel persona. So when we take, for example, the acrylic stroke brush, making sure that it's black, we can start drawing with it
and we will see that we'll get different types
of texture results. It takes a little bit
of getting used to it and finding your
favorite brushes. You also get Artista brushes, victor brushes for free when you register with affinity and
you can download them. One of my most favorite brushes is this Hatch three brush. Just make it a
little bit bigger. It looks like this as if it was really drawn with pencils. Then we have dry media. So for example, this charcoal
dry is very interesting. And I'm drawing in black on purpose so that you can
see the texture better. I will draw a few lines to show you what variety
we have here, and then I will
discuss the properties of vector brushes in a
little bit more detail. There's the engraving section. For example, that looks
very interesting. Oop. I have a ton of brushes again from Frankintun that I purchased a while ago. I'm going to skip that.
You don't need to buy any new brushes because
affinity has a lot for free. So for example,
dry gouache brush. We just have to
make sure that we always in this
vector brush menu. Sometimes it can switch back, for example, to the move
tool or to the node tool. Then just have to make
sure that you go back. And again, here
we just the size, and you can get
different effects. I'll show you in a second, a few illustrations of mine that use vector brushes,
inks, markers. This is more of a dense marker, but it has some texture
around as you can see. Some texture is more visible
when we change the color. Oil in pasta for example, and the rest is pretty
much up to you to play around with all
those categories to explore, for example, pencils. This one is really awesome. It's for free and the pencils
folder, pencil strokes. I love it because it really does look like pencil strokes. It's amazing. There's also pens, and right at the end, we
also have watercolor. Watercolor is really cool. I use it quite a lot in my
children's book illustrations. This one is amazing. You see? So it has this texture of a real watercolor
brush, actually. So now we can go back
to the note tool. Over here one more time, and you will see
that, for example, this stroke, the water
looks a bit like a worm. It is editable. Editable. Yeah. Just like
any other vector shape, it is very easy to re scale, and it pretty much
behaves like a stroke. So when we are drawing
with the pencil tool, we have the option to draw
just with the stroke. So right now, I'm just
creating a standard line. And then we can also draw
with the pencil tool. Creating a fill. So this
black outline is the stroke, the circle that is empty, and the fill is what
you have inside. We can also switch off the
fill and have only the line, and then we can play with this line through
the stroke studio. And those vector brushes, you will see that
they're not like this standard vector shape which has both the
outline and the fill. They rather behave
like a normal line. And along this line, there's this single
line that is in blue. There is a clipped
vector texture. I think I also have at
least one YouTube video on my YouTube account showing vector passes and explaining
them a little bit. We have a pause. Let's, for
example, recolor this one. We have to recolor on the line
side, on the stroke side. C just choose this default blue, for example, and now this other line will
be also visible. Everything goes on the line. We can add in additional Nodes by just clicking
anywhere on this line. Of course, this doesn't
make too much sense because the texture is getting
a little bit too weird. But theoretically, we
can grow this line, add extra notes, and
with the node handles, we can keep editing it. Again, if I want to recolor
it, empty circle, stroke. Maybe from my Halloween section, we can change the colors, and depending on the
medium that we chose, the color effects
will be different. So this green looks
very interesting. But just like in watercolor, if we choose lighter colors, the texture might be
more or less visible. I guess, with
watercolor in general, it's better to choose
slightly darker colors so that we can really see
those texture effects. Now, some people are not fans of vector brushes because
they say they are not real vector brushes,
whatever that means. But to me, they are real enough, so to say, what does it mean? It means they give me texture. If I were to try to create this effect with
normal vector shapes, it would be impossible. So they do offer really,
really interesting textures. That's number one. Number two, they are very scalable. Number three, they are
super easy to recolor. What was the word
non destructively? Non destructively, so we
are not losing any quality. And on top of that, I think
this original pattern tile, not a pattern tile,
illustration file is again 4,000 pixels square. If I were to go to
Export and export it in an original color of
4,000 pixels, let's do that. Save image to my camera roll. And then if we were to export
it again, but this time, instead of 4,000, we would
choose maybe 14,000. That's a lot. Square. It
will generate a new export, which will naturally be much bigger because it's a
much bigger dimension. Remember, if you're creating pixel based artwork,
for example, in Procreate, you will be tied to your original
document size. You can scale it down, but you cannot scale it up. Here, I started with
4,000 Pixel square, but now I am exporting exactly the same artwork
in 14,000 Pixel square. Share, let's save this image. And now we will compare if the quality really deteriorated, basically because
we scaled this up. So when I clicked on Safe Image, I clicked to save it
to my camera roll, so let's find it
in my camera roll. Alright. So these are my
recently saved illustrations. This one is 4,000 pixels. I mean, it's the original
size that I created in, so it all looks great anyway. Now when we swipe
to the next image, this one is 14,000, and it's exactly the same. So if we click on this I, we
will get the information. It's a bigger file.
It's 19 megabytes, but it's 4,000 pixels square, whereas the previous one, we click on the
information is just 4,000 pixels square
and 5 megabytes. This is working.
This is brilliant. Sometimes I create
an illustration for my agents and they ask me for higher resolution
file converted to CMYK for the client portfolio that
they need to print out. I don't have to do everything from scratch or I don't have to, I don't know,
export it to Adobe, to maybe edit it up there. Everything is possible
in affinity designer. Those are the advantages
of those vector brushes. You can scale them super easily. You can export them at any size. You can recolor them. And through the node tool, they have this flexibility. Because they behave like a line, you can also go to
the stroke studio, and you can change also
the size of the stroke. So to say, which will influence depending what texture is used, meaning depending on
what brush you're using. We can go back to
this test file. For example, this
original watercolor blob, we can make it smaller
or we can make it wider. The same with this
engravings brush, smaller or much
wider, of course. We usually come at
some sort of a limit. But when you're working on canvases that are between 2000, 4,000 and even
more Pixel square, then you rarely arrive
at those limits. These are really,
really sufficient. So this is how you roughly
use vector brushes, and now how can we use
it here for our pattern? First of all, you have to
know your favorite brushes. I already have a few.
So one challenge for you will be to
explore this library, to go to the Vctor Brush tool. For this background color, I would say I would stick to the white because the contrast
would be good for me to explore what kind of Vctor brush details I can
add in to this pattern. Then you go to the brush
studio. Hatching vertical. I wanted to create or recreate
those clouds with rain. Look at this lovely texture. And this is actor
vector, I don't know, vector hybrid pixel brush that behaves like vectors and has all the
flexibility of vectors. So I don't know
what's not to like I can start drawing my rain. If I don't like it, I
can always go back. I will clip my canvas, so I just see the
original pattern tile, and I can make a few shapes. But because everything
is vector based, when I switch back, it's super easy to
reshuffle everything. For example, this angry Cloud. I would like to move it a little bit here and maybe
make it bigger. And now from the node tool, I would like to explore
if I need to make adjustments to to
those guys here, maybe make them a
little bit bigger. Actually, like how
it looks right now. Then I can group everything. So this is my vector brush rain. And because it's a line, it will behave like
a line in a way, and on this line, we will
have this raster texture. We can edit it from
the stroke studio. So if you want, for
example, change color, we have to do it on
this empty circle side. Ooh. That looks nice. I can also make a copy, duplicate and I can keep one in black and one in white so that I can make
up my mind later. So back to the vector brush, let's explore one
more variation. I really like to do
this watercolor. And there's one brush that
is called water particles. I'm on white color. This is the size of my brush. I just want to see that
can also look interesting. You can make rain like this, even though I think
it's too grainy, so I'm going to go back and try to look
for something else. There's watercolor bristle. That can be fun, or I
can make wind out of it, you know, a very abstract. And unlike with the pixel, I'm just going to
demonstrate here, we can still draw outside of
our original canvas size, and it will be non destructive. Nothing will be cut. And we can see our whole preview here to double check that everything is
really nicely balanced. So this is, for example, one more pattern variation that I can think of,
and it's textured. You see, it's very beautiful. So this will be my pattern tile. If I ever want to edit
it or make it invisible, I select everything
and I group it, and now I can either
switch it off, or I could, but then I have to leave the
vector brush, for example, to the moveTol and now I can also recolor
it, for example. That looks very cute
or make it darker. Black also looks great. For a pattern for kids
or just plain white. Now, if you have your
favorite brushes, the way I have, I have
a few favorites here. You can also save them
into a dedicated folder. And this, by the
way, also applies to the lesson about pixel brushes. So if you want to
create a new folder, you go to the brushes studio, of course, three vertical lines, and then you add category. And for example, we can
I like to choose zero or one so that my categories
are sorted alphabetically, but the numbers will
come to the front. And then just for the sake
of this demonstration, I'm going to make
a new category, for example, new favorite. I would create it
and it's empty. I can go, for example, to this watercolor section, and I think I used this watercolor bristle
number three brush. If I swipe to the left, a new menu will pop,
and I wouldn't move it, I would copy it, copy two, and we're looking for this new category called
zero New favorite. And now a duplicate is made. So when we go back to this Oh, this is my old
favorites category. New favorites, then we
have this brush over here. I also liked what else did
I like Is it in patterns? This hatching vertical. So again, swiping to the
left, copy two, new favorite. I think also pencils, I really like this
pencil strokes brush. Swiping to the left
copy two new favorite. And now when we click
on this title here, we have access to
the whole library. We can go back to this new
category that we just created, and this is one way
to kind of cheat your way into remembering which of the brushes
are your favorite. I have to admit when I first started working with affinity, I felt a little
bit intimidated by the sheer number of brush
options that were there. But again, one plus is that you don't need
any new brushes. Everything is here. You just
have to pick your favorites. I also have some
favorites for liners. And of course, I also
bought some brushes. So this is, for example, by True Grit texture supply. And of course, Frank
and tune brushes, I think I only buy from
those two sources because not all of the digital shops
out there for brushes, not all of them still create
for Affinity Designer, which hopefully will change
soon, but in any case, there's so many brushes
here that I am good. I really don't need
anything extra. So I just want to go to
the Stroke Studio and make this texture a
little bit wider. Super convenient, and I'm
going to leave it at that. So we were working with
our Fresco base that has a bit of this uneven outline which adds a lot of interest. We experimented also. Just let me remind you with
more of our fresco assets. So textures that you
get access to in the resources section when you download this whole folder. We also worked here
with the pixel persona, clipping textures, for example, to our vector shape. And finally, we also so
let's get rid of this snow. We also played around with some really awesome vector
brushes affinity designer. And kind of referring back to the very first lesson when I was explaining what
software is out there, when you compare
all those options in between different types of
software Procreate, Fresco, Adobe, then you'll see that
affinity has a lot to offer, and luckily for me, I still have plenty
of material to teach. I think it has a lot of offer
with regard to texture. Some people think just
because it's called designer. It is mainly for vector
design, which is also true. It's called designers, so
a lot of people use it for graphic design with text, you know, for marketing
branding purposes. But it's also very suitable for illustration and it's also very suitable for
pattern design. So we have one more
lesson to cover about pattern variations and about our color palette
and recoloring.
13. Efficient Pattern Variations: Throughout this course, I showed you ways to be efficient. So one thing that you
can do is you can create different pattern variations
with regard to the details. For example, you can create different the card
developments that are around your main assets, which for me, are those clouds. You can also create different
kind of texture elements. For example, this
pattern variation, which I remember I just made
a copy and I let it be. You can still go back to
those happy experiments, and then you can
keep refining them, change color and so on. So you can make it
one set of assets. For this pattern, I also created different
color versions. Then I also saved up
those extra assets. So I'm going to
bring this pattern here so that you can see better. I think I created also one
with a pink background, one with a green background, and on top of that, I use those cats,
those cat assets. To create greeting card design. So when you are
creating your patterns, you can also recycle
all those things to different types of materials, including
marketing materials. For instance, as we
speak, right now, I'm running a sale on all my
courses through my website. Let's have a look. So
this is my website. And some of those assets, they will be part of my branding or my promotional
material, you know? This is how I created
this banner to announce my Halloween
sale, for instance. We can also go
together to Instagram. That was at least from today. This is how I created
this post about the sale. I was also using the
same spooky cloud that I created for this pattern. So one option that you can do is to create different
color variations. We haven't talked about
color palettes yet. Sometimes you will start
with gray scale and you will be happy with the outcome. For example, if I wanted
to change this gray color, I have to focus on
the background layer, then I have to go
to the fill area. Oops. Select this blue color, and I also have to remember to change the blue on the clouds. I have to go back to
this original folder. I will open all the
clouds at the same time, select just their bodies, and readjust it to this blue
so that this shape kind of merges with the
background or kind of floods into the
background seamlessly. If I want to find any
particular color at a time, I can also select this
one color, for example, this green and from
the move tool, I can go to SAM. Fill color. And it's
only this green. So maybe it's a bad example. But if you had more colors, you could select
exactly the same color, which is a few clicks
using this function. And now I can maybe change
the color here to orange. I think those pinks
were exactly the same. But you can keep
tweaking your pattern. You can keep adding
different details, recolor it to your liking. So to change this pattern into
another pattern variation, sometimes it's enough to
just change the background. So for example, this
pattern here with the cats, I mainly changed the background and I just needed to
see, for example, if some of this green
does not have to be changed to a different color. But it was a matter
of maybe 1 minute and I was able to create my
own pattern variation. So I think recoloring is clear. Then another thing that we did was we created different
types of assets, and this is how you can create similar pattern variations
by using different elements. So we had snow. This one, we can create very quickly a pattern for kids, for example, with the stars, there
was a variation with this wind can recolor
it also very fast. We had a variation
with this self made vector texture for snow and
all that, you can export. Let me just make
sure that this is the original pattern tile. Every time you
create a variation, you go to the three
vertical lines export. And in this original size, you can click Share and you
can save image either to your camera roll or you can save it to files to
a dedicated folder. Every time you have a variation. And then perhaps you put
everything into one folder, and then you see
what you've got. For example, when I was
working on those GrampyClouds, I created I didn't bother
about color changes at first. I just wanted to
create see there's one with the textured rain. There's one with
like a dotty line that's also Victor brush. I hope you can see
that when I zoom in. And there was one
with my own texture. And in this way, I have one, two, three, four different
pattern variations. On top of that, I can also recolor to make
further variations. So I hope that this small
demonstration shows you that you can expand
it very, very fast.
14. Final Thoughts: Yay, congratulations. Another pattern design
course in affinity complete. I really can't wait to
see your final work. I hope that you also
fell in love with adding texture to
your vector patterns, and I am absolutely sure that you will get fantastic results. As always, in case you're taking this course
on Skillshare, you can share your work
in the project gallery. You can, for example, show
us your pattern tile, or you can screenshot
your entire interface. And if you're taking
this course on Gum Road, you can share your work on the
social media, for example, Instagram, under the
Hashtag Magical vectors. Also, don't forget to download your class resources and
leave a class review. I would very much appreciate it. Now, we also have two dedicated Facebook groups for people who use Affinity Designer for general illustration and
also for pattern design. You can definitely publish your projects there and
ask for a critique. So it doesn't matter if
you're taking this course from Skillshare or you
bought it on Gum Road. And even for
Skillshare students, it is a good extra place to connect with people
outside of Skillshare. Or, you know, you can also post your own dedicated threat
with your own images, and even my students
were posting their videos to explain
problem that they had, and the whole community was
able to help in the end. And in addition, I have
some extra resources and articles because I really
like writing on my Sap Stag. I call it a blog letter. It's like a blog, but
it's also a newsletter. You can get it to your mailbox. I called it the art
of growth because it's about illustration
in general, life of an artist,
and, of course, also affinity
designer and using it for work and for
personal projects. And I like promoting this
platform because it's great also for leaving
comments, getting involved. Again, with people
who are outside of Skillshare or Instagram, you can leave your comments,
start a discussion, or you can also discover other creatives who
write their articles. Remember that you can
learn with me both on Skillshare my Gumbod courses, or maybe I will also see
you on my YouTube channel. I'll see you in my
next class. Thank you.
 Weronika Salach, Art with MAGIC