Transcripts
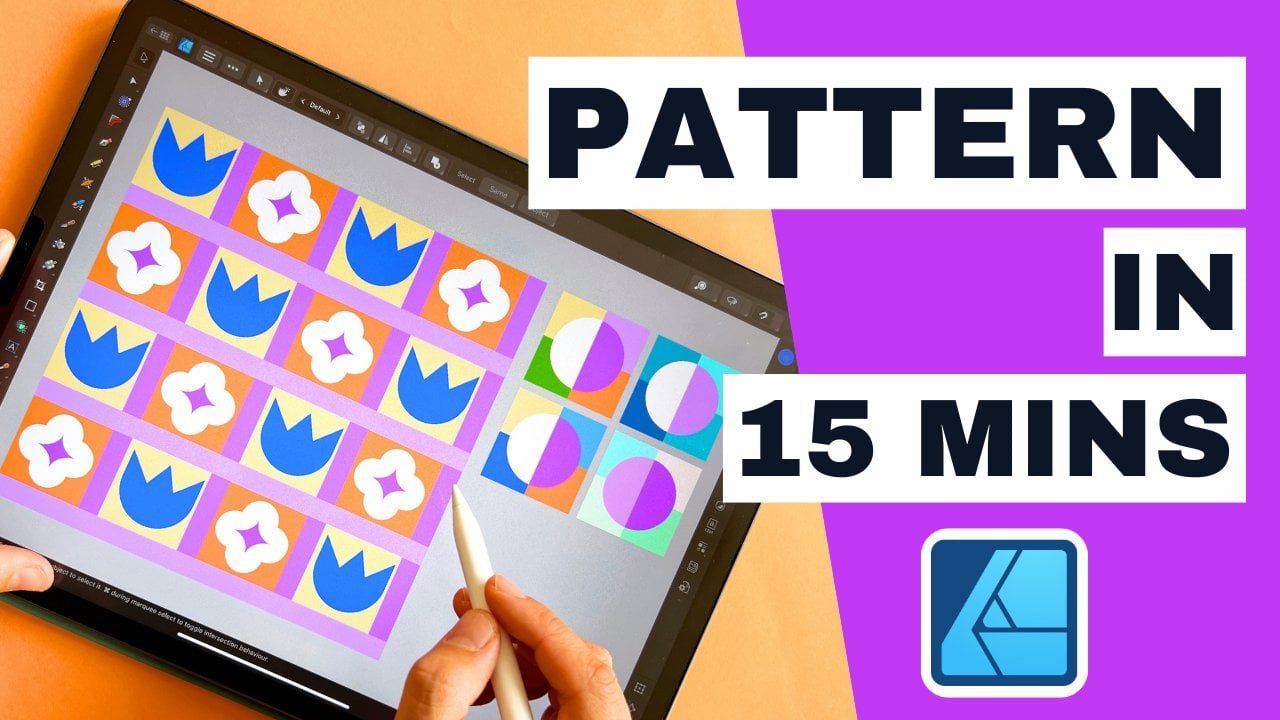
1. How's This Course Different?: This year, I have completely
changed the way I'm creating a repeat patterns
in Affinity Designer. I am super thrilled to share
my new process with you. Once you see how I'm drawing
in my automated templates, you will be actually shocked
at how you could have been working all this time using the life pattern preview tool. You will be surprised that how much you were
actually missing out. Imagine if there was a way that the repeat was created
automatically for you. That's right. No more
transform studio and no more manual calculations. You're practically
drawing your pattern. The repeat is created in
real time as you're drawing. Hi, my name is Vera in
case you don't know me. I'm an illustrator and surface designer based
in Berlin, Germany. I'm teaching about
the graphic design and surface pattern design
in Affinity Designer. This time around we are tackling the most requested
by my students, diamond repeat, but with
an automated twist. I'll be showing you
step-by-step the new way of creating pattern repeats
with my automated templates. You will solidify
your knowledge about using symbols in Designer, and I will teach
you how to harness them to create
repeat automations. The result is
beautiful and detailed repeat patterns
with no mistakes, speeding up your overall
creation process. Apart from that, I will
be showing you how I'm managing my color palettes
in Affinity Designer, especially for
faster re-coloring, as well as how I am naming and managing my Affinity files. This course comes with a free diamonds repeat
workbook, three color palettes, and a free automated
diamond repeats templates so that you can
start designing right away. Are you ready to automate
your patterns with me? Then I'll see you in the class.
2. Getting Started: To get started with the course, all that you will need is your affinity designer software
and your drawing pencil. I'm recording this
course in May 2023, and my affinity designer
version is 2.0 0.4. I'll be showing my demonstration in affinity version
two on my iPad. However, you can certainly follow along regardless
of your version. The steps that I'm demonstrating
in this course can be applied to both version
one and version two, as well as to both
the iPad version and the desktop version. This course is suited for
more intermediate students, but I'm pretty sure that ambitious beginners
can keep up with it. If you're a complete
beginner and you don't know the interface of Affinity
designer just yet, please consider taking
my introduction to Affinity Designer course. If you'd like to proceed
with this course and at the same time work
with vector assets when building your pattern, check out my vector assets
course for Affinity designer. Your task in this
course is to create a diamond repeat
based vector pattern in affinity designer,
whichever version. In order to focus
on purely mastering the template and learning
how to work with symbols, I suggest a simple
botanical motive for your project, but of course, feel free to choose
any theme that would be a good fit for your own surface pattern
design portfolio. If you're active on social
media, you can, for example, share your beautiful
pattern on Instagram, using the hashtag
magical vectors and tagging me in your caption. If you're in our
Facebook affinity group, you can post it there
and ask for a critique. Don't forget to download
your resources. This course comes with a PDF
Diamond Repeat workbook, three JPEck color palettes
from my own collection. In case you would like to skip creating your automated
template from scratch. You can download the Diamond repeat template that
I created for you. There's one for Version one affinity and one
for version two. Thank you so much for taking my course. Let's start learning.
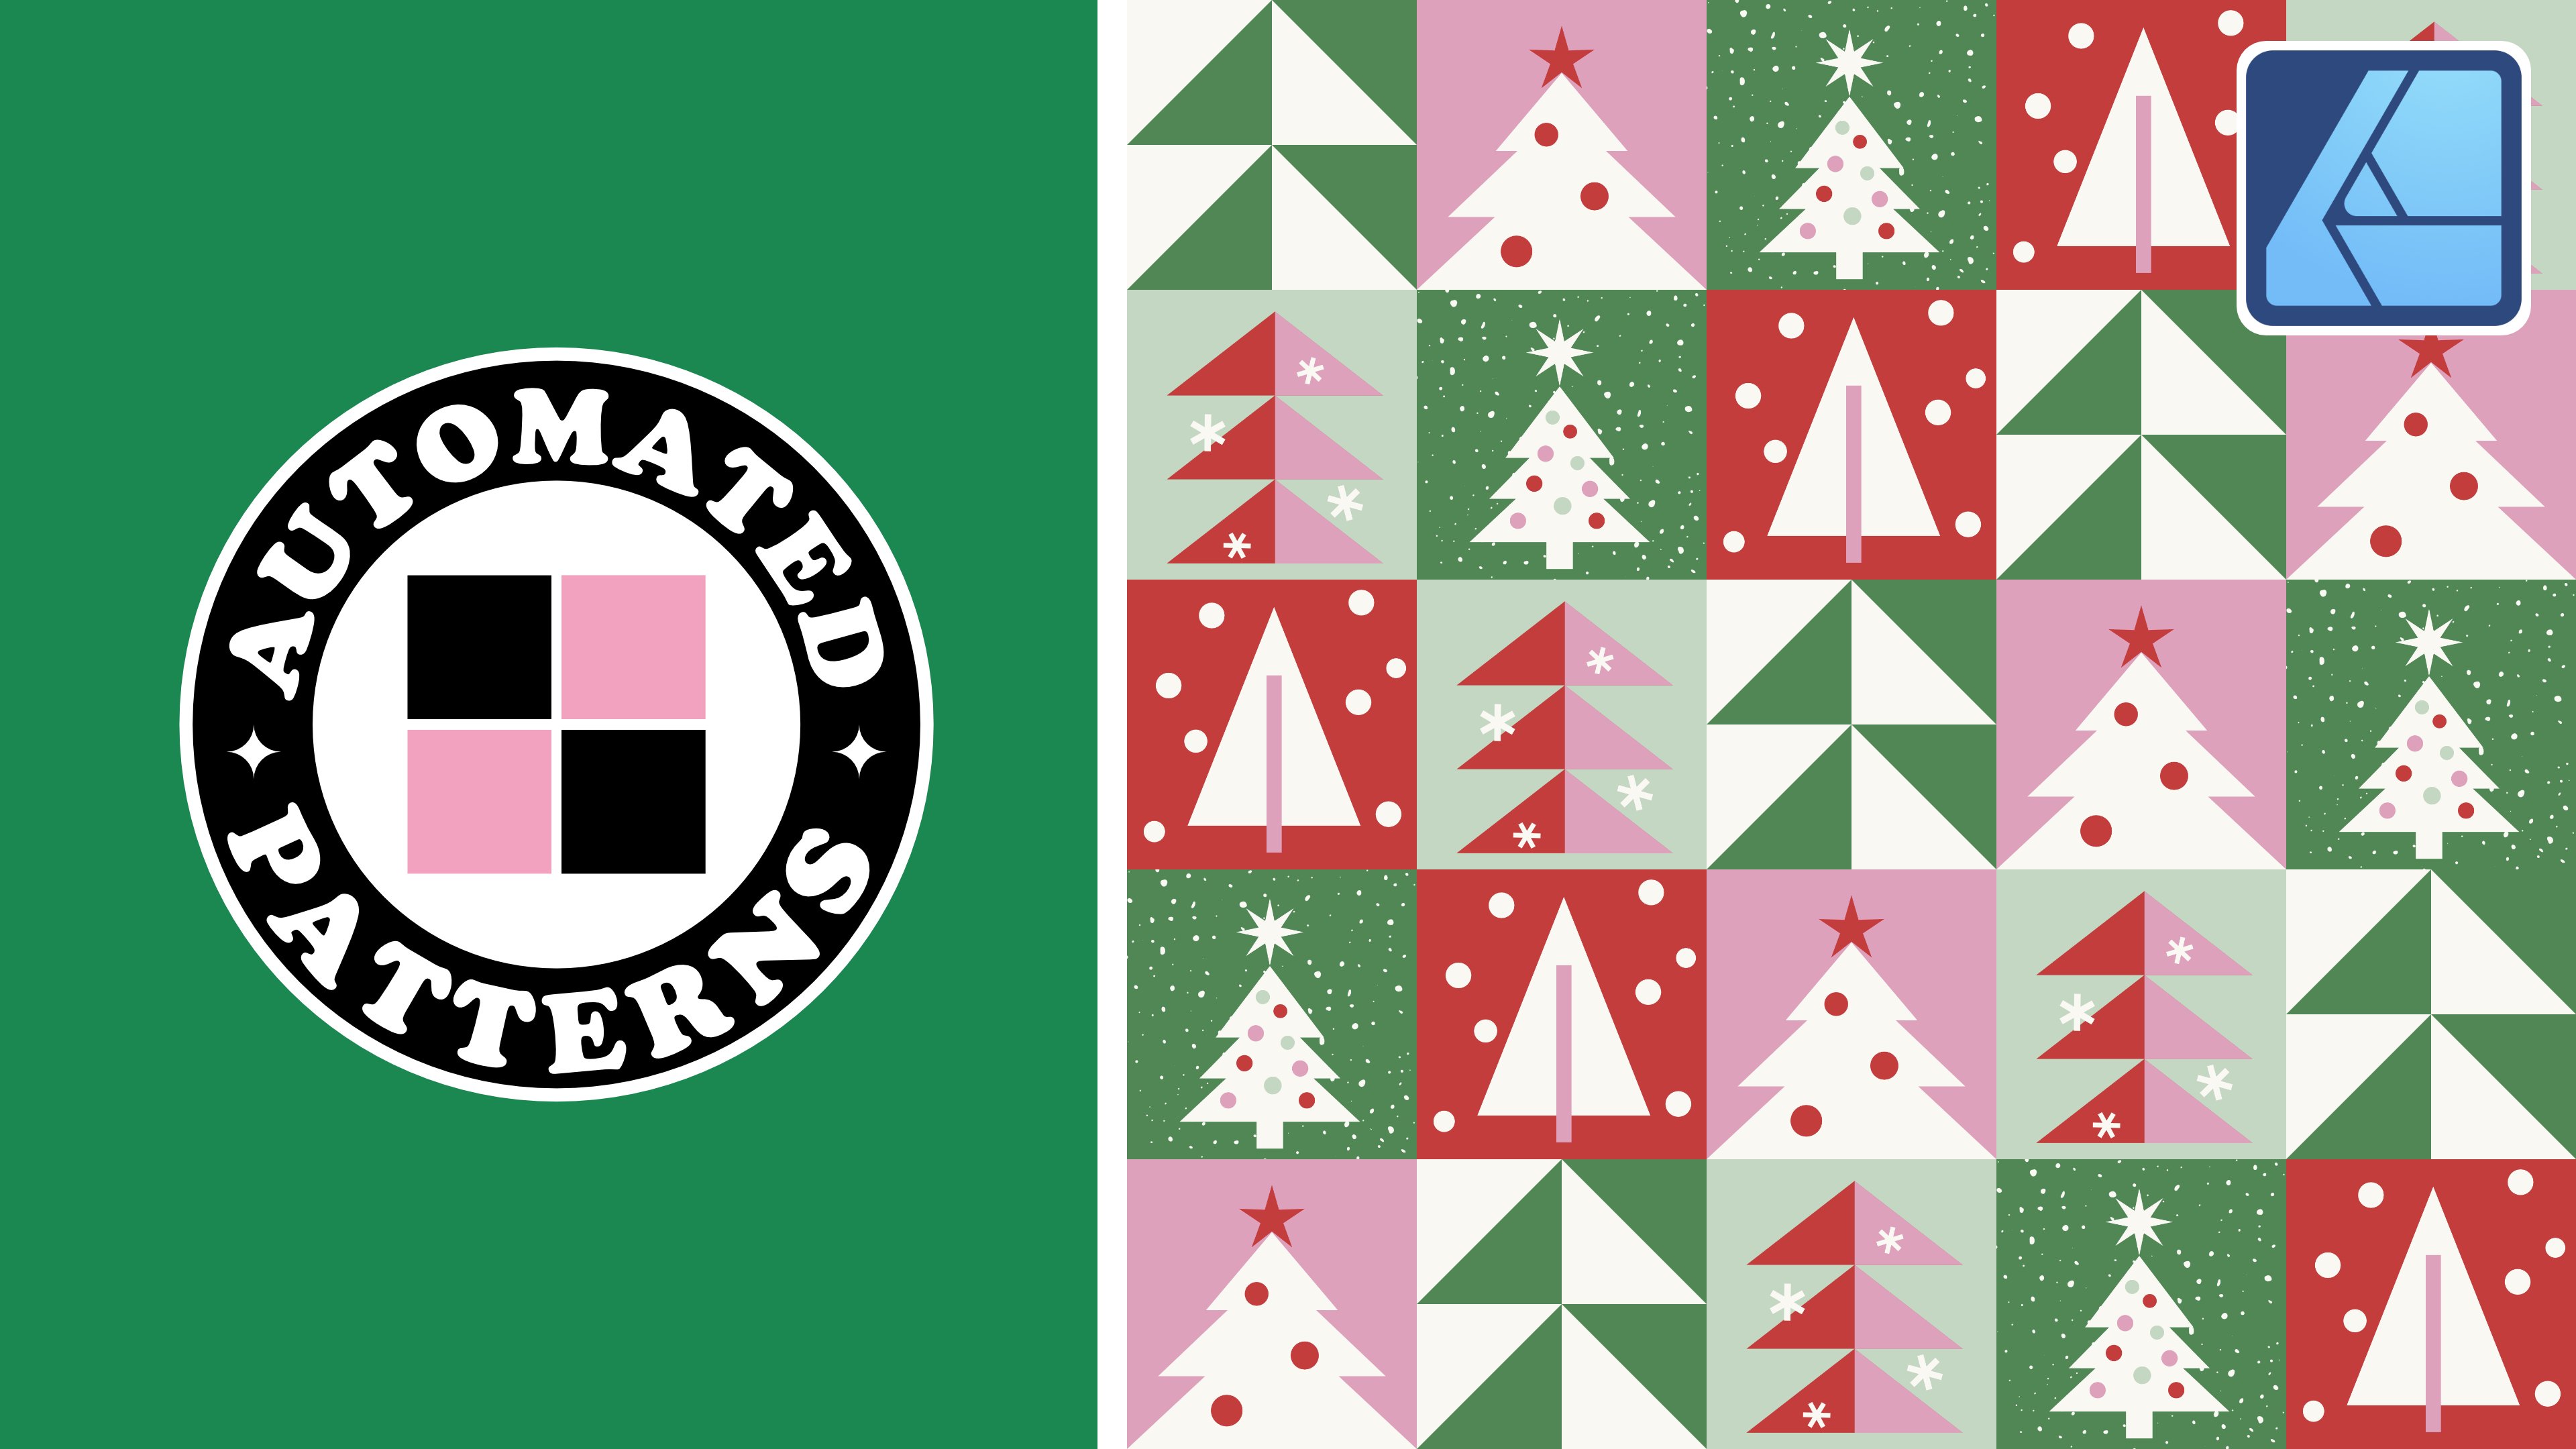
3. About The Diamond Repeat: In this lesson, we will
briefly talk about diamond repeats and
give a few examples. Let us first answer
the question what is the diamond repeat and
why is it so popular? A diamond repeat repeats
at a 45-degree angle. Each of the diamonds
repeats with one another perfectly
in diagonal rows. It's usually squares
and this is also what we will be
drawing in this class but you can also come across
elongated rhombus shapes. Diamond repeats can contain elements of symmetry
but they don't have to. It is really fantastic for more intermediate designers
and it's also really terrific for both
geometrical patterns as well as for
well-hidden repeats. It really gives the
pattern a very nice flow. I've mentioned before
that you can also create diamond repeats with
elements of symmetry. You have to stay tuned for another class which
we'll tackle that topic. We will be just making a plane diamond repeat where
the diamond will serve as a guideline for our pattern
and the result will be a pattern that
is very detailed, quite intricate, and the
repeat as well hidden. Let me show you what I
mean by demonstrating a few diamond repeat examples
from my own portfolio. This is one of the first
botanical patterns that I created using my automated
diamond repeat template. This is one of my most
favorite patterns. I think it will look really, really amazing on the fabric or on stationary or
on wrapping paper. Here you will see
that indeed we have a diamond shape within this
pattern but it actually looks pretty well hidden
and the patterns seems to be flowing very seamlessly. Next, we have another
botanical pattern that I created for one-off design challenges
that I found on Instagram for a
wallpaper design. In this case, I
was actually using a template with
elements of symmetry so it's a symmetrical
diamond repeat pattern with vertical symmetry. I truly believe that the
diamonds repeats look really, really well on wallpaper design. This is where you can
see my diamond repeat. In this particular example, I was aiming at a more
geometrical design. The repeat is not that
well hidden compared to the previous pattern but
that was actually my aim. Just like in this next pattern. The diamond repeat pattern
here is very, very obvious. The diamond served again as a base or as a guideline
for the flower shape. I also thought that
it would look very, very good as a fabric design so I included this pattern
also on the mock-up. Here you can see the
diamonds repeat elements. But since it's not
so well hidden I'm sure that you could
identify it straight away. [LAUGHTER] Now this is a pattern that we will be creating
in this course. Once I was finished with this
pattern I knew right away that I would like to use it
on a stationary mock-up. The repeat is not that obvious. The pattern is very flowy and all the blooms are all the flowers go in
different directions. Here you can see
my diamond block but it's very well hidden. I also wanted to show you a few examples of
diamond repeats from amazing artists that I
know from my social media. I'm showing those patterns
with the artist's permission. This is such a gorgeous
diamond-based pattern by Annelie. This is what she says
about the diamond repeat. "I actually do love
diamond repeats because they're a
quick way to make a simple repeat much more interesting and it makes the eye move more
over the pattern. Always a plus when the
repeat is less obvious." Here we are definitely
on the same page. I also believe that diamond repeats they make
the pattern much more interesting and there's a lot
of flow in those patterns. She also thinks
that it's easier to hide the repeat with
the diamond repeat. Another beautiful
pattern is by Ashley. At first, I didn't
even know that it's a diamond repeat but
we were in touch and she actually suggested
that I present to you this particular pattern
and she said she created it using
a diamond repeat. This is what she says. "The diamonds repeat
is my favorite. It's my go-to when I'm looking for a structure
in my design. Also when you overlap
elements the repeat is often not as
noticeable or expected." You will notice
here that Ashley is using a technique where she pays more attention to those
floral elements overlapping. This creates even more
depth in her pattern and it makes the repeat
hardly noticeable. You would probably never guessed that it's
a diamond repeat. It looks stunning. Next, we have Rebecca, who is also a fellow
Skillshare top teacher. Another beautiful stunning
botanical pattern which I think has a
bit of a vintage vibe. I really liked the fact that this whole
pattern is monochrome. This is what Rebecca says. "I love working on diamond repeats in
Procreate because you get to see how your
pattern edges are overlapping with the
tiles around them. It feels more like
painting a picture than constructing a pattern." Rebecca teaches her technique of creating diamonds
repeats in Procreate. You may want to go and check out her classes
on Skillshare. Next is Beata, who created this
wonderful very modern, and bold-colored pattern where the base is a more
elongated rhombus. This is what she says about working with the
diamonds repeat. "I love designing using
diamonds repeats. This shape introduces balance into any chaotic composition. It's one of the most
elegant designs perfect for a wallpaper, fabric, or branding." I can totally agree with Beata that diamonds repeats
are very versatile. I've mentioned before
that I really love it for wallpaper or for fabrics but it has so many
more applications. I also wanted to show it is beautiful somehow very graphic diamond repeat
pattern by Jen and this is what she says
about the diamond repeat. "The diamond pattern
is a favorite of mine for its versatility
allowing for both simple or complex motives that create a beautiful
repeat pattern." This is totally true. The diamond repeat
is so versatile. You can either create very detailed patterns which have a lot of elements but you can also go for more
minimalistic patterns that have this
Scandinavian vibe. They're very pure,
they're very simple, and yet very striking
and very attractive. Now are you ready to create
diamond patterns with me? Let's get to it.
4. Clip to Canvas: Hi everybody. I get this
question quite a lot, even though it is
included in the tutorial, but I thought I will highlight it in a
dedicated mini video. Namely, sometimes you're wondering how to get the
view that I am getting. Let's open the layers studio. So when I switch off the
pattern and the background, those are the diamond
guides that I built. We can also bring
back the color. So this is what you want to see, when you open your document, you usually just see this. That means that your
canvas is clipped. Everything that you want
to build around it, it's taken away, so this is one preview mode
that you have access to, and I already used the
keyword here, preview. You have a preview
options menu over here. This symbol, I don't even
know what it looks like. It looks like some
sort of a dashboard, but It reminds me of when you're driving a
car and you have all those indications of
how much gas you have left. [LAUGHTER] Maybe this is it, so this symbol next to snapping, I use it all the time. When you click on it, you can unclip your canvas and
when you click back on it, you clip your canvas. Another way to access it is
through the hamburger menu. You can go to canvas, and here we also have the option to select clip to canvas. But those were 1, 2, 3 clicks versus just
one simple click. From my own experience, I use this symbol pretty
much all the time. I do not even bother to go to the hamburger menu because
this is just so convenient. When do you want to use that? Usually when you're curious
about your pattern tile. So you're working
on your pattern. You see your diamonds, but you're like [LAUGHTER] you just curious you want
to see you, okay? What will the final
pattern tile look like? Then I select the symbol, and this is where you can
see your final pattern tile. So I hope that this
answers your question. Let me know if you have any more questions that I could answer for you
regarding this course. You can either do that
if you're watching on skill share in the
discussion section, or you can also
reach out per e-mail or in our Facebook
affinity support group.
5. Diamond Repeat Automated Template: Let's create our diamond
repeat pattern template in Affinity Designer. I will be showing you my process in Affinity Version
2 on my iPad. However, you can replicate
this workflow for the Version 1 as well as
for the desktop version. Thanks to this template, you will be able to create a beautiful diamond
repeat pattern in a semi-automated way, without using the
transform studio. That means no more mistakes, hopefully no more in maths, and no more pixel counting. Alternatively, this
template will be available for you to
download on my platform. However, by following
this exercise with me, you will learn more about
the program and you will become much more efficient
in using symbols. Let's get started. All the pattern templates
that I've created are saved directly onto my iPad because I still have a
lot of storage space, but you can also choose
to save them into a cloud server such as
Dropbox or your iCloud. So all the Affinity
templates that I created are available
here under Templates. Beforehand, I have them
saved into my Files app. So this is the Files pp, you can also search for it. I already have it
here, but you can start typing in files, and this is the
pp that you have. Over here, you can see I have created a dedicated folder, so here you can click
on this folder with the plus symbol icon and you can create a
dedicated folder, that's what I would recommend to store all your parent templates. You will recognize
that those are Affinity Designer
template files because they have this
extension.aftemplate. Next time I want to use
one of those templates, the software will simply create a copy from
this template. After creating them,
you can access them from the template
menu, set over here. When you click on it,
the system already recognizes that I have
access to this folder, if you cannot find it and if you have saved
it onto your iPad, you just go here to the
location on my iPad. Here I have the
folder that I named with the zero at the
beginning so that it's always alphabetically
on top of my list. When I click on to
it, you will see I have all my pattern templates, so I have one for brick,
for checkered templates, one for diamond, diamond
with a vertical symmetry, full-drop, half-drop, and I have a lot
more in the making. If I click for example, on this diamond template, I will open a new document, so this is my diamonds template. When you go back to
the main homepage, you'll see it's
just named diamond, just like my file. This one over here, diamonds. Then once you start
working on your pattern, you can, of course, go
to the hamburger menu, and you can save it as, and this is the way
in which you can rename your working file on
that particular pattern. But for now, let's close this
document and let's create this diamond repeat
template from scratch. I'm just going to hit the x and I will close
it without saving, and now we will start
a new document. Let's go ahead and let's create a new document by
selecting new document. I already have created
a new category called pixels that I always work
with. You know what? If you have taken my
previous classes, you can also learn
more about setting up your presets and your categories in my beginner's classes. For the purpose of our tutorial, I have a special document that I have called
4,000 pixels pattern. Because this is exactly the
setup that will work for those automated patterns or
semi-automated patterns. In case you don't have
pixels saved yet, you can just choose
whatever you have here in your Affinity Designer
interface, it doesn't matter. Then you want to make
sure that you change your document units to pixels from whatever
you have chosen here. I would recommend that if you really want to follow along, you also select 4,000
pixels square 300 DPI, and I tend to work with
the RGB color format. Now the most important thing is that you do not
create an art board, so normally this would
be ticked and this gray switches to the right
side and it turns into white. You want to untick it and you do not want to
create an art board. If you would like to
save this preset here, you can click this
plus symbol in the lower left corner and
you can save the preset in the given category and you can rename it or just
name it as you like, but I will cancel that because my document
is ready to go. So very important,
no art boards. Then I hit "Okay", and it creates the new document for me. Now, we have a blank page, this will be essentially
our pattern tile. This main pattern
tile will have, by default a white background. This is really important
because it will help us not to lose our focus and
to draw somewhere else. Then like the background of
the document is set to gray. You can also go back
to the main menu, to Preferences in this
lower-left corner , User Interface, and you can also
play around with the background gray level color, so that when you open the document you have
enough contrast, you can also make it lighter
or you can make it darker. Whatever helps you to
see things better. Now, what we're going to do, we will start by creating
a perfect rectangle. In order to do that, we will be using the rectangle tool, so we click on the
square symbol, and right on top
we have rectangle. Then we start drawing our rectangle and by
default it will be gray, so what I recommend is to go
to the color studio here and to change the color
of the fill and the stroke into
something more bright. I have here my signature
electric metal color palette, and I think I will choose something more
peachy for the fill, and this electric
blue for the stroke, which is the outline
of my square. It's not square yet, but we will fit it into a
perfect square in a second. Before we go ahead, I also like to go to
the Stroke Studio here, and I like to click on
this measurement here, which is right now,
by default 0.2 point. When you click on it, you can just select the new numbers, so I usually take Number
5, click, "Okay", then you will see that this line is getting a little bit heavier. This is just my
personal preference, but on top of that, from the Stroke panel, I like to select this
second line option where the stroke is actually really in the
middle of my shape, so it only makes
the line thicker. That's pretty much it. Now, we have created
our rectangle and from the Move tool, we have to position that
perfectly to our square canvas, which is this white
background here. It's super important that
you're snapping is on. You can also make sure that your snapping over here is set properly next to
this snapping icon. If you click on it, you
can open more options, and then you can select
snapping options. Here you can have a look,
I'll set my interface and just make sure that
we have the same setup. Something that I
have adjusted quite recently is this
setting over here, force pixel alignment and
move by whole pixels. This has allowed me to really snap everything
perfectly pixel-wise and prevent those nasty white lines
whenever you're sometimes testing your pattern
or you're making a bigger pattern tile
out of JPEG documents. Just have a look if
you have everything in the same way and
then click "Done." Now, from the Move tool, we have to make sure that our rectangle is perfectly
snapped onto our canvas. We will see that by seeing
those guiding lines, the green one here,
the red one here. Then we will know that
it's perfectly snapped. This step is really
important for accuracy. What I like to do is having selected this rectangle layer, I go to the transform studio. There's a mistake and I see
it's not perfectly snapped. I snap it one more
time now I also see 4,000 pixels in height
and in my width, and also my anchor point, as you can see here, is
in the upper left corner. This is also correct.
I have zero pixels on the x-axis and zero
pixels on the y-axis, which is my starting point. Everything is perfect. This step is really
important that we check our accuracy
because even if there is one single
pixel difference then our pattern or our
template actually will not be error free. Now, we need to turn this
square into our diamond shape. As you can see here, there's this little handle. Let's maybe make
it bigger on top. When you select this handle, you will be able to
rotate your shape. But we would like
to rotate it by perfect increments so that this shape reaches
45 degrees angle. In order to do that,
you have to put one finger onto the screen, and you will see that
every time you move, it will rotate by
exactly 15 degrees. From the starting point 1, 2, 3, and now we have the
perfect 45 degrees. This is the beginning
of our diamond shape. Now, we have to fit this diamond perfectly onto our
white canvas over here. To keep this shape still
in a perfect square, you will again, at
least on the iPad, have to hold one
finger on the screen. What we will do, we
will have to shift this upper point down so that
it fits with our canvas, and the lower points. Just those two points
will be enough. Remember that really
snapping has to be on. This is super important. First you select and
you start moving, and then you put one finger. In this way, the shape will be retained so we really want to keep this
perfect square. If I don't have my
finger here and I move one pixel there to
the left or to right, then we will create a square.
But we don't want that. We want here for our shape to
snap into a perfect square. Now, you see it has snapped to the upper edge of my canvas perfectly so I can release it. Then I will deal with
the lower point here. First I select it, then
finger on my screen. See it's still a perfect
square. Snapped back. [LAUGHTER]. Now, I'm looking at those guiding lines, the vertical one, the green one, and
the horizontal one, the red one to make sure
that everything is perfect. Just remember that you
really have to keep it a perfect square shape by holding the finger
on the screen. Now, we have created
our diamond base. The next step is to turn
this square diamond into our symbol.
What is a symbol? We have been learning
about symbols when we're creating our life
pattern preview tool. Just as a reminder, a symbol is an intelligent
object that can be placed repeatedly
in your document. Then any changes that we
make to that symbol will be reflected across all the
copies of that symbol. When creating a
symbol, for example, if I deselect by tapping
outside of the canvas, it's important to again, select the layer that is
supposed to become that symbol. Our rectangle is selected. Then this is where we
have our symbol studio. We tap at it. We make sure that it's
synced hamburger menu, and we add symbol
from selection. Now, we have created
our diamond symbol. Now, if we go to
the layers panel, we will confirm that this shape indeed
has been turned into a symbol because we have
created this symbol folder. We can also open this folder. Our rectangle is still inside of it but it created
a symbol folder and you will see that there's bright orange
line beside it, and that indicates
that this is a symbol. Next, we have to create
copies of this diamond. We have to place them
around this main diamond, so that we will be able to build a nice repeat pattern and double-check if it's
really seamless, and if it repeats nicely. You know if you have been
taking my classes that I love the two fingers on
your screen gesture. First we select the main folder. Just be careful not to
select only the rectangle, better to close it, and then from the top level, making sure that you're
on the Move tool. Two fingers on the screen. We will move it, then you don't have to hold the two fingers on
the screen anymore. Then you will position
it for example, in this upper right corner. Again, making sure, just really take your time, this is a really important step. Making sure again that those guiding lines
are perfectly aligned. What I like to do, this is the main diamond on which we will be
creating our pattern. I like to put it on top or you can take this
one and position it down. When you tap on it, you see the selection here that
everything is correct. This is our copy. Let's create another copy
and let's place it below. Another way to do that without the gesture is to select
what you would like to duplicate and then you can go to the three dots menu and select Duplicate
and then move it. But I really love
working with gestures. For example, now I can
select those two symbols, two fingers, moving
them to the left, then I can release
the fingers and again snapping
everything perfectly. I love it. [LAUGHTER] Which
one shall we take now? Let's zoom out a little bit. Let's create one here. Two fingers. A copy was created. Now, let's recycle it. Position one over
here in the corner. Now, here at the bottom
and one more here. You see everything has
snapped perfectly. But really just take your time because this is
really important. Now, de-select so that you're not moving anything anymore. Our basic grid has
been established. This upper folder will be the one that we
will be working on. My recommendation is to select
all the remaining layers. You can use the gesture tapping with two fingers
on the last one. All those remaining layers, remaining symbols
that are around the main symbol
have been selected. Then we can group it. Now, we can also
rename this group into something like
diamond pattern. You can also recognize
that already. This is our middle tile. The middle here is missing so here indeed in this folder we have all the other symbols
that are only around. By the way, this is
something that we will never ever touch anymore so
this is important. We will be working only here. We just name it here
to know okay this is a diamond pattern but we will not be working in
this folder anymore. It's more to put it away so that we do not mess
around with it. Let's de-select. Another thing that
we have to do, the next step is to create the background layer
for our pattern. We're still on the square, on the rectangle too, and we just start drawing. We position it in the middle, we make a bigger
background layer. We can shift it
right at the bottom, rename it into background. Also perhaps change the
color into something more pleasant, something
brighter perhaps. This will be our background
layer and this is the one and only layer where we change the background color. There's nothing in
the symbol anymore. Next, we open the symbol, we go to our original
diamond rectangle. We go to the fill and we flip up so that we
get rid of the fill. The reason why we had to fill in the first place was to
see things better so that we really create a
pattern that is error free. [LAUGHTER] But now we
can get rid of it. Instead of rectangle,
we can name it guide. A quick summary. We have
our main working symbol. We have our guides
so that we see, this is where I have
this pattern shape. We have the rest of the
symbols which will only help us to refine the pattern because we will see
how it repeats. You will see that in
my demonstration, and we have the
background layer. This will be always
our starting setup. Now, we can save it as a template and of course,
this background layer, you can also change it and
make it really fit everywhere. In order to save that, we go to the Hamburger menu and we can export
it as template. Then we can rename it to
something like diamond pattern. Save. Then you basically
save it wherever you want. It could be in your Cloud or it could be in a dedicated folder, then you just click, "Move" and this template will be saved. I will cancel because my
template is already done. Now, we have the diamond
pattern template and we can start designing in a
semi-automated way. Your task is to recreate the diamond repeat
template with me. Alternatively, you can download the ready template
from the course page. Let's go ahead and start
working on our sketch, a draft.
6. Rough Sketch: It's a good idea to
prepare your draft sketch before you start turning
your pattern into vectors. You can work on
your rough sketches digitally, for example, you can use Procreate or even directly Affinity Designer, I will show you that in the next lesson or
even traditionally in a sketchbook or on
such square notes, papers, I don't even [LAUGHTER]
know how to call them. Hope you can see that. Basically, those are some bits of paper
that were square. If you turn them like that
at the 45 degrees angle, you will have your
diamond pattern. If you prefer to work like that, maybe, you're
somewhere in the cafe, and you're having
some scrap paper that you would like to use, you can, of course, work in exactly this way. Then if you would like to import this sketch into
Affinity Designer, it's enough that you snap a photo with your iPad
or with your smartphone, you send it to your
device, to your iPad, and then you can import it
directly into Affinity. I also like to work
directly in my sketchbook. This is an example from my
own sketchbook practice. I have created a few
composition ideas that you can copy, and practice drawing
by yourself. In your composition,
for example, you could cluster three
botanical elements with a variety of sizes, so you can make sure that one of the botanical elements
is the biggest, one of them is middle, and one of them is small, and spread all the other
elements around it. Those three elements
will be a central point. You can also create
a composition that is completely scattered, and all the elements,
as you can see here, they go in completely
various directions or you can create a
botanical composition that stems from the middle
of your diamond, and then it flows as if to the edges of
the diamonds like so. You can also choose to create one central botanical
elements, for example, one prominent flower, and instead of being
straight, it can, for example, go
in one direction. For example, it can
lean to the left side. Another composition idea is
to make it as if it's spiral, so that the composition flows
in the spiral movement. My final suggestion is
to start the stem of your botanical composition
from this lowest corner, and to allow your
pattern to grow in all the other directions
of your diamond like so. This is a sketch that I have drawn very quickly in Procreate. I can quickly show you how I did the setup. It was very easy. It's important to note that this document is the same size, just like my pattern tile, so it's 4,000 pixels square. Then what I did, if you want
to, for better visibility, I can switch it off, create a new layer, I have filled my entire
Canvas with color. Then I have gone
to the Move tool, rotated it by 45 degrees. Also making sure that
Snapping and Magnetics is on. Keeping the uniform settings. I have pushed the
edges so that they snap perfectly to the edges
of my Canvas, like so. De-select. Then I went in and I lowered the
opacity of this diamond, and then I created a new layer. First, I just show some
pretty much random colors. I use my favorite waxy dense
pencil from Sheryl brushes. Oh, she makes amazing brushes. Then I have drawn some
simplified shapes, some stems. In a very messy way, I designed the sketch. Let's maybe reduce the
opacity over here. What I have done first, I sketched very roughly the positions for my
main flowers over here. Then I knew I also want a few random smaller
flowers over here. Whenever I design or
sketch first my pattern, I like to use circles
and flowy lines. Then I knew, I wanted this
one main stem that will run across my diamond from this
lower corner up, and okay. I want something to stem
off to the right sides, and also another stem stemming
off to the left side. When I work on
patterns like that, I usually use different colors. I also knew I would like to have some filler elements like
some stars later on. At this stage, you really
shouldn't be perfect. Just let your hand flow, because this is just a
rough stage of our sketch. The main refinement will actually find place
directly in Affinity. But what you would like
to focus on, is that, your elements are
spread out evenly. This is really
important that they're not in one line, for example. You can also draw arrows
to indicate movement, and you want different scales. You want some elements
that will be bigger, and some elements
will be smaller. Some elements will
be hero elements, whereas others will be
more clustered together. This is how [inaudible]
this would look like. Then I exported this
rough sketch as a JPEG, and I saved it to my
camera roll on my iPad. Later on, I will import and place this image
into Affinity Designer, and I will be refining it further directly in the program. Using Procreate is
absolutely optional. If you want to, you can use
something more physical like some sticky notes
or your sketchbook, and then you can snap a photo. Your task is to draw
your rough sketch. It could be a botanical
composition or whatever theme you'd like to tackle for your
pattern portfolio. Please note, I will be covering diamond pattern
templates that includes symmetrical elements
in another course. Now let's go ahead, and refine the sketch directly
in Affinity Designer.
7. Sketch Refinement in Affinity: Before we get into vectorizing, we need to refine our final sketch for
our diamond pattern. In case you're new
to this template, we need to get a bit
more familiar with it. Our templates is open and
remember in case you closed your document and you again
want to reuse your template. You go to templates and
you just have to find the template that you saved in your folder or in
your Cloud storage. Now we need to place our
rough sketch into infinity. You can either place a photo that you'll
have taken or the JPEG file from another
digital drawing software. We go to the
hamburger menu place and we will select
the rough sketch. In my case, I will select the rough sketch that I
created in Procreate. Why do I use Procreate again? Because I liked the brushes and if I didn't use it for
sketching, to be honest, I would never use it
again [LAUGHTER] because I really shifted all my
workflow to Affinity. It's sometimes nice to
go back to Procreate [LAUGHTER] I'm going to place the rough sketch
from my photos. There it is and now I
tap and I place it in. I'm going to take the sketch and position it between
all the symbols that I created previously and
the background player and now I will also switch off here
the visibility of the background players so
that I can see better. Snapping is on all the time, the dimensions of
my sketch are the same and now from the Move tool, I have to position it perfectly
onto my original Canvas. As you can see here, the guiding lines are telling me that everything is perfect. Then I go to the
three dots menu, and I lower the
opacity of my sketch. You can also deselect by
using this X symbol here so that you don't nudge anything by mistake and now we have
our sketch placed. At this stage, you
might be wondering why I see my Canvas. The white part like
that and why am I seeing my guides like so? This way of working is a little bit different
compared with using the life pattern preview. I will show you just as a reminder one preview
tool document, for example those electric
oranges pattern here. This is how I used
to work before I had my pattern templates
file over here. Then I remember the drill. Basically, we used a lot the transform studio
and whenever we needed to shift the
pattern elements onto any of the opposite sides, we needed to use Mattes. This was our preview over here. This is the way, a completely new way of working and in order
to access that, you remember when we were
creating our document, the very first
prerequisite is to not create an art board when
we set up our document. Then next, we go here to the hamburger menu Canvas
and you can toggle on and off to see the visibility of your Canvas differently
by selecting Clip To Canvas. Clip to Canvas like so
everything is clipped. That means that the
visibility is limited only to your Canvas. When you go back and again, select "Clip To Canvas," you
will see everything that is outside of your main Canvas, which is this white square. You can also access it
through this menu here. It's called the
toggle preview mode. By clicking on it, you
can switch it off and on. If you switch it
off and you don't see all the
surrounding elements, essentially what you will see
is your main pattern tile, and then when you
switch it back on, you will see
everything around it. Okay, now we will be
working on our sketch and I prefer to see what is
happening around me. I have it not clipped so that I can see the
surrounding elements. Let's open the Layers
panel and remember, we are not working on those
surrounding elements. We are only working within
the main symbol that is right in the
center of our Canvas. Let's go ahead and open it. Click on the guides, and then hit the
"Plus symbol" and create a new pixel layer. Now this pixel
layer is positioned between the symbol
folder and our guide. This is our guides,
those lines here. In case they are too bright, you can click on them three
dots menu and you can also reduce the opacity or you can also go here to the color studio
and maybe change it to a different color. This is only stroke.
Remember, because we have switched off our fill. Now we will be refining our sketch drawing
on our pixel layer. As opposed to this rough
sketch which we added here, the pixel layer is also
part of our symbol because it's inside of
this symbol folder. When we open this folder, you will see that everything inside of this folder
is our symbol. It will be copied across all the other symbols
that are around. You can also recognize it by this orange glowing
line beside it. Next, we switch from the designer persona
to the pixel persona. From the brush studio, we select our brush. I like to work in
acrylic brushes, but you can test it
out for yourself. I like the Matte
Acrylic 02 brush, so I will select it. I will change its color
to this vibrant blue. Making sure that I'm on
my pixel layer over here. I can also increase
the size of my brush. Here I can increase also
the flow of my brush. You have to experiment a little bit with your preferences. You have to test it out and
see which brushes you prefer. But for example I like my brushes to be a
little bit more chunky. You see everything starts to repeat now because
it's an hour symbol. My recommendation is
to start sketching out your main flowers or your main elements depending
on what you're drawing. Then as you go, you can
zoom out and you can see if the proportions
are right for you or maybe you want to
make some adjustments. That's why it's only
a rough sketch. It's not set in stone. Now, with this live
preview as you draw, you can see if
things really fit. For example, here I have this tulip flower which is
supposed to look like that. But seeing everything
as it repeats, I see that this bloom is a
little bit too big and it creates this weird linear
repetition over here. I will still include it, but I will make it smaller. Now, there's a better balance because I'm regarding
the entire repeat, not just this diamond sketch
in isolation, so to say. If you want, you can also change the color as you
go, for example, I will change the stroke now to draw those secondary flowers. As a reminder, we
have switched off our background layer because
we really want to focus on drawing on this main canvas
and not somewhere outside. There's a little bit of focus involved but it really
does pay off because look, essentially now you're creating a repeat and there's
no calculations, so you didn't have to count any pixels anymore [LAUGHTER]. It's really liberating
because I know that some of you were quite annoyed with this transform studio and having to
calculate everything. But those times are
over [LAUGHTER]. This is why I called those parents semi-automated
because of course, you're still this active hand behind that is
drawing the pattern. But man everything else is just done for you automatically. That's why automate
your patterns. Those types of automations, I'm a big fan because
they prevent errors. The last thing that you want to do is to send something to your clients that
contains some mistakes. Let's change the color
to this blue one, and let's draw first the stems. I'm working on one layer, but of course you
are free to create, for example, an additional
pixel layer and to work maybe separately on the blooms and separately
on the leaves. The beauty of it, sometimes it switches
itself to the eraser, so you have to stay mindful, don't panic, if something's
switches itself off. The beauty of it is that you can go outside of your guide. In this way, we're creating
this seamless repeat. Now it's also up to you. I am creating right now a
very dense botanical pattern, which is based on
this diamond shape. But if you want, you
can stay away from those guidelines so
that when you zoom out, you will see that this diamond
repeat is really there. It's really up to
your personal style, how you want to create. I want the diamond
here to be my base. But I don't want it to be
so obvious, for example, for this particular
pattern. It's up to you. But you can also stay away
from the edges of the guide, and then you can make this
diamond repeat more obvious. I think at this point we can
even switch off our sketch, and we can deal with
it without our sketch, making sure that we're
back onto our pixel layer. I don't like to switch
off the guide entirely because I still want to
see this diamond shape. But in case it's too rough, you can also go down
here with the opacity. Then going back, I think I will add a leaf here
and a leaf there, that will look quite pretty, I hope, and changing the
color one more time, maybe to something more yellow. I would like to add in the star. I will have one star here, whoops, here, making sure that, see, it repeats here
on the other side, I have positioned this star
placeholder a little bit below because I didn't want
obvious straight lines, for example, straight
horizontal line. I love this preview. This is a completely new
way of working [LAUGHTER]. Now I can maybe switch
off the guides. Have a look at it again, maybe bring back the
background layer. I will go back to this original
blue color of the stem. I think I will extend this stem so that it looks more seamless. The iPad is very
sensitive, so sometimes, especially in the pixel persona, you might make some inky
blotches by mistake. [LAUGHTER] Don't worry. Now, if we wanted to see only
our main pattern tile, we can also clip it. You remember get
rid of our guide. After vectorizing, this would
be our main pattern tile. I think it's beautiful. Can you imagine doing it in the old way where you
have to calculate, where does this go?
Where does that go? Like I said, I have created a very thick or dense pattern where you don't see
this diamond shape. It's not so distinguished
but if this is something that
you're aiming for, if you would really like to see how this is a real
diamond pattern, you can, of course, do that, and you do
that by staying more away from the edges of this diamond because I
wanted it more dense, I have, for example, crossed
my guidelines a few times. I like to create such dense
botanical patterns using this diamond template because it creates a lot
of nice variety. What do I mean by that? I mean that once you really export your pattern and
you make it bigger, you see that it flows
really beautifully, it's truly seamless, it's error-free, and there is no obvious repeats
in this pattern. A big reminder for this part of our
workflow is to remember, always work in the main symbol. I will repeat it a few times because it's really
important that you do not find your way to this diamond pattern with
all the remaining symbols, just close it, forget about it, and make sure that you only
draw in the main symbol. Now we're ready to vectorize
our diamond pattern, and this is truly where
the vector magic begins. Your task is to refine
your diamonds patterns, sketch in Affinity designer, get familiar with
the pixel persona, and practice sketching
directly in the program. Now let's briefly discuss
our color palette.
8. Troubleshooting Pixel Persona Issues: I also wanted to include
in a separate video a few tips regarding troubleshooting in
case you're having problems drawing in
the Pixel Persona. This probably
concerns mainly those of you who are
drawing on your iPad. The automated templates, they're actually pretty
heavy with symbols, so the document
itself can demand quite some memory to
work in a smooth way. Hopefully you do not come
across any of those problems. Unfortunately, I had
some of my students reporting that when they
draw in the Pixel Persona, then the app can even
crash or it can freeze. Personally, this has
never happened to me, so fingers crossed that
this doesn't happen to you. Now for your information, I am drawing on my iPad Pro. It's a 12.9 inch and I think
the year of production is 2020 and it has one
terabytes of memory, so quiet a lot. I never, never had this
problem with freezing. I wanted to share nevertheless, in case it happens, three tips of what I would do next if it did happen to me. Tip number 1 reduce
the number of documents on your homepage. Many of you actually don't
know that you can close the many documents
that you have on your homepage once you start using Affinity Designer
for many of you, it's still a relatively
new program, it's not so much cluttered. But if you're like me and you've been drawing in
it for nearly two years, then the homepage can become
a little bit too crowded. You have so many projects, which is folders with documents inside and so many
pattern files, it's actually really
not necessary to keep them open in your homepage. What I mean by that,
rule number 1, you always have to
save your document. It's actually good practice, I know that in this course I forget about it and I do it at the end [LAUGHTER] after I have already created my pattern. But it's a good practice
to think of a name for your document and then to go from the homepage through the hamburger menu
and to save it as, and then either to save
it to your iPad storage, which I do because I
have a lot of storage or you can use any editor for
example Cloud service, such as Google Drive or Dropbox
to backup your documents. This is the first thing
that you should do. Then probably you're
going to have some files or some collections of
patterns for instance, that are way in the past and you can really
just close them. Make sure that you save them
and then you can really just hit the X button
and this will close it. Closing will mean it's not
deleted, if it's saved, it will just get kicked out of your homepage on
your device, on your iPad, for example if you're
using the iPad and hopefully when you
declutter your homepage, this will make the
app a little bit lighter and it will
run more smoothly. Hopefully. [LAUGHTER]
Tip number 2, check if you need
to update your app. All those updates for Procreate and for Affinity
Designer on the iPad, they should actually
run automatically, but you might want to
double-check and you do that by simply going to the App
Store on your iPad. You search for Affinity
Designer and then if you just see the button to open or if there is
indeed an update. But from my experience, this should happen
automatically. I am drawing in Affinity
Designer Version 2. I'm not sure if this problem persists and affinity
designer Version 1, if you're for example on
Skillshare, on the forum, or if you're in my Facebook
Affinity Designer group, then I would love for you to
maybe start a discussion and to share if you're on
Version 1 or in Version 2, and if you're having this issue and maybe how you fixed it. Tip number 3, seeking assistance on the
official Affinity Forum. This is really when
nothing else works, then you can maybe reach
out to professionals like I'm still not
working for Sarif. I do have contacts
with them and we do have dedicated forum
for professionals, let's say, this group of professional users
of Affinity Designer, which is separate from
the general forum. I may also ask there
on your behalf, but normally you do get really great answers simply
into your official forum, they are very helpful. They reply very fast. All you got to do
is just search for this forum on
Google by typing in Affinity Designer forum and 100% it will show up on top
of your search results. I think you do have to start an account just with
your email address. You don't have to provide any other information
about purchasing the app, for example no need to do that. First you got to go through
the forum and you got to see if such a problem has
already been noted. Maybe yes, maybe you will
already find an answer in one of the older threats or
you can start a new one. Then alternatively, there's
another support group for also troubleshooting
some problems. It's a Facebook group
that I started this year for Affinity Designer users. You just have to
search for the name. If you're not going through
my links on my social media, you just got a search for
Affinity Designer for Graphic Design and Surface
Design and then you will find this group and you
can ask your questions. You can share videos
or screenshots. It's always good to include the screenshots
from your device. It's also a safe space to share your artwork and it's a safe space to ask
for an art critique. I'm also active there. I give critiques and
I answer questions. But the members of this group are so nice and so helpful, someone might be actually faster and provide you with
an answer before me. [LAUGHTER] Having said that, I do hope that you will
not have this issue. I just wanted to record this
disclaimer video that I know that it's been reported
that it might happen. I hope that you give
the upper chance and we work together to get it fixed in case you're having issues with
the Pixel Persona. It's mainly about
the Pixel Persona. Another solution, by the way, which I haven't mentioned
as tip number 4 should be that you
skip the sketch. You only import the sketch
that you have created in some other digital
drawing software such as Procreate or from
your sketch book and you can go ahead and you can start
drawing with vectors. There's no need to be using the Pixel Persona
sketch refinement, which I'm showing in
one of the lessons. I've noticed that I also do
this approach quite a lot. Like I just draw spontaneously and if I
need to move any objects, it's all vectors you go
to the notes twin is very easy to move around your objects or to
change their shapes. That might be a solution too. I hope there are no problems
on the way and I hope that you will enjoy
your drawing process.
9. Limited Color Palette: I truly believe that it is
always more efficient and looks more professional
when you're using a limited color palette. I suggest you select maximum
six colors for your pattern. My recommendation is to
include wide or some sort white or yellowish-white
as your highlight, and also to avoid pure blacks, unless it's really part
of your personal style. Instead of black, you can choose a dark indigo color or
really dark purple. Alternatively, you can
also head to my Pinterest, Weronika Salach,
and there I have a dedicated board for
all my color palettes. At least I try to keep it up to date with my recent patterns. You can pin it over
to your boards or you can take a
screenshot and then you can import it into Affinity
Designer and you are really free to use them
for your next pattern. Now, let me show
you another way to manage your color palettes
within Affinity Designer. Let's go back to Affinity, and I'm going to show
you another document. This is another diamond
repeat pattern over here. You see that you
can put pretty much anything around your
main symbol folder. I really like saving my
color palettes as assets. This is one example here. If we go to the Layers panel, this folder over here
is my color palette. It includes just a
neutral gray background, and then it includes those circular shapes which I created with the rectangle tool. Here you can create circles. I filled them with the colors from my color
palette basically. For each of those
color palettes, the most favorite palettes
I saved them as assets. You have to go to
the Asset Studio. You have to create a
dedicated assets category from the hamburger menu. You can add a new category. You can name it to, for example, color palettes and
you can save them. I have right now only three
favorite color palettes, but you can have so many more. You can also create
subcategories. You can, for example, create a subcategory with
some pastel color palettes, another subcategory for bold
and vibrant color palettes, some monochrome color palettes. The sky is the limit, it all depends on your
personal style again. Then if I wanted
to, for example, copy this pattern and to
quickly recolor it to another signature color
palette of mine, for example, this one, I can insert and I can really
place it just anywhere. This is again the
background rectangle. Then using this dropper
tool over here, I can select the
colors very fast in order to recolor
my pattern tile. Another way is maybe
you have, for example, created a screenshot from
my color palette or from some picture that
you found inspiring, and you would like to
place this picture. Then I drop the colors
from this picture directly within your document.
You can do that too. You just have to go to the Hamburger menu
and place your image directly here into your
document. Let's do that. Place, and then from your photos I have this
color palette saved here, so I can select this image, tap, place it wherever,
make it bigger. I can select those colors
directly from this photo. Of course, the color studio, the obvious choice, you can save your
favorite colors into the swatches panel. Select swatches. Here you can start a new application
palette which will be available across
any new document that you create in
Affinity Designer. Or you can add the
dedicated document palette. You need to create
a document palette if you want to use
global colors. I use it only if I'm
using global colors. Apart from that,
if I want to see all my colors across any
new document that I create, I add a new application palette and you can save your
color palettes here. For example, here I have
a new color palette that is more pastel. Then you can select your
colors from the color studio. It's up to you. Let me
again sum it up for you. You can use color
palettes saved as assets. You can use your
own color palettes saved in the color
panel under swatches. You can also place an
image from which you would like to take the
colors for your pattern. I hope that those tips
will help you set up your color palette
in an efficient way. Your task is to choose your
minimal color palette. Try to stick to a maximum
of six colors and please make sure to include a highlight color and
the darker color. Feel free to use my
own color palettes, which you can find
over on Pinterest. Now it's time to build
our vector pattern.
10. Building The Pattern PART 1: Let's build our
diamond repeat pattern and vectorize our sketch. For starters, I would like to place here somewhere
maybe next to my sketch, my color palette from the assets panel so this
will be my color palette. It's again not set in stone. I might actually do
some tweaks later on. I would like to change
my background color to this purple here. Then let's maybe put this color palette a little
bit lower and remember, we're always working
on our main symbol. In case you have doubts, it's the one that you
have right in the center. If it's easier, you
can also switch off the background
layer maybe I will actually switch it off for now. We can reduce the
opacity of our sketch. I will again snap the color of my guidelines into something
a little bit lighter. I think this will be enough. Next, I will create
a new vector layer, hitting the Plus
symbol vector layer and I will make sure
that it's in my symbol. We will be using the pencil
tool because as always, I am Amy got a hand-drawn
organic shape. Just like in my
previous courses, we will be using only
fill and no stroke. I have an entire course about creating hand-drawn assets and Affinity Designer
with a huge focus on getting to know
here the pencil tool. I'm assuming that you are a
more intermediate student. We will skip this
introductory material. We start by selecting
the pencil tool. At first, it's important to de-select everything
either by tapping somewhere outside
onto this gray area or by hitting this X symbol. Next, we want to use fill, so we select Fill and we make
sure that auto close is on. I will be using probably a
little bit of stabilization. I usually stick to this
Window Stabilizer at about, I think 28% around this
level here. Not too much. That it's a little
bit streamlined. I will start by drawing
my main flowers, which are those tulips over here and I will be sorting
everything by color. The way I did my rough sketch, I will have the main colors
in a separate folder. Then I will have those
secondary flowers in a separate folder. The stems and the leaves will also be in a separate folder. Now zooming into my Canvas. I start drawing. Because auto close is on, my shape has snapped together
and now it's also closed, so we have a closed vector. Please note that I am
drawing between my guide and the pixel layer with my sketch because I still want to
see the sketch above. Now I will go ahead and I will roughly draw those tulip shapes. Next, what I like
to do is I like to switch off the sketch, select everything,
go to the Node Tool, and see if everything
is to my liking. So sometimes I just would
like to fix some shapes. But most of the time
it's not necessary. I can also rename this
folder into tulips. I'm bringing back my
sketch from the guide. I am creating a
new vector layer. I'm bringing it right
above the guide. Back to the pencil tool, making sure everything is de-selected and I will select this color for
my secondary blooms. Back to this layer where I
want to place those flowers. Now I can start drawing. This is a pretty
straightforward process but let me just
mention that you can, of course, change the sketch. Again, the sketch
has been refined but you can still change it. You can go outside of the lines. You can zoom in, zoom out, and see if you like
the proportions. Of course, you can
change your mind so that you do not get lost. Which flowers belong? Where am I drawing? On the correct layer? I suggest that you start vectorizing from the
center and you move to the edges of
this diamond guide. This will help you to
prevent any mistakes. For example here, normally would be
like, this flower, does this belong here, or does this belong
to the symbol, [LAUGHTER] the main symbol. So we start drawing from
the center and then we're moving towards the edges. Again, I'm only using
fill and no stroke. Let's see. There's
one more left. You can set up the opacity
of your sketch layer as you like so it could be
a little bit darker or you can make the opacity
a little bit lower. Let's switch off. I have noticed that this is the same color.
Now we're talking. We can change the color from
the entire group level. We will talk about
re-coloring in a separate lesson, but now, let's make sure
that everything has its own color because we have grouped
everything by color. Those tulips will be, let's say red and those
secondary colors, maybe for now I will just
make them this random violet so that I can really
distinguish them better. I can do some color
changes right at the end. When I'm done with vectorizing
the rest of the elements. Now a new vector layer. Let's drag it here below. Now I would like
to do the stamps. If you have watched
my other classes. I sometimes use
the technique that whenever I'm drawing lines
like the lines for the stem, I'm using the stroke
but this time I will use a different approach because I think it's a
little bit more comfortable. First, let me maybe change to
this blue color and I will try to replicate those stems by simulating just
a filled shape. Let me show you what I mean. Just making sure I'm
on the correct layer. Let's also rename those
maybe two smaller blooms. This folder with the
secondary flowers. This one we can
rename it to stems. It's important to stay organized so that you don't make
any mistakes on the way. I will start drawing my stem. Then I will try to draw
without the stroke, and now from the note tool, I will get rid of
some of the notes. I will position it
in a better way here so that it fits better
with the other flower. We can also move the handles of our vector to adjust the shape
or by tapping on its path, we can add new points. See that looks great. Adding one more point, making it a little bit wider. Instead of using the stroke and then converting
it into curves, At least lately to work
in this way whenever I'm creating lines the
elements, so to say. Back to the pencil tool. One more here, and
another stem here. Making it thicker. Later on we will add all those lines together you
will see it in a second. This one we can
also make thicker. But by all means, if
you prefer working with the stroke when drawing your
lines, you can do that too. I think this is my main stem. It's made of many
lines, as you can see. I've probably made some small, tiny lines that are
hardly visible. I'm going to erase that. Now I will select
all of those layers, and go to the Move tool. I will use the Boolean operations
to merge them together. Here you have the
Boolean operations, you click on it, and you select, Add, and everything
is on one layer. I don't need it to be
on separate layers that's why I merged
them together.
11. Building The Pattern PART 2: Now a new vector layer. This one will be for
my leaves because maybe I will want it to be
the same color as my stems, but maybe I will want
them a little bit lighter so that they stand out. I want to leave
myself some options. I'm drawing with the
same blue color and I'm following my rough sketch
in a rough way, so to say. Sometimes you can make
alterations, of course, if you think something will
look better if it's bigger, for example, maybe here
I want a bigger leaf. Your initial sketch is only for your first
orientation, so to say. But you don't have to
follow it blindly. You can make changes
as you go because you see you have
your live preview, so at any point you can
also switch off the guide. Maybe bring back the background and see if you like everything. Bring back the guides. I would like to
finish those leaves. I will switch off my sketch and I will just double-check
if I like everything. I think I need a
different color. Let's bring back the
background and let's change those small blooms into something more bright so that
I see if there's a balance. I can change the
colors later on. I think I will go back
to the stem pencil tool and add a stem
spontaneously here. I have to switch
back to my blue, but it's not a problem, and maybe one more stem here. Now you can see that I have
completely switched off my sketch layer and I'm
really just improvising. Maybe one more here. This is really fun.
One more here. Because my goal is to have
a really dense pattern, maybe I will add a few
more smaller leaves. Let's see what it looks like. You can always go back or delete something if
you don't like it. Actually, let's change those
smaller blooms into white. I would like to see if they're
spread out in a good way. From the swatches panel, after you have
selected one color, you can also use
the HSL sliders, make something more
vibrant, for instance, or make it darker or brighter, or change its hue entirely. Let's stick to this yellow. The stems are here, the leaves are here, secondary, smaller
blooms, and my tulips. If this is too confusing, switch off the background layer, deselect, and here you will
have your main pattern tile. Another thing that I wanted, I remember from my sketch, I wanted some small stars. This is one example where I will be using my
assets because I have a whole category that I
created with tiny stars. I think I would like to
use this star over here. We will change the
color in a minute. Everything is correct. I just have to make sure that it's in the main symbol and I will just change the color to this vibrant yellow just so that I can see
it more clearly. If I want to retain
the shape of the star, I have to hold one
finger on the screen, make it smaller, and then from the Move tool, I can move it around. I would also like to make my guide not so bright so
that I can see better. This is my guide. I will again reduce the opacity. Then this little star, I will create a few duplicates, but I will bring back my
sketch because I remember here I have a cheat sheet of
where those stars should be. Two fingers on the screen. I'm making a copy, retaining the shape of
the star by holding one finger on the screen. Creating another copy. This one could be a
little bit bigger, and another copy, this
one will be more tiny. Maybe another tiny star here. See because I have here
my pattern repeating, I can see okay. I couldn't really position
this star here because now they are in line and it doesn't really
look professional, so I'm going to place
it a little bit to the side so that
everything looks good. I will bring back the background layer and
from the top folder layer, I will change it to white. I think I will switch
off, actually, it's called pixel but we could
have renamed it to sketch. Now it's too late because
we're nearly done. [LAUGHTER] I will turn off the sketch and I will see
if everything is okay. Another thing that I
would like is to create some middles of those flowers that also look like a star, so creating a new layer, I'm going to my assets, and I will use this shape to create the middle of
this flower, like so. I will change its color in a second and maybe also
change the color, fetching a color from
my color palettes, getting rid of stroke, making sure it's only fill. This is not prominent enough, so I will choose again this red. I can change it later on. Now I will take
some time to create those middle parts for
each and every flower, rotating them in
different directions so that everything looks in
a nice and balanced way. On my iPad, I'm using the two fingers on
the screen gesture to create very quick duplicates. I think our pattern is ready. Let's switch off our guides. Let's clip it.
It's so beautiful. I'm always happy when I
reach this stage. I love it. This would be my
main pattern tile and our pattern is ready. You can also bring back all the elements
around it and you can see if your pattern
is really seamless, if it's well balanced, and if it repeats nicely. We will be testing this pattern
tile in a second as well. As a reminder, we were
working in this main symbol. We were not touching all the remaining symbols
that were around. We had our color palette placed here and this is where
we had our rough sketch. Right now we can remove it, we can get rid of it. Inside of our main symbol, we also had our sketch. You can also keep it
for future reference or keep it visible right now. We have our guide and we
also reduce its opacity, but we can bring it back again. For my pattern, I
decided to make something really nice and dense. But you can also stay away from the edges so that when you zoom out and the
pattern repeats, you can see that indeed
this is a diamond pattern. If this is something that you would like
to achieve visually, you can do that by sticking
away from your guidelines. The guide is switched off and as you will be exporting
your main pattern tile, it is important to get
rid of this guide. This is our final pattern tile. In the next lesson, I will show you how to
export it and to test it. For now, your task is to finish vectorizing your vector
pattern and to sort out your elements into folders
by color so that you can manage your vector pattern more easily moving forward.
12. BONUS: Pencil Tool 2.6 fixes: H Hello, everybody. Welcome to this update
video for iPad users. Zarif rolled out their newest software updates
across Affinity Designer, Affinity Photo, and
affinity publisher. I'm under the
impression that there's a whole bunch of videos
about the desktop version, but only very few videos
for the iPad users. And if you've been
following with me, then, you know that
I'm an illustrator. I predominantly
illustrate now for children's publishing and
for my illustration work, I always use affinity
designer on the iPad, and I always use
the Pencil tool. So I will be skipping
the rest of the updates. This video will focus
only on the pencil tool because this is the most
important tool for my work, and the changes that were part
of the most recent update, the 2.6 0.0 update will
really make your work easier, and I would like to highlight what exactly changed
in this video. So heading back to
the Pencil tool, I'm also going to use this
older sketch of mine, where I created this
illustration just to demonstrate how the Pencil tool changed and what you need
to take into account. There's also some icons
that you will see here in the contextual menu that have changed, so do
not be confused. Everything is
actually quite easy. In essence, there's no
more forced smoothing. There's also better
control over the stroke. So there's basically better control over what
you're drawing. And there are some new
auto close options that can really improve
your efficiency. All right, so the very
first thing that changed, luckily, is that there is
no more forced smoothing. Previously, the pencil tool would always apply some
level of smoothing. So we really didn't
have full control. And when I was illustrating
projects for clients, I felt very frustrated after the previous update because what I was drawing
was unnatural. And what I wanted was a feeling that is more organic
and less vector like because all my artwork, even if I use some texture, this is all vector
brushes or vector shapes, and vectors tend to look
a little bit more rigid. So the previous update
really destroyed my workflow and caused
me some frustration. And I'm very, very happy that Serv got rid of this
obligatory smoothing. So right now, you can draw lines that are more kind of rugged. Do I have an example,
for example, if I wanted to draw the man of the pegasus
in a more rough way? Previously, this whole
line would be more smooth. What does it mean? I
would get more rounded. And the shape that
I drew would not be reflected in the line that
the software would draw. And on affinity forums, I found that a lot of artists, for example, who were drawing
maps, illustrated maps. They were in particular,
very frustrated because when they were
drawing the outlines of the countries for the maps, then they needed all those
tiny little details, they didn't want smoothing. And in my work, it
was exactly the same. Sometimes I really
wanted this more hand drawn feeling and the smoothing
would destroy everything. Right now, this is fixed, and the only way to get smoothing
would be if you opt in, for example, for some
form of stabilization. Right now, if I click in here, you see, nothing
has changed here. There's a rope stabilizer
or a window stabilizer. Which you can also set the force of the stabilizer
here on the left side. So if I wanted my line to be, you see, more smooth, then you can use stabilization, and you can be more intentional, about choosing whether you
want this smoothing or not. So with this regard, you
have full control over here. Now, another thing
that changed in the contextual menu
are the icons. I didn't take any screenshot
or I would have to find some old screenshots from my old work to show you
what exactly changed. But those two icons
are different. You can also click on the question mark to
see what is over there. The one on the left is about using line,
using an outline. And the circle that is more
full is about using fill. So if you want a
line, right now, it's selected, you will just, let's get rid of
this stabilization. You will just get an outline. So for example, I could use this Let's increase the
width of the stroke. I could use this when I'm drawing or creating a project for a coloring book if
I only want outlines. But for me, more
often than that, I draw without any outlines. So we can also start by going to the color studio and then just choosing color
from your swatches. U and then you will
have no outline. And if you want a line, you can select this
use line symbol so that you can also
draw with an outline. Right now, both of
them are selected. You will recognize that
something is selected by saying that this gray background of
the icon changed to black, that means that it's selected. If I don't want an outline, I just deselect seline. And then another important thing that changed is the auto close. There's a whole menu
of options here. The first one obviously
means that there is no Autoclose then
there's close near, close far, and close always, which can really make your
work very efficient sometimes. So auto close basically connects the start and end points of stroke automatically. And before this auto
close changed behavior and you really needed
to come very near. So this will be
the second option close near to close a shape. And oftentimes I failed
to close a shape, and it was again another
thing that frustrated me. Right now, you can, for
example, choose close near. And you will have to
again come quite close. You see there's a small red
selection that tells you, Okay, this auto close
will be recognized and the shape will be closed.
So now it's closed. But I don't think I'll
be using this option. I think I'll go straight
to Either close far that you have
more wiggle room. You don't have to go super duper close for the shape to close. Was a small mistake there. Let's do it again. You
don't have to go super super close and the shape
will be still closed. Or clothes always is very cool. For example, if I wanted to
draw the wing of the pegasus, I would just go like this. And here, I just let it go
at it closes automatically. This is exactly what we had
before the previous update. So if I was drawing this cloud, I would start somewhere
outside of my canvas. Sorry, that doesn't look pretty. But I would just draw
what is essential without wasting my time to go all the way up here because
this doesn't matter. The illustration will
be cut here anyway. And now that we finally
have this close always, I think I'll get
back to it and I'll just get outside of the canvas, draw my cloud, release it, and everything is
closed automatically. If I wanted to draw
this tail, the same. Sorry, this doesn't look great. Depending how you like to work, you can choose among
all those options. You also don't have
to close it off. You have to switch it
off if you're just drawing with the stroke,
so just with the line. Personally, I would
recommend that you either choose close
far or close always, and I think I'll stick to close always because this
will just snap. Look at this. This
will just snap so fast and have me save so much time. I just have to make sure that the whole film selection
is where I want it to be and everything snapped in a
very pretty and fast way. So those new auto close options
are much more intuitive. They will give you
the ability to create more natural linework despite the fact that you're
drawing with vectors. You will have
better control over your style after all those
pencil tool updates. And the new Auto close will give you basically better shape
building capability. And the fact that
smoothing is off, this is, I think the best
news will mean that your vector illustrations
will feel less mechanical and you
will be able to embrace some more imperfection in your perfect vector
art, so to say. So what do you guys think about those new changes and
about the update? Let me know in the comments
or in our Facebook groups, what you and if you found
this video helpful, please give it a like and make sure to
subscribe to stay updated about any affinity news or new affinity tutorials.
Thank you for watching.
13. Testing & Exporting Your Pattern: I highly recommend that you test your pattern tiles somewhere outside of Affinity Designer. For the purpose of
my demonstration, I will be using again Procreate. To export your pattern, you have to go to the
hamburger menu and you can go to the exports
section, of course, you can do it also through
the export persona, but we have this one
single pattern tile, so it's completely sufficient to go through the export panel. In this export window, you see that you have different options
regarding your file type. We will be exporting our
pattern tile just as a JPEG. This is the original size,
4,000 pixels square, 100% quality and we will be sharing it to
Procreate directly. I'm hitting the "Share"
button and Procreate, and now it's sending
to Procreate. This will take a few seconds
and then we hit "Cancel". By the way, I haven't
done this before, I usually do it much
faster than that. Namely, we have to save
[LAUGHTER] also our pattern. From the hamburger menu, Save As, I will rename it as, so 23 is the year
when I produced this pattern and then
it's Collection Number 5, Pattern Number 2 and this is Color Variation A and then I have this is
my own naming convention, and then I have underscore
electric midnight. It's just my fantasy name that I created for this
particular collection, save, and I'm also
saving it on my iPad. I have a folder here for
this very collection, and I move it here.
Now it's saved. Now let's head to
Procreate to look at the pattern tile that we just
exported to that program. This is our pattern tile, let's go ahead, open the document and
now we can test it. The way I like to
proceed in Procreate is I swipe to the
left, I make a copy. I turn this original pattern tile invisible and also the
background layer to invisible. From the Move tool, snapping has to be on with
magnetics and snapping. I snap it to the middle
till the guiding line tells me that everything
is aligned properly. Then I swipe, make a copy, bring it down and then I
merge those two together, duplicate and there it is. I can test it further but so far I see that
everything is okay. There are no lines, everything
repeats beautifully. If I want to see it in
a more dense format, I do it one one time. Create a copy. I already see it looks so
beautifully, I love it. That's so nice. I
really like it. This is the beauty of
the diamond pattern. Let me show you, you can see that, Wait which color shall we take? Maybe this white one. You can see, this is where we had our diamond because
there's a little bit of space in there. You see there's a line here, there's a line here. I can see exactly
where it repeats. But the beauty of it is that it really hides
the repeat perfectly. Let me save that as a JPEG to my camera roll, Save image. I can also use it later on
for my marketing purposes. I will also save this
one to my camera roll as a JPEG and the
original pattern tile. This is what I would
send to the client if they just wanted
the PNG or a PDF. There it is. Everything
was tested properly. There are no white lines. Everything repeats
beautifully, there are no mistakes.
Everything is great. Now that the pattern
work is done, you can for example upload this particular pattern
tile into your POD shop, into your print on
demand shop like Society6 or Redbubble
or Spoonflower. Your task is to export and to test your final pattern tile. I hope that the entire
process was easy and you can see that this technique is a wonderful way to
create error-free, seamless patterns in
a few simple steps. If you were to create such an intricate and
overlapping diamond pattern, the traditional way using maths, calculating and the
transform studio, you would probably get
a headache real quick, [LAUGHTER] so I hope
that this technique will come to your liking and you will enjoy this way of making
patterns from now on, especially that you
have this live preview and you don't have to do any
calculations on the way. Thank you for watching so far. In the next lesson, I would also like to
show you a few ways to recolor this
pattern real fast.
14. Re-coloring Options: I would like to
show you a few ways to recolor your pattern
in an easy way. What I would start with
is creating a copy. You can create a
copy by swiping to the left and here
is a copy symbol. You can also rename it
by selecting Save As. This is just my naming
convention I do now B, so this was the color
variation A and this will be a color variation
B and I get rid of this copy word over here and then I save
it in the same folder. This is variation B
I'm going to open it. For starters we will
change the background. The first technique is by simply changing the colors
on the folder level. This is the reason why in
the main working symbol everything that we've
been working on is on a separate layer and
it's sorted by color. For example, all
those stars there in white they're in a
separate folder, the tulips they
are also separate. The middles of those
flowers separate. Everything is in a separate
folder so that now it's so easy to change
the color immediately. We can start with the
background for instance, I can go fetch the color
palette that I had for my electric medal series,
this is this one. I'll have a look
at that one too. I recommend that you start by changing the background color. I'm using the color picker tool directly from the color studio, you can also use the
color picker from the menu here to the left. First, I will change
the background. I can already tell
that I have to change those smaller blue colors. So I haven't selected any particular flower
within this folder, I make sure it's closed and
I select the entire folder. You will see here indeed, the color of those secondary
flowers is yellow. Now on the folder level I
can also change the color, so I can for example,
choose this purple, then I can change the
middle for example, to this light yellow and I also do it on
the folder level. Next, I want to change the tulips let's maybe
try this orangey color, that's also very pretty and I will select the leaves and the stems
together because I want them to. Actually this color
versions already nice. I could stay with
that but I can also play around with this blue, maybe I will make it darker, now that doesn't look that good. Maybe I will use this purple
color that could work. But I will maybe stay
with the original blue and then the stars they also need to be a
little bit more prominent. Maybe I will actually go back
to this original red color. I don't know if this
stands out sufficiently so I will test out this other
blue color for the stars, now I think we're talking. On top of that for instance, I'm not sure about
those tulips here. Once you have selected the
color that you think will be good which is this orangey
color you can use the sliders. I usually have a color
wheel, some other sliders, I usually use the hue
saturation luminance sliders and here you can play around maybe make them a
little bit more saturated, you can make them darker
or even brighter, but I think this will
look quite good. Let's clip it, so this would be another pattern variation. Then you just have
to make sure to save it and now I will show you another way of changing
colors let's create another copy and we
will save it as, we'll get rid of this word here that gets attached
automatically, copy and we will
change it to variation C just for the fun of it and we will save
it in the same folder. Now what I would like to do is, I would like to have a darker
background perhaps so one variation with the darker
background so let's choose this very bright and
dark blue color. I will shift the other color
palettes to the bottom and always making sure that I'm working in
the main symbol. I'm selecting one
of those tulips because I would like to change this orangey color
and I will make a quick recoloring by using the same function which
you will find here. From the Move tool same, we would like to locate the
same fill color so we select Fill Color and now all those orange tulips
have been selected. Since it has been
selected and located now we can perform our
changes for example, we can make it lighter. The prerequisite is to
choose only one element, this is pretty straightforward, this is very easy
to locate colors. But imagine that we have a
super intricate pattern with maybe 12 colors
and you would like to find the color fast then
you just select one item, one layer, you go to
same, Fill Color, everything you see
the selection here, everything will select it, I de-selected it by accident, same Fill Color and
now we can make our changes across
this one single color that we have pre-selected. I would also like to change
definitely the stars. I know that I could
have done it on the folder level because
everything is so neatly organized that you
can do it right here but I want to show you
again this technique of choosing the
select same option. Select same, Fill Color, let's make it brighter, that will do and now
selecting one of the leaves I think I would also like it to stand out a little bit
more from the background. This option is
available again from the Move tool, select same, Fill Color, now everything is selected and let's see maybe something from
other color palettes. This one, that looks nice. We have very nice
opposite colors here, blue goes very well with
orange for example. De-selecting, let's clip
it, that also looks great. I don't know which one
is my favorite now. [LAUGHTER] Making sure
that you save it. In this pretty fast way we have created two more
color variations. You can either
change your color by changing it on the folder level if everything is
sorted by color, or if you have more intricate
patterns you can use the Select Same Fill function. Just make sure to always make a copy of your original pattern and to create those
color variations in separate documents. Your task is to create a copy of your final pattern and to work on at least one
more color variations that you could show us. This was the final lesson, I hope that you
enjoyed the process.
15. Final Thoughts: Thank you so much for taking
my Affinity Designer course. I really appreciate
every one of you and thanks so much for the lovely
reviews for the course. I really do hope that you
liked this new approach. It is a little bit
different from using the life pattern preview
tool but overall, I think it's been
already weeks since I opened the templates with
the life pattern preview. I have shifted my entire process completely to my
automated templates. You have to also
stay tuned for more. There will be new courses
also coming where I'm introducing different automated
templates for half drops, for full drops, for scallops, for orgies so really exciting
stuff coming this year. I can't wait to see your beautiful diamond
repeat patterns. I'm very curious about
what you will draw. Remember that in case you're
looking for inspiration, especially from the
field of botanical art, you can have a look into my PDF workbook for
diamonds repeat patterns. On one of the pages, you will find a full 30 days of botanical prompts
list which is included. This will hopefully help you to stay motivated and
to stay inspired. Or maybe even to pick up a 30 days project for botanical patterns in
Affinity Designer. If you're sharing your
work on Instagram, please don't forget
the #MagicalVectors because I will be pulling out the work to feature
in my newsletter or on my account only
from under this hashtag. I would also like to invite
you to leave a review for this class and comment
how you liked it. It's super helpful for
both me as a teacher, as well as for
other students who are considering
taking this course. Please check out my other
Affinity Designer courses and consider signing up to my monthly newsletter
to stay in the loop for new tutorials and
for artists resources. Until next time, take care
and happy creating, bye.
 Weronika Salach, Art with MAGIC