Transcripts
1. Intro tech: Technical drawings are important in jewelry design to show the sides for more details to the goldsmith in order to produce a jewelry piece. My name is Soundous Bouhandi , I am a jewelry designer, Goldsmith and a jewelry design teacher. In this class, I'll start by explaining the basics of the orthographic projection on a simple object. I'll be showing you then examples of orthographic projections on a pendant and a pair of earrings. You will have exercises all along the class to practice what we learned. All you need is a paper, a pencil, and a ruler. I'll be very pleased if you share your drawings with us in the project section. No prior knowledge is required. So if you're interested in this class, Let's dive into it.
2. Orthographic projection: In this lecture, I'm going to show you how to understand third angle orthographic projections. This means to be able to view a three-dimensional view in two dimensions. This is an isometric view of this particular shape. So imagine we put a glass box around this particular shape. This will help us visualize it better. We've got front of the box. Which you can see in the left. We've got the side of the box, which is in the right, and the top of the box. And of course the back and bottom of the box. I will color each view with a different color. So you can visualize it better. In the two-dimensional drawing. I colored the front view with red. And then the side view with blue color pencil and the top view with a green color pencil. The way that third angle works, we need to visualize this in two-dimensions. So let's imagine that the corner of this glass box here is a hinge line. I'm going to unfold this box on that hinge line and draw it over here. We're looking directly at the front of our glass cube. I'm going to draw what I see when I look directly at the object from each face of the box. Now, if I project that on the top view, I'm going to see just a rectangle looking down from the top. Don't forget this edge here as well. The key here is that they should always line up as well. On the side view here, if I fold that out, I'm looking at this angle, it is going to look like so. And don't forget that step that you see when you look at it from the side, from the other side by imagining looking at it from the back of the glass box, I'm gonna see a rectangle. I am not gonna see this step though because you're just gonna see the back of this object. But we can do in technical drawing is use what's called a hidden line. That's done with dashes that should line up across here with the step. Directly below. If I'm looking from the underside of my shape here, I'm going to see a rectangle. And similar to this back view, the step here, looking from the underside, won't be visible. That's why I'm going to draw a dashed line that lines up through the front view. This last view is a little tricky. We don't usually show this view bad. If we did unfold that back face down, what will actually be seen is the front view is going to actually be upside down. I will color each view with a different color and color, the front view with red. And then decide view with blue color pencil. And the top view with a green color pencil. The front side and the side* view are the most used in the technical drawings, you can also use just the front and the top. Depending on what you need exactly to show with your drawing.
3. Ex1 tech: In this exercise, I want you to pause the video and draw three views of the following shape that you can see on the right. A front view and top view. And the side view. Here is the result of the views. Does it look like what you did? I would be very pleased if you share your results in the project section and do not hesitate to draw other examples and practice more.
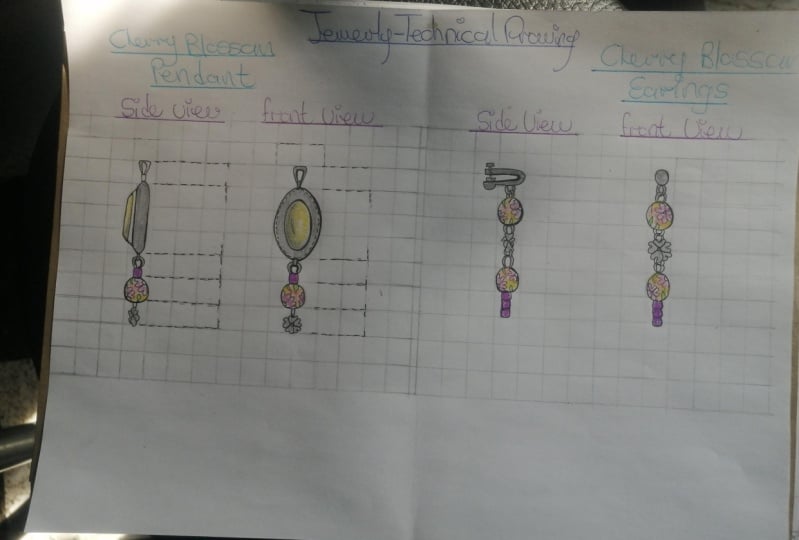
4. Side view pendant: In this lecture, I'm going to show you how I'm drawing a pendant from two different views. I'm starting with the side view. I start by drawing a rectangle showing the thickness of the metal sheet. And then add in a little horizontal line in the middle that is telling me that there is an edge and then a vertical one, which is a dashed line. And it is telling me that it is not visible from the side I'm looking at. And that there must be a hole inside of the pendant. I add a connection from the top. We see it from the side view as a little rectangle, but it is actually a circle from the front. Now I'm adding a bezel. And then a cabochon. I add another connection in the bottom of the pendant. And a third one that will be connecting a pearl to the design. I use dashed lines for the extension because it is inside of the pearl.
5. Front view pendant: I am extending the lines for the different parts of the pendant. In order to draw the front view, I draw a rotated square metal sheet and place an oval shape inside of it, which is going to be the bezel. And I draw a second oval shape inside of the first one, which is going to be the cabochon. And then the dashed lines to show me where exactly is the hole in the bottom of the pendant. This here is the connection on top of the pendant, which is a circle shape. As I mentioned before. I add the other connections as well as the pearl. As you can see in the front view, I did not show the little stick that is inside of the pearl because this information is not really necessary since we saw it in the side view. I then add the bail connector that will be attached to the necklace from both views.
6. Measurements pendant: Next step is to write down measurements. So for this, I'm going to draw dashed lines as extensions for the parts I want to write the measurements for. When we have a very small space. Then we can draw the arrows in the outside and write the numbers in the inside if possible. When the space is enough, then we just draw the arrows inside the lines to write down the measurements that are relevant to the making of the jewelry piece. If you already mentioned the sides in a view, you don't need to rewrite it in the other one. The most important is to make it easier for the goldsmith or the factory to produce it.
7. Shading pendant: Right now, I'm adding some shadows to the piece to make it more visible. For example, I understand from this shading that the Cabochon is an opaque one. And I understand that the bead hanging in the bottom is a pearl. Thanks to the shading. Please, if you didn't watch the first part of my jewelry design course, I highly recommend that you do because I explained the shading and Sketching of jewelries in a detailed way. Pay attention that during the shading not to hide dashed lines or any important information. And I finished by adding the cast shadow in the bottom right side of the jewelry pieces. This step is not obligatory, but it is adding a special touch and a plus value to the technical drawing. Especially to show the curves and the stones. I add yellow colored pencil because I want my pendant to be a golden one and some orange for the shades. And I use a skin color pencil for the pearl and a light blue for the oval-shaped.
8. Ex2 tech: In this exercise, I want you to draw this pendant or any other pendant to like in three different views. And please share it in the project section.
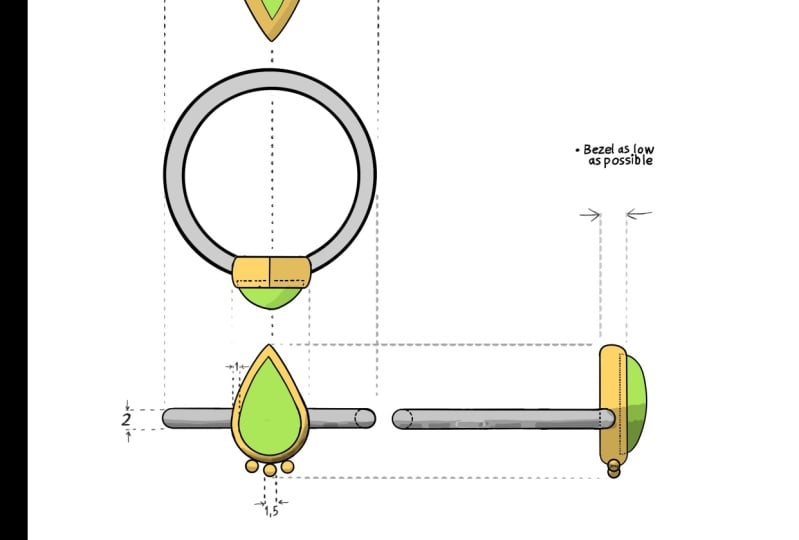
9. Front view earring: In this lecture, I will show you how I'm going to draw a technical drawing of a pair of earrings. I start by drawing the front view. Right now, I draw a long trapezoid shape. And I'll draw two parallel lines which represent the channel where I'm going to be setting the stones in. I'll draw three round shaped zones. I then add three loops, which are going to be the connections that are connecting the earrings findings to the drop setting of the bigger stone. I chose a pear shaped stone for this specific design. I'm using a v form prong to protect the summit of the stone from getting damaged. I am now drawing the facets of the stone. I start by drawing two rectangles, one inside of the other. And then connect the corners of each rectangle to the borders of the stone. And add V forms in between. And I add two round prongs in the bottom of this tone, where it is rounded.
10. Side view earring: Right now I will be drawing the side view of the earrings. I'm extending the lines from the front view to the side view in a way to line up the lines. If you already have a stone, make sure that you measure it and know exactly the length, the height, and the width before you start your drawing. I'm drawing the finding a little bit curved. And then I add the stud that is going to get inside of the ear. I consider it usually 10 millimeters long. And these two little lines that I drew are the spots where the push back is going to stuck when closing the earrings, I usually make two because it is safer for the pushback to not fall. But of course you can draw only one. Now to the drop stone. I start by drawing a side view of the pear shaped stone. And then I add the setting, which is going to be the combination of this v form prong from the top and the two prongs from the bottom connected in the same setting. And obviously, I'm going to see only one prong because I'm looking at it from one side only.
11. Stone setting earring: When we have very specific details in a pendant or any other jewelry piece, we need to show it. For this, if the stone is going to be hiding it, then we need to make a drawing for the metal without the stone. Like in this example. I remove the stone so I can show the goldsmith what is behind it. I tried to make a special design. So in case the jewelry piece flips over, you could see a beautiful design from the back as well. I was actually thinking at the same time that I was drawing the piece. That's why my paper was a bit messy. If you get a little mess like I did, you can always erase gently and redraw on top of it to get a clearer view. You can also use a calque tracing paper if you want to make a very clean drawing. Right now, i am drawing a side view of the setting up the stone as well. Next step is to write down measurements. So for this, I'm going to draw dashed lines as extensions for the part I want to write the measurements for. When we have a very small space, then we can draw the arrows in the outside and write the numbers in the inside if possible. When the space is enough, then we just draw the arrows inside the lines. Try to write down the measurements that are relevant to the making of the jewelry piece. I chose this pear shaped stone to be an emerald. This three little stones are going to be diamonds.
12. Ex3 tech: In this exercise, I want you to draw this pair of earrings or any other earrings you like in three different views. And please share your drawing with us in the project section.
 Soundous Bouhandi, Jewelry Designer