Transcripts
1. Introduction: Hey guys, I'm Ed for Chuck. And this is my course
on how to draw the head and face in
a simplified way. Listen, as humans were designed and taught how to recognize certain
features in the face. How to make sure that
it aligns properly. And when it doesn't, when we draw it and it's a
little off even just slightly. We catch it quick. I'm going to teach you through this series of
units in this course, how to make sure everything lines up when you draw the face. In this course, we work on simplified structures
and making sure we understand the skull and then the proportions of
where everything should be. Then we start to move
into the details, working on the eyes,
the eyebrows, noses, mouths and lips, everything
to make sure that it's simplified and
easy to understand. Then we get into a little
bit more detail working on realism versus comic style,
head variation types, emotions, and even touch on different ethnicities and
stylistic choices as well. With every unit, I
attach a PDF worksheet, something that you
can follow along with me as I go
through the unit. But then often I'll give you some homework
assignments so you can practice on your own
at your own pace. Guys, there are a lot of methods out there on how to
draw the head and face. Tons of them. This one, I actually think
it's the easiest. Why don't you join me. We'll
jump on in and we'll get drawn some faces
with some emotion.
2. Warm Up: Hey guys, I'm back and I've
got a unit for you here. I see not so much a unit, but more of starter pack, just a bit of a warm-up
before we get into drawing. Whether it's this course or
anytime you sit down to draw. I want you to take a moment
and set yourself right? Sometimes that can
be done physically. For example, like
stretching yourself, stretching your hands,
maybe moving it, misogyny and a little bit
what I do often is this ball, which you're gonna
see a lot through this course as I've put it on a surface and
roll my hand on it, breaking up some of the
fascia tissue there. So when you're thinking
of warming up, whether it's every time
you sit down and draw or at the beginning or midway
or something like that. I'm notorious for
sitting down and drawing for like eight
hours without looking up. What happens in is I get up and everything's kind
of snap crackle pop, it's all tight and everything. Instead of waiting eight
hours for that to happen. Get up every hour,
stretch out a little bit, and then come back to
the drawing board. That's the physical aspect. The other thing that I
want to do for warm-ups is a little bit on the paper, especially for this course. I think this is what we're
going to practice on. What I want you to do. For this warm-up. It's gonna be really simple. All I want you to
do is draw circles. Now, you're going to say, well, I can't draw circles every
time I tried to draw what? It looks like this or this
or something or this. Here's what I want you to do. Whether your hands on
the paper or whether you're whether you're braced and you're basing your
elbow or whatever, just start slowly
rolling around. And you'll find, the
more you do this, eventually you find your
path to a nice circle. What I want you to
do as you start this course and all the
units inside of it, just start making big circles, little circles, all types
of circles as your warm-up. For this course. Once you get into
it, you'll be like, ****, now I know what
he was talking about. This is why circles are so
important in this course. You'd draw circles
within circles. But this is what
I want you to do. Even if it's just
this for a minute, just you're not cutting
into the paper. You're not. This
is a light hand. You're not pushing very hard. You just kinda, this
is a rough sketch. You do not want
to draw one line. Perfect circle be done. That's what not, that's
not what this exercise is. This is a warm-up exercise. Getting your head, your hand, your body all working
in the same pattern. This pattern is circular. Guys, like I said, do this. Maybe at the start of
every drawing session. That's kinda my recommendation. It's up for you in your flow. But stretch out a lot. Do a little bit of warm-up
and then jump into the units. Let's get to it.
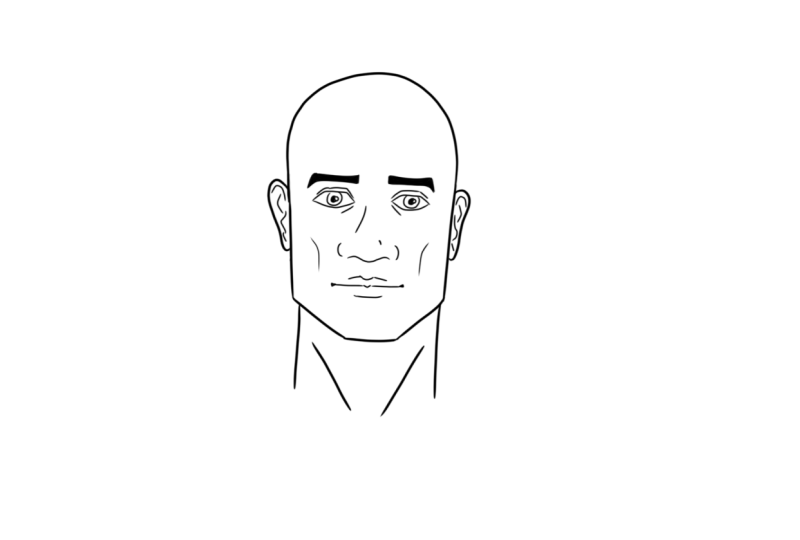
3. Simplified Structures: Hey guys, I'm back.
In this unit. We're going to cover
structures and proportions. And of course, how I do it is I usually try to make things a little bit
simple for you. I know when we're
looking at the head, we're looking at something
very basic when it comes to a structure, the skull. And some of you
have drawn a skull. Some of you haven't, some
of you have seen one. Some of you have
seen one in real life and you people scare me. We all understand the
concept that there's something solid in here
that we can't escape. Unless we're going for
cartoony proportions, we've got a solid base
of which to grow on. The problem is though,
is if we want to draw a circle every
time and then start to lay down all the muscle
tissue and everything on top. It's extremely tedious, like it takes a long
time to do that. I'm gonna show you a
simple way that we can get to it a lot faster. Let's check it out. Okay, up top here, I have a Wilson ball. Some skulls. They're
superimposed on each other. And you're going to see
why the Wilson bowl is what we were talking about in our warm-up section of about
practicing with circles. So I'm hoping that you've
been practicing with circles. My circles get uglier every day. Just keep practicing. What we're gonna do
here is we're going to practice and draw a circle. Keep, keep outlining it until it seems like you've
got it right. There we go. I kind of did it right the
first time I looked it up. Now that you've got a circle,
what are we going to do? Well, we're going to bisect it. What does bisected means? Cutting it in half
and cutting in half. Luckily, we can see how this Wilson has a little marker on it that
it's already been cut in half. A lot of balls. When you
buy them from the store, you will see these kind of lines on it depending on what
support therefore, and you'll see this
bisecting line. What we're gonna
do for this here is we're going to bisect it. We're gonna count from the top, the middle, and the bottom. We've got 12. Then what we're gonna
do, I've already brought it down to this line,
is bring it down here. So this is 123. Let's do that again. I bring this one
all the way down. We'll bring it off to this side. The top is one. Comes to here. This is the first 1, second, 1, third 1, all the
way down to here. Now what does that do? Let's wait and see. Come over to the skull and
do the same thing. I superimpose Wilson
on the skull. So we'll come in and
we'll draw the circle. I'm really hoping you guys have printed off this sheet
and are practicing alone. It'll make it so
much easier for you. You're going to bisected
down the middle. Bisected down the
middle this way. This top, this bottom
middle line will be 123123 down to here. Now look, here's
where that chin jaw. It's gonna come up. It's going to come up
just a little bit of an angle and come up
towards the ball. You notice how it
doesn't come on the outside of the ball here comes the
little shorter that. And we're going to explain why, Because we've got an ear and there are years eventually going to be
in there and stuff. So if you want, you can come back
and practice here. And it's gonna come up,
come up a little bit. You want to have these on the
same similar angle and have them come up to the
side of the bulb, but not the outside of the ball. Just a little bit in from there. What do we think? How does this look so far? From the front? It makes sense. We're just going with the overall height
of the head so far. Now, let's see if we
do it from the side. We've got Wilson again. We're going to bisect. Bisect. Listen as soon as we start getting all belong and squishy, we're going to throw
proportions off. So be very careful with that. I want to have Wilson
still as a ball. We've got the top,
we've got this bottom, and we've got this line, right? So we're gonna go 12 and
come down to here for three. We can carry it all the
way down if we want. From the front of the ball, we can drop this
straight down and bring it up to about halfway. And eventually this will lead
us to our gears and stuff. I'm not too worried
about that right now. The only thing is from the back, depending on genetics and deformities and a
few other things. Sometimes you'll see some skulls have a little bit of
a bump at the back, so they're not a
perfect round somewhere a little bit longer that way. Let's see if we can
do this over here. We'll drop it down
following that skull, will bring it up about midway. Bring it to round about
where that ear would be. But listen. When it comes
to ears eye placement, we're gonna get into that
in just a little bit. Then we can bring a skull and
we can bring it back just a little bit of Fremont
and there's our skull. What I'm hoping is that
you give this video a pause and you start to
do the same thing here. So you're here here. It can be smaller, it
doesn't have to be one to three year about here. And now you start to
draw, from the front. You're drawing a
whole bunch of these, the skulls, these simplified skulls,
very, very simplified. You could do it
from the side here. You're going to cut
it, cut it, cut it. Maybe add. It would be 123
somewhere around here. I'm gonna come back. You're gonna practice this tons. You're gonna be doing
all these circles. And that's why I gave you
so much margin here is to just practice
play around with it. It doesn't matter
the size as long as these proportions are on. We're going to come down and
try this on a real person. Somebody pretending
to be a real person. We're going to look
for circular outline. We're going to go with
the top of the head. We're going to go with a
bottom of that circle. Then we're going to cut
it about in the middle. So we've got 12 and we're gonna drop it
down to about here. We're going to carry
it all the way down. We're going to use the chin, come up and it's
inside the circle, come up and it's
inside the circle. If I was to back that away,
you can see how that looks. Let's see if we go
to this other side and see what kind of head Ryan Reynolds
has pretty circular. We can cut it this way.
Could it this way? We've got 123. I didn't write here, but then we dropped this down. Bring it up. Gonna be like this. And Ryan's had doesn't
go back very far. Okay, so now we're going to get into a little bit of rotation. Right now we've got our balls and we've just been
bisecting like this, whether it's turned straight on or all the way to the side. We can see here Ryan. He's not straight on,
not a straight line, but it's a slight
turn to this bowl. It's still not
looking up or down, so it's still got this. It would be a drop-down
from here and up. But he's got this very slight
rotation here. Let's see. I've got a prop, got
this ball, this ball. Let's see if I can angle it. If it's looking straight at you, this line looks straight. As soon as I start to turn it it looks like that
line is bending. But it's really not. It's just it's still
a straight line. Obviously to your eye, bends around this curve. You can see I've done it
a few times on this ball. What you can do,
you've got to get used to being able to move a ball and have a line
curve in different ways. This would be a good exercise. You can pause it
now if you want or just practice as, as
we're going along. But understanding that
straight lines from certain perspectives curve as they
curve around the shape, as that shape starts
to turn and move. That's what's happening
here. We've got circle that didn't have a
straight line bisecting it, but because it's turned, it's turned this way. This has been turned this way. It's turning this way. Overall, I've still
got this top, this bottom 123 from
Midway of the ball. I'm bringing it down. His chin, comes in
this way a little bit. I'm gonna come up here, come into a skull, come up here and come
into this practice. Guys. Take time to draw
it straight on bisecting. Draw it slightly turned. Bisecting, draw it
turned even more bisecting and then
turned all the way. This would be the
line on this side. And then we start to do
the drop-down and stuff. Take time to practice this. It's really important. Honestly when it comes
to this whole course. Get this one down, you
get this unit down. You can't draw a
circle, get that down. Now you're on this, make
sure you get this one down. It's really important. Isn't any different when we talk about Scarlett Johansson? Likely not with women. The hair can sometimes
get in the way. I'm going to bisect
this like this. We've got one line, second line, third line. It comes up. Her face is a little wider. When it comes to its proportion to how it interacts with
the back of the skull. That's okay. This one's a straight on shot. This one What's going on here? Well, we're about to discover. I've still got this
line, but instead, if I'm following the features,
kinda goes like this. So this bowl has
been rotated this way and rotate it
up a little bit. So this middle line
of the ball is maybe somewhere around here. Then as it comes to
here, it's coming down. Into a chin. Her mouth is
open a little bit so it's distorting how far
it goes down, right? So this would actually be angled this way, if
that makes sense. One 23, because everything's been tilted up as we
were talking about. From the side. Not really a side but slightly turned
actually, it's bigger. She's turned it. Here's the bottom,
Here's the top. We've got 123. From about here. It's dropping down, comes up, comes over to the ear. Then all the way turned over. Scar Jo's head comes down. Let's see if we cut it.
This is an easy one because it's straight on again. We've got 123 comes for here. Her head goes a little
bit further back though. Her ear and job placement
is gonna be further back. That's an individualized thing. Then what do I have
this room for? You bet you. I want you practicing. This is how we're looking
at the structure. Start with a basic bowl. Let me grab my basic bowl. Start with the basic bowl
and get used to turning it. Then get used to saying, Okay, this bowl is two-thirds
of the skull. The other third is going
to drop down below, below that center cut line. Once I've got that down, then I'm good to go. I've got a simplified
skull that I can kind of manipulate. So I wanted to drop
that out and move it all over right. Now. Okay. Next up, what we're going to take a look at is
where things are placed. I'm going to switch the
colors for us just to make this just that
little bit easier. I've got this topline and
I've got this bottom line. What I want to bring it
off to the side here. We've got this top and bottom. If I cut it in 1.52, that is going to be our eyeline. Now listen when I talk
about proportions, proportions of the
face and everything, I'm kind of giving you
some basics right now. I'm giving you some basics of, here's Ryan Reynolds
for an example. But when we have different people, we
have individualization. And so it can shift
that some people have a much larger upper head or shorter lower face or whatever,
features get squished. But for right now,
I hate to say it, but let's look at Ryan
Reynolds as the perfect guy. We're going to do this again. We're gonna go top
to bottom, middle. And there's our island. And it's actually more
like right there. What I like to use
as these points, the insertion for
the I actually, I always wanted for that. If that's the top of the
head, that's the bottom head. There is that one too. That's what we're doing. So if you're looking at when you're
constructing the skull, you're looking at There's
your eye placement. He's gonna be halfway from the top of the head
to the bottom. Everything else kinda gets
to fall from that point. Coming off the top here. Coming off the bottom. Halfway would be about here. Networks without one. Once we've constructed
the head to properly, we can now start to place
where the I is gonna be. This one. The time that this
gets a little hint here is when we're looking at it from certain angles
here to here to here. If we look at it, well, that's halfway and that's right at the bridge of her nose. And then it would come
across like this. This would come
across our shape. Once you start doing
angles and everything, it gets a little
bit tougher, not just straight on
turning this way, but looking up and looking down, you've got to kind of tilt where your measurement
is coming from. That's the eye placement. Next one. This line is where
the ears start. I'll get into all of
these individually when we start looking at
individual units, the ear start at the eyeline, come up from the island to
about the eyebrow line, and come back down
to the nose line. The nose line is pretty much almost always where that ball, where our construction
of the ball went. It's going to come here
and come down, down here. Again, there's some
individual variation. But it basically, if I
follow this eyeline, come here, the ear starts from there and it
comes down to there. Here's Ryan Reynolds has
generally speaking smaller ears. So it's not the biggest thing, but the key point is to start them at that eyeline
and bring them up if you want to bring
it all the way down to where the ball finishes somewhere
around the nose line. That's up to you. But yeah, generally
you will find that the ball will finish at
somewhere around the nose line. I think I kind of went big
on this one on the side one. Let's see if this holds
true for a scar Joe. We're looking at years while unfortunately
Here's the eyeline, right, Here's top,
Here's bottom. Here's the eyeline. Does it work? 12 looks about even for ear would be somewhere
around here starting and then ending somewhere around her nose line there hidden a
little bit from this angle, but that's where
they would be at. Is there a picture here
where we can see her nose? Eyeline is here. So we got we've got top of the skull, chin, halfway, one to bring
us back years here. And it comes down
to about her nose. She might be slightly
angled here or wherever, maybe on a slight head tilt. So that's what's throwing
this a little bit. That it's a little top heavy. But other than that, it works. If we back it up, we
can see how we've got this simplified
structure to the head. Guys. This sheet is
extremely important. I want you to work at it. I want you to really
do a good job with it. Make sure that by
the end of when you're done practicing and
everything that you feel, you can draw that
simplified head in a lot of different angles. I'm going to give
you a little bit of extra sheets to
practice on here. You can come in here. You can work on your circles, work on bisecting them
in different ways, work on twisting them in different ways, turning
them and stuff. If you have a bowl at home, you can play with that
and take pictures of it and practice on how
this would look. Then you're gonna
go into the skulls and you're going to
do the same thing. And see how if you could start to draw the
structures of those. You're going to
draw side-by-side. You're gonna get creative and
do a whole bunch of them. There's lots of room
to practice here. By the end of it. You should have
this page filled, the previous page
filled your mind filled with an easy, simplified
skull structure. If you have that, you're ready to move on
to the next unit. If you don't have
it, don't worry. That's why we have
these video lessons. You can go back and
you can do it again. And it's nice and easy. Once once you have this though, like I said, as we
practice with other ones, get in there and go, Okay, well, There's the top,
there's the bottom. Here's halfway.
This would be where the eyes are at. You
can practice that. The main thing
though, structure, don't worry about putting
the eyes and yet because those are coming in
following units and stuff, you can get a feel for
where they're gonna be, but don't stress about it yet. I don't want you to stress
about the proportions yet. The placement yet. I want you to get
this structure down so that it makes sense this way. Once you've got this
structure down, you're ready to move on down. And let's move on
to the next unit.
4. Eyes: Hey guys, welcome back. In this unit we're going to
talk about eyes can be tough. There's a lot of things that
are expressed with the eyes. Lot of emotion that happens. They say eyes are the
windows to the soul. As humans, we're always
constantly looking at each other, looking each other in the eye. You can tell the honesty of
looking somebody in the eye. When you're drawing it.
If you muck up on it, people catch it really quick. What we're gonna do is
we're going to explore how to make sure that we're
drawing them correctly, both in the right
position and everything, the right sizing proportions. And then also understanding the variations that
come from individuals, my eyelids, my shape, my color are going to look
different than yours. So how can we address that? Okay guys, when we jump on in here and
see what we can do, first thing we're
going to talk about is we've already studied a little
bit of the structure and remember Wilson and his
bowl and skull, right? Do you remember we were
talking about how we can sketch out the circle
we can bisected. We were measuring in the
last unit how we can do top, bottom, and then another
third down here. So we've got 123. Well, the other
thing that we could do is it takes the top here. Take the bottom, draw
it all the way down, and then cut it in half. Right there, it's about half. And what does that do? Well, that's gonna be our
eyeline where we start to draw the insertion points of the eyes and stuff
like that, right? So we've got 12 halfway
is our eyeline. As we go through with various phases and tried
to see how that works. We're gonna see, you know, obviously there are
some people who have a bit higher forehead that
changes a little bit, but this is a nice general
basics to kind of go on. I hope you're exploring or this with me on your worksheet. If you're not, you'll be sketching off to
the side yourself, hopefully by now you can draw
a basic simplified skull. This eyeline is going
to be about halfway from top of the skull to
the bottom of the chin. Individual variants,
depending practice these skulls you've been
practicing from the last unit. The other thing we're
gonna practice here that I want you to working on
is the eyeball itself. There is a circle, but what's the difference between a
circle and the sphere? Three-dimensionality.
You want to be able to have this and be
able to rotate it. So yes, I could
bisected this way. And the iris, the
pupil was right there. But what happens when I
move this off to the side? Well, that moves with it. You can practice
tracing circles, bisecting it and finding, okay, well where
would the center B? And then drawing in
the details that way. And then just keep doing it. Do it off to the side. Say, Well, what would
this look like? How would this look? What if I take the same ball? Turn it and turn
it down this way? What if I go to an
extreme and it's up? But the person is looking up. How do I do that? One little hint you
can do is what I have is a ball like this. So I, I've drawn
on it and it helps me for understanding bisecting lines and all that
kind of stuff, but also helps me for
understanding when I have a circle and I
start to bend it. Notice how that circle
is no longer a circle, but it's now an oval. As I put it on down here in midline and stuff
against pretty even. But as I start to
bend it to its edges, start to move it around, it
becomes more of an oval. If I'm drawing that, my
circle itself stays a circle. But let's say I'm moving
it down towards here. Instead of being
straight circle, it starts to become
slightly more oval. As it starts to bend
and rotate down. What I want you to do is make sure you understand
this premise, draw a whole bunch of circles and rotated a whole
bunch of different ways. And you're going to find
that's what this course is. Understanding, how
everything changes as you tilt it in pivot and
all that kind of stuff, then experiment with bisecting
it in different ways. So to start off this course, what I really want you
to do is make sure, or rather this unit, make sure you understand
the proportions of where things are gonna be
placed in the skull for the I, understanding that it's an
eye ball, not a circle, and then that bowl rotates, actually rotates
within the sockets. The next thing I want to
understand is sizing. And maybe we can look at our good friend Hugh to
try to explain that. We can actually look
at the skull or hue. But you can use what I call
the eyeglasses technique. Basically, if you've
got a skull here. Here's an eyeball,
here's an eyeball. How do you measure it out? Well, there's an eyeball
worth in-between it and usually an eyeballs worth on either side
or at least half. It depends. The good
spacing though the one that almost always stays
consistent is this. Let's take a look at Hugh
Jackman and see if this works. His eyeball would be
something like this. As I start to search to see where where his eyes would be. There's an eyeball in-between eyeball on this side and
an eyeball on this side. If I'm drawing his eyes. Here's the end of the head. He's a little tilted
and stuff, right. So that's why it's throwing
it off a little bit. But his eyeballs are
approximately the size. So I would count them
five across for his head. The eyeglasses
technique would be, if I come up here,
we would look at it like maybe I'll just
draw it down here. Here's the skull. I bring it on down, bring it up. I'm going to find that center, maybe somewhere around here. If I'm going to divide it
up, I wouldn't divide it up. Here's the middle. Here's one. Here's another. I, I can kinda throw
these on the end here. But the eyeglasses would
look like eyeglasses. They would come around this way, Come around this way and
come around this way. Once again, getting my
spacing down in between them. Looks like a pair of eyeglasses. You can practice this. It takes a while to get
it down to make sure that Here's the thing
you're going to have narrow set eyes are going
to have wider set eyes. There's individual variants, but it's good to kind
of keep it this way that in our sketches
we can kind of run it. That it's both Five Eyes across. Sometimes some people are
a little bit wider space, so you might get a half an eye on the end here or
something like that. But five eyes across
as nice and easy, that that's how the
skull looks and stuff. I get it. I didn't even
looking at me now, I'm sure you're kind of
looking and saying, okay, I can kind of see that
if you've freeze-frame, take a screenshot and
kind of draw over it. You've got this five
eyes across structure, the eyeball, the proportions
within the skull. Then we get into the lids. Whenever you're
drawing an eyeball, realized that the
eyeball is here. We've got this structure
as a basic eyeball. But then now we've got some other things that
are going on here. We've got the eyelids that we're all pretty
familiar with. We've got this little
thing here called the caruncle, weird name. We've got eyebrows over top. We've got sometimes,
depending on ethnicity, the folded lid, we've got eyelashes
that actually run from a ridge that are just folded
out just a little bit. So depending on the person, you actually get a little line, especially if you're
looking down at them, you get to see this
line, then you get to see the eye eyelashes
coming off of it. I want you to practice
that understanding that there's still
an eyeball in there. Let's hold this
one's interesting. This one is rotated way down. There's still an
eyeball in there, but that's the the
caruncles here, usually at the edge
of the eyeball. And then we've got the
eyelid being pulled up here, a fold, the eyebrow over top, and then the eyelid underneath. And sometimes you're gonna
get bags under the eyes. You're going to get
that kind of stuff. There's so much going
on with the eye. Again, I'm gonna refresh. We start with the
placement structure. We keep in mind that there's an eyeball
and its rotational. We look at the proportional across where we would
place it and how many i's. So it would be we realized that there's anatomy that
overlays the eye, the eyelashes, the eyelids,
all this kind of stuff. So weird little caruncle their sounds like a
cartoon character. Then we start to look at
individual variation. What I want you to do, and if you have two
different markers, I think this is great, right? Try to find. So I'm gonna go blue first, where you think the
the eyeball would be. You can use that caruncle is
a little bit of a reference. Sometimes I put a little
dot there just to help me. All right. Then I work the eye
lid off of there. Usually I tried to find
a sweeping motion. So for me, I like
going this way, 12 and then three. So this is 12 and then
33 and a backup again, so I would go 123 underneath. But everybody's got
their own pattern. We'll zoom in a little bit more. This is just practice. I put this here for you to
see if he could hunt down. Say, Okay, here's an
eyeball. Here's an eyeball. We can see how there would be
a spacing here in between. We're gonna go
with the caruncle, place this in here. Go up, down and up,
down and under. You can see how just,
just so you know, like eyelashes will also
flow in this direction. Eyelashes will flow this way. I like working with
my right hand, so it's gonna go this way depending on how
they did their makeup, but it's gonna
come out this way. And then the bottom lashes
will also flow out that away. The bottom lashes will
also flow out that away. Then you can add
details of the pupil, the iris, all that stuff. Makes sense. Practice even more and look at
the variation here. A lot of this eye ball is
hidden by these monoliths. We might look at it as a
bit of a smaller item. The eyeball itself is
really not smaller, but how much we can see
of it maybe is coming here and do the
caruncle come off down? This one is small or smaller? Narrower it smaller. We can kind of have that. It's a mono lid. So like with other ethnicities, you might have this
second lit up. They're not with
a lot of Asians. You can come in. Like I said, if you
want to this in first and then come in and
start to draw the details. Keep practicing on this. It takes a lot like what I
would recommend is do this, pull it off to the side, look at the variations
that we're working on. There's a lot going on here. There's a lot of things
happening and I think it's awesome when it comes to eyes that there's
so much expression. But it can feel a little bit like there's a lot
to take in at times, especially when we throw
makeup into the mix. I think makeup can, especially for a guy,
really gets confusing. That's another thing. We've got Hugh Jackman up here. What's the difference
between a guys and girls? I well, there's the
eyeball is the same. But look at the makeup that
we've got going on here for. Generally, if we're
looking at a woman, what we would do is,
oops, that back. Let's take this as a
woman and this is a man. If I'm gonna do that, I'm going to have
this I and this either the eyeballs
are gonna be the same. Just nice, ugly circles. We're going to have
this here, this here. This does not change. Once we start to get
into the details. We can have the
chronicled the same. We're going to have
the I come up back and around I shapes are
often very similar. Depending on ethnicity, we can have different flowing
of eye shapes, of different shapes and stuff. I guess. We can have these eye
shapes very similar. One of the biggest differences between a woman
and a man will be the eyebrows on
women will be often higher up and there's
a lot of space here. It comes down into the
nose and there's a lot of space and body due to
more feminine features, but also eyebrow management. For dude, I'm gonna
make this into a dude. The eye brow itself is
often more muscled. The shape. This brow that sits on top of a lot of guys will
often be a heavier set. You'll, you'll get
this heavier set. Musculature, sometimes
Cro-Magnon looking heavier brow. I'm not even talking
to the hair, I'm just talking about the
muscular part of the brow that can change
things. For a woman. There'll be a lot more
makeup in the eyelashes, a lot more details to
the eyelashes for men. Maybe just Angular. And that's it. There's not
a lot going on there for, for any eyelash details. Drawing it in will
make it more feminine. The more. It's funny because for women, adding more lines around the face makes it
more masculine. But when it comes to eyes, adding more details into it
often make it more feminine. We, just as a society generally gear that
towards femininity. Guys. I've created this sheet for you. You can practice off of
this side or this side. It's, it's really up to you. There's lots of examples of given a different shaped
eyes here and stuff. I'm also going to include this extra worksheet
of just just practice, just practice,
practice, practice. I hope you're drawing tons of eyeballs, rotating them around, trying to draw different
eye shapes and seeing how it fits an outlet, how it figures for you. Recap from the beginning. Understand where the eye
is placed in the skull. That halfway mark. That's the basic. You can move it from there, but you use that
as your standard. After that. Get the rotation down, understand how this
rotation works. After that you're going
to go into I sizing. I, is it almost like that
eyeglasses technique? That is there, There's
an equal space of an eyeball in-between them. Okay. Then you're going to look at how everything's
covered on to them, how the brow hangs over. How, if you're wanting to
do extremely masculine, how that Brown might hang
even heavier for females, how it might be
groomed and put up. How the caruncle almost
forgot it there, how it starts and then
spreads out from the island. The island, how the
eyelid we'll start here in the tear duct
and everything and then move out and come out. This is what you're
practicing practice. Do you want to do it nice and sweeping like that?
Do you want to do it? Hard techniques? How do you want
your eye is shaped. Is it more of an animation? Which really open? Is it tight? More sinister looking,
focus looking. This is up to you guys, up to you and your character
design and everything. But my recommendation to
you is practice, practice. All shapes of eyes. Look at how others have
drawn eyes looked at in comic books, manga, anime. How they can get away
with very few lines. Right leg is adjust this. And that signifies an eye. This goes all the
way back to some of the first things that
humans ever drew in Egyptian hieroglyphics
and stuff and cave paintings and stuff
into what represents an eye. It's important because as I explained at the
beginning of this unit, we looked at that as gateways are gateways to understanding that character, that person. So make sure you get this down before you move
on to the next unit, guys because it's
super important. So practice, practice, practice.
5. Eye Brows: Hey guys, we're back and we got another unit for you
here. This time. We're talking about eyebrows. I'm using the plural. Even though a mind sometimes
gets into a singular. Eyebrows, It's important to God because they can show
a lot of emotion. We can show surprise. We can show so many
things when we're using our eyebrows and when
we're drawing them correctly. I've seen eyebrows
drawn incorrectly. And I've even seen them
drawn in real life after a bad trip to disbar
drawn incorrectly. They're incorrect. Makes other people
raise their eyebrows. I'm not gonna get into
the, all the anatomy of the muscles that are
underlying the frontalis. The super silly. There's too much
going on in the face, but I will simplify it
and just kind of break it down for you so that you
could draw it easily. So let's jump into it. Showed the anatomy
of the face here. But the main thing I
want you to see in this anatomy is don't get
too stressed over it. But you can see we've got muscles that are pulling
from this direction. So they can shorten shorten
up this way so they can lift they can lift
everything up. All right. That's where we get the
there's a shortening. There's a shortening here. It's not huge on
different people, depending if you
got Botox or not. There's, you can have
some play there. But there's also a
section that's in here. And displays of this way. This is where we have so much play with the
eyebrows on the inside here. The temporalis as well
on the side here. I don't know if you
catch them on camera, but I can do a little
ear wiggle and it gives a little bit of a
movement on the side here. Usually when it
comes to eyebrows, that's not all big factor, but I just wanted to
throw it in there and kinda show off
my ear skills. Main thing raising. But we've also got we've got an eyebrow that's sitting here. Sitting over on this ridge
of the ocular orbit. It can go straight up. So we can raise it up. We can raise it up,
and we can also raise this middle section. Hire two. Now as we draw that in there, we can see how
realistic that looks, how it can be raised and that middle section can
flip up even more. So. First, I want to talk a
little bit about eyebrows. The different variations
of eyebrows for people. Mostly when we're drawing it. You can draw each
individual hair. Spend a long time doing this. Let's, depending on how
you want to render it, you can do individual ones. For they started to, they start out like
this and then start to push back and blend, fold over each other sometimes
and stuff like that, depending on the person
you can do that. The other thing that I really
want you to do though, is think of how
you'd simplify it if here's the eye and we know that the muscle
is coming over it. What we can do is just have fun and follow
that outside line there. Even if it's a little jagged. We can follow it
like that and we can see how this has
raised on the side there. You can follow the
nose and it often is nose ridge will often
lead up to the eyebrow. And then you can
follow it like that. Instead of doing all
individual lines. It's up to you and your style. Sometimes I think maybe it's better to do
individual lines because then you could
really emphasize how wild things are. But you could do it also
in the outline of it. If I wanted to. Instead of these individual
lines like this, this, it almost ends up looking like a
crosshatching beast. You can do it off to
the side like this. For women. Sometimes simple
fine line will do, or sometimes a thin, thin little line on top of it. We'll do two for style. If we look at where
the eyebrow starts, usually if we go from the
Chronicle inside here, we start to move up. That's a good placement
for where you can set your baseline of
where the eyebrow starts. It varies a little
bit and obviously, unicycle here has it
all the way inside, but generally, they're
leaning forward and generally you could think of it something along those lines. If you want to make
them big and bushy, make them bigger
and bushy. Bushier. Eugene levy is famous for his
massive, massive eyebrows. Use that play with it. This is where it gets into. Later we can talk about
caricatures and stuff I get. But if I was drawing
Eugene levy, boy, I think I'd have like half his forehead to
be this big banded. Practice with
eyebrows and stuff. Okay, So we're gonna back up a little bit and
we're gonna see how we can use thin lines. We could use outlines, we could use heavy detail
or just sporadic detail. The main thing is though we
want to start the eyebrow just over the caruncle or just inside of
it if you want to, you can go inside a little
bit depending on the angle. But realizing that there's a
lot of variation involved, what I hope is that you
guys bring it on down. Practice the eyeballs, maybe practice this
eyeball, practice this, I will just say, okay, well, how this guy's got
a very heavy brow. How are the eyelids
sitting on top of that? That's what I want
you to practice here. That's the first step
when it comes to it. We understand the anatomy of the underlying muscle
structure enough. We understand how it
moves the eyebrow. And then we talked about how
we're going to render it differently depending
on our stylistic choice and the character style. Next up, let's talk about
emotions a little bit. And this is really simple
to start off with here. We're just going to look at the eyes and
the eyebrows here. This one is important. If it's coming up like this. What does it mean? Could be surprised depending
on the other feature or curiosity or puzzling,
something like that. I isn't it? If it's up and off to the side with the eyes looking in
a certain direction. Again, curiosity. This one I like this
kind of scooping in. So it's raised in the middle. Even. It's got this
committee look. When we're talking about
emotions and eyebrows, there's this huge combination or correspondence between
all our facial features. So it's not just the
eyebrow. Raise your eyebrow. By its lonesome. It looks a little freaky. When I push them down. What does that mean? Like, let's say I go in here and push these downright angry. But I've gotta, I've
been pulled off, got a bit of an angry face. Resting phase. I want you to play
with these eyebrows and even look in the
mirror for yourself. Hold a mirror up or your phone
or something, look at it. Here's my phone
somewhere down here. Look at it and just say, okay, well, don't worry
about the rest of it. Even do some mockups of like just this is why
I put this here, not because of it's
showing anything major, but because you could just use this as a template and just say, okay, where am I going to put the eyebrows on these templates? Some of these eyebrows
I like how they look already and I can practice
and play with them and stuff. Others, I don't know. I think I could do better. So puzzling In one down, one up, angry, raised, play with it yourself. Play with your
eyebrows a little bit. Draw them and see the stylistic
choices you want to have. And just see what
emotions you could evoke with different eyebrow
choices and stuff. Guys. Nice little unit on
eyebrows for us. I hope this was informative,
both for anatomy, stylistic choice, and conveying
and expressing emotion. Practice. Play with it. Look at your own eyebrows. If you have them. Show me what you got.
6. Noses: Hey guys, I'm back and I got
another unit for you here. This time we're
talking about noses. I always thought mine
was a little big, but people tell me it's decent. So I'll roll with that. Big noses, small noses. Why? Noses? There's a whole bunch
of different types. And we're going to
talk about them. And we're going to talk
about how we can draw them, choose what lines go, where that type of thing. But how basically the
underlying structure is pretty easy and it's
fun to play with. Okay guys, let's jump in here. I've got a sheet of people
that I liked their noses. Let's practice with it a little bit and see what we
can come up with. Hopefully what I'm hoping
is you guys print off all the sheets and
then you follow along. Sometimes there's sheets
that you follow with. And then usually I include
some extras for you. Just for not homework
sake, but extra work. What are we going to do here? Well, the style that I use for drawing noses
is pretty simple. I draw a circle, bigger circle, smaller circle, and
a smaller circle. I know in this course we
cover a lot of circles. So let's do that again. A bigger circle, smaller circle, and the smaller circle. Practice again, a bigger circle, a smaller circle, and
a smallest circle. You can start to play
with this really large, smaller, smaller, really
small, whatever you want. So let's just look at this next example here we're
gonna do the same thing. A bigger circle, a smaller
circle, and a smaller circle. Now, why do I do that?
What's going on? Where am I going
to go with this? Well, the bigger
circle has the bottom. That knows that comes in. And then you have the nostril. Let's try it again. The bigger circle carries
the bottom of that knows. You come in to the
outline of the nostril. And it gives you a
nice clearer way to draw all those sides to it. So this might be into
the nostril there. Then we can go out. If we've got somebody with
a button nose, same thing. It's going to have this. And I can draw that little, little curvature, little button that goes
on top of there. Let's see. There's more to it though. Because the nose
is not just does not their babies and that's all you get is
that little nub, right? So yes, I want you
to practice this. But what I also want
you to understand is here's the big one, here is the smaller ones. Notice how this one is. We're
kind of drawing through. But then we've got
some curvature that happens into between the eyes. If I'm doing drawing this, I get to draw this outline. Draw this. Had a little nostril there, maybe do a little bit on there. And then if I want to, I
can draw a curve there. Let's draw it off to
the side a little bit. We'll practice this so many times we're going
to get this down. I'm going to draw, let's
do it in blue first. Draw the bigger one. Draw a smaller one. Smaller one because it's turned so it's gonna be more
of an overlap there. Then maybe draw a
line that comes up. Now am I going to draw
all of these features? No, I'm going to come out here, draw this outline into
this nostril here. I'm going to come
out here, draw this, maybe a hint of this one here. And then maybe this might
just come up that away. She's got a small, cute, relatively small nose. It's not huge. We could draw it from a whole
bunch of different angles. So that's what I want
you to do here guys is draw it from a whole
bunch of different angles. So I'm going to draw
the same thing here, but this time we're
looking up at it. So how would that look? Well, there's gonna be a bit
more of the underside here. So I can come like this and come into an Australian
maybe I don't want to draw that insertion
that comes down here and it doesn't always have
the nicest look to it. Draw the outside of
the nostril there. And then maybe this line
comes up like that. Something along those
lines. Just give it a hint from the side. Let's see if this
looks any different. Here's the bigger one. Here's a smaller one and
I can't see through. So this would just
be this line coming up here. Draw it
off to the side. Here's a bigger one. Here's the smaller one. And here's the line
coming through. I think you're
already getting it. Here's her button knows that
comes up. Nostril comes in. And if I want to, I'm
choosing the details that I'm drawing and then I can have
it swooped up like this. There's a lot of things
you can play with here when you're drawing noses. The size of the nostrils. As we're gonna get
into different ones. The shape of the nose itself has a bump here,
something like that. But for right now, we're practicing with this
cute little nose. Keep audit practice, use. Use her as a great example of just that easy circle
button type of nose. We're gonna get into
different types though. Same construction. Circle, circle, circle. But there's a bigger,
bigger line here. With her. The emphasis is gonna
be the heavier, maybe the heavier, longer nose. If I'm doing that, I might
circle, circle, circle, and then there's a longer
line up to the eye line here. Proportionally, It's
a little bit longer. I can have a really big, heavy shadowed nose down here. All right. That overshadows
small little nostrils or something and then
have it come up. Obviously. We've got a bigger example here. We've got this is where we can get away from circles and
start to go into ovals. Just nice looser shapes. If I'm gonna draw this, maybe I might bring
it out this way. Have it hangover. Haven't come over under here. This is his nostril,
and I could do that. But this is where we
get to have some fun. I really like this. Let's blow it out even more. Then moving on this. So instead, I'm going to have to come out, come like this, come in and have it more of
a cartoony type of figure. You can start to play with it. Push, push it as
much as you want. See how it looks to you. Play with the nose
as long as you're keeping his general
rule for the shapes, you get to play around a little bit and
stuff and just see how far can I take it before it looks like something
otherworldly. Now, sitting by itself. It doesn't look like a
nose, but as soon as I put his mouth below it
or something like that, then it starts to
look, as we'd expect. No teeth. We get into a
character type stuff. Guys, this is what
I want you to do. Go through and really look at these different types of noses and see where the
features are for her. I'm going to back that
out a little bit. Because I think with her, She's got this detailed kind
of diamond shape almost. So if I'm drawing
this off to the side, you'd be like this, like
I can still rough it in. But the details
I'm gonna have are like It's this almost square
nos squared button nose. And maybe I'd add just
a hint of something there and then appear coming in. So the lack of
detail on this and focus on just this
square button, even the top peaks
and stuff I get, I can square it
off on the bottom if I want, but that's too much. Yeah. I think I would
leave it like that and just have it that way. Little bit of a wider nose with the features round
or features that, and then a swoop inside. So you can play with that more wider nostrils and
that type of thing, right? So if I'm going to come in, I might come in like this. Might even give her
a bit of a button. That type of thing. You can start to play with it. Different ethnicities will
have different shape noses. We know this, It's
not a huge secret. Make your choices. Is it going to be this
tiny little detail that we barely put on there?
What are we choosing? Once we add in base? Are we choosing to just
have a few little features? Whereas the dark spots? Is that what we're doing? Is the nose the detail
or is it the nose, the orbital socket
here that leads into the nose with the
heavy brow up above. Is it a kind of a
pig looking thing? This is where it comes
into individualization. De Niro here we're going to talk a little
bit about the bridging, knows he's got a bigger,
bigger main bulb. And then we can bring
it up this way. Into the brow. He's got a furrowed brow. What am I going to
emphasize here? While I might emphasize
this bulbous nature to it, maybe a bit of the
nostril that comes off, comes off into his face. But really, I might
emphasize this part. And then the muscles
of the brow up here. So you can do a whole
bunch of things. Who is it? Owen Wilson. He's got almost
like a button nose. There's lots of things
that you can play with. Guys. I want you to understand
that once you have this basic thing
down of the circles, whether it's a circle
from straight on, we're looking at the
nose from straight on, whether we rotate it and it's where we can barely see through or whether we
rotate it all the way. We only see one of the nostrils. It's important to know that this three circle combination, even if you exaggerate,
it, still kills. It's an awesome simplified
way to draw the nose. So yes, you could focus on more details and nostril hair and all
these kind of things. But that's not what
we're going for here. I wanted to teach you
simplified skeletons, simplified structures,
simplified noses. And so this in a
short period of time has really helped you understand
how to construct a nose. Focus on this. Then you will see where it sits, how it sits as you turn. You can make the bridge bigger,
you can make it smaller. It's up to you. You
can expand either way. But once you start with
those three circles, you're set as well, guys, I've got a practice
sheet for you here, so you can practice with
different noses here. There's different
shapes, but also, I want you to play
with caricature. See how far you can push
it this way or this way, or this way come hanging
and stuff again. And what does it
look like to you? How far can you push it? So I don't care if
you're tracing on these people's faces or whatever you're drawing
off their side. I teach you to study, sometimes to trace it, copy
it, and then create it. That's the step here, guys. You should be able to study it. Tracing over sometimes whatever. Copy it, go side-by-side, draw it and make sure, okay, now put that paper aside
and draw it on its own. I guarantee. After
doing this unit, you could grab a piece of paper, draw three circles
and make a note, and then do that a 100 times. That's your assignment. Copy it, or trace it, copy it, then created on its own, and then play with
the proportions and stuff, guys, that's noses. And I still don't think
mine is very big.
7. Mouths: Hey guys, I'm back. And in this unit we're
gonna talk about the mouth. Do you see how I tried
to overemphasize that? We're gonna
talk about the mouth. And I think it's important to understand where a lot of people go wrong when
drawing the mouth. There's some structural things
that people really miss. And I think it's very
important for us. So when we're starting
off at the mouth, we're actually
going to go behind it. Started off at the jaw. Let's jump into it. Here's our basic skull. I know you guys have done
this way too many times, but we've got our
structure like this. Something along
those lines, right? So if I was to draw it again, draw it just beside, come down. And it's our basic
skull structure. If I want to, I can even
decide little eyes, the nose, my ugly teeth. That's not what
we're doing here. What I want to show
you is that there's something happening right
at about the nose line, right at about here. And we can see better
from the side here. If we draw the skull from the side and we
bring it on down, we've got that jaw that comes up into into that side that right. But what happens is
this jaw doesn't, so I'm going to draw it again off to the side here just so we can kind of get it
getting going on. Where the ear would be. This, I think it's starting to look
more like a skull or a head. You see it away from the skull. Well, what happens is
this is a hinge point. This is where the jaw hinges. Right in here. You can see how it hinges. What happens when a
lot of people draw this and they want to
draw the jaw moving down. So let's see if I
just to simplify it, coming down here, what
they'll do is they will just simply draw this. And they'll say
the melt is open. You'll see that a lot. And even though bugger this one, you'll see that a lot
when somebody wants to draw the mouth open. Although do is drop
the chin down. It'll be this
disjointed. I get it. That's kind of an easy thing, but there's two things that
happened in the face gets way longer than it should be. And to the way that we see teeth and everything in here changes because when
it just drops down, we're still gonna be
viewing them from the front. That's a problem. We're still gonna
be looking at it straight from the front here. What actually happens though, and let's see if I can do this. So it works well. What actually happens to them? Maybe I'll draw
some teeth in here just so we can kind of see. Alright, back to this. What actually happens
is The rotates, it drops down this way. Now, why is this important? Because when we're looking
at from the front, instead of looking straight at these teeth like we
were straight here, we're looking at this
street row teeth. We're now looking down
at them slightly. We're looking at them
from this angle. So let's see if I can do
this with my face here. Not the greatest teeth,
but they're okay. Normally you're looking at
them straight on like this. But as soon as I dropped my jaw, you start looking down
because here's our eye level. And as soon as it
goes below eye level, you start to look down at that. If I just dropped the jaw down, you'd still be looking
straight at it. But that's not what's happening. I can't do that. Instead, what I do is
it hinges on the jaw and at angles so
that now we start to look down at all
of these things. So our viewpoint,
instead of straight on as if we were being lazy
and drawing it that way. Our viewpoint instead
is we start to see some more of the teeth. Especially if it, if
it really hinges down. There's fangs and
stuff like that. What are we going to see if it's really opened in
somebody's snarling. What we're going to see
is straight on here, this straight road teeth. But as we start to look here, as our brain is able to
see that, we will see. And let's see if I
can get a better. I'll see this. But now I
get to see the tongue. I get to see this surface, I get to see this tooth
and I get to see this. If we had just dropped
a straight down, everything looks the same. We might have tried
to draw a tongue in there as something that
it doesn't really work. Please understand that. When we're looking at
the drawing the mouth, the jaw comes first. Understanding how the jaw looks is really important
and how it works. Now that we've got the jaw down, we're gonna get into
teeth a little bit more. And you could see, what
I like to do is draw the front for here. The front for, for
me. The easiest. I just kinda, you can
partition it nice and easy. All right. Then after that
you get into your canines. Then it starts to get into molars and semi molars
and all that kind of stuff. And these ones down
here, they get flat. They flatten out
on the top right. These ones are kind of
sharp, like a plate. We can see them, how
they're fine line. And then these get a lot flatter as we're
drawing them back. Just exactly how I
described what we can view here with
this mouth opened. Instead of just
looking straight on as if I was looking
at this skull. Now get to see some of the top of the surface ones
going back here. Your choice. This is one thing
I usually advise against, but your choice
whether you want to draw individual teeth or not, it's a stylistic choice.
Really up to you. Do you want to draw
just the outline? The gum? Where are you going
to emphasize? You can draw just bits of it. You can just draw a hint. Because if I'm drawing this, I have a row of teeth here. That might be enough to capture what I'm trying to
go for with this mouth. If I back that,
Okay. That's enough. I think I might
even, You know what? I might even take
this stuff away and just say that might, for a cartoony feel
and be enough. Or you draw every
individual tooth. Then let's see how this looks. If I draw the lips, this is a very rough sketch. Obviously. You could go in and render
the teeth even more. But I don't think it's going to do what
you expect it to do. That is not very attractive. A hint of teeth, the white outline or
something like that. Generally I say this is the
better stylistic choice. Now how much detail? Again, it's up to you. The one thing that I
would say is practice. Practice on what you can
see from different angles. I told you about
the front for that I like to draw as just
almost a block unit. So I might draw them. Here's my center line and I
might come off like this. There's my four. Then I've got my canines. I know something's going
into the back here, the molars, and I start
to draw the details. I'm using these Kansas
a bit of an example, but I can draw below here too. They start to go received back. As we go back. I want you to be able to wrap it around an object to realize that they have this U-shape. Now if you want to use a cannon, if you want, that's okay. It's not a perfect examples. Like I said, it's
more of a U-shape, but you've gotta be able to draw your fun for your canines. And then those that
go back from there. How we view it. As
it angles down more, we get to see more of it. If this jaw was, let us say all the
way down like this. Well, I can have a tongue there. That type of thing. From this view, I would
see so much of it. And so I'd have to
draw more details of all of these
teeth going back. The wider the mouth,
especially in comic books, we can open that
mouth really wide. Then the more we're
going to see. Even though I hinted at you, you might not want to
draw every detail here. If it's a character like venom or werewolf or
something like that. Yeah, get in there, draw all those fangs,
draw all those teeth. Start to look at how wolves mouth's look or something
with the teeth. Keep in mind that we
don't always want to draw the teeth straight
on, flush like this. The mouth does not drop
straight down in angles back. And so we're gonna see tops and bottoms to teeth depending on sql positioning,
skull moves back. I'm gonna look up
and I'm gonna see the top of the bottom of
the top row of teeth. That's the biggest mistake
I see everybody make when they are drawing
mouths, lips. We're gonna get into
in another unit. But I wanted to have
you set correct. That you could draw
the jaw, the teeth, and how that moves so that you can move on to The
prettier things and stuff. Guys, what I would recommend is practice drawing
this down below. Say, here's, here's the lips. Will get into that
later. Here's the teeth. This lip comes below. And then make your
choice of do you want tons of detail
in there or not? How does it look when we're
looking at a mouth open? How many teeth do
we see back here? Play with it. Enjoy it. I've got a lot of
examples here on your practice sheet
where you can use the canning lids if you want to practice
drawing on top of, you can draw your first four. Then start to draw the
teeth from there on back, or drop it off to the
side here and try to follow that sweeping motion. Look at how he's looking, look at how she's looking,
what do I see for the teeth? Whereas the construction
on the Gator, whereas its row,
whereas its hinge, try to look at these animals and see how similar is it to what
we were just talking about? How similar is it
to the structure of the jaw hinge and how many
teeth we can see back. But I'm gonna tell you
whether it's animals, whether you're
drawing this animal. Street next to it. Here's the hinge and it
comes out, Here's this. And it's going to come
back to this hinge. And then what am I gonna see? I'm gonna see this, but not this road, this was not visible. I'll see this row, this row up to that point. That's why I put
this practice sheet in here so that you can practice with people, animals. Start taking picture of yourself
and look at it and say, there's, there's the angle, That's what I can see
going on there and stuff. The teeth are so
important and there are a huge importance when it
comes to stylistic choice. Whether you over render and put a lot of
detail into them. And it's really very,
very clearly defined. That'll have certain
look to the picture, whether it's just simplified, that'll also have a look. But the structure is
the most important. Now that you've got this, you've got the structure down. So guys, I hope you print it off both of
these worksheets. I hope you are
following along with me and I hope you practice
on the second one. If this was too fast for you. Well, that's kind of the
magic of video and stuff. Stop it, rewind it
and say Hold on. Edx, drawing those teeth. Okay. He's got those
front for the front for and he follows up
with a canines. Yeah. And then he starts to
head into the molars and they're kind of flattish. How would that look if I'm
looking straight at them? Well, they would be stacked behind each other so I
wouldn't see that much. Let's see if I can just
give you a little example. If I'm looking straight at them, they start to get stacked stack and I would no longer see that. They would start to
block each other out. They would be behind, behind, behind, and eventually
you don't see them. Play with this guys, have fun with these worksheets. And next unit we'll move on to something a
little bit prettier.
8. Lips: Hey guys, I'm back and I've got another
unit here for you. This time. We're
talking about lips. I'm trying to do my
best duck pose here. We covered mouths already, but that was more of
the structural thing. We talked about, the jaw
and all that kind of stuff. If you don't have that down, make sure you go back to it. It's, it's really important. But also important is
how we deal with lips, the covering of the mouth. They can be nothing special, or they can be the focus
point of a character. It's up to you and partly up
to her how I teach you here. All right. Do we have the skills to convey what I'm
trying to do here? Let's see if I
have the skills to teach this lesson
right now, right? Let's take a look at it.
Okay, so who do we got here? We got Ruby Rose and
her lips really, it works like she's got a good set of lips on
are easy to talk about. I'm going to show you what
I do in relation to lips. The external part of the mouth. Real simple. When we draw like a happy
face, what do we do? It's like this. We
have the mouth. It's, it's pretty clear. In a simple line from one
corner to the other corner. Works. It's really that simple
like that denotes a mouth. If you have eyes, nose, and this people will know
align means a mouth. From this point on
of a simple line to more detailed is your choice of how you want to express it. How much rendering Do you want
to have? How much details? I'm gonna show you? The formation of ellipse. What I like to do is off of
this line I like to draw. You can even cut it in the
center if you wanted the line. I like to draw a circle up here, a circle to one side and
a circle to the other. Once again, I draw a
line, cut it in half, draw a circle up top, circle on the bottom
of either side of those lines. Why
am I doing that? What does that then
start to look like? Well, for the bottom, there's often a lot
of mass that comes in this type of shape and this
bulb down near the bottom. And then this comes up to the corner and comes
up to the corner. You will see often there's a bit of rendering here
or something, right? It has not much shape to it. It's got a lot of weight down
at the bottom of the lip. Almost everybody has
pretty salted lip. A lot of people don't
have an upper lip, but most people got a
pretty decent a lower lip. Up here. What I use this as maybe halfway through
the circle or so, I use this as my marker
for the V-shape. There's a little bit of a
mass that happens here. And so that's why even use
this a little bit to help me. And then I bring this in
here and down to the corner. Bring this over here. And down to the corner. You'll see there's
even a little bit of a cleft or pointy ridge in that. Now that I've got this going on, this is a nice set of lips. I might even poke it
in at the sides a little bit to see if
that helps emphasize it. What do we do it off to the side here, we'll practice together. Okay, so we'll use a
slight U-shaped to come around that bottom circle and come around that bottom
circle up here and up here. And I kind of forgot to draw this in first, but
it doesn't matter. I can come here and come here. The sharpness of
this V is up to you. Some people have
a really sharp V, others barely noticeable. And then we'll come out this
way and come up this way. So that's a nice
looking set of lips. Like I said, if I back this ODE, you can see that's
clearly a set of lips. What I want to do is
practice a few times. What we want to do
is draw a line. If you're constructing
your skull, you should already have
this basic lines setup. When you draw that mouth, that bisecting lines
should already be running down the center line
of this, your face. Then you come in. You can have whether you're drawing your roughing
it in first, or whether you're just
winning and you're like, Okay, I know this will be here. I could come up, come down. You can have it a little bit
more angular if you want. Just realized that
the shapes here that there's more mass on the
bottom here and the divot. And maybe sometimes the
point that's up top here. Alright, now we're gonna do this from a few
different angles. We're doing it from the side
a little bit because here's our cut line coming down to the chin or cut line
comes through here. This mouth has more on
one side than the other. So if I draw this
line here and here, instead of right center, it's actually going to
come something like this. So how does that look? Well, this might be ahead
of this one a little bit. I'll draw it off to the side. This ball might be slightly
ahead of this one, not by much but just by a hair. Then the one up here. All right, what are we gonna do? Well, we can start here
and bring it down to here, down this way, and up to here. There we go. Okay, so we can see how there's maybe a little
bit more mass on this side. Because this is the
side that's closer to the viewer or camera angle. I want you to practice
this a few times. Just line, line. Like that. You can start to mix it
around and I haven't small, have a bigger do a few things that That's why on these
worksheets that I give you, I leave you so much room
that when you print it off, you can doodle off to the side. You could do it all
above. You could do it all blow everywhere. I tried to leave you a lot of workspace room that
you could get it. Now that we've got a
basic set of lips, where do we go from here? Well, not everybody was constantly in a tense
pursed lips stage, we open it, we
express ourselves, we're talking, we're
smiling, wear whatever. How do we show that? Well, let's see if we could do
the same thing. Here's the melt line. So we've got this actually it's a little bit officer there
bisecting line here. Normally what we're gonna do, we're gonna draw that
up here and down below, but the mouth is
opened a little bit. So I'm going to have
to drop it down. The lips. The bottom would be here and
the mouth would be here. Problem is this. We can see it has
been pushed out, like it's moved out this way. We can see that by the face and most likely if
we light it up, It's a wider mouth than
what's a straight shot. So if this was a straight shot and she's not smiling
or stretching, it probably be yea
big or whatever. But she's stretched this
out. So what happens then is when we're drawing
the circle up here, it also gets stretched out. And when we're drawing
the circles down here, they also get stretched out. The amount of mass. Instead of being
lumped up and relaxed, it's stretched and
everything gets narrowed. What looks like a
fairly meaty lower lip is getting really
stretched out here. So we can come in here
and realize that, yes, there's still
this mass here. But boy, is it ever
stretched into more of an oval type of thing? Right here, it comes up. Here, it comes up and out. We can have this nice
stretch going on here. Same with above here. This one can be the
instead of a harsh V, We could do this harsh v is, v has been stretched out and then comes out this way,
and comes up this way. Then it's our choice. You know, how do we
want the teeth to look? We already discussed
this in previous units. And what you can do is add
those little stretch marks, the impulse, but the
pinch marks and stuff. We're going to keep practicing bisecting. Bisecting below. Have the circle, two circles. And this could be, you know, what I'm gonna do,
I'm gonna start to change the proportions
a little bit. I'm gonna have to really
big circles down here. If I start to draw it too well, I'll start to draw it this way. This one's stretched out a
little bit. Stretched over. This one's a little
bit under this way. But even though they're bigger, I'm still going to have it
stretched. There we go. Here's some really full
lips, but you know what? Why don't we make
them even fuller? Like I want to
really cartoon eyes, this set of lips. I'm going to do this a little bit different,
almost like a heart. I'm still going to have
this pinch down here. She's got a lot of
weight to these lips. And then even look at the mass
on the inside of this lip. I'm gonna follow
that a little bit. Bring it up this way.
Follow this a little bit. Bringing up that way. We can draw these
textured lines. While these are great,
exaggerated lips. While still keeping the basic
construction of at all. That's the key point
is now that we understand if we have
this basic form there, we can start to blow up the proportions a little
bit and everything. But we're still keeping that
basic, basic structure. And that's what's
important here. I'm gonna leave this next one, so I'll rough this in. This is what I want you to do. See if you can really work
on these a little bit on your own o-chem below this one out. What
are you gonna do? Make them very narrow lips, make them very wide. I've been pulled for dude,
my lips are pretty big. I'm partial to big lips. This is where it gets
important in my mind. Doing it from the side. Here's this rough skull that
we've got going on here. Comes up probably to the
ear somewhere around here. How do we draw an
ellipse from the side? Well, we can still, here's this and it's actually
come around to this point. Here's the edges of the mouth. Here's one ball, and
here's the other ball. Remember, when objects are
overlapping like this, we can draw through them, but we're just knowing
that it's covered up. And this one is here. So how do we then
make the formation? We can do that. We can do this. So once again, off to the
side here, we can do that. And we're gonna do this. We bring it up to here, bring it around back
towards this pinch point, and we can even do a little
bit of an overlap there. This one is coming here
and this is where we could see this almost ridge, how it comes in forms in there. It comes back down
around and up that away. If we do that here, this one's
gonna come around and up. I guess it would
have helped if I would've I'm giving myself
some more room here. Let's say that this
one's gonna come up to their lipids going
to follow this. It's going to come
up to that point. This one will come down to
that point, up and around. This will come up. And then over here, I kind of
pinch myself into a corner. It would've been better if you guys would probably come out here and do the same
thing, draw it up there. Draw it down there. And this will come over
center line a little bit. And then here, but because
it's closer and it's angled, it's gonna be pinched moral
and moved in on this side. See if we could do it
for a closed mouth. On this side and this side, looking at how unequal that
is. This side and this side. See the spacing
in-between here and here. Obviously because of the tilt. We've talked so much
about understanding how when something wraps
around a form, how it changes, how it starts to get shorter on one side
or something like that. How that line bends. That's an extension
what we're doing here. So we would be following the construction lines of the face that would
follow this everything this would probably lead up up to the center of the eye is depending
on hurt proportions, but we've got that. Okay, So what do we do? Same thing. Here's one, here's the other. And you can see how my circles, this circle is starting to
come over that center line, the circles starting to come
behind the center line. The circles kind of leaning off to this side
of the center line. Instead of actually
I'm gonna make it more of a heart-shaped
D for this one. Just because look how
I come down to that. And I come down to that. I'm kind of giving her a
fuller upper lip here. Come down to that.
Come down to that. Give a little bit of
space here if I want. Giving a little bit
of a pout up to here. And then there could be even some little
bit of mass here. Again, you can render, usually if you're going to
simplify rendering on lips. The weight under the
lip is one key point. Under this bottom
lip is a key point. And then a little bit of
texturizing where you could see the lines and stuff. Again, this is really turned. So let's practice that. It's turned here and it's probably wrapping around,
I'm gonna be here. So that means that there's
some wrap-around here for the mouth. If we
do it here again. So this mouth is
wrapping around. This is where you
practicing with teeth. Remember how we even
did the alligator? The alligator one. Rapping round, realizing that the teeth will wrap
around the object. Whereas on the top we'd only see probably this
part getting used to. How are all these
forms wrap around object that's kind of
mastery of the face. So you really got to
have your head in the right place
to get this down. But again, look at the forms. Look at the forms. Everything stays within
how it should right here, this one's kind of put
this one up a little bit. You can change the flow
of lips a little bit. This one's going to come
and I'll bring the bottom. This was our line here. I'm going to bring
it down to here and bring it up over this way. Okay. So how do we
get the lower lip? Well, I could add a little
bulge here if I want. Come down this way. Come around this way.
What's going to happen is flip that a little bit but see if I can get
rid of that line. It comes to that point there. And as we turned it
all the way around, it's going to be on both sides, so it's going to wrap
around like this. The two circles will
almost be intertwined. This one will be here. And we may not be able to see. V probably won't be unless
it's somewhat angled. So then you go like this. It depends on how you define that little heart-shaped v thing or whatever it is. Our ellipse looking so far,
we've got a lot of lips. Now that I've shown
you how to draw lips, I'm gonna show you
how not to draw lips. Because generally
speaking, okay, I'm a guy and my lips are
especially wearing this shirt. I'm just realizing
how red it is. Pretty dominant or predominant. Very easy to see on
me even with a beard. When we're drawing guys. The more definition
we give two lips, the more feminine it looks. When we're choosing
the difference between guys and girls, especially in the face. Girls, we usually add more details in the
eyes and the lips. For men, we add more detail in the brow and the
cheeks and jawline. Really simple rule here. So if I was to draw this guy, this guy being prisms worth,
I might just do that. Let's try it again. Now I might remember how we
have these two balls here. Well, Chris hammers
also has two balls. I might still put them in there, but I wouldn't render it. What I would do, meaning I wouldn't
do a permanent line. I might just do this. This again, might just be this. And this. Then maybe if I want, I might put that small
little dividend top there. That might be as much
as I draw for a man. As soon as I start
drawing it in. What does it look like? He might have these lips here, but it looks like women's
lips when we're drawing them. So my advice is
always your choice. You render how you
want to render. It's your choice. But realize that the more
details you put in here, the more it looks like women. If you want to just have
a man's looking mouth, it could be as simple
as these lines straight across
underneath the divot. You can even get rid of that. Look, if I was to do
this, That's all I need. You can even make
it that simple. Your choice. Your choice, how many details
you add in here. I love adding these little
corner pieces in here, right? So for him, maybe that's
all I would put for a guy. For women, I would flush
it out a lot. For a man. Avoid hyper detailing it. But again, this is your
choice if you want. A man is more sensual. Cover of a romance novel. Fabio hair, maybe you're
doing fabulous lips. That's up to you as a creator. That's up to you as the artist. All I'm doing is showing you the basic construction of it, basic rendering, and then
the choice is yours, how far you want to take it. Like I said, this still conveys lips down here
or a mouth rather. Guys, I've also included this
extra little bit for you as a bit of a worksheet and go on through it
at your own pace. If this video was
too fast for you, rewind, play it again. This is the wraparound for lips are tough if you don't have the wraparound
for the mouth. If you don't have the
wraparound idea for the skull, if this wrap-around thing is too difficult
for you right now. If you're finding this
really complicated, if you're like, I don't understand what
it's talking about. I can't why would this
be hearing this be here, but it's back when
I tried to decide. You miss something,
you got to go back and understand how forms and shapes and these these landmarks of a face wraparound are curved. Heads. Guys. Hope you enjoyed the lips and go ahead and draw a whole bunch
of them, send them to me. Go ahead and draw mine. Let's see how how
interesting they look. I have fun guys.
9. Ears: Hey guys, I'm back and I've got another unit for you here that I think you're
going to like, I find it super easy. So I'm hoping I can
convey that onto you. We're gonna talk about ears. Specifically the outer ear. The inner ear doesn't really
have much to do with us, not for what we're doing, for trying to draw most of that. Let's take a look at the
outer ear for a second here. All right, So as I zoom in, there's some key
points that I want you to recognize a little
bit to drag us. Oh, sorry, I'm gonna the
the helix, the loop. The rest of this is all
there and it's important, but it's not as important
as for when we're drawing, when we're looking at an ear, we're usually seeing this, this upper ridge into the helix, this knob here, and
this lobe here. Let's take a look at how we, what we see here. We can see that that upper
ridge going along here. We can see the Dragos nob
and we can see the lobe. This is basically what
we're seeing here. We're seeing this,
this, this and this. Once you understand that you don't stress so much about ears. So let's say I'm drawing, Here's my bisected head. I've got my simple, simple skull going on. And of course we know
that the eyeline leads to the insertion and starting point
of that upper year. So it's gonna come there,
it's going to come here. All I'm gonna do is draw a simple year that
starts on that island. That's it. I'm going to draw that. That in itself is sometimes
enough to draw your ear. You don't need any details. See if I get some
more room here. We're going to draw
this, this eyeline, going to come here
and draw this. Now we can do a little bit
of shape, the shape to it. We can have it nice
and round like this. We can have a going
up like this. We can have it going like this. Everybody's a little bit
unique in your design. It's up to you. But if we want to add details, this is how we're gonna do it. We're going to come and
have this knob here. We're going to come from
behind it, come up. Then we're going to
just put a couple of little lines in there
for some details. And the loop, again, we're going to have this
nub coming up here. Usually I like to run the jawed down from that point, come up. And then we can have some small
lines for the inner side. Let's see if we do this
off to the side here. We're going to come
up, come down here. We're going to have
this little nub that comes down into the jaw. We're gonna come up for
the ridge, come around, maybe draw a little
detail there and have a little bit for the lobe. Some people will just
lobes are connected. Some people's lobes or
not, they hang free. What do you think so far? Is it really complicated? Not really right? Like if we're gonna draw becoming here and we draw the head,
something like this. Well, what do we do? We can draw the
eye line is here. We're going to have that
nub start below it. We're going to have
the helix come up around and have the lobe and
that kind of thing there. From this angle we might
see almost nothing. We might see just
the outside of the top there little bit of
lobe. And that's it. That's just kind of looking
off to the side here. He's got an interesting design lower lobe and he's got some, have a feeling he's been
rubbed a few times. We got cauliflower
ear on the go. Again, we're looking at this simple head construction
comes down, we come up the jaw
line and come around. Comes here, starts and comes in. So let's try that again here. Starts up and comes in and
comes down into the jaw. So what do we do? What does that little nub be called
again, the tragus. We're going to have
that come from below and have the helix
part up top here. I'm going to have
different types of details of the inner ear lobe. And then we're gonna have the lower lobe here
that might come around. I would minimize
how many lines you have going on inside of the ear. I just don't think that all
of the folds are really, really, really that needed. I usually just kind of might
have something like that, some simplified version of it. What I want you to do
is practice drawing the different
shapes of years and see if you can get some of
the details down from it. See if that makes sense. These almost look like bat ears now that I'm looking at them. Yeah, that's kinda weird. This one is more of
the typical figure eight or butterfly wing effect. Then down into the job. So do this flop, old floppy here, lobe it. Oh, he's got some weirdness
going on in here. Doesn't take my
course really like, oh man is making fun of my ears. You can have lots
of fun with this. Start to draw your own way. Start to make your own designs. That type of thing. That's what I want
you guys to do. Here we go. So look if
we were to make it a healthier, how would I do it? Well, it's still starting
off that same formation. But the tragus there, the
helix comes up to here. It folds in. Maybe it comes up this way. I've got a lower lobe and then I've got the different
folds inside. Guys have fun with this. Realize that when you're drawing a head, anybody years work? Big, big Dumbo ears work. Figure eights. They all kind of work as
much as they need to work. The choices, how much detail are you going to put in now that you understand that basically, you can minimize it with
just a few simple lines. Well, this just
became super easy. Adding those details in, details in art,
super-duper easy. That's why I say this is a
very easy unit. I don't know. For me, it is really like if you're drawing
it from the front. From the front. Oh geez. Here's from the front.
All I do is this. That it's not simple. I can change the shape, I can put it closer to the body or something
like I can even have less details and it's just barely
showing as it turns. I just find ears so, so easy. Especially once you understand just some of the
basic key points that we're usually looking at. I want you to understand that
you're usually looking at the ear from the side
or from the front. Once in a while you'll
catch it from the back. But I think you've
got to go for that. I've also included another
worksheet for you here, a little bit extra
that you can do. We've got Barack Obama, the rock, a few others. And what I want you to
doing is play with it. How would the proportions
of the ears change? What do small ears on a
character and make it look like? What do ears that come
forward even look at me now, I'm going to pin my ears back. It has a certain look to it. What if I move my ears forward? That also has a
certain look to it? If I pinch them in,
they have a look. Some of these looks are not attractive when we're
choosing ear size, shape, pinned or not. It has an influence on
our character designs. Now that you
understand the basics of constructing the ear, you got to make a choice of how do you want your
character to look? What message do you
want to convey? Guys, practices, worksheet,
practice, practice, practice. And I'll see you
in the next unit.
10. Proportional Placement: Hey guys, I'm back. And in this unit we're gonna talk about proportional
placement. Sounds really complicated,
but it's really not that bad. Basically. Where does everything go? Like, where do things shorter? Lineup know we talked
a little bit about this whenever we talked about
structures and everything. But I want to give
you a baseline of how you can line things up. Because as you go
through the units, it'll kind of set things
in the right place. Now eventually, we're going to talk about variations
on all that. But for right now, this is our proportional
placement baseline. I was gonna say baseline. Let's jump in here. For this first figure, I'm going to be drawing
over a lot of this. For this first figure. We're gonna, we know that we've got a skull underneath that. And let's just draw
some lines here. There's gonna be so many lines. This is gonna be an
ugly, ugly worksheet. Here's our top-to-bottom
measurement of lines. From the side. We're going to go with Here's
where the her eyeline is. Here's where the noses, Here's where the mouth is. Interesting. If I'm
looking at it vertically, this To this is not bad. It's my bump. A little bit like probably right around here
is more like 50% of the way, but proportionally,
top to bottom, we can kinda go half and half
with this particular face, this particular model, little bit lower on the bottom
end, but we're close. Now how do we divide
up this next half? This is where it gets a little tricky on this particular model. We've got a large gap between the nose, the
mouth, and the chin, and then a very
small space between her nose and her mouth. If I was to do the same
thing over on the side here. Let's see if we can do this. He's also got a
longer lower one, but we can see that on the bottom spacing here from the bottom half we've got 123. They equal no, his
chin is very big. What I would try to do, what I could suggest you aim for is from the middle
to the bottom, go thirds as a baseline. The nodes could be here. The mouth could be here, the chin, and the eye. That's a baseline. That's how I would suggest
breaking it up vertically. Not everybody's
gonna fit that mold. That's fine. We don't expect it, but that's
an easy way, is the rule. Do half, half, and then 123, somewhere along those lines. Now how do we break
it up horizontally? Well, there's some key
features I want you to notice. Usually the middle of the
eye and the mouth line up. And usually the insertion of the Chronicle there
and the nostrils line up. If we want, we can
draw bisecting this little off on that. I would say it's more like
this is a nice bisecting here. We can see that she's not
perfectly proportioned. Don't tell her I said that.
But it's important that we noticed that her nose is a little bit off on one
side and that happens. The other thing that
I would say is look at I size on her. Her eye size would place us at around 5.5 eyes across. That's pretty large for
the width of a head. She's got quite small eyes. The average person I
would say is five to 4.5. Or even for what you could
do them when you're drawing. That is, for example, here's one I,
here's another eye. Here's a half. And here's a half an eye, that
type of thing. This guy here, Dave, he's got a lot of space
in between his eyes. That's just his genetic
makeup and stuff. If you want to
start drawing that. What I would do, for example, like I said, is draw one. I hear when I hear, when I hear, I would
enlarge it and then half. And that would be the
end of that face. Half and that would be
the end of that face. And that's how it will
do it proportionately. Perfectly. Again, don't tell
her. I said that I would make the eyes
a little larger. Again. This was drawn off of,
off of a reference. And so. Individual variation plus maybe the camera,
that kind of thing. I would also note that, generally speaking,
coming up from the caruncle, you've
got your eyebrow. Hers comes in just a
little bit so you can angle that in just a little bit. But that's kinda how it works. And why don't we pop over here and see if this holds true. His is basically
straight up from there. So far we've got
what's important is this top, bottom half. Then on the bottom
half we divided into 1234, nose and mouth. When we're dividing
up from here, we might put a roll of eyes. And personally I
would aim for 34. I would aim for
about four actually, and we go half and a
half on the sides. It depends. I liked that comic book look. Comic books have a
little bit larger eyes, so usually I do four
cross, 1.52.53. But realism, you're more
looking at five across. In this case, 5.5. Then you can start
to draw the markers down from the middle of the
eyes, that type of thing, from the insertion of the eyes, of course, you can
make the mouth wider. You can make the nostrils
narrower. It's up to you. When looking at the
proportions though, I want you to realize
whether we're going off of the side view, the front view or
anything like that. When the head is level two, you, it's very easy to say,
here's one, here's two. I cut it. But what happens when the
head is at a bit of an angle? This one is angled
this way slightly. When we start to look at it, we would be coming
along this way, along this way, along this way. And then where does
this actually go? This curves, this curves here. So you'd be right about there. From this perspective here. Wow, this looks pretty bad. His eyes, even though
it's the same guy. The gap between the forehead and the lower part of the
head seems to have grown. It didn't, it just rotated. What's actually happening
here is that there's this rotation and you could see, because this is where
it's important, the ear is actually the
same level as the eye. When we look at the
insertion of the ear, it's on that same
line as the eye. And that's about, it works for him and it
works for me too. If I draw this, you can follow my wrinkle, draw it
all the way here. You can see how it starts there. If we're being better with our
reference lines and stuff, I get, we start to notice. It actually goes like that. And so our proportions come back in place. Does
that make sense? Same as if we're
turning it down? We noticed that Sure, Here's the top and
here's the bottom, but the top is actually going to be more along the lines of
it would be right here. This is where looking at his
hairline and everything, that's that's where
it would have been. Right. It's bending
down this way. If we come across here, is eyeline would
be somewhere here. Mouth, his nose,
that type of thing. Okay guys. Hopefully this unit on proportional placement
helps you a little bit. This is just kind of a simplified approach
to it that you can say, okay, this is where it starts. Now I'm gonna move it around. I drew out a whole bunch
of faces for you here, rows and rows of faces. Some of them you
might recognize. What I did on a lot of
them is in the next row, I edited some things. I edited some proportions. There's two things that
you could do here. One, I would recommend, use this as a practice sheet. Use this to draw what you see above and see if you can do some of the measurements
you're like Okay, here and here and
here. Use your hand. I come in and use my hand and I squeeze it in and use my head and squeeze
it in and say, Okay, Well that's
the middle line. I start to draw it in. So I want you to, we're going beyond just understanding like tracing where we're copying
below now and stuff again and using our eyes and our minds to understand
the proportions. You can measure it with your
hands a little bit there. Maybe do that on the first row. That's a lot of good
practice for you. That is probably a good
hours worth actually. But now when you get below, take a look and see
if he could find some of the changes that I made. I went through and
made lips bigger, stretch mouse, move them around, move eyes around these
types of things. You've got to hunt for them. If you don't find them, make
them yourself say, okay, I'm gonna draw this exact
same head with all this. Going to make it bigger eyes. I'm going to play
with the proportions. I'm going to expand them. So instead of being five
eyes across five eyeballs, it's actually going to be
for something like that. Right now. I'm gonna make it into more or even three, make
it into anatomy. Look with big giant
eyes, right? Guys. That's your assignment here. One, understand the proportions and
I've talked about here. Understand the how you can bisect the face and
then you start to cut, cut, cut, cut, and then you
cut it horizontally as well. To understand that, when
you pivot the head, look for landmarks of where
you are pivoting it at. And then realize
that, okay, well, this normal cut mark has, has been moved across
this round form. Pretty sure you recognize this. And so even though this
is a straight line, as soon as we start bending it, we got to recognize where
does it actually come from. Once you've got that, go down, spin in our practice, drawing these faces and stuff. You can use a sheet
again at the end of the course and you'll
be like so much better drawing all these
features and everything. But right now use it for plotting the
placement of things. Even if it's just a
simplified I like you don't have to make it all pretty because you haven't
gotten into eyes yet. Watch the placement. Try to line it up where
you want and then start to play with
that placement, starts to move it around. Guys, That's your assignment for this unit. Have fun with it.
11. Realism vs Comic Style: Hey guys, we're back and I've got another
unit for you here. This time we're gonna
take a few minutes out to kind of compare realistic proportions to
more of a comic book style. Now, I want to be clear
on this when we talk about comic book styles. And then we move into realism. I would say large portion
of that is rendering. What does that mean? Well, when we look at comic books styles, we often have simplified
forms, simplified lines. It's just nice and simple. It's one line. And that's all it takes. When we get into realism, we see that it's been
painted in blended and everything's been
smoothed and then, then even color is applied and all these types of
things so that we have a very realistic look. It's painterly like. So when we look at
realistic paintings, all the definitely add form, shape everything through
every means possible. Comic books started off with simple print and they
couldn't print like that. They couldn't print with
that high definition detail. Instead, symbol lines. You'll look at early
comic books and stuff. I got just simple ones. Newspaper print, very simple lines to show very simple form. As you start to get more
detailed in calling the forms, you start to add hatching and different types
of rendering. That's a little bit different. What I want to cover here more. So when we talk
about proportions, We have a realistic face and then a comic book face.
They really that different. Let's find out. Here I've got a few
faces done up here. The girl on the left is
a good-looking woman. I know this because
she was my girlfriend. She's she's a good-looking girl. The girl on the right though, is much more comic
book style, right? There's, there's more of a comic book style to her
in how do we capture that? What's the difference? Well, let's break it down and see if we can figure it out. What I've done here is I've
put the top and bottom lines, top and bottom there to kind of show where
their heads would be. Right? So we've got that. That's seems like
it kind of works. But what about where
everything else is aligned? Well, we can take a
look horizontally here and see this head is
slightly tilted forward, so there's a slight variation, but here's her eyeline. Here's her island. That can be part of it. Here's the notes. Here's the nodes. We can see already. Here's the most,
Here's the mouth. If we look at from top
to bottom here on this, again, there might be
some slight head tilt, but we'll take a look into it. This compared to this, this top is just a
little bit bigger. This one's almost perfectly equal or the bottom half
is a little bit bigger. And where's that spaced
out in the bottom half? If I look at these
proportions between the eye to the mouth,
It's almost all the same. Actually, this looks
really similar. The eyes to the mouth,
almost perfectly comparable. It's this chin area. Look at the size of the chin. Real people have a bigger chin and we'll get into a little bit something
different there, but bigger chins are
one of the factors. The other factor
is, like I said, I think this character is
might be slightly tilted down, so that could be a factor. Another thing that I think is
important once we get into, Let's zoom in a little bit. Once we get into we'll we'll
take a look at her eyes. She's got a wide spacing
between these eyes. So if I was to draw her eyes, her eyes are fairly wide space. This might be a little bit of the camera playing
tricks on it. It might be flattening out
the face just a little bit. But we can look at
this face and this is five to six eyes across here. When we look at where
the eyeball would sit, we'll look at her eyeball. Maybe a little bit bigger. This one's more like
just under five. You can see that when we're looking at the
more realistic proportion, the eyes are a
little bit smaller. Make sense as we get into
comic bookie things, the eyes get little bit larger. And then when it comes to Manga and all that
kind of stuff, they can get really animated,
get really exaggerated. So that's one thing. Anything else that
we're noticing here? Look at the nose here
versus the details here. On this one. When I put the outside
of the nostril on this one, it's
not even there. And if it was, it
would be much smaller. Smaller feature
knows, bigger lips, even though my girlfriend's
got pretty big lips. These are these are lower lip has a lot of weight
to it. Bigger eyes. The eyes are bigger,
bigger lips. Smaller, knows. Yeah, we're looking. This is the cartoon
or comic book. Look. Let's see if this
carries through as we go into another one here. Might not always. These are different
artists, different styles. So I'm going to carry
her eyeline over, nose line over them and her mouth line over because we're kind of
even top to bottom here. Eyeline over, nose line
over, mouth line over. These are lining up
pretty **** close. But there's some difference
in proportions here. Here's her eyes, a little
bit bigger space there, but five eyes across. Here's her eyes. I'll make that a
little bit bigger. And of course I can measure
this a little bit better. But look at that. That's like maybe one to three
with some spacing there. 3.5 for maybe this
is for eyes across. She's definitely
five eyes across. The spacing of the eyes, the width of the eyes, the size of them, the
width of the head. That's one factor. The lips. I don't know, Ruby Rose has got some pretty
good lips here. I don't think any
comic book character is gonna do her on that. But look at the taper of this
jaw, looked at that angle. If I was to have
that same angle, I'd be shaving off a fair
bit of Ruby roses face here. And it would come from
maybe the nose area, somewhere around the nose. So look at how pointy,
that would be. Huge difference theorem. And of course they
bring this up, but surgeries and stuff I
got tried to emulate some of these different
proportions, different looks. Don't recommend it,
but we have to study it and understand where
the differences here. So if we're looking to make
a comic book character, the eyes will be bigger, nose will be smaller. Generally less
details on the face. Lips, big. What about if we look at men? Well, here's a picture
of Chadwick Bozeman, and here's a picture
of Superman, remains a little
too tilted here. But let's see if we can
carry some of this across. His nose is going across, Let's call that the mouth. Gino's over here. His eyeline is here. We've got an island
here. Already. Small nose. We've got the chin there. Small nose is one feature. I think that's a
different small nose. And again, very limited
details on that knows now, this can also be played into ethnicity and how we draw different ethnicities
and stuff I got. So let's toss that one aside. Let's also take a look at when
we're drawing ethnicities. Whether it's details like
the nose or the lips. Those can be important in that character and important
in their ethnic makeup. With Chadwick
Boltzmann, I'm going to put those aside right now. I don't like yellow
circles look, but what I will say is
look at this **** chin. Boltzmann's a decent
looking dude, but he'd have to have a
chin as wide as his mouth. Then jaws that
come out straight, straight down, straight down. That's one thing that
we would change on men. Maybe. If you're looking for that certain type is at
squared, square root off jaw. You can even have that suctioned in look that come down
from the cheekbones. And a little bit
of details here. Now with men, you can add
more lines with women. When we're drawing women,
realistic, we see lines. I'm looking at myself and I got lines all over my forehead
here and stuff, right. We do have lines no matter what. But when we draw a
comic book women, we take away the lines. I'm going to say no two lines. We take away lines
on women's face. On men's face though. We might give a
little bit extra, a little bit extra
focused semester. The chisel in the
face and everything. Guys to recap. For women. If we're drawing comic book
style, we've got switches, bigger eyes, smaller
nose, bigger lips. Let's see if I can
write that better. Taper jaw. Anything else? No, I think tape or jawline. That's for women. For men. We've got the chin,
stronger chin. We've got that suction cup. Jaw line. I'm gonna stay away from
the ethnic features. So I'm gonna say
maybe more details. More details. This is a nice and easy
comparison between not rendering, but just looking at the
structural difference between Realism and
comic book style. If you're wanting to get into more comic book style and look
at some of the notes here. If you wanting to
have your characters look a little bit
more photo-realistic, even with simplified lines. Stick on doing what
we're doing, guys. It's up to you and your
stylistic choices. How do you want
your book to look? How do you want your
portrait to look? How do you want
your art to look? My job is to make sure
that you understand the difference and you're able to achieve
those differences, then the choice is yours. Enjoy guys, have fun with it.
12. Don't Lift The Pencil Exercise: Okay guys, I've got an
interesting unit here for you. I kind of paused a
little bit because it's something a little
bit different, right? It's just a bit of an exercise for us to just have some fun with and see what we
can come up with. It's gonna be weird. So you're prepared to be weird. I'm going to show you
two different ways to maybe go about this. The first one I'm going to
show you that you can do is use the reference and do
exactly what we normally do. Have this circle, find the form, and find the face, right? So draw it right beside. Find the face nice and smooth. Nice and smooth. And find the outline. Why don't we do that twice?
And we'll just kinda see where this takes
us for a second here. Okay, so do it again here. Find that square jaw
that this nude has, and see how it plays out to do it again
here, right beside. Bring it down, find that
square jaw that this dude has, and see how it plays out. So we can do it that way. But that's not what
this exercise is. We've done this a few times and hopefully here you've been
practicing and stuff, right? What this exercise
is, what's next? I don't want you to
pick up your pencil. So I want you to, once
you put your pencil down, it's going to continue
in a continuous line. I don't want you to pick it up. I want you to put it
down and see if you can draw this hair. See if could draw
whatever it takes. Enlisted this don't
don't expect this to be good-looking or anything. I just picked up my pencil. I wasn't supposed to.
Don't tell anybody. Try not to make it up. Okay. And so how do
I then go in here? To the mouth? Do the
lips this right? Come back up. Do the eyes. Come back over to the eyes? Okay. That was tough and I'm going
to admit something to you. I picked up my pencil
and I didn't want to. It was just so instinctual
to bounce off the page. Right? But that's what we're working, we're working at just
not doing exactly what our instincts are telling
us to like we're working to fight that just a little bit. And to see if we can
fight it, right. It's a little bit different,
so let's try it again. This time I'm going
to be better. I swear I will going
to try this next one. And I'm going to try hair. And Nice job going to come
up here, do this here. I'm going to come over
and do this eyebrow. I don't want to do
the I come back over to this eyebrow
and I come and do that. I come into this, knows what am I looking for? And that's it. Interesting, almost
looks like a bit of a caricature right?
Now, here's a question. When we did this
first little bit of an approach high roughed in a bit of a sketch with
with that green, right? What if I tried it without I
expect us not to be pretty. Let's see. You can
see how I'm still kind of aligning things in the way that like there's still that line for the ears and the eyes
and stuff I got right. Is it ugly? Absolutely. Does it bother me? No, I don't think so. I think that what's important
is that I'm just doing this exercise by pushing
away from my comfort area. I'll tell you
honestly, my comfort isn't usually like I'm I'm a very sketchy person
and I keep it pretty light and I don't wanna do this. So this grounds
me frustratingly. So that's what I'm
hoping it does for you. Is it grounds you? It helps you think of
basic forms, right? Helps you push past
comfort that things are supposed to be good looking
because she obviously hasn't. It makes you think, well, would this be better
if I was drinking? And then how can I
make this better? Is it better to start in one
area and work my way over? Or is it better to just go with the flow and make it
more of a caricature, right? I put these faces here because I found them like
super interesting. You might recognize
some of them, right? But it's just, it's interesting. So if I start with what's
interesting here, the eye, the brow, the head, the folds, the neck.
On. There we go. What am I doing here? This almost looks, it looks interesting. Alright. How simplified as
this, this is like. I find this fascinating
for me because this is so difficult for me, right? How am I gonna do this? How am I going to keep
getting texture down here? This is interesting. I don t think I want to
spend too much time in this section of the hair. It's just, I think I could spend way too much time
that way wrong. That went south fast. Yeah. But that's the
exercise, right? Guys. I'm really I'm trying to
keep this kinda fun with it, not getting hung up in
and being pretty right. Because I think all too often when we're
doing portraits were scared to make it
look not perfect. It doesn't always
have to be perfect. With measurement techniques,
you can practice perfection. That's cool. There's a skill in
that direct skilled at copies from one to the other. In fact, I'm pretty sure there's a machine
that does that. But this is a step beyond that. This is pushing our
creative juices into areas of discomfort. And believe me, looking at these drawings I just did
is very uncomfortable. There is a certain level of discomfort here and
you're looking at these. But I also realize that
there's a lot of growth here. There's a lot of
interesting things and not necessarily growth in my line quality or
anything like that. But growth in me pushing bass, pushing past rather
comfort areas. And that's what I want for you. I teach a lot of technical
units in this course, a lot of measurement and making things so that you
can make an exact. And I wanted to teach you
something very, very different. Something that helps you push
in the opposite direction. Something that helps
you be creative, more artistic, and
a little goofy. And I think that's what
we accomplished here, right guys, when I look at
some of these, I'm like, Yeah, I would've never
drawn this normally, but that's exactly
what it should be. These should look exactly this way because that's what
came out of my pen. Guys. This is your exercise. I hope you can take
this sheet and draw these faces and
just have fun with it. Push out of those comfort zones of wanting things
to be beautiful. Keeping that pen or pencil
on the paper the whole time, no matter how much you
want to pull it off. And then seeing what
you come up with. And when you do send it to me. Yes. I'm saying this because
I also need a laugh. Fun guys.
13. Ethnicities: Hey guys, I'm back and I've got another unit for you here. This time I'm talking
about ethnicities and realize that this can be a touchy subject
for some people. I'm a white male
and so for some, that means I maybe
shouldn't talk on this, but I'm an artist and I need
to draw all types of people, all shapes of people, all
dynamic types, right? So you need to know certain
differences in ethnicities. Lucky for me, I grew up in a very diverse area and
I've traveled the world, lived on a few
different continents. So it's really helped
me to understand that even though we might
have an ethnic group within that group, there's tons of variation. Yes, ethnicities have
their own grouping. But we know there's variation
and we know that there starts to be overlapping
other ethnicities, humans for their entire history, I've moved around this planet. And so we get that
variation in our features. Guys. That was my disclaimer. This type of discussion
bothers you. Maybe you skipped this unit. But if you're into
discussing some of the ethnic variations in
features, Let's get to it. Okay, so we're gonna start
off with some Asian features. Now listen. For me. I lived in
Asia for 20 years. I traveled to a dozen
different countries in Asia and there's a lot of different features all
over the continent. To say something is
Asian is really wrong. There's like maybe in Northeast Asia or
Southeast Asian look, and even then there's tons
of variation within that. One thing, a couple of things that I'd like
to point out though, is that for many Asians, especially East Asians, There's
the talk of the eyelid. This is a mono lid, meaning there's no fold-over
or crease is just that. It's one of the biggest
surgeries in Asia to get this to get a crease
folded into it. They like she's got a
little bit of it here. I don't know if he
could see, but there's a slight crease there. Creases or what they
call double eyelids are actually very popular
in Asia for surgeries. But yeah, most Asians do not have it or a lot of
Asians don't have it. So I'm going to get rid of
that. They don't have it. We don't want it. The thing that you
want to focus on, for the most part would
be that the shape of the eyes is just this
nice olive oil almond, I meant kind of shape
or something like that. Now as I draw that,
I realized it looks way more feminine than I want. I might come in and
even do a little bit of a harder line. Something like that. As I'm drawing it. Something
along those lines. Meant to raise that. Then as
I'm putting in the details, it might be something like that. That might give more of
an Asian look to it. Just focusing on that single
eyelid and not much else. They're not showing a lot of
folds or anything like that. The other thing
with many Asians is a slightly wider nose. I don't think it's very wide. I think actually, for me I almost think of this as
kind of a standard nose. Forgive the term wider. I actually, me, it
seems pretty standard. For a lot of Asians. There might be a narrower
chin and a narrower jawline. This particular gentlemen
does not have that. He's actually got quite, quite the jaw line
and quite the chin. But as we go into say Japan, narrower jaws and chins
are common there. So that's something to
think about as well. Actually. Like I said, when I'm talking about these features,
especially about Asians. If we'd look at the
plastic surgery rates in different countries and
what they find attractive, what they hunt for in Asia, a lot of it is facial surgeries. It's really important there. Let's leave Asians for now. The main thing is
this mono lid and the slightly narrower
jaws and tapered chimps. But again, that's different
if you go up into Mongolia, wall, very strong jaws up there. When we're looking at Africa. Once again, Africa is
a giant continent. How am I supposed to
capture Africans? Let's go with some
dark skin here. That's fairly easy one, even though there are
lighter Africans, there's a lot of mixed Africans. Darker skin, wider nostrils, I think is pretty
dominant, right? Wider, stronger nostrils, I
would say not just wider, but stronger ones that
have bigger emphasis. Lips. Men and women look at
the size of the lips. Gorgeous lips here. For, usually for men, I don't draw lips very much. But for this guy, maybe I would, maybe if I'm drawing his lips, I might do something like
that or something depending. He's got a quite a
great jaw line here. One that I almost, I could
emphasize when I was, if I was drawing
it or something. But for Africans in general, I would go with larger nostrils and larger lips when we're talking
about facial features. Again, it's a giant continent that has a lot of diversity. If we go up north in closer
to the Mediterranean, the Egyptians have a
bit of a larger bridge, their nose subset
hair and Africans have a smaller scoop
to their nose. Depending on where you're
looking in Africa too, right? There's just so much variation. Now that I'm looking at it, it's really hard
to break it up per continent, but like I said, I just wanted to give
you guys a little bit of a quick peek at some of
the different features. Native American.
Native Americans. One of the key features usually are stronger bridges
to the nose. Stronger cheekbones,
strong high cheekbones. I think that's, that's
a pretty good one. We can see the
double eyelid here. And a lot of Native Americans
actually look like. Lot of Northeast Asians. And Northwest Native Americans have very similar looks to them. So if we look at Siberian Asians and the Inuit of
Canada and stuff, they're very similar and you could see the genetic makeup, how they're really close, right? They've got a rounder face. Whereas as we start to go down in the American continents, you often have a slimmer,
more defined look. This guy's, both of these
two kind of epitomized that. All right, so if I'm looking at Native Americans, usually, not always, but a
bigger bridge to the nose and high
strong cheekbones. Europeans. Once again, lots of diversity
on that continent. We've got to, we've got to kind of
blondes, dirty blond hair. Hair color can be a
big factor there. You know what? Now I almost feel
bad for neglecting the hair when we've
got kinked up hair. Africans can have a lot of
variation in their hair. Some of it can be partially
straightened to a loose curl. Natural might be this
small kinked up type. Asians, strong
coarse black hair. Native Americans, actually very similar to Asians in that way. That was my little roundabout
for hair that I neglected. I'm sorry guys. For Europeans, look at how narrow this noses
and noses can often be. Very, very narrow. The nostrils especially
and almost like, square-like at the
nub of the nose. Sometimes look at how
strong that could be. Depending where
we are in Europe, sometimes huge
bridges to the nose. Once in a while you get
this cute little nose. But a lot of Europeans have quite strong bridges
to their nose. Any other standard features? Hair color, I would
say Europeans and eye color for Europeans. This isn't a color sheet right now to ease in your printing. But when it comes to
the other continents, There's not a huge amount
of eye color variation. There can be some in different parts of Africa and
in the Americas and stuff. I got some lighter browns
or some variation on that. But generally speaking, it's brown right
across the board. In Europe, that's, I
think that's where we see the most variety of eye colors. Everything from the caucuses at Euro mountains and all that. The Kazakh stands and all
those as they move across into Europe that we've got like crazy blue
eyes and all that. Okay, So if we're looking at just these four
basic ethnicities, and I just chose
these four because they're easy to cover
the continents with. Again, I want to review
that for Asians, usually a single eyelid
and narrower jawline. Generalities. For Africans usually wider nose, nostril base, less
of a bridge to the nose unless we get
into North Africans. For Native Americans,
usually more of a bridge to the nose and more defined
cheeks and higher up. For Europeans, often bridge of the nose can be pretty large, but especially usually
narrower nostrils and stronger tips of the nose. And of course, as we go through, humankind has
traveled quite a lot. And we've got a lot of mixed, diverse type people that are their ancestry can come
from all over the place and we get a lot of cool things
that are happening here. This gentleman here, he's got
a very light colored skin, but a lot of African features. His nose looks more African. Definitely. He's got his little
high top fade here has kinked hair to it. He's got that. This
filipino model. She's got very European
and Spanish features with Asian flare to the eyes, freckles, smaller
eyes, wider, nose. We've got a lot of variety. Let's look at this
beautiful curl to the hair. Like this is awesome looking. How much fun would she be
to draw as a character? I'm going to send
you off this sheet. Like I said, if
anybody wants to, they can definitely come at me. This unit. It's an easy target, but it's something that
needs to be done when we're looking at drawing
different types of people and you should learn how to draw
different types of people. It's really important. You have to know, okay, well, where can I push some
of these features? Does that mean Every
African has a wide nose? No. Does that mean every
Native American that has high cheekbones? Know what we're looking here at here is a little
bit of generalities. And then we can start
to push and pull off. That mean. That's all this was just to introduce
the topic to you. Below it, I measured out
each of their features, their eyeline, their nose
line there, melt line. So what I'd like you
to do as an exercise is to use that little
model head that I sketched out there for you
in the worksheet and fill in and see if you can get
some of those features down. If you have to trace first
and then go below and see if you can get it
down and then even copy it to decide if
you want or something. The main point is
look for some of those key features that we've been talking about in this unit. And see if it helps you to differentiate between
the ethnicities. Guys, hope this was
helpful for you.
14. Head Variations: Hey guys, I'm back and I've got another
unit here for you. In this one we're gonna
talk about variations, basically meaning
that the human race is kind of a wonderous thing. We've got tons of
different looks to us. All. Big heads, small heads. Feel like I'm singing
the coconut song here. I want to show you some examples that I just grabbed
from the Internet about how shapes heads, features can appear
different on everybody. We've got variations
within ethnicities, but even within
that ethnic group, there are tons of variations. Tons that society
deems attractive. Some that people will say
are very unattractive. Some features that were maybe considered desirable
in different parts of history or in a
different culture and now have become undesirable. Realize that as an artist, it's up to you to be able to
draw all different types. That's kind of your job. As someone trying
to learn the skill. It's even more important
that you're like, okay, you know what? All my characters might have this certain look to them
or something like that. But I wanted to be able to. Here's a great example. Let's say you want to draw a handsome person, hence a man. You have a characteristic
of what you find handsome. Handsome person will look more handsome in front of or next to people that are less
desirable, less Haenszel. We talked about body types. You want a superhero,
then you have to draw everybody else
as less than super. You want to draw somebody who really freaky and
the hideous looking. You've got to have
attracted population. You have an attractive
population, and then you draw this
one-person that's hideous. They'll look that much more hideous because of the contrast. Learn to draw different types
and different variations. And that's what we're going
to take a peek at here. Let's jump in the first two
that I've got going on here. Basically. If we do the simple red
here, simple skull, one thing I want to emphasize is that even though this
is a real person, I'm going to kind of push
the proportion a little bit. So we've got we've got her face, but we've also gotten an
extremely narrow jaw. You could see her chin to hear. It just seems really
pointy down here. It's not a very big
chin or anything. I should I drew the
circle too narrow. I think she's got a wider, wider upper face at
narrows quite low. Whereas in we can contrast
this with this gentleman here who has a strong jenn
and a very strong jaw. If I was to draw this
off to the side, it'd be something like this. Strong chin, actually
even stronger. Jaw. Chin and jaw variations
can be important. Head size, some people not the biggest
heads in the world. Other people have extremely long lower
portions to their head. If you look from here to here, It's pretty small gap
we've got going on here. If she was straight
looking forward, it might be something
along these lines. It might be kind
of pretty small. Her nose, her mouth might
be along this line, and she doesn't have a whole
lot of Chin going on here. We've been looking at it from underneath and it's not
a very big gap there. This guy has got quite a lot. So if I'm drawing it, I hate to use this term, but it almost seems monstrous. Like he's just got
this noses up here. Melt is here, and then this
massive chin down here. Pretty big yours too. So just even not just the
width or the angle of the jaw, but the space between the lip and the chin
can be important. For me. I got this beard so it gets to distort
things a little bit. Look at the browse on
these guys, right? So if I'm drawing a normal list and I come down and this is how we would normally
construct his face. His brow would hang heavier, something along those lines and you could come back this way. For this gentlemen. Again, we'll kind of
do a simplified thing. This type of thing. His
nose hangs heavier. His brow is a little big, but the nose big
protrusion there. This guy's nose is
actually kind of small. Look at the brow. Look at the noses. Huge variation there
and look at his chin. I hate to bring up
Andre the Giant, but he was a big icon of mine
in the eighties and stuff. And he had pituitary gland. Irregularity that
caused gigantism. Is growth hormone
was out of balance. When we look at people
in our population, we can see variations. Softness, extra weight and their face
or something like that, or extreme leanness that, that's often caused by
not just lifestyle, but genetics and everything. When we look at all
these variations, no chin, massive chin, big nose, small, knows whatever. The point is to really start to recognize them and appreciate
them for what they are. We're not here making fun
of people or anything. I hope I don't come
across that way. This is more just saying, okay, how can we start to
recognize these, these varying features
that will help us either capture
that characters look going forward or even expand on it and maybe become a
caricature at some point. We can see normally it would
be something like this, but her chin for Tod's, so much force does not. But this is, we were talking about
attractiveness and stuff. I get both of these
by my reckoning, are very attracted women. It's just different
different functions, different structures. Normally we could say, well, this is the skull. Here's the eye line. You're just going to start here. And then we can start
to construct a nose, the mouth, all that
kind of stuff, right? The brow here. But for this girl starts
to angle this way, it's still attractive
on her, on this one. It's more like a rule of duck lips here
and stuff like that. But it also works for her. That's the point of
this is to realize that even though we have
all this variation, it can still be
extremely attractive. Just learn to recognize it
and play with it a bit. This one, we've got
tons of different, we've got these kind of
classic beauties of top that Western society is deemed the
handsome, handsome, right? What is it about them? What is it about these three? That you would say? You know what? That's an attractive
person there. What do you think it is? Is it the jaw? Is it the lips? Is it the folded I eyebrows? You don't like? What features of these three? I'm envious with the hair. What, what makes
them attractive? And how does that
affect variation? If we throw a square
jaw on a, on a woman, if she's still attractive angle, these two women seem
quite attracted to me, but they've got square jaws. Do we, do We love
the Tinkerbell? Pixie look with kind of bigger eyes and we can
even animate these eyes. Do we like little button nose? Just got a little nose
and lips or something. Actually, in the more,
I'm drawing this more scarier I realize it looks. Do we start to look
at head shapes? Then maybe even start
to crunch them down. This is where we can get
into more cartoonish looks. We can get into a
more cartoonish look. Doing something like this. Just looking at basic shapes and applying some of our
basic anatomy to it. Alright. Have fun with these. With these. I've thrown a whole
bunch on here for you. On this sheet here that you can try to draw the classic
beauty if you want. You can draw some
variation of it. Depending on where my students are that you're all
over the world. So structures of
beauty might change. Maybe pick some people out
of magazines that you find interesting phases and then really sit there and
take a look and say, well, what is it about
this I really like, is it that tapered chin? Isn't that strong jaw? Is it? Is it the hair? What is it that is
captivating both this person has their
eyes. Why is that? And try to capture that. Play with head shapes,
play with proportions, play with all the variations
that we see in front of us on the sheet
and in real life, because that's the fun of this course is once
you understand, okay? In the past I told you at the eyes are halfway
down the head. And then we wanted to three, we can cut from
heat from the eyes. 123. This is the proportions
five eyes across. Those are just Standards, easy to learn standards. Once you get into this, this
is where the fun begins, where you start to grab
variations and stuff. So like I said, I've kind of showing you some variations of
how even on normal, normal on real humans, how we have this
extreme stretch pull, disproportionate type of look. You don't have to
draw real people, draw cartoons, draw
something exaggerated. Have fun with it. And it can still be, in
my mind, respectful. Yeah, have fun with
this unit guys and just push and pull on some of these examples
and see what you got.
15. Hair: Hey guys, I'm Ed for Chuck. And in this unit we're
going to talk about hair. Something I kinda wish
I had a little bit more of. Let's get into it. So where do we get
when it comes to hair? We're going to talk
about the blue line, what we're gonna do, our normal blue outline
for the skull, right? Drop it on down to
the chin, come up. The reason I do this is
because I really want you to understand when
you're doing here, it's important to have
a structure on it. It's not just strands coming out of anywhere or
anything right there. They're layered over
top of the skull. So when roughing in the head, you really have to
do this blue line to get the hair in the
right place, okay, get the ears, the eyes, everything in place so you can understand where it all goes. See if this makes sense. Bear
with me as we go forward because we're actually not
going to start with here. We're going to start
with hair lines. So let's take a look at our men, Justin Timberlake here
and his hairline. I'm going to rough it in here, go down and around a little bit, just roughing where
the hairline goes. Right. You can see he's got
a good one, right? I'm pretty impressed
by his little MBS. Maybe not focusing
on the here yet, just focusing on the pattern that goes across
the forehead here, down into the sideburns, and into his Hollywood would kinda pseudo
beard here, right? Okay, that works. This gentleman though. Mr. Travolta. He's little bit older
and we've got the M. We can see it. I want to point out right
here at Davidson just a little bit and then comes
down into sideburns. Alright. So we've got this M shape. And we know obviously this is called a receding
hairline, right? You know, like for those
of you who remember Mr. Travolta from well, jeez. How far back Greece maybe.
You had a better hair line. It was never great
though, right. But it's moving on back. Okay. And speaking to
move in way on back, we've got this little island
of law, Jude Law, right? And you can see what's
happening here. So this is typical in
male pattern baldness. We get the hair moving back, you get a little
island or you get a bald spot starting with, we go back here,
starting around here, and it starts spreading
out that away. Eventually, you might just
get this whole thing bold. Okay. But like I said, that's more common with
male pattern baldness. Here's Millie Bobby Brown, who's neither male nor having any type of
pattern boldness here. She's a young girl, but she did shave down for the role of 11. So we can kinda see how the hair how she looks without a big wall of hair
on her head, right? This might be a really
healthy hair line to look at. We can see how it indents
a little bit here. It's got this nice swoop. Who does this look like? This looks like how Timberlake
Timberlake's was, right. So he's got a healthy
head of hair. As far as we know. Move on down. This haircut is interesting
because it's straight across. Now, there's a good chance that this has been trimmed
in the corners, manipulated by the
barber, right? Okay, so don't get
too worked up on it. But for a lot of folk, this is, they liked
that clean cut, right? So they'll, they'll trim
up any stray hairs. Keep this line really
high and tight. Even when he's
pretty clean shape. It's pretty tight. Right. So if I was to do is hairline, I think I could
follow the skull. Right. I can think I can follow skull, but almost any other hair and
we'll get into that later. We'll raise above the skull. When we had Jude
Law up top here, we can see this hairline
was moving back. Usually, this is a forehead. This is the forehead region. Me and my daughter
will sometimes joke that there's a five head, right? If that's true, then this
kid's got like a three maybe. I don't know. Look at this. This is like werewolf style almost it's
coming down into his face. Some guys, you'll also notice that it might come
down in closer to the eyebrow and stuff
that you'll get a little bit of hair moving on down there. And now we're getting
into hairstyles. No, I don't want to talk about. I'll rough it in for you, but that's not what I
want to focus on yet. Still want to focus on
this hairline, right? So yeah, we've got this narrow hairline here
and then we've got Jesse, who's got a big head. Alright. More like mine. I can roughen with the
hair is right now, right? Yeah. He's got a big forehead and
I don't even think this doesn't really show
male pattern baldness. He doesn't have the dip
here or anything like that. I think that's just
his natural forehead. It's huge. It happens. Right?
This little kid. He's not so much of a kid, but he doesn't have it. He's got a really narrow for it. And like I said,
sometimes you'll see the eyebrows start merging. Merging into the
hairline actually. So what's all this about? We've talked showing a
whole bunch of examples of male pattern baldness, a nice hairline, a
three-headed of four or five. What's, why am I
teaching you all this? Because it's important. What's important is that
you understand that there's a certain pattern
that's happening even though his head's
coming up this way. We still got this little dip, this little dip of
the hairline that comes in the sideburns. So keep that in mind
that whether you wanted the forehead to be really high or a little bit of
a shorter forehead. You want to follow
some similar patterns that humans hair follows. And this is for men
and women, okay? Obviously the women won't get
the male pattern baldness. Like you can see the difference
in Millie Bobby Brown here compared to Jude Law. But they will have this little indent that
we're looking at here. And you can kinda gauge
that off of the eyebrow. That's a good way is this relationship here and
here and stuff, right? It's not gonna be perfect. Everybody's heads a
little bit different, but that's one way
to think of it. Okay, so moving on
from from hair lines, we're gonna get into hair now. How I draw hair. A lot of people,
you'll see a lot of artists like trying to draw
every individual strand. And they really,
really work at work, at work at work when
that's not bad. That has its uses
and stuff like that. But almost like when you draw, remember the mouth unit when we were talking
about teeth and stuff. When you draw it too
much individual hair, it starts to take away from the message
you're trying to do. So instead, what I
tried to do when i'm, I'm doing here is think
of it like a wave. I think of the movement
pattern of what I see, and then I take it in clumps. So I'll grab this wave, move it down, grab that, how it flows that away, right? All this one spins
around. This way. It comes this way, this
comes in this way, this way, it comes in
this way and this wave. So I might draw the occasional strand
inside of that wave. But a lot of it is just
drawing the wave itself. I think it was pretty cool. Alright? So don't worry about the individual strands and you
try to try desperately to, to draw and highlight
and do it perfectly. It'll take away from the message of what
you're trying to do. Which you want to do
is catch the wage. Why does it sound
like he's commercial? Catch the where
it's coming from. You just catch the motion of it. There we go. So what I've done here is
I've copied the blue frame. I'm not gonna make you draw out all these blue frames and stuff. I've copied it over so you can work on the hair just
off to the side here. Okay. Not on every model, but
on a lot of them here. Hopefully that'll help you practice for this one
just to focus on hair. Okay. Chris Pine. Chris. Where do we know him from? He's maybe I know he's the only Chris that's not in
the Marvel universe, right? So how do I, how am I
going to approach this? Well, there's different. He's got this hairline, right? We've got this normal,
kinda typical hairline. We can see here's
the eyebrow marker and then this
relationship here, right? But that's not what
we're going to focus on. What I'm going to focus on
is where the hair stems from and where it's
flowing to, right? So it's coming from
this, this section here. So I might draw some details
from the root of it. And it's coming out and we can see how it keeps coming
from this side right. Now might not even
do all the details of this side of it or
anything like that, depending on how
I'm going to do it, I probably wouldn't have drawn that hairline in there at all. Right. So I'll erase
it on this side so it makes a little,
little better. As I'm roughing in the
waves of his hair. I might just rough in just a little bit
of the hairline here and stuff depending on What I plan to do with this, am I going to ink it and
we're going to color it? Alright. There's Chris, hair. Kinda cool. So you can see we're
following this wave across. And I left the room
for you to do it. Speaking of waves, wow, no clue who this guy is, but he's definitely got
some waves going on, right? So if I was to do this, I would be following
these waves. And some of them curl
up and over, right? You can have fun with it. As they, they come back a
little bit, alright? Okay. He's got a little bit on this
side here they fold over. This one switches now starting
to switch over this way, coming up and you can start to create the momentum yourself
a little bit, right? As you start to flow with it, your hands will get used
to which way you're going. And you'll just kinda have this nice flowy herself
to get the hair down in. Here we go. Wow. Yeah, that's kinda cool. Maybe a couple of evil
flips up there. Alright. So those are some
short hair examples. And this girls
long hair example. What else we got coming up here? A kind of a short
cropped hair for girls. Okay, so where am I
going to take this? You gotta kinda search. Where's the, where's
the part, right? Or where's where's
the flow coming from? For Miley? It would be coming here. Right. We can bring it over this way
and bring it up this way. So this is maybe tucking under. You can see some of
it tucks, right? Sometimes it's tucking
under or over For her hair. The other one is moving
this way and then there's a couple of little odd strands that are
coming, coming across here. But these ones are coming down on this side and maybe a couple of coming behind her hair. Then you can see
it's still rooted here because we've got
this side of the eyebrow. And what I did for you here, Let's see if I can back
it up just a little bit. You can see I gave you
the face down below here. So you're welcome to follow that same model and see
if you can replicate, replicate the hair a little bit. One of my little crooked. There we go. Okay.
Let's get on in here. So here's where it looks like. When we want to draw strands, we don't want to have
every piece of hair because it looks funny and especially we can't really
see them from a distance. So we can almost draw
it like like I said, waves or leaves. That's what her hair starting to look like here. And that's it. It's really that simple. Right? Because so much
of it as covered. Her face is covered
and everything. Right. Okay. So let's see, last one. Here's what I wanted
to talk to you about just a little bit. No matter how tight
the ponytail, no matter how many
chemicals are put in, no matter how
straightened hair is, It's still going to give
some volume above the skull. So if we're imagining that
this blue line is our skull, we can see we've got some
volume above it, right? So this, this lovely lady has her hair and she's
really worked it. Whoever did her
hair is really like put it back and
it's all tied up. You can see this braid that's in the back here. And
then it's an abundant. With the bun. You can look at the directional
flow of the hair, right? You can see that there's a highlight that squiggles
along this side, right? Okay. And you can see how it even comes down to the
sideburns here and stuff. So just make sure even
though it's pinned high-end tight that you still give a bit of
volume above the scalpel. And you can see how it
routes from this area. And we've still got
this relationship that we're talking
about right there. There's a bunch of
examples for you to do. You can hold those,
look pretty cool. You can work on them there. I gave you extra room on a few of these
heads on the sheet, and I made another
sheet for you. So you can use these
little mannequin heads and stuff like that and draw
out even more when you can. I would recommend trying
to follow the flow and sweep of the hair
that's already here. We've got a bunch of
different hairstyles for men and women. So you can try all
different types. But here we've got a
combination of high and tight and then puffed out. Alright, so tons of things
for you to try here. After you tried these. Why not look in a
magazine and see what other hairstyles
are out there and stuff. You can use yourself as a
model or either magazines, internet, or your
celebrities, right? So there's tons of different hairstyles
to work on and stuff. Keep in mind that the rendering, the flow might be a little bit different depending
on the type of hair. Here we have a course,
straight hair. Here we have curly Afro, right? So with ringlets actually, you can see some spirals
here and stuff I get. So how would you not go in and do every
individual being lit? Just like I wouldn't do
every strand of hair. But I would find it. How
can I embody that in here? How can I capture that, that curl just on the edges? And then the highlights of where I need to have it, right? Okay guys, so this
extra sheet here, this is some extra work for you. You can call it
homework if you'd like. Just make sure that you
follow the proper hairline, even if you can't see it,
just imagine it's there. And then look for the
flow of the hair. And imagine the Heron
waves. Write it. It's not individual strands, but rather catch those waves. And there's my eighties
logo for the day. Catch the wave. Okay, that's it. I hope
this video helped you out.
16. Emotions: Hey guys, I'm back and I've got another
unit for you here. This time we're talking
about emotions. How do we capture emotion
in the face, right? Well, I think there's been
so many university studies I remember they were doing like
just kind of showing eyes. Just eyes with a
smile or fixed mile. So if they just kept her eyes, I don't know if I can zoom in. I don't think you want that, but like fake smiles
versus real smiles. And humans could still
capture IT. People. The face is such an
important part of how humans interact with
each other that we have become masters of recognizing just the slightest variation, the slightest tweak
the slightest change in what's being presented to us. That being said, it's
tough as artists. How do we capture all of that? How do we capture all this? Tens of thousands of
years of evolution and put it down on paper so
we can capture a little, that little tip right there. That's small,
little, little thing that brings forward
that much emotion. It's tough. I got to say like this is just gonna be
your introduction to it. I want you to work
on it and I'm going to simplify it almost too much because I want you to look at what are the key components. What are we really
looking for here? Then you can start to
work on, okay, well, how do I bring it into
a more rendered figure or face or something like that? We're just going to look at
some of the key pieces and see if that helps. Kind of light a little
spark and you say, Okay, I think I get this right. Okay, so let's jump in. Guys, I have a master
in front of me. Master Jim. Jim Barney. He has quite the repertoire
of facial expressions. What we're gonna do is just
go through some of this and see if we can understand
what's happening in y. What's this first one?
Well, what do you think? Well, what does this
look like to you? To me, this is shocked. Why do we have this? We have raised eyebrows,
very raised eyebrows. We have very wide eyes. The head is slightly
tilted back, so we're looking at the nose. We're looking at
the under part of the nose and the mouth. Gaping. What I want you to do is instead of drawing
the whole face, we're just going to go
back to our circles here and draw below this
and see if we can have this like we're gonna
have this big eyes. Actually, I got to say
that that looks off. Why is that off? I think because the eyebrows
are too close, they look too angry. Instead, the eyebrows,
I got to be up here. There we go. Then we can see so much
white in the eyes. We can see just that. You're like, Oh my God, he's making me draw him much easier. But that's just because we're not going to spend
a lot of time on this. We're just gonna keep going. What do we have here? We have this pinch
of the eyebrow, the sadness, and especially
this hook in the mouth. This is what I want
you to focus on lake. Where's where's this? Whereas some of the
key factors going on here on this next
one, what do we got? Well, we've got like a pinch on one side with a raised
eyebrow, right? We've got a bigger
eye on another. We've got to snarl here on the nose and we've got
the mouth going like that. I want you guys following
along and just drawing your own stupid
little happy face or unhappy face emoji
circles and stuff. Here. We've got kind of a concern, so we've got wrinkles, we've got eyebrows, and we've
got the eyes looking up. You don't have to do your
circle faces the same way I am, like obviously might have been be doing them
better than me. I'm butchering them here. This one is scary. Laugh, smile. Like we've got this huge, huge smile with eyes over top
and then raised eyebrows. This one sleepy. So one thing you want to do, a sleepy all let's
do the face here. One thing you want
to do is sleepy is have the eyelids in there. He's just kinda that way, right? That'll work. What
am I capturing here? We can see what are
the key components? Its eyes, eyebrows, mouth, which doesn't surprise
us on anything. This one seems to
have a lot of stress around the mouth and the lips. Then a pinched, puzzled look. I don't know if I'm
capturing that. I might want to rework that. Let's see what you guys
could come out of. This one. We've got one
eye open, one eye closed. Maybe even a raised
eyebrow on this side, and smaller, pursed,
pinched mouth. This one's cute. Okay, so what have we got here? Again? Big eyes. And then this kind of like actually I'm
gonna make it even wider. I'm going to exaggerate
that even more. And then we've got
that going on. Whereas in this one
is almost the same, but the mouth is higher up and there's a bit of
an arrogance to it. He is, He's got his
eyebrows over top. We've got that kind of
arrogance going on and he looks like he's
looking down at us. What do we got? We've got kind of a
sleepy I think going on. And then a big gaping mouth. This one's cute. I don't know, just
kind of a side smirk. I think the sides
mark, I like to give that on the end there. Just like it's pushing up, pushing into what could be, would be might impulse. I'm running out of
room here, but you can see on your sheet probably
when you print it off, you've got a lot more room. Again. What are we looking
at? We're looking at these little dimples. The eyebrow twist here. One straight ones up. Just this. He's not really
showing much lipase. He's got this thing going on and you can
see it does that law. He's got this
personal lip thing. He really kind of sucks
his chin back in there and stuff that shows
a lot of emotion. Here's a kind of like I just spilled the milk
or spilled something. The mouth is open on one side. It's kinda like kinda getting
that fishhook drag to it. That's part of it. Of course, you know,
when he's looking off to the side here, sorry guys, I kinda ran out of room for
my face on the bottom here. This nope. That's pure Jump Box me. How can I keep and explain
what's going on in that one? Guys? When it comes to emotions, it's, oops, where
we go, there we go. That's better. Here's an extra sheet for you. You can go through and
really just kinda work them. Start stretching things. Whether you're doing it with a simplified happy face or
whether you really go in and kinda define the Build a skull and then
build off of that. It's up to you. Key point to this, the
reason I simplified it back to the emoji basics was because I wanted you to
understand eyebrows, eyes, mouth. That's pretty much the
formation around the mouth. That's pretty much what
you're hunting for. Once you've got that down, you're gonna be able to
convey so many emotions. I hope this was helpful for you and lots of practice
sheets here. So get rolling on it.
17. Face Turns and Angles: Okay guys, I'm back and I've got another
lesson for you here. This one is about heads. Well, I think that's pretty
clear. Heads and faces. But in particular, turning them. You can see this handsome
devil in front of you is me and my winter beard. Yeah, I sketch these out earlier and to prepare
for this lesson here. And I'm hoping that by
practicing more and more, you get comfortable
drawing faces, getting used to the measurements,
all that kinda stuff. What we're gonna
do is just kinda reviewed some of how we measure things and see how
that holds true. Measuring it and drawing
it from different angles. So the first thing
we're gonna look at is I've already got some blue lines that
I wanted to keep them here and there on your
worksheet to write. So this will help
you as a bit of a guide as we start
to, as we're learning, we're studying, we're
moving on and stuff I get construction lines
are important so that you have that overlapping form of
the face and stuff. I'm going to switch it
up though and just go a little bit green and my sketch, just so I can see
what's going on here. So we've got our top to bottom and we've
got our midline right? But that's not where
things started. Where things actually
start is a circle. Okay? And I can make my circle
really ugly, really rough. Whatever. I can make it
prettier, whatever I want to do. But I'm just going to
draw a rough circle, bisect it, and drop it down. I think this is pretty
familiar so far. So I've got a bottom
and a top here right? Now, halfway through this bottom and top, I'm going to come off. I'd say that's pretty close. Maybe, maybe somewhere rather, I'm going to draw a line
on either side of that. What I might even
keep this See if I can get get consistent
and my drawings here. So there's my line,
There's my top line. There's my bottom line, right? And like I said,
I'm really hoping you're kind of following along. I'm going to bring the skull
down, bring the skull down, use my chin and my manly beard, a jaw, and draw it up that way. Okay. So I've got I've
got this going on. What's this halfway mark
here? What does this signify? Signifies the eyeline
started the I so I can either put my
eyes in as I'm looking, all alien, ask or robot or something,
or just leave it be. Now if you'll look, my nose is about one-third
the way down my face. So if I do this and I
divide it into thirds, this is where my
nose is gonna be. Right below that circle. My mouth is about halfway
between those points. And there's my mouth.
And that's me. There we go. That's this
rough sketch of me, right? No. What do you think? Does this does it look like me? Well, hopefully it
does If we start to add stuff over top. So I can come here and do the, the, the eyes a little bit. I can come and do
the eyebrows above. Alright. I can come down
here to the nose. I'm just kinda practicing little bit and come and
do my angry snarl. I'm going to come out here, follow the eyeline
across the ear, from the eyeline
to the nose line. The year start up comes
down from the nose line. And then I don't know, I think I'll start
drawing my beard and do the do the under section
of the beard here. Do the over part of the beard, the upper part, the
hairline a little bit. Comes around here and my nice receding hairline comes around. Then I've got this this part that goes there,
something like that. Actually, I don't
know what what I drew there are why I do it, but I'm the beard is going to be Here's
the lip underneath. There's a little tuft under the lip and it comes
over and down. Comes over and now and
then I've got this. Okay, so what's the difference between the one that I just drew out here
in the one up here. This one looks a little wider, like I feel like
this one is wider. This one I drew a
little bit too narrow. Yeah, that's the
main difference I'm noticing like a much wider in the cheeks and everything and my eyes
are a little wider. So if I wanted to go in,
especially the eyes, I get clean them up a
little bit and see if. See if that helps. Just a little bit. Helped a bit. But you know what,
here I've just got chubby cheeks and
here I'm thinner, but the structure
is there. Right? Okay. Let's see if we can
go on to the next one and see if we could do
something similar, right? So I'm going to, I'm
actually going to keep these lines that I've roughed in here and I'm
doing a really rough. And there's a reason
for that because I just want to keep
it nice and loose the way that I'm hoping you're
sketching as well, right? So there's that. I'm going to bring this
central line kind of curving. Remember we've got a ball here, It's kinda curving the ball. Here's my top, here's my bottom. Halfway is the eyeline, right? So that's gonna be my eyeline. Their central line is
going down to the chin, comes up, comes around
for the ear roughly. And this one's going to come to cheek there
and roughly come down and come around and then
my neck and into the traps. Okay. So that's a rough
should probably do the nose. We go one-third. One-third. There's my nose. Half of that is my mouth. Okay. You guys like
sketching like this? Like I mean, like doing the roughs first because
sometimes what I honestly do is I just
kinda go to all of them. I noticed I'm doing much smaller here than I am up
here, but that's okay. Maybe I didn't give
myself enough space. Kind of go in here. And this is my high lines. So my jaws is just going to come and it's going
to come up the side here and back into the
year, roughly around there. And then again, one-third, one-third and half of that. That's my mouth. That's
my nose or thereabouts. Okay. I feel like the head. Yeah, my circles
are not big enough. So once I've got
this all laid out, well, I can come in
and start sketching. Going to come in
and maybe I'll just zoom in just a little bit more. There we go. Okay, so what I'd like to do is maybe start
with the nose, bring it off of here, have it come down to her, that nose line is there. Have this eyebrow
come off of the nose? Come there to the side
of the head here. Bring this up, right? This eyebrow is going
to start there. Kinda come back. My eyeline is going
to start there. Sweep under this one's probably a struggling
somewhere there. Sweep under my mouth. Give me unhappy
expression again. Under the lips, right? I can come out here. Draw that cheek coming down. Here is going to be.
And I can see already, I've got way more space
here than I do here. So if I, if I wanted to
make an accurate portrait like then I would measure
it a little bit better. I don t, I just want to
have the fundamentals here of what my face
kinda looks like. Alright, so I'm going to
bring the beard up this way. Bring it around, bring it over, up into the ear. I'm going to have
that top of the ear. There is kind of the
shapes or whatever, right? Back to the hair. This is going to come
up with the hairline. Come up top here. Watch my center a
little bit and have my cool fro. That's
not that cool. Inside here. I want to make sure I have
another lip that comes up, comes up above the
lip from my beard. This comes up and there we go. Okay. So again, what I'm noticing
is as I'm recreating it, all of these are narrower than the ones that
I'm copying and stuff. And that's just because I'm not carrying I'm not taking
the time to draw it exactly as that is because that's not what
I'm trying to create here. What I'm trying to I'm
not trying to create an actual exact copy portrait. I'm trying to teach
you guys how to do some of these
measurements correctly. So I could start with
the eye here if I want. And that's the
bridge of the nose. I'm going to come down. I'm around. The brow comes over and it bumps up over
here, the hairline. And look how I'm just kinda
filling in almost like a puzzle piece or something, a mask and where's the
where's it all coming from? And I can go in any direction. I could start on the back
here and work my way over. I can start on the front, whatever features you kinda feel comfortable with of
where you're coming from. Okay, so I'm gonna come there. I might want to draw the
mouth and the mustache. He's gonna go over top
of it, comes down. This beard thing that
comes down in here, the lip mustache goes this way. And how we're does it
look without an eyebrow? There we go. Okay. Let's back out a
little bit and take a quick look here and see
what we think of it as it. Is it looking the way
that we wanted to look? Construction wise?
I'd say, Yeah, yeah, if we back away some of
these sketch marks and stuff I got I'm drawing a face. I'm a little little squished, so I might want to
make sure that I don't there are pay
attention to that, that I'm not loving how
how how narrow these are. Like. I kinda like it
because it's a bit of a comic book feel to
it and stuff, right? But it's also a little
bit too narrow. I think here I should have. If I'm going to do that, I
got to play out and flesh out the back of the head
here just a little bit. And I bet you'd just
that change will give it the change
that I was wanting. Yeah. Much, much better. And you can see how
there's a lot of space back here in
the back of my head. That space needed
to be added there. Right. Okay. So continuing on. Now, this is where it gets
a little, little trickier. We're going to talk
about facing down. Okay. Do you remember a
while back we were practicing with spheres. Weird. I got you. Drawing whole bunch
of them, right? We are practicing
drawing circles and then doing bisecting
circumference lines, right? So if this is the midpoint and then it
starts to rotate down, we can see how that
circumference line would rotate down with it. Alright? And so even though
it starts at that midpoint, it would rotate down even, even more or whatever as it's
rotating downward, right? Well, that's kinda
what we're doing here. We're gonna have a base
and you know what? I'm gonna see if I can draw, I should bust up the
ruler a little bit more. Kinda. See something like this. You don't have to just
doing it just for fun. The things I call fun in this and doing
this stuff, right? Okay. So I've kinda got this rotated face and
I'm going to measure it and say, okay,
here's halfway. So this is the halfway mark. From this halfway mark, the eyes are going
to rotate down. So in my skull is
being rotated right? And then one-third from here, my nose is going to rotate down and then off of that again, tick, it's going to be my mouth is going to be rotated
down from there as well. It's going to come
to that point. I don't know if I like there we go a little bit
more even there. Okay. So why don't we do
that again over here. This is kind of a downward
three-quarter angles. And so this is tough guys. This is not what everybody, everybody tries to avoid
some of this, these angles. And if we were looking
at it, this has halfway. Well, here's my, my
bisecting sphere, but it's, it's, it comes
to this point and so it's turning this way, right? And so this is going to be, imagine it's, I can start to
measure it this way instead. So this is my
halfway point here. And this is my one-third. This is one tick of that doesn't make any sense because there's two
things that happened. One, I turned and
started dangling it. Right. And so that turn that angle of my head change
things just a little bit. And I almost want to redraw it for you
because I don't know if I explained it exactly. But instead of measuring
from this way, which I can, I can also measure
from this way because my face is pointing
in this direction. I could rotate the screen
back up this way if I want. But in reality, I can also take these measurements and
measure along this way. Okay. Let's see this one. My circles were much
bigger up here. This one's going to come
down. It's going to come up. But how do I measure this? Well, again, this
is a slight angle. Almost as hard as this
one, but not quite. It's a little bit less, It's it's more like that. And so if I was to
cut it halfway and then it rotates from there. And it rotates. They're rotates through there and there's my measurements. Alright. So once I've got those
measurements and let's see, what do I do? Well, I start to
sketch it in just like I did before, just
like I did above. I can look at the
markers for the eyes. I can look at the
marker for the nose. The ears will start
here and come up. Start here and come up and down to where that
NO starts right? The eyes, I won't be
able to see much of them because I should probably zoom in because I'm
looking down at them. So there might just be a
little bit going on there. The eyebrows will be
fairly close to them. The hair my my receding hairline will come something like this. Jude Law ESC hair line. I got going on. I'm just doing whatever
hairstyle comes to mind here. Whenever I made my nose known as pointing
as it is up here, maybe I should change
that just a little bit. The mouth is here with
the lip below it. And then that beard
coming out of it comes around and I might as well draw on
that part of the goatee. Comes up this way,
comes up the face. The side here, comes up the
face and up the side here. This comes down flares
a little bit for the jaw and I carried
it too far down. But that's okay. I'm measurement was slightly off
but it still works. If I want to, I can add in some, Some cheek definition here. But a brow definition, a little bit of
stress I get from teaching and add that in. Let's see this next one. I like to start as usual round the marker of some
familiar marker, right? So if this is where my
eyes are and look at this, here's kinda going, here's
my top, here's my bottom. Highs are gonna be somewhere
around here, right? But they're following
this curve. So they're going to be
something like this. My nose is gonna be coming from here and it's going
to come down there. My eyebrow will be
something like that. So come up to my eyebrow there. The other side. I can over. I like to center line
for plotting my hair. And I just kinda plot it from
back here, coming around, going down to the jaw, to the ear, throwing it in. Like I said, guys, I've
said this many times. You don't have to follow exactly what I'm
doing at the pace, I'm doing it or something. But try to follow along. If you want to just
pause or whatever. I'm gonna put my my mouth
in here without lower lip. Thing that goes under the
lower lip, making the goatee. There we go. Sternocleidomastoid
with that part. Again, what I'm
looking at it and I'm thinking I'm too
narrow this way. So all I do is take the eraser and just make
a slight adjustment. Okay? And the next one, this is kind of
down into the side. This one's tough though. So my eyes are on that
line, still, right. Eyebrow to the eye, back into the nose. Seeing a bit of my
beard here, things, certain things become
not so visible. Certain things start to
disappear a little bit. Alright. The brow up into
the skull a little bit. Come back. The hairline comes on down. This follows the
skull around back. Come over here. For all the here a little bit. Just some awesome
little squiggles. Now I can tell I
messed up messed up with a beard
was a little bit. That's going to come
I can do there. Just comes down. Comes in
that way. There we go. Okay. So what do we
think? Yeah, know What? Oh, I like the evil
look down on this guy. We drew it straight on. And it looks pretty good. Noting that it's not an exact
replica because we didn't measure it out exactly the size of our little
sphere, right? But structurally
it's how we want it to be. We came on down. Exact same thing. Structurally. It's how
we want it to be, right? We can get rid of some of
our construction lines and see what's going on here. If we ever feel something's
a little off, well, we can just go in
and say, Okay, well, I feel like this should
maybe be more like that. Because no matter how much we're constructing
to begin with, we can still go in
and make a few edits. Just to make it a little bit better for what
we're looking for. Let's see. There we go. Okay. Last one. Looking up. This one can be tough to whole lot on nostril
action going on. It's not easy, but what happens is exactly what we
were talking about before. We've got our circles. And our initial
circle is straight on with those points, right? Those points can remain. But instead now this person
is looking up, right? So our skull is looking up and we have
to make sure that our, our features do that as well,
that they are looking up. So what do we do? Well, we
start off with our sketch. As usual. We just started making a circle. We draw a central
line because we're not looking off to
the side right now. We can draw our base chin and
we start to go up with it. Okay, This center or this type
of simplified skull should be pretty familiar to
you at this point. We can then come
off to the side. We measure it and
halfway, halfway mark. Now at this halfway mark, this is going to be
roughly are eyeline. One-third of that is
gonna be our nose line. One little tick below that on this particular character
is the melt line. I can already see like, jeez, am I ever narrow? You got to follow my model just a little bit better there. Now, they're not winds it out. And we know that if this is the the eyeline and
this is the nose line, then this also will
be the ear line. That's where the ears will
stay within that form. Let's see if we can have this
lesson over here as well. We're going to draw our circle. Draw our basic form, top, go bottom, right, and carry this over. So that means our our eyeline, our nose line, mouth line will somewhat conform to
this standard, right? So the eyeline is
going to come out to the cheek and come
down there. Right? Like I said, I feel like
I've been lacking in the back of the skull and
some of these sketches. And on the side, the truth is the back
of the skull has got a bit more meat to it depending
on the type of skull. Some people have
skulls like this. Others are kinda like this, like they have
this bigger thing. I call it the alien head. And I have one. That's why Why I don't
want to go fully bald. I'm just going to hold onto
my receding hairline for now because I just don't
want it to happen. Okay. So we're gonna just
going to continue this line across this eyeline, nose line, which is
our measurement here. Eyeline one-third
and just tick down. And realize that it's gonna kinda go like this a little bit. Because again, we're somewhat looking
up at this, this figure. That's the point of it, is that we're somewhat looking up at it and you can see how
the ear fits in there. Okay. So now we're going to keep going with a bit of lines
and listen like, I'm kinda guessing you
guys are taking a break, whether it's a break between
each head that we're going at or whether
it's a break for each. Each row or something like that, take a break because
this can be tiring. So with the nose, we're going to see the
underside of the nose. Maybe some details there were, these eyes are going
to start here. Start here. And they can either follow the line like that or
there can be a little bit, little bit of role under
like a little bow, but it won't be like this or anything like that because
we're looking up at it. So even this line would appear straight by
looking up at it. Okay. So we're going to have
that. We're going like that. The brow and the middle. I kinda long, long eyebrows. And you want to try to
have an equal, right? I'm mouth, still
unhappy about life. Just a little
goatee beard thing. I'll keep that there. The hair can hide the
hairline on this angle. You can see the hairline talks a little bit by the eyebrow there. It's going to come down comes
into the face slightly. When it comes up
into the moustache. So I can I can approach
it from either side, you know, I mean, I
can do the mustache. Then. Habitat away from the exterior
of the head and the hair. It's coming up this way, giving myself way more hair, even though it's not there. I really got the beard and
the outline of the ears. You can see how well this
is all measured in right? Like everything is in proportion
of where it should be. Good enough. So on these angled ones, especially this
three-quarter angle, I often like to
start with the nose. You'll probably notice
that as my marker. Everybody's a little different
where they like to start. But for me the nose
kinda starts to center everything and have it have
it where I want it to be. Okay. Oh, you know what? I started to low on that. I'm going to back it
out a little bit. No, hold on. Here's my
I didn't sketch this. Correct. So I'm going to jump in. My eyeline should
have been right here. This is actually my eyeline. There you go. Why didn't I do that? Weird. I put a brow in there but
I didn't put my eyeline. That's that's my eyeline there. So sometimes you can find yourself a little
bit off and you're like, where did that come from?
Why am I doing that? Right? Look it up, try
to figure it out. Where, where did you go wrong? Why did things look
wonky all of a sudden, see if you could track it down. And occasionally it's
because while you just kinda forgot something or
messed up or whatever. Here we go. Can go
back to this ear. And you know what? Even
there I can see, I, I want the ear to start
here and come down. Right. That's the eyeline. I wanted to start there. There we go. Okay. So that the hair is
going to be like this. There we go Much better. Now I've got my
mouth on this line. That angry have a guy
come my mouth here. The underside of that lip. And the underside of
lip makes that a little goatee into the beard.
Top of the lip. Give myself a
little beard there. Coming on this side, down and over. And there we go. Now I can clean it up the eye. It looks a little wonky
and stuff, right? Si is actually should
be drawn through. And then I could come just
clean it up a little bit. Any reason. But that is the three-quarter
slightly up angle. This one's gonna be tough to and hopefully I did this right. Yeah, I'm looking
at my measurements. I've got my my eye
in the right spot. So I could actually start
with that if I want to start with my eye. And then it arcs over
to my ear is going to start a little high there. Kind of paranoid about drawing my eye in the wrong
spot now and so I being extra cautious
with it, Here's my beard. I'm just going to leave
that there for now. I'm going to come back
up to the eye and have my brow above it with
the actual brow brow. Come in here, my nose
come down. Never realize. Shape your nose until
you're actually like, I have a big bulbous nose. Like this is where
you can play with a little bit to have a
cute little ski jump. Oh, there you go. I just make myself
better looking lip thing under the lip, right, that little
tuft of cutie here. This is going to come down. Come around and you can trace your hairline either from the bottom
or from the top. Here. There we go. Wow, guys. That's about 30
min worth of work. But so much was done here. I'm hoping you kinda took it in ten-minute chunks and just made it a little bit
more digestible. If you want to do
exacting portraits. Like exact as it looks exactly like the
person measure it out. I was doing this quick and on the fly because it's a
teaching lesson, right? And I didn't want it to
be doubled this time. But if you do care about that, you want to draw my
face specifically. I don't know why
anybody would want to, but just in case in case you want to draw
me specifically, then measure it out, whether it's a ruler
and you're kind of bouncing back
and forth on that. Whether you are like e.g. you are doing stuff like maybe doing
straight measurement, straight down, right? Like if you're kind of
going like this and this right from here to here you can see where my
measurements are way off where my quick sketch did
not do my reference. Justice. Do that if you want,
it's your choice. But either way, you
need to do this sheet, this is really important. It's an important process, it's an important lesson, it, and it's an important
assignment, okay? So whether you measure it out, It's a portrait of me, or whether you're doing it
just to do what I did here and show how the measurements
work in angles. It's really up to you. It's up to you how you
want to approach this, but it needs to get done. I'd love to see it. So if you can, after you're
done at all, send it in. And I get to look at these
wondrous versions of myself. I expect to be both
impressed and terrified. Guys. Just have fun with this. And if you're not
getting it, do it again. There's a lot of
exercises on how to draw the face here
that I'm providing. This is just one of them and
it's designed to just throw that extra practice
into having you feel comfortable
with your tools. Hey guys, will catch
you in the next lesson.
18. Lighting: Hey guys, I'm back and I've got another unit here
for you at this time. We're talking about
lighting, how to shade, kind of listen when we talk
about shading and rendering, there's a lot of different
techniques you can use. You can talk about hatching, crosshatching, blending, coloring, all that
kind of stuff. That's not what we're
talking about here. This is not a rendering course. I want you to understand
instead how the face is lit. Then come there, you can choose your writing style where
the planes of the face are even right now you can see where the light
is hitting me. This light is kinda like
a straight above me here. Like where am I looking
at right above there. That's where the main light is and it's highlighting here, highlighting here maybe a
little bit too many highlights. But if I was to change it, move that lighting around. Well, how would that look? Let's talk about that
and see if we can understand the planes of
the face a little bit. Okay, So what I've
got here is Hercules. He seems angry. And I'm going to kind of go with simple way of
explaining lighting. What I've done is covered it in great or like a
grayish blue here. And I'm going to explain how, where that light might hit. Let's say for example, I'm going to just switch
this up for one quick thing. Let's say, for example, my my lighting is
coming from this side. Well, that seems pretty simple. What would happen is you
would come here and it would wrap around
some of the form. If I want to, I could
just go straight. Like let's just say I'm
going to illustrate on this. And it would look like this. But that's not really
true because what would happen then is like
there's shading in here. There's shading in his
mouth from the shadow and that that part of the beard and stuff
there might be shading a little bit
of shadow there. Again, it's not straight. It kind of wraps around some
of these curves, right? It might wrap around the tooth
a little bit or something, might wrap around
the nose and have a little bit of fun
with these ridges. And it might even touch
on this side just a little bit because certain
things are protruding. Light's hitting. It's not just a, It's
not just a sphere. It's not playing. We've got bumps and bruises and whatever he's got
on his face here. I can get in here and do the, do the rest of this part and
there's gonna be shadows. This is a little bit easier
because these are half, half spheres and stuff,
that type of thing. But just I want you
to realize that when we're when we're
looking at light, It's not as easy
as you'd expect. There's crooks and crannies all over the human
face and body. Occasionally, depending on
how far his cheek protrudes, there might be a little bit
of highlight on this side. Okay. You can see how when, even when coming from
just what would seem like a simple side side
lighting thing. It's not that simple. Why don't we do the
lighting that I have right now over my head. That's a little bit of slightly slightly overhead
but not too much, like it's just coming
forward and overhead here. So let's take a look at this. What I'm gonna do is selected, then there'll be a plane right here that's
on his forehead. There's the eyebrows, There's
the ridges of the nose, there's the cheek ridges. And I'm just doing this really simple and really fast right? There is again, the nose, these parts, the lip, the chin. A little bit of a jowl, maybe a little bit on the ears. Of course, I can come into
this band a little bit more. If I want to grab the
light a little bit more, then it's going to come here. I'm not too worried
about the rest of this. This is just kind of gravy. That's what it would look like. I can go in and add a
little bit more detailed, maybe a little bit
of highlights here, a little bit, a
little bit clean it up and stuff around the
teeth and stuff like that. Maybe there's a little
bit under the nose here. There's some wrinkles
that are happening. But you can see where
I hit the planes. It was the forehead,
it was the eyebrows, it was these cheeks
and it was the jaw. Again, forehead, the brow. Kind of almost a
triangle in here. And the jaw and the chin here. You can see how that's
working on me right now. Alright, we're gonna
go for another one. And you know what, I hope
you're following along. You could be either doing
something simple like just, I don't know, just be coloring and white or
something like that. Using a highlighter that could work if you're working
traditionally, you can be doing
the opposite and working the shadow and
everything, right? It really depends what
equipment you have. I'm just trying to like I
said, teach lighting here. Why don't we go
with an under view? Basically, it's
lit up from below. How would that look? Well, the bottom ridge
here, it would be lit up. It would light up
under the nose. Remember the triangle? It
would be more like this. It would light up under there. It would light up the
bottom part of the brow. Maybe a little bit here and
maybe a little bit on here. It might be like
this and it might be just a little ridge line there. The bottom of the lip might illuminate the
bottom of the teeth, maybe just catching
just that little bit, maybe a little bit up into
the beard, the lower lobe. Then of course, I
can do the chest, the shoulder, that
kind of stuff. How does that look? It looks like it would be
if it was lit from under maybe a little bit of the back of the eye or
something like that. It depends. But something
along those lines. This is coming up
from underneath. Why doesn't it come up here? Look, if it's coming like this. We the light is not
hitting up there. We're talking about
just when we look at one main light source. Do we want to go from this side? What about straight on? Let's do straight on. Straight on would
almost be simple, like let's say I'm going
to select everything. Almost looks like this. That's kind of straight on. Only it's not even straight on. There's gonna be some
kind of angle to it. You're going to have
maybe a little bit of original line here, a little bit of maybe
that's too much actually a little bit
of shadow in here. Even with there's gonna be shadow cast and the grooves and everything of
a person's face. There's gonna be shadowed,
deepen his mouth. There's going to be
shadow in the beard. The hair is going
to cast them just a little bit everywhere. There's gonna be just
that, just a hint. It can't almost always
be exactly straight on. It's going to caste somewhere. So it won't be much. But you can see that
we're still going to have just a little bit of a
little bit of shadows, even if it's directly
straight on there. Just, we've got 20
groups in our faces to have it whited
out completely. Another one that is really kind of typical and mood is
a rim light from behind, like let's say I'm being lit
from that apart from behind. What does it do? Well,
kind of just you can line the outline of the back. Let's see if that works.
That type of thing. Well, once again, we use
it as a simple thing, but then it starts to
come into certain groups, like it might catch
the cheek here, depending on how far that light or how powerful the
light is behind. If that light behind
is a mega powerful, it almost wraps around the figure sometimes
or something, right? It can cast itself a little bit. Even more, can go on any plane. But then you want to go in
and add in a little bit of detail like maybe that are in the ear has got
some groups there. Not bad. Let's see. What do we got? We've got from the side, we've got from the front, we've got from the bottom, we've got kind of
like straight on. I don't even know how I
want to do that arrow. Straight on. We've got from behind everything is coming
from behind there. I'm wondering if there's any one that I'm missing
for you guys. I feel like this is this is so some of the basic lighting. Once I know what I'll do. Last one, I'm going to
do two primary ones. For example, from I'll do the rim light in the
back like we just did. This is often what happens is we get a number of
different light sources. This will be rim light,
nice and nice and easy. It's from behind right? Then what I'll do
is let's say he, there's a little
bit of bounce it. Something is hitting a table or some kind of reflective surface and it's coming up like you
can be standing in water, it could be staying on
concrete, anything. What you can do then let's see if I can shrink
the size just a little bit. Is just a little bit. Just something bounced up and it's just a little
bit light there. That's a nice little to
two types of lighting. The harsh light, the harsher
behind overhead light, and a softer secondary
source. Gaius. Lighting is important. How you choose to render
lightings up to your style. Like whether you, like
I said, whether you're shading and smudging or
something like that. Whether you're crosshatching, whether you're using colors, whatever it is, it's your choice and your
medium and everything. It could be watercolors,
whatever wanted you to understand the
planes of the face. And so as soon as you start
moving that light around, Let's see if I can even do that just a little bit for you. This is, I experiment with this. Sometimes. With this, I start moving this around and you can
see how like, okay, well, half of my face is dark, but as soon as it comes
in just a little bit, it starts to catch right there. Starts to catch a little bit
more and a little bit more. If it's from behind. I've got that. This isn't a very
powerful light, but you can see
how it's reaming. If it's from over top. I've got all of that
going on from below. Doing evil storytelling
right now. Guys, I think it's important
that you have fun with it. But you also learn
that the face, even though we started with
this, that's not all it is. Understand those planes and you'll have a
lot of fun with it.
19. Wrap Up: Hey guys, I'm back. And this is our wrap-up video, kinda taking a lot of the things that we've already
learned and seeing if we could put it together to do what we came
to accomplish. Draw a face. From the start of
it, we worked on just simple construction
of skulls using circles and understanding
and then how we can my handy dandy bowl
and how we can tilt it and all
that kind of stuff. Understanding proportions
and everything. And that's what
I'm gonna do here. Just a quick little
sketch for you guys. There's no worksheet for this. I hope you're just
sketching on your own by this time and
everything like that. You should be just randomly drawing skulls and
then starting to draw all the pieces in
there and see how it works. In this wrap-up video, I'll do a little sketch. We'll talk a little
bit and make sure that we feel comfortable
with these things. And then you're free. Draw on your own. All right, let's jump in here. Okay, so the first
thing I'm gonna do is see if I can draw a rough outline for the face. I'm doing that rough skull. Here's my bisecting, so
here's gonna be my top. There's a bottom, roughly and
roughly right about here. So I've got 123. Then what I'm going to do
is come from the chin. Let's see, I'll make
us chin and bow. To come up here. Come up here. That's
not too bad, right? If I measure, I'll
go on this side. If I measure on this side, measure halfway approximately, this is gonna be the
eye line. All right? So I've got the eyeline,
I've got that set in. Let's see where do
I want the nose? Will set the nose around
here and around here. There we go. This is my nice rough sketch. I'm going to back it
up just a little bit. Go over top of it
and see if I can get some some lines going on here. Oh, you know what
I should've done? I'm gonna go back and
I'm just going to kind of space up the eyes. Let's say this is the
one I, another eye. And this is another
I, I'm kind of doing. Let's see, that would be
both for eyes across. All right, so I'm gonna jump in here and I'm going to say, I like to start with the eyes. I'm going to kind of come
up on this side, come down, come over and over, come up, come down, come over and under. And there's there's
one right above. We've got a little bit thick
on this pencil right now. We've got the eyebrows right about there,
right down here. Knows if I was to roughen
it would be like that. And so I can kinda do
something along those lines. Finishing these eyes
just a little bit. Little bit of forehead
wrinkle here. A little bit of that. It's a dude, so it's gonna
be not much lip to him. He can have maybe a
little smart here, a little bit under the
chin. There we go. We're gonna come out
a little bit further. And then I had skipped sketched because I want a little bit more of a
jaw. And then come up. We're going to start to
get into the ear here. The ear starts right
about here at that line, comes down to about
where the chin is, right here, starts
here, come to down. All right, Sorry,
where the noses we go. Just kind of roughing this in. Don't want to put a bow. I don't know. So far. We talked about how
the hairline comes down and follows that
eyebrow a little bit. And then I'm going to bring
it up just a little bit. I'm going to do some
funky hair here. Gonna be kind of like
this. Parts on the side. It comes up this
way and comes down. There we go. Neck comes
down and then come down. And that is what a
two-minute sketch. Two minutes sketch, using
all the pieces and just putting it together really
simply, really easily. You can add a little bit of the nose in or
something like that. I could put more of a button
nose on there, right? I can start to add a
little bit more details. I could add this part if I want. I actually like to without
I can put some crows feet. He's stressed or whatever
I want to put on there, you start to add details,
you start to add lighting. But that's how simple it is for putting into practice
what we've already done. Okay, guys. This is the two-minute wrapup. The reason it's so short is because you've already
been through it. All right. You've already
been doing it all. We've spent over a dozen units right now leading up to this. So that's how fast
phases can get. You just draw the circle, measure it out and for
the proportion down, and then drawn a couple of
details and you're good to go. Faces are tough, but when you apply this nice and easy
system, super easy. Guys, I hope this course
was helpful for you and I want to see some of
that stuff you're submitting. I'll send me some faces
that you're drawing. Let's check, make sure we'll get some feedback going
on and stuff and make sure everybody's happy
with what they're doing. And then you can draw
some beautiful people or some really ugly people.
20. Faces Thank You: Hey guys, that was awesome. Right now we understand the
measurements of the face two proportions and
where to put it all takes a lot of practice. But I know you've got it. I know you've got
what it takes to draw handsome face
or an ugly one. But tell you what, if there
is something in this course that you're not quite sure on, something that's not
working for. You. Shoot me a message, leave
a little comment and say, Hey, I'm not sure about this. And if I can answer it in
a little blurb, I will. If I can't if it's
something more in depth, well, I might just make
another unit on it, right? Because chances are
if you're not sure, there might be other
students that are not sure either love to hear
about what you need. So I can fulfill that need. Guys. If you like this course, if you enjoyed it
as much as I did, Do me a favor and leave a
review, leave that thumbs up. Just tell me I'm on the right path and
creating content for you because I'm having tons of fun and I hope you are too. If you are curious though, for the next course, to
see what else I've got. I've got about 20
more on this site. I think you would really love. So now you've done this, you
can always come back to it. But once you're done, jump
on into the next course. See what else learning
has to offer for you.
 Ed Foychuk, Making Learning Simple