Transcripts
1. Introduction: You remember watching
the transformers when you were young
and thinking, cool, I want to draw
something like that. Or when you were my age and
watching the Googlebots, you could be looking
at mx and thinking, how did they make that? Well, this is the course on How I Met for Chuck and I'm going to teach you
how to draw transformers, robots, and all of the mix. In this course, I start with
simplified perspective, some of the basics so you
can understand how to build the building blocks
in the correct perspective. After that, we move on to points of articulation
and types of joints so that we can get the movement down that you really want to have in your Mac. Next up is a bunch
of references. We go after animals, humans, real-world vehicles,
and even cool weapons. Once we've got all that down
and we start to build it up, we start to put all the pieces together and build up some
of the coolest mx around. During this whole course, you're expected to follow along. Not only can you draw
along with my video, but I've included
a PDF worksheet attached to every unit for you so that you can follow me and look at the sheet in front of you
and follow along. What do you say? Are you ready to draw some of the
coolest mx around? Are you ready to draw some transformational
transformers? I know I am. So let's get to it.
2. Warm Up: Hey, what's up, guys? Adhere and I've got a bit of a different
unit for you here. What we're gonna do in this one, and it's gonna be short and sweet is talk about warming up. It's gonna be two parts of this. One, warming up our bodies. To warming up on the paper. Starting off warming
up your body, it's important because
I don't know about you. But when I sit and draw, I get all hunched over
and I can sit like this for 6810 hours at a time. Like I'm just like focused, I forget to eat sometimes
when I get up from that snap crackle
pop and my bodies, it takes awhile to
start to warm up. Might be an age thing,
but it's also posture. It's also just keeping in
good health of our bodies. And so that's what
I want you to do. Before you get into drawing. Sometimes take your hands and just make sure you move
them around a little bit. Make sure you stretch
them out a little bit. Make sure you take a second to just kind
of massage in there. If there's some problems, maybe break up the
fascia a little bit. You can do this with a hand
massage or what you can do is like usually have some ball kicking around here that put
on the desk and rotate in and it helps break up some
of that tissue. Do that. Take good care of your
hands because you're spending a lot of
time using them. Take good care of your
hands and then also, like I said, stand
up, get up, stretch. Just kinda move around a
little bit, shake it off. And honestly, when you do that, when you return to the desk, you'll be much better off. You'll be healthier,
happier, and you'll, you'll be able to focus on
the art that much better. So it's really important
you do that audio side. I can tell you drink lots of water, all
that kind of stuff. But now we're gonna get into the warm-up that helps us
for the art part of it. What I want you to do is
grab a piece of paper. It could be any piece back,
back of a piece of paper. It doesn't really matter. What you're gonna do is draw a lot of little
dots on the screen here. Just to fill the screen
thoughts far apart, dots close together, all
that kind of stuffs. Spread it out. Like just put it all
over all of your sheets. Then what you do is draw, connect the dots, basically, draw from one to the other one. Oops, I'm going switch colors to make this easier on us here. I want you to just go like this. And you're going to see
sometimes you miss. When you're starting
off, you're like, Okay, I'm gonna treat
my brain a little bit. See if I can just do straight
line to where I'm going. You can start off at one
dot and you can kind of pivot your paper and
start to connect the dots. You're not really
drawing anything. It might look like
some abstract shape when you're all said and done. But what you're really
trying to do is put your head into bringing your pencil from a
to B in one stroke. Not just one stroke, but
with a bit of confidence. You'll see a lot of
beginner artists are very short and sketchy because they're not
confident than they're lying. You know what? I get That way to especially a little bit too much coffee in the
mornings and stuff. I guess it can happen. But you want to try to
work on this confidence. If you want to work on the
confidence in your line. Sometimes if they're
really close together, it can be done with just you
got yourself braced here. It can be done with just
a flick of the wrist. I've got my hand based on the on the paper on
the screen and I can just drop straight
across that these, but for larger ones,
I'm gonna back up. You're going to use the big sweeping motion
from the elbow. All right. Try to connect those four points straight across using
the sweeping motion. Guys, this is your warm-up. Whether you do it
at the start of every drawing session,
somewhere in the middle. Whether you do it every
second time or whatever, really the choice is yours. The only assignment
I'm giving you is keep this in mind that
your body, your mind, everything can be kind of get
too focused into crunched in and you lose perspective, you will lose your ability
to really do well. Pause, stretch,
massage a little bit, and make sure that
your brain is in the right frame of
mind to be able to connect the dots. That's it. That's your warm-up. Have fun with the guys.
3. Perspective Basics: Hey guys, welcome to my
course on how to draw max. In this first unit we're
going to cover perspective. Listen, perspective,
linear perspective is a very big topic and it could take hours and hours
and hours to master. I'm going to break it down
real short and simple for you. And I'm going to explain
why you need it. Let's take a look here. If I asked you to draw a box, your box looks like this. There's something wrong. What's wrong with it? It's not a box. It's
a square, right? So that's the first
problem we want to be able to draw
for this course. Especially when
we're talking about Max and all that kind of stuff. You've got to be
able to draw boxes, boxes of varying
dimensions and stuff. So this is your box. First problem. This is two-dimensional. We want to bring it to 3D. And if your attempt
at 3D is this, that's why you're
taking this course. That's why you need this unit because this thing
here is a monstrosity. We're gonna go through
a little bit of basics of linear
perspective here. And it's got more courses
that are in-depth board, but this one is going to be
the very abridged version. So hopefully it's not
too fast for you. If it is, feel free to
rewind and watch it again. Okay, so the first
one we're going to look at for perspective is 1. What does that mean? Well, it means that a couple of things that on
this horizon line, something off in the distance
there, horizon line. There is one vanishing point
that things will go to. When do we use this? We use this when an object is, its flat surface is
flushed to us and it's parallel surfaces are
running towards this line. The easiest way to do this and for me to
explain it would be, let's say I draw square. I'm going to be
drawing this box that has its surface flushed to us. And to make this into
a square, into a box, I'm gonna take these corners, corners that can be viewed from this vanishing point
and bring them on back. And you know what, I think
I might even do this with a ruler just to make it a
little bit cleaner for us. We're going to bring
it on back there. Bring it on back there.
Bring it on back there. You don't always
have to use a ruler when drawing max
and stuff I got. But for us right now, we're gonna start with a
little bit of a straight line and then we'll get a little
bit more casual with him. Right now, what this
is is it's almost like a rectangle that's
been stretched out. Rectangular box that has been
stretched out to infinity. It goes over to
their horizon line. We're gonna cut it wherever
we want to cut it. We've got, let's see, we've got a vertical line here. We've got this vertical
line going up here. What we do is we track
it back and we're gonna have a vertical line
wherever we want it, how deep we want this dimension. We've got vertical lines. Then we're going to draw. Let's see if I can
just angle this a little bit better
for my hand here. A horizontal line that
follows this horizontal line. I've got horizontal lines. Whenever we're
drawing boxes here, we've got vertical, horizontal,
vertical, horizontal. And then I'm gonna come in here and kind of sketch this in. And there's my box using
one-point perspective. It's a legit box up here. This is not a legit
box down here, this is a legitimate box. So what I recommend for you
to do is draw a bunch of boxes all around this
section of the worksheet. And even they don't
have to be squares, they don't have to
be perfect squares. You could draw more of a
rectangular front-facing shape. What I'm talking about this, I'm talking about it grabbed
my little toy box here or whatever and say that this
is a front-facing shape, this box as lots of sides to it as a
three-dimensional object. But for right now, I'm
placing it like this. This is the box, how
it's looking to you. You're looking at
the front of this. Now if it starts to go
off to the side, look, look how you can see the
side and it's starting to go back towards a
vanishing point. If it straight onto
you and it's flush and everything, almost exactly. If I was to say
draw it right here, this is almost how it would look right now because it's sitting right in the center
of this camera. But as soon as I move it below the vanishing or the
horrors of horizon line, you start to see the top
of it like we've seen. Soon as I move it above
the horizon line, you're gonna see
the bottom of it. If I move it out of center from the camera and I move
it off to one side, we're going to see
one side of it. Likewise, if I move
it to the other side, we're going to see
the other side of it. That's what we're doing
on this sheet here right now for
one-point perspective, we're having one main
point flush to the viewer. And then everything
else is kinda tapering back to that grassland, all these parallel
lines that run, because it's a nice simple box. Once you're able to
draw a simple box, the world is your oyster. Especially for when we're
going to be drawing max. This is one-point perspective. Get it, practice it, pause it, pause it right now, and just keep working at it. I want you to be able to draw these points all the way there and then start to make a shape out of it and stuff at
three-dimensional shape. Practice, I'm including
these worksheets, print them off a
whole bunch of them, whatever it takes, make
sure you get this done. Because after you're done,
1 were quickly moving on to 2 perspective. Two-point perspectives,
similar but different. Two-point perspective
is when this object is not flush with the
viewer, but instead turned. So it's just not a flush facing item,
it's turned instead. As you can see, we get one line that comes
from it, right? So let's see if I can draw that. Actually, before I even do that, I'm going to put it into VP
just to make it clear for us. Normally this would be for 1. But instead, what's going
to happen is I'm gonna put a vanishing point over here. This will be my one. I'm not using this one. And I'm gonna put a vanishing point over
on this other side here. And this will be my
second managing. The reason why is because as we're looking here
at this object, this line will go off to
a vanishing point and this line will go off to a vantage point that's gonna make more sense on
the screen here. Let's say, for example, the edge of my object
is right here. Right there. Now, this is the top, this is the bottom of my box. I'm going to use construction
lines and I'm going to pull this one to this
vanishing point, the bottom and the top
to this vanishing point. And I'm gonna do
the same and pull this bottom and this top
to this vanishing point. It's almost similar to the
one-point perspective, but obviously we've got two. How does this look to
you as you can imagine, this being a rectangle
stretching off into the distance and this being a rectangle stretching off
into the distance. It doesn't quite work yet as a three-dimensional
object because we haven't made some choices. What we're gonna do is
make the choices of how to make it a square or a box. Just like I've got a
vertical line here. I'm going to, let us say you all choose a
vertical line here, and I'll choose a
vertical line here. Now we can see that this
is one side toolbox. This is another side to the box. How do I make it a
three-dimensional box? I'm gonna take
this top one here, drag it over to the
vanishing point, and I'm gonna take this top one here and drag it over
to the vanishing point. Now we're seeing how it
could be viewed as a box. I've got my bottom my top
outlining my top here, and doing it there. And
then my bottom here. Nice and sketchy,
but it works right? So here's my box. You start with an initial line. Take the top and bottom
and draw it off. Why do we take the top
to draw it off here? Because it's below
the horizon line. If I'm looking at
it from this one. Whereas this object gonna be, it's gonna be below or
above the horizon line. Well here's the horizon
line and this one's above. All right? So let's say if I make it a bit of
a narrow one here, make it a bit longer here, longer rectal type, sing,
rectangle type thing. Well, this would be
drawn off to here. This would be drawn out here. I don't need to do
these top corners because they're already above. Then what do I do? Well, I just fill in my shape. There we go. And now I've got this floating, fairly accurate,
somewhat ugly rectangle. Why are we doing this? Well, we know that when
we talk about max, when we talked about robotics in general, all
those kind of stuff. They're using these
basic shape forms. They're not as fluid as a muscle belly or
anything like that. They're not as
bulbous and stuff. What I want you to do is go
through this two-point sheet. Draw a fair bit of shapes, just like you did
for 1. Up above. You drew a whole bunch of
boxes and stuff again. For 2, you're gonna do
the exact same thing. I want you to drawing a
whole bunch of boxes. Get it and get it down. And again, this is
the abridged version, so I get it that
it's really fast. And if it's too fast, pause this pause, it won't
even be fazed by that. Pause it and say, I'm confused, rewind it, and go back again. Because you need to
understand how to draw these basic rectangles and
I'll show you teach later on. That'll be the next
unit. But for this one, I really want you to understand the fundamentals of
1.2.3 perspective. So just like we started off with a one-point,
we started off with a 2. We're going to do three-point. We're going to have a 1 here, 1 here. For an example. We're gonna do 1 down here. A third. Let's say I have my, my starting corner point. This is, again, we're
gonna do drawing things, but this is if it's worth, we're viewing it
and it's tapering down almost like a bird's
eye view in this one. We're going to treat
it like a 2 right now. We're gonna go with the
bottom off to the side, top off to the side. Bottom or top off to the side.
Bottom off to that side. But here's where it
comes in the difference, this is the biggest difference. That when we're
doing these edges, instead of them being
straight edges, straight vertical
edges, they come from this third perspective. So let's say I come up from there and I come up from there. Well now that is going to be you can see the difference how it
looks from 2.23 here. That's gonna be the angled edge. It's almost exactly, oops, I guess I need a
ruler on that one. It's almost exactly
like a two-point, except for all the
vertical lines are gonna be tapered
down to this third. You can see here how now it's got that kind of
warping effect for a building. Imagine that being a
transformers foot or something. You're looking down or
looking up at a Mac. So here's an example. Let's say we're going
to come from here. This is still the third. And we're going to draw a foot. And it's going to be from here. We're gonna have the
top go into here. The bottom stays
on that profile, like on the horizon line. This one comes off to here, stays on the horizon line. But now I want to have that
foot coming from this point. Check this out. This is how this
foot might look. We would start to draw
this leg or this foot. And imagine the viewers
somewhere around here. And it's starting to look up at this giant bought or Mac that's coming
towards it and stuff. And that's a key point that
we'll get into later units about changing the perspective
to give size and height. Because if we just draw a robot, just draw a mic. That's good. And we can draw,
will learn how to draw them with their shapes
and everything like that. But adding perspective into it, adding vantage
point of viewpoint, getting size to it. That's what makes
it a realistic. Okay guys, this is 1
focusing on this one here. This is 2, focusing
on these two points. And three-point perspective
using these three. This is tough. In my other courses. Sometimes they'll take
an hour to teach this. I don't want you to
get to wound up in it, but I want you to
be able to create some simple boxes and stuff. So like I said before, if you have to rewind it, I'll give you this sheet. You can print it off. Practice. It's really important. In the next unit I'm
going to teach you a little bit of tricks and cheats to make this
a little bit easier. But understanding that with art, knowing the rules is important. And then once you get them down, you can bend and break
them a little bit. Guys, your assignment here on this first unit is
to know these rules. Get him good, Get him
down, and then move on.
4. Perspective Hacks: Hey guys, I'm back and I got
another unit here for you. This time we're going to
talk about perspective, but some easy cheats because, you know, you need
to know the rules. We've already gone over that. And if you don't have
it, go back and do it. Well, once you've got that down, there's gotta be a faster
way to get things done sometimes that sometimes just plotting everything out
to that point can be a little bit tedious for
maybe even just a sketch. You want to draw
a sketch that is based in correct perspective, but maybe not
tightly adhering to it because it's just
a concept sketch. I'm going to show you a couple
of tricks here that we can get into and see if, I don't know, see if this
makes it easier on you. First thing I would
suggest is let's see. First one I would suggest
is do a pre grid. This is one sheet. Pre grid would be like, let's say I'm doing
two-point perspective and I just go like this, this, this, this, this, this, I've got this off of one. Then I can go off to the other. I'm just drawing this grid. We can already see how this
makes a lot of sense, right? If I'm, if I wanted to
draw within this grid, I can just loosely sketch. I'm like, okay, well my, my building would be, Let's do an easy line here. My, my building or my
MSc base might be here. So this one's gonna
go back here. I wanted to build this
big and it's going to follow roughly that line. This would go up here. This one is going to
go back to there. I know this one
will come to here. Follow that and this one will come to here and
I'll follow that. So there's a nice rough box and you can even
make it rougher. I'm gonna guess right here,
I'm gonna say, okay, well, here's this and I'm going to kind of guess
and I'm kind of guess and I can even
start to play with it a little bit like bend
it in and I'm gonna say, okay, well this one's
coming down to here. I'm going to bend this
one in and I'm going to start to get looser
with your forms. You can get really sketchy with it. Play with it a little bit. Just say, okay, well I'm, I'm working within
this dimension, right? So let's see. Now I've got this. Now I've got this bendy base and this is a lot easier
for just sketching. So that's one way to do it is
to lay down a little bit of an easy grid and it
doesn't have to be like so many lines. It can just be a few lines
that you work off as a base. The other one would
be kind of know, for example, your
top and bottom, like let's say I know my
bottoms here on my tops here. That at this point it's going to be wider
than this point. It doesn't have to be who
can explain this? Let's see. If I do it. Like I'm going to have this and this is
gonna be our base. But what happens if I start
to make it wider here? While I've now confused things, like I've drawn this way, when you're kind of
roughing something in, just realize that the point
closest to you versus how, as those lines go away, these lines has got to
be getting smaller. How much smaller?
Like for example, let's say I'm
drawing this object here and I wanted to go away. There. One fraction of a millimeter,
they're getting smaller. But they're not getting larger. Never make it larger as it goes away to the vanishing point that
distorts the object, that distorts perspective
and everything. If you just going to kind
of sketch something, just casually just
realized that okay, well, I know that it has to get smaller as
it goes further away. So you can just kinda
rough, rough in like that. As soon as you
start to say, well, it might get larger or
it might get smaller. My box gets almost like
what we were talking about. It looks like
somebody who doesn't know perspective at all. So guys, too quick cheats here, draw a pre grid that
doesn't have to be heavily defined
with lots of lines, but just kind of roughed
out and everything. Or just realize that as things go further
away, they get smaller. So if you've got parallel lines, they're going to get smaller
and they don't get larger. That's the key point.
That's where you get things looking really wonky and people know that you
don't know what you're talking about or don't
know what you're drawing. Realize that as it goes, it's either going
to stay looking roughly the same or it's
gonna start to get smaller. Those are two simple
ways at once you've got the foundation
of perspective. You can not have to plot
it out every single time and just find rough
ways to sketch things out. Make concept sketches
much easier for you. And it'll help you as you
move ahead in this course.
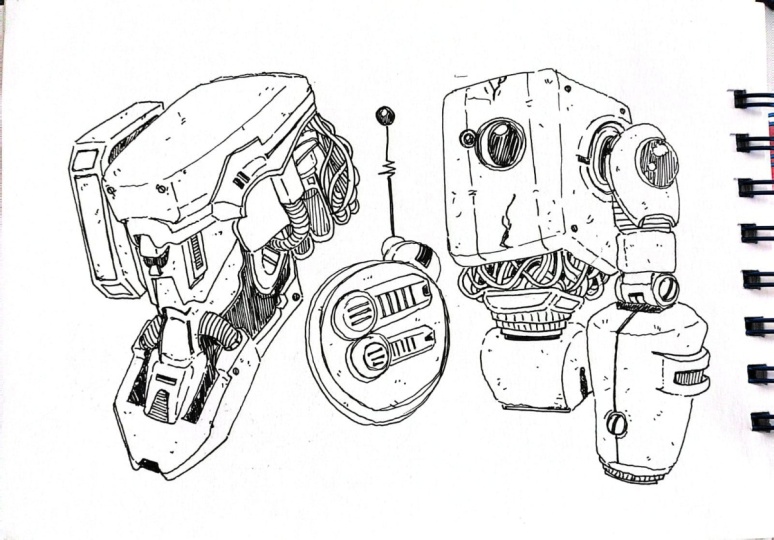
5. Articulated Structures: Hey guys, we're back and
I've got another unit here for you in how to draw max. This time we're talking about articulation,
structural articulation. What does that mean? Well, body language is kind of giving it away
here a little bit. It means the ability
to move pivot, manipulate a joint
so that you can, again move pivot
and manipulate it. Now, why do we have
to learn this? It's important so that once we've got our
structures down, kinda blocks on puppet blocks were able to stack
blocks and everything. We want to be able to start
to turn them, twist them, move them all those
kind of things so that they come to life. That's what this is about. Having some realism that they're based in
perspective in reality, but they also have movement that we usually don't see
from robots in real life. We see it more in cartoons, animation, sci-fi movies,
all that kind of stuff. Okay, Let's jump into this articulation bit and see if this starts to make
a lot of sense to you. Because I promise you,
if you get this down, your bots are gonna
be cool looking. Alright, so whether
we're looking at drawings or toys or
anything like that, we realized that there's
certain structures to them. Yes, we can see, let me see if I want to go
with a red here actually, we can see how there's like a pillar thing
going on here with that. Like for example, that leg, but that's not what I'm
talking about here. That's not what I mean. What I mean is the overall
structure is very humanoid. Wheel this back and talk about the first humanoid figure,
everybody can draw it. Ms. Johnson's grade
to English class. You're playing hanging
man or something. Okay, so there's a
little, little humanoid. The problem is all we end
up doing is hanging them. They don't really do
anything other than just stand there, maybe smile. The reason why they don't
do anything is because these arms and legs really
don't have much range to them. They don't have needs,
they don't have joints. They don't even have a torso
here, anything like that. When we're designing some type of structure that we
can articulate here, we're going to add more
articulation joints. We can look at
example number one, example number two
here that has that. Yes, we have box here, but then we have a second
section that has a point. Let's see if we can change them of articulation between it. So once we start to look at when you buy action
figures or something, there's these points
of articulation to them that can bend, twist, pivot, all
those types of things. You can see me going after these figures, whether
it's a drawing, the drawing is
often in this case, almost exactly matching
up to the figure. I think there's even articulate. There we go. There's articulation points down in the feet here and stuff. That's what we want to
do is design figures that have these various
articulation points. Let's just do this. Let's have a quick line,
and let's have a box. It's that simple. We'll have this could be like the chest box or
something like that, will have the the pelvis box. We're doing it humanoid
to start with, but we're gonna switch this up. It's going to switch up. We're going to have a
shoulder pivot joint. We're going to have
a box for a head. We can have hands,
lines connecting them. We can even have like pivot
joints, their elbows. This is obviously looking
really humanoid here. We could have feet, knees. So where would the
pivot points be? Where are the points of
articulation b here? Well, all here, all right. And we can move these points. And if you ever get into buying action figures or transformers roll-outs,
all that kinda stuff. You're going to see this
type of thing happening. I want you to try to draw
this again next to it and just see if you can maybe
change something on it. Like, what if I was to add
or remove a pivot point? What if what if I
take some away? What if it's just actually, I'm going to do
this even simpler. Whatever it's just this, this, this where my points of
articulation b. Maybe here, here, maybe here, here, maybe the head. What does this remind you of? Honestly to me, I don't
know what reminds you of, but this reminds me
of the 1950's toys versus starting in the 1990's or even 80s
or something like that. We were able to mold plastic better and we got
better points of articulation. Is this a toy lesson? No. But so much of when we
talk about bots, robots, max and everything there, the sci-fi concept behind them, the science behind them. And weirdly, the toy design kind of
all work synergistically. They all build on themselves. So if I'm bouncing back and forth between that,
don't mind me. Okay, so let's go with
the 1990s or plus. We look at these
examples of above. So we've got the big draw,
the center line down here. We've got the big chest plate. We might have a smaller
grill plate below. I'm just using optimist here
as a bit of an example. We've got his shoulder points, we've got a bit of
a hip hinge area. We've got two legs
that come out of it. We've got an knee joint here. We've got looks like legs that come out of that
right leg, the lower leg. And then we've got this
profile foot part. We've also got this part
extends down into here. This is the shoulder, upper arm. It seems to be one piece, comes into a joint of an elbow. Then we've got
another section here. Then into the hands. We're going to talk
about hands separately. Again. Where are the points
of articulation? Well, I think we can go
we know there's going to be at this point of like this
wherever it inserts here, the elbows, the hands here, likely along here,
likely on here. It might be a turning bulge
joints or something in here, here, here, here, here.
Somewhere in the feet. You can see how well
this all matches up. If we look at this without
counting the hands necessarily because we're not
quite sure about the hands. We've got 123456789101112131415. Points of articulation on this particular figure,
this particular mech. But what if I want to change it up and make it something
really different? What if I want to
have a box circle? And let's say it's a
all-knowing eye in the middle and something like
this. There we go. Okay, so what does this? This is just a little quick. We started off with a
humanistic structure and I loved that because
so many of our, as humans we designed so much
from the human perspective. We approach our design,
especially in fantasy. From a human viewpoint, we tried to model
it after ourselves. Are things recognizable to us? Then we can devolve that door, evolve that into different
shapes and functionality. This one's almost like a spider. I have a thing that I
have going here and it's again just simplified. Where would I have the
points of articulation? Well, the ball joints that
are coming out there, maybe those hinges
there on the legs and maybe a swivel underneath this all Seeing
AI type of thing. I want you thinking of
points of articulation in your structure for when
you're designing, it's really, really important
because otherwise, you're going to go back
not just to the 1980's, but back to grade to Hangman. And it's gonna be a
really stilted design. Get fluid with this. I think we can come down
here and we can start to see a few examples. What do we have here? We've got a mass unit here. Seems to be, let's just
call it a rectangle here. Right now. We've got another
rectangle type form there. We've got a rectangle here, and I'm fleshing this out
just in a basic shape. We've got kind of piston
type of thing here. And then obviously we've
got the feet down here. We've got what looks like some type of ball
joint in there. We come to another ball joint
which comes to another ball joint or some type of variation of a ball joint
to a forearm area, a hand. And it's actually got
points of articulation. We'll get into hands
at a later point because that's the
unit onto itself. We've also got up here. Beam that has this and then maybe launchers
on the top there. So let's try to draw
this auto side, see if we can just do
a 2. Second thing. We're gonna go with a rectangle. We're gonna go with another
rectangle shape below. We're gonna go with
this beam across the back with two
blocks on top of it. We'll go with bulge
joints for shoulders down into two ball joints here this might have a multifunction to extension to it or something, down to a form and
then out to the hands. This comes blocky, simple
rectangles right now, into another rectangle
with another joint there, and then out into the foot. In the middle, maybe
some type of piston with some type of shaft with
a turning point owner zone. Where are the pivot points? We're all those points
of articulation. I think we can
probably assume here. Here, if I'm designing it, this is what I want
to have here here, here, here, here,
here, here here. Maybe the entire
hand, the fingers, definitely here, here, here, here, here, here, here. And maybe if I'm being funky, that I, this is what we're gonna do just
as we continue on here. Try to find the basic
that was way too thick. Try to find some of
the basic shapes. As we go through the sheet. This is your little work area and see if you can imagine and you draw through
a little bit. Imagine that this
comes up to here. Imagine what's on the
other side of things. Sometimes comes down
to an elbow, forearm. And this goes to
an elbow, forearm. And this is almost the
exact same design it seems. Here's the, it just
turned around right? Here's that center of mass. So it's not so much a ball, it's a turning math or
a training shaft. Here's that first leg. Here's a second leg. There's the joint
the knee joint comes back into another rectangle there and then out
towards the feet. Out towards the feet. I want you to draw it again
off to the side. This is good practice for you. Just keep working these mics because looking at how others have designed these
points of articulation, it's important.
Here's an easy one. Well, some easy, right? We've got a kind of
a chevron front. We've got coming down into
kind of a simple shape there. Into a rectangle for the
lower leg and into the feet. Where are the points
where articulation? Here? It seems here. Likely hear likely here. Not very many points
of articulation, but because this one is simplified and it's
lost its other half, It's half of its source. So here I want you to try to draw the same one
off to the side. And you know what, if you
want to draw it turned like maybe see if you can
draw like for example, the lower section here
is looking this way. And that triangle or that shape is looking up into the
sky here or something. Actually I should have
drawn a much bigger. There we go.
Something like that, like it's looking up here. So the advisor would be in
that zone or something, right? And there's the shaft coming
down into the shape here. Then here's one leg
coming off of it, and there's another
leg coming off of it. Just kind of play with it a
little bit and see what you can try to do some basic shapes. This is just the
beginning of this course. There's so much going on. The point is, you're hunting
for points of articulation. Okay. Last one. I wanted to see what you got. This sheet. As I said so many times here, is designed to help you understand that instead
of just going with a simple hangman that
we bring it beyond. If you want to ever go back and you'd want to design a 1980's stylistic bought Lost in
Space type of type of thing. Cool. But you're doing that
not because you're limited in your abilities
or anything like that, but you're doing
it because it's a stylistic or design choice. I want to make sure
that you can add as many points of articulation
as you want to, uh, bought. And just because
it's your choice, it's your choice and design, it's really important
to get that. So I think sometimes
this lesson, this unit in
particular, it helps break people out of a mindset. It helps just saying, oh, I was so restricted in, locked in and now I can do anything with
my design, right? That's the point of
this course and that's especially the point
of this unit here, is you can do anything. But let's, let's habit
based in a little bit of conceptual reality that when we've got this pivot point, bowl pivot for example, or something, I get that. That's a point of
articulation and that, that is playing into
design of our max. One thing I'd like you to do
is to make a blank sheet. Just draw random lines. Once you've got
these random lines, start to just fill in certain boxes there
or something like that. This is just totally random. Like I'm just going to
do this type of thing. Now I'm like, Okay, well
this is where this, this one's looking. All right. So let's say I've
got a head here. And now I'm just going to
kind of start to add in my, my design of the bot. Looking at these points of articulation that
we've talked about. A little bit of an extra
thing just starts, know, I've got too
many lines actually, I'm going to back that up. But I mean like just draw
a few lines on a piece of paper and see if you can have your design of whatever bought it as
or just a random one. Like I said, I was
doing a spider there. You can have like kind of millipede type thing
going on here. And just say, okay, well, what does this look like? What does this, how would this design look if I was to
draw something like this? Play with it, play with it. Once you've understood these
points of articulation, I think you're gonna be
so much better for it. Your designs are gonna be
better and you're gonna be better because you're
practicing like this. Okay guys, once you've
practiced, send them my way. I want to see him. And I promise I won't start designing and taking it to It's your
intellectual property. You got it, guys. I hope this was alpha for you and have fun with this unit.
6. Types of Joints: Hey guys, I'm back and I've got a bit of a
unit here for you. That's technical, mechanical. Let's go with mechanical.
We're gonna talk about hinges. We already covered
articulation about the need of hinges and hinge
joints and stuff I got within when we're
constructing them back, right? But we're gonna talk
about the different types of hinges just a little bit to help you be
a better artist. So let's get into it. Let's talk about how these
different hinges work and then see if it helps you
in your drawing process. The first joint we're
gonna talk about here is the hinge joint in overusing that
word a little bit. What this usually, Let's
see if I can draw, draw it something like this. Nice and simple. And let's say for example, we've got a shaft
that goes through. This comes in through
there, it comes out here. The other piece of this
joint comes in here. And it goes through there. What happens is we've
got this one piece that can rotate on this one. Hinge. It's mono
directional as in, it just kinda goes one way here. It's just got this one
plane that it moves on. This is when we look
at the human body, we can think of this as
this normal hinge joint. It doesn't rotate well, just kinda and then it
has a stopping point. So if we're designing this here, we might bring up some type
of stopping point here. In its design. It might block out somewhere around here
or something right? Then. So this part of the piece might just come up and hit at this
point or something. So like I said, when we talked about
this type of joint, simple hinge joint, fingers, knees, elbows, non rotational. Pivot. Pivot might be something. Let's see if we
have it like this. Then we have, we'll just draw this as if it's
going straight through. We have this cylinder that goes through and realized that
this would be kind of a, we wouldn't be seeing
this stuff or whatever. What does this do?
Well, this pivot allows for the full rotation. The pivoting of this shaft. You can attach something
else down below it. This can rotate within itself. It's just it's rotational
pivoting joint. You can attach, for
example, two joints. This hinge could work here
and then you carry on that pivoting shaft and it could rotate
somebody else, right? And these aren't always fully exclusive as you can only
use one for one MSc. And that's it. It depends on the joints
you want to want to do. The next one would be
this orbital joint. Usually, Let's see. What you could do
is think of a ball. This ball has something coming out of it
this way and it has a socket that it sits
in. Something like that. This ball. See if I just shaded
in a little bit, gets to not only rotate within this socket
that is sitting into, but it can shift left. It can shift, you can shift
a lot until the shaft that's coming out of it hits against
a wall of resistance. Whatever socket it's sitting in. On the human body. What is an orbital joint
while the shoulder, we got a lot of rotation
in it until boom, it hits the scapula or it
hits something, it hits. It hits hits a bone that it's just that's the extent
of the range of motion. Okay. So think of it this way. We've got the Bulge joint
like this and it's rotating. It can the shaft can
shift around all at once. But once it hits that wall, that's the end of the rotation, That's the end of the
joint where they just can't move beyond that. This orbital joint. If it's got something
coming out of it, like a forum here or bone
or shaft or whatever it is. It'll be limited if it's
just a rotating ball like I think what
you could have, for example, is going
to have cube like this. And then you could
have a ball sitting in it with an I, an eyeball. This eyeball can
rotate all at once. It can move all around
in this all at once. And it has no limit because it has nothing
sticking out of it. There's nothing to obstruct that there might
be some type of, however, whatever
lubricates it after all, a ball moving around. But there's no, No protrusions, so there's no limit
to its rotation. Last one is Glide. Glide can be like for example. See, actually this is
getting kinda ugly here. Let's say there's a groove here. A groove on this, on this piece. This this block sits
within that groove. Then slides back and
forth within that groove. A glide joint. It can slide in a
groove or it can, sorry, I'm going to
switch colors here. It can sit with it a housing. And the for example, in this case, it's a tube. And it can slide. It can slide in and
out of whatever it is. It can glide and slide
in and out through. However we're going
to define this. Okay? So when we're designing
our mix, like I said, we want to have a
lot of points for articulation rate as much as is needed to convey the
mechanics of the MSc. From the base structure up, we have to understand
that there's certain ways that we want to have movement and everything. Even if it's a tank. Like let's say we're
designing a tank with a head sitting on top
of it or whatever, those wheels are
gonna be moving. And what do they have? Well, they have a pivot rotation with each each wheel
in that tread. Almost every type of MEK will
have some types of joints. If it's, if it doesn't have
articulation and joints, it's a brick wall. That's all you've got is
if that's what you have is just a floating brick
wall, that's your mic. Chances are you want
more than that. And that's why you're
in this course. So that's why we're looking at all of these different
points of joints. I really hope that
whether it's the hinge, the pivot, orbital or glide, or some combinations of all of those that it's
helped you really understand that there's lots of different ways to approach
the points of articulation. And there's a lot options you
can get away with, right? So get creative with it. And let's see how you can
add these into your mix.
7. Human References: Hey guys, I'm back and I've got another unit here for
you in how to draw MX mic, mechanical bought robot. We know that these are machines of some
sort, some nature. But so many times, because we are people, we base the designs
on people, on humans. Structurally, you can see how so many of the
functions of max or the design and mechanism of them follows humanoid structure. I'm going to teach you. And we're going to
go through very quickly about how we can
use humans as a reference. What you can do with this is you can gather references
off the internet, pictures and
everything like that. Some cool poses. You can use kind of
like maybe a 3D app. Sometimes there's a
lot of them out there for human ability and
all that kind of stuff. Take your own pictures and that's what I
usually like to do. Now I'm going to warn you. I didn't post anything by
pictures up in this worksheet because nobody
wants to see that. Usually I'm not wearing much. I can see the joints as a reference and all
that kind of stuff. Let's imagine 1970.
Short shorts. Didn't want to put
that in this course. But I want to tell you
that you can really use the human structure for having a good solid base to your max. So let's jump in and see how
this might work. Right away. We've got this warrior. Do you remember how
we were talking about the basic skeleton? Like I could do a
box here, box here. Here's a joint, Here's a
joint. Here's the joint. Here is joint. Why do I
feel like that's a song? Here's a hand, the
joint and the wrist, knees, a joint, ankle,
joint, meso joined. I can just start
connecting the dots. The heads up here
that's going down. And really this is how
simple can kinda look. If I take away the reference. Well, what do I do this a few times before we
really get into it? Something we can do here is
just as we're looking at it, recognize that these are the proportions that we're given with this particular model. This is a model
that's been used on, maybe, I don't know
what website this was, human anatomy or something. But if you want to
change it, well, you'd have to do is bump
it out a little bit. Something along those
lines that could work. You can even
lengthen and bottom. You could just use
this as a base, but lengthening the bottom or
something like that, right? Okay, So what I'm gonna do
here, Let's see if this works. I'm just going to kind of
grab these and copy them. And drag them down below and see if that works. That work. You can see how now I've got
this basic outline, right? And so what am I going to do? Well, later on in this course, you're going to get into
the details of a MAC. Like all the hoses and
the vents and all those. But for right now,
we're still just going to go kind of
roughing things in. So we'll just start
to use rectangles. And what if I
wanted to make this like optimists prime
with the grill in front. So I can the windows and the grill and then
this can come down here and then it comes
something like this. The shoulder becomes that block with the extended of the arm. This is another
point, the forearm. So I can start to fill in
these details using what I know about this design
for the MSc writer. In this case it's a
transformer or something. I can do that. And of
course this works out better over on
something like this, where we're able to
bump the proportions because even though this is
a massively muscular dude, he doesn't quite have the
frame needed for optimist. Optimists is, is a bot. So it's going to be much bigger. And we want to start
to add some depth into this as we've talked
about, right? That type of thing. You can go in and start to fill these figures in and
start to work on it. Maybe there's a joint in there. Comes out to this. There's maybe I'm just
doing this all from memory. What we can do is go
through and try to block out some of the key points that we can see
where the joints, what's the pose like? And that's what this unit is really about is being able to, because to be honest, most of the references online for bots or somebody
else's artwork, you don't want to be copying
somebody else's artwork. Believe me. When you're
studying, copy it. I don't care. Use
it as a reference. I don't care. But as soon as you get
to a certain point, you want to be
moving beyond that. And online, or whether
it's yourself, as we've talked about earlier. You can use humans as a
bit of a starting point. Even for this, like let's
say I'm doing this and I want to beef up the top of this bought or
I want to lengthen these lakes, these feet. I can, I can start to
make the hands bigger. Start to do things with
this head and stuff. Now you can see how
I'm transforming. What is a normal pose? She had a gun or
something, right? Yeah. So you can start to transform
this into a boat pose. Like I said, that's part
of what I want you to do is to go through and I've made the sheet for you so
you can practice it up. Whether you are
drawing on top of it or whether you're
drawing below. Whereas knees are here, his feet are here. I'm kind of going like
this. This one comes out. I might even put
a handout there. You could see, I've
got this right. So here's the joints. Now, how would I make it into? I keep referencing Optimist
Prime because he's the coolest more of a sound wave guide now
that I think about it. But that's the thing
you start to say. Okay, well, here's where
that chest plate would be, but it's actually angled on him. So if I look at it, it would actually be coming
across this way. And then there'll
be some depth here. So maybe I would
change this and have a going back, Something like that. Then there's a plate below
and I could do that. I can have this arm
coming out with a big shoulder coming out
this way, that type of thing. And you start to
fill in the blanks and the proportions of
the average person, like I've said, they
might not work for you. So instead, what you might
do is you might just take the top of this pose. It might not work for your, for your bot at all, but you might take
the top of this pose. Let's see if I'm going
to do this right now. Take the top of this pose, then. But the bottom of this pose is something totally different. It could be a bit of, we've talked about this before, link, something like that. He's got this electronic sword coming out or
something like that. Go through and sketch a
little bit of the stick man beside each of these
human references and then see what you
can come up with. Then what you also get to do. Start to play with it, right? So here's, we're looking
at a perspective here. Here would be the block. Let's see if we can
draw up beside. We practiced this quick blocks. Here. It's tilted in. It's actually we're
looking straight at it. So the block below is maybe
more like this or something, but it's blocked out
because of this. Let's see if I go over
anybody sit there. Then I've got this knee
hinge here, ni hinge here. This can come out and
this can come up. This comes down into that, and this one comes down. Flare these as a design. And the foot goes down
that away or something. It's already, you could see how this transformer is looking
pretty, pretty bad ***. The shoulder is out here. The shoulder comes back here, comes out to the elbow, and l to the elbow here. This block is coming forward. Then this one is going
to come up this way and into a hand that's
holding the gun. See if I draw that a
little bit deeper. This one's going to come
back into a hand here, so it tapers back, and
this one comes back. Now the gun. You can draw whatever you want. Maybe I'll even draw
it in red here. This is where we start to
get used to drawing tubes and cylinders in a
certain pattern. This gun could be here and
monstrous. That type of thing. Use this human as a bit of
a reference for drawing. A cool, cool bought. See if that makes
sense. Okay guys, I've kind of practice
on maybe half of these. But even without this,
what I'm gonna do is just include this
worksheet with you. And I want you to use
people as references. This one I've collected for you, I've collected this sheet for
you. You can use this one. But it's the Wild, Wild West out on the Internet. Start collecting references
that you think would be cool, like guys coming at you with a garden or something, you know. Or what I've done
is actually gone to the toy store and
collected my own weapons. Like so. Imagine this coming
at you like this. Yes, these are modern-day
kind of weapons, but how easy would
it be to adapt these into something a Mac
might use or something? If we're using a Mac that
has kind of humanoid hands, which we'll get into
in another unit here. Then we get on
what makes sounds. Get into using weapons. Whether it's doubled, smaller, whether they're bigger
weapons, this kind of thing. Use a lot of these and hit your poses and then see if you
could turn it into a mech. Really, I think that
that's a great resource because otherwise
what's going to happen is you keep
drawing your mix. The street on. I am robot. When you use dynamic poses with humans and are able to box them out and work them
and manipulate them, push and pull the
proportions into something that is what you're trying to
achieve with a Mac. That can be pretty cool. Imagine a Kung fu
poles with a robot. Can be a stringy robot,
could be a fat blocky robot. That's up to you. All of this is now up
to you, as you've seen, whether we were in
perspective and making blocks and then
understanding, hinging and stuff. Again, we've gotten
now to the point where you could take Conan here, whatever we want to be gonad
and make it into a bot, make it into transformers
fighting in the medieval times. They didn't movie like
that. Or you can take a sniper and transform that. The choice is yours. Now.
8. Hand References: Hey guys, I'm back in this unit. We're gonna talk a little
bit of both drawing hands. Not magic hands,
but actual hands. And there's a reason
why I'm putting hands in a course about Mx
and robots and stuff. I keep repeating
again and again, how so many of our
designs revolve around the human design. Like that's really why so much
of this is familiar to us. I would say out of the hundreds, thousands of mx I've
looked at, drawn. Maybe 80% have humanoid hands. Why is it, why do we
have human height? Hence, not just
because as humans, we recognize that design. We're familiar with a design, but because it freakin works, we get to grip things. We get to grab onto things. There's a certain
great dexterity that comes with our
little digits here. Normally this is
done in a human, human anatomy
course or whatever, but I wanted to throw
it in here so that you guys could have at
least a base understanding of drawing hands. I'm not going to go into every fine point of
anatomy with it. That's not the purpose here. If I want to be able to have you watch this unit and
feel comfortable with drawing hands and
different formation. So I don't know how to say that, but you get my drift within all my hand motion and
that's when I start talking about pushing through it
all. Let's get to it. Okay. So we've got hands. We've got these hands
right in front of us here. Seems simple enough. What I like to do is
make it kind of basic. I'm just going to draw a
circle and draw a circle. Good enough. Now this circle
doesn't really work. I won't even draw it
over the bones here. This circle doesn't work because certain things go outside
of that circle and stuff. What I start to do is I start
to hunt down the knuckles. Now once I've got that down, once I've got the
four and the one, obviously, we're working
with five digits here. I kinda start to connect
the dots a little bit more. See if this works. If I was to draw this, I might come below here and
you can draw it a few times. I would come in and draw 1234 and then one down here on the other
side, obviously 112345. But then I would start
to just it's almost like this type of shape, starting to look a little
bit like a pentagon. So if I was to make it
look like how it does without the circle overlay, basically, I'm chopping
away this part here, right? I'm not including that
little corner there. It would be 12345. That's the pattern I want you guys to be able to get down. So draw a circle, draw 12345, then just cut away
at it and sweep it around. That's how simple that is. The next point, look
at this in proportion. Let's see if we can get
some proportions down here. One to the finger
length is especially, I like to use the
index finger length and use it at that as a gauge. This index finger length, the base of the
palm, is the same. Going up. You try that again. So here's the base. Go to the index finger, one to draw it up there. That's where the fingers
are going to go to. Obviously, these fingers
follow the pattern below. They follow. Everybody's a little bit
different for links. So fingers and I hear hormones and all that
play into it and stuff. But we're following this pattern
here. This pattern here. So it'll go something along those lines, come down in there. This is the base. Like I said, kind of
like the Pentagon slightly but a little skewed. One thing though I want
you to get used to is this circle has depth to it. Imagine it almost
like a disk because right now we're looking
at these hands flat on. But obviously as I turn them, you can see that there's
some meat to it, some depth. Why don't we try to do this? Let's go over here
and we'll just do a circle on top of
this reference. Will put it as if
it's like that. But remember, the circle
comes off to the side here. So it comes off a
little bit like that. Do you remember we cut into
it a little bit there. Let's do that again. This
is a bit of an oval, but it comes like this, comes like this, and
that's our depth. Then where would we
plot where we got 1234? Then our thumb out here. See if that makes any sense. Then obviously our digits, something along this way. And this is without even referencing the
length or anything. We're just kind of
guessing here right? Now. Once we've get, get this done, What do we do it a few
more times, actually. Just don't want you to
get this part down. So we draw a circle and we come up and come
in, bring it back in. And then we find 1234. And some try it again. Besides, we're gonna
draw a little disk. We're gonna come out for
the thumb and go up. So give it some depth, come up for the thumb and go up. Then we're gonna find
our thumb, 1234. How does that work
for you so far? We're gonna have a little bit on the edge here and come up. And we're gonna go 1234. And the thumb is out here. Keep practicing guys. We can stretch these into oval. Sometimes. This one
comes out a little bit. Download just the way this
hands stretched and pose. It's stretching it a little bit. We've got 12345. You can see how this still works as it's coming up this way. We come to the peak
and then taper off, come to the peak of the
middle finger at taper off. Work beside if you want like this and put a little
bit of depth to it. Then added in 12345,
something like that. You can draw it next to the example or on
top of the example, I give a whole lot of examples here. What do we do it below? So this would be here, oops, when I switch back to blue here. But it's coming this way.
This one's kinda flat on, so it doesn't really
do much for us. So we've got our thumb, 1234 for our top fingers. Then where are these
sucker is going? Well, this one's coming
up to here to a joint, here to a joint, and out here
to a joint here to a joint. And out here, here and
out here, here and out. And this one's here and out. Now we're gonna get into
these other joints. Smaller joints, the smaller points of
articulation in the finger. This one here it looks a
little bit like an octopus. Why don't we go through and
try to grab these joints, see if we can identify
them a little bit. There's one that's here
and one that's here. Thumbs are funny
thing because it actually the hinges
starting way down here. If we come if we come here, we can see it's here, It's here. But we also hinge just
slightly on this one, olive, the whole hand has a slight
bend ability to malleability, but this thumb has a bit of extra little bit
of hinge to it. So keep on going. Let's do some more here. 12312312323, here and here. 12. Which one is an
obvious the fist. This one might be harder. So let's say, let's say we draw a circle here and we'd
give it some depth. Comes out to the thumb there. We've got a hinge here, here, here, here, here. And you can see I'm
drawing through. What's happening is this
is up here folding in. This one's falling over. This one is folding in, this one is folding in. This one is folding in. And so we won't see at all, we won't see all
of these points, but we're gonna see a
fair bit of them here. We'll see this one,
this one, this one, this one, this one, this one, this one,
this one, right? So we're trying to draw
through just that little bit. We can understand
what's happening here. Okay guys. This is a big one. Of course, even though
we can't see it, we know where all the main
hinge knuckle joints are. What are they doing?
Well, they're wrapping around this so they're
coming out in, in, out, in, in, in, you know, unwrapping in. This one's coming out, bend, bend like that. And this one's coming over
over the gun like that. This is what I want you to
practice on this sheet. Keep practicing. Do it at different
angles, maybe. Like it's coming at you. Different hand poses like this. And once you're done this sheet, once you've figured
out, okay, well, this is where all these
knuckles are going, right? I'm going to place them all. Just work them and work this
sheet as much as possible. Once you've done that, stop,
make sure you've got it. Then I've drawn out some
extra ones for you. This is an extra
worksheet for you here. Okay, guys, I know that this
might seem a little fast. I got to say in my
human anatomy course. If we go a little bit more in depth into it are
and stuff like that. But as far as drawing
Mexico and bought, I think this using
the disk technique, thinking of this as a disk with a slight jumped on the side. I think this will work. So use it. And let's see what you got. Let's see if you can
move some hands. Have fun with the guys.
9. Animal References: Hey guys, I'm back and I've
got a cool unit here for you. This time we're gonna
talk about how to incorporate animal
designs into your Mac. This can get really
wonky and it can, it's hard to draw the
line of where you actually just are
inspired from an animal and where you're trying to
copy it outright, right? What I want to do in this
unit is kinda look at some key features of that animal and see if
we can mechanize it. See if we can make a
mechanical a little bit. Guys, this isn't gonna be easy. So this is one of the
tougher units before we get into learning how to put
all this stuff together. This is one of the last units of understanding the
construction of the MSc. Take a breath. You're ready. Let's jump into it. For the first one, we're
gonna look at a kitty cat. I don't know. I'm looking at this cat. I'm thinking, oh, that's a cat. Yeah, yeah, that's a cat. I chose this for a reason because it's goofy
looking at, I don't know, I was searching in cats and
got on a bit of a tangent, but let's go beyond this cat
just, just a little bit. What I want to do is
just like let's say, we're going to draw
some of the things. What I want with a
cat as movement. I'll draw the base body,
something like this, almost thinking like a motorcycle
gas tank or something. Then hinge it. There's a hinge on
either side of this. So one thing that I like
about cats as the balance, the tail balance, so I can
pull something like that. So already I feel
like it's got this little bit swooping
grace to it that I want. The other thing about cats. The head. There we go. We've got this swooping
grace, this head. With cats. We've got the pause. Let's see. There we go. This one can go back. And maybe this one comes kind of thrown in joints
here all over the place, but have a little tall
kids playing in something. Here's a rough sketch of
maybe what a cat might be. I wish I had made the head a little bit more
graceful, but whatever, you can start to add
details into it, have the chassis, the body. Wherever it have. Some cool points to it. Have the neck coming
maybe a little bit. Some hooks on different sides of this. Something like that. With the feet maybe
for gripping. It could be something like this. Although I got to say the two
claws kind of make it look like it's a bit of a
herd or something. Maybe counterweight
at the end here. Then if you want, you can coil this however you
want or something. I'm hoping you're
following along. I'm hoping you're rolling
with me a little bit on this. It doesn't have to be exactly
what I just did there. But like I said, the main thing that was wanting was this kind of fluid motion of a cat. Let's see if we can catch
a little bit better. The second one, because
I kept reference here is a little funny. Okay, So let's, let's do this. Anything. We're gonna
go on this side, we're going to have this
main motorcycle tank ripe. Maybe I'm going to add like a hip joint into it just
to give it a little bit of movement will come out here. We'll have a bit of
head and the tail. There we go. Okay, so we've
got asleep looking thing, kind of like the reference here. We can have the shoulders
and the hip joints in there. What I want to do is have this jumping or leaping forward. And maybe this one can
come back like this. This one can come
forward like this. There we go. Now, what do I want? Maybe on the top we'll get
into this in another unit, but I can have mounted machine gun or some type of
weapon system up top right? And then I can start to draw in all the details of the
cat or something, right? This could be some type of hose network or a crunchy
network into the eyes. A cat. If I wanted to, I can make that just
a little bit sharper. So what am I doing here when I'm trying to
capture the cat? Like I like this,
knows how it looks. Something like that I can, I'm starting to
capture the grace of the cat that I want in
my animal reference. Maybe not so graceful. But I'm also starting
to capture it like the tail balance and the face design. That's
what you're looking for. You're looking for
something that kind of captures the essence
of the animal without always being
an exact copy. So let's say, let's say I
want to do this panther here. I like the pause of the panther, the big quantum pause. So that's one of the first
things I'm going to draw. I'm going to maybe draw the
pause of the panther here. That's one quality
that I really like. Now the thing is
the haunting face. Now I've got this kind of focused and already now just these two pieces
are looking pretty bad ***. Let's say I want to
have the shoulder here. This is a shoulder unit
into this part of the body. It comes down into an elbow, comes forward into this, comes down into an elbow,
comes forward into this. What I could do is start to design the different
parts of the macro. The backend. Do I want to put it? I can put it crunched
over. I can put it. Cats are often like this, like kind of a hunchback, right? So I could even depending on what I
want for the back-end, we'll talk about this
a little bit later, but I could throw, I
remember what was it? Panthera had tread. Actually, now that
I'm looking at this, this reminds me so much a band froze his car and thunder cats. You can start to add different things to this and
start to beef it up if you want to have chassis system, weapon system on the back, right with whatever rocket
launchers and stuff I got, you can add a lot of things, but you can see how I took
the look that I wanted. Moved it over and grabbed the features that I thought were really important, especially the
pause, I don't know. I don't know if I'd buy into
this track in the back, but I had thunder cats on mine, so it kind of popped into it. So that's something
to think about. I've kind of been
focusing on cats. I think when I did this panther, when I lost the grace of what I was trying to
grab for cats here. That's okay because I had
focused on something different. Scorpion. Well, there are
some key points, right? So if I want to, I could
have big honking clause, the body and then this
massive tensor up here. Then how I want to
maybe I could line up some type of ribbing system or something like that that helps me do the legs. That type of thing. Depending
on the design I can have. What's a way to connect? Looking at this model,
I can just do the ribs, how it's got the scorpion
itself, it looks very armor. That's the cool thing about
when we're starting to use insects as they
look very armored. But you can start
to add variations. Lake, I hate to get all corny on this
or anything like that, but here's a joint, here. This is a ball joint.
So it's gonna come out. Come out. What could I add on
here that could add to it? Can add like, I don't
know, I hate to do this, but rotating chainsaw that's moving much, I'm going
to do it this way. That's spinning blades this way. So it's constantly cutting
in or something like that. This spinning of the blade
that's comes through the cycle here is
something like it could be o whirling sensation. Then on the front. I can, if I want this
as a writable MSc, I could put the cockpit here. This is where the person
can sit, the driver. We're gonna go with our stick
man sitting here moving the controls with a guard over top of them or
something like that. There's also probably
more I can do here. This could be instead of that, it could be laser or
something like that. Do you mean like a a
laser cutter or something that has effects coming
off of it. Gay guys. What I'm talking about here when it comes to drawing animals is, again, not what
you're looking at. The grace, the features, the weaponry, the armor
plating, whatever it is, and trying to expand
on it, saying, Well, how could this fit
into my machine? Whether the machine
carries a human or not, whether it's autonomous
or not or whatever. How can I incorporate
some of this in there? We'll get into more
details in another unit, but I want you looking at the
overall concept of animals. So here's another sheet for
you that you can practice. We've got a rhino. What's the
big feature of the rhino? Should be obvious. What's
the function of the rhino? Again, should be obvious. The spider got a lot of cool points of
articulation there. How could you expand on that? Could you make the body even smaller and the legs bigger like a daddy
long legs or something. How would you do that? We get into a millipede. What could this
millipede be doing? We're going to be carrying, what could it be transporting? What, how could that change its function? The
function to change it. Look, think about that
for the millipede. The gorilla. How would you break down
the anatomy of a gorilla, almost like a human that we
were practicing already. Build it up as a machine. Guys. I hope this unit helped
you a little bit to think of we're not just using
humans as references. We're going to use
animals as references. We're going to use nature, sci-fi, anything we can to
pull in to making our mix.
10. Machine References: Hey guys, I'm back and I've got what I think is an
exciting unit for you. So far we've been building and building on our skill base, designing max, we've understood hinging and joints and
all that kind of stuff. We're understanding
how to add references. I know you're thinking, well, when do I get to build a Mac? Mom? Truthfully, you are,
you're doing it right now. I'm just adding all
these blocks for you. By the time you
actually sit down. And you're like, Okay, I'm
going to sketch this out, which we'll get to in a
couple of units here. Um, you just gonna be like, yeah, I've got that
and you know what? I'm going to throw
that in there too. I'm basically feeding you a massive buffet of
resources right now. So that when you do start to sit down and
start to sketch it out, you're gonna be like, yeah, audi got this already
know what I'm doing. This unit is another
continuation of that. This time for references, we're going to talk about
modern machines that we use and how we can, just like we have with
other references. Take a piece here,
take the piece, they're going to piece it
together and say, that's cool. I'm going to use that right
there. Let's jump in. Okay guys, first up. Well, what is it? It's a tank. Tanks are cool for
a bunch of reasons. But I think even more
than you expect. One thing that I want
to talk about is like we're getting it into details of machines
and stuff like that. So these rivets and that type of stuff that we're
gonna talk about later. But what I like is this guarding is angled guarding over this. And I know that's kind
of a weird thing for me to first out on a tank. But imagine you've got
these platform guards and stuff over top of a shoulder or something
like that right? Over top of an arm
that's coming. Don't be afraid to grab little pieces of design
and make it your role. Another thing that
I'm going to point out here is the tread. You know, normally
when we draw a tread, we draw it like this. Then we wrap the thread
around and that's how I drew it ever since
grade two or whatever. I don't know what
else drawing trends. But look at the
actual application of this design here, right? Sure, we've got, let's
draw this again as a base. But then we've got
one that comes up. What is that? Why
does it come up here? Well, when it's climbing
ridges or anything like that, it's got that extra grip. And it's got this profile
to allow for that. Not only that, but behind it. Our backup wheels
that helping this. When we're designing
our tread for our max. Don't be afraid to throw a
little bit of funk in there. Have extra wheels in there, have things that maybe
even wrap-around higher. Like what if, what if I want to climb vertical challenges? What if I wanted to
bring myself up? So you can start to have this
and we can combine it with something like the millipede from a previous unit or
something like that. There's a lot of cool
things you can do here. So like I said, when I'm looking at the tank, I'm grabbing design
features and saying, okay, why is this covering over top of the exposed areas with paneling and
stuff, I guess. I want to have that on my Mac. I want to have that
protective covering. Tanks. Tank, they're designed to be armored and fortified and stuff. So I think that's
pretty awesome. The other thing we're looking
at is when we're talking about the top piece of the tank, the barrel, the muzzle,
all that stuff. The typical way to draw that
would be, here's a box. Here's the cannon. Maybe
dude comes out of here. And that's how we drew
it for a long time. But looking at this reference,
there's a lot more to it. So even if I want to
draw it like this, well, there's a bit of, it's
not just a square, there's a bit of
shape dynamics to it. There's sometimes a beveling
going on here or an angling. And why is that? When opposite tanks shoot at it, it might be it's not just hitting on one side
and destroying it. It might angle off
depending on like it gives more chance for that shell to hit it and kind of angle off. You've got that,
you've got a Gunther it up top that you can use. You can reference
and everything. You've got a number of coverings that they
could come out of. You got an antenna
coming off the back. And then when it comes to the actual barrel
that comes out, you've got a tapering
effect with a bevel to it. It tapers as it comes forward. He gets smaller. Smaller until finally comes here and then what happens here? It gets wider. I believe part of this
is for the shell, the amount of force that's
coming off the shell, so it comes out, the explosive power
comes up this way and the actual projectile
ends up coming out. You can design, take
that design feature and bring it into your mic that when something's shooting, it needs some room for the
blow off exhaust and stuff. Tanks are freaking cool. I want you to google a dozen of them and see like grab a whole bunch of
different designs. I'm just throwing
one in here for you. But I really think that
it's worth looking into, I think it's worth
grabbing even more saying, Well, what can I
do with this tank? Why, why, why does
it look this way? It's not just tanks, but different types of armored
vehicles in general. How the front of them
slope and stuff. I drive a jeep so the front
profile and how it hits, not just curves but any rise. And the angle is
really important so that you don't just bought
a mode on your front-end. So that's what we're dealing
with here. We've got tanks. Now, we've got some were moving into construction equipment. What I think is cool in this
one, I liked the exhaust. It's not just like a pipe
and smoke coming out of it. It's this cool angled vent. You can have that in a housing and then look at these
two side-by-side. There's they're the same
they're doing the same thing, but they're just a
little different. One looks cooler. Okay. The other thing we
can talk about not just like we've got a hinge, we've already been talking
about hinge joints and stuff. I guess. We've got this simple hinge for
a lever of like drop, lowering it and
raising or whatever. But look at these
hydraulic supports, these hydraulic pistons, they come up and lead
to another hinge here actually there's a small,
slightly movable hinge. It's probably only move so much, but this allows for this slide shaft to go in and out of this
hydraulic thing. So to do that, what do we draw? We can draw the base of it. We could draw the
shaft that comes out and then whatever
it is supporting, in this case, a bit of
part of a hinge joint. They're minor
moving hinge joint. How cool is that? You can
just grab something off of, off this big boy
here and use it. Another cool thing that I like
on here is the laddering. All right, Actually it
comes down and comes down. So you can grab a design
like this or the handrail. Too many times when
we're drawing a mech, we forget that people got
to get in and out of it. So why not throw a
ladder in there? And it's small things like this. Make a design so much
more believable. If you've got a
cockpit with a driver, figure out how the driver's
gonna get in and out of it. This, even though it's not
a Mac, gives us a solution. Ladders, ladders and
not just ladders, but hand railing, right? So if they have to walk on
a bit of a platform here, give something for
them to either handles or a hand railings
or something like that. It gives something for
them to grab onto. Again, just like this other, the other units
we've covered about references and stuff I go I don't expect you to draw a mech looking
exactly like this. You can if you want, and it transforms and we've got a
line of toys to do that. And that's cool. What I want you to do is say
what are the key features? Is it the bucket? That is that a key feature? And it might very well be that, that might be why you're
looking at this design. But I'm looking at all
the little details that he's supporting things
on this and thinking, Shoot, how cool is
that even look at this axon instead of
a straight-out axon. The middle is thicker
and fortified. It's extra supported. And you can throw that
in 20 year designs. Next up is this ATV
personal one man carrier. It's cool. It looks funny actually. I'd love to go off
roading in this thing. Here's a couple of things
that I think are interesting. Some features that I would look at when I'm talking about it. Features that, like I said, when I'm designing a method, I might forget about visibility. In this case, it's a mirror
system to look behind us. When somebody is in your mic. Again, if this is a driver
or even if it's not, if it's just a bot itself, how does it achieve visibility? Doesn't have eyes,
does it look around? Doesn't have a
pivot in its head. Where does the driver
is? In a cockpit? Can she looked behind her? If not, throw some years
in, there's a great idea. I like this guard
rail. I would love to. We could have a bought land. I'm just drawing a chest
plate here with this cool. Sorry, I said *** railings. System coming out. And so that when
it hits anything, it gives us sine of protection. That it just has an extra little bit of
protection to it or something I got inside might be something you want
protected or whatever. In this case, it's the radiator grill on
everything like that. So you're going to
have a grill system inside or something like that
that needs some protecting. This bumper slash guard system. I would add in for sure. Look at this even
just a TO ensure a hook. How cool is that? If you incorporate this
into like a, you know, there's a hook with a cable system or whatever
on each corner of this. Well, maybe that's how it gets
taken care of in the shop. It's got this little
hook system or whatever. And that's how your
MEK gets lifted up. There's just so many ideas when we're looking
at modern machines, you could pick it apart. You can pick apart the tread
or something like that. I've actually got someone
with a better tread here, the shock system with
the coil wrap up. We've got our hydraulic
sliding joint, but then we've got an extra coil of shock absorbent around it so you can draw
something like that. I think. Cool ideas, even
just this **** seat. It's not just how many
times do I want to sit down and I draw my
little seat like this. Dude sitting in this
little chair or whatever. How simple is that right? But what if I start to change around instead of just that? It's now comes this way. And then there's a
little bit of room for leg and it's a bevel in here. And then it comes into some support and it
comes back into here. And then there's just
so many possibilities that when we're looking
at modern designs, engineers have designed
this stuff for us already. Would they have the same? You don't need to
reinvent the wheel. It's already been done. So market, look at it and say, somebody who spent
a lot of money and effort into designing that, I'm going to grab it,
grab it, grab it. This is the one I wanted
to talk to you about treads like look at okay. So I could draw a normal wheel, but look at the depth. I could the treads like this, but they're angled down
to right and they cut in. Like how freaking cool is that? So you'd be seeing it
from the side here. And there's this bevel
through it because it's slightly faded off of
this side. So it comes up. But then you've got this angled part that goes down
into the groove. Like honestly these are
the coolest hires around. I would definitely be
using something like this. If I wanted an intimidated
or intimidating machine that could just roll
through anything. In this case, it happens
to be a machine that can roll through cornfields. Those corn her really
intimidated here. But anyway, I'm messing
with these tires. This is what actually entirely I pick this tractor
because of these tires. I think they're cool. I have no idea what
this front end does. I'm trying to imagine
what it does. Let's zoom in a little bit. Legit, don't know. I can't figure it out. Maybe there's something
that goes in the side here. I don't know. This is obviously
the air intake here. This is maybe used for other things are
attached to it or something. That could be I'm sorry guys. I'm disappointing right now. Anything else? Obviously, we've got the covers, protective covers over
vital vital things. So if debris or
whatever is falling, it protects the tires
and stuff like that. This is only a 1.5.
And why is that? Well, maybe it needs to climb until it can't
have this interfering. It can't be hanging out here. This designer said, Okay,
well, I'm only going, there's only a need
for half in this case, I don't think this tractor
is climbing actually, what is actually happening is likely there's a big
chunk of equipment that usually sits on the
front end of this and that's why it's gone. Maybe, I don't know. I'm guessing. I'm not a farmer and I'm
revealing my ignorance here, so I'm just going to move on. Jets. The aerodynamic sweep
is pretty **** cool here. Look at how it just flows over everything
like this is a nice, what you could do is
as you're designing, do this kind of
topography line over, over your whatever your design is so that when you're laying
down panels and stuff, they follow that as well. Instead of a panel
just being blocky, looking at a sorts you want it so that it really goes over, flows with the direction of the the bevel or whatever it is. Air intake. That's a cool air intake
that comes up this way. So yes, it can go
inside or whatever. But just something that
juts out of the machine. And then it kinda
comes in or whatever. But all that air is flushing in. I think for me that's
one of my takeaways on this jet is this air intake. I think this is pretty cool. The other thing cool
is the cockpit. Interesting on this though? They don't have a way in
and out of that cockpit. And you don't
always, Why is that? Because this machine is sleek. What they do is they roll up a little ladder
system and the dude, dude or do that
jumps in and out. If your machine, your
MEK gets very sleek, then you don't want to have that hanging that's sitting off. You're looking at all awkward in flight or
something like that. It does not gonna
work. That's not the purpose of this design. But look at that,
that cockpit is cool. So I would usually
you do a cockpit, something like this or whatever, and then it comes around. Again, you've got those
circumference wraps. But you can mess
with that front end. You can have a little
divot here or something, and that can lead to
something or whatever, right? It also helps you set
your central lines, sometimes these circumference
lines and stuff, whether they're on
a perfect sphere or whether on this half egg
or something like that. You want to get really
comfortable in being able to do that too, just fine. Okay. Where's, where's
the form of this? How can I get that form,
shaping and stuff. Anything else on this plane? You know what? Every
plane has flaps. If you're gonna take flight. Flops factor in. Even with Jet Propulsion. You want to have some
flaps on it for steering. That's the whole point
of otherwise you just a rocket blasting wherever
that rockets going. Helicopters. I think sometimes having a big a big setup blades like
this could be kind of cool, could also be a weapon. It could be on somebody's forearm
or something and then on the side of it as like these blades that
come out and stuff I got like, I don't know. Like imagine that
whirling around. It could be a cool
weapon of sorts. It's also too large sometimes. What I like about this though, is not only do you
have the rotor blades, but you have an air intake and exhaust here and look at it, look at the shape of this thing. Looks almost like a sci-fi one. It's basically this with a weird kind of doctor Zeus
exit points or something. And it obviously comes in, in a more solid form and
then leads into this. There we go. You can, there's two things. You've got to square design. You've got a nice
curvature and stuff. You can sometimes
alternate that. If you don't want to
have the blades exposed, looking at how they contain
them in this backend. I think that would
be pretty cool. Another thing that I really
wanted to show was cockpits. So we've talked
about like the jet one where it's just kinda like, you know, contained
and stuff like that. And so if we're drawing a Mac, I'm just going to draw
simple boxes here. Just for now. Simple boxes. One mic might have the cockpit somewhere here in the front and it's just kinda leading
towards whatever it is, like this jet thing
that's very low-profile. It just barely sticks
up above the mechanism. We can have shoulders
or whatever it is and the heads barely there. This, what does this feel like? Sleek. I probably wouldn't be
in that kind of design. I'd probably be something
that's a speed type of thing like when we were drawing the MCAT or something like that. There might be, that's how
you can design a cockpit. And then the other one
though is like how this has designed
this chopper you can have coming forward
and then come into a bit of a MOS and then
use that and throw the, you can even just when it has, it has a bit of a guard
in the front and then that and then you
could throw the seats, the pilot seats in there, and then shoulders can
come off of there. Somebody got looking at cockpit design for
these types of mics. I don't know. I think
it was pretty cool. We're moving on. Cars. Yeah. Mine isn't this cool? But minding go off road. That's one cannot. What's cool about this? Well, I'm gonna show you, I've got both cars here and there's some cool
things about it. One would be the bevel
and the sleek design. Like let's say I'm gonna draw this and I'm drawing my MSc. And I love how all
my mixer going to start with a symbol box.
And this is a reason why. What is this? What's going on here? Do you I mean, like I can
have this sweeping front-end, then it can come up to a ridge. And so this sweeping
front-end comes up to a ridge and then it profiles
down or something right? Now. And remember my sleek
cockpit that I had earlier. We were just talking about it. Well now this What's
going on here is this, is this now what
the MSc looks like, that it's got a body down here. It's got speed to it. I don't know. That kind of thing. Like
this sleek front end is my takeaway from this car is how beautifully
designed these curves are. Not just that, but
now you can look at, okay, well it comes
around and curves in, it comes around and
curves back in, comes around and curves back in, or even comes
around and curves a secondary down into here. And then we've got a
little hookup that comes, a little hookup that
comes on this side. Then there's actually a bevel that comes to a
center point here. It comes up, you know,
there's, there's so many design features you
can take away from this. So many, even these small little trunk and trim
lines and stuff, we had these small
little bevel lines that run through the design. Then you can have these as they slowly curve through and
cut through the design. That's my takeaway from this, is how sleek it is. For this one, this is sleek, but it's got a bad *** factor. I didn't look at all
this air intake. So if I was to do
the same thing, I've got my again my
front end or my mixing. Well freak, I'm gonna
carry this forward, carry it forward like this. And then look at this
design like boom, boom, I could come
out like that. Come in, come up. This is all great. And this is coming in. And this is my air
intake for the front. And it just how cool is this? You've got to maybe
use a little bit of perspective there if you're
looking down on some of this. And that's like and then
behind it could be like this cool mesh grid that you overlay in behind it or
something like that. You can have all these
lines coming through, support lines for the
grades there and stuff. You can have more
mesh in through here. There's just so many cool
designs when it comes to this. And then have this carry over
just like the car thing. And then that wraps around the shoulder unit that then comes down into
the arm or something. And then the robot's head is up here somewhere.
Something like that. So with all of these, you can take them
for what they are. You could just say,
Hey, you know what? I love tanks. I'm gonna draw a
tank that basically has something extra to it. That's cool. I mean, like tank plus tank. A 100 years from now or
something like that. That's cool. So you can do this
and add onto it. But I think the reason
why I focused on what I did was yeah, you can take that tank
and just add onto it. But I want you to look
at the tag and say, what's cool about
this and what can I take away and
put on my designs? What features as it is
that the bolt system, is it the coverings, is it the rotors? Like is it the
wheels, those meals? I mean, what is it? Is it the exhaust,
how they exhaust is angled and just
these small little things that all of these designers have made these choices over
the last couple, 100 years or
whatever, 100 years. Let's go with more like a
100 years for these type of mechanical designs that
will ease your burden, or at least will help you
bridge into the next step. You don't have to
reinvent the wheel guys. It's already right here. Take it, take what's
been designed, taken apart, deconstructed, reconstructed, and
make it your own. I hope this was helpful for you because I freaking loved it. Like I I love this stuff. And I know it's kinda like, Yeah, I've seen these before, but now you're looking at all of these different machines
in a different light. I think that's really important. Look at them in a different way. And then when you start
to build your MX, you'll be like got it. I know what I want to put there. Now. You got it.
11. Function References: Hey guys, I'm back and I've got another
unit for you here. This time we're gonna
talk about function. One of my favorite
quotes in architecture and design in general is
form follows function. What does that mean? Means your design will follow whatever the
function of that thing is. The sounds painfully obvious, but it's not often as designers, we put design ahead of function. And sometimes as like
as a comic book artist, I'm like, I can blow it out. Throw up what any design I want. Yes, that's cool. But
what's going to happen is there's a certain need for the human body are for
our minds to recognize a certain grounding
in our reality and believability
within that reality. And so just keep
that in mind that it helps you as a designer and whoever you're
showing this to, whether it's a
comic book reader, whether you're pitching it for a toy design or
anything like that. Um, you want some grounding in reality and following the
simple rule form follows, function will do that for you. This is going to
be a quick unit, but I wanted to talk about
this because I think it's really important in design. We've got six monstrous
beasts in front of us here. Right away. We can tell they've all got
different functions, right? That's why do we, why
can we tell that? Because we can tell
it by the design. That's why this is so
important. Let's take a look. Number one. What's the
function of this machine? Yes, I am pausing to
hear your answers. Yeah. All the function is
to scoop something up here and either
push it or lifted. And so what do we have? Well, we've got this big, big shoveled type scoop, right? We've got a lot of
power coming behind it, so it's going to push things or we've got a hydraulic
system here that has multiple parts to it that will lift
it up a little bit, lift it and maybe
dump it, right? Just by looking at this machine. I've never driven one, but I can kind of guess what
it does by the design. Next machine, we've got a huge, It's hard to see from
this vantage point. We've got a huge container
in the back here that a lot of dirt gets
in and then there's a pivot point across here. So let's see if I, I'm sure most of my students
know what this is. Let's put the truck here. There is a pivot point right
here where this this part of the machine dumps and what it does it well, whatever the ****
was back there. So it might dump dirt and whatever it is and it comes out. Dump truck. It seems pretty obvious, but we can tell just by
looking at this, this is the function
of this machine. We've got three more. This number two, we've
got 345 that have this similar arm with maybe
1234 points of articulation. Let's see if this 1234, 1s, 12, maybe even, not even three. He's kind of the week
one of the bunch. But generally, we've got
some similar things here. So all of these designs
have a track and the base cockpit for the driver to visually
see what's going on. What's important here,
What's the difference? Well, look at the difference. Different heads on
the end of the arm. Here's a scoop shovel. And so what do we talked
about scoop shovels before, like grabbing stuff up, spooning it up, maybe
dropping it somewhere. This one's got the Cloud, obviously for grabbing
something and picking it up. And this one has it's
actually, it's hard to tell, but there's a a machine
like a mechanism in here. So this is a bit of
an impact drill. I get it breaks apart
concrete and stuff again, it's hard to tell. It looks like he could
just be stabbing people with this or whenever. If that's what you want to get from this design, go for it. But it's actually
used for breaking up a concrete on the
road and stuff. So similar housing. And this is what you
can do with your mix. You have a base.
Foundational housing. After that is have add-on variations that show the
functionality of your mic. Let's show the functionality
between the working class and the weapons class max or
something like that, right? Lower ranked mx compared to
higher rank max or something, whatever your world
is designing. The last one, although it
looks somewhat phallic, it's used for drilling. Roughly. Case. We've got a whole
bunch of working mx here. While working designs of
machines, keep saying Mx, but these are
machines and they met comes from just by first glance, looking at all six of these. I would say even I've got students all over the world
in different countries and I would say a
good portion of them have never seen some of
these machines before. But just looking at
them, I have a feeling. You can guess most of
them because we can see, okay, well, what does the form? The form is this. What does this do? Well, the function,
the form is this. The function must be, yes. It's not always obvious,
but most of time it is. Then we can come down
into weapon systems here. And this is where it
gets pretty funky. This is, you can add a lot of these onto your, your maximum. Let's just compare 12 here. What's the difference between
these two? What do you see? One thing I see his wings. This one has wings. It must usually
wings denote flag. This one has tread. I don't know if the trend
goes all the way up here, whatever. What
does this tell me? Well, it's used to going
through rough terrain, uneven train, train that it doesn't normal car
wouldn't go through. This one also has a bit
of a not a battering ram, but some type of
pronged thing that can hit through maybe walls
or something like that. So we've got a bit of a
ram and we've got a bit of war ship thing, right? Okay, so whatever we want to name them, it
doesn't really matter. They both got weapon
system on them. This one's got two
pilots sitting here. This one, the pilots
cannot be seen. They're hiding through this. They can see through
small points, the small visibility ports. And we've got chain
guns on the top. We've got oh, here's
one driver up top. We've got access
in and out of it. We've got a weapon
systems on the side, but most of all it's a
pretty heavily armored, protected thing that
you can't see inside. This seems a lot lighter. There's actually three drivers, maybe a weapon system guy
up top here, like this guy. And then maybe drivers. This one might be a gunner here. We've got missile
launchers on the sides. This landing system is
extremely weird, but whatever, we've caught, all the balls,
everything's in here. It's got a massive
cannon in the middle. It's got missiles all over
its its arm to the t. That's ridiculous. I don't even like I'm trying to let me zoom in on this thing. Yeah, there's mini missile
launchers all over. Maybe they fly up and
come down everywhere. This one, I don't
know if it's a strobe light thing or if
there's weapons there, but this thing is
armed to the teeth. And so it's actually
kind of ridiculous. But that's the point of it, is that these bottom ones are very different than
what we've got up top. What we've got up truck top. Our machine is used
for construction. Usually a single-purpose
digging, pushing, grabbing. These machines down
below are used for war. I guess it's a single-purpose do that is to destroy
the enemy or something. But how it approaches construction versus
how it approaches war. Again, we look at how to design and follows that
function just a little bit. We've got ones that
are maybe used for straight-out ground attacks, ones that come from the air, and then ones that
just will destroy your entire country. Guys. Like I said, this was gonna be a short unit that I'm just putting a bug
in your ear here. I want you to thinking
of what is your mix. Function? Is your robot, the negotiator? Is it the peace keeper? Through vocal or
through weapons? Is your MSc transport carrier? Is it bringing troops
to and from a battle? Or is it to protect
those troops? Is it a quick emotion and just needs only has
a few arguments? Or is it really like a heavy
duty personnel protector? Think of the function that
you have in your mind for the MSc and that's
going to help you carry into the design. It won't, It's not
a limiting thing. Actually, that's not
what this is about. It's about grounding
yourself just a little bit so that when you grow, you grow off of
those good routes. Guys. I hope this
helped you and I already gave you a
lot of good ideas.
12. Weapons References: Hey guys, I'm back and I've
got a cool unit for a year. This time we're gonna
pull up the gun show. Never mind. Hey, that big. But these guns I'm
gonna show you are. We're gonna talk a
lot about weaponry. And I know sometimes
it feels like, well, I've already
done some references. I've learned about references for machines and for this and that never have
enough references. Anybody who tells you to
draw without references, especially max, they've lost it. Use references, use
them using Museum until you don't need them as much, but you're
still going to need them. It's important that we have this wealth of references that
we're moving forward with. That's what this course
is gonna be for you. A good chunk of it is about references and understanding
how to use them. Weapons. Let's get to it. Okay? Okay. So first off, we're gonna start with a bunch of machine guns. There's a few things that when we're talking
about a garden, we're pretty simple here. We've got a firing mechanism and we've got a barrel that
everything comes out of. So let's set that aside, that that's what we know. There's some things
that I think are important in the barrel, sometimes having some details
of kind of venting holes. Those holes are important. So we could add that type
of thing into the barrel. We could add a staggered
or tapered barrel into it. We can add venting through another section of it to take some of
the pressure away. As that round gets expelled. We can add, this is a big one, how the munitions are
added into the gun itself. So we've got, like in this case, this is a mounted,
mounted gun here, right? So it's coming down here into this mount, mounting apparatus. It can pivot around. Maybe back here is actually I liked this
design of the handles. And then there
might be something like the pistol grip,
the trigger below. Depending on how I think
actually on this one, the way the handles
are designed, the trigger is right there. This one's got to same as you
would find on a handgun or any semiautomatic or somebody got a normal pistol grip to it. But for me, how the
munitions are fed into here. So they're either, in this case, there are traditional
bullet rounds and they're being fed in. This is a munitions box
or they can be fit in. Sometimes you can get like band of munitions being fed in out of a secondary location. I think when we talk
about machine guns, I want to focus on the
details of the housing. You've got some type
of aiming section to it at two points at least,
so you can line them up. You want some type of section
to feed the munitions into. You want the barrel with maybe exhaust ports or something
like that venting ports. And you want a firing mechanism. Let's see. I actually, I should
have probably done this bread firing mechanism, munitions entry, aiming,
venting for machine gun. That's kind of some
of the basics. You can get into funkier
machine guns like this chain gun instead
of one barrel. This one has maybe anywhere from depending on the
chain gang itself, anywhere from five to a dozen. Some of them have an open casing like this that you can see
the individual barrels and they go round a
turning turning housing, turning piston
inside the housing. And you can see how the end of the barrel here has
this ability to vent. Other ones that I've seen on actual battleships
and stuff like that. The whole housing is just it's covered up, up
to a certain point. You won't all you see is a
stream of bullet's coming out. What looks like, kind of like a block or
something like that. But in reality,
it's this inside. We've got we can adjust it. Here's how to hold it. In this case, we were
talking about amount a mounting system that can go on top of a mech that
if somebody can use, these other ones are
either hand-held. So I'm gonna add
one more detail. Mount, mounting or holding. Maybe I should label
this stuff for you. Trigger, aim,
feeding ammunition, venting and hold, or the amount that goes
to here and goes here. This one, obviously, this could be on a wall
or on the ground. This one, the user holds this with one hand and grabs
this one with the other. Now when I was talking about
this first, this large one. I was thinking of it
like being mounted on top of a Mac or
something like that. How cool that would look, right? But you know how it
would look even cooler. A mech holding this chain gun. That's why would that
be like That's insane. So think about that. How a mech would hold the
chain gun, kind of doing this. Then how would ammunition feed maybe from a pack in
the back of the macro? Something. We're getting a
lot of ideas here. Next one, we're moving into his rocket launchers
and launchers. And in general, this
is a handheld one. It's pretty simple. It looks like a gun, right? You've got the pistol
grip and everything. We've got a little stance, but we've got, this is
the actual launch itself. And then the rocket sits
inside with a propulsion here. And it comes out. That is exactly what's
happening inside of here. There's many, many rockets
and you can even see this gets into a missile system
that these are self-propelled. The projectiles of
the machine guns are launched as a
protector of these. Often, as we move up in this have their own
mechanism of propulsion. What you can do with these, mount them all over your Mac
and mount them in units. Like you could
think of how plane has a mountain under the wings
and everything like that. The only thing about
this is often in a design issue is
refill, like a resupply. Once you shoot off a
couple of these missiles, how do you fill them back up? Does somebody gotta
come in, clamp them onto your back
again or something if you're doing that
transformer thing, right? So think about resupplying here. But basically these are pretty cool when we're looking at
missile systems and stuff. Missiles can be
clamped anywhere. And then if it's an unarmed, you can launch it off the
arm or something so they can either be exposed or covered. But you want a hint that there's something very bad ***
about to come out of there. Okay. I've probably shouldn't
throw an artillery on with the with the machine
guns up above. Because again, this
is propelled shell. We're looking at some theme in muzzle design here and stuff. I got this venting off, right? So just make sure that when
we talk about these designs, as I said before,
other designers have gone through
this for a reason. Form follows function. The function of these is to send a massive projectile
into an enemy. And you need to have certain things being able
to come away from it. Whether it's pieces of a rocket or whether it's
exhaust or whatever it is pressure to have that projectile go in the
direction you want it to go. Take a look at what some of
these designers have already done and see how you can incorporate that
in your designs. Let's get into a little
bit of high-tech stuff. These are fictional weapons, somebody else designing these and I just put
them on the sheet. What does it look like? Will they look
like machine guns? They looked like
there could be around in here somewhere or
something like that. This looks like
lasers sites maybe, or this might be a
secondary launcher. This looks like remember when we talked about
different joints, this looks like one of the
slide joints like a shotgun. Maybe this could be
pumped back and forth. And you can do that. This
is maybe the rounds, the rounds down
here for, for this. So even though we're looking
at something futuristic, we're still looking
at how do we hold it, how do we shoot it? How do we aim at? How
do we feed weapons and feed munitions into it
and stuff, I guess, right? So as we're looking into
this futuristic thing, what are the munitions? And how do we deal with the functionality of
this design right here, this person, what they did
was, here's one munition. And you know what,
I suspect this is another firing thing, right? So maybe another second round or a second source of
munitions going to go in here. This looks like it
only fires one. This one's harder, but we've
got some themes going on. We've got citing mechanisms
like this one doesn't, that's a little strange. Again, these are designed supposedly from the
future and stuff I get so you'll see some
consistency in this. How do we hold it?
How do we shoot it? What's going on, what's
coming out of it. Those are pretty consistent. These are handheld
ones that maybe your MX could be holding and shooting and
stuff like that. We'll practice drawing them in just a little bit when we get into application
onto the Mecca. But this is more about
gathering resources. So think about this. When we are going to
draw this though, what would this look like? How would we sketch this out? Well, what would we do? It would be a long
rectangle or something. Then we'd start to
break down the form. We'd start to say, okay, well, this is where this housing goes, this is where this part goes. And we'd start to draw
it all out and say, Okay, well, this is
what this looks like. So. I think this is
somebody else's design. I think they're great designs, but I want you doing
your own designs. What I'd rather you
do is say, okay, well I'm going to use this in the same perspective that
this person has done theirs, but what would I do different? Well, maybe I'd have
circular end to it. Maybe I'd have two projectile
shafts coming out of it. Right. So how would that look? Well, maybe there
would be some bulging going along this part and maybe this would come
up here or something. And maybe this whole
housing within there. This is coming back like
this and maybe I wanted to a second grip down here
for this part of the hand. And so you start to
design and say, okay, well, I'm gonna, I like how they have this handheld section here. I might take some of this
shoulder mountain than that. And that's what I
want you to do, is this isn't really a
massive homework assignment, getting you to draw exactly
what's on this page. What it is is grabbing
elements of these weapons. So if you just draw
a rectangle and say, okay, well how am I going
to make this rectangle gun? Well, here's the main
housing, for example. Here's going to be where it
goes up against the shoulder. Here's where it's gonna
be, where it's being held. Here's a secondary
holding point, maybe a secondary firing point. Maybe these, we can use some of that stuff
from the shelves. Maybe there's another
munitions going in here. And maybe even like an
old-style Kalashnikovs, there's a feed of
bullet's coming into this top section here
that come out here. Whereas my aim, my aim is here. And gentlemen, That's
what I want you to doing. So when we're looking
at weapon design, I want you looking at
what we've covered here. Looking at how it's
being triggered, how we're feeding munitions in whether they're lasers or
whatever it doesn't need it, It's lasers doesn't need a power source like a battery pack. How do you protect
that battery pack? It doesn't need any venting. How do you hold it? How do you aim it? I want you to kind of addressing
some of these things. I feel bad not saying Well, you'd have to redraw this here. This will be
officially saying it, redraw every one of these. That's your assignment. Now, that out of the way, what I'd really rather you
do is just start to take some of these elements of design and jump in and
make your own stuff. Because we're talking about
Mex, Mexico futuristic. That's what I want from you. I want you thinking, okay, well, here's a couple of
designs I really like move into the
future with it. In the end, I posted a
few things from the past. The reason I put the
catechol distribution, battering ram, oldest
kind of stuff, siege weapons and
everything is because I think some of this can still
carry forward in our design. Imagine a battering ram here. I've got, I've got
this battering ram. Imagine that, but it's a
piston shaft along the forum of, of CJ MEK. Mek is slow in lumbering, walks up a vocal, punches through whatever the
**** it needs to punch to. You could take the
battering ram design, maybe pivot joints or
something like that. That just kind of rock
back and forth and just going on and that's
what it does, right? And it's a heavy
Mac because it's braced for that function. I don't know if we're
going to use a lot of these medieval designs and in what you're doing and stuff. But I wanted to include
them here because I think no matter where you're
getting designs from, whether it's a sort whether it's a gun, whether
it's a laser, whether you're looking at
some sci-fi movie trying to grab from there. It
doesn't really matter. Look at the function of it, what you're trying
to do with it. And then think of how
you can create or implement these elements
of realistic design, functional design, actually
that's a better one. Functional design into the
weapon system of your MAC. Technically, I'm
giving you homework, draw all of this. But really, what I'm saying
for you for homework is take important
elements from each of these weapons systems and try
to make something yourself. And I think it's going
to look pretty bad ***. Show me when you got it.
13. Details Mechanics: Okay, well, I guess actually that's what we're
going to be drawing here. We're going to be
drawing a little bit of this kind of stuff. All the wires and the
mechanical details, the bolts, the hoses, all the vents and
everything else. That kind of adds that
little finishing polish, the cherry on top of your bot. That's what this unit is about. So let's jump in here. Okay guys, we've got a whole bunch of references
in front of us here. And some of them are well, we've already used them
before, a couple of them. But I think what's important is how we're going
to use them here. We're not looking at
the weaponry and stuff. I got it right. What we're looking at
is some of the smaller, more important,
unimportant, smaller, more overlook details, right? So here's some things that I find fascinating
about this. Right? Here is a panel, right? And we can have a
series of panels. I'll even divide it like this. This panel looks like panel, I guess it just actually
it looks like a kind of angled square
right now, right? How do I then bump this into some type of actual
recognizable panel? Well, one thing you
could do is start to add some type of bevel into it. Some slight indent between
the paneling, right. Where they could be a fixed together or where
they might bevel down. You can even add a bevel on all four sides of
the panels, right? So the panel has a low point
and a high point to it. You're going to have the
gutter of the panel, right? Where e.g. in-between your tiles and
stuff like that at home, you might have those
cocked gutters and you might have bolts. Now, how you wanna do your
bolts kinda up to you. You can do them in in each
corner and as if the panels were riveted into those
sections or you can maybe e.g. along the bottom. Well,
that's not what choice. I'm reinforcing the
bolt pattern along the bottom because I want
it to be stronger, right? Maybe more stuff gets kicked
up into the bottom there. So when I'm looking
at this tank, I've already looked at
the weapon systems. I've already looked at the
the the movement of it, the treads and
everything like that, those kind of designs. But now I'm looking at
the smaller pieces, looking at hinges that hold this flap together
or something like that. So if I wanted to have a flap that comes
down and maybe it has some little bit of mobility
will then, what do I do? In perspective? I'll put a bit of a hinge here and have a hinge
attaching, right? Then I'll bolt those
down to Humboldt and everything on this
thing right there. That gives me that little
bit of extra realism. That now this panel is
stuck on there, right? Another thing that
I really like, his handles, but I'll get into
handles on this next one, I think I think for right now I'm going to leave
this one alone. I might be coming back to
the tank for some stuff. On this one, what I like is how the operator gets
into the cockpit. So we've got a ladder system with lots of railings because
it's not just a ladder. I've done that before. I've just put like,
here's the stairs and dude has to walk up the
stairs to get in their way, but he's going to fall,
you're going to slip, he's going to trip,
he's getting into this and different weather
conditions and stuff. So what do you do? You put her a railing system in or something
like that, right. You put a railing system in. So it also adds realism to
it and it wraps around. So if you've got something
that has a driver to it, somebody who's
popping in and out, put a real system into
it, also put handles. Now, usually I'm
cheap and I just draw handles like this, right? And then I might
put something down here and here and more rebuts. I can do that, but look, you could do something else
with your handles. It doesn't have to be
a basic metal handle. There can be a lot
of other things that are going on
with that handle. So make sure that you can have some details in here
that, that you forget about. Like look at that,
even just this, right? I think it's important to have some of these
minor details, especially to me,
especially for me. That's really what mixer about. Mixer about all these
little details, right? So another handle, right? We've talked about
different types of joints. So that's what this
is going to be there for those young people out there that I've never seen
anything like this. This is how you can
roll up your window. But it could also be like e.g. cranking a weapon
system or something. You could be rolling it
around that way, right? Think about it. There's lots of
different ways to use different types of handles. Okay. If we go back to the tank, you can see they've got handles maybe just for getting into
compartment areas, right? That's another thing
that you can add. Is little hatches or
anything like that, right? Hatches with hinges.
I love those hinges. And of course handles. Hatches, hinges, handles. I'm going for Triple H. Okay. Moving on for details. We've got bolts,
we've got hatches, hinges, all this kinda stuff. We've talked about
exhaust systems. What I want to talk about
is front-end air intake. When you've got a front grill. And it's a combustion engine. Or rather when you've
got a combustion engine, often you're going to need
an air intake, right? So what you could do is just make it a slanted front grill. You can do different
patterns over it. You can put some type
of protection over it. It depends how much
you have to intake. Imagine if this was a
massive double engine or triple engine machine, right? Basically the engines are being repeated here
or something, right? Well, how cool would it be to have all these grills coming at? You, write something about that. And then you could even put, I don't like the company
your your branding of space marine or
space mining company or something like that
in there as well. So use grills as an
intimidating factor. I think grills or it can be
really cool and they can be really intimidating if you
kinda get into them, right? Okay. We've talked about
the wheels before. Use details like that. I think it's really important. Moving on, we can see
what I like in this one. This is an armored vehicle
versus an unarmored. Usually not too many people
are assaulting farmers. This is his window system. In this one, it's pretty big. Tons of visibility
all the way around. Gets to see what he's towing, gets to see the Wildlife. He's running over whatever. This one, very small, slanted, maybe
really thick paint. Glass for their windows. Horrible visibility like they've got a visibility
plane here, right? And they've got a
visibility plane here, but tons of blind spots
that are going on, right? So if you've got
tons of blind spots, you can have eyes
up top or maybe a camera system,
something like that. Alright. So look for visibility. Look for the details. How you would protect a window if it's an
armored vehicle, What would you do to give
visibility to your driver? Okay. Other things, you
know, once again, I want to point out
all the bolt system, but you can have
heavy-duty lockers at certain points just to make sure you're locking
everything in, right? That's another technique. Let's see. We're
also talking about, we talked a little
bit about hinges, hydraulics, piston
or sliding joints. Throw these on if you've
got any mechanism that needs to have support,
like let's say, um, I don't know, it's something that
has to be lifted. Right. So you can have your
hydraulic system pushing this part up as it
lifts up the rocket launcher. This could be a bunch of
rockets or something like that. Okay? So adding this type of mechanic into the rocket launcher or into the rocket launcher
that lets you aim right? Next up. Talking about events. We've talked about vents, a little bit about
weapons systems, about allowing excess
power to go off, right? But whether we're
talking about the grill of a truck or a
machine or whatever. We're talking about,
weapons systems venting. I want you to look at
and think about it that there's lots of
different patterns. Usually we look at venting
is like okay, it's circular. Whereas this circular,
there we go. We've got circular
eventing, right? And they could be symmetrical or they could be
misaligned, right? It can be 1111111, that type of thing, right. Okay. Or like as you saw,
just all lined. Think beyond that though. I loved this Chevron. How cool of a design feature would that be as
a venting system? This is also, it's repeating
here a little bit. Alright. Does your mech have a
design theme to them? And can you incorporate
that theme into the vents? Right. And so if we scroll up, there's vents on the front
grills event in a way, right? There's Vince back in the
back of this tank here. There's venting systems on the
side of this truck, right? For these things,
there are a lot more functional and so they go
with a straight slap that. But for you, I want you to
think as you're designing, this mic, doesn't have a
giant chevron on their chest. If so, well, how cool would the event B if it was done
in the chevron thing, right. Is the half half-moon or
half circle or something? Yeah. Well, maybe you can
incorporate that into the venting system like circle
and then just chopping. Alright, so think about that. Venture. An opportunity to
show finessing, design, their community to
show functionality, but also a little bit
of stylistic finesse. The other thing that
I wanted to show or talk about just a little bit is about cables and hoses. I didn't put all the
types of poses here. But basically what I want
you thinking of is like, let's say you've
got a battery pack here and weapons
system here, right? This is so simple, right? Okay, good enough. Weapon system needs
to be a connection. Well, the Mac might be carrying this on their
back or something like that. This could be atomic energy
pack or something like that. Whatever creative mind you have. And you've got to
think, well, how do I bring the power back
and forth, right? So think about wiring. Think about how wiring
might look for something. Are there two cables
coming out of each one? If there is a large gun that has some special type of
energy coming out of it. Does it require a hose to bring whatever
substance that is? Does it require? There's all different types of hoses to you can
make it almost like an accordion hose, right? You can make it a mesh hose. There's lots of different
styles you can use. So I want you to think of
how you're going to connect sometimes your
different systems. This is a system
connect whether it's wires, whether it's hoses. Usually though with a Mac, the exterior, you're not
going to see a lot of this, but maybe when the arms move or something attached to
the hydraulic system, you might see some of that and these types of mechanics will help add to the realism of
what you're going after here. Okay. So guys, a
super quick unit about adding a few little bolts, hoses, vents, wires,
all this kinda stuff. A few little bits of mechanics to make your mix
more believable. Hope this helps.
14. Blobs to Bots: Hey guys, I'm back. I've got a cool
unit for you here. This is one of our
first steps into actually putting
it all together. We've been doing
so much work in, in the structural
foundation of a bot and then understanding
the referencing of bots and stuff I get. Now I'm gonna show you kind of the quick way of getting something down
on paper really quick. I call this blobs to bots. There's other ways
to go about it, and there is much more precise, but this is going to be just
a quick little lesson for you in understanding
how to lay it out. Trying to simply and then
come up with something fast. Make more sense
once I get into it. All right, so blobs and bought. Well, this is going to look, Let's see, I'm going to
put this layer as a blob. And so I've got
this blob of them. How am I gonna do this? Let's see. I don't know,
I'm just trying to think. I'm kind of jumping around
for brush sizes here, maybe something like this. Here's a blog, right? I'm putting a blob here. Maybe some axial back there. Like that. One that hooks there. One that hooks there. Maybe rockets on the back. You can see I've
got a blob there. I'm actually going to back
this up just a little bit. Now let's see how do I do this? Well, I can start to take
a little bit bigger. I can start to take the form
of this, this blob, right? Let's see if I can add some
type of cockpit into it. Well, there we go. How cool is that? It's already starting to work. I've got this coming up here, maybe some type of
housing here, right? And I'm just drawing
in different lines to show where
everything's going. This comes into the leg. Let's see if I box it out. I'm going a little fast, but not too fast that I don't
think you can follow along. Here's the knee joint. All right. Here's the
back part of this. Maybe some something there. It comes back into the leg and
then this one's plays out, maybe splayed out
something like this. These these come
down into there and then maybe some type of
something back there. Nice and simple footwork, something like that
in the back here. While we already talked
about munitions. And I can make this kind of
see-through if someone put a seat with control
dashing here, steering mechanism,
that type of thing. That is super-fast, little
sketch like crazy fast. One of that take
me I don't know. I'm trying to look
at the time here. A minute, two minutes
from blob tool bought. Let's see if I can
do that again. I'm gonna do another blog here. What I'm doing is I'm just
using kind of a fat marker. I'm going over it a little
bit fat and then just to see where that leads me, do I mean, Like I'm
gonna do this again, I'm going to actually,
I'll make it even bigger. Gonna go fat. Have this, and then kinda jump
down and let's say 12341234, something like that. I already got a spider
thing in mind, right? So let's see if I can do this. Well, what I was thinking was, I've got this oops,
messed up on that one. Didn't see this
over here. And so I've got this top housing. Bottom housing,
maybe some type of pivot joint can come here. This one can come
here and this one can come up here in this
background, can come there. Okay. When do I want a cockpit or
do I want an observational? I can put a turret up
here, something like that. Talked about tapering
hertz, adding in, venting. Alright, going to hatch here. Maybe there can be an observer looking at something
off in the distance or something like this is, you want to keep this as
rough sketch as possible. There we go. There's
a nice spider. Metabolic and T
are anti-aircraft. Maybe it's, it
gets some pivoted, gets to move around really
fast and stuff right? Spotting. I can even throw some type of radar radar device
on the back room. And that's going to
check the time again. I just sketched out a
little broad concept in two minutes. That's how long it takes. That's why I call this the easy way or at least the
easy way to start. I think, I think
that's where it's important trade like
then you can just get, just get rolling with it. Taking so much of what
we've learned so far. And just starting to throw down like this blob on
the piece of paper. Let's try one more. Like I said, if you're following along with me, it's cool. If you're not, that's cool
too. It's really up to you. If I want to have something. I'm going to put those two
big foot my main box up here. This is where I'm thinking
the main box of the body. What do I go next to? Another box here? Put a hand here and a hand here. Sometimes I do that. I kinda throw hands around. Like I'll throw a hand here. And I'm like, Okay, well, this can kind of come down here. This can kind of
come up like that. I guess I should've
done it from there. You can already see
I'm kind of like using my simplified skeleton a
little bit. I'm making this. So here's that hip joint. I'm making this very much
like what we had before. So this is going to come up
to a knee and then down. This will come back to and then down like that,
something like that. And then heads here. My confidence is like,
well, let's see. Okay, so I'm just going to rough in what would be a foot here,
that type of thing. For f into what should be a leg. I'm gonna go with my my Optimus Prime easy front
grill type of thing, even though it doesn't have to be primary,
anything like that. I'm going to have the shoulder. The shoulder have a
coming down into an ARM. Have this coming in? Big forearm. Big forearm, and maybe huge gun back into this leg. And of course I'm going to
add some depth into this and into the knee joint. This seems to flare down here. There we go. We have there we've got different types of boats that were just
roughly blocked in. Sometimes using a simple blob. Other times using a bit
of a fast skeleton. Are these pretty? No. Not yet. Could we make them pretty? Well? Yeah. That's what we're gonna do an
upcoming units we're going to start to show, Show and flow with a little
bit of polish on this thing. This, this here, this
is Fast and Furious. This is nice and easy. This is how you start
to just throw it down on paper and then
start to rough it out. Put your blocks in, your
shapes in simple forms in. Then you build some
kind of beautiful using all those references
and knowledges that we have coming
into here, right? Hey guys, like I said,
this was gonna be fast. It's going to be easy and ten minutes, that's
what you got. Use it.
15. Putting it together : Okay guys, this is where we
start putting it altogether, where we start gathering all that knowledge
that we already have. And just this is how
we do it, right? It's hard because I want to throw everything
into this one unit, but I also realized that there's time and
attention limitations. I always try to have
my units around 20, some odd minutes or whenever I feel if we go past 30 it
gets a little bit long. So I'm gonna take this unit and maybe break it up
just a little bit. But I think it's important
that we do this together. That we're kind of taking all the stuff
that we've learned in this course and laying it down
and showing how it works. All right, so let's jump into this and see
how the **** it works. If you remember in the
blobs to bots unit, we were kind of laying
down a little bit of some sketch lines. We did a little blob
and then we did a little thing over,
over top of it. And then we kind of said, okay, well, cool, That's how that works.
That's how simple that was. Let's see. There it is,
bouncing around everywhere. If you remember this, well, I decided to take
this guy and say, let's do something with, it. Seemed like a simple design
that I really liked. What I would do here is, this is a very rough
sketch that was based off of a very rough blob, right? So I'm gonna do some things
here that maybe that, Yeah, I'm just gonna start doing
things that I remember that we learned in the course. So first thing I'm
going to do is put a little bit of a fender flare on
over the top of this. And you remember how we had that one panel that
I really liked. I remember I was talking
about that one panel that had a bit of a hinge to it and had a bit of flexibility. I'm going back in my memory of the stuff that we
covered in the course. I'm saying on that tank
I liked how that head, that one hinge section. And I thought that was cool. I'm going to add
some of the bolts in here and maybe add them more. Reinforcing along the outside
here, along here as well. I'm going off this design, but I'm gonna be
changing a few things. I think I'm going to
change this cockpit. I think I'm gonna
keep this and this is still kind of rough sketch. But I think what I'm gonna do is bring it maybe somewhere. Let's see if I can maybe
if this is the front. I'm going to bring that glass
up this way. There we go. What do I want it? I don't know if I want. I'm trying to think of how to design the glass
just a little bit so that it has actually, you know what, I got a
little bit ahead of myself. I was thinking of this thing
and I didn't quite tell you as a bit of a scout thing, like we were talking
about function before. So for me this is not like it's not going to be a bulldozer,
anything like, uh, it's gonna be a scouting
mechanism or a scouting bought. You know, what I can do is like, for example, on the top here, put some type of radar unit or something like that that
has a scanning system and it's got a communications array so that it can report back to the base whatever
is going on here. We've got that. But I also want visibility within
this for the driver. So I don't know. That's still going to be
roughly how it looks inside. I mean, I'm changing the
cockpit around a little bit. We talked about
grills on the front. This can be a bit of a quick
grill that I've got up here. Not bad so far. I'm liking it. I think it's got to
have a lighting system. Gonna go with a Ford
Bronco lighting system. Just looking at the
design the other day. Gotta kind of a cool look to it. It's got this
lighting system that can last more light
and you know what? Maybe off to the side here. Rotational lighting
system that's hinged on a pivot joint or something because it might have to light
up some area or whatever. It's traipsing through the darker, something like
that. Like I said. I'm having all this function stuff going through
my head saying, okay, well, what
would this look like? How would this how
would this play out? We've got this part
going over here because it's protecting this joint. I can have some some paneling
going on here and stuff. I got a little bit of
bevels going in here. This isn't a hydraulics,
but rather it's showing that there's
some stuff behind here, maybe some mechanics in there. And I can have this
one's coming out here. So that's where that the rest
of that bowl goes, right? Not bad. Again, this is me just trying
to be a little creative. Here's here's another ball
joints that's maybe secured, hear something like it
or rather a pivot joint. And it's secured there and
then it comes back down into this leg and the
back of the leg. I might add some details there. Give it a little bit depth. Make this section where that housing is part is coming in. I'm just drawing, I'm just roughing in some of the
mechanics of it so far. This is one part of the leg. It's coming down. What else? It's coming down into the
housing of this foot area. Instead of just simple blocking, I might make it a TO thing. So I can even come over here and just kind of drawn these toes. Rough these tools back. You can see I'm using a lot of just simple rectangles and stuff that are just guessing at. Let's see if I can. The perspective right now. Like I'm just roughing
in this perspective, it's really, really not tight. This is still a
sketch. You know what? The reason I'm doing
this sketches, so it saves time. Like I just, I don't
want to be spending time really teaching
how to ink and how to. That's a bit of a
different thing. I want to teach how to come up with these concepts
and everything. I think that's important. I'm looking to match what's on either side here
just a little bit. Looking at both legs back
and forth and saying, okay, let's do that. So we've got this
window windows up here. What else do I want? What I want a weapon on this
front system here. I'm going to do this
and bring it back. Then erase everything in here. I know if you're following
along with me, you're like, wow, I just wanted I just do. Well, that's because I want
to have some type of weapon. I loved the chain gun
when we talked about it, when we were learning about the chain gun and stuff, right. So this is the rough end of the chain gun and maybe
the AML box sits behind here or something like
that, that type of thing. Okay. So already you can see how
this thing is looking. Like he could do something. I've started adding
in weapon systems. I want to add in an engine. I'm going to have
this machine here, but then I'm going to have
a bit of racing back here with maybe some hex or hatching venting system
or something like that. Then I can even add Benson,
that type of thing. This looks like
it's functional so far. On the back of this. Then behind the engine system, I'm going to add
another weapon system. They can be multiple missiles, launching system without inking. And I can even go one further. I'm kinda bring
these toes forward. That's everything and
then start to add details that we've
we've gone through. We're gonna add we already
added the weapon system, we added the engine system. Now, what are we going to add? We're going to add maybe some
of the beveling details, like just some of
the bolts that might help in this some of
those mechanical systems, maybe there could be a whole or electrical electrical wiring or
something that we see occasionally coming out
from one section to the next. I don't want to add
too much though, because I don't want the
scale to be too vulnerable. That's basically
how it's going to look as a rough, rough sketch. Not bad, right? When I take
the time to clean it up, this is what it looks like. These are some nice
polished lines that I didn't want to
waste your time doing, but basically the concept
was already there. So I wanted to make
sure that you've got to see some of what this would
look like with Polish lines. I think it's important guys, that you understand that
you've learned a lot so far. You've learned tons. You will learn so many
pieces that go into a bot or a Mac or
anything like that. And now you get to apply at all. You get to throw it
on an actual MSc, whether it's
transforming robot or whether it's like
this little sculpting that we just did up and stuff. You've got all the
pieces in your arsenal. Just one more left. That's what's coming up next.
16. Coloring: Okay guys, this is it, we're putting it
together even more. We're gonna take the
sketch that we built up from our blob into a bot. And now we're going to
throw some paint on it. Not literally, but I guess
it depends how you work. For example, right
now I'm working on my tablet in a program
called Clip Studio Paint. Now if you're working digitally, you could be working in
Procreate photoshop, or there's half a dozen others
that are pretty common. If you're working traditionally, maybe you're working
with markers. Whole bunch back there and this will be a
different process for you. I'm not really going to talk
to you about the process so much as like the
mechanics of the process, meaning, however you're
coloring is kind of up to you. We're just gonna talk
about the concepts and why we're approaching
things a certain way. So put a little disclaimer and now we're going
to jump on in here. I've got this little
bought and I've got a few little things below it. There's some things
that I like about this bot and some things that I don't for coloring
wise and everything. Right now it's just a
gray, which is fine. But that's not the gray
that I want overall. What I want is I'm going
to go with a gray metal. So I'm just selecting
off to the side here, see if I could find the middle choice
that I'm looking for. Sometimes I'm using
markers and stuff. Let's see if this does it. That's closer to what I wanted, maybe even more of a blue. What do you what do you think? That's more of what I want. Now that I've got
that, that's gonna be my base color that I've
got laid down everywhere. Beyond that. That's not going
to be the color everywhere. Like I don't want that to be the color all over this thing. What I want is some,
some black spots. So I'm actually
going to comment, this program has this
awesome fill bucket that can kinda just jump into. Let's see, I'm going
to fill these feet. Feet are kind of like rough and tumble and so
they're going to be black or off
black or something. So we've got that. Maybe I'll throw that in there
for good measure. I'll stay consistent
with some of the the color schemes
here, like so. I'm trying to use
this one off black through a lot of
what I'm doing here. If it works, maybe I'll even
use it. Inside these things. You can tell my line work
was a little sloppy. I didn't quite fill all
the holes and stuff. I guess what I was doing here, as I'm filling up
using this program, it spills over into
the other sections. If I was being more careful, that wouldn't be
happening as much. I've gotten this. Let's
see if we back up. Like a chicken
first one. I think it's the way the legs are done. Chicken desk. She can ask legs. That's SQ just saw the
pronunciation is clear for you. I'm going to switch this up
and go a little bit darker. And maybe come in
here and do that. And maybe do this
part on a lake. And you know what? This is
supposed to be just a wire. So that's not really working
for me. I've got that part. The window itself is
gonna be this kind of lighter shade with
even lighter parts as this kind of
reflection. Enough. The window railing, maybe I'll make it a
little bit metallic. See if I can fill this and be cheap was how
quick I can do it. I don't know if that'll work. That's kind of working
and it'll keep that metallic theme going
throughout. There we go. Cool. Now what I'll use
this on the hinges to it kind of spilled over there a little
bit. That's not bad. I keep kind of backing
out and taking a look as I roll back and say, Does this look at the
way I want it to? Want this radar thing to be a similar color, but
a little bit off. So I just colored picked up and then jumped off of it just, just a little bit there. Cool. Inside this mesh part, that's going to be ugly to fill. But let's see if I can do it. You can see how if
you are coloring, whether it's markers
or whatever, you're just kind of
like actually coloring. I don't know what's fun for me. I've always had fun doing it, coloring as a kid and
everything and so shouldn't be that
tedious for you. It should be just filling
in the empty spots. But it's also starts to
be a bit of a choice. Once you get into
that went wrong. Once you get into color
theory and stuff, you're choosing certain things. Right now, I'm not using
a lot of color theorem, using complimentary
colors a little bit. Try to combinations, but
really I'm trying to keep this really nice and just more
design-oriented that I'm like, Okay, well what would
look cool here? And it runs a little counter to what I was saying about
foreign follows function, but not totally because
this Scout is gonna be in a war zone or whatever. And so like, I'm playing
that up a little bit. Let's see if I can
color in these lights. He's like nobody
yellowish Spotlight. These lights inside here. Like I said, I was looking at the new Ford Broncos
the other day and it kinda getting slightly inspired by the way they did their headlight combinations. I thought it was in the dark. It's a cool look to it. I don't necessarily
love the Bronco, but you can take design inspiration from
pretty much anywhere. Just have to draw it in. What do we think on
this front section? Do we want to keep
that the same color or do we want to lighten
it up a little bit? Or darken it up a
little bit, I guess. Front grill, I feel
like it should be a little darker
looking at it. Right now, I feel
like I'm gonna pick this color and then just go
a tad darker ahead and see. That reads Yeah,
that worked out. Well. Yeah, that
looks pretty cool. So we've got that I want this
this chain gun down here to be black and the barrels black all
the way through in that. Cool, then this part can
be a little like that. Here we go. Maybe the housing, wow, that's similar
color pattern. Yeah, that looks all
right. One more perfect. They're there. Okay. So as far as coloring goes, I'm liking how this looks. I think maybe if I want to, I can add something
like a stripe. Maybe see if I can go and have a stripe coming on
the outside here. If I'm going to have
a stripe there, sometimes good to be
consistent with it. Where else might I put a
stripe? Something like there. So doing on the other side here. That's not bad.
Yeah, that'll work. We're looking good
on this so far. I think it's a cool
looking machine. Now what I wanna do
is add a few little, little extra tidbits to it. So I've got this red star. I'm going to transform it. What's cool with
a free transform? Just line up where it
might fit in perspective, you can see how this is
so easy on a computer if you're doing it manually. Good luck. You can see I'm matching
the shape of that. I'm just going to flip this into different mode. There we go. And put that star,
they're going to put the CCCP go numbering. I was thinking was like
transform this again. Where do I want to put it? I was thinking the numbering
under the cockpit here. Somewhere in that. That looks pretty good there. I'm
just going to fade it out. A little bit so it doesn't
punch to too hard. Cccp. I wanted to put it on like
this flap or something, but I almost think
it's too obvious. Let's see. I'm just
thinking on that flap. I can lay it down there. What do you think, guys?
Where should this go? Maybe really small. Right above here. That right there. Okay. So now I've got a
bunch of these decades on. See if this how this looks. Yeah, I think that
works. So far. I think it works. I like those muted, muted
look on the decal right? Now what I'm gonna do is
sometimes when we have metal, we have kind of a bit
of scraping to it. What you can do is
you can add some texturing over top of some of the metal or
something like that. Then you can do
something like blend. A blur of fingertip
loan that's too large. This fingertip knows too much. Want to do. That's not working
the way I want it to. What I want to do is
be able to stretch it. Still not doing what I wanted
to see if this does it. Let me go and we're just getting a little bit of
patterning down on this. It looks like there's
just a little bit of stuff happening on it. Once we have that, we can just stretch it out
just a little bit. So they're just faded off. You can also put
something like like little scratches on here,
different things like that. And then you can it can fade them off if
you want or something. Just back, way, way
back. There we go. All of this adds
just a little bit of texture and depth
to the machine itself. Once we do that. Now what
I'll do really easily here is I'm just going to
add a little bit of shading. See if this works for you. Right now it looks
blue and this will be a really fast way
of looking at it. Let's say the light is coming
down from, I don't know. Where do we want it? Up
top to the left, maybe. That means this largely
will be lit up. This largely be lit up. Here. We're gonna have some, some light on this. There's gonna be light in here. We'll do those circles
a little bit more. There's going to be
light touching on here. Maybe a little clip here. Light here, light here. Light on this leg. Like coming in here,
light on this foot. Light touching here as well. Like touching a little bit here. Like touching a
little bit there. Maybe back here,
just a little bit. Back here. Around there. If the light's
coming from this left side. That's about what
it'll be touching. Maybe I'm gonna have to
put some gun as well. Anything else that lightweight
touch or might not touch. What it would do is, let's say these are
rockets in here. I could start to shade in
the cylinder a little bit. Let's see, this isn't
looking beautiful yet, but I have a feeling it'll
be better than you expected. There we go. That'll work. What do we think? Is this going to work? There we go. That's a cool look in Mac. You can see some
texturing on it. You can see all the work that
we put into doing a Mac. That is how easy it is. Guys. We can add to this. We can put transformers, we can do whatever we want. But once we've got this down, some of these basics, this is how easy it
gets to be drawing max, like, seriously, look at this. When it came to the
end of this course, all it was doing was pulling all the stuff that we had
already learned together and slapping it on our
blobs, on our blocks. We already learned
how to draw blocks. We learned how to
articulate things. We look for pivot
points and joints. Then we look for references
and how to add it on. Now, we know how
to finish it off. I got to say this was
pretty awesome and I think it worked
out really well. I want to see the
maximum box that you guys come up with and make
sure you send them my way. Whether it's traditional on paper or digital, it
doesn't matter to me. I want to see some of
these cool designs. Okay guys. Hope you
had fun with this, and let's transform into some x.
17. Transformer Tank: Hey guys, I'm back and I've got another
unit here for you. This time we're going to
talk about transformers. What's the concept
behind a transformer? I think it's in the
name transforms. When we look at transformers, we use a reference that we have, maybe something that is in our lives like a car or
a cat or whatever it is. And then it's able
to use those pieces and move into more
humanoid form. Transforms pretty
self-explanatory, I think, I hope. But I promise you that this is what we're going to
lead up to and stuff. And so that's why in part why we were looking
at so many references. So that whether it's humans, humanoid form,
whether it's animals, whether it's vehicles
or even weapons, actually, we can
grab any of them. Take some of the
key pieces of it, work with those components
and make it into that bought. So why don't we jump on in here. I've got an idea of one
that I want to do and just, we'll just sketch it together
and see what happens. In front of me here
I've got a tank. I think it's a Russian t 61 or something.
I can't remember. It doesn't really matter.
You can grab any tanker, you can grab any reference
you want. You can be a car. It could be a portion
of my favorite. Whatever you want. What we're going to
start with is just kind of I'm going to box this
in just a little bit. I'm just going to just
want to kind of have this perspective going on here. In this perspective, I'm
going to make another box. This is all really rough. I'm just kinda putting shoulders and he hears
the top of the shoulder. Here's another shoulder
and I'm just kinda roughing things and this
is all BlueLine, right? So it's not gonna be anything
special and I'm gonna put another box below as the
pelvis kind of do this. Let's see if the legs will
be out to a little bit. Something along these
lines, something like this. This is all super super rough. Let's see if I can have
the hand somewhere else. I usually try to have the hands
in a human type position. I'm going to throw in
some joints in here. And maybe the head should probably put a center somewhere along here, something like that. Okay, So here's my rough sketch. I'm going to back this
up just a little bit. And we go through a few versions of this
roughness because we're gonna be getting
into it a little bit closer and looking at some
of the key components here, what I want to do is grab
the front of this tank. And a rough in some of these details that I'm seeing on the front
panel here of this tank. There's seems to be
a classic thing. There's some bolts. There's a grid, an Arab and grid here with a
handle up top here. There we go. There's also a ridge line here.
Another handle here. Do you see what I'm doing?
I'm kind of looking at this piece here. Then what I can do is
have this flap down here. Take this pelvic piece to it. I'm just working on these different small
little add-ons to it. You can see there's like
clasps hanging here. This is just me kind of roughing in where I think
things should be. The shoulder. This shoulder. Let's see. I'm going to bump up
here just a little bit. We can have this hinge
here, this hinge here, and I'm looking at, now, I'm looking at these parts. The shoulder is going
to be this part. You can see the lines I'm carrying over here,
these guidelines. Then this could come back and come back in or
something. Okay. So far, It's starting to
maybe look like the tank. One of the biggest
things on this tank that was the turret. So I'm going to have this
turret and I'll do this. I'm going to rough this head for now just so I've
got the spacing on it. We're going to have
this trick setup here, the underbelly of it, because I want it protecting his backside. If I was to turn this
around, we're gonna see the top of the church. So there's, there's things
that are coming off of it. Then I can have the barrel. Guess I should have
left more room. But here's the fun
part of that barrel. Here's that midsection
I'm looking at here and also
draw it all out. There's way more
going up this barrel. I kinda since myself, but that's okay if I was when I redraw this
and do good lines, all I'll put that in there. Let's see what else
do I want here? I think I'm gonna have a
box here for this arm. Maybe a box going down this arm. Then what do I want in between? What am I going to grab here? Any details? I kind of like this part here. If I come down just come down
with a simple rectangle, some of its internal joints. So I'm not that worried
about it, right. But I could see
the flaps that are here that are all
the details in here. So I might have like
a line with some, something holding
it together there. Then even, even this back flap can be this flap
over top of here. You're going to make
some type of joint here, depending on what I want. This is going to be
the hip structure. Then the hand I'm going to
rough in the hand here. And then we're going to draw in, I'm going to do the inner, the inner feet right now. I'm going to do the intersection here and
there's a reason for that. As I start to move
into the outer one, I'm going to actually
make it so that this this is where the tread is. Not gonna spend too much
time on it right now, I'm just roughing in
where the tread is. Then you can see if I draw
through just a little bit, the wheels would be
inside of there. We're just going to see a
little bit and that's what's going to show us. On these lakes. I want to put a hinge in here
so it'll break down into there and play
engineer so they can be a bit of a nice thing. And let's see, we've got these type of details
that we can add into it. Then this handled go in there. And that is how you start to rough in taking pieces
from your reference. And there can be more
like you're gonna see. I don't want this unit
to go on forever, so I'm just going to
jump to the final lines. And you can see how I brought an even more
references and stuff, added a lot more
little mechanics and everything off of the tank. And how I made this into
a finished transformer. I think it works out. Pretty cool. Guys. This is a big part of what
this course is about, is we spend so much time
learning about hinging. We spent so much time
learning about references. And now we've got to take
them and just apply them. We have our humanoid bought. Then we started to grab from the reference and throw
it on all over the place. That's what I want you to do. I got a sheet for you
here with the tank, but what I'd really like
you to do is grab a car, grab a toaster, blender, whatever it is you want, and start to add
the key features, the key components onto a bought and see how you
can make it work. That's a challenge, That's
a challenge of this course. Making it work. I have confidence that you can.
18. Mechs Thank You: Hey guys, that was
cool right now, you can mechanize all of
your creative shifts. We taught you some basic
fundamentals of hinging, joints and all that
kind of stuff. Being able to combine it
with a real-world mechanics. And I'm really curious about what you're
going to come up with. Why don't you send them my way. I'd love to see some of
your creations guys. And guys. If you've got a question
that you need answered, maybe you feel I
went a little bit too fast, go into the unit. You've rebounded a few times
and still can catch it, shoot me a comment and if I can answer it and just a
little blurb, I will. If I can't. Well, that's cool because then I'm going to create
a new unit to explain it. Because if you're
confused by it, chances are other students
are confused by two. And I want to make
sure that all of my students are
guided along the way. So if you enjoyed this course, if you loved hanging out
as much as I did, tell me, give me that thumbs up, give me that review or
whatever so that I know I'm on the right path in
creating content for you. Speaking of content, I've got about 20 other
courses on this site. So if you liked this course, take what you learned here and
jump on into the next one. Because I'm excited
to see what you got.
 Ed Foychuk, Making Learning Simple