Transcripts
1. Monsters Intro: Hey, guys, I met and I'm the father. And this is how to draw monsters for kids. It was funny, actually. Okay, so obviously is the title shows you were gonna be teaching you how to draw monsters using some very basic techniques. Stuff like shapes, figures? Yeah. Using the articulation and the hinging that we learned in our basics. Course, we're gonna grow on that and help you design some monsters. Some are gonna be cute. It will be sometimes intentionally ugly and sometimes just ugly by mistake. But that's still okay, right? All right. You ready to do this? Yeah. Let's do it.
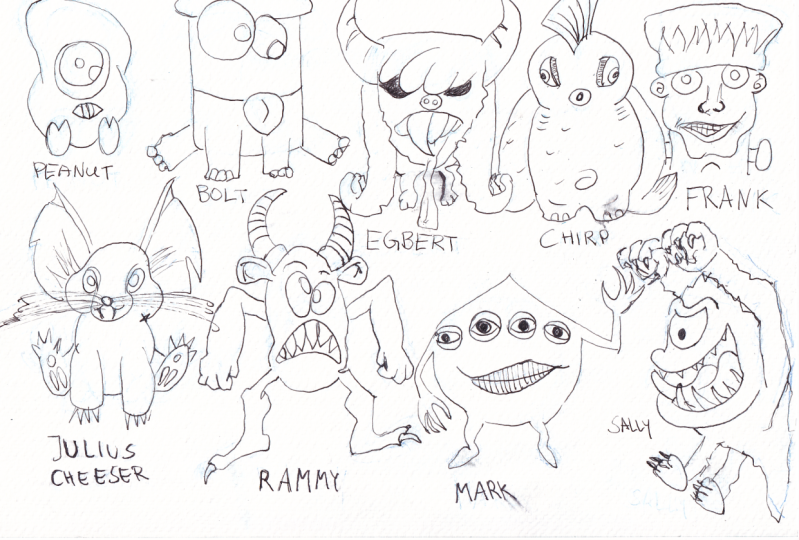
2. Monster 1 Drawing Peanut: Hey, hey guys. Here's our first unit in the how to draw monsters course. The enthusiasm you got here. Listen to do this course. I'm hoping you've already taken the how to draw basics classes that we already set aside for you there, right? Those courses are kinda needed and I know their basics, but they'll really help you when going forward with this one. Okay? So you should be comfortable with drawing basic shapes, circles, spheres, understanding all that kinda thing that we could turn 2D circles into 3D spheres, that tight grip. Have those basic shapes, have them comfortable, and then make sure you can do them as many times. Because that's what you're going to need for this course. Okay? Okay. Now that I've put that little disclaimer there, are we ready to roll? Yes, We're gonna go with Monster number 1. Do we have a name for this monster? Peanut. Peanut. And a works actually looks like it. Looks like a peanut, right? Kinda looks like a peanut. I agree with you, right? Yeah. Okay. So you know what you've always been drawing in. I'm going to do a little bit of a draw over here in red. So I want you to kind of understand what forms we've got here, right? When we look at this monster, we've got this kind of squished oval here. And it kinda squished oval here. Yeah. Okay. So I want you to really pay attention that we've got two sphere sitting on top of each other. We've got this squished oval here and a squished oval kinda off to the side. And then we've got two little feet or their little ovals too, right? Yeah. Okay. So why don't you do that one should try to yep. Go ahead and trace over peanut. Peanut. And then do that top oval there. And hey, students at home, I hope you're doing the same thing. There is a sheet that you could print out, get your parents are printed out for you. I've attached it to the course here. And all of these monsters that we're going to be drawing, you've got them too. So you can draw on top of them and right next to them. Perfect. But it looks like, well, it doesn't really look like peanut right now. Oh, no, no, no. Oh yeah. You've got the feet. But you know what we're what it looks like to me right now. We're like all off like a snowman or something. But another little head on there and we've got all off, right. Okay. But we're not drawing all off. We're going peanut. One of the things that I noticed with peanut that's different than Olof is we've got this connection going on here, right? Yeah. So how do we do it? Well, we can kind of run from the side here, come up and around. Right. We're just going to trace it around a little bit. Okay? Yeah. And then it's going to come back down here and back around. And if we want to now we can go in adding the feet. And then the bottom of his book. Okay, it looks good. Peanuts got a huge circle in the middle here. That says I write a circle inside of that circle below it. Yeah. Okay, so we've got the basic shapes here, right? This is kinda look like Get it. Now actually I kind of like my second peanut more than the first, the second piece that has a big drop in the top of him and stuff, right? Well, you're still drawing the circle. Good. Yeah. Yeah. It's okay. Listen, you don't have to keep pace with me. You draw it your own speed and stuff. I got raped. And if you ever need to just put the video on pause. Oh, wow. Yeah, I kinda like it. Although your eye is smaller, you know what? It doesn't matter whether it's bigger or smaller than the original peanut, right? The original peanut was just as goofy little thing that I drew, right? I want you to play around with it a little bit and see, make your own peanut, make your own monster. You're using the monster that I have here as a base, but it doesn't have to be perfectly that monster. Okay, So now that we've got our new peanut off to the side here, right? Yeah. How do we kind of finish them up? How do we make it look? Well, you know, he's he's missing these teeth. He's missing the teeth, right? His little little toes. There's some separation with the toes there, right? Yeah. And then I kinda did this thing with the I where I started to almost make it look like there's a light reflection there and stuff. And then I started to cross hatch or hatch inside of the eye. Right. So why don't you do that? Why don't you take your peanut now and start to do a little bit of these finishing things too. Okay. You can start to darken the outline of them. You can circle in some of the feet and stuff where you hope your drawing, as I'm talking, there's no reason to wait on me or anything like that. You know. Yeah. I'd say my peanut is done. What you're faster than me that I've got character to it. And I'm going to come in here. Draw my circle for the eyeball. Here's this guy character, are you trying to say mine has no cure? No, like minus city. Weirdly, it's like almost falling over. Q. Okay. So here's my peanut, my old peanut, and my new peanut, right? I think somebody stepped on my new peanuts head. But it's still kinda works right about here is how does yours look? Well, yours is cute. I like that. I like the smaller I had kinda worked out well, right? Yeah. Yeah. Yeah. I think the new peanut is cool. It looks good. The only thing I would suggest on yours maybe is to do a dark outline around the edge. Thicker line, yeah, right. That's kinda what I've got for, for that stylistic choice. You don't have to do it. And if you really want to, you can come in and start to erase stuff, start to clean up some of these lines and stuff. Depending on how much, how sketchy you were to begin with and everything right. You can come in and clean things up. I don't really want to clean it all up. I want to keep it loose looking because I want you guys to see how I did it, right. But I also want you to know that it can look better, it can look clean and stuff if you want to get in there. There we go. There. My peanut starting to make a little bit more sense, right? Adding a thicker outline. Okay. Yeah, I like that. Okay. We've got peanut and as ugly squished brother in it. Perfect. Okay. That's it for this one guys. I hope you enjoyed drawing peanut. Otherwise known as monster number one. Note that's a very creative name. You know what? If you want to draw out a few times, try to squish them around, see how the circles and spheres can play out a little bit different. But basically, time to move on to the next monster. Let's go.
3. Monster 2 Drawing Bolt: Hey guys, We're back. I'm Ed, and I'm Joey. And we're here to teach you how to draw monsters. This is unit number 2 and have named this monster, monster number two, because I like to be consistent. But I think my kid is named. It's something I've named this one. Not really. No. I'm still deciding. What do you think it okay. It's between rocket because it kind of looks like a rocket kinda and bolt like, you know, yeah. Like a bolt like a screw type of thing. I kinda like volt. So that's what I'm going with, fault, okay, we're doing well. Okay, So let's start sketching a little bit here. Let's find out the basic shape of what we've got. I think a quick look at Bolt here. I'm going to go with bold TEA has kind of a, a bit of a rounded rectangle, almost like a soda can or something like that, right? But it's not so rounded, right? We've got a rectangle there and then we've got these little rectangles going off all over, right? So why don't we do that, come off to the side. And I want you to draw kind of a bit of a rounded rectangle. Just rough. Okay. Maybe in the front you can put two little square, rectangular type things. And off to the side maybe a rectangle and a rectangle. Look about right? And I'm just kind of roughing it right now in orange so you guys can see it, but I'm going to start to go into it in a little bit of a darker color here. Okay. So because these feet are in front of them, what do we do these ones first? That's what I like to do. Come down, draw this foot. All right. Come down, draw this foot. Draw what's in between here. Right? And it seems these feet or the back feet or something. But yeah. So I'm going to keep them behind. I'm gonna kinda come down and draw this this way. Come down this way and then go in and put. I can see I've got like a little toe action thing going on here. I don't know if you noticed that. So I can come down here. The little toe at the top. Cool. Somewhere around the middle of this sort of Kant seems to be a mouth, right? Yeah, I made my Smiley face. You can make your guy a little bit unhappy if you want, with a big tongue sticking out of it, right? Yeah. Okay. Take up top here. I kind of gave him a little bit of a cat. Can think of it like a mushroom cap or something. Then I gave him kind of a one big I and one smaller wonky I write, but we gotta go in and erase this because this I want in front of there. Okay. Here we go. And we can dark in that in. Wow, this guy is super easy. What do you think, Joey? How's it going for you? I think it's going to try and do a different expression. Although be cool. Yeah, You don't have to stick to the expression I'm doing like, I think the people at home should do it once the way I'm doing it. And then they can kind of change it up if they want to do it a second time. Oh, you're giving eyelids. Get all technical on me here, right? Yeah, that's right. Okay. Yeah. I like it. And then I'm gonna do a little, maybe I'm going to do that now you've inspired me know. Okay, you, you claim it as your own because he is happy minds game like SAS or because I even see your mouth is like a straight line? Yeah. All right. Yeah. Okay. I can see that. Yeah. Okay. Enough. That enough. No. Okay. Then what I would like you to do is go along the outline, give it a bit of an outline. Darken it up all around the edges, right? Yeah. Make it punched a little bit more. You can make it a lot thicker if you want on the outside here. And you can see it doesn't look perfectly like the first one, but I think it mine carries over pretty well. Right? Oh, I think I'm forgetting something though. What? I think I forgot to Stokes. He's got these will not really toes, these nasty little toenails or whatever, right? Like elephant feet. Yeah, he does. I was going to say that sometimes it's good to copy from nature that you can look at nature and see what they've got, right? Yeah. And these elephant feet, they kind of work. You do. And then if you want, you can come in, grab your eraser, start smudging and all around getting rid of some of the construction lines. I'm not too worried about it because I'm not going to show just anybody. Well, I guess you guys get to see it but nobody else. Not like the thousands of students that might watch this. Yeah, that worked out really well. I actually think I formed a better than the first monster. What do you think? Take a look at yours. I think my looks adorable. I do too. He's got this kind of like straight. Like he's annoyed at his goofy sibling. That's totally it is it's one of those I'm with stupid science. Yeah. Okay. That looks pretty good. You can name them both. I'm with stupid. Yep. That'll work. There's an arrow. There you go. I love it. I think we did a really good job on this. It's about five minutes. And we've got monster number two. And what do we name monster in number 2? Bolt, Bolt, let's call them Bolt. Bolt n is dumb brother. Okay guys. As always, if you feel like this was going a little bit too fast, ferry anything, why don't you rewind it, start from the beginning and then even do it on another piece of paper. This paper is included. So you can follow along on it, but you can draw them, draw bolt a few times with a few funny different expressions on his face, on your own. Have fun and good luck with it.
4. Monster 3 Drawing Egbert: Hey guys, we're back. And this is unit number 3 of how to draw monsters. I'm Ed and I am jelly. And we're ready to work on Monster number three. Yeah, and white icon with the most original nicknames for my monsters, right? Alright, Joey has always, what are you going to name this dude? It's between Egbert and egg. Because he has an egg face. He does, he's got this. Let's see. I mean, I'm going to bust out the orange kinda thing right now. I'm going to do this upside down. He's definitely got like an egg shape just flipped upside down, right? Yeah. Okay. Let's go with AIG Berkshire. I like paper. So I'm going to go with this egg shape, right? Maybe a little wider. And I hope at home you're following along with us. You know, you can pause it if you want for going too quick. But Mean Joe, you're kinda on a roll with these monsters. It's going really well. Okay, so we've got that. And then we've got these two big hands off to the side and two little feet, right? So why don't we draw those big hands auto side then, true feet right underneath. Right. Does that sound about right? Yeah. Well, this is weird looking until there's connections. Then, you know, he's got these horns coming up that I work on a happy face. Okay, so now we've got to start to connect this stuff, right? Well, I know I've got the body. This body stays true to the whole thing. So the body, I can kinda roll like this from one horn down to chin, I guess, and up to the other horn. Okay. We'll keep it that way. That looks about right. His mouth or go in the middle here. And I want to give them these big teeth are like these big cheese. I'm going to give him smart. That's okay. Okay, So we've got these big huge teeth, big mouth. He's gotta kinda of a pig nose, right? And he's got this kinda floppy hairdo over top, right? Good stuff up top. What is he got? A 0 giving some tuffs of hair that he's got, right. We'll bring it down. Bring it down, kinda pretending that that's his hair. Alright. And then he's got these horns coming up. They don't have to be perfect, but they're kinda same on each side, right? Try to make them the same little notches in them or something. All right? Okay. Yeah. Okay. I honestly, I think that was the easy part. How's it going for you? Are pretty good. Yep. I gave him a dorky smart. Okay. This is where it's gonna get a little weird though, because he's got these monster arms. Monster. He's got these monster arms. And the hands have this weird, if you noticed. There's this kinda, you know, they're bent backwards as it's as if the the back of his hand is resting on the ground there. Right. So how are we going to do this? What I would say is coming from the bottom of the horn here. And this is a little bit different than the original. I'm changing it up just a little bit from the bottom of the horn, come down into the middle of that circle. From the bottom of that horn. Come down into the middle of that circle. Now, from maybe somewhere below his jaw here or his mouth or whatever. Take a hand like that and coming down around the bottom of that circle. So again from about the same side here, come down around the bottom of that circle and you can kinda use that circle as your nice smooth arch down to the bottom there. And then what you could do there is just folded into a finger, folded into a finger, folded into a finger. Fold this one into a finger, fold this one into a finger, and this one into a finger. And that makes sense. And then I think he had a little tuft of hair somewhere around his elbow or something. So you can kind of put like a little bit of hair somewhere around that midpoint, right? Not bad. You caught up to me. What do you think? I am still doing the fingers? Yeah. That's okay. I he didn't book yep. A few fast. Yeah. I know I'm going kind of fast on this guy. I don't know. I think it was the AIG made it so easy seeming for me and stuff happening if you try to have them equal where they're starting and stuff trying to give mine in like wonderfulness. That's cool. Okay. Good stuff. Now looking at the bottom, small feet, right? Those were his arms, I guess even though they're huge and the small feat, what I would like to do is just kinda give you a bit of votes, solid, flat platform at the bottom and pretend it's coming up over that circle type of thing. Okay. Think of it kinda like a dog's foot or something, like a pop, like a Paul. And you can even put those little politics where the nails might go or something like that. Like an example of nature adding nature into your monster? Definitely, yeah. Like that. Dogs ponds. Yeah, you're going to incorporate a lot of those things when we learn animals, monsters, faces, basic shapes, everything kind of flows together after a while, right? Okay, So you should have this kind of solid thing and then that little hookup for that Paul, right? Yeah. We're going to come up to a knee and then up to the body. So up to a knee, it's kinda outwards, right? We're going out this way and out this way on the other side. And then up to the body. Yeah. And then on the inside from the heel, you can just make a nice bend up if you want. Yeah. There we go. And what did I have on this first one, I think I had some little bit of drool. Can be standing in a puddle tool. That'll that'll hold my construction lines here a little bit. Okay? And then for the final thing, what I'd like you to do is get a little bit of a darker or push a little bit harder and go round and outline your monster. Now, at this time, you could also come and start cleaning some things up. You could clean up some of your sketch work. I like to keep my sketches are my drawings here with the sketch lines in them usually to show you guys and stuff, right? But, you know, if you wanted Let's say you had to have presentation for school or something like that. You wanted to show something really good. Of course, you would clean up your sketch lines, right? What do you think, Joey, how's yours coming? Pretty good. I like one. He's like smiling and everything because he's hungry. Do you smile when you're hungry? No, I get really mad when they're hungry. I was going to say, I don't think you're no, he's hungry and he's hungry and he sees food. That's why he's drooling and he smiling because he's like, ooh, I get food and get checked. My whole thing connects together. And what was his name again? Egbert, right? Yeah, Egbert. He's quite smart communicating glasses. Now, one thing that I'm going to save for joy here, I'm looking at her drawing and stuff like that, right? Yeah. And if you can notice over by where the horns come out, her horns. And this was one of the problems on the original piece here, was that the horns were actually coming out. When I had sketched I messed up. The horn should be coming out of the head. Not the not the arm there anything? So on mine I fixed it. But you've actually what you need to do to fix it. This is what the horns is. Bring the horn to the head. And that's that simple fix there. So good. Yeah. You're given glasses, cosine squared, sine squared, of course. Okay guys, that's about it for monstera number 3, otherwise known as Egbert. I hope it was fun for you guys. And you know what? If it went a little bit fast? Don't you worry, just hit rewind and practice again. Good luck guys and have fun.
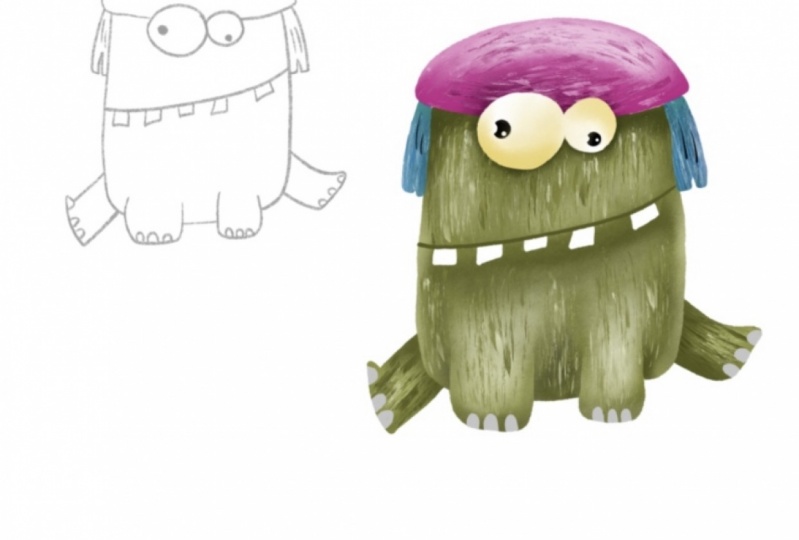
5. Monster 4 Drawing Chirp: Hey, hey guys, we're back and we've got another monster video for you here. I'm loving the enthusiasm so far. Okay, I affectionately call this monster number four. But as usual, my kids not love in my names for these things, right? So Joy, What do you think? What should we name this little birdy type dude? Chirp. Chirp, yeah, like, you know, character tweet. Tweet. Yeah, let's call it tweet. Okay, we've got tweet sitting here. Okay? And hopefully you've got tweet sitting on a sheet at your feet in front of you. The way to my dad jokes here, I know. Okay, so what I want you to do is we're going to look at, is we're going to draw over tweet and see some of the basic forms. So I'm going to draw a circle here and see that I've got at least one circle. I've got a circle overlapping it. And I've actually got a circle inside of it too. And now he looks pretty horrible, but it totally makes sense, right? So why don't we why don't I give you a second joy, you don't have to. Yeah. You draw over my little tweak drawing and see if you could find those basic forms. Basically, the height is more of like a squished yeah, right, right, right. It's more of something squashed, right? I guess not a good circle. Circles and then squish. Perfect, perfect, perfect. Now why don't we bring that off to the side and we'll kinda very lightly rough and the big circle, the circle in the middle. And then that squishy marshmallow on top. Something along those lines. Okay, And listen, I'm kinda doing the initial sketch and orange, but it doesn't really matter. I just do it so you guys can see a little bit better just like Joey is sketching and blue, right? Helps to make things clearer. Sometimes she continues in blue, but I'm going to use my darker pencil here to kinda make it a little bit more clearer for you, right? Yeah. Okay. So from the head, why don't we start on this side here, over on this side, and we're just going to bring it up like that, a nice squished head type of thing, right? And then on the inside here, we're going to go with that belly. All right. I think I kind of lost my circle a little bit with my belly here. Okay. So starting with the head, kinda did up top and then kinda did the belly. You notice how I didn't finish the circles here? No need to finish those circles. Okay, that's not in our reference here. If anything, we can see that the reference has these goofy little gills kinda going on here, right? So that could be your kinda connection there if you want. Okay. Down at the bottom here, we're going to put one little foot and then another little foot. And they can kind of follow that outward circle if you want. It doesn't have to, but it's nice and easy, right? You keep it up a bit slow, but it's okay. You know what? Just like everybody watching at home, there are welcome to pause. Unfortunately, you can't pause me know. I'm sure as my kid, you kinda wish you could. Yeah. Definitely. You were supposed to say no. Okay. So what's next then? What I wanna do next is go on the winds here, right? He kinda looks like something happened to a penguin maybe and z. So we can see that one when kinda comes down on that circle and same on the other side comes down that circle. But then from the bottom, the winged kinda comes up and out and up and out, almost as if it's flopped over and behind him. Right. Okay. What else? We can draw the mouth in the middle. We can draw the eyes. Now, listen, what I kind of did here was I drew circles for the eyes and then cut them off like this. Okay. So if I kinda come into it, the actual details are like this. Okay? Yeah. And then the inside this inside part of that circle that I had kind of sketched in there. I just erased it as if it looks like we're looking at it from the front. And this circle is slightly to the side or whatever to this side of the head. It gives the head a little bit of form. And then we can draw the eye, the iris and those kind of things in there. But the little effects dots and make it look a little bit cute, right? Yeah. Okay. Okay. We're missing the big fin. Why don't you depending how you want it but started in maybe the middle of the head here. Put it up, put it over, and put it as if it's going behind the head, right? And then you can kind of bring this over as if it's kinda rounding the head a little bit, come on in and erase it. Now listen how you want to do this. You can make it big thin. You can give them a little fan. It's kinda like a little Mohawk, right? And then you can kinda do these form lines going along with it, right? Okay, What else are we missing here? Missing all these little details. We already got these gills in these little gills. But now we can go in and add these other little, I guess what our belly button I don't know about the belly button thing, but whichever we could add in these little things that are looking like scales, right? Yeah. He I don't know. He seems part fish. He's got gills, but he also seems part penguin. I don't want to explain little tweet here. I don't think there's a lot of logic other than he probably goes in the water, right? Yeah. Gay on the back of the fins. We can kinda, if we want to add a little bit of detail into these, right? As if it's, you know, they've got slices in them. Yeah. On the toes. We can add these little cute little toenails. Toenails. Yeah. Yeah. And then our boy tweet is kinda done. Right? What I like to do to kind of finish it off, if you can go around it with a darker outline, gives it sometimes that animated look, that animated character look that it has a star getline. You don't always have to do this depending on what you're trying to do. In the industry. Sometimes we call this a bit of a halo because it doesn't necessarily, it's not like inking how we darken things to bring it closer. This is a halo to fold the entire form of the character. It's a technique that can be used and can be abused. Alright? But for these, these types of characters that we're doing here, I think it's perfect. It fits really well. When it doesn't fit well, sometimes is when you've got a really big scene. You've got a bunch of characters at play. And they've all got halos around them. It can look a little goofy. Okay, it looks, it gives a nice sticker effect kinda thing. And punches the characters. Yeah, right. That's kinda looks like it's stamped onto the page here. Yeah. But not really always useful and stuff, right? So just keep that in mind. You don't always have to have the halo. So what do you think about your little tweet? He skinnier than the original one. I think mine's fatter than the original one. And minds got a tiny email because I like this. Well, yeah, it does look cute. All right. Yep. I don't know. It looks kinda like a half bird fish. I like yours doesn't look like it should go on in water much. I don't know if you look at it from here. In Cache. Yeah. Okay. I kinda see it. Cool. I'm happy with mine. He's a little skinnier in the middle, but a little fatter and the shoulders. And it still works, right? Hopefully you like your monster number 4. Otherwise, no one else tweet. And if it didn't work out the first time, don't worry, rewind it, do it again. Have fun with it? Just remember those basic shapes, right? Those circles and squished circles, right? Okay, have fun practicing guys. Good luck.
6. Monster 5 Drawing Frank: Hey guys, we're back and we've got another monster video for you here. This time. It's monster number five. I know. Let me guess. You want to rename my monster number 5? Yes, definitely. And the name is Frank. Frank, like Frankenstein. I can kinda see that. I would say that that is Frank. It definitely does look like Frankenstein, right? Yeah. Okay. So how are we going to approach, Frank? Well, we can see we've kinda got a bit of a rectangle thing going on here almost like a solid can type of thing, right? Okay. So why don't we, now that we've looked at Frank and got that there, we can just draw that sort of can often aside here, right? Okay. It doesn't have to be perfect. Okay. We've got that. Now. What's next? Well, you know what? Why don't we cut this sort of canon half and do the heavy brow. I think that's a good place to start. We can see where the brow is. It's about halfway, right? Okay. Because from that brow, we're kinda gonna come up, go a little bit wider than our soda can, and back down again. All right. Yeah. Okay. What's next? I say the hair because I like how the hair follows this. We can come up and you can have jagged hair, top chunk, chunk and it comes down. I like how it starts right around above the brow there, right below the brow. We're going to put the jaw. The jaw is going to come out past the can. On both sides. Could get past the can and then come down to the chin. I want the chin to be here for chins gonna kinda come up to the brow that away. Okay. And listen if it gets kinda ugly, like I'm starting to get a little wonky here. Feel free to erase a little bit. Come back in it. And I don't know if I made it any better, but not better. What do you want to do next? We've got details come in, right? So where do you want to put the details? The ears, years, we can connect that with Frank. We want little cute ears. Okay, So inside you can just put those little ticks and little nub. Yeah. His ears are cute here. I like that. Okay. The mouth in the original one, we've got kinda this squirly little expression, right? Whatever expression you want. Let's see. I'm kind of going with the original, but if you want to switch it up, I think I want to kinda have this this opening in the mouth here as if he's leaning to one side on it. And I know I shouldn't be playing too much. I'm starting to change things around a little bit, but I think you guys can start to get that then you can do what you wanna do with it. Well, we got to add the scar. Definite the news, you know, isn't nice little triangle. If you don't want the triangle, you can do whatever shape you want. You want to put a little bump. We put little nostrils in there. That'll work too, right? I'm getting too far away from my original here though. I'm going to go triangle. If you guys want to switch it up, go for it. Next up, I'd say the eyes. So you can draw an entire circle. And if you want, just realized that the top half above the brow, you're going to be erasing, right? Yeah. Okay. Let's see, because I've got the changes melt. I kind of want my guy's eyes to be focused this way. Right? Yeah. Give it a little bit of folks there. Cool. Well, when you said also, what was the thing I missed on the top here is stitches. Stitches discard, right? We can draw it across and do little hatch marks across. And that makes it a stitch. And then we're still missing one thing on trend here. What do we miss? It? Isn't that his neck. So as next gonna come down here on Frankenstein, sometimes you'll see bolts coming out either on top here, like out of his head, or sometimes out of the neck. The, you know, the characters changed a few times depending on who's drawing them and stuff I got. In this version, I've now got two sets of bolts, right? That's okay. I just wanted to show you you can put them on either end of it and right, Where you going to put the bolts. Ions are wise, you're so cute. You give them little eyelid lashing. Yeah, I think that kinda looks cute. I like it when you guys do something original and stuff like that, Just follow me as your base and then tweak it out a little bit, you know, add some extra stuff. And then of course we're gonna go through, add that halo lining, go around and darken it. But listen, if you want to make changes gold for it, the only thing that I kind of hope is that you, you follow little bit of my base. Follow it, make sure it's going in the direction that I'm kind of instructing you on. And then after you've done that, after you feel comfortable with it, even just go on and do it yourself. It's okay if you want to give them a smile. If you want a happy Frank, make him a happy Frank. No problem at all. Thank thank you. Frank. Yeah. You know, I was gonna call you Frank. I'm tempted to still call you Frank. Yeah. Okay. Good stuff. Yeah. Yeah. I think Frank looks pretty good here. My pharynx adorable. Yeah. I think yours this adorable and I like how you shaded the HER2. That worked out really well. Yeah, cool. Okay guys, you play with your frank? Not really, but just play with them a little bit and see if you can come up with anything interesting. And you know what? If you love it, send it to us. We want to see what your Frankenstein ends up looking like, right? So go ahead and get your parents or you can email it to us. And we want to see your frank. Have fun with it. Bye guys.
7. Monster 6 Drawing Julius Cheeser: Okay guys, we're back and we've got a pretty cool monster. You're going to see that as we're going through all of these monster units, they get just a little bit more and more difficult, right? Some of the first ones were just like one simple shape, rectangle or sphere or something like that rim. Then we started to get into ones with a few different rectangles are a few different spheres, right? So don't worry if you're feeling it's getting harder and you're supposed to be feeling it's getting harder. This next guy, he's a little bit tough. He is Monster number six. I got a name for what you do. Yeah. What's the name? Julius Caesar. I prefer monster number 6, but okay. Could you hit cheesy? Okay, so what's the basic foundation of Julius here? Like what's, what's going on with him? Well, let's take a look. We've got one circle that says main head. Okay? And you can draw along, you don't draw over the sketch a little bit just lightly. We've got another circle that's kinda the cheek, another circle that's kinda the cheek. And then kinda this all fall down below. That's his body. Not easy, right? We've got a bunch of weird circles and ovals going on, but let's see if we could bring it to the side and break it down a little bit more. We've got one circle, kind of an oval shape. Actually it looks more like an AIG, them doing it. That's his main head. We've got a cheek here. And a cheek here. Hmm, not bad so far, right? We've got another oval or egg shape that kinda comes down below. And this is looking really confusing. But what it kinda makes sense, right? If we look back and forth, we can see, okay, where are things supposed to go now? How can we do it, right? Well, how are we going to do this? His head is here, right? So why don't we start with that. We'll go over and draws head in first. Then we're going to draw this cheek coming in this side and this cheek coming off the other side. We've also got this kinda muzzle thing that's coming off the bottom here. And then it comes in, inside and loops into an I in the cheek. It comes inside, loops into another. I think I do this, I too small. So I'm going to come in, just kinda adjusted a little bit. All right. Okay. So I've got a weird cheek, weird cheek, and then this muzzle thing. You know what? I'm not loving my muzzle thing. How's yours? Look in it. Really bad. Yeah, I'm going to redraw it. I'm gonna make it a little bit bigger and make it a little bit bigger. Okay? Okay. Now, honestly, it looks like a pod person so far it's really ugly looking. Even if I draw on the eyes. It's not going to help matters much, right? Because right now this is weird. It just looks like this big nose is hanging here. So how do we change that? We're going to draw kind of a dog's nose in here that looks almost like a shield. Okay. We've got a little knots wrong this side, little nostril on that side. And then the mouth comes off from the middle. Mouth comes off from the middle. There we go. That makes more sense. The teeth, right? You can even put little whisker marks in here if you want or something like that. And now it's starting to make more sense as, as a bit of a muzzle for an animal, right? We've got eyebrows up top. Sweetly little eyeballs. You can make them angry if you want. Whatever. The eyebrows seemed that carry a lot of emotion to them. Right? Okay. Now, where do we want to head next? The hair? Yeah. Okay. I didn't do it. A little tuft of hair that you can put a little tuft of hair sticking out there. Right? Okay. Then from a boat somewhere up on the head here, you're going to have two straight lines coming straight up. Then bring it down. And bring it down. And those are going to be as ears. You can clean it up a little bit if you over and over, we went over some lines. There are some like that, right? So the ear just like ru or lobe, is going to have kind of a lobe section that gives it its stability as it goes up into this section of the year, right? So it's going to come off the head and come and give that the stability that needs it to be able to hold up like that, right? And then you can kind of draw tuffs of hair or something like that that are coming from inside here. And then the big hanging parts are actually this section here. All right. Okay. Next up I say draw the the lakes, the front legs coming in. So what I'm gonna do is draw kinda too big. Not rectangles, but kind of almost cylinder rectangles coming down. What this little bit more rounded at the bottom. And then as you can see, a little belly here, right? Yeah. Okay. How are you doing, joy, I'm still stuck on the ears. That's okay. It takes a little bit of time. Just make sure that you have the, like I said, that kinda thick part that holds the Europe there, right? As if it's like your ear, that top of the ear lobe there are kept me. So going down to the legs, you can put little claws on it because he isn't monster, right? And then coming off to the side, put some tape of bottom of his other foot here. Right? You can make them bigger or smaller depending on how much his body is going to be coming up as we follow that that original circle. And then his legs can look like they're coming from behind here or something right bottom of the foot. You could put little footpaths depending on how you want to draw them. And then put bigger clause as if they're, you know, these are coming off the foot, right. So they're they're bigger the back foot. So they're going to be bigger than that front foot. There we go. He's looking kinda wonky because I've got all these weird lines, construction lines going through. But you can also add in these kind of scales type of thing. If you want to add for, you can add for or something like that. Like just these little hatching of lines. The original one that I did. It was more kinda rough and scaly and stuff, right. But you can add little ticks for four and stuff. If you want them to be a free guide. How you do it on your skin. That looks good. And he does to Keith, feral cats or feral. And then what do I say? Go in and let's do that halo effect all the way around the arc and that outside line. See how it looks. And you know, it's funny because you're going to be looking at, you're going to be like, my monster isn't perfect. It doesn't look exactly like it's supposed to. Actually, you know what? So long as the monster, It's kinda following the construction of what we laid out already. I think you've got it perfect. Because we're just kinda creating monsters here, right? We're learning how to draw them using basic shapes. But a lot of this is your own creativity. They own vision you have of what this little monster should look like. So don't worry if yours is a little fatter, little skinnier, angrier and angrier, right? Yeah. Just try to follow those basic shapes and see where it takes you, you know, and if you don't like it the first time you go through it, don't worry about it. It's okay. You know, sometimes I can't think of how many times I've drawn something. I'm like, I didn't make that first attempt or the second attempt or the 10th, 11th grade, all of a sudden it'll hit right? Are you happy with your what's his name again? Julius Caesar. His t-shirt, right? Are you happy, happy with your Julius Caesar? Yes. Well, good enough, then we're done. So I hope you are happy with your monster. Number 6. Julie is cheesy. And if not, keep practicing.
8. Monster 7 Drawing Rammy: Hey guys ed here and I'm with jelly, and this is our monster number seven unit. That's right. I've come with an amazing name of monster number seven, but as usual, I think Joey is going to one-up me. What's your name for this game? Rather? Ramy. Yao Gei kind of see it. He's an angry duty, looks like an angry dude, right? Let's look at some basic shapes on Ramy first and then see what we think about it. We can see we've got this kind of rounded bottom and then almost an a bullet or an egg on top right. So if I was to draw that off to the side here, it would be this rounded bullet, bottom rather and then this rounded AIG up top, right. And like I said, it kind of looks like a bullet to me. If I was to draw this in the middle, it looks like it could be a bullet, right? Okay. We've got that. But then there's a whole lot more going on. And you can see how much more complicated these monsters are as we go through the course, right? Yeah, we've got a hand here. Hand here, a big old banana foot here, and another banana foot there. So why don't we do that off to the side here. We'll draw one hand here, one hand here, a big old banana foot here, and another. Well, I guess they look more like eggplants. Yeah. Okay. So that's roughly our figure, right? You know, these are the basic shapes that we're looking at here. This bullet in the middle, circles for the hands. And these banana PHP, if we want to, we can kinda use almost at Stickman thing to connect them, right? If I want to put a knee here and a leg and a need there. Right. If I want to use the elbows here. Elbows up top here. Yeah, it would go up to the elbow. Up to the elbow. Into the body. Into the body, right? Yeah. Hopefully by now like I'm I'm, you shouldn't have gone onto the monsters course unless you did the basics course. And in the basics course we started at a learnable that's simplified. Stick man, you know, changing it in two points of articulation. Yeah, well now we can start to apply that more to these monsters and giving them some points of articulation. Yeah. Okay. So he's starting to look a little bit like our little stick man, right? I was just looking pretty good. Good enough. Right? Okay. So i'm I was sketching an orange to begin with, but I want to now do it in black. I think the first thing I'm gonna do is the mouth. I like to kinda centered the mouth where I wanted. And so it all it is is little kinda half-moon and I'm going to do this jagged teeth in the middle there. You can change it if you want to try. And I think of a good emotion for this man. But I'm going to stick to this guy because there's a lot of things going on, right? Yeah, I think I'll do that too. So I've got the mouth then I've got one I coming off of the mouth and another eye coming off of that. And I've kinda got the pupils of the eyes being all weird on the inside here, right? The eyebrow above, this eyebrow above. Okay. I'm kinda following it. Not doing too bad with it. I come down, put the big hang of the lip on this side and the big hang of the lip on this other side. All right. Actually, I think he's following the model. Not bad so far. Alright. I'm gonna do the top of the head. It comes down to the lip. Gonna do the top of the head, comes down on the other side, down to the lip. Okay. Now I got a choice of which direction I wanted to kinda take this in. Or which which I think is first right? Like I'm gonna do the ER because I've got these big floppy ears on either side. They look like Shrek kinda. And make sure to have the stability of the lobe. So it kinda makes sense a little bit right? There we go. Okay. And behind that, I've got the base of the horns. So you can kinda draw base and then draw the horn coming up and back down. Horn coming up and back down. Does that make sense? This is kinda like where the horn roots out over something. And you could draw these little circles, circumference lines as they follow the movement of the horn, the pattern of the horn, right? Okay. Not bad. Why don't we go down law before we do the hands and stuff, I'll put this bottom part in. And it's going to come down into this area. We're going to come down from here into the nominee. On each side, come down the leg and into a nominee. This one will come on inside. This one will come on the inside. And then the calf comes down. Calf comes down into the heel, into the heel. Now, how you want to draw the feet is up to you. You can put claws on them or whatever. I would bring the shin, the front part of the leg down like this. Why don't we do the same as in the drawing a little bit. How big bubble toes. Okay? So I want to have a big bubble TO, big bubble TO big bubble TO kind of comes under and then comes like this. We're going to come on this side again. Big bubble TO, big bubble TO, big bubble TO. And then it kinda comes under and like this, if you want to, you can add like little nails into it or something like that, you know. But toenails on him. Okay. Not bad. With a hand, what do we do the hand first or, you know, instead of doing the arms and stuff leading into it, would do the hand first when he's making a fist. So to start the fist, we're going to come on the inside here, bring this finger around and come up the next one around and come up to the side so that it rounds up the fist on this side. We'll do that again on this side, nice and slow. That's kinda like the midi palm that you can't see covered up here. Come out to the first finger, second finger. And the third one is going to make the rest of it. Inside here is the thumb. Insight here is the thumb. So that's not a bad hand ax. You have got it kinda mocked up on this side, but here we go. That's a decent looking hand, right? He's going to have these big pop I forearms. Do you know who Popeye is? Yes, I do. Oh, big Popeye forums on either side. Chicken place. Not Popeye's Chicken. He was an animated character that had really big farms. Okay, anyways, these huge forums. And then skinny arms coming off of it coming in. Okay, skinny arms coming into the body. Some little flourish around the elbow maybe or something, right? Yeah. Okay. Looking pretty good actually, I think this looks like our model a little bit. All right. Listen, instead of a halo, what you can learn to do is darken a very specific spot of it. In this case, I want you to darken everything that's kinda on the under side. Okay. So it would be under here under the hand and stuff under the lip, under the character. And what you're starting to learn here is that, you know, where is the, where would the shadows B and stuff. In this case, we're doing it as if it's coming from above, right? So everything on the underside of this character is going to have a little bit of a darker line to it. As if the lighting is coming from up top. Yeah. So we're not going to do the halo like we normally do on these guys. On this one. I want you to do it as if everything underneath is in shadow just a little bit. And it'll give a little bit of a different look than what we've been doing so far. Also going on here is Joy. Pretty good? Yep. Yeah. I think when straightening out. Okay. Good stuff. Okay. And there's our guy, what do we call them again? Grammy. Grammy, right? Remy looks twisted, having troubles, right? But that's okay. I like twist a character sometimes. How to Ramy turned out for you. He looks scared and confused. That's how I feel too. Yeah. It works but I think he turned out pretty close to the original one. Yeah. Ok. It's OK. Yeah, I think so too. I think yours, it looks pretty good. The key point is really guys, is that learning that the, the skeleton that stick man with the articulation, you can start to bring it into your monsters now. Okay, so we're not just going to have circles, we're going to have circles with arms and legs jutting out of them and stuff, right? And if you're gonna have arms and legs, don't do it like that old school stick man. Do it like our new stick man with all that articulation. And if it's tough, what do we do? We do it again. That's exactly it. So if you thought that was a tough do it again and have fun with it guys.
9. Monster 8 Drawing Mark: Hey guys, we're back and we've got another how to draw monsters unit for you. This time we're working on Monster number eight, better known as Mark, was asked, Mark was ascii. I wonder where you get that from. The Mike Mike's deformed brother, uh, kinda works, right? Mike had one giant eye. And Mark II, he got split into four. Yeah. But he seems to have mikes personality as well here. Yeah, funny guy. Okay. So we're going to look at where's the basic shape. And I'm hoping by now what you're starting to do when you look at characters, whether it's on a movie like Monsters Inc, or whatever it is. That you're starting to look and say, Oh, I get it. The basic shape is like a soda can or like a squishy ball or something like that. You're certainly notice the basic shapes. And then looking at how those basic shapes were added onto, right? Yeah, so one mark here, we've got a basic shape of a circle. You can even see how it was originally sketched in there, right there. There's this original circle, right? And then offer that. We've got a hand, a hand or foot? Foot, and then connections into them. Right elbow, shoulder, elbow, shoulder, knees, knees, that type of thing. So why don't you do that off to the side here. Draw a circle. Draw a foot down, one side, foot on the other. Hand up here. Maybe hand down here. You can put the hands wherever you want. Actually, it doesn't really matter to me. And then find the way, you know, me in knee, in, elbow, in, elbow in, and you'll notice how alike We're the leg comes into the circle here and here. They're they're kind of aligned right. And where the shoulder might be or something, they're kind of also a line there. Then we've got this role of eyeballs that are up here, right? You could draw 1234 eyes. But you know what? If you really want to get goofy, put three, I's put 10 eyes, whatever you want to put in there, right? I'm putting four. But Marx, a weird dude and make the old there could be more. You could make like cousins, Mark, Mike, Michelle. Anybody else? Marcus. Yes. Yeah. Mikhail put eruption i gall Michael. Yeah. There is Mikhail. That's a Russian. Yeah. See, I'm educating you on all the things here today. Right? Okay. So we noticed that with the hands, you know, one finger is going this way, 123 and he's got another thumb and then 1, 2, 3, right? You can kinda rough these in if you want just as little sticks and then go in and start to do more details, right? All right. So this is my rough little drawing, an orange joy. You get a rough little drawing or you're already gone onto the fingers. Good for you. But it's rough. Yeah. That's okay. That's that's what it's about there. Yeah. I'm going to start with the mouth in the middle. Kind of get it all goofy. Do the center line for the teeth and have these teeth kinda running as if I'm doing a kind of circumference lines along my sphere here. And if you remember that we were doing those back in the basics unit, right, and the basics course, right? So you should kind of feel comfortable with that. What else we got here? We can do the eyes. I'm going to do one circle here, one circle here, one circle here, one circle here, and do some eye lids. And again, we're doing these almost as kinda like these. The, the circumference lines that we practiced way back in that first course, right? If you didn't do the basics course, you shouldn't be doing monsters. You really have to have those basics down here. Why don't I change the I direction, have them all looking over here. So I'm going to put them on this side of the eye and I'll kinda shake them and maybe just to make it look like it makes sense here. You can do this too if you want, shade them in. And if you really want, just go in and put like a little white dot where the sun might be hitting it or something, right? It's no problem. Mark here has a bit of a pin head. His goes up and then comes back down, right? So it doesn't quite follow the circle. It leaves the circle a little bit, right? What do we want to do? I'm going to do it as his hands first. So I'm going to do this. He's got wonky fingers and stuff. They don't really, they're kinda jelly, right? I kinda like that for AGI jelly type of hands and fingers, right? He's going to come down to the elbow, up into the hand. And this other hand here too, we're going to have this wonky fingertips, almost alien ESC, right up to the elbow. And then up to the shoulder and he's only got three fingers. He's got three fingers and a thumb. And then we can follow the curve of the body. Follow the curve of the body. That's where it helps with your outline originally and stuff I got do a little sketch. You can tell when somebody hasn't really got a good handle what they're doing and they haven't gone to a construction sketch or anything. Yeah, things get really wonky, really off to the side and stuff like that, right? So make sure you gotta construction sketch going on with the foot. These feet, I've kinda got them almost the I got him roughed in a circles, but they're actually more pointy at the end. So I wanna kinda like that a little bit pointy. And then it's going to come up to the knee into the body. And this one's good. Just going to bend up into the body, up to the knee, into the body. And there we go. And then rounding out his his belly underneath, right. Cool. How's it going on yours? Okay. Do you choose an eye direction yet? He's winking. Oh, he's got three, I's winking and then one, pure looking, right? Is that what you're doing there? Yeah. Like what do you think? Yeah. When I close one eye open, I know but you've got three eyes closed? Yeah. Because yes, I have at least one. But works. Okay. And then at the end, what I want you to do is go through and do the halo. You know, you can do the halo a little thicker if you want. A little darker. You can even do it in a different color. That's often how halos are actually done, is if you go over them in a bit of a different color and that helps punch the character even more. So you could do it like for example, if you're working on black paper, it could be a white halo that really punches the character forward or something, right? Yeah. Sometimes you can just pick a color that you feel punches harder. Read, orange, yellow. Something that really has one of the primary colors and stuff. I got it right. Yeah. That really has a lot of strength to it. What do you think, Joey, how's yours coming? Finished giving your finished. I'm wondering if I should go over this one more time with a bit of a coloring Halo just to show you how it might look a little bit, right? Yeah. There we go. And I'm not being careful with this at all at home, you know, if you want to spend some time, do a little bit of extra work on it and really get, you know, get it pretty looking and stuff like that. That would work. But look at how cool this looks with this secondary halo. I kinda darkened up with my black, right? And now I'm coming on doing it with this orange. And I think it's got a nice effect to it. It would be tons nicer if I got rid of that. All my sketch lines and everything. If I clean it up. Yeah. And that's what I would like you to do at home if you can go through your drawing and just start cleaning up some of those construction lines and stuff, you know, making it look a little bit tighter, little bit cleaner, a little bit more presentable, right? There we go. And then it starts to look more like as it should, a cool character, right? Yeah. Okay. So that's Mark was asking. I think he ended up pretty cool looking. I wouldn't change a thing on mark, even though he's not the favorite and was ascii family. I still think that he turned out pretty good. How do your mark turnout? He's cute. He's cute. I can cool. Minus kinda I don't know, cringy I think, but I think that's what I was going for, was a big cringe on it open you look at it, right? But I'm glad that you experimented with a little bit. You can see off of a simple circle. We threw in some limbs, put in some articulation. And now he looks like an actual character that could be coming out of animation or movie or something, right? Yeah. Okay. And if it was difficult if you had troubles, if it didn't work, what do you do? Practice again. That's right. Keep rolling with the guys and have fun.
10. Monster 9 Drawing Sally: Okay guys, we're back and this is unit number 9, monster number nine. And as you noticed, they're getting tougher and tougher, right? Yeah. That last one was Mark was ascii, I think. Yeah. For number 8 and number 9, I'm guessing my kid wants to rename it because it him her. It's her. Okay. Who is my name's Sally. Her name's Sally. Sally. Like Sally. Sally. Sally. Okay. We're going with Sally. And listen, Sally's not going to be easy. Sal, he's a little tough here. Okay. So let's see if we can find some of the underpinning structures on Sally and help her make a little sense as we draw it, right? The first one I'm noticing is not so much of a circle, not a, not even an oval, but more of a beam type, right? We've got this, this flow that's happening this way, kinda like a peanut or bean or something, right? Yeah. And then above it is one hand and another hand, right. So we can do that off to the side here and one hand. And then another hand, right? Yeah. And then down below we've got two circles for the feet. We've got two circles for the feet, right? And they kinda works. And then we've got one eye in the middle here and when I hear All right. Yeah. Okay. Now, anybody who's looking at this is going to be like, I'm confused, right? Especially if your parents are like, what are they teaching you to draw on this thing? Because if we're looking at just what we're looking at on the screen here. It doesn't really make sense. But if you've been taking this course from the beginning, you realize that these are just some of the foundations, right? Yeah. What we can do is track it back to the elbow and the shoulder. Back to the elbow and into the shoulder. This one could go back to an elbow and then maybe the shoulders on the other side here or something, right? Same with this one. It could go to a knee and into the body. To a knee and into the body. This would be knee Audi knee, body. All right. Oh, and help. As soon as I did that, you know, as soon as I added the connecting limbs, this character is starting to make a lot more sense, right? You know, before we're just all these floating circles. But you know what, I really like placing the hands and the feet before we get too deep into it and stuff, right? Yeah. Then we can kinda, you know, connect them all and put them all in place. Okay. So you can see my little rough or in Sketch. Joey's got her little blue beam going on. Yeah. How do you feel about it? Keep enough, good enough. Well, you know what? Don't expect anything amazing yet, because really this is just a goofy looking bean right now. Right now, where do we want to start? I like to start at the big features or some of these landmarks and stuff, right? So I'm going to start with the mouth. I'm actually going to bring the lip, as we can see it here, bring it all the way around and bring it like that. Okay, so it's going to be a huge mouth. How you want to do it. If you want to make it smaller or something, you want to make it bigger, It's really up to you, you know, don't don't stress about it. Just bring it all the way around and bring it past that way. The lip the bottom lip is going to come from this side and come around. Okay. Are you done? You've got a mouth? No, not yet. I think he kinda messed up on it. Yeah, you did. I write too far down. What you've gotta do is have that big sweeping motion for the mouth. Watch. It's going to come right around the eye here, is going to come out from this point and then loop around like that. Okay. Almost like you're drawing a big S. There you go. Okay. Yeah. You got it now. Okay. And then from this other side of the mouth here, it's going to come around as if it's the lip and come underneath it. Yep. Okay. And we can draw the top of the lip and this part that's going to come into the head, right? Okay. So that's one landmark and we want to fill out the mouth now. Yes. Okay. So we can just put in like goofy little teeth if you want going up the side, you're going to have a same goofy little teeth on the bottom. You're going to have a tongue that's got some body in the middle and then kind of erase some of this stuff so that it makes more sense, right? Okay. And then you want to draw the back of the mouth coming on that side there. Okay, so those are the details of goofy little teeth, little tongue. You can have the tongue flopping out if you really want. But I'm kinda trying to follow this here a little bit. Even though on the original one the mouth is much bigger, you know? Yeah. Okay. I wanna do an eyebrow like that over hang of it. Draw the eye below it. And then draw the big eyebrow above it. Let's see if I do that one again. Like that. Cool. And I'm going to come in a race where the head is a little bit. Draw that mean I going in there. Okay, I think that's the basic face that we've got going on right now. And it looks okay. Yeah. I think it's adorable. Yeah. Yours looks actually kinda crazy. It's very cute. Yeah. I gave him like shaved down teeth, like saf sof teeth. He doesn't know our capillary. Now we're going to hit some hard spots here. We're going to do some hands first. Okay, So why don't we start on this top hand to the left. And off the circle, you're going to draw kind of a thumb. It kinda comes down and loops around. And then we can put a little fingernail in there if we want. From the top of the circle, we're going to draw the first finger it that's going to come down like that. The second finger that comes over. And then the third finger that comes around. Then you're going to draw the palm of the hand inside there. And you can add little ticks to the nails if you want or something like that. And this is tough. We're gonna do it up top here too. Again. First finger will come down. Second finger will come down. Third finger will come down. And you can add nails and if you want them again, okay. The bottom of the palm will kinda be like this and this. And then the thumb will come off to the side here and I have it there. Okay. His left arm, this one on the right side is the one closest. So we're gonna give him the forearm first. Actually, you know what, I want to draw the head and just a little bit. So it's got a bit of, it's in the way. Then this forms is going to come back here. It's going to come from a hand out to the elbow and then into the shoulder. This form is going to come behind here and behind here as if it's following back there, right? You can kinda see how the forums would be coming into the elbow there, right? Yeah. That's why it's really good to draw in those joints. If we draw in those little points of articulation, the elbows and stuff, we can see where the forearm would kinda come through and end up there. Right. Okay. Why don't we go down into the feet. The feet are going to be much easier. Basically is we're going to follow this circle. Draw one TO draw another, TO draw another toe and down. Put little toenails on them, maybe. Go same with followed again, follow the circle, draw one TO another TO another TO put little toenails on them, and then fold a circle around. You can draw kind of the three legs that are connecting. By fruitiness. You could just like do some jagged and stuff. There's a tail out here or something, right? Yeah. And then you can have it for a going down there, right? Yeah. Cool. I actually like the mouth on my first guy here. His mouth was way up here, but it still works, right? Yeah. Okay. This is tough. I know it's tough. I know that sometimes it might seem like we go a little quick because we're trying to keep all of these videos around 20 minutes and stuff for sorry, rather ten minutes. Yeah. But I think that if you want to, you can rewind it and try it again. You know, that's, that's really the awesome thing about doing, doing it with these video courses is that you can go around. We follow what you can. If you miss something, It's okay. You stop it, rewind and pause it again. So if our video is like ten minutes long, honestly, I'm expecting the students probably watch it 20 or 30 minutes, two or three times to feel a lot more comfortable with it. Some videos might take, you know, five times. For some videos might take one time. It depends on the video. Depends on how quick you kinda wrap your mind around it and stuff like that. So don't worry about if it takes too long. All right. And I know sometimes I can go a little fast. Even my kid is like a, you know, I'm still doing this, right? Yeah. But the people at home are lucky because they can stop and rewind. My kid has to sit here next to me and follow. Yeah. You can pause me. And I know you dream of it. But you get to fall along. And so now I'm doing the little halo. Just kinda following it, right? And Sally's done. Don't want to feel like if it's Sally. I didn't originally think of Sally. But now I'm thinking of Sally needs like about a bot. So I'm going to start to erase some stuff here and put a nice little bow on her head and printing one on her eyebrow. I'm kinda putting one. Their their salaries got a nice little bow. Cool. Myself, He's still pretty angry. All your ball looks cuter than mine. Sally's also got eyelashes online. Oh, right. Yeah. You know what? I think I could put eyelashes on Sally. Make it I don't know if that's helping her at this point because no matter what I'm doing, she looks pretty angry. Okay. Yeah, I don't think that helps. Well, she's a monster, so it works, right? Yeah. You know what? You guys, even at home, you can start to goof around, do different things to your monster, play with it a little bit and see if you can add anything funky that kinda makes the monster, your monster. Make Sally yours. And that's kinda the whole point of the monster courses that you get comfortable working off of basic foundation shapes and then pushing and pulling and turning things and making them into your own. All right. Yeah. So you're going to look at my monster. You're going to see Joey's monsters and what they use the basic shape. But we each took it in our direction, right. And I'm hoping if you guys email me or send me into messages, some of your monsters, I'm going to see some pretty cool creations. So be sure to ask your parents to help you message me and show me some of your Sally's or your monster, a number 1234, whatever and stuff like. I want to see some of these monsters guys. And above all, keep practicing and how fun.
 Ed Foychuk, Making Learning Simple