Transcripts
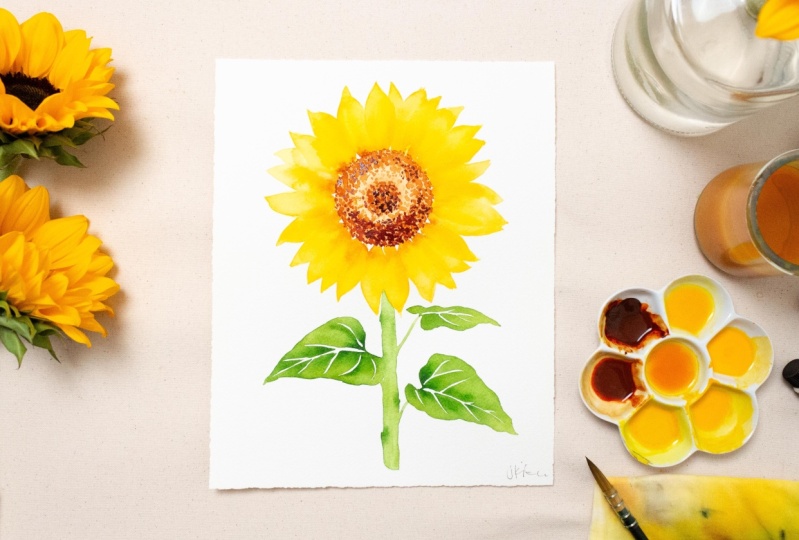
1. Introduction to Sunflower Watercolors: Hi, friends. Are you ready for a watercolor
sunflower class? I'm Jenny K, also known
as Living Pattern, a watercolor artist soaking up the sunshine
in South Florida. I'm a painter and a teacher, and I'm thrilled to
share my passion for floral watercolors
with you today. This class is all about bringing the cheerful essence of sunflowers to life
with watercolors. We are going to play with
some really fun techniques that will become part of your creative arsenal and maybe even get you hooked on
painting these sunny blooms. We'll start with a simple
sketch using basic shapes. Then you'll see a
quick demonstration of essential techniques. Blending together
those sunny yellows, creating texture for
the seed center, and bringing your sunflower to life with layered brushstrokes? We'll wrap up by adding those final touches that make your sunflower uniquely yours. By the end of our time together, you'll have created your
very own sunflower painting, and gain skills you can apply to many other
watercolor flowers. Remember, this glass
is all about having fun and giving yourself
permission to explore. Whether you're a total
beginner or looking to add a new flower to your
botanical painting collection, you're gonna love this one. Are you ready to paint a watercolor sunflower
with me? Then let's begin.
2. Sketching and Preparing Your Sunflower: Let's begin with a simple
sketch of our sunflower. Don't worry if
you're not confident in your drawing skills, we're going to keep
this super easy. Okay, here's my drawing. I've got a graphite pencil
in my watercolor paper. I've actually got my drawing
underneath this vellum. This is my sketch on
the watercolor paper, but we're using the vellum
for the sake of you being able to see me
sketch with the marker. We've got our marker
and we're ready to go. I'm going to start in the
center of the sunflower. Then I'm going to be working
my way out from the center. Just give yourself
an outer line for the circle of the
Sunflowers disc head. Keep it a little bit loose. You can go solid if you'd like, but I like to keep it
a little bit looser of a drawing because it allows
for more expressive lines. Now I'm going to be adding a little center part where
all the highlights go. Keep on adding a small circle in the middle of the
sunflower disc head. Now I'm going to start
adding the petals. It doesn't matter where you
begin around the sunflower, pick a starting point and
create one petal at a time. Keep the tips a
little bit pointed. If you look at the sunflower, you'll see that they're
a little bit pointy and that really is a
characteristic of a sunflower. Not too rounded,
not too bubbled, or it might start to look like a daisy or another
type of flower. I'm just going
around in circles, drawing petal by petal. I might start to go on the other side of the
sunflower like so. That way, I can give my drawing just a little more movement. Just one sunflower
petal at a time, defining where each of your
brush strokes is going to go. This drawing doesn't
need to be perfect. Sunflowers are not perfect
in nature, either, so keep the petals a
little bit busier in some areas and then a little
bit more open in others. Don't forget the little
petals that are in the back. Just pop one in
every now and then. Again, I'm using this marker just so you guys
can see me sketch, but you're going to be using your graphite on the
actual watercolor paper. I usually use an HB or two B. No H pencils because those are such hard lines to remove
from the watercolor paper. I'm not sure if you saw
the class resources, but you do not have to start your own
sketch from scratch. You can take mine if you'd
like a jumping off point. You can modify my
sketch a little bit and make it to your own
whatever you'd like to do. I just wanted to provide this sketch in the
class resources, so feel free to
download it and use it. Now, I'm just adding
in my last few petals. So prominent forward facing petals and some little
background facing petals. The key petal takeaways here
are keep them the same size and make them all just a little bit different, just like us. Everybody's just a
little bit different. And look, they look
so nice together. Now I'm just going
into the stem. Let's make lines from the top of the sunflower head all the way down to the
bottom of the paper. The sunflower stem needs
to be chunky and thick. That's another characteristic of the sunflower that you'll
definitely want to get right. Just keep it thick. I'm going to start putting the
leaves in the sunflower. They're kind of heart
shaped and wavy. They've got those
really distinct veins. So I'm picking up on some
of those for the drawing. I might catch a
few of the lines I add into the veins in
the in my watercolor. I'm not going to focus on
making them absolutely perfect. But I do want to pick up
on just a few of them. Now, just place
your marks evenly. And this is my last and final
leaf.'s the biggest one. Keep that little edge
wavy for some movement. And see, just work
kind of quick. Almost like you're
just dedicated to moving the pencil
and just go with it. And now I'm going to remove this vellum and marker piece
of paper off of my sketch. So this is the original sketch. This is what you
guys have in front of you with the graphite. What I'm going to do now is
lift some of the graphite off because I personally don't want the graphite showing up
in my final painting. So I'm going to take my
needed eraser and lightly remove about I'd say up
to 70% of my drawing. I know that sounds crazy, but you just want to barely
be able to see your lines. And that's why people always ask me if I
free hand my art, and they ask me where
the sketches below. I've gotten really good at doing such a light sketch that no one ever can believe that I had
pencil there to begin with. This removes most of
it at the very end of the painting when
it's completely cured. You can go back in with a white eraser and erase
even more of the lines, but I'm just going to
get rid of as much of it now that I can without
losing the lines totally. So just keep working
your eraser, make it tackier by
stretching it apart. You can pick these guys up
at your local art store. They sell them at Michael's. Check my list for all
the supplies as well. But this is really
a studio staple. So just keep erasing until all the lines are about
25 to 30% showing. And the needed eraser
is great because it's sticky and it pulls
up the graphite so well, and it doesn't rip up the paper. Some erasers will rip
your watercolor paper up. You watercolor paper
is made of cotton, so it is a bit fragile. Just want to be
careful with that. And I'm getting
close to being done. Just going to hit a few spots that I think are still
a little bit dark, but as you can see, it's
almost completely gone. Just a little bit more. Just going to kind
of go all around to remove some of the
little darker spots. When you do this sketch, you definitely want
to not press too hard because exactly
for this reason, it'll be kind of
difficult to get the sketch off where you
pushed in very hard. That's about it. I can
barely see my sketch. I know it's hard to
see it in the video, but it is about 25
to 30% remaining. Don't worry if it's not perfect. The beauty of
watercolor is that it allows for loose
expressive strokes. The sketch is just
a suggested guide to follow for more ease. Now that we have our sketch, let's move on to the
exciting part, adding color.
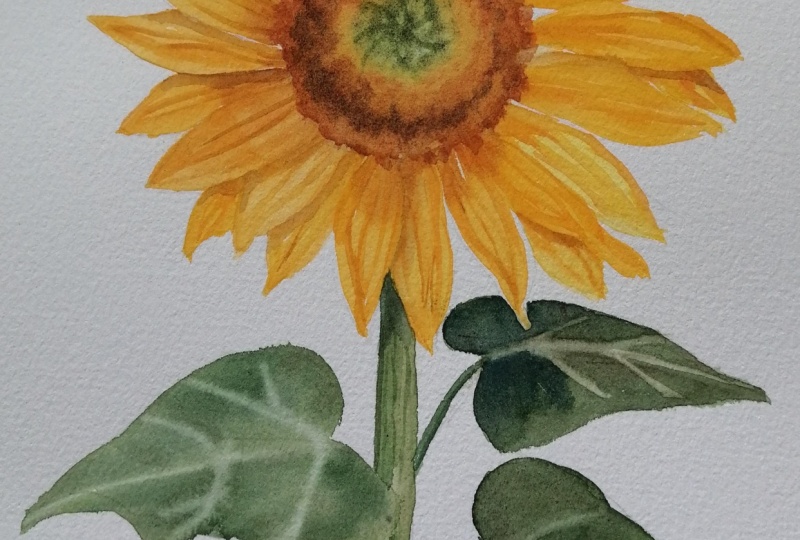
3. Painting the Center: First Layer: Now, let's bring our sunflower to life by painting its center. First, we're going to
mix a light brown wash. I'm using Mission
Magella watercolors. You can use whatever
water colors you have. I'm using the burnt
sienna color. So I put a little bit of the
dark pigment in my palette, and now I'm just mixing down a very light wash.
Just for the center, we're doing three layers
for the center here. So the first layer is just
going to be very pale. So mix mix mix until you have no globs
in your paint wells, and you've got just a
perfect light wash. So there's my swatch
card right on the left. I keep those around
just to make sure I'm getting exactly
the color I need. And I test out all my marks on my scrap papers before
I go to my painting. So I'm just about there, and I'm going to
start filling in. So I'm going to fill in slowly, just the center of
my sunflower head. O h, yeah, that's perfect. So I'm going to start to add just a little bit more pigment. This is very watered down. I want to keep this very light. And if you've used
water colors before, you know that they dry even
lighter than what you see. So I'm keeping it very light. See how I just added a little
bit of water right there. That's going to
start to sift down and give it a little
bit of texture. So I'm keeping the center
of the sunflower very pale. And then the outside edges just have a little
bit more pigment. I'm going to round
those edges out, keep it a little bit natural, not such a perfect circle. Remember, sunflower centers
aren't just plain brown. They have warm
golden undertones, and that is the reason
I chose Burnt Sienna. It just has that gorgeous
glowing undertone. So you see how rich
and warm the color is. It's perfect for capturing that sunlit glow of
a sunflower center. Now, we're just going
to keep on moving around in that circle. You know, I'm going
to add a little bit of touches of water
just like that. Just till I start to see
some texture take shape. I'm using a dry brush technique here where I'm pulling
off some pigment, and then I'm putting
it on my rag. So it's very much
playing in puddles. Watercolor is all about playing in puddles, removing pigment, adding pigment, So you see how the color is spreading and
blending on the wet paper. This creates a soft
natural looking base for the sunflower center. I'm leaving some
areas a bit lighter, and this just adds to the variation and the
depth of the sunflower. Don't worry about
being too precise. The random pattern will
look a lot more natural. And remember, if it
dries too light, we can always add
more layers later. I also want to point out
that the sunflowers that are sitting on my desk have
a lot darker of centers. The reason I chose to bring mine a little
bit lighter than the actual sunflowers
is because I wanted a more airy
and open feel, and I also wanted to connect
the white paper with my painting a little bit more than going just totally
dark and black. Also, if you hold a sunflower out in
the sun in the light, you'll notice that it has
a lot more high lighting, and there's more
variation in the seeds. Oh, we're getting
so close to being finished with our
sunflower center. I'm just going to continue to add just a few hints of dark. But remember, this
is our first layer. So I still have two more layers until the sunflower
center is perfect. The reason I'm spending
so much time on the center is because it is the most important
part of the flower. So just a little dab, dab dab. There are some dark dark. So I just worked from light
all the way up to dark, and this is going to dry a lot lighter. Just
keep that in mind. But I have also left that
little circle ring of white, and that's just going to be a perfect sunlight high
light when this is complete. There you go. A beautifully
textured sunflower center. Next, we're going to move on to painting those cheerful
yellow petals.
4. Bringing Petals to Life: First Layer: First, we're going to
mix up our petal colors. For this, I'm going to use
two of my favorite yellows, Alain and permanent yellow deep. Now I'm going to start loading these two colors
into my palette. You can use the same palette that you have the burnt
sienna in because we're going to actually be mixing them all
together at some parts. Now, I'm just adding a
little bit of the urolin in a well that's one step over from the
permanent yellow deep, about a quarter of
a teaspoon again. And make sure that you
put those lids on tight. They really can dry
out if you don't. So grab half of the yellow deep, the permanent yellow deep. Then grab half of the lain
and mix those two together. What that's going
to do is give you a nice tone right in between those two colors so
that you have a dark, permanent yellow, deep tone, a light lain tone, and then a tone that's
right in the middle. It just makes for a
harmonious palette. Now, stir that up
really, really good, get all the globs out, and you want it in the
consistency of milk, right? And I'm going to add just a little bit more water
where I think I see fit. I want all my palettes to have either a milk
or tea consistency. And I'm going to check that out. Oh, gosh, look perfect
yellow for the sunflower. I like these two
colors mixed together. And it's interesting because some colors out of the
tube are just perfect. And some you have to kind
of mix down a little. But this one just came out to be the perfect sunflower tone. So I'm happy with them
out of the tube here. I'm just going to
kind of mix a few of these olin colors,
so you can see. I've got a nice range of the permanent yellow deep all
the way to the cheery, sunny elin color, and I've also got a
little pot in the middle. That is the burnt sienna mixed with the combination
of the two yellows. So that's just going to
give me a little flow from the center of the
sunflower out to the petals. So that's going to
bring it all together. Using all these yellows at once makes the colors
feel more natural. Perfect for capturing the
glow of the sunflower petals. I basically want to feel like the sun is shining through all of the
petals on the paper. Just testing a couple
more yellows out, but that's pretty much it. And now we are onto
painting the petals. So I'm going to start with the petals closest
to the center. I'm going to grab a little
bit of that pale yellow. I'm going from the center out, and I'm using the side of my brush to create
a wide stroke, and I'm going to taper
it as I move outward. This mimics the natural
shape of a sunflower petal. Remember, sunflower petals
aren't perfectly uniform. Some might be a
little bit longer, some might be shorter, some might be curvier. These little
variations will make your sunflower look more
natural and lively. Now, you see that I'm kind
of skipping petals, right? And I can still see the graphite lines on my
paper as I'm working. I know it's hard to
see this in the video, but my graphite lines are still
there, so I have a guide. I'm just going to fill all of the pale yellow petals first. And I'm going to let
these dry in the end, and you're going to see that
it's going to create lines. So I'm grabbing a little bit
of permanent yellow deep, pulling it out to the edge, kind of blending
the two together. I'm using the vertical hold once I get to the very
tip of the petal. So it creates a nice point. I don't want my points
to be too too perfect. I want all of them
to be different. So you'll see me kind
of switch my brush. You can pull off as you paint
in circles with the petals. And I'm also adding in
a little tiny bit of that burnt sienna wash that
I created in the middle. You're even going to
see me pull some of the dark barncena wash from
the other palette too. Just Remember to kind of get in your Zen zone when you're doing this.
Don't overthink it. You can always lift
up if it's still wet. You can do the pull off dry
brush that I showed you. And don't overload
your brush either. You don't want it
so sopping wet that you're worried
it's going to come off or it's going
to be too puddling. You just want it just filled up. And once you use
watercolors more and more, you kind of understand the
pigment and water control. It's just practice
makes perfect. So we're just going to continue
to go around in a circle. And I'm adding one
petal at a time. I'm going to leave some gaps so that some of my petals can
overlap once they're dry. And that's the
beauty of layering. It's going to make it
look like it's, you know, if you're holding the
sunflower up in the sun, you can see the
overlaps of the petals, and that's what I want
to achieve today. So now you can see how the
petals are taking shape. Don't worry if you can still see some of your pencil lines. We can always build up
more layers to add color, and those lines are
going to disappear. You'll barely be
able to see them. I also have that white
eraser at the very end that I can go back around my cured painting and
remove any pencil lines. Some people actually
accentuate the pencil lines, so that's fine,
too, if you want to leave your sketch
totally showing. This is just my
technique of working, and Feel free to explore. It's fun to explore, and this video is instructional, and I'm showing you
exactly my techniques. But in the end, you're going
to start to experiment, and you're going to
do your own thing, and cool things are
going to happen, and you're going
to be very excited about what you created. But copying is really a
great place to start. So try to copy exactly what I'm showing you in this video. It's really good
to use my sketch. So yeah, I think you're going to love your sunflower
painting at the end of this. I'm just going to keep on
going around in a circle. And I'm going to
keep all the petals just about the same size, adding one petal at a time. I might drop in water here
and there or dry brush out some lines to
keep it feeling a little bit more
modern and expressive, or I might add pigment in places that got a
little too light. It's really up to
you in the end to decide what feels best.
Just go with your gut. I'm adding in a little bit of that burnt sienna wash.
And if you notice, I give my brush a
little bit of a, like, flick, but it's
still on the paper, and it's still in the painting. What that does is it
makes for a little line. And you'll notice in some of them that that line is
starting to show up. So if I had a tiny amount of permanent yellow deep or
burnt sienna on my brush, it's going to just run through the painting where I lay it. So try out those little
flick placements of the darker colors like that. So we're getting closer, but I'm still
working in a circle. It's so exciting at
this point where you're really starting to see your painting come together. I know in the
beginning when you see that blank white sheet of paper, it can feel a bit daunting and you're just hoping that
it comes out good. But this is the point
where it's starting to come together and
you can get really excited about what you created. I'm just going to keep
on going through. Very meticulously, I'm
painting this slowly. It's not my more
expressive, quick painting. It's a slow living
kind of a day, and this project reflects that. Just one little petal at a
time, building up slowly. I cannot wait for you guys to
see the finished painting. I do want to mention
that a lot of these colors are mixed
differently with the water. The pale yellow, the lain
is about a t consistency, and then the permanent
yellow deep, and then the darker
colors we mixed are a little bit thicker
at a milk consistency. So we are just about
finished adding our first layer of
sunflower petals. Now, I'm going to let this
layer completely dry. I mean, all the
way, don't let any of it be damp because what's going to happen is our second
wash is going to go on top, and you're going
to see some lines, and it's going to be those
distinct sunflower petals. Next, we'll add those
tiny little details that really bring our
sunflower to life.
5. Enhancing Petals: Second Layer: Okay, now we're here. It is time for our second
row of sunflower petals. This is when it starts to come together, get very excited. This yellow is so beautiful. I'm using my permanent
yellow deep, and I'm just going in and I'm filling in the second
layer of petals. So I'm going to probably go every other one and then skip, and I'm going to go back into the previous petals with
water or something lighter. So I can achieve a little
bit of the overlap effect, but just keep it soft, so it's not so strong. I'm going to add water every now and then and pull off pigment, and then I'm going to grab
other colors and load them in. I'm going to keep my tips
very light in some places. And I'm also going to add in a little bit of that
burnt sienna so we can get the wash from the
center to flow into the petals. It'll just keep it harmonious. Also, I just want to
remind everyone again, I am still using my
graphite lines as my guide. I am not free hand
painting right now. I know it's so hard to see the graphite lines in the video, but know that they are there. I just erased them down so much that when I'm done
with the final painting, I don't see a bunch
of graphite lines. I'm going to keep on
adding petal by petal, I might start to work into the other petals that
are completely dried. Little by little. I'm mixing the permanent yellow
deep with the lin, and I'm also grabbing some of that burnt sienna wash
in the middle to give some depth and also to flow from the center
to the leaves. Just keep working in a circle. We're working very slow. This is your Zen
zone. Just enjoy it. Enjoy going back into the
petals and working them again. Sometimes you just need
to grab a little bit of water to blend it all. So you can see that I'm
starting to get some of those beautiful overlaps that aren't strong, but
they're there. I'm just grabbing some of the burnt sienna so I
can pull it down from the center of the sunflower down through the petals,
that'll help blend. And I'm just adding
and subtracting. That is all water color is, especially when you're
working in layers. You're just adding
and subtracting, and you can use your
water, you know, to kind of move the pigment
around as you wish, and you can also lift off with your brush and then
put it on your rag. Yeah, this is really just
having fun, following a guide. We've only used three colors so far throughout
this whole thing. Keep working in a circle, just to build up
all the layers of color and make sure you keep all of the
petals the same length, follow your sketch guide. Little by little. You'll
start to build it all up. Painting these
sunflowers is making me feel very happy and cheery, and I'm reminded of all
of the times in my life that I've either received sunflowers or come in
contact with sunflowers, and they're just such a
special flower to a lot of us. I think it would be
really incredible if you made one of these
as a gift for someone. Feel free to take my drawing, do your painting, and hand it to someone else because
that is your creation. I just got you started
with the drawing, but really, this
is your painting. I also love that sunflowers can symbolize many different things like positivity and strength, joy, and optimism, resilience, I see a lot of hope
and warmth in them. And we actually have them
locally all the time. So I love picking them
up in the grocery store. And that's why I have these lovely sunflowers
to paint with here today. I love having that live
reference on the table. It just gets you so inspired. So definitely try to have the
live reference if you can. If not, just make
sure you print out full color photographs and have those at your desk
to work from, too. Sunflower petals aren't
perfectly uniform, and some might be a little
bit longer, some shorter. So keep that in mind as you're painting
these in a circle. They can all be a
little different if you go outside of
the graphite lines. That's okay, too. It's going to keep
it looking a little bit more real and natural. So I'm still just tweaking
all of my petals. And some areas are drying. I'm going back in while
they're still wet, almost totally dry, and
I'm pulling off pigment. So it gives some highlights. You can also dabble
a little water in. You can dabble some of this
burnt sienna in for lines. You'll see it starting with
the depth that I love that. I love when it really starts
to come together like this. Just keep moving
the pigment around. There I'm adding a
little bit more yellow. See those quick lines. They will show up too. Quick little lines. Let them dry a little, and then once they're
almost completely dry, go back in with
your dry bush and lift some of that pigment
out just like that. And now you can
see how the petals are starting to take shape. Don't worry if you see the
pencil lines underneath, they are going to
fade away over time. And whatever is remaining on
the outsides, like I said, you can go back with
your white Stler eraser. I love the white Stler erasers. So yeah, just take your time, keep going around in a circle. And you'll notice my
tips are not rounded. They're very pointed, that
is trademark of a sunflower. A lot of these trademark things and plants, just
be aware of them. I like to joke and say, Oh, I am the sunflower because
I just really study them. Sometimes I'll pull
the petals off, but just become the plant. And then when you're painting, you'll understand the form and the growth and the color
and the way it all shifts. But nature so
beautiful to paint. I love these cheery yellow,
beautiful sunflowers. We are still continuing
in a circle. We're just perfecting all
the little sunflower petals. I'm using my pale areolin, all the way to my
permanent yellow deep, and I'm still grabbing
just a hint of burnt sienna here and there to connect the center
to the petals. And I love these soft
overlaps that I'm getting. So now I'm laying in the burnt
sienna darker and darker. If you notice, I'll start
laying it in light, and then as I move around, I'm going to keep on adding
it in darker and darker, and I'm just building that up. Because watercolor is all
about depositing the pigments, removing the pigment,
adding the pigment. It's a dance in pigments. T brush has been one of my favorite brushes
to enter my studio. It is a quill brush by Jacksons. What I love so much about it is the belly of the brush
can get really full, which means it can just
hold a lot of pigment at once without dispersing
it all at once. It can really sit
there and hold. So I can go through multiple petals without
grabbing more pigment. Now, if I wasn't using so many different
colors of yellow, I would probably work with it longer before I put
it into the palette. Another thing I love
about this brush is the fine point tip, even though this brush is full belly and has such
a wide disperse. I can come up and go to the tiniest little
point at the end. This brush is fantastic. Now you'll see me. I'm just going to keep on
adding in the dark. Okay. Look at that umbra. It's starting to take shape. And I'm still pulling off. Now you can see as well why I chose to go back over the petals that we did
in the first wash, like the first layer
of petals because I'm pulling off pigment and I'm
getting really cool overlaps. You can be a bit more dramatic with the overlaps if you'd like, but I wanted it to
feel very soft. So we are about 75% done
with painting the petals. And once we're done
with this wash, we're going to be
completely done. So I won't be going back
into the petals again. However, these bleeds come out is how I'm
going to keep them. And this is a little
bit more technical. If you took my first class, which was radiant roses. You know that it's a little bit more expressive and loose. It's definitely a lot faster. This is a more manicured
technical approach, which I actually like
working both ways. I can work very loose
and expressive, or I can be, you know, very technical and getting
every little thing right. It depends on what day it is. I think we all know
what that feels like. Especially artists that work in so many different
mediums and styles. It's okay to work in
different styles, too. I also think as artists, we get hung up on having that
character signature look, and I think it's okay to be working in
all types of styles. You know, let your
mind wander and just experiment with whatever you want to experiment with. I went to a Dolly exhibit, and that really was a point
when I started to realize how many different styles and phases we go
through as an artist. He had everything. Tiny paintings to mural
wall size paintings from sculptures to
painted match boxes. I mean, there was everything. So, you know, don't
put yourself in a box, experiment, have
fun, try new things. I love doing all
that in my studio. So now I'm just still
filling in some of these little
burnt sienna moments just to give a
little bit of depth. And I want to bring that
center out to the petals. So that little wash
color that we mixed up. Isn't that amazing?
We are only using this 17 well palette to achieve one giant sunflower head.
You don't need much. Watercolor is a
wonderful medium. I love all of the cool effects that you get from watercolor. T. And sometimes things happen. And you don't realize that it's going to turn
out the way it does, but it's like it's like a
Bob Ross happy accident, and you just embrace it. I can barely contain myself
right now because we are just about done with
our second layer of petals. And I am so excited to see
that center come together. I cannot wait to show you
this stipple effect on the center that I have in mind for our second
wash on the center. So we're almost done. I'm just
going to add a little bit more of this Siena in a circle. Just do really quick. A couple little lines here,
a couple little lines there. And I'm glad you
guys can see now. This is just a slow process, and just sink into your seat, have your cup of coffee, your cup of tea, and just move these
pigments around slowly. Don't be too rushed to have something
come out so perfect. Just take your time. If it's wet, you can
still work in it. Once it starts to dry, all you have to do is apply a
little bit of water, right? Just go over the same areas that have water color in them. But yeah, this is
just about done. I'm taking a final look at this. Yeah, just a couple
of pull offs, right? Just some highlights
I want to add in. But I'm feeling good about it. And also, don't forget
this is going to dry a little bit lighter
than what you see. Just making my
final little marks with that permanent yellow. And if you notice, I'm going in one little swoop of a line out from the center just to give some cool effects
because those dry, that pigment will dry, and
you will see those lines. And I'm also still pulling
off pigment as I'm adding my last few marks to
my second layer of petals. And after this, I'm going to
go back into the center for my second wash and start
building up the seeds even more. I feel like this is
so close. All right. I've got my entire second layer of sunflower petals complete. Now let's jump back
to the center.
6. Adding Details to the Center: Second Layer: Okay, now we are
back at the center. I'm going to pull some of this burnt sienna that's
already in my palette. If you need to add a little bit more to make it
darker, go ahead. So this is going to be our
second layer for the center. There's still going to be
a third layer because we want to make it gradually darker because we want to preserve that white on the very
inside of the head. Almost like the
sun is shining in. I want to have a nice
highlight there. So layer two is going to be
a medium burnt sienna wash. So let's just swatch
this just to make sure we have the perfect medium wash. I like to just keep my
little swatch card handy. That helps keep all your scraps. Don't throw any paper away
without making it a scrap. So just keep mixing around, no globs, get it on your
brush, a fair amount. And we are just going to
head right into the center. So using a vertical hold, go ahead and lightly tap. I'm going to stick
in the darker areas. You can see where I already
place some of those lines. And I want these to come off in a stipple effect because
I thought that would be cool for the middle
of the sunflower. When you look at
it from far away, you can almost see all
of those seeds forming. So that's why I'm
using this technique. So don't cover the entire area. We're just going to loosely use this medium
burnt sienna wash, and I'm barely
kissing the paper. Also keep in mind
that watercolor dries about 50% lighter than
what you put down. With the exception
of pure pigment, which is, very, very dark. A lot of these washes. Once the water dries and
it's completely gone, then you're left
with the pigment. So this is about a 50% wash. So it's going to
dry a lot lighter. So just keep on adding, and I'm going to go around in a circle and get all
of those dark areas. Then I'm going to
hit the center. See, now it's really
starting to come together. This is the part that
really excites me too. When you can see
things take form. You're like, Oh,
yeah, we got it. So just keep on going
around in a circle. I've added even a little bit of water on my brush in there. I'm not sure if you saw that. So we just keep stippling. Take your time. There is
absolutely no rush here. So just keep on going
around in a circle, and you're kind of just going to use your intuition a little bit here too as where you
want the highlight to be. Just don't hit that highlight
too much or you'll lose it. This brushwork and this
sunflower is now starting to remind me of Vincent
ango's sunflower paintings. You'll have to take
a look at them. And now in my head,
I'm like, Okay, I want to paint a whole
arrangement of these sunflowers, like in a vase, just
like he painted. You'll have to look them
up. They're so beautiful. I love Vango's work.
I love impressionism. So this is kind of
probably coming out of me because I love
early impressionism. So just keep on adding in a little tiny dot here and
there through the highlight, so you don't have two
totally different areas. You just want to start
to join them up. And that's just done by carefully placing in one
little dot to the next. Now, some of these
dots are going to start to blend together. So it's not going
to be total dots. You know, all tiny
separate dots. They're going to form together, and the water is going to start to flow
through all of them. And you'll get a really
cool effect from that, especially when like, some of the darker pigment moves into
some of the watery pigment. I love that. That's
why I love watercolors specifically for all of the
bleeds and the nuances. So it's really starting to come together now. I'm getting close. Just a few more little
marks here and there, and I think I'm going
to be done with the second layer of the center. If you need to stand
up and you know, stand back from your painting and look at it from far away, you'll see more that way. But yeah, this is just a
couple of little dots, and I am pretty much done. Next up is the stem and leaves. I'm so excited to get some
green into this painting. Oh.
7. Painting the Stem and Leaves: Okay, now it's time to trade out our yellow palette for
our green palette. We've got this gorgeous
sunflower head, and it's time to add
the stem and leaves. I'm just getting my
palette situated, and I'm going to
change my water out. I don't want any muddy
yellow coming into my green. So there's a nice
clean jar of water. I think I need to refill my palette with the hooker's
green that I'm using. I need to make sure I
have plenty on hand. This palette is dirty, but it only had the hookers green and some of the yellow from the sunflower
painting that I mixed. So I'm going to grab some
more of that yellow from my sunflower palette and
put it in the middle well. Let's friend that off. And then I'm going to
add some hookers green. That's where I keep
my pure pigment right there in that well, and then I mix all the other
colors in the other wells. So just rinse your brush and fill some water in
the remaining wells. This is just going to be
our light shades of green, medium shades of green, and darker shades of green. It's a very similar
color we're mixing. We're only using
hookers green and some of the yellow from
our sunflower palette. So not too much variation. So mix down some of the
medium wash in that well, and then we're going to mix the lighter wash right above it. I'm going to grab a
little bit of that yellow to knock that green down. And the reason I do that is because you want your
sunflower petals and the sunflower center to be harmonious with the hookers
green right out of the tube. If you mix that together, it's just instantly going
to make it harmonious. So I've got my swatch card out. I'm going to put my
medium wash down now. So see, that's nice. The light wash to
the medium wash, and now I'm going to
mix up my darker wash. So that's a really nice color. I think I'll add in
a little bit more yellow from my other palette. I just wasn't looking
for a too vibrant green. I wanted just, you know, a little bit of a yellow green, just to, you know, keep it nice and cohesive
with the sunflower petals. So if you can see now, I have a dark and medium and a light wash in my palette
and they're ready to go. Like I said, I use a lot of liquid in my
watercolor painting. You can make jars. You can store all of
these colors and jars. So you just open them up
and they're ready to use. I find color mixing
really therapeutic, so I love mixing these wells. Every time I sit down to work, I love to sit and just mix colors and just never know
what's going to turn out. So, yeah, that's a nice
little light wash there. And this is looking
good. I'm happy with it. So just rinse my brush off, and I'm going to start
painting the leaves. My sketch is lightly
drawn on my paper. I know you can't see it in
the video, but it is there. It is totally my guide. I am now picking up some
of my light light wash. I'm going to work
on the left side of the sunflower leaf first. So see my vertical hold. I am going to be very precise. I want to preserve some of the veins from the
sunflower leaf, and I'm laying in
the light wash. You can see how light that is, and I'm avoiding some of the graphite lines
for the veins. So you'll see a lot
of people think that my leaf vein work
is done in white paint, but it truly is just avoiding
the watercolor paper. It just makes for a
really cool effect. It makes the leaves stand out. It makes everything prominent. I'm just adding a
little bit of dark probably some medium
and some dark once I get into the corners
of each little leaf. I love this brush
again because it has the ability to fill
up with a lot of pigment, but it doesn't disperse
it all at once. It isn't controlled. Now I'm going to
grab that dark dark. Look, I'm just
popping it right into the corners of where the
leaf would be at the center. So that's just going
to give some depth. I'm going to move that around and keep placing pigment in. So you'll notice I
do a lot of strokes with the light wash, and then I go back in
and add all the darks. See how it's already
giving that depth. And by pulling pigment off, you can create nice
little highlights. So It's fun. Watercolors fun. You're playing in a puddle. That's all you have to know. You're just playing in puddles. So therapeutic. So I'm just going
to work around, see how I'm working in kind of it's almost like doing
one of those mazes. It's just weaving in and out and avoiding the white lines. And I'm going to
keep adding dark and all of the center
areas to give it depth. I do love how this
green came out. It's got just a hint of that yellow from
the petals in it. So it's going really
nicely together. If you look at the sunflower
and then look at the leaf, they are the same
amount of vibrancy. And what I mean by that is, in terms of just being
a vivid vibrant shade, they match, they line up. Because sometimes if
you use a more like neon too vibrant of a color against a subtle color or like a more neutral color, it just won't look
right, so you want the vibrancy to be the same in your subject, especially
with botanicals. So just slow and steady here. One little mark at a time. Try to preserve
those white veins. That's exactly how
I get my white. Now you know. It's
not that I'm using white guash or white acrylic at the end to paint my veins in. It's really just the
slow steady work of avoiding the
white of the paper. You could also use
some liquid mask. But I typically don't because it looks different
than my brush strokes. So I like just doing it by hand very precisely like
this, just painting slow. Oh, This is really starting
to come together now. I love when you can see the green and the yellow
interact on the page. Sitting side by side, the plant is coming to life. So just slow and steady.
Don't be in a rush. You know, just enjoy painting. Moving your brush around. It is so therapeutic. I hope to get everyone
into watercolor. It's a medium that has
brought me so much joy. I used to paint an acrylics, and I just love the cool effects you can
get with watercolor. The ease of cleanup
really did it for me. I remember having to spray my palette down with
my acrylics all the time, and you can just reactivate your water colors like at your convenience.
I just love that. And look at that. Se See all the depth. So I just know, using that dark hookers green on the very inside edges of
the veins and the leaves, and I'm, you know, keeping those cool highlights. So I'm just finishing
up this last leaf, and I'm going to
add in a new leaf. So I'm going to put the
stem in the leaf first. And then I'm going to
fill the main stem. So I'm grabbing the
medium green wash, and I'm going to kind of bleed it into the original leaf
see it was still wet, so I love the
overlaps like that. I'm going to kind of just
let them blend together. And then I'm going
to add in some of the light wash and
continue to move around. So little by little, I'm just filling
this entire stem in. And if you notice, you'll see my hand occasionally on the table
while I'm painting, and that's just to give me a little bit of stability
and more control. Just be careful that
you don't smear your palm or anything
through the painting. But that is a good
little trick if you need more control and you're having like a shaky
hand or something, put your palm on the
desk or on the table, just like you see me doing here, if you need just a
little bit more control. So I'm just laying pigment
down and then pulling off. And now I'm going to work on
the remaining two leaves. I'm going to kind
of simultaneously, you know, manipulate the
pigment in the stem as well. So I'm just grabbing
some of the dark dark, and I'm going to add some of those cool little points that you see on the
sunflower stem, just to make it look real. I also think they make
it look less perfect. You know if something has, like, a little jut out or you know, some little imperfection, it makes it look
more believable. Nature is perfect, but
it's also imperfect. So keep that in mind when you're painting that your strokes
do not have to be perfect. So I am working into this tiny little
leaf very carefully. And notice how when I get
to the tip of the leaf, I pull up quickly, and I let the tip of the brush kind of
dance along the paper. The tricky part of
this little leaf will be to preserve the veins, and I'm not going to
drive myself crazy. I'm going to do my best, but it's not going to be 100% the exact graphite
mark that's below it. That's okay. Sometimes those little
happy accidents look so good in the end. You'll see I left it light
on top and now I'm going to go back and add the dark. Just to give it a
little bit of depth. And I think everyone is
going to want this brush that I'm using because you all
can see how amazing it is. I love two brands, and this is actually a new
brand that I just tried out. It's called Jackson's. I think what I look for in
a brush is if it can be used in technical work and
also used in expressive work. And this brush just
fits that bill. It is a mix of synthetic. So I'm sure you can see the
ability to lift off with it, and then the ability to put more pigment down
with it is amazing. It's really just a dance of putting pigment on
just like this. And then pulling pigment off. I'm also adding a
couple little lines just to see you know, some of those little strokes, the natural strokes in the stem that you see
in the actual plant. I'm so happy I have the
sunflowers on my table. Having the live reference
helps me a ton. And you really don't have
to have the live reference, but it is good to work
from photographs. You need some sort
of inspiration on your wall or on your
desk around you to get you painting and in
the mood to work, too. So I'm just grabbing some medium pigment
and light pigment, moving around, and I'm careful not to disturb
the main middle vein. I did actually miss a couple of my graphite
lines, but that's okay. I don't want it to be perfect, so I just let it go, and I keep on moving. Dropping pigment in,
and then pulling out. So that started to dry a bit, so I'm adding a little bit darker of pigment
to those spots. We are really getting
close, folks. We are right at the very end. This is usually the
part of the painting that I tell myself
to remain calm because my hand kind
of starts moving a lot quicker because I'm so excited that I get to see
the final result soon. So I have to tell myself
to remain steady and calm. And get to the final
bit of the painting. I am just about there. I'm adding in all
of the darks to the center to give it some depth and keeping all the nice
little highlights on the edge. And I'm still avoiding the
center vein as much as I can. The other little veins. If you miss one here
and there, that's okay. It's still going to look great. And if you have been following
with me this whole time, and you're about
at the same point, I am so proud of you. Keep on going.
You're almost there. And I hope that everyone
has a chance to upload their project in the
project gallery because nothing makes me happier
than seeing your artwork. I get pumped when I see a
uploaded class project. I love teaching. I love
spreading the joy of painting. I identify with
Bob Ross so much. I will quote him so many times during these classes
because I love that man. I just love his softness, and I grew up watching that. My dad always put
that on for me. So we're right at the end. Just going to grab a little dark and start to
create some depth there. Just a couple little spots, but I am pretty much done. To rinse my brush off. And next is back to the center for the
last and final layer.
8. Final Touches on the Center: Third Layer: Now we're going to add the
final details to the center. I'm going to trade out
my green palette for my yellow palette because I need that beautiful
burnt sienna again. And this is going to
be my very last layer. So we're pretty much done. This is only going
to take a minute. I'm going to grab see
my yellow jar of water. So you want a cool jar of water and a warm jar of
water to rinse. So I'm rinsing my brush. I'm grabbing some of
this burnt sienna, and I'm going to go right back into my center for that
last and final wash. The second layer
on the center of the sunflower head was a medium
wash of the burnt sienna. Now we're going to be mixing a dark wash for that last layer. And you can see how
dark it is right now. I'm just going to
be laying it in loosely and a little bit more spread apart
than the second layer. This is the last
layer. I don't want to get so dark that I can't
come back from it. I know that these
sunflower heads on my desk are just full dark. But if you do hold the
sunflower up in the sunlight, you will see a bigger
reflection of light. And that's what I want to
achieve in this painting. Just keep on stippling. Don't do as much
stippling as you did in the first and second layer. This one should
be a lot lighter. I'm just hitting a couple spots. I'm not going to put too much
into that highlight area, maybe just a tiny bit
to bring it together. But I'm going to keep
this very light. I am right at the very end. I might add just a
couple more dark spots, but I am right at the end. I can feel it. You just
know when it's done, and it's feeling done. So there you have it. I have completed my
sunflower painting, and I'm so proud and happy, the yellow and the green
and the burnt sienna, just looks so pretty. It's giving me so much cheer. Of course, as a sunflower does, and now I'm going to
sign my painting. Now you have a completed
sunflower painting to either keep in your own
home or give to a friend.
9. Conclusion: Reflecting on Your Sunflower: If you've followed
along this far, you've created a
beautiful piece of art. Remember, every
sunflower is unique, just like in nature. Your painting is a reflection of your personal
style and vision. Just let it flow out of you. Please share your
sunflower paintings in the class project gallery. I'm excited to see your work
and connect with you all. Engaging with other students is a great way to support each
other's artistic journeys. And if you have time to
leave my class review, I'd really appreciate it. If you enjoy this video, I hope you check out
my other classes, and please follow me on Instagram at Living Pattern to see time lapses
in studio posts. Thank you so much for spending your time with me
and happy creating.
 Jenny K @livingpattern, Watercolor Artist & Teacher