Transcripts
1. Introduction: Hello, and welcome to this
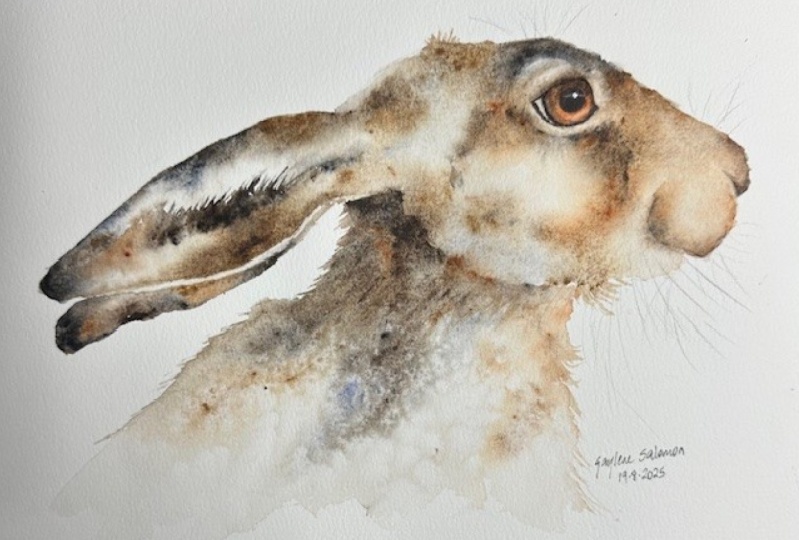
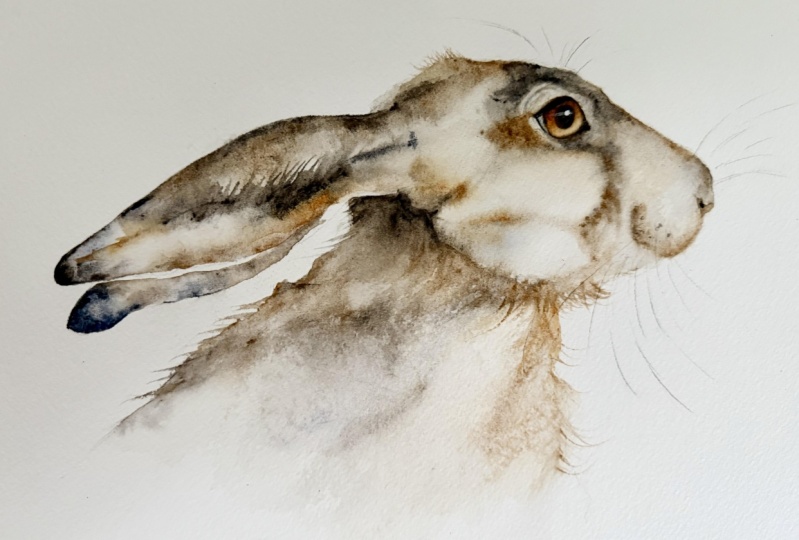
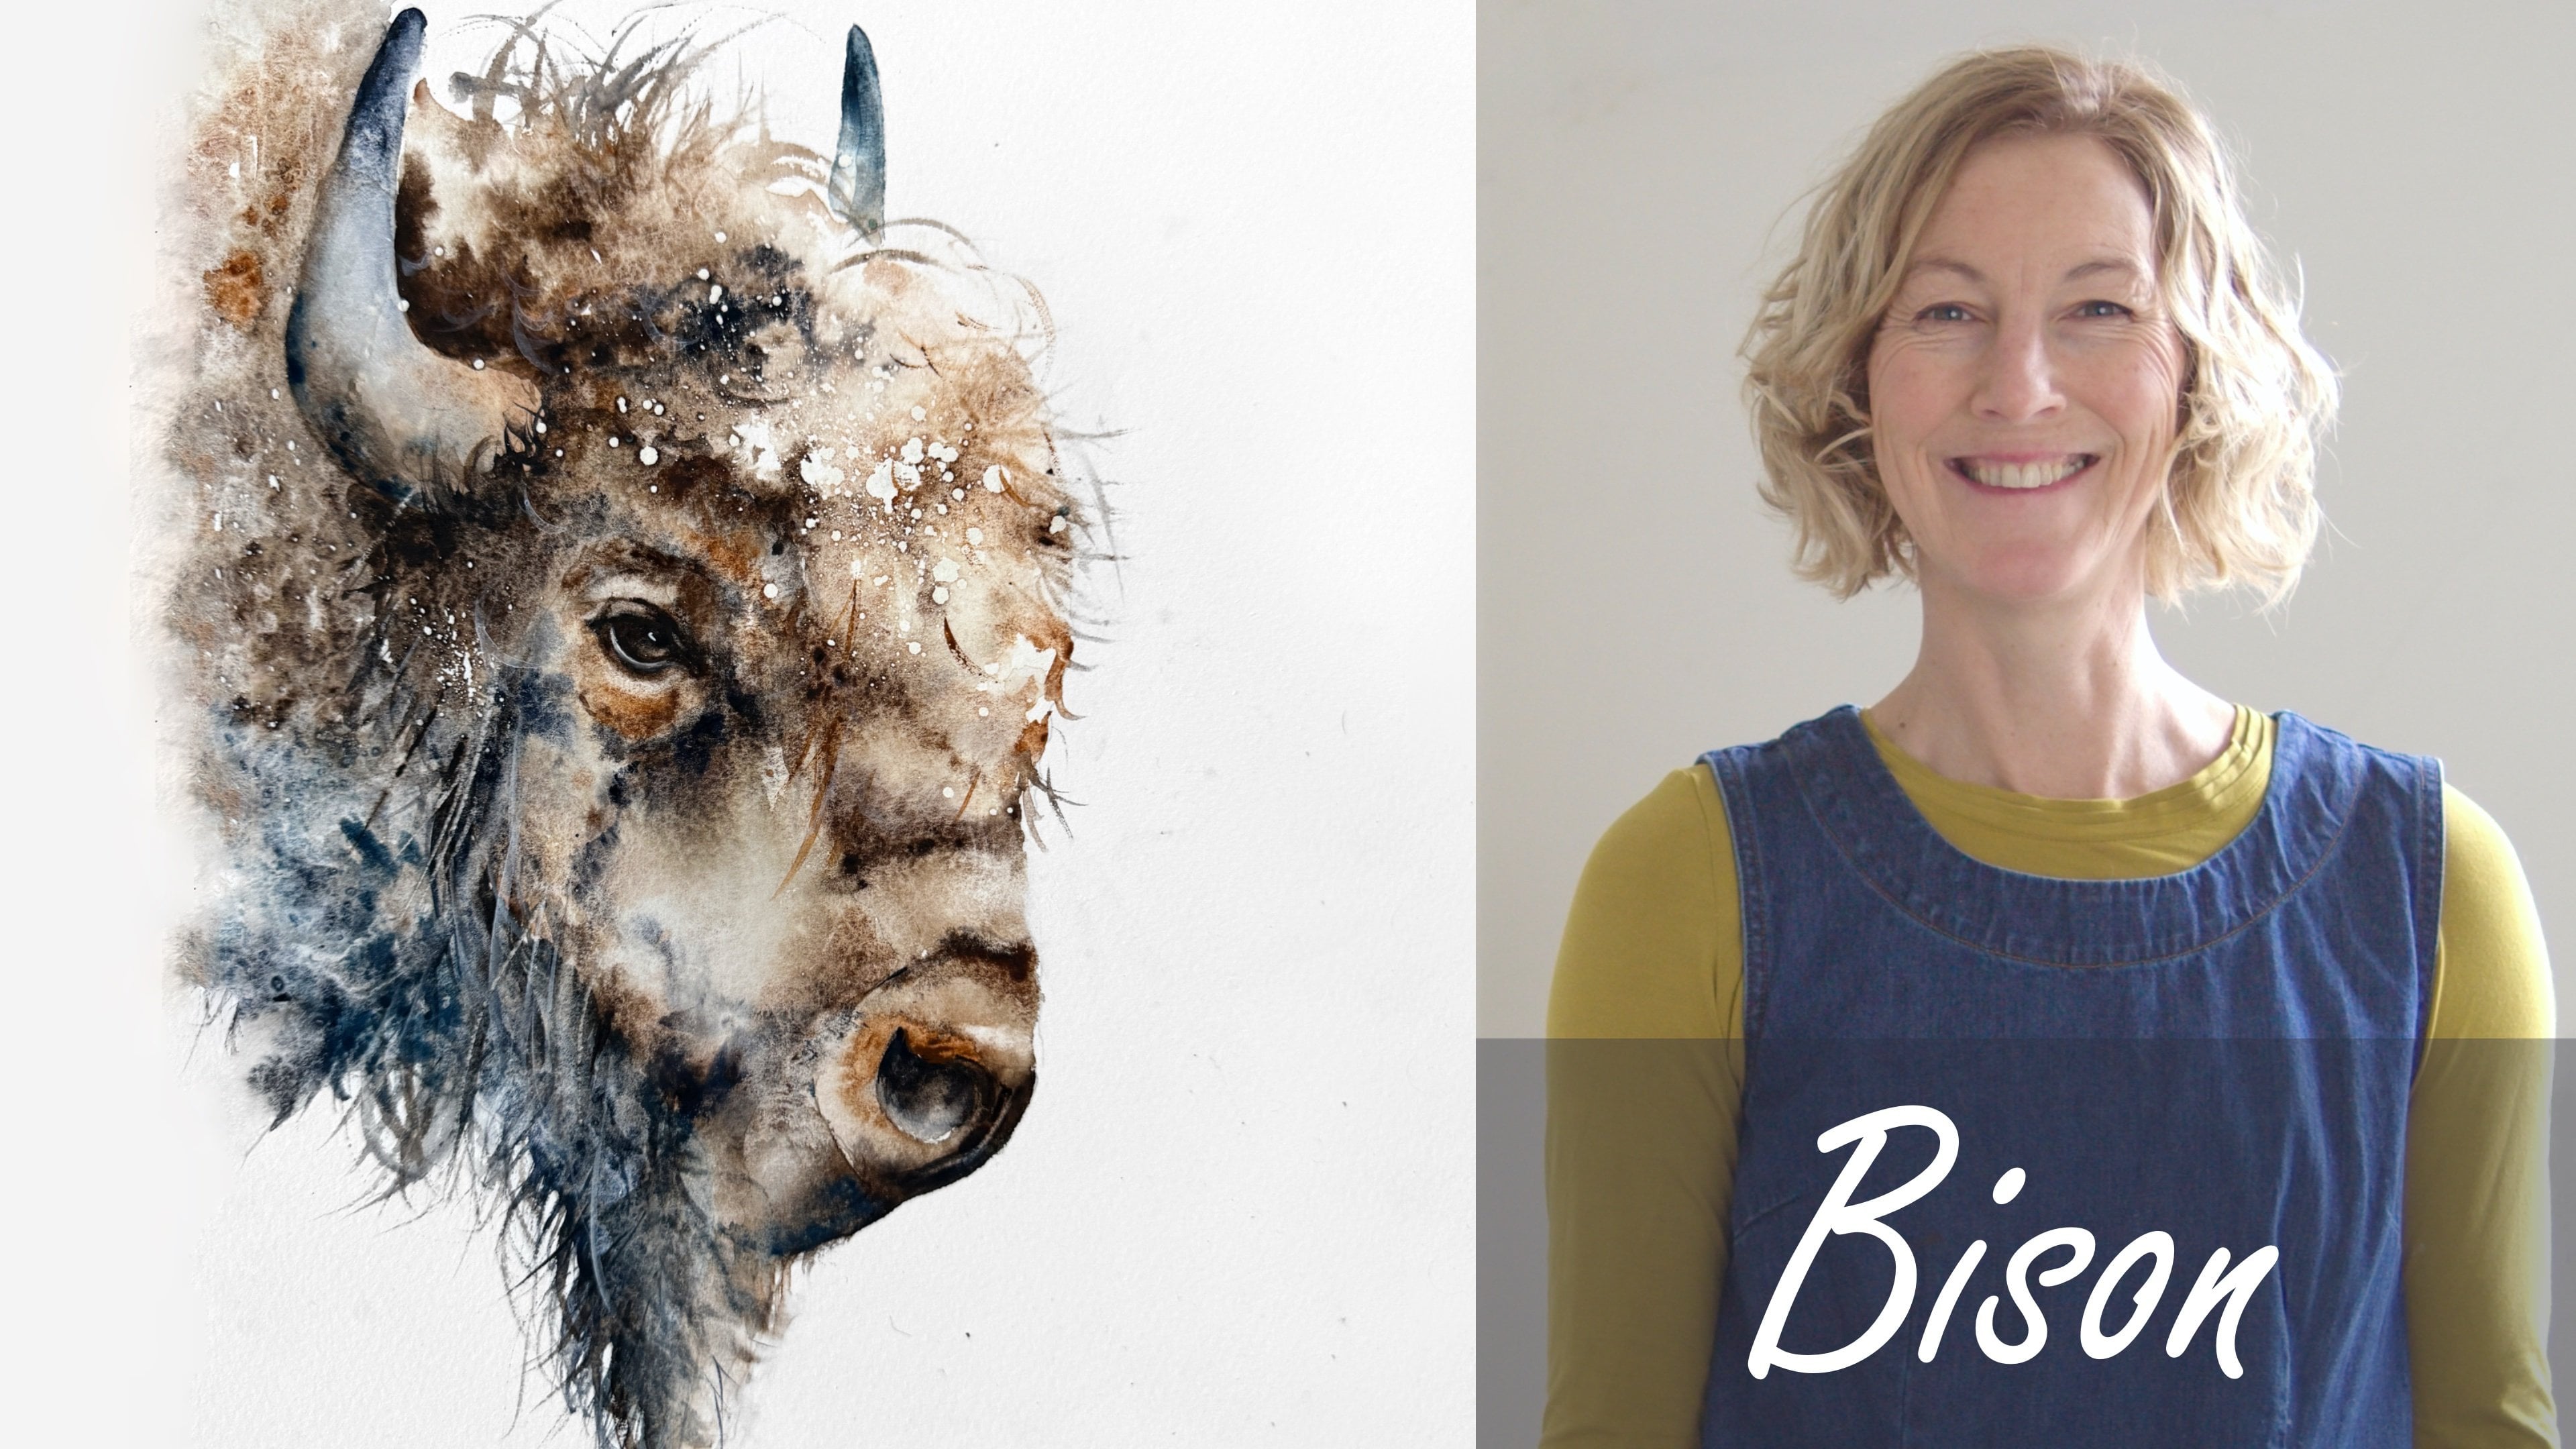
intermediate watercolor class. Today, we're going
to be painting this magical mystical
hair together. I featured it in my
popular summer workshops at the studio this year. So after that, I had a lot of requests from you to
release it as a class. So I always aim to please. I'm Jane Davis. I live, paint, teach, and walk my lovely spaniels in the beautiful South Downs
National Park in England. Over the last 20 years, I've taught myself the free flow technique that
you see today. Not having been to art school, finding my own way has been
fun and sometimes daunting, but has allowed me to
develop my own style. This has led me to teach others either on a
one to one basis or as part of a group in a wonderful studio in the
heart of the South Downs. I also run a successful
art business where two days are never the same from the thrill
of exhibiting to painting pet and
wildlife commissions in my own home studio. In all my classes, you will follow
along in real time, where I can guide you
to keeping your work loose and fresh
without overfussing. If you're just starting out, my three beginner classes
will guide you with your first masterpiece
painted in only 15 minutes. Then you'll find dozens
of my master classes available covering a wide
range of beautiful subjects. In each one, I share the techniques I use in
my own professional work. We'll have a lot
of fun together, and you'll gain the
understanding and confidence to
incorporate everything you learn into your own work. You'll be amazed at how
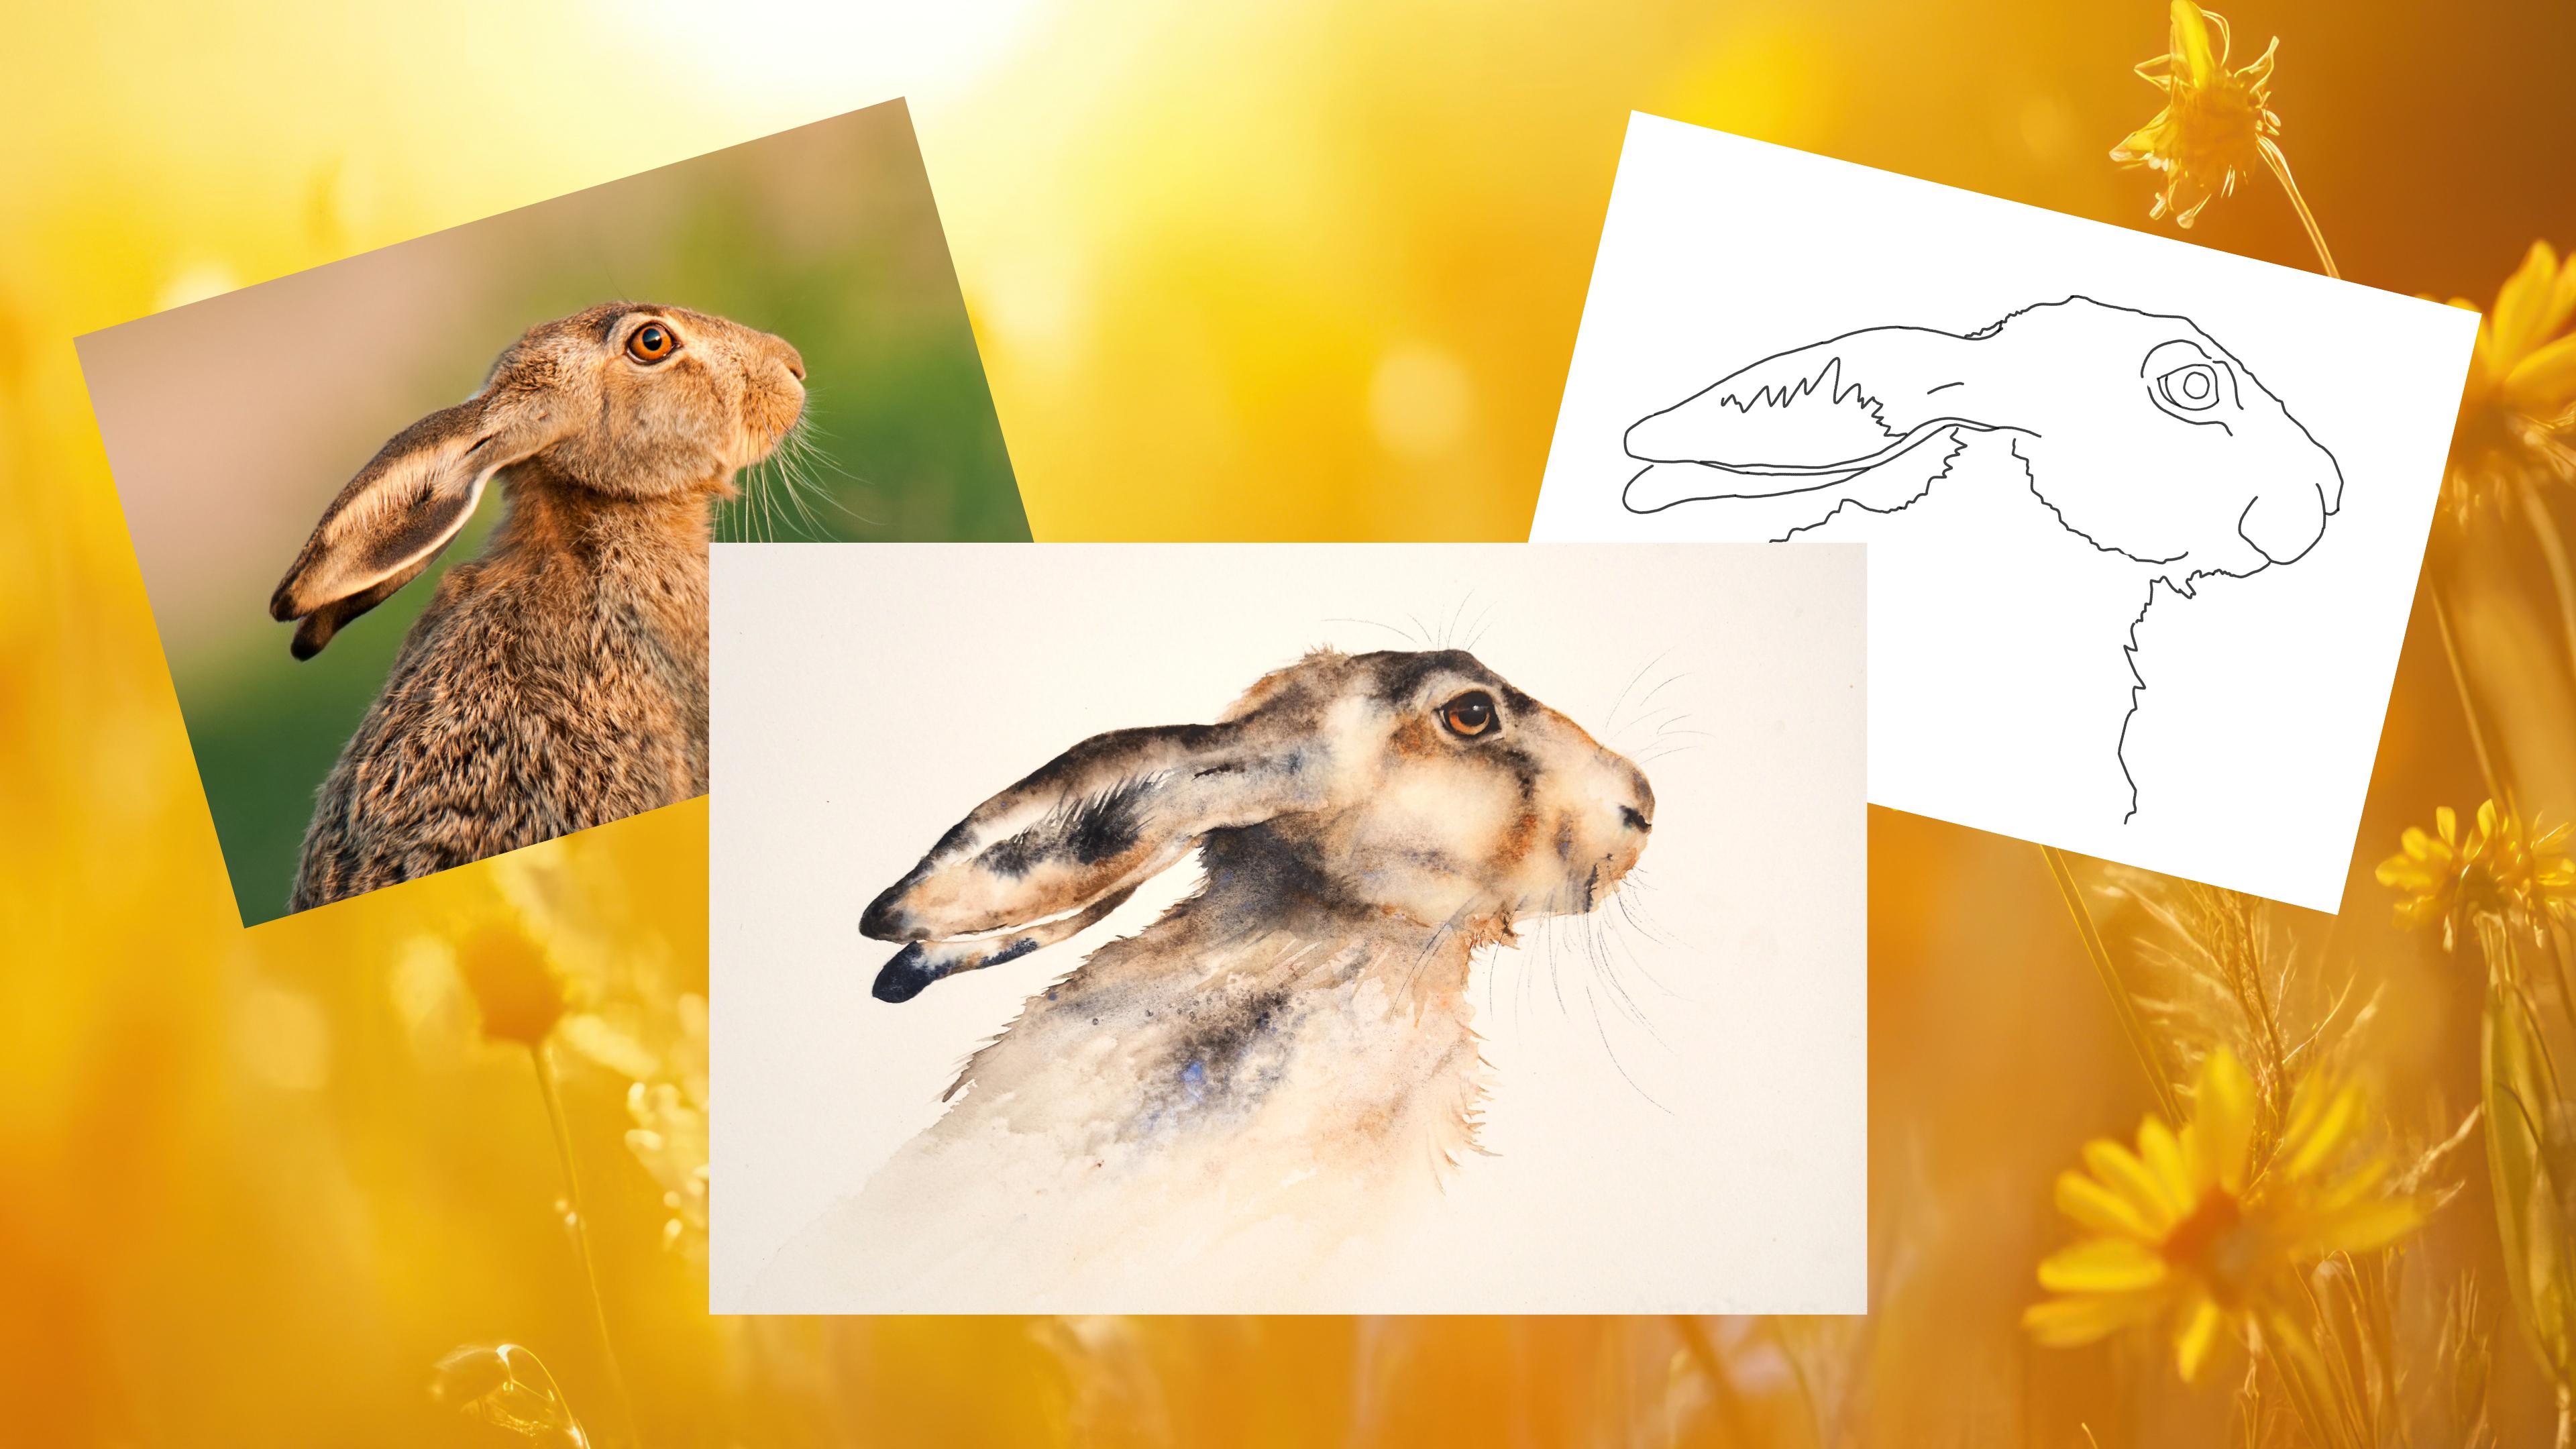
easy watercolor can be. As ever, I provided you with
a wonderful reference photo, along with that downloadable template for you to print out. The template will give you a stress free drawing so you
can just enjoy the painting. I'll be showing you how
to use salt and gravity, giving your hair that
fabulous feeling of movement and texture. We'll be sectioning areas off, and I explain the hows
and whens of joining them together to create
that wonderful sense of magic and ease. I will demonstrate how to
create gentle layers with colors to softly build
up depth and definition. And, of course, I'll be showing you how to create
that wonderful, all important character for eye. It's easier than it looks. If you'd like to learn
more about me or my work, then please pop
over to my website at Jane Davis watercolors.co.uk. This can be found
on my profile page, along with the links to my
Instagram and Facebook pages. I'm very active on
my social media, where I love to share my art, especially on stories
with many ideas, works in progress, and
tales of judio life. I really hope you will share all your paintings on the
projects and resources pages. I love seeing your masterpieces. And don't forget
I'm here to help if you get stuck or
have any questions. I want you to experience
that buzz of painting in this liberating wet on wet loose style. So
come and join me.
2. Materials: Right, let me run through
all the materials you're going to need to paint this
rather beautiful hair. As ever, I shall start
with my collection of paint all Daniel Smith apart from a little
bit of white grah which is Winsor and Newton. So I have quanacrodome,
deep gold. I use it a tiny amount,
mainly for the eye, and I do use it in little bits, but be careful if you're
using the orange. I obviously can mix with the lavender and give you
a slight green tinge, so it's only used a little bit. I've got the sepia. So like genuine. So you can see where I'm
going with this. It's a firm favorites
of mine, all of these, a lavender and a
Goethite brown ochre. Again, these are all on the
projects and resources pages, so they're there for
you to refer back to. My paper is Archers, and it's only 90 pound, actually, but it's
been stretched on a perfect paper stretcher. Again, I'll pop a
link on that on the projects and
resources pages for you. I've just noticed off
camera. I didn't add that. Um, there's obviously
a little pot of water, salt, table salt,
nothing fancy in there. Simple rubber, a little pencil. Don't go too hard. Something that's sort of soft, so you can easily rub that out. I have got this is a
Panart, um, dagger brush. It's not particularly fancy, I must admit, but I've
really enjoyed painting it. Obviously, you can
see holds, you know, enough water for doing
smaller subjects, and it's got a nice point, so I do use that a lot. But if you haven't a
normal round brush, it's absolutely fine
and you probably need. And I do use trying
to get hold of this. And I do use this, and
it's just a number naught. Again, for tiny eye details, little bits of actually I don't use them
for the whiskers, but potentially
for the whiskers, little bits of flicks, as well. So a little brush is used
for if you haven't got a dagger brush or things. I have paper towel, kitchen roll that's like
a little trusty heart, and it's about an inch high. I use that to simply tilt my board to give some
movement to the paint. But down and I have got a
rather delicious pen by Topdrawer and the
company's Cola Koala. I haven't quite pronounced it. They very kindly gave
me it to try out, along with some of their paints, which I go into a little
bit later on in the lesson. But yeah, a lovely foundry
pen and a real sort of nice keepsake and beautiful
to to write with. But if you haven't obviously
got anything like that, I use pencil for the whiskers. You can use a fine liner pen, which I have used in
many other classes. Or if you have a fountain pen, it doesn't have to be
obviously one of those. They're great for doing whiskers hairs are all about the
whiskers, aren't they? They have so many
beautiful ones. Um, what else is there? The reference photo
is on the projects and the projects and
resources pages, along with a downloadable
templates so you can just get your drawing down
and get it all right. And I have got a hair
dryer off camera just to just dry a couple of little
bits in between layers. But it's quite a good
flowy class, actually. It's not too much time having to allow paint to dry before you can move on
apart from the body. But you'll see as you work
your way through the class. So yes, let's go
and sketch him out.
3. Sketching Out: So on to the all important
sketching outbit and the most probably, like I say, probably the most important part of
this whole class. And then once you got this lovely sketch down,
you can kind of relax. You can enjoy the painting.
But it's really critical. You get all the lines right, and we've sectioned the
little bits off that need to be sectioned off.
And we can relax. So I will hopefully go through
and point out any bits that would be helpful for you to particularly
pay attention to. I'm going to start with the eye. Now, the reference
hair you have isn't quite the one I had
intended to use, we had a lovely summer workshop, and I was kindly allowed to use a beautiful hair
reference photo. Unfortunately, I couldn't use it for the Skillshare class. So I found another
hair who's very close, but I have taken the eye from the um the summer workshop hair. So your reference photo hair has a slightly different eye, very, very it's only minor. But I would get this le sweep just so it tucks in a
little bit more here, and it's a little bit
pronounced at the top. You'll see if you open
up the reference photo, you'll see, it's a little
bit different shape. And the eye boy is also a little bit more further forward. And I've got a little hump
that sits above the eye. It just helps break
this line up. The reference photo
is a little bit one. Um, kind of continuous
line where. That just breaks it
up, and I like the lit the little sort of feeling
of character that bought. Um, we will also section off in one of the
layers, this little white. It's a really obvious
thing with the hair. They have these lovely sort of white markings and
darker patches. So just get that little one in. That's a useful little
part to make sure he's in. What else is there? Just the very obvious
lines, the headline, because we'll be sectioning
off the body and the head and this line here also
that runs there. That's a useful one to get in. Obviously, the
shape of the ears. And we'll also be section
a little bit off here. So just make sure you get
roughly where those flicks are. It doesn't matter too much. Every hair is going to
be slightly different, so don't get too
worried about that. And again, I know I always repeat this if you
follow all my classes, sketch your little
hair out, step away. I feel like I broken
record sometimes, so excuse me, but go
and have a cup of tea, go and wander around
your garden, come back, then look at your hair, and just check you're
happy with it. Even maybe you've created
something that's a little bit different than
the reference photo or even my piece,
but you like it. As long as it is
pleasing to you, that's absolutely that's brill. So yes, just be happy with
your sketch before you start. It's, it's just critical 'cause this is a
lovely loose class. We've got a nice
little bit area to allow the paint to flow. And once you're confident
the sketch is right, I just feel a lot
more happy that I can just carry on and just
go for it and enjoy it. Right. I'll see you in the next lesson before I
prattle away too much.
4. Ear First Layer: So a lovely, easy start for you. I like to be kind, and it always helps me to
get going, as well. We have something
nice and simple. We can get the paint down
and feel like we're started. So I'm just going to remove my pencil, which I won't need. I won't need my lovely
pen, or the rubber. So give my desk a
bit more space. Okay, pick up your brush, and we're going to wet down
this front ear and all of it. So there's not an
obvious join, really, so I'm going to go, which probably would
have been helpful if I even put there as
a little sketched line. Somewhere roughly there, it
doesn't matter too much. So we're gonna wreck the whole
lot down. Take your time. There's no hurry. You want it nice and wet, but not puddling. It's a really goldilocks thing. Once you kind of
get the hang of it, or while I think of it, there's there's a nice white line, again, something else I should have mentioned on the
sketching out pot. There's excuse me, there's a nice white line separates
the ear and again, another very hair like thing. So yeah, just make sure
you got that in as well. It's always quite nerve racking. I know I've done
this quite a lot, but when I start, it's
always a bit nerve racking. That camera goes on
and you're started. So, the sketching
out bit is always the first part of me talking. Lovely. What was the
saying? Goldilocks, yes. Um, Make sure you've
got it lovely and wet. So you've got a really
good sheen to it, but you don't want it
sitting in puddles. It will almost have
the same effect as if you haven't
got it dry enough. So if it's puddling and
you pop the paint on, it just sits and sort of sits on top of that puddle
and won't move equally, if you've got it too dry,
which is more common with most people don't quite get
their paper wet enough. Then it just sits, and
it won't you know, you'll tap that paint in
and expecting it to move, and it won't because it's
just not wet enough. It hasn't got enough
water to run into. So it is that sort of sweet
spot of getting it right. So a good sheen
but not puddling. Okay, we are just going to put a bit of paint top
and bottom, really. I'm going to pick up a
little light genuine. Let's have a bit of sepia and
maybe the gothte as well. Let's have these. I'll try to minimize my paint. So really we're
only working with four colors on the
main hair. The orange. I use predominantly for
the eyes and a tiny hint, so not too many, hopefully colors to confuse you. As a few of you have said,
it's almost too many colors. Okay, so I'm just tapping and
allowing that paint to run. Don't forget it moves of
its own accord, as well, so it, it takes time. Sometimes it takes a
little while to get going. Sometimes people brushes
isn't wet enough, so make sure your
brush is wet enough. That's always a good tip. Just work your way down.
Obviously, your head's got that lovely dark
patch at the bottom. While I'm thinking of
it, 'cause I might not remember this further
on in the class, there is a lovely book I finished reading
called Rising Hare. I will pop a link in the
Projects and Resources pages. But such a lovely read,
it's just magical. And if you love hairs, you'll love this you'll love the book, so well worth a read. I say, I will pop a link in the projects and
resource pages to that. Just picked up a little
lavender. Why not? So hold on my goth out, and
I got a little lavenown I'm gonna tap again at
that bottom area. Now, this little section, we will wet and add more color. So this isn't quite as important if you haven't
got it dark enough. The top is more, so 'cause we won't put
another layer on there. So make sure your
top area is nice. Say it doesn't
it's not critical. It looks like the
reference photo. If you get something
you're really pleased with, just go, yep. That's nice. I'm leaving
that. Have the confidence. Just keep your eye on
that reference photo. Bit more dark up there. I did this as a practice piece
a couple of times, and I did use some
of the orange, and I'm just looking
at my practice piece. I think I added too much, so be careful if you are
tempted to use orange. It can be quite
strong and make them. Obviously, then you're adding a little bit of bluy colour,
a little bit of orange. You can get a bit of a green
tinge if you're not careful. Okay, I think that looks lovely. It's With this technique, I said, I would say the magic is in the leaving and doing less. The more you fiddle, the quicker that magic
just disappears, and you'll lose that. That's all we need to
do for this layer. I say, I'm just putting
out a little bit more. Um, not necessarily. You don't need to
leave this to to you don't need to make sure this is dry before
we move on to the eye. As long as you're careful,
I always sort of say, make sure sections are dry. But if you want to
sort of continue on, because particularly as
you're as I'm right handed, and most of you are
probably right handed, then yes, we'll be
working on there, so there's hopefully no
risk of smudging it.
5. Eye Part One: Okay, I'm going to do the eye. Next, I know I normally
leave the eye a little bit later
on the painting, but today, I'm going to
do it quite early on. Right. Is so simple. We're just going to
with the orange, we're just going to
literally paint it in. You can put a little
bit of water. Make sure you brush it
sort of nice and wet, and we're just going to
paint the orange part in. Really, really simple. Make sure you get a good
amount of strength. And you just whizzle your
brush around around, so nice and easy. Again, just make sure you take
the time with that shape. A little deviation
on the shape can just change the whole
character to your hair. So take your time. Okay, I'm not going
to do too much sort of drying and
then adding layers. It just adds more time, I think, and it gets
a little bit fiddly. So I'm going to try and do
this in sort of one hit. But if you're more confident allowing these to dry and then wetting and then adding the strength like I normally do and maybe you're
used to doing, then, you know, obviously do so. But I'm going to continue on while that's
still nice and wet. So I'm going to
pick up my gothit, a little bit of sepia. I'm going to try and get a little bit of
strength along the top, so I'm just tapping and getting
a little bit of shadow. Again, that reference photo doesn't necessarily
show the shadowing, but I always like to
put it in underneath. What would be the
sort of eye you know, the top of the eye? It just gives another sort
of dimension to the eye. Lovely, you don't need
to do too much att. The minute you get something
that's kind of working, don't try not to overfddle it. Sometimes it happens
too quickly, you're like, That
can't be right. I need to fiddle more.
But be confident. Right. I just needs to
dry just a little bit, and I'm gonna get some sepia. And then we're going to do the eye makeup all the way around. Actually, we'll switch
to my little brush as I actually have made
the effort to add it. These are I love
this little brush. It's nothing fancy, but
I love the tip on it, and I've used it a lot recently, and it's really nothing fancy. Okay, I got my little
tiny tiny brush. Just having a look probably about ready where
you are for the UK? Super hot at the moment,
so it's drying quickly. So with this epia, make sure
particularly doing this, make sure this is really creamy. Your brush isn't too wet. She says, Just check
in wine isn't too wet. So you've got a good sort
of sticky consistency. And we're going to
start at the top, just to see how that feels.
Yep, that's doing right. I'm going to literally
go around the outside. So we'll put in what
I call a bit makeup. Now, try to go inside the eye. This is where it can
get a bit confusing. It always used to catch me out. If you go outside, then you're going to make the eye bigger, so we're going to go inside, and it just allows the
paint to soften inside the eyeball and gives us a nice sort of crisp
edge on the outside. And then we're going to
come down a little bit, and you can see
there's a nice white. Bit of where the eyes
rolling round a touch. I'm just gonna pull
that down very gently. And then there's other little
bit here that runs in. Take the brush away, as
I say, how it'll look. See how you think
that's looking. When we do another layer, we will have the opportunity to sort of sculpt this
a little bit more. So rather than ding too pinioty as long as you're
fairly happy with it, then I would leave it rather
than fiddling too much. I'm just gonna pick
my go fight up. Oh, yes, a little bit sleepier. Just make sure I got that a little bit stronger
at the top there. This is just for
me, really. I just wanted a little bit more shadow. Yeah, that's been done in, say in one layer, and we can start to take out that
little bit of light as well. While it's still damp, sometimes it's quite nice because
it doesn't leave such a hard line if you draw the paint out while
it's paper's still damp. If you do it when it's dry, which I normally
do, I must admit. But there is sometimes a risk you leave a sort of a hard line. Fabulous. Now, we just got to leave it to dry
completely now. It doesn't need to be dry
before we do the eyeball. Unlike a dog's eye, which is very lovely and soft, and I would put the pupil in now while it's
loving and soft. But a hair's eye, as you
can see on that photo, it's very exact and
very defined, isn't it? And it can be why hairs are
quite hard to paint because, yes, it's very, very exact. So I'm just gonna
allow that to dry, and I might put a little
hair dry over it, too.
6. Eye Part Two: A right. Once that's
nice and dry, I'm going to do the eyeball in Sepia actually just to
keep it a little bit warm and not too the
blue can be a bit harsh. I like the brown, even
though it's very subtle, it's quite strong, so it
does look quite dark. Now, it's always a bit scary, but I always start right in the middle and gently
work my way out. I'm just painting.
There's no wetting down. It's just thick paint. And we're just
gently coming out. Just keep taking
your brush away. It's too small at the moment. Don't be afraid to just sort
of take your brush away, have a look, see the
positioning of it. The tricky thing, as I say, is the the eye is not in sorry, the eyeball is in a
slightly different place than the reference photo. Let me let me show you. This is only a very rough Oh, let me show you
this one, actually. Hopefully you can see that. It's on a slightly
different color palette I'll explain that, yes. You can see the eyeballs
a little more further forward than in the middle,
like the reference photo. And it's probably a
touch bigger, as well. Obviously, if you like
the reference photo, then go for that and I just quite loved I loved
my summer workshop hair, so I'm trying to take a little
element from that hair. They just keep going. And err
on the side of smallness, 'cause this is probably one of the reasons I like
doing the eyes later. At the moment it's sitting
amongst white paper, there's nothing else round it to give a sense of character to it. So I'm going to leave it there and I'm also
going to leave the catch light to the sort
of more finishing off parts, and I can adjust it if I feel the rest of the painting
somehow tells me to. I know that sounds
a little vague, but, I think that's
gonna be right, but I find it very,
very hard to judge it without some more
hair around it. As in hair, the rabbit, the bet. Oh, bet. The hair. Okay, we just need to
allow that to dry, and then we can get on with
the next little bit of layer.
7. Body: Right, we're going to
do this lovely body. So I'm going to have it on
a little bit of a tilt, and we're going to dry it on
a really quite strong tilt. I'll explain more
as we go along. So again, my little heart, it's about an inch high. I just gives my paint a little more a little bit of a gravity to allow
that to run down. I paint to run down. So we're going to wet
right underneath. Sort of, um cheek area
underneath the chin. Down I'm gonna come
down about halfway. Let me put a little bit of paint roughly
somewhere like that. Don't It's not exact.
It doesn't matter. It's just we're gonna wet this
further down in a minute. So it's just somewhere to
collect the paint for a minute. And then Hovily again, once it's nice and
wet, you could almost you could almost have it puddling at
this stage, actually. It wouldn't matter because
we're gonna draw this down, so it's not quite so critical. Okay, I'm gonna pick up. Got Sepia. So like Genuine. Go you know what? I'm gonna have all four tubes in my hand at the same time. And we're going to be quite
bold up the top here. Again, the reference photo, there's some lovely light. I think it's a summer light, and I've actually
added the whole photo, so you get a more context
of where the hairs sitting. It's obviously, I
say, either dawn or dusk, but it's beautiful. But I am going to add a
little bit more strength in this corner just to give
it a little more umph. So I've done sepia and so light genuine on my
brush at the same time. Again, I'm just going to
tap quite nice and strong. Use in theory, this
paint's got to go all the way down
or some of it has. Is that nice. They just
tapping and allowing. I'm gonna go a little more
gothty as we go forward. And, you know, me, jars a little bit of lavender. It's such a pretty color
mixes so beautifully. Especially with
this Archers paper. It's a good combination. Okay, you can see that's running beautifully and what
we're gonna do. We're just going to
wet further down. By doing this now, that's giving this paint we've just applied
more room to run into, so you'll get that lovely
sort of sense of movement. Obviously, there's not
quite enough paint there, so we just need to add a little bit more
now at this stage. We can just sort of see
where it needs to go, now it's started running. And we need to bear
in mind, we need to do these flicks, as well, a little bit further down the
body because we're going to do another layer
over this section. I'm only going to concentrate on just the lower
part of this hair. I wish I hadn't put that a little bit of lavender there to show you where to wear down. I can see it. Okay, I'm just gonna come down
a little bit more, depending on how well
that paint's running. Yeah, you can you can
pull it down a bit more. Again, I definitely
need more strength, so I'm gonna be a bit bolder. Definitely need to add more. So we can get you off. I'm gonna be savetiny. I'm trying not to put too much, but tiny, little bit of
the orange, as well. I'm gonna put that
more to the front, see if we can give that
sense of light, as well. I'm not necessarily trying to pick up any of those
colors that are in there, if I'm honest or, you know,
where they're sitting. I'm just trying to get a
lovely sort of sense of flow and just something that's gonna that's gonna
sort of move and give us a something pleasing. So, it's always worth just
taking your brush away, stepping away a little
bit, 'cause sometimes you can especially
if you're sitting, it's so easy to sort of be on top of it and
not allow the painting, you know, not allow
yourself to sort of step back and see where
you're headed to. A little bit of love and, uh, Some of the workshop hairs that were painted
were beautiful. You may have seen
them if you follow me on Instagram or Facebook, you may have seen
some of the hairs that were produced.
They were lovely. And every has their
own unique style just like the
Skillshare classes. If you ever look back
at the projects and see how we all
interpretate what we see, it's just slightly
differently in people's styles, it's lovely. Okay, before I start
chatting about the summer workshop and all
the delicious food we ate. Right, we need to do a few of these little flicks before this dries, as well. So say I'm only going to concentrate on the
little lower part, I say, we'll be wetting
this part down again, so I will do the
flicks then just so they can be as
natural as they can be they're if you put them on while the paint is
dry or the paper's dry, it will look like
they're stuck on. I quite often see some people's projects where
it's done a little bit late, and you can see there. I don't know. There's a
line and then a flick, and it can look
like they're stuck. So it's always worth
trying to do those flicks, as early on so that you
get a nice, natural flick. Pull that. So the
water right out. So it's wet right
down the bottom now, and you can see, hopefully
see that's moving a little bit more again.
You can add water. You can do a droplet of water just to kind of get
some of that moving. I'd say I've got this
on a tilt this way. It's just to give a sort of a little bit of
sense of movement. I have to be careful
with that orange. It's a little bit fierce, it's put a little bit go fat on top. Now, I'm getting to the stage, if I'm not careful. This is beginning to
dry a little bit on me. I want to get some salt
down there, as well. So I'm especially as
it's so hot in here. Right, I going to leave
that all my paints down. Some sort of order. Now, I'm
going to sprinkle some salt. Now, I have cut well,
I think quite often, I add the salt while my
hands a little bit damp or sticky or wet or some
water drops in there. So it's really I say it's quite important to make sure
your salt and your fingers are dry when you add
the salt because you're then applying wet salt, which will stop the
salt effect working. It's only a theory I'm
running with at the moment, but it sounds plausible
to me. So give that a go. If your fingers are
wet when you add it, you're just putting wet salt on, so it's salt's got nothing
to it's already saturated. So I'm just gonna sprinkle
some of this salt. On nowhere particular. And I'm going to hurt. This is where it does
have to be left to dry completely because
I'm going to dry it. Hopefully, this is going to lose this a little
bit on the camera, but I'm almost going
to dry it horizontal. If you've added a lot of paint and it looks like
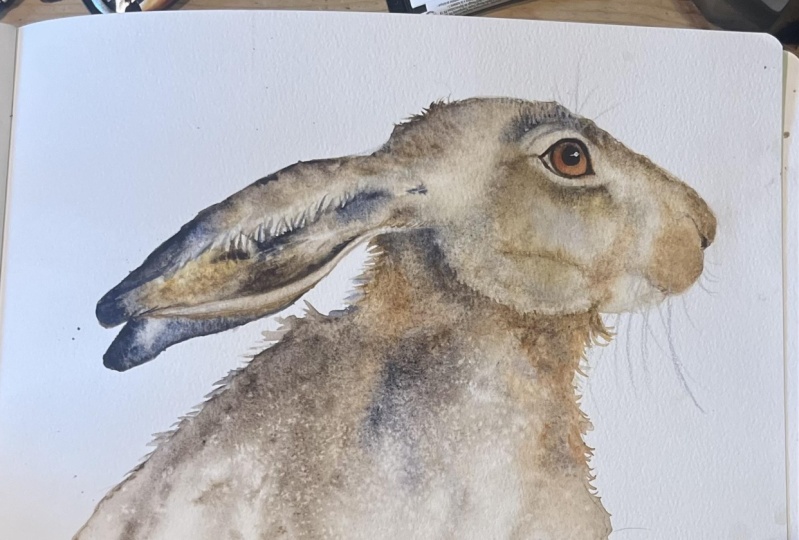
it's running too much, just lower it down a bit. But you can get some nice, um, pop that down for a second. This is my practice hair this morning on slightly
different paper, but because I let it
dry on a horizontal, you can see where the salt has given that sort of
movement as well, rather than just
sitting and expanding, it's expanded and moved down. So it's quite nice to
play around with that. And yeah, this hair painted on a different paper and different paint has worked. The paints reacted
quite well to the salt. So before this does
dry on me, yes, I'm going to tilt it right up, allow it to dry, and
then we can continue. But, yeah, I allow that to dry completely before
we start again.
8. Head First Layer and Ear Second Layer: Yay, fabulous. I love
how this has dried. I'm going to keep the
salt on for a minute, but you can see where
that salt's run. Archers and granulating
paints don't really give that very
obvious salty effect, but it's worth
playing around with paper because it definitely
has different effects. But I'm pleased with
that. It's just giving a subtle a
subtle hint of salt. Okay, we are going to put the
first layer down on this. Has face. We are going to let me
add this little actually, I'm going to use
goth see this is a little bit softer so
it won't mark the paper. This colour is just for you so you can see the
areas I've wet down. We are going to leave
that little white line. It's not really a line, is it, but you can see
there's a nice sort of creamy patch that goes all
the way around their eyes. We're going to reserve that for this layer just so
we can make sure we keep that nice area
without too much paint. So by doing this,
we aren't obviously allowing the paint to go into this area
on the first layer. So hopefully you can see that. And then we are going
to carefully wet down the rest of your hair, and we're going to touch
while I'm thinking of it. Just touch the top here. On the second layer, we'll
drop down into the body, but for this layer, we won't then just
go carefully round. This lovely little flick
that comes out here, be careful you don't
wet too far in and then end up
flicking out or wise he's going to end up with
a rather large flick. Got your hands
latching onto that. Say, take your
time, make sure you get it's like being
little, isn't it? Make sure you stay
within your lines. But yes, don't go
outside your lines, boys you'll change the
shape of your hair. We are going to run into
here as well and do those felis into the
upper part of the ear. So wet that down. Right down to the
end. I'm being random aren't not even finishing
the top of the head. We're going to reserve
that white line again, so be careful you don't
go into that white line. Separating the two ears. Yeah. Work your way up the top. Well, you may have
done the top and been a little bit more
methodical than me. And then once you think
you've wet it all down, just suck your head up and down and make sure there's
no dry patches. If you get dry patches, obviously, the paint
just runs around it. Doing likewise. I think
I've got ever everything. Now, if you're somewhere hot
like I am at the moment, where you've started is often beginning to say it's
not going to dry, but it's often just losing
some of that dampness. So just go back over it again and make sure you have
got it loving and wet. I look in that. Fabulous. Well, all we're going
to do with this layer is just to put a bit
of soft coloring in. Again, the reference
photo doesn't necessarily show the very distinct
markings they've got, but it does show a little bit. So we're going to put
those on the second layer. So this one is just to
build up a little bit of color and give us
a bit of context. So just got up my Goethite. It doesn't really matter
so much where you start. We're just going to start
adding little bits of color. So you may as well start
at the same place as me, just to say, we're just
tapping and allowing. And if you've got that
nice and wet enough, you should get that
good movement. I'm going to put a
little bit risky. I'm gonna put a
tiny little bit of orange on there. Just tiny bit. Be careful because we
don't want to green here. So just a little tiny bit. Pop that down before
I muddle it up. Got a little bit of blue
and a bit of the gothte. So you're just getting a
always squint your eyes. Ideally, you don't
want to go actually physically put paint
on the lighter areas. So as long as I don't actually there's a
lighter area there, as long as I actually don't
put the paint in there, it will take care of itself. You'll get left with
that nice sense of light if you don't
put the paint on it. I'm gonna go a little bit more lavendery at
the bottom here. You can see it's a little bit cooler at the bottom, isn't it? So just tap a little
bit of that in there. Say, we don't have to be
too strong 'cause we've got another layer
where we can add more strength if you've
been a little bit. A little bit softer, which
is a nicer thing to do. It's always easier to put more color in than it is
to try and lift it out, 'cause it's really hard to lift color out and then make it look sort of nice and
natural and flowy. A little bit more gothte. Almost missing my
extra few colors. I think I like using sort
of six or seven colors. I keep looking for
my extra colors. That's okay. A little squint. Add a little bit
of go right here. I might see just trying to
find those extra colors. I'm gonna have a little bit. Again, just a tiny
bit of the orange. I did use OsioRdGld on that practice piece
I showed you earlier, that definitely was too orange, so I think the quacodoms a little bit softer,
quite so bold. Say, take your brush
away, have a look. I'm keeping that nice sort of
light there, which is nice. Might just just gently
take a little bit of that. You can either wipe it away or actually pop a little
bit of water in because the water will push back
that paint either side. So we quite a nice way. Let's get a little bit of
strength on top of that head, so I'm going to have the sepia. I gonna bit tiny, little
bit of so light Jane. Side light enemy is lovely. It's quite strong. So
I'm going to go gentle. That's probably a
little bit bold. I'm just gonna put a bit
of got on top of that. Work my way along a little bit. I'm not going to do
any flicks, I say, the flicks are
always best done on the very last layer so
you get those natural, really lovely natural flicks. They don't look like
they're stuck on. If I do them now and
then put an extra lay, I'm then putting a
sort of a barrier. So they give the
impression that they've been sort of popped on later. Just keep that a little bit warmer's put a little
bit got in there. They just tapping. Line there. So it's just sort of building up some of the sort of
strength of areas, but I'm I'm not going to
put those markings on, but it's just looking at the reference vote and sort of getting a little
bit of colour in. Work our way around here, a
little bit go thunder there. Light genuine down
and the sepia have the lavender for a minute. A little bit of lavender there. It's such a useful
color as well, because it does push
the colors out as well, so it's useful for that, too. Brush away. You
one kind of tidy, tiny, tiny bit of orange. Just on there. That's
a little bit much. Blend it down. Sorry, that was
whispering. Blend it down. Move it up a little
bit there, line. You can see the
line running down, so let's see if we can
incorporate it there. Lovely. Okay, before
this dries, and it may? Yes, it's starting to go a little I'm just gonna rewet it. You're gonna always rewet
areas if they're still damp, and you won't get those lines just 'cause
it's so warm in here. I've obviously got a big light shining on my work, as well, so it's increasing the heat
in here today. Pop that up. So I'm gonna have
the Goethite sepia. Again, the reference to Hpo doesn't necessarily
show the darker, but I'm going to put dark right underneath where
those flicks are going to go flicking up
into that upper ear, just so it gives it a nice definition really
between the two. So it's a mixture
of the two colors. Now, if you were a little
bit lighter or paler on that first layer, then you can add a little bit more strength
if you want to. If you didn't or you
don't want anymore there, then all you need really is a little bit of
strength underneath that area where we're going
to flick up in a second. I'm just gonna pop a
bit more color there. I just need a little bit
more there, as well. I keep going to this
orange, don't I? I have a little bit there. Okay, I keep sort of squinting. I'm standing. I always stand. I never sit to paint. It allows me to be
a little bit above my painting right
before this dries. Cause I can see it's going
to dry, especially today. I had a little bit of don't
like raining on my brush. I'm gonna just clean it, take the excess moisture off. Again, this can be done
with a very little brush. I'm hanging on to
this, aren't I? So I'm just going to pull
up a little use the little one. Wake it up. So you can see we're creating the white
heads coming down, so make sure you get
the angle right. You can see they're
sort of going up to 2:00 if it was a clock face. So flick up. Try not to be too uniform,
try to be random. That will give you a nice look. They tail off a little bit
towards the back, don't they? As you're working your way down. Sort of. I can't I confuses me. I can't quite see that's
the white hair coming down. It's a bit of and
mind bend, isn't it? A little bit darker. There's
that nice bit of ear mark? That's supposed to
crease, isn't it? He's just going in
there, so's pop that in. Yeah, I'm getting a little liny. If I'm looking at
this, it's getting a little bit of a line. So I think where
we've wet this here. I'm going to see if I can get a little bit
of colour up there just to increase
that height there. Because I look at it, it's a bit linyPbably Let's just add a little bit of
tiny bit of sepia. Let's have a little
bit of go through. Let's if I can my. Sometimes you have to
trust your gut instinct. Whether this is exactly
right, I don't know. That feels better. I think I'm gonna get rid of this little bit of line here. I go to move that
in a little bit. Come in to that that little
bit higher part of the ear. Actually, those flicks started a little bit further down
the ear, don't they? It's just stuff on
that a little bit. Yes, that looks better. Right. And let's put
that little crease back in there,
which I did put in. I a little bit of CP. I
should have put that in. Lovely. Okay. This just needs to dry, really, 'cause we can't do
the second layer until the first layer
is completely dry, 'cause if you do, it will just end up
being a muddy mess, so you really need to make sure Ed layer is completely dry, but just make sure you've got all those we aligns
nice and neat. Lovely. Right. I'm gonna down tools before
I over fiddle and, um, yes, allow it to dry.
9. Head Second Layer: Hoke doke. Now, once it's lovely and dry, we're going to re wet. Always go gentle
on a second layer. What you don't want to do is add that water and
sort of scrub, you want to go as
lightly as you can. And we're going to go right
up against that eye, as well. So what we ideally want
is that sepia that went round the eye
to gently blend. So if it doesn't it
a little rustle. Try to get the angle
right so I don't go into the eye. Carefully round. And then we want
to also just give that little line a bit of a
rustle. Everyone's paper. Well, if you're using arches, obviously going to be the same, but if you're using
different paper, it all behaves
slightly differently. So some of you may find it's a little bit more harder
line than others. Some may find this is
bleeding, and it's perfect. We want sort of a line. But we're just by giving it a little rustle,
you'll just soften it. And work your way along here. We're not going into
that here in any regard, but I am just gonna come a little way in just so it
doesn't look too segmented, so we'll end up with a sort
of a sense of a round ball, so I might just come
a little way in. And we're also going to come into this dark area this time. And we're just going to come
a little way and just have a little bit of an arch
somewhere like that. Doesn't matter too much. It's one of the reasons
for doing this, we can strengthen
this if we need to. We're gonna do some flicks into here, which
actually I would have. Let's just brush that salt off if you've got
your salt remaining. But, yes, we're gonna put
some flicks into the body, see if I can get brush of that. I see. Um, yes, this will
soften here, this edge, add a little bit more colour
if we need to and yes, and we're gonna flick
down into the body. Okay. Well then work
your way along. Say, gentle, just let your
brush fall against the paper. Okay, make sure you stay nicely with in your lines or where you put the
paint down the last time, just so you don't get
with a double line. And then see duck your
head up and down, make sure you've
got no dry patches. I think that's looking good. I can't see anything
the big disc of light I have to film, gives a lovely light, but it also actually
can't see very well where the dry patches are. It doesn't give much of a glare, which is ideal in many
respects. Lovely. Okay, so once that's
nice and saturated, we're going to start building
up some of these let me bring in my hair from
this morning a rushed, what say rush Not the
greatest of care, but we're going to build
up some of these makeup. Round. Let me bring in
this other hair, as well. Bear in mind, this is different paints and
different paper. But that line there, which isn't quite so obvious on the
reference photo hair. I told you to do that,
we'll have the sepia and we'll have so like genuine. And we're just going to
very gently just tap. Let's have let's have
the gothte as well. So make sure we keep
it nice and brown. It does. Quite often, a lot of the hair
photos I've looked at this makeup almost
kicks right into the eye this sort of area here. And it just sort of buzzes
down Blends around. I'm coming down
here, you can see, I've got a dry patch somewhere
on there 'cause it's not moving. That was better. Okay, keep taking your
brush away, having a look, seeing where you need the
darker areas and where you want that catch
that loving makeup. A little bit down
here. Let's keep that a bit browner, get too strong. Let's go a little bit more
gothty as we come down, see if I can try and keep that nice sense of
Let's pick up that. Let's pick up the orange again. Tear a tiny bit. So go very careful. I don't want to
make it too orange. But it does give a little bit
of war warmth, doesn't it? A is there a little bit
they got a lovely cheek so let's go try and get that
a little cheek in, as well. Again, it's just tapping.
Take your brush away. Such a useful thing. Just
to take your brush away, get away from your
painting a little bit. It's amazing what you see. A little bit more down
there. Let's keep it a little bit cool as
we're heading to the back. I don't want to put
that orange on there. That's a little bit don't want to be too
much so like Jane. It's a little bit
too bluey, actually. I don't want to add too much. Probably a little bit
of seepew on top. We can to strengthen
some of that if it needs to be strength that actually my first layer
was actually quite strong, so I don't need to add
too much, but again, you can kind of
be a judge of how your piece is looking
a little bit of goth. It's got a little
bit blue and cold. I'm gonna wheeze
this underneath. We need to do the
flicks, as well, we didn't do those
on the first layer, so we need to do
those little flicks up the back and neck. A little bit of
ghost right there. So, you don't have to do
them all the way down. And again, we've got
this lovely some of the flicks in the
front here and there's that nice one
underneath the chin. It's quite cute. Let's
get that one in. So I've got my
little dog with me, and I can hear she's dreaming. I'm not sure if that's
gonna pick up on the camera or not on the audio. I haven't got some strange
beast in there, just her. Okay, and then we can do
some little flicks as we're, just into that dry paper. Lovely. Again, just take
your brush away. If it's gone too flicky, you can always just
sort of soften it. Fingers always good if you want to sort of
squidge things around, it squidges it without without actually
lifting the colour up, so it's quite a
useful technique. Get keep taking that brush away. Slow as the paper dries, then when you're putting
these colors down, it won't move as much, so it's always a
useful thing to bear in mind once the very first
when you first put it down, you're first adding the paint, it should move quicker. And as it dries, you won't
find it moves as quick. I'm just going to make
sure I keep that. White, clear. And also,
this is a lovely time. If this eye has got a
little bit misshapen, you can very just gently
sort of sculpt it, especially that nice kick
in there, which I like. Again, it's not on
that reference photo. It's kind of quite a slope
out to the nose, isn't it? But I liked the little hair, which I had as a reference
photo for my summer workshop. Again, equally, if
some of it's got lost, you can add a little
bit more strength. I'm quite happy with how that eye is looking
at the moment. But you can see how
that, that softened the eye into the body, now we've added
this second layer, and we managed to
we can now sort of wet up to the eye and allow
everything to soften. There, that's looking
quite good. I'm gonna pop. It's Just a little bit. I got a little bit of lavender, a little bit of lavender just right on the
end of that node. Actually, with the goth on top, it's a lovely makes
a nice color. Let's have these two together. I just want to make
this little cheeky, a little bit more pronounced. L just keep flicking
your eyes. It's amazing. You flick from the reference
photo to your hair, you'll see where you
need to add more color. Might add. I should
pick up my sepia. A little bit of
lavender. See if I can just make this ear look
Like it's inside the body. It's not actually
stuck on the outside. I still lost that
little line there, haven't I? Keeps eluding me. Is that little line for the ear. I think this is
looking quite good. I'm just gonna do a few
little flicks as well, again, not necessarily on
the reference photo, but you can see that
sobscuring the camera. Just a few, a very
few. Just up there. Thing in breaks up that line. But of course, we've got those lovely
whiskers to put on, as well. They always give us
a nice movement. Tiny, tiny bit of
orange on there. Are you sure the shape right? I think I'm nearly there.
What I don't want to do is to sort of continue
fiddling, as it dries, you always run into sort of
a risky thing where you're going over the same patches
you've already added color, and you start it, it starts to get muddy if you're not careful. And I'm a terror for doing
that and then carrying on. Just want to make sure I
get that line up there. I think you enjoy it, as well, and you're like, I
don't want to stop. I just want to carry on playing. But for the sake
of the painting, just a little line there. We need to behave ourselves.
Right. I'm going to. Down brush. Again, really, that needs to dry. Thoroughly. I'm just hesitating
'cause we can actually, you know, leave it to dry. We nearly finished, so we will do the little
finishing off bits. But if you wanted to sort of crack on
it, it doesn't matter. That can sort of be drying while we do these little
bits at the end here, but I think I might
be confusing things. So I would ideally
leave it to dry.
10. Finishing Off: Right. So we are really
at the finishing off bit. So obviously got this
little back ear to do, but what I'm gonna do is
to finish this eye off. Now, it's contained
within a hair. I can see a little bit more
what I need to do, I feel. So just looking at it. I just need to very gently
wet that little white area down just to soften
it so you haven't got a very stark
white piece of paper. And I'm just going to pour it in a little bit just so I
get a little kick around. So just that white,
it looks like it's coming around a bit more. Tiny, tiny little things. The eyeball, I'm
quite pleased with. So like I said, if you've
made it a little bit smaller with the view of adjusting at this
stage, then do. I perhaps it could
be a little bit lower. So have a little look. And equally, if the shadow underneath the eye, wine, again, is right, but you could
always very gently wet, go right up to that makeup. Just gently wet down
around the eye. So you're missing out the eye. What you don't want to do
is to wet the pupil down, so you can just go
very gently round. And again, if you made
it a little bit big, you can always very
carefully to nudge it or just even kating it up. Maybe the little line
has got a bit raggedy. But again, so I shouldn't
have put my CP down. If you had, I was going to say, if this shadow who's got a little washed out and it
doesn't look strong enough, I think it's a little
bit misleading because obviously
the reference photo doesn't necessarily show it, and it's only my
personal choice, but I quite like that bit
of shadow underneath. But it's worth if you haven't added much, see
what do you think? Does it look more natural? I think hairs eyes
they're tricky to paint, and I think because
they don't always show the shadow here, they look like they're almost
popping out of their faces. I think that's
head should I say? That's probably why I like
putting that shadow down and equally taking that little bit of color out here, as well. I think that's really
nice because that gives a nice gleam of color. So a gleam of light not color. If this wasn't sort of sculpted enough on that last layer, you can always do it
with this layer again. You can just very gently take anything in or add anything. Again, I'm quite pleased
with how that's looked, but, you know, I can kat it up. There's that little little
tiny little corner there, which makes gives the illusion
of that nice round eye. So you can always
add that little triangle in a little bit more, so it's a bit more prominent. Again, keep taking
your brush away. Don't try to overwork
it too much. So I'm quite happy
with how that looks. I will bring in my
little white bit of gouache which off the camera. And we're going to put
those catch lights in. Just be careful if
you've just wet down that eddle
area like I have. It's gonna be mainly
in the black pupil, but just be a
little bit careful. We've it gone a little bit wet. What you don't want
to do is to get this white gouache
onto wet paper, and on left to bleed because it will I look like the
poor hair has cataracts, 'cause it will give a
very milky white look. That's what I'm trying to do. So I generally just always put the little catch lights
right at the very top there. Somewhere tours the front. Always a lovely
thing with hairs. When people are generally
taking a photo of them, they're often on a field, and you'll get this nice. If you look at that reference
photo, it's the same. You'll see the sky
above and the ground. So what some of my very clever students did
in the summer workshop, some actually took color out or just added a little bit
more white across there. So I just gave that
little idea of, you know, just what I was
saying, the sky and the ground. Obviously, you don't want
to get too too pinckoty and start adding trees
and stuff in the eye, but it gave some pieces it
gave a really lovely look too. I personally I think
I'm done with that eye. I like it. It's a
good shape to it. So we're just going to go
round now and sort of put little nostra in little
tiny lines and do the ear. So while we let's dig that ear into it will look
a little bit more complete. Bear in mind, you've got that
nice white line underneath. Well, it's actually on
this frontier, isn't it? So let's paint that in. Actually I think my pencil lines have got
a bit confusing there, so it comes here
somewhere, doesn't it? And then runs round.
I've been a little. We've been telling you to be really careful
with your sketches. I think I've been a little
a little ragged either. Alright, I'm gonna put. I can't quite This is
more for me 'cause I can't quite see where
I've put the lines into. I don't know, add a little bit of gothip there,
just at the back. O the front front.
Probably not back. Just allow that to bleed. I want to try and
keep that white line. Yes, it looks alright. And we want to get that lovely dark tip to that ear, as well. So I've got so Genuine and
a little bit of sepia. Just gonna literally pop that on there and allow
that to bleed up. Okay, make sure you
get the shape right. Do you have a little kick round? All the important bits
the shape that will make the hair look like a hair.
That's made it better now. It's got the second earring. Bit goth in there.
That's chew dumb. I don't know, a CPA just see where that
second year comes in. I'll say, I've done the best drawing there, 'cause
I can see a line there. I'm not sure what that
line's meant to be doing. Yeah, that looks alright. Fabulous. Right. Let's
do the little nostril. Um, let's not make
it too obvious. I got just a little
bit of gothite. All right, go to paint. Just gonna paint it in.
It's not dark enough. Let's have a tiny,
tiny bit of sepia. If it ever looks like it has been painted on,
which obviously it has, you can then always
soften one of the edges, so you clean your brush,
excess one moisture off, you just run along
one of the edges. So it just softens,
put it up a bit. There it is. What else do we do? So any light that can be
taken out if perhaps some of your white area around the eye has got a
little lost or somewhere else, maybe you'd like to have had a little bit more light or
even colour or lack of color. So we can always
take that out very gently dab it out with
a bit of kitchen roll. Or if you want it even softer, you just dab it with your finger that would just displace it a
little bit more. There's a really
nice very subtle. It's terribly subtle and
I actually might use. It's a little bit of go
tiny bit of lavender. It's almost like a little
little brow there, isn't it? Goes over little a little line. Again, I've put the line
in and I've softened one edge down. Not
sure if it's right. Sometimes I put these things
in and go, No, not right. Then then I can very
easily take it out, but I think it looks
right, actually. Like all this. I don't really want to add flicks to
say if I add them now, rightly so it will look like they've been sort of stuck on. Coming down here, might take a little bit
of color out here. After putting it back in
at one point. Very gently. Getting probably just
soften with my finger, stepping away, having
a little look. This is probably me. This is the thing when we get to
the end of a painting, we're all going to
differ quite a lot. So I'm now tinkering
really with my piece. It's not necessarily stuff you would need to
put on, either. But I've just pan a
little line there. That looks quite nice. Yeah, so some things
will be relevant, some won't I say, if I'm doing stuff and
you're like, Oh, no, I don't want to do
that, you know, as we sort of progress, they I'm sure everybody's
painting differs, and it would be lovely to
be able to help you all, but I can only do obviously
the painting I'm working on and hope I say enough stuff that
will resonate with you. Take that little just a tiny little bit of color
off that makeup line. Again, that will give a it's a slightly
different character. It will make them if
you go too far in, they can make them look
like they're worried. Yes, it will just a tiny bit of color out or in just
changes the whole character. So it's interesting. Right. Personally, I don't
think there's anything else I need to add or put in. We do need to do those whiskers, but ideally, everything
needs to be dry. I don't think I've wet
too many bits down, but I will give it a little
blos with the hair dryer just to make sure it is nice and dry. Any salt. Sorry, I took that salt off a
little bit earlier. But if you've got
sil sub remaining, just brush that away carefully. I am going to run a
hair dryer over that. We can rub any
pencil marks out and put those gorgeous whiskers on. Hokey doke. Now, it's really lovely to
rub any pencil marks out. I can't see any that
are very obvious, but sometimes they
can just sort of hold a painting a strange
line I put in there. So taking them out can really alter a painting
and make it look. Sort of you can gain
that sort of lost and found look if you've
got strong line, ideally, you want to do your
pencil marks, you know, as light as you can, so
they can be rubbed out. But not so obvious on here, but generally, yeah, make sure
all the pencil marks out. That will make a huge
difference to your painting. Right. I say, really,
the last thing to do is the whiskers now. They can either be done
with a simple pencil, and then you can kind
of get rid of them if they don't quite
work out for you. Or I have got this
is this gorgeous pen given by top drawer for
me to look at that. It's beautiful. It's, I was very lucky to be
given this to try out. And it's a very lovely pen.
Beautiful to write with. So I'm going to put some
of those in with the pen. Lo some up here, I don't know. I will put the link to
this pen, and actually, I'll just explain some of the paint they also gave
me some watercolor paint. Try not to be too selsy, but it's it was interesting for me to try
some different paint. I've been so used to Daniel
Smith. And I do love him. I wouldn't swap, if I'm honest, but it was they gave some interesting
texture and difference. Right, I will finish
this a little bit off, before I prattle on
about that first. So, you say, once you've got your whiskers in,
really, you are there. I always say this, and it
pop your painting away, go away for a sort
of 10 minutes. Little bit lights
getting it out. You can come back
and see if there's anything that needs adjusting. Quite often, if you've
been painting for a while, you kind of don't see what you're looking at,
and it's very easy. Well, at least, I do. I can make silly judgments
and take bits out or try to add bits that
shouldn't have been put on. It's just because I'm
sort of tired and I'm not seeing it with
a fresh pair of eyes. So yes, leave you
little piece for a bit. If you're unsure whether
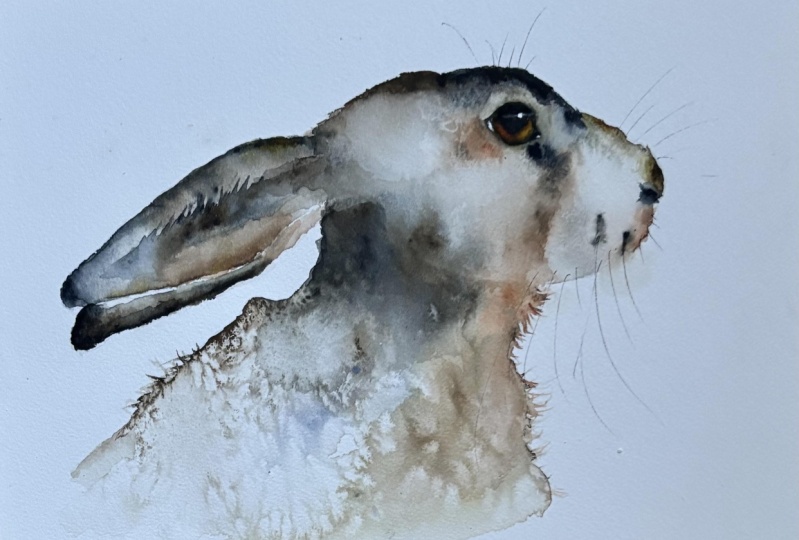
something needs adjusting. It's really worth stepping away. So I have been scooching this painting in and
out during the class. So these were the paints
given to me I used so I painted this keg with the paints given to
me by Topdrawer. And they were
interesting, for sure. They acted very differently
than I'm used to. They're quite creamy. They
don't have the quite the same I'd have said
the luminosity, but some of the
colors were gorgeous, and they're just
beautifully presented. You know, really
lovely little box. I think they gave me
two of these Obviously, if you're into mixing a bit
more, then that's brilliant, 'cause they were
a little limited, but I believe they
do other boxes. But I just thought they would be a great gift for somebody. If you've got somebody
who's into watercolor and hasn't really done
much, they're nice. And they also do little
notepads and watercolor books, which all fairness,
worked really well. Have I got the book I can show you quickly looking
around the studio, where I popped it. Oh, this is the watercolor
book, 100% cotton. You may have seen his
little sketch on Instagram, if you've followed
him on Instagram. That was some hairs I tried, so nice paper,
actually. I liked it. And a little while ago. I was a couple of years ago. I also did them
some um paintings, and they put these
on the sketchbooks. And they got a
drawing one and Aah. Okay. Well, I think I've
probably done enough plugging. But they are generally
really lovely products, but I don't want
to get too markety it's horrid people
trying to push them. So, yes, I really hope
you enjoyed this class, and as ever, thank you
so much for joining me. And please, please do share
these on the projects and resources pages I adore
seeing your work. And if you get stuck,
have any questions, like I said, something
didn't quite make sense, just pop them on the
discussion page. I endeavor to get back to
people as soon as I can. So yes, thank you very much
as ever for joining me. I
11. Final Thoughts: I hope you enjoy
painting this hair. Isn't there something inherently mystical and special about them? I hope you got yourself
some lovely salt texture. And tilting the paper will definitely give you
that different effect, but it needs to be left
to dry thoroughly. What about sexing
those areas off? A great way to create the painting that doesn't
feel too overwhelming. Did you enjoy painting
those soft layers? You can see how easily you can build up
character and depth. But remember, gently, does it? As I always say, it's
worth stepping away and coming back and looking at your painting with a
fresh pair of eyes. It really does highlight the
bits that need adjusting. So we look forward to seeing
you in the next class.
 Jane Davies, Professional Artist and Teacher