Transcripts
1. Introduction: Hello, and welcome to this
intermediate watercolor class. Today, we're going to be
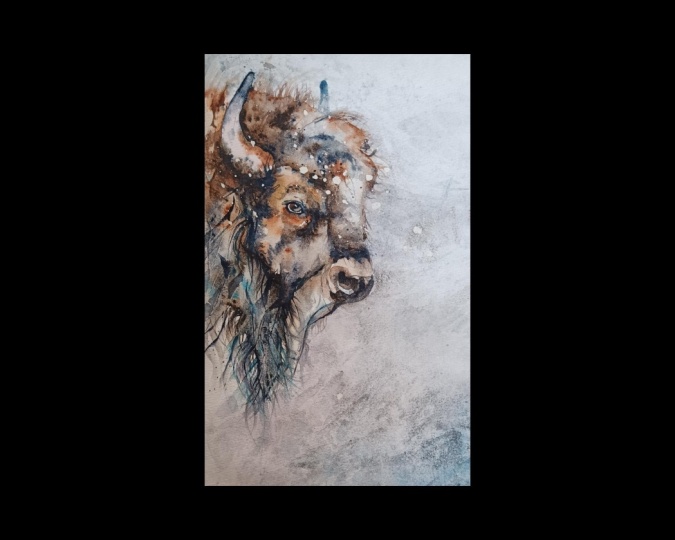
painting the snowy bison. Now, if you're
intrigued how to paint long haired animals
in watercolor, you're going to love this glass. We're going to be exploring
layering, timing, and paint flow, and some
quirky ways to add texture. This is a big juicy fat glass. I'm Jan Davis. I live, paint, teach, and walk my lovely spaniels in the beautiful South Downs
National Park in England. Over the last 20 years, I've taught myself the free flow technique that
you see today. Not having been to art school, finding my own way has been
fun and sometimes daunting, but has allowed me to
develop my own style. This has led me to teach others either on a
one to one basis or as part of a group in a wonderful studio in the
heart of the South Downs. I also run a successful
art business where two days are never the same from the thrill
of exhibiting to painting pet and
wildlife commissions in my own home studio. In all my classes, you will follow
along in real time, where I can guide you
to keeping your work loose and fresh
without overfussing. If you're just starting out, my three beginner
classes will guide you. With your first masterpiece
painted in only 15 minutes. Then you'll find dozens
of my master classes available covering a wide
range of beautiful subjects. In each one, I share the techniques I use in
my own professional work. We'll have a lot
of fun together, and you'll gain the
understanding and confidence to
incorporate everything you learn into your own work. You'll be amazed at how
easy watercolor can be. I provided you with a
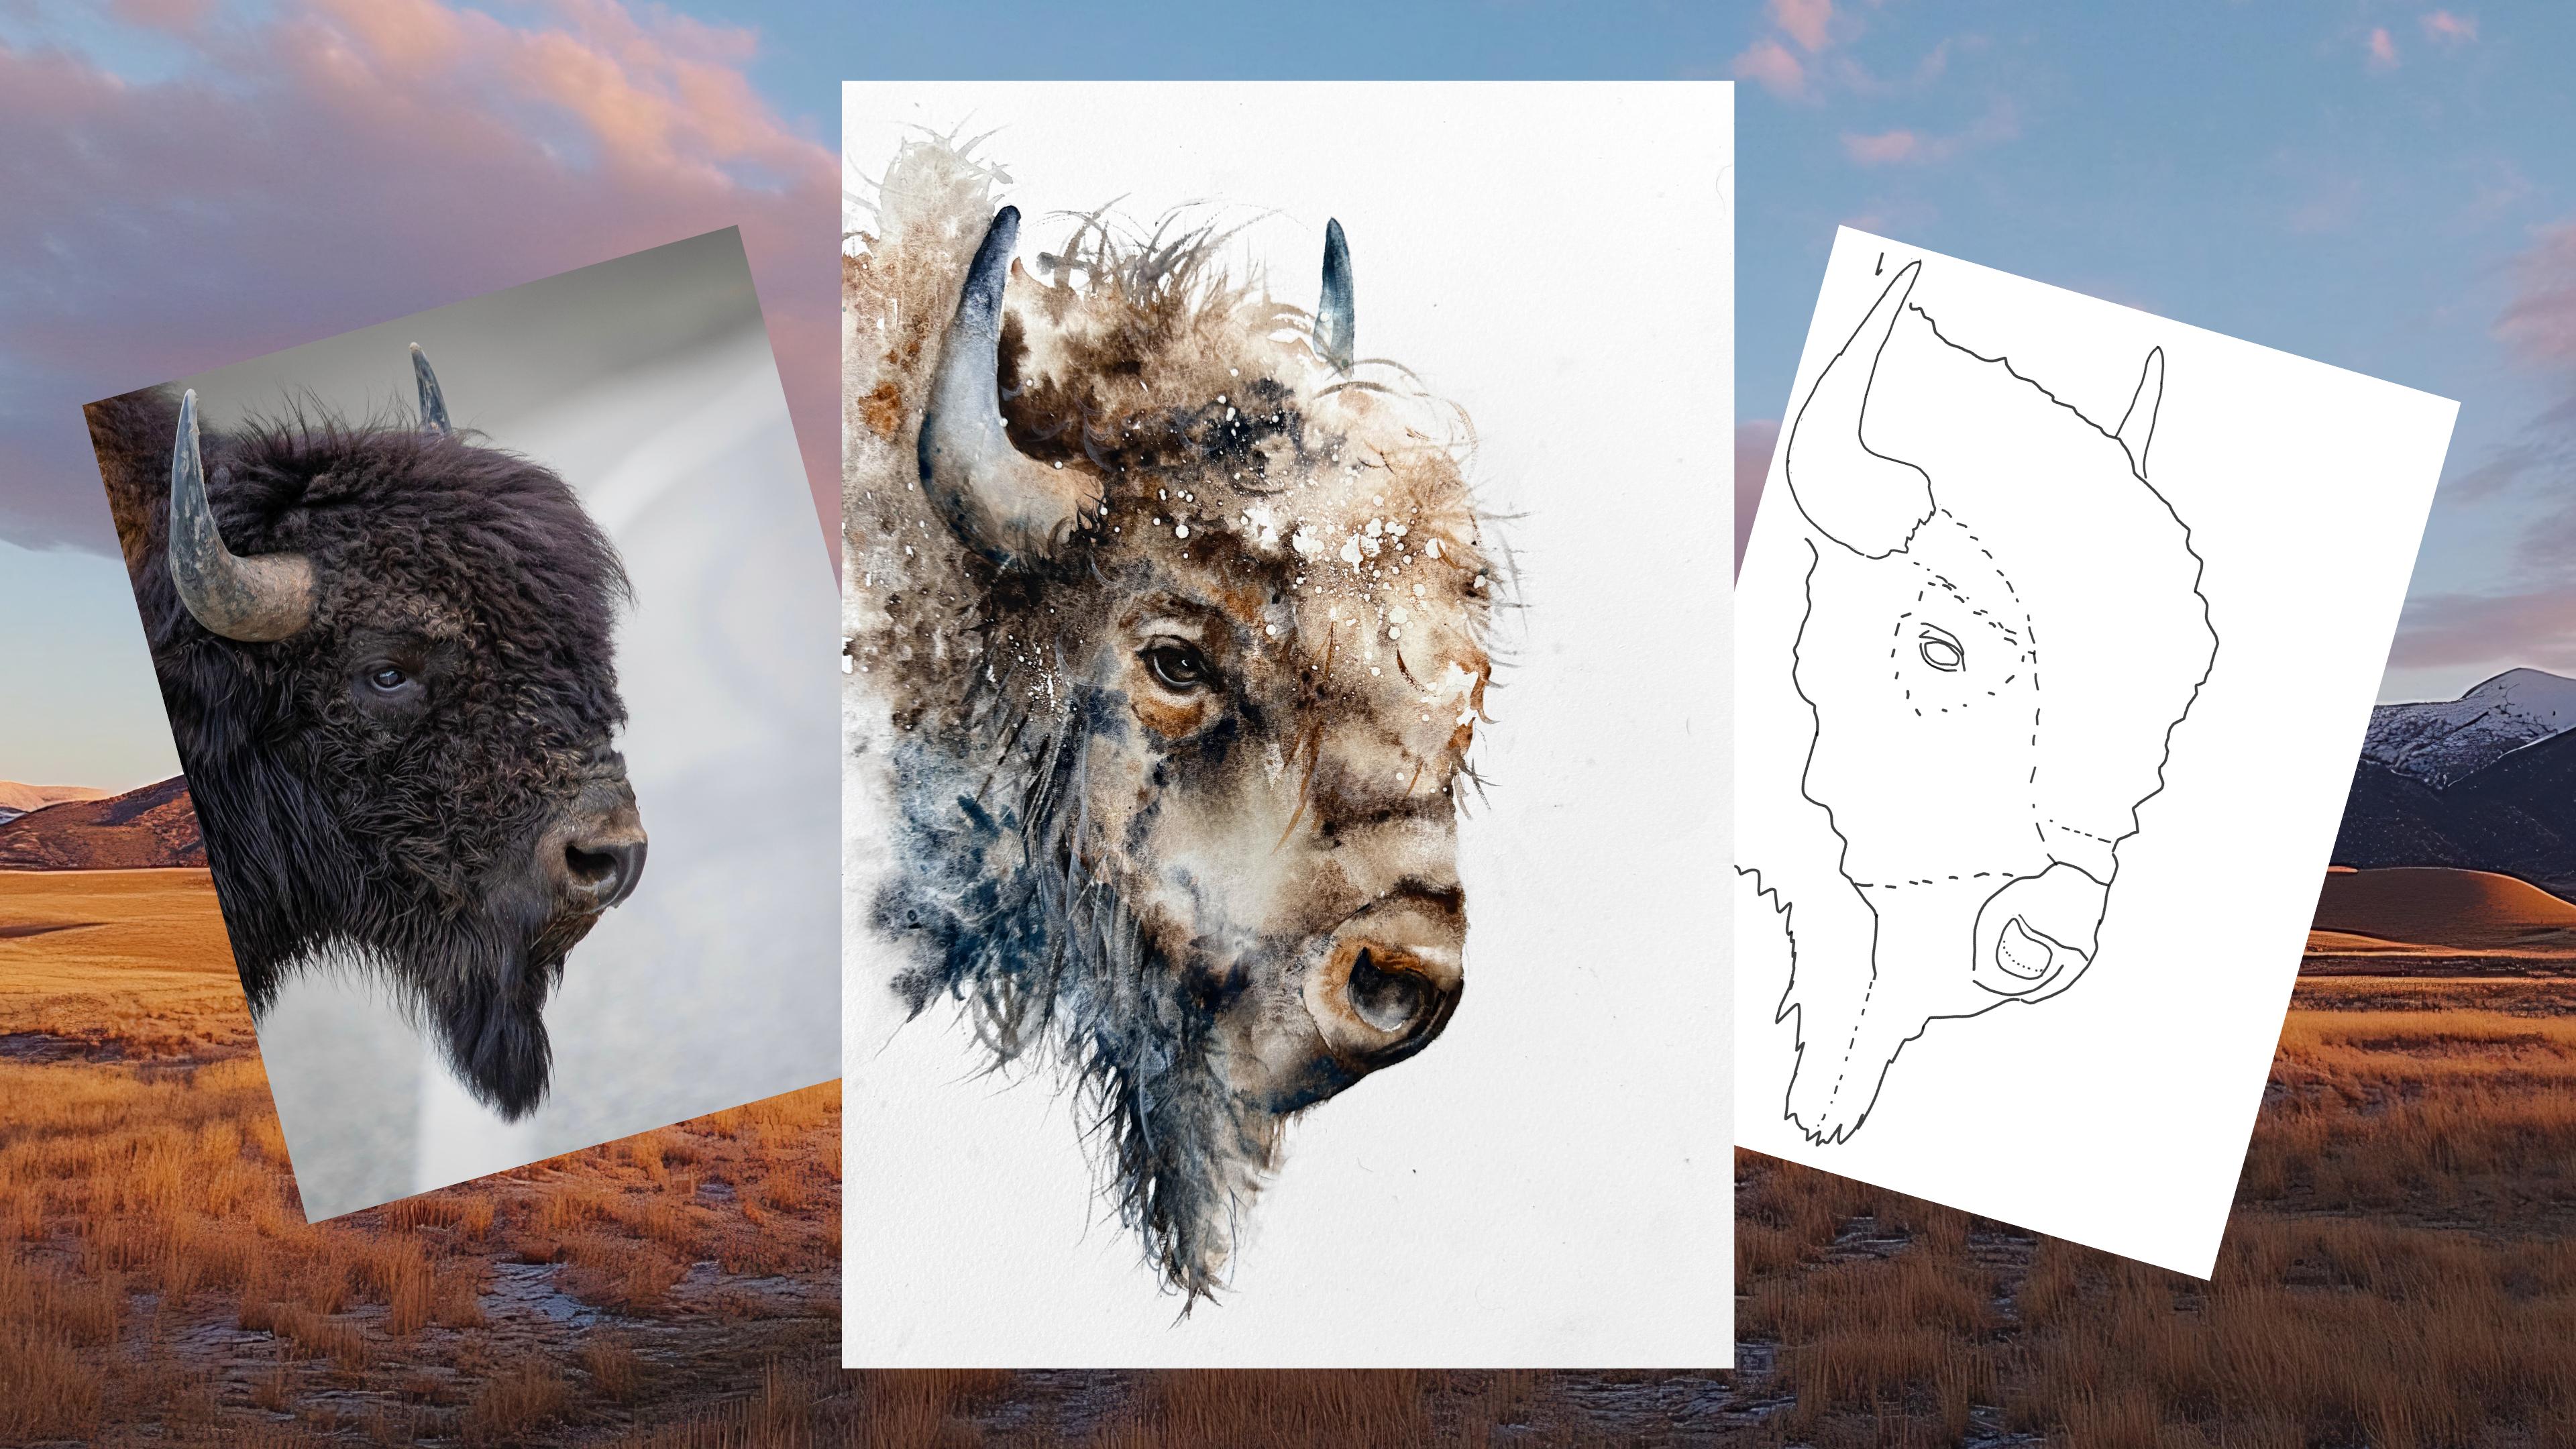
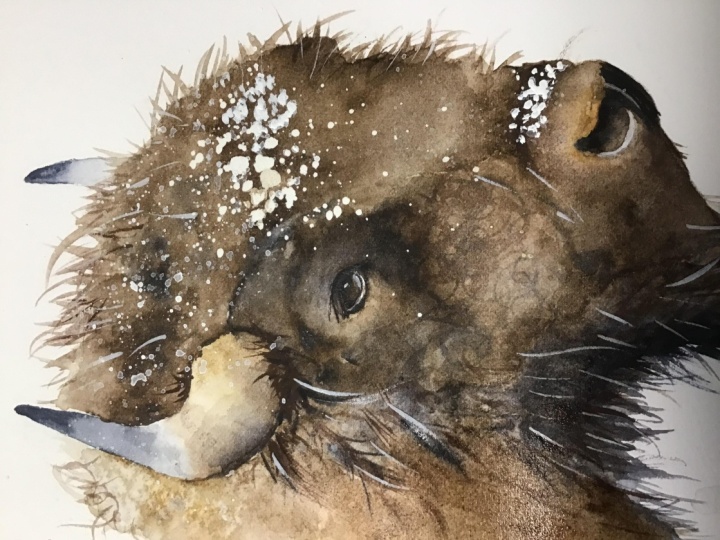
wonderful reference photo of the bison and a
downloadable template. The template will give you a stress free drawing so you
can just enjoy the painting. I'll be showing you how to
start your painting off to give confidence and set
the stage for success. We will be adding
multiple layers to specific areas to add
depth and complexity, and I will guide you through seamlessly integrating them all. And there's some great
techniques I want to share with you that gives texture and
interest to your bison. And, of course,
I'll be showing you how to adjust and dare I say, fiddle at the end to bring this complex looking painting
to a brilliant finish. If you'd like to learn
more about me or my work, then please pop over
to my website at Jan Davis watercolors.co dot K. This can be found
on my profile page, along with links to my
Instagram and Facebook pages. I love to share my
art and adventures, especially on stories
with many ideas, works in progress, and
tales of studio life. I really hope you will share all your paintings on the
projects and resources pages. I love seeing your masterpieces. And don't forget
I'm here to help if you get stuck or
have any questions. I want you to experience
that buzz of painting in this liberating wet on wet loose style. So
come and join me.
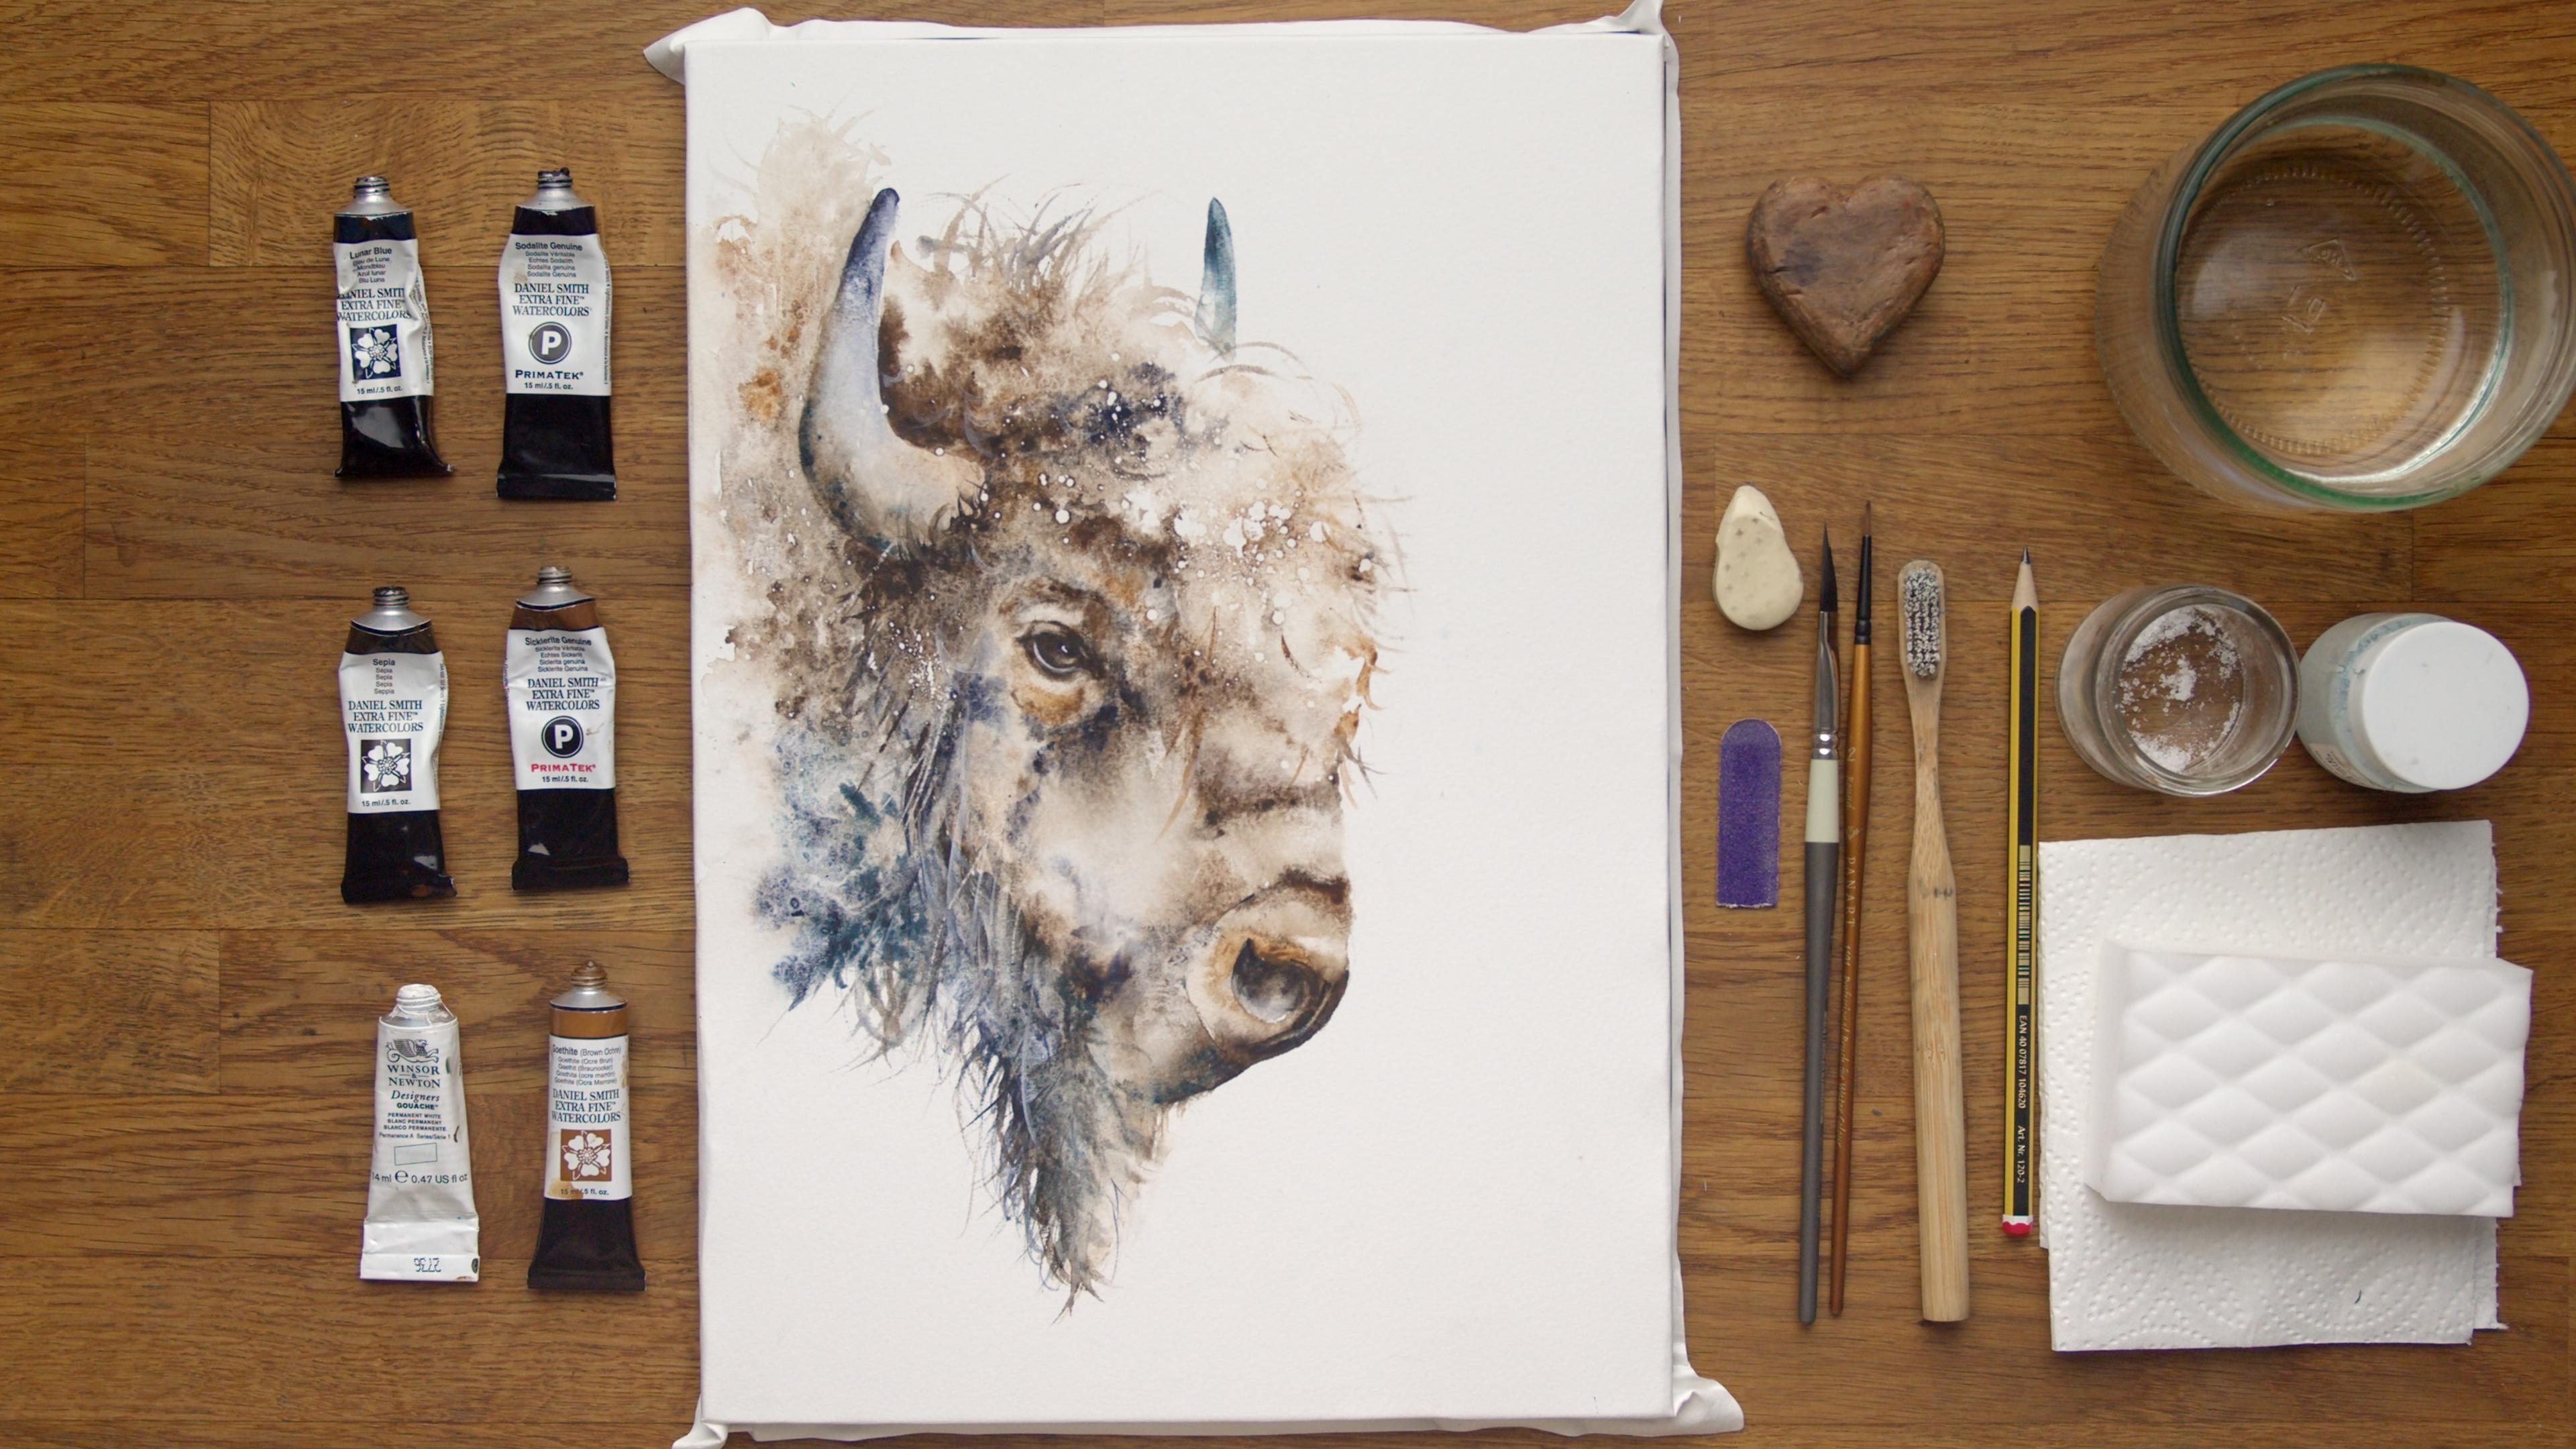
2. Materials: So let me run through
all the materials you're gonna need to paint
this fabulous bison today. So I shall start from the very
top and go with my paints. So a lovely collection of
Daniel Smith paints as normal. And I have Luna blue. So, genuine, a
really lovely color. And one of my all town favorites is just this blue
here at the top. It's a lovely kind of
granulating, warmy, coley blue. Perfect. I have sepia. I'm site genuine and another
favorite gothte brown ochre. And I've got a
little bit of guese which is just huge
for the catch lights, nothing else, so I don't
actually paint with it or the odd flick. But yeah, I don't use
that a huge amount. Now, if you're looking
at this, thinking, I haven't got those exact
colors, please don't worry. Have a look what you've got. I was looking for
cooler tones on the bottom and warmer
tones on the top. So I'm sure you have
something equally as good, and most people do an
amazing substitution if you've had to sort of
substitute other shades out. So please don't panic. Use what you have and what
you're familiar using. My paper today is Bockingford, and actually, it's really light. It's only a 90 pound, but it's been stretched on
a perfect paper stretcher. And I will put a link in the projects and
resources pages, and you'll find all these
materials there as well. So they're all there for
you to refer back to. Right. I shall work from the top as I have
quite a fu table here. I got my little heart, which is, and many of you
will be familiar with this. It's about an inch high, and I just use it for tilting my board so I
allow paint to run. So honestly, anything that gives you a little
bit of a bit of height obviously a pot
of water, go this way. I've got a rubber.
I have a nail file, and you don't have
to have a tiny piece of nail file. You can
have a whole one. It's just for some interesting
techniques at the end. I have a dagger brush, and honestly, I could have done the whole
painting with this. It's got a lovely point.
Hold the paint well, and I can obviously get
those right into the tubes, as I like to paint
directly from the tubes. I do have a little one just 'cause I thought I
should include it. An old toothbrush. And make sure whatever you use
to use this masking fluid, it's an old brush or toothbrush because
you will never get that masking
fluid completely. For pencil? A
little bit of salt. Now I don't really use
the salt personally because it actually
doesn't react to that well with these
granulating paints, but you may find them. You may find it useful with a selection of
paints you've chosen. So I've incorporated that. Obviously, the masking fluid, and that's for the
splatters on the top of the forehead. Again,
they're optional. I have a magic sponge, which is actually a
cleaning product, but it's great for
removing paint. And again, it's another sort of technique I use at the end. Paper towel, kitchen oil. I think I've done
everything on that table. I have a hair dryer off camera, which is just used just for the very last stages of
the drawing process, just so we can move through
the process a bit quicker. And also, there's
I have an iPad, which I put my
reference photo on, and the reference
photo can be found in the projects and
resources pages, too, along with that
downloadable template. Some of you might
find that useful. I'm sure other people have
other methods of actually transferring that image
onto your piece of paper. Um, and I think that's it. I think that's all
you need to know. And yes, don't forget all these can be found on the projects
and resources, pages. So let's go and skitch him out.
3. Sketching Out: Okay, then, it's on to the all important
sketching out part. And this is a part that's
really worth taking your time over as
boring as the Well, that's a bit mean.
Tedious sometimes. I'm not the greatest sketcher, but I do value the
importance of a good sketch. So take your time and let me
give you a few little tips. Firstly, keep your pencil
marks lovely and light. And this applies to any
class that you take with me, because ideally, when
you're finished, you don't want to be able
to see the pencil marks. And although this
bison is very dark, if you have any
pencil marks out in there and you want
to rub them out, when you rub them out, you'll also be taking
the paint out, and it will be more obvious
on a darker subject. So keep them nice and light. The shape is important. Let me start on the top here. Obviously, he's very hairy and the hair probably
comes out a little bit further to this sort of place. So what I've done, I've
tried to mirror a little bit more where the
denser hair starts. So when I do some flicks, I'm not flicking from where the hair on the reference
photo starts somewhere there, and then making it larger.
I hope that makes sense. So look at your reference
photo, and yeah, you'll get a sense
of roughly where the sort of a nice
inner line would be. So when you flick out, you
get to the right length. Coming down to the nose, these little lines are just where there's quite a
bit of sectioning off. So these are worth putting on. But again, keep them
nice and light. It just helps to
guide you when we wet areas down so there's
this nice line here. Obviously, that's an obvious
sort of nostral line, which you can see on the
reference photo or nom. I'm not sure what you
call that because obviously that's a
nostril, muzzle, maybe. I'm not sure. And
that's the nose. Anyway, this little bit here. He's lovely beard. I've sectioned in half. It all makes sense when
we come to paint it, but just put a little
line there just so you know where to
wet areas down. Again, it's all self
explanatory, really. Just get these
lines in and don't forget the templates in the
projects and resources pages. The eyes worth getting
right as ever, because this is very loose, and I will actually
say this now if I don't in case I forget to
say it as I work along, there's a big ugly
stage on this painting. Um because there's a lot of paint flowing,
if you look at him, he's just a big ball of fluff, really, and we've got
the eyes and the nose. So I'm actually going to start with the
eyes and the nose, but it's really worth
getting that eye right because when you
look at your painting, that's the thing
that's going to anchor your bison and yeah, the nostril, say, to
some extent, the horns. So I've done this
is the eye ball. And this little line here you can see that is the white rim. I haven't then put what I
would call the makeup on. So I've just done some
simple lines there. Partly, it's to make
my sketch look nice. So when I start, I've
got something that looks pleasing that often keeps
your sort of spirits up. But yes, just do eyeball
and that little white line. It's a little marking round
the eye, which is important. This isn't so relevant, but
it's worth putting it in. And again, just make sure
everything looks nice. I always say, step away
from your your sketch, even if it's just for 5 minutes, come back and just reassess, make sure you there's
nothing obvious you've missed out or haven't quite got right or doesn't look right. And what we're going
to do actually in this little sketching out part is actually to put
the masking fluid on that needs a little while to dry probably probably properly. So I got a little
masking fluid in. I've taken actually maybe
give it a little shake. So I've partly unscrewed
the lid before I started so I wasn't struggling
on camera to get it off. Gonna put that lid somewhere on the other side of the studio. I have got an old toothbrush. Don't go and use your
best toothbrush. You can also use a brush, but make sure it's something old and you're not going
you don't want to use, although you can wash
these out really quickly, you'll still get a sort of residue gumminess to
whatever you use. So nothing that's
precious to you. And all we're going
to do, I'm gonna dip my toothbrush in there. Give it a little tap
because I don't want to a great big
splodge falling out. You may find it might, but you can always take it out. And I'm going to work a little bit on those sort of forehead. So this gives you
impression of snow. Sorry. So he's maybe
push through snow. I know it's not on
the reference photo, and you might not
like that effect, so have a look at the
finished painting. And if you like
the masking fluid, then obviously put it on if you don't just miss
that little this. I'll stage out. I
might that little tap. Let's see if we can do this. I'm just going to
flick to start with. And then I get a tap, hopefully, if some of the really
gunky stuff come off. And obviously, it doesn't matter wherever it goes once it dries, you can rub out the
ones you don't like. So don't be afraid if it goes, maybe falls on the
eye or something cause that can be taken off. Just a little bit there and
a touch there, I'll see. And almost go heavier
than you think. Some of my practice pieces
a little timid on this. These are too big, so I will
rub some of those ones out. Yes, if unless you get
some good splatters, they don't really show up
once you rub them out. So yeah, be liberal. So just a couple down there.
I think that's enough. I say, I will discard some
of those once it dries, but make sure it's dried
before you don't try and rub them out if you've got something you don't like at this stage, because it will just smudge
and go horrible on you. So we just need to
allow those to dry, and it probably depending on
your sort of size of blobs, it will probably take ten, 10 minutes, quarter of an hour. And you can always
tell, just give it a little tap and if it's
rubbery, then it's nice and dry.
4. Eye Nose and Horns: Right, then, I am going to rub some of this
masking fluid out. I'm going to start with
one of these ones out here to check it's dry. Yes. And actually, a word of caution if you put
this on and leave it, I wouldn't leave it more than a few days sometimes you can actually see it could
be cause I have hair dried actually,
it's marked. So be a bit mindful of that. Right, I'm gonna take
that big one out there. I'm gonna take that one as well, so stuck my big finger on
it to see where that was dry as well. Get
rid of that one. Don't want any too chunky.
I quite like that. I might leave that one,
actually, I think. Yeah, I think that's
right, actually. Right. Let me get rid
of the little rubber. I don't need that at this stage, and I don't need my pencil. Get my desk a bit clear. Are you ready now? Right, we're going to start a little easier. We're gonna start
with that eye first, 'cause it's a nice, easy place to start. And plus, we get an anchor. And hopefully, it
keeps your sort of spirits up when we go through
this rather ugly stage. And if we've got an eye that's
not complete or in there, I think it's quite it's easy to drop your head
and think, Oh, good, this all looks a bit messy 'cause he's quite a messy chap, so I hope this will help you. It's gonna be quite simple. I'm literally just gonna paint this in actually, at this stage. So a little bit of Sepia. Actually, What the little
bush. Let's use it. I do like those Dagger bushes, but it will be a little bit finer. Very simple. You could be sitting
at this stage. I say, I'm sure many of
you familiar with this, but I always stand to paint. I never sit. But actually, doing
little small details like this is quite nice to sit. But as you probably
just started, you probably don't need
to take your weight off your feet so Okay, so that's a little bit Sepia. I'm going to add
a little bit of, um, so like Genuine to the top. Just give you an impression of shadow underneath the eyelid. It's such a useful thing. Even if a reference photo
doesn't obviously show it, I find it just adds a
lot of depths at eyes. And then I will just
gently at this stage, take a little bit of light out. Again, these can be fiddled
and finest at the end. But let's say, let's try and
get a nice eye in there, so we've got something
that looks pleasing. Help keep us anchored.
Right. I'm just gonna pull that little
line out there. There's only one down there. I say, this is a little bit just just to help with the
overall appearance. Okay. Let's should have I should have worked
more th methodically, shouldn't I done the
horn first. That's me. Um, right, let's let's
do the horn next, actually, 'cause I'm I
know what I'm gonna do. I'm gonna put my fist in it, so just be careful that's
a little bit, wet. What are we going to wet? Let me put a little
bit of colour in so you can see
where I've wet up to. So we're just gonna
wet. About halfway. Honestly, it doesn't matter, just so we get a little bit of a line between the two
sections of the horn. Hey, nice and wet. And if
your colors aren't flowing. Paints aren't flowing, always check you've got the
paper wet enough. It's a very common
thing people go, My paint doesn't flow
like yours does. It will Almost certainly you haven't got the
paper wet enough. It should do that.
Obviously, some paints and paper react
slightly differently, but you should get a nice flow. So just tap and just
allow it to flow. Try not your best. Try not your best,
try your best not to try to interfere
with it too much. Just let it be. That will create that lovely freshness
we all love in watercolor. That's a little bit of
Sepia. Again just tapping. So make sure you get
nice neat lined, so you got that horn, really
lovely sort of crispness. As I say, a lot of
this is so loose, we need to make sure we keep
some nice tightness to this. And we're going to be roughly
working warmth to cornice. That'll give us a nice
contrast, as well. So I'm going to try keep that in mind even
when I do this horn, warm at the top,
cooler at the bottom. Let's even put a little
tiny bit of luna. Blue there. Just
keep that cornice. In the minute you've got something you quite
like, leave it. Let's put that down. I
can start at the top here and wet the very
top of the horn. I'm not going to quite join
that line up at this stage. Let's have so like genuine. It's a little bit of
a warmer color than the um blue, lunar blue. And again, I'm just
gonna touch and allow Ito have been easier if I had done this
the first way round. I'm conscious of
now putting my fist in front of that
eye, into the eye. Let's lovely. And then we're going
to pull it down. Not too. It's almost
too much water. You see it bubbling quite a lot, but let's see how that goes. And then we're gonna
touch the lower part, so the two wet sections join up. And that would give us a nice, hopefully, natural
sort of blend. And the best thing, honestly, is just to leave it
'cause if something doesn't quite work out and
it looks a little bit odd, we can always do another layer, but it's just nice
to allow things to move of their own
accord and not to interfere too much and allow those lovely paints
to do their thing. Fabulous. Right, we
might as well do the other one here
as we're there. Not so complicated. I would just wet the
whole thing and then just pop a little bit.'s put
the lunar blue at the top. It cornison over the top there. So, just take your time, make sure you get
those nice nice shape. Just pop a little bit of
the goth at the bottom. Y. Pb. Actually, let's just round
that up a little bit. I don't think they've
got very spiky horns. Lovely. Right. Let's do this nostril while
we're down here now. Um, let's have the Sepia. And we're just going to paint
it. Nothing complicated. We're gonna just leave a little
white line at the bottom, that's a nice you see
on the Reference photo, it's a nice sort
of gleam of light. It's obviously
catching the moisture, isn't it on his nose? So again, I might put a little bit of so light
genuine just at the top. Should I give up real wimp
of darkness and coolness. All these things don't
look that obvious, but it does add to the overall effect of the painting, sir. Lovely. And that really is all
we can do at this stage. It just needs to
dry because we're going to be doing this
little head section. I don't really want
to touch this. If I obviously wet
this area down, touch that that lovely color from the horn is going
to run into the head. I could leave a
little white line. At this stage, I just
want to try and keep everything as easy as we can, so I'm not going to leave
a little white line, but if you are really
pushed for time, you could put when you come
on to the next chapter, or listen you can leave
a little white line, which will be dry, and then you could just carry on
and then join that up. But I'm going to I'm
going to leave it.
5. Head First Layer: Ooh, it looks strange
to see the IFs. I rarely do an IF, so it's fun. Um, I'm gonna get rid of
my tiny little brush. I'm not going to use
that at the moment, so I'll try and keep my little
area as clean as I can. And with my bigger brush, we're gonna wet down this area. Let me put. Oh,
let me put tight. This is just so you can see
the Oh, no, that's very blue. Um, say, always make sure your brush is nice and
clean before you start. I think that's gonna matter. That's probably done
the job, actually. I was gonna put a tiny
little bit of color so you can see the
areas I've wet down. So make sure that
horn is nice and dry. As I say, if you touch that
and it's wet, it will run. We don't need any extra running,
I think, on this class. So I'm going to you see that? I'm gonna miss that little
section around the eye. We'll do that in the next
layer. We do over the head. And then all the way
down to this line here. Just make sure
it's nice and wet. You don't want it puddling, 'cause sometimes if it's puddling and there's a
big pool of water there, your paint will also
not run because it would literally be
sitting on the top of that water and not dispersing. Sir, it's just
getting that ratio. And once you've become familiar with your paper and your paints, then you'll become a lot more. It'll be a thing you
do instinctively. Okay, it's worth just bobbling
your head up and down, making sure you've
left no dry patches 'cause obviously
little dry patches, the paint will just
whiz around that. I think I've caught everything. Lovely. And we're
going to keep the head at least on this leg quite warm, so I'm not gonna be using
the unablue or the so light genuine a lot. I
still might pick that up. But I've got sick a genuine. And let's just tie the
paler of the two colors. So I can see my
buffalo buffalo goat. See, I'm convinced.
I'm not convinced. So if somebody had
showed me this picture, I would say it's a
buffalo, but I'm wrong. It's I think most people would
refer to these as bison. So I'm apologies if I start
referring to it as a buffalo. Okay, so I put the two colors
on my bah at the same time, I'm just tapping and
they're allowing. That lovely combination
of these two colors. They're nice and granulating.
They flow quite well. What I call, do you? I've got big just caught
that in time. A big spldge. I think this is
quite a new tube, and as I open the lad,
it's obviously come out. I'll get you back in there. Right. Let's work our way
down a little bit down here. You can leave a
little bit of a gap. Say, the beauty of
doing two layses. You can assess where you need the extra paint on the
second layer and add. That's a little bit
of the combination of a little bit of
sukalite there. Actually, I might just
pick up a bit or so light January it bridges the gap
between sort of cool and warm, so I might just a tiny
little bit of that, a little bit of salite and let's let's just sort
of pop it round. You know, it's obvious how sort of warmer patch
here isn't there, where the coat's got a
little bit of warmth to it. But a little bit under here. I just want to get a sense of some darkness. Just under there. One of the reasons
I like stand here, I can sort of take my brush
away, have a little look. I'm far enough away
from my painting to sort of assess
where I need to go. I think if I'm sitting,
I tend to clamp, as well, and everything
gets a little bit tighter. Tiny bit or so light genuine. Let's actually pop
that one down. Let's try and keep
the blues at the top. Let's pick up a bit
of Sepia because, again, the Sepia
is a bit warmer. Let's tap dark a bit there. Probably don't want to
do too much on this. As say, the beauty of doing
another laris we can then concentrate on sort of building up some depth if we need
it or where we need it. This is just to get a
little bit of colour down, something there.'s pop a little bit here because
we're gonna pull that beard into that
beard in a minute. So let's get something
a little down there. So we've got something
to work with and I've got some paint to flow. Right. I'm gonna pop
those down for a minute. Clean your brush, and we're just going to touch this part here. And then we're
going to run this. Write down. So be careful. Don't get it too. I mean, hopefully, you've drawn the line so you've
got a little room to do those lovely
flicks, but be careful. You might want to even stop
there. Then we can flick out. You can see how that
by wetting this area, you're getting that
lovely sort of sense of pull and flow. And I haven't got this
on a tilt at all at the moment. Let's just take off. Take off a little bit
of excess moisture it's quite a puddle
sitting there. I want it to carry on running. And then, where you can pick up, I'm gonna again,
stick to the warmth. Although the
reference photos show to I can't get more
words out today. The reference photo shows
it quite dark down here. I'm gonna keep it a bit lighter. I can always add some
dark a bit later. Oh, that's why is
that sick of light. Gee, let's do a little line there, and let's
actually do this. I was quite sure when to
do this little part here, but I don't see why
we can't do it now. Let's do it now. I think anything that gives
us a little bit of shape on this one will help. Then we can do those
tiny little flicks. Right. I think I'm
happy with that. It's hard because obviously, the complete
painting isn't done, so be a little cautious with those flicks because
we can do more, but it's hard to take them off. So, as with ever some of these, we just really need
to allow this to dry because the next section
we're going to do is this. So this obviously needs to dry. Always we're going to get that same problem
with it running into the wetted section,
if that makes sense. I'm not going to hair dry. Again, hair drying is useful at times because it can
speed the process along, but if it's really wet like this and you put a hair
dryer over it, you just disperse that lovely those lovely paint that
painting the lovely colors. You can see how I got
this nice rundown here. And if I was to
put a hair dryer, I would lose that nice sense. It can be done just
at the end when it starts to go off and
it's a little tacky. That's when you can
use a hair dryer. So, yes, it's afraid this one a little bit of
being patient at times. Once we've got to finish this, it's a little easier and we
can just sort of crack on.
6. Neck and Beard: Once you're confident
this is lovely and dry, we are going to turn the
painting upside down. If you're not confident
of doing this and you prefer to see your
painting the right way round, then obviously, you can
keep it that direction. But, if you wanted
to keep or say, keep it as you're seeing it, I would tilt the board
and give it a good tilt. I've got my little heart, which is probably
about an inch high. You may even want
something a little higher, depending on how you
paint he's flowing. But I'm going to tip
it up the other way. I'm going to do
exactly the same. I'm going to give
it a good tilt. I think by turning
up the other way, I'm not looking so much
at the bison in painting. I'm just looking at
the flow of paint. I'm just concentrating on what I'm doing on this section rather than taking into
account this chap. It might not work for everybody, but I'm going to do it. It's something a
little different, isn't it, and worth
playing with. So we're going to do a
similar sort of thing. We're going to wet up
to a certain area. So I'm going to put
a little line here. I said, this is just so you
can see the areas of wet. Down, gonna write the
edge of my paper. I'm gonna go right up
against the face color. I say, some of it bleeds. These probably
won't these paints, but if yours and you
haven't got the same as me, if they start to bed it a
little bit, that is perfect. But yeah, just make sure
it's nice and dry, though. And we're gonna go wet round. And again, make sure
it's nice and wet. Now, it's quite a lot of things to sort of
do on this layer. We've got to make sure when we put this strong color down, we also do the flicks
fairly quickly. Otherwise, if they're put on
when it's starting to dry, it looks like they're stuck on, so it doesn't look
quite so natural. And again, we're
gonna flick into this front portion of
the beard, as well. So, let's stick into
sort of cooler colors, I'm going to have mys
light genuine, lunar blue. Gonna have the sepia
as well, 'cause that's got a nice
depth of color. Gonna start with a sepia. So the solightGenui,
shall I say. And be bold it's got
to go a long way. I just allow that to flow. I would try to not put
too much down this edge. So when you've got, let
me show you quickly. That's all running. You've got a sort of a lighter
area to the back, so I'm going to concentrate mainly on the sort of
up against the face. What am I doing here? Hold on. I've got this tilted around
the wrong way, haven't I? That's a proper dissected
thing to do, isn't it? Wally. Right. You want it tilt it this way. So
it's running down. Yes. Concentrating fully. I wonder why it wasn't running. And just allow it to run. And if it's not running, you
can add some more water. You can just drop drop water. Let's keep a little bit
of lunar blue there. Let's a little bit down there. Watch out. If you keep adding
water, it will bobble here, so you might want just
to keep an eye on it, but it doesn't then run. It wouldn't matter too
much, but obviously I don't want it running right
off the page at this stage. Alright, let's do a few
flicks and bear in mind, you've obviously got it
upside down so it does make it a little bit more
confusing some ways, 'cause we have to make
sure the flicks go in the right direction once
we turn the page paper up. So just use that paint
you've got there. Nice, easy flick. Start
somewhere in the middle. Don't start right at the edge. We can always add
a few more later. It doesn't matter too much. Um, as long as you've got some
that are put on when it's nice and wet and
a bit more water, and let's get a little bit more right up against this edge. We have I put that?
Like genuine. There's been a little
bit of sepia, as well. I don't want to have a
line here, white line. Let's go we up
against that line. Fan. A few more flicks out here, S. And you can use your
fingernail, as well. Again, that will give you a
slightly different shape. Say we can run
some of those into the front portion of the bed. Okay, let's let this
run So just wetting. Well, just go to stop
sort of somewhere there, allow that all to run. In just suck that
little bubble up there. Come on, and we're
going to a little bit of goth and we're
going to try and warm it up at this stage now as we head to the
top of the head. I usually your
bottom of your page. It's just confusing me now. Now I've done one silly error. It's thrown me. But yes, we're trying to keep it a
little bit warmer as we go to the top of the head. Just keep eye that little
reference photo, as well. You can have a look, see
where those dark areas. We won't do another layer, so make sure you've
got plenty of paint down here and
it's looking good. You know what I
might do? I'm going to switch it around
the right way. It's so I have a
throwing me today. So I'm gonna if you're happy keeping Oh, my
that way, then do. I'm going to just switch it and make sure I put the heart
in the right place. Yes, that's looking
a bit easier for me today. Okay, right. I can I can see a
bit better now. Right. I want to alert this. I'm gonna flick
some of these up, make sure you get a knife,
some of my practice pieces. I didn't get the back
of the neck quite high enough or it was going
into the shoulder here. Obviously bit some big
things, aren't they? So having never seen
one in real life, it's a Yeah, sometimes easier when you know the creature
and you've seen it, but I've never never had the privilege of
meeting m. Okay, now I can have a look
at this, as well. While this is all
lovely and wet still, and I can add more
color if I want to. I got the sepa here.
Let's add a bit of that, and it's just beginning to
warm up as we're going up, so I can put that in there. They just just randomly flick
little bits and pieces. If you can stand for the stages, this would be amazing
just to stand up and have a look and just get away from your
piece a little bit. How do your flicks look? If it's still wet, we can add a few more or just get them a little don't want to
get them too uniformed. Again, fingernail. Just make sure you get that
gets the horns. That's nice and tidy. You have to keep
tidy on this piece, say, a lot of it is very
loose and very free. So you need to keep some nice sharp details
in some places. All becomes a little
bit too messy. I'm just trying to
squidge that out a bit. I don't think it
running over here. It's getting a bit too cool. Let's add a bit more
warmth up here. To be a judge of your own piece, as we work our way through, we all start to look a
little bit different. So if I'm adding bits that
you don't need to add, then don't be confident
in your own piece. I just want a little bit more a little bit more
strength down here, I think I'm going to put a little bit more so
like genuine here. I know I can still comfortably add this 'cause
this is still wet, but if it's starting to dry, be a little more cautious. Take my brush away.
I think that's looking that's definitely
looking better, isn't it? Well, I've allowed
that to run. It's run. Done quite a strong
line of paint, so I'm just gonna break
that line up a bit. A few more flicks
down here just to make sure that
shape looks right. It's come out a
little bit more here. Actually a bit fatter there if I got that reference photo. Other than getting a shape, I want to make that a
little bit more borbous. And the risk is to
not over fiddle. Oh, these are going
out of shape. Now, a really fun thing to do at this stage is to get a little
dry piece of kitchen roll. Kind of scrunch it
up a little bit, and we're going to adjust. If you've done, I did an eagle, Bald eagle, agall depending on where you
were in the world. We did this on the
chest, so I'm just pressing and it's taking
some of the color out. Again, if you don't like that
effect, then don't do it. But it's best done
while the paint is quite wet still because it will close up and won't
be quite so obvious. So I'm going to leave it there. I don't want to
do too much of it because it look a
bit too cressy, but it gives a nice sort of texture without us
having to try and put that coat in or you
could use salt. I have got some salt here. It probably won't work so well on the granulating
paints that I've got. I've chosen to do this buffalo, but you may have chosen
something different, so I'm just going to
sprinkle some salt anyway. And because we've got
it on a little tilt, it can give you quite
fun effects, but I say, I'm not expecting it to do much with the paints I've chosen. I just want to give the option if you're
using different paints, so I can probably
get rid of that. Now, at this stage, again, we just want to
sort of leave this. Again, if you push for time, we're going to be
doing the section, so you could just be careful that you don't put
your hand in it. But as ever, I want to allow
that to dry a little bit. And I will stand here
and sort of assess if I see things are moving
a bit too quick, maybe I've got a bobble
of water sitting here. I don't think I have I can watch it just to make
sure it's not gonna fall off or if I look
step away and think, Well, I needed a little
bit more strength there. While it is still wet and you have to make
sure it's still wet, I can add a little bit more, but be a judge of your own Pete. If you're happy with it,
step away and leave it. It's normally the best
option, if I'm honest.
7. Head Second Layer: Okay, I'm pretty confident
my bison is nice and dry, so I'm going to take it
off that little tilt. But I'll put back to one side. Try not to throw it
across across the studio. Right. We are going to do
this top section here, then run it into the head, and we're also going
to do the nose, which will pull it all together. So, let's wet down. I'm sure if this is helpful. Pop it on for you. I just so you can see the
areas I've wet down. Hopefully, it's quite
self explanatory, but we're going to run right up against this portion down. I'm just going to run
it just to there again. Say, make sure you do touch the existing
color on the face, just to allow any sort of runs
and keep it nice and soft, although we will be running
it into the head anyway. All over those little
bits of masking fluid. Again, we're going to try
and keep this nice and warm, but we do need to add a little
bit of a punch, as well. So I'll be using the
suck like genuine sepia and probably the
goth probably won't be using the two
blues, but who knows? If I feel like it
needs it, I will. So sometimes you just have to be a judge and not have
everything too regimented, you have to go sometimes
with the flow of things, and if something needs more
attention or a little bit of a little bit more darkness, then you can, you can
obviously add Right. Let's start with sucklt
I'm going to keep. So I've got the three
browns in my hand. Nice and loose, deep breath. And we're just going to tap, allowing it to say, keep eye on that
reference photo. You can see it's quite
nice and dark up here. Make sure you keep
your those lines lovely and neat up
against that horn. Say, it'll be these
sharp details which will help this painting, 'cause it's very loose, I say, very sort of abstracte. Trying to keep everything loose, just allowing
everything to happen. If you feel like a little
tilt running down this way, then you can always
give it a little tilt. I'm not at this stage,
but I'll see how it goes, but if you feel like
that would help you, then obviously do. There's a nice dark patch
up here, isn't there? It's obviously a
twist to the coat. Try and tap that in.
Again, I'm standing. C get a nice nice way, nice just a nice
view of it a little bit further away. Run down here. I say, we will join them up, but I'll join them
up just as this head sort of what we call this? I've got a top knot written
on my little notes, so I'm gonna call it a top knot sure it's not a scientific term. But yes, we're going
to allow that to sort of almost dry and then we're going to
run it into the face. Allow this line to be soft but won't give this chance of this top knot color to
run straight into the face. So a lot of this especially this technique
is about timing, getting the desired effects. Now, make sure you get enough. I mean, it's lovely to
leave that light and looseness and not
too much paint, but you need a certain amount
up here just so when we rub these masking fluid little
bubbles off, then they show. Otherwise, if you haven't got much paint, they won't show. But if you've decided
not to do them, then just they're little
easier in some ways, 'cause you know
what you're looking at to the finished part. A little bit more strength
at the moment in a moment, we're gonna pull
that down into here. Right. Take my brush away,
have a little look. I need something just here. This is why I'm
just going to have a little bit of so genuine. Say, it's a nice
color that straddles the warmth and cornice a nice punch and a nice
sort of granulating effect. Need to do those flicks as
well before that paint dries, as well. Lots of
things happening. It's partly why I
set these laries off then it gives us
time to do these things. Otherwise, it all becomes
a bit of a mad scramble. Which is okay if you're
doing it on your own, and you can experiment
with these things, but not so helpful if
I'm trying to teach it. I'll give you the best chance
of getting a good result. Okay, let's them a bush, take the excess moisture off, and we'll start on some
flicks. See how they feel. If it's very wet,
sometimes they're too wet and they become
a little bit solid. But I say, keep your
brush nice and loose. You can do your
fingernail. It just keeps things a little bit more. Just another dimension,
another texture. Again, you could pick
up another size brush. I've only got the
small one, but again, it will just give me it's a little bit wider
probably at the bottom. That'll give me
another thickness. And they are quite
chunky, aren't they? Bear in mind, we've left some
space to do these flicks, so make sure you get almost the top of the
neck thick enough. A couple of my practice pieces, I wasn't didn't get
enough height here. Shot a little bit of color from there? Take your brush away. Don't get too carried
away cause can do all these flicks and it all
ends up looking a bit flicky. So let's go on to the front
Oh at that reference photo. It's a nice one here, isn't it? I'm gonna use my
fingernail again. And actually, if you
use your fingernail, depending on your paper, it can actually almost
scratch the surface. So you'll get left with
some little lines. I don't know if you
notice this down here, that would have
been my fingernail. I say, habit does a better job
on some paper than others. Having a little cis. I need a little bit of
paint here, really. So let's do the goth. I want that to be warm, although on the photo,
it's all quite solid. We need to be able to break
this up a little bit of eyes. We'll just have an eye, and
some paint, spluty paint. I think that looks
right at the moment. So let's Lima brush. Let's allow this
painting to here. Let's. I'm gonna just
carry on, actually. I think at this stage, it's qual a lot of water there. Let's suck a little bit up. We're gonna run it straight
into the nose, as well. Or the muzzle area. I'm quite sure what to call it. Okay, let's just allow
it into here, as well. Again, that will sort of help
pull a lot of that color down from the top
knot. Bring it round. I'd leave out this little white
line that we've got here, so let's just swing it round
so we know we can keep it. Swing it round up against the nostril that we painted in right
at the beginning. Yeah, that's looking quite nice. I might even run it down into this little funny section
which I did paint in. I have a little bit
of sepia down there. Okay, that's looking good. Come back up to here a
little bit of like genuine. I kind of want to get a little bit of a sense
of line up there. To flick there. I think we rush away.
Have a little look. I say, we are. Bear
in mind if it's warm and this is beginning
to dry or almost dry, you might want to
sort of crack on and wet this area down here. But at the moment, it becomes hard to help everybody and get the
timing right for everybody. But, yeah, we want you don't want to allow this to completely dry before wetting
this head down, but I have to work on my own piece and judge my
own piece at the time. So Let's put a
little bit of goth there up around the
top of the nostril and around trying to get
that color in that wolf. A lot of water sitting here,
so edging my kitchen roll. I'm just gonna allow some
of that to be sucked up. Move it out again. And let's sit. What
have I got in here? Clutching onto these sepia. Let's get that nostril
in while the sepia, it's a lovely color full stop, but it also doesn't
move very much, so you can get a nice. You can always paint
it and it doesn't actually sort of move much. Whereas if I put the
sucitGenin there, that would have,
moved a lot more. Gain, take my brush away. I might have a little bit of so light gen just to
cool it a little bit. Just on that lower part. Yeah, I think that's
looking right. Right, I'm going to T is actually quite wet
up here, still for me. I'm conscious of your drying
time, as well. Right. I'm going to I'm gonna start
wetting this area here. I'm gonna start
let's put these down firstst I'm going to start on
the lower part of the head, then I can move up. And then once I got to here, then all this area is wet, so it doesn't allow
this paint to move in as much because there's
already a barrier of water. It's a That's a good way. I wet that down now and
carried on wetting, you would get this, you know, we've used this to get
that nice sense of run. So it's sort of
judging each section, really, and what you want
to achieve out of it. I'm just gonna go
around the eye first, I'm I want to leave
that little white line. And we'll go over the top
of those that painted line. That was a little
bit, just to say, just to help us be confident with the painting
we've got in front of this eyes if you've got
a funny looking eye, that can kind of
disturb you, as well. Oh it's all nice and wet. Before we touch that line. So we're just running it
to here at the moment, that same line as
we used before, but we'll probably run it down
and soften this junction. Right. I think this is a
little bit dryer here, so I will join these
little sections up now, and you can see it's just
a soft and just running. I will allow that knot
to look as sectioned. Lovely.
8. Head Adding Colour: Now, each of us now need to assess where we want more color. I'm going to This is
obviously very cool, we've used warmer colors here, so I really want to
incorporate some so light genuine
into this area here. And I will probably
use Sepu as well, just to give us a
bit more punch. It's quite washed
out at the moment. But, say, be a judge
of your own piece. I know squinting
sounds a bit corny, but it really does
help squinting and seeing where you need a
little bit more strength. So I'm going to start
at the top here. So we have to start somewhere. And I'm just going to tap. And we also will do some flicks into this
neck area as well. But let's just stop
getting a little bit of color there and a little
bit of cornice from the so light generally
and tried probably to keep that more
to the lower part of the head and the
warmer sepias and actually it's
scaliteH to the top. So use that reference photo as a reference. Don't
be a slave to it. If you like if you put some paint down,
you like what you've got, but it's not exactly what's
on the reference photo, then I would go, you know, with what you've
got the you're pleased with. It is just a reference. It's different if you're
doing someone's pet, 'cause you will need to sort of be true to some of
their characters. But something like this
doesn't matter so much. Again, I'm just analyzing. S, wait, nothing to
stop you going into the top knot area as well, so you can
kind of join that up. If it's still looking a
bit disjointed to you, then you can obviously just straddle those two
areas like that. So that's not quite right,
but you get what I mean. Little bit of dark
area down there. I feel like I need a bit more
sort of strength down here. Again, I'll use so genuine
and a little bit of SPIA. I actually quite
wet at the moment. I have this amazing disclighte
that I used to film. It gives such a
lovely oval light, it's quite a flat light, though. Quite often don't see the
amount of water I've added. I think there's
quite a lot there. I just gonna stuck that
up just a little bit, 'cause when I pour this in, I still don't want lots of water. Let's just warm this
little eye area up Gua well waiting I'm just gonna wait for that
to dry a little bit. So let's just work on this. It's a little bit bored
at the moment, isn't it? So I'm just gonna
warm it up a bit. So obviously, what we're always
drawn to is the eye area, so we can warm that up. I just gives our eye
something to search for. And there will be a nice
little bit of makeup there, but it's a touch too wet to put that on
there at the moment. So, taking my brush away,
having a little look, actually, while we're
waiting for that, and this is probably
still nice wet. Let's do some flicks
into the neck area. Again, if you don't
feel that you want to, it all becomes a
bit personalized. The further we work
through these classes, some things will
be more relevant to your piece and other bits. But I think it's quite nice, even if you just do a
little bit it again, stops that looking so sectioned. But be careful. Keep
taking your brush away, having a little look it's one of those things they're
so satisfying to do, Felix, and before you know
it, you've done too many. Let's just soften
that a little bit. Do a bit more sepio one to
warm it up a little bit. So keep taking my brush away. Stepping back. Well, I think that's probably enough because we can add
dry flicks, as well. So I'm gonna err on
the side of caution, not too too many, I know
how addictive they can be. And let's concentrate
on this little area. Now, this nostril is probably
still a little damp, but I don't think it matters
if it blends a little bit, so let's release this
line into the beard, and I'm actually
going to just sweep it over some of this. It's only all my other pieces. I haven't had such a junction, but this is quie a
junction between the cooler back and
the warmer front. So by merging them, that should just soften. Again, if your junction
is nice, as it were, and you feel it doesn't
need to be merged, then don't haven't done on any of my other
pieces, but, again, you just have to go with what you've got in
front of you really and not be too much of a slave to maybe an
idea you had before. I think that's
looking right for a bit lined a bit hard there. Again, while it's wet,
you can take color out. So the beauty of this papers very easy and the paint's actually is very
easy to lift color out. Right. I don't want to
overfit of that too much. That nostrils done okay. I don't think there's
anything might put. Let's put that down. Where's
that? Sickle like there. Let's just a little
bit color there, just looks a bit
savy, doesn't it? So it just gives us
a bit more of a line there. We did have a junction. Yep, I think that's
looking right. We'll join it up
later, but much later. Take your brush away,
have a little ponder. We can obviously take some
color out to do those flicks as well or add some of the
white gouache in there. So don't over
flick, I would say. Let's get. Just be careful you
don't put your fist in it. It might be just a meth, but
it's easy done, isn't it? So I've got my sepia. Clean my brush,
excess moisture off. A nice fine point. And I'm going to
try if I can get the angle right
underneath this eye, do that makeup, get
some of those lines in 'cause this will help
the painting at this point. Now, if you've got quite a hard line like me,
that shouldn't have done. See, that's the beauty
of sepia in some ways. It hasn't bled at all, but let's just give the
edge a little bit of a rustle so it does.
Just to soften it. He's got a bit of a lazy
eye now, hasn't it? It's amazing the smallest of movements of a brush and
smallest amount of paint can just add such character
or take it away or I always surprises me the small adjustment you need to either lose
it or gain it. Yes, that's a bit better.
You would be angry. I think some of the softer
lines were put on or more soy, the more exaggerated lines
were put on in a minute. Still a little bit wet.
Take your bush away. That's put a tiny bit. Little bit of so like genuine. Tap that there a bit a bit of I a little bit of hardening soy, a
little bit of strength. Actually tap it over
the top, as well. This is where everything
sort of slows down. We've been quite bold.
We've let paint flow. We've tilted the paper, and
as this dries and shrinks, and we need to add sort
of fineer details, all sort of slows down. And this is probably where you could be sitting again now. And all the movements and little adjustments
become quite small. Especially around the eye. Yeah. This little white
line can be softened. It's a little hard
at the moment, but same with the nostril, we'll soften it once
everything dries. If I was to join that up now, it would just bleed and
blend into that white line, we'd lose any strength.
Right, have a little look. For this, I should imagine
with the majority of you, and I think actually mine
is almost dry there. It's still a little damp. But
yeah, have a little access. If you feel, you want a little bit more
something somewhere, these little junctions lost
a bit of strength here, and I can see these just
about still a little bit wet so I can add just a
little bit more opin. Because the paper is
beginning to dry now, all sort of settling down,
it won't move so much. So then this will then
give us that control. When it's paper's really wet
and you put the paint down, it all flows really quickly. As it as it begins to dry. Then you find the exact
exact same amount of paint you put on your brush would have allowed
lots of movement. I won't now. And actually, let's do a couple of little flicks into the horn. So it looks like you've
got a bit of coat. You can sort of swizzle
it around a bit. Let's What have I
got in my hand? Let's have a little bit
of so light genuine. Suck Bush way. Yep, I think that's
looking right. It's a little tap around there. It's a little bit
dark around there. I want to move that line to
it becomes a little liny. I'm just going to break
that up a little bit. Just small adjustments. As I say, there are
small adjustments now. That softened into. You can see how that's
sort of merged now, others, I had quite
an obvious join. So that's nice. Do
you ask what to do? Sepia. I want something there. Yeah, that's probably
just enough, actually. Put more strength under there. I mean, if you put something in, say example, I've put in a
lot there. I don't like it. I can clean my brush, I can just gently remove it. So you can experiment. You can put something in there
and go, No, that's wrong. And then you can just gently take it out, squeech
it round a bit. So as long as you're gentle, don't sort of scrub and
be mindful, then yeah, I think watercolor isn't quite so permanent as
some people think, so don't be afraid to
add something in there, and then sort of gently mindfully sort take it
out if you don't like it. I think I'm almost there. I just a tiny little bit
of warmth, actually. That's above yeah, I'm going to leave it there
because I know what I'm doing because it's so
easy at this stage. You're enjoying it. You'll
become a bit more relaxed. You're kind of seeing it
all coming together and you carry on fiddling 'cause
you're enjoying the process. But I think I'm
going to down tools. I'm gonna allow it to dry, and then we can do all
the finishing off bits because there's quite a
few bits we can do to sort of just really lift this with what's called that
masking fluid to take off. So my advice would
be just to leave it. We've probably done all of us, both of us enough at this stage. So yes, down tools, and we will look again
once it's lovely and dry. So. Oh, and I know what
I was going to say, which is a useful tip, and I find quite good is to take a picture
of your painting. I get that there.
Can you see that? And I will often then
work for my photo. It just gives a different
sort of impression. I'm quite happy with that. So before you
actually down tools, you could take a photo,
have a little look. If it's something
obvious, you're like, Oh, no, that's not quite right. Somehow, you can see that
on a phone that you can't sometimes see when you're
looking at your actual piece.
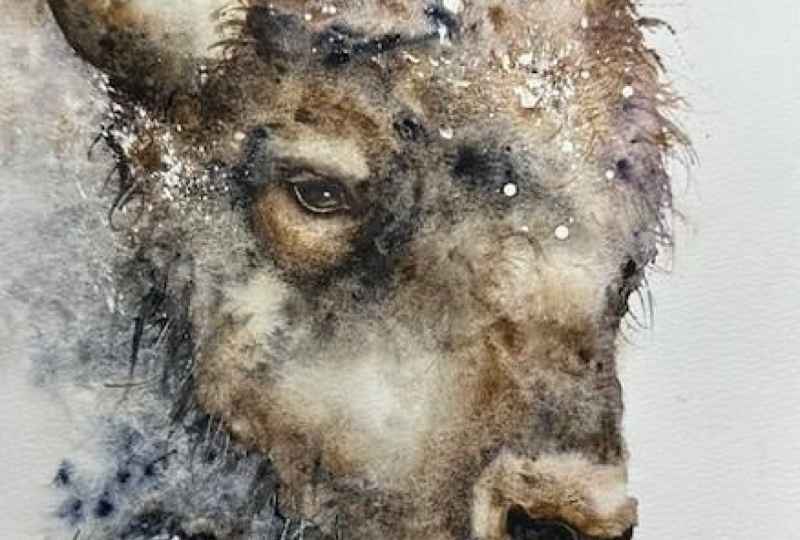
9. Finishing Off: So how does your lovely bison look now it's completely dry? I think we ought to get this masking fluid off
next cause that's, yeah, that really helps
with the overall painting. So make sure it really is nice and dry and
your fingers are dry, and you just gently rub. It's quite satisfying. Just continue taking it all out, you can normally feel
where you put it. And any salt, if you put salt down as well you can
brush that off as well. Nice can you see? I mean, you know, that looked like
quite a lot of masking fluid. But actually, once
it's rubbed off, it doesn't seem quite
so so prominent, does it? All right. Let's try and brush this off. Bits thin. Lovely. Fun, isn't it? Adds
another dimension to me. I quite like masking fluid. Even if sometimes it's
just a splat across it, and it's not really trying
to portray anything. It just gives a little
bit of splash of light, and a bit of just
interrupts things, I think. It's good. So what
we're going to do next is to take
out some light. And I'm going to do that
with a magic sponge. Which. Was it the other
side of the studio. So this is a magic sponge. It can be found on any dare I mentioned the Amazon word, but
you'll find it anyway. It's actually a
cleaning product, but it's great for
taking color out. And any splatters. So if you this one, I've actually managed
to keep quite clean, but I know a lot
of my practice pet there with splatters
all over it. So if you have, simply, ideally, I'd have
changed my water. It's a little bit dirty, but but there's a
little splatter there. And you just simply rub it out, so you wet the sponge and just Dada really good for
taking sort of color out, you know, any splatters
and marks you make 'cause it's so
easy done, isn't it? But what we're
gonna do, you know, wet that down, give it
a little bit of squidg. You don't want to add
too much, you know, we don't want it saturated, but what we're gonna do is just take a little bit of light out. I don't often use this, like this technique, but I found it quite useful for this bison. It just broke up some of those these lines here
without using a brush. Normally, I sort of take
them off with a soft brush, but that led to taking lines off rather than just a
little sense of light. Don't go too crazy with it. Again, keep sort of stepping
away and having a look. And anywhere else you feel that might be
beneficial for you. Obviously, I can't see
everyone's work and advise you, but go easy a once
you take this out, you can't put it back in again. So err on the side of
caution. Little bit here. I think I've gone a
bit misshapen here. I always tell you
on every class, be careful about going
over your lines. I think I've just
done that there. So again, great way to sort
of neaten up the lines. Just take a little
bit off the top there just to give a
little sense of light. I'm going to actually leave that there for the time being, I can always do more, but I can't put
it back in again. While that's still
down, we don't want to be rubbing any pencil marks out. But what I did do on a few of these practice
pieces was with, I've got a tiny little bit of nail file was to actually
file some of the paint off. Have I got I tell you what I'm just gonna grab one
of my practice pieces. Practice piece. And I simply, I've already
done it to the horn here, but if you can imagine
this was the horn. You just give it a little scrub. It will take if you've
got a textured paper, it will just take the top
of the textured paper off. My dad, bless him, who was a really good watercolor artist uses this quite a lot
actually in his work. So I will leave you to decide whether you want
to do that or not. I like the horns I've
got, if I'm honest, but I will have a little
go on this one side here. I can get this Of you
don't have to have half an elf but it's a
little easier to work with. So you just simply or very, very light piece of sandpaper, would do the same thing if
you haven't got a nail file. And again, you can
just use the edge of it to actually create
some little lines. But, yeah, if you're in doubt, practice on a piece of scrap a piece of paper or
an old piece of, you know, maybe a painting
that didn't quite work out or some experimental spldges,
where you test colors out. And it can be used
a little bold, but you can use it again to take out some of those
lines is quite useful. If you're just using
it on the side, again, it's not it's a bit
once you've done it, you've done it,
whereas if you use the white grass, you can
kind of lift that out. So you have to be quite confident that's
where you want that line. But it's an
interesting technique. Worth having an experiment
with even if you don't use it on the bison. So let's finish this eye off, and I'm actually going to have you invested in a pair
of glasses at last. Then, obviously, I can't show you what I
look like in them, but it helps me a little bit
with the smaller details, especially standing where I do 'cause I can never quite
get quite close enough, and so I should be able to
help you a little bit more. Right. I like what
I've got here. It's a good shape, but you could just go back and
reshape the eye a little bit. You don't really want to
go into that white line too much at this stage because you have a
nice white line. But you have if this white line has really gone a
little bit array, you can always sort of
apply it reapply it with some white grass and make the eye a better shape,
if that makes sense. I'm just going to put that
little line up there. It does feel weird
wearing glasses. I've never worn glasses before, so it's a whole new
chapter for me. It's that line over
there and up here. Yeah, I think that
looks pretty good. And also, there's a nice
light piece coming out. Just at the corner,
isn't it, very gently. Just take that out. Squid
it with your finger. That takes a little
bit of colour out. Oh, I'm gonna take those
glasses off to look think. My distance is quite right
where I've got the camera. There is also, I lovely if you scroll into that
reference photo, there's a nice white
line, isn't it? And actually, I will
put that on with a bit of white gouache, so nice creamy consistency. And you can see quite plain you see it on
the reference photo. I just want to paint that in. Oh, that's made him look
quite cross, hasn't it? The difference that's made. So doing a little
bit of tinkering, I'm going to take that
little line out there. It's gone too far down, and it's making him
look quite fierce. So I'm just gonna
take that line out. Like I said earlier, the
tiniest little thing can alter a whole eye with the
minutest little touch. So don't be afraid to tinker.
There's always this thing. We shouldn't fiddle
with watercolor, but there is a time and a place, and this is at the end, it's just assessing and doing tiny little movements to get these important
details right, and it's well worth
taking the time. As I say, the rest of
it's ever so loose. It's just a it's a lot of
splogies really, isn't it? Hopefully, carefully
selected splgies, so we need to make sure this
eye is lovely and right. Alternatively, you can't if the white grass isn't
working very well, you can always take
the color out. It depends on your
paper and your paints. But again, Bockingford is a good paper for
taking color out, and so obviously, the paints
lift out well, as well. So that's another
way of doing it. Okay. What I will do. Again, I've done in some of the practices,
but not others. I'm just going to
wet around the eye. I don't know if you
remember that pencil mark we put in there very early on. Seems a long time
ago now, doesn't it? Doesn't matter if you can't see the pencil mark anymore.
It's just a rough. You can see on that
foste it almost looks like a lighter area
around the eye. And with a little bit
of sucalite genuine, I'm just going to
make it a little bit more pronounced in places. And even by the mere
fact of wetting it down, you'll end up with a
little sort of water line. I want to when I squint, there's that nice
try and put it. I started to put it in earlier, but I've lost it a little bit. That's nice line
there, isn't it? Kind of swings
swings off the eye. Take your brush away,
have a little ponder. Think I've managed to put in a different two line
tier, haven't I? That's what happens
when you wear glasses. That better? Yes, I
think that looks better. It still looks a
little fierce to me, but I may tinker when I
can get a touch closer. Um, exaggerate. If you can hear
snoring, it's my dog. She's having a quite
old dream down there. I think I'll leave it there. I don't want to go all the way around and circle it in color. It was just to try and
sort of pick that out. Fabulous. Right. I'm
going to leave that there because I feel I'm starting
to fiddle a little bit. There's this nostrial area. So what we're gonna do gonna
wet the nostril down again, and then we're going to
incorporate that white band. And we're just gonna
give it a little bit of a rustle
and it should just gently flow into
that white area. And that should be that really. You shouldn't need to do too
much more, but, you know, if your paints are a
little more stain, you might need to give it a
little bit more of a rustle, but that's just given enough. It's softened to that
white area and then allow the top color to
blend into the line. There's also a nice line that comes off the nostril again because I've got
this nice brush. I'm probably just
gonna take it out. But you could add it in
with the white paint, so's leave that one up to you. It's all these little
fine details and say, it will really bring this
painting to life, as they say. So take your time on this bit. Again, just have a little look. If you want a little
bit of light out. We know we took some
out with a sponge, but we can be a bit more
exact with a brush. It looks better. Take that off. It's sitting on the disk. I'm just standing away from
it, having a little look. Again, you can take a photo
of it and see where you are in the process of
the tinkering bits. I can if you didn't
want to be brave enough with a nail file, which I can completely
understand, you can take some color out with your brush to do some flicks. Just to maybe break
up that line. If you've got a line still, you may be fine with you. Again, you have to be a judge of your own piece and whether you want to do these
little tinkers. Some will be relevant, some won't And again, you can take if this lines
got a bit solid down here, you're going to again just
take little bits of color out. Itch mole. It sweeps in the front here. I almost bled too
much now once I soften those two
sections together. Walk say, you can
use a white gouache. It doesn't always show
particularly well. If you're used to using
it, you know what I mean, but it sometimes looks great
when you first put it down, but dried, quite pale. But, yeah, you can
do some flicks. Be careful. I'm showing
you these examples. So I'm probably adding
too many flicks. So be careful you
don't add too many because it can get
a little too much. But you can go around and do a few little bits
and pieces. No. Alright, I think I need
to stop doing flicks. I keep showing you all
the different ways, and I'm getting a bit flicky. Right. Well, we've
taken the color out. Let me show you on this chat. Did you decide whether
you want to add more? I've done these little flicks, so I did magic sponge. Obviously took the color out, then I've added some flicks in. So again, you can kind of decide whether you
want to put some in, but I will for the sake of
showing you, put a few in. I kinda say I'm getting
a touch flicky here. Up here. And you can
add a few in here. You can break up some of those dots looked a
little bit solid, then you can sort of
flick over those dots. Yeah, dots with masking fluid. Again, these that line looked
a bit solid down here. Yeah, this section here from
the top knot to the face, you can kind of break it up
with either flicking color in or flicking colour
out like that. Well, I think you get the
general gist and obviously just go round your own
piece and just assess. I think this is
looking pretty good. I know what I haven't done. Is that catch
light, which always just gives you a proper
old zing, doesn't it? But let's just we're taking
colour out. Or I'll forget. Again, you can take
a little bit of color out the front
of the horn knob and go back 'cause it gives
you that sense of light, but you don't have to if you've got a good effect there already, so be careful. Don't over, if you've got
something you already like air on the side
of not worrying. Looking away, I say, I
think he looks quite good. I think there will be some glass wearing eye adjustment
a little bit. So if he looks a
little different when you actually see
the finished piece, then you know I've
had a little tinker off camera when I've been
able to get a bit closer. But let's put that little
catchlight in cause that always makes the world a
difference, doesn't it? I think my little light
needs to come down a little bit and
just make this eye a little rounder so
he doesn't look quite so squinty and sort of angry. But, yeah, if that's the
look you're going for, I think that he's I've
achieved it on this one. Um, just looking at my notes, was there anything else that was worth doing these little
finishing off bits? I've got quite a long list of little a little adjustments. This was particularly relevant
in this Bison at the end. I think I've done them all. Honestly, again,
like I often say, I would we've probably
been painting together for quite a long time if you've actually done
this in one sitting. So I would go away for
half an hour, come back, have a little look and see if there's anything
that needs doing. It's very easy 'cause there's a lot of loose work in here, and it's easy to sort of
overfddle and muddy it. Um, so yes, be careful of
that when you come back. So I would definitely leave
it yeah, and reassess. And you may find
you'll look, you'll come back and go, No, you know, that is enough and be
confident to leave it at that. So yes, if there's like
I've said in a few classes, if there's when I come
back and if there's a lot of adjustments I think
that need doing to this, I will film that little section. But like I probably always say, as well, I don't
think there will be. Eye needs a little work,
but I will probably do that off camera, but it will just be making
that little rounder. So, yes, as ever, thank you very much for
joining me with this Bison. And please, please
do share these on the projects and
resources pages. And again, any questions or I haven't made
something clear then just reach out on each class has
a little discussion section, so just pop that in
there and say, Help. I don't get this bit or
have a look at this. You know, do post your projects up and maybe ask me a question if something you would like
some particular help with, maybe the horn looked
a little odd to you. Post the picture up and and ask, and I will endeavor to give
you a hand as best I can. But other than that, thank
you very much for joining me. And yes, it's been a
pleasure as always.
10. Final Thoughts: I hope you enjoyed
painting the bison. He was a full on
class, wasn't he? How did it feel to
paint the eye and the tighter details
first? Was it helpful? I hope the ugly stage
didn't last too long, and you didn't get disheartened. It does all pull
together at the end. You just have to stick with it. Did you try out
those quirky ways of adding texture like
the kitchen roll, nail file, and masking fluid? Or maybe you found your
own fun technique. As I always say, it's
worth stepping away and coming back and looking at your painting with a
fresh pair of eyes. I think it's especially
relevant on this bison. So we look forward to seeing
you in the next class.
 Jane Davies, Professional Artist and Teacher