Transcripts
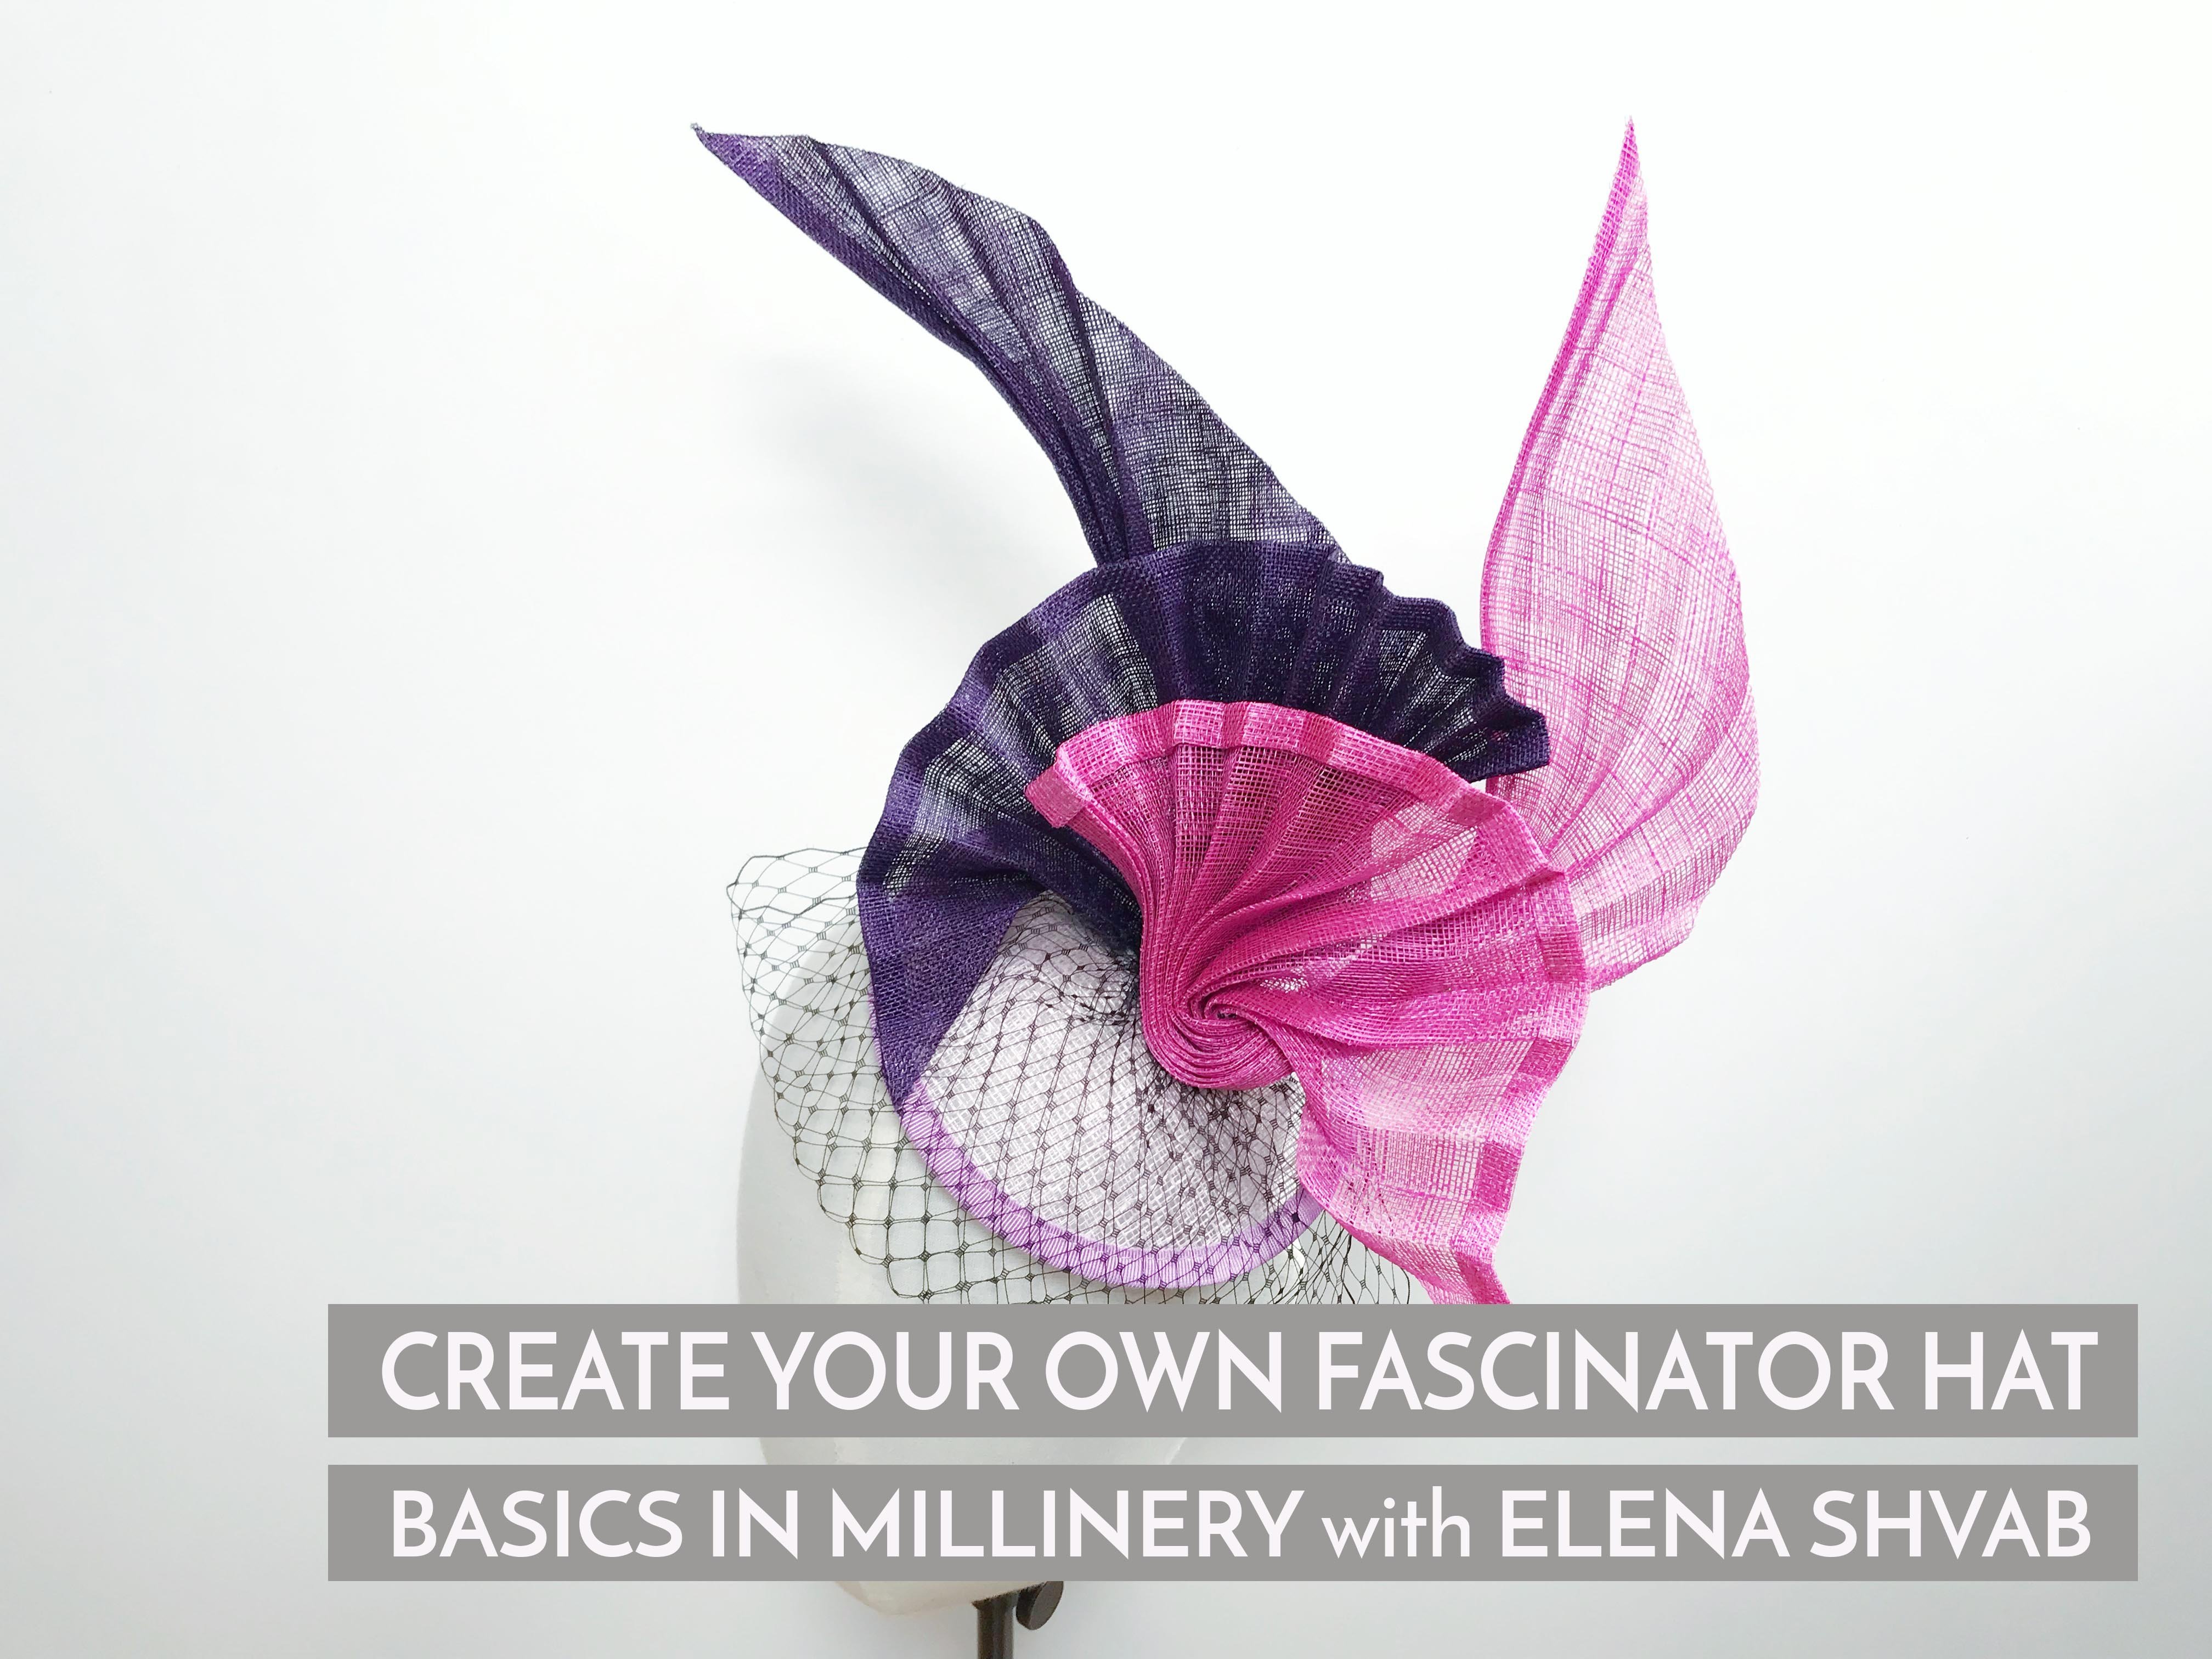
1. Introduction: Hello. My name is Elana Schwab, and I am a head designer
based in London. I'm thrilled to
invite you to explore the world of bespoke
head bands in my studio. With over ten years
of experience in millinery craft and with a
background in textile design, I love working with a diverse
range of materials creating unique textures and textile
material combinations transforming them
into variable art. This is why I see head
bands as a way of combining beautiful fabric materials in order to express personality. Today, I will show you how to create your own spok headband. Head bands are more than just stylish and
fashionable accessories. They are also
effortlessly practical and easy to wear
elevating your style. Headbands are perfect
for any occasion. Whether it is casual
wear or special event, it suits any hairstyle
from a slicky pony tail, to a messy bond,
brake. Loose curls. Headbands are an
effortless way of elevating our style and
expressing our personality. During this course, you will learn how to create and style your own bespoke
headband from shaping the base and adding
structure with wire, padding for volume,
covering the headband with your choice of fabric and
creating beautiful decorations. After all, fashion is all about self expression by
completing this course. You will have the skills to create one of a kind
bespoke headband to we your masterpiece
with pride and let your personality shine
through. Let's begin.
2. Part1. TOOLS AND MATERIALS: In this chapter, we will
talk about what tools and materials are required in order to create a
bespoke headband. Head block is the most
important tool in millinery. Head blocks are pieces of
wood that are carved into the shapes of a
particular had style, just like this ones. For our design, we need a
head block in the shape of our cd top and
ideally flat sides. This type of head blocks called dome shape or open
crown head block. This head block shape is especially useful if you're
a beginner in millenary, and don't have head blocks yet or looking for your
first head block. This shape offers
versatility for various projects such as creating dome shaped
head grounds, fascinator bases, free
hand blocking techniques, and also blocking
headband bases. If you don't have
a head block yet, you can use an alternative polyrin dome shape
just like this one. Well, slightly
rounded on the sides, it will still effectively
support blocking a headband base or creating other small
blocking projects. Headband patterns. Before we begin crafting
our custom headband, it's crucial to finalize the shape widths and
lengths that best suits us. Measure your head
from one side to another just behind the ears to define the perfect lengths. Next, choose your perfect width. With these measurements in mind, you can design your very own personalized
headband pattern. Alternatively, you can
use the measurements of a premade headband
as a reference and make any necessary
adjustments. In order to create
a head band base, we need a strong
foundation material. For that purpose, we
will use background. Background produced from cotton an ideal for heavy creations
such as theatrical wear, blocking head bases,
and support structures. Brom comes in white
and black colors. It comes as stiffened
or non stiffened. If you purchase a
non stiffened Bram, you would have to
apply stiffen the same way as you would
stiffen straws. Stipend and heavyweight brom fabrics are easily manipulated
with steam or water. If you don't have
Brom available, you can use a cinema
straw as an alternative. However, since cinema
is a lighter material, I would recommend applying at least three layers to
create a stronger base. Cling film or cellophane bag. Using cling film, clear cellophane bag is essential for protecting
had blocks from moist and stiffen while also helps to easily remove blocked
shapes from the had block. Baking paper is the most unexpected but
very helpful tool. It will help to protect
the iron from sticky rum during the ironing process that we will cover
in our next chapter. Water spray bottle,
spraying rum or cinnamy on the fabric is a
convenient way to soften it before
blocking. Had dry. Optional, not
necessary, but it might be quite handy helping backrom
or cinema to dry faster. The next essential tool is a cotton covered
steel millinary y, used in Mlinary industry
to support the edge of a ht brim or for creating
a unique shapes and forms. It comes in a variety
of widths or diameters. We will be using cotton covered millinary y, 1.2
millimeter white. It also comes in a
variety of colors. The most commons are
white and black. As a tip, the fact that the wire is covered with a cotton
thread allows you to paint the wire
with acrylic paint to color mag the wire
to your creations. We will also require pliers, any players will do,
really, and iron. We will need a very basic
iron nose steam required. Padded material
foam and boarding. There are many
different materials available for padding headbands. My personal choice is this standard upholstery foam typically used for
furniture padding. This foam comes in various
widths allow you to select the perfect one based on the height and design of
your desired headband. Today, we will be using a
1 " 2.5 centimeter wide, medium density,
firm, feeling foam. If you don't have
a foam in hand, wording fabric is a
great alternative. While softer than the foam, it comes in different widths
for you to choose from. Just keep in mind
that you may need to layer it to achieve a
higher style had band. For those who don't want to create their own headband bases, go through the process
of blocking wiring, padding, and so as
an alternative, you can use a pre made padded
headband and just enjoy the process of
covering the headband with your choice of
fabric and decorations. When it comes to choosing
the perfect glue, my topic is Yu,
all purpose glue. It's versatile and
works wonders with all types of materials,
including fabrics. Plus, it dries quickly, clear, and does not smell. As a tip, it is easily removed with a nail
polish remover. If you're looking
for an alternative, consider using hot glue. Just keep in mind that while
it's a strong adhesive, it can get messy and be challenging to remove it
if you make a mistake. Additionally, it may leave visible chunks of glue
underneath the fabric. Pasha ribbon is used to trim
underneath the headband. The ribbon is a must have
in any Mlinary projects. Made from viscose, cotton, or ion fabric, it is
very easy to use, comes in many different colors, and with Today, we will be using Pesa ribbon, 2.5
centimeter wide. We can also choose to
use other ribbons, such as this lovely velvety
soft to touch ribbons. Selecting the right fabric is
a deeply personal decision. We will talk about fabrics
in our next chapters. For now, keep in mind that
opting for medium weight not overly thick and preferably stretched on nitty
fabric is key. Consider incorporating
fabric nettings to add depth to your designs, layering materials to
craft stunning textures. We might also use dot. Do meet is a fusible interfacing and usually available in two classic colors
white and black. Ideal for creating
a protective layer between a light fabric. And a more textured
materials like Bachram. We might use it in case our choice of fabric
is too fine such as silk or if the wave of the fabric is to
loose or C through. We will be using a pencil or chalks for tracing the pattern, heavy duty sharp scissors
for cutting rum, fabric scissors,
and small scissors for cutting threads,
and fine details. Sharp cropped knife for
cutting the padding foam, matching threads,
needles, measuring tape, and a cutting board. Blocking pins is a crucial
tool in the world of melonery, coming in a variety of shapes and sizes to suit your needs. The key feature of a high
quality blocking pins is their super fine and firm wire ensuring that they don't bend. Go for non rusting y to prevent any unwanted marks
or delicate fabrics, especially when
working with felt. While traditional blocking
pins are excellent, I have also discovered
a great alternative like push pins that are
perfect for blocking. For those using
polysyn head blocks, go for longer pins, such as tailor pins
for a secure hold.
3. Part2. BLOCKING THE HEADBAND BASE: In this chapter, we will learn how to block
headband base. We will need Brum or sname
straw, blocking pins, Dm shape head block
headband patterns, iron, water based stiffener, if
you're working with non stiff backro or
Cinna baking paper. Before we start blocking, we need to understand what headband size we want to create. For this step, it is
quite important to finalize your headband
shape and create a pattern. Measure with a measuring tape, the lengths of the headband, starting from one side
of your head just behind the ear to the opposite
side and write it down. Then decide how wide you
want your head band to be. Based on these measurements, you can create a patern. The measurements of
my headband patern is 38 centimeters
lengths or 15 inch, four centimeter wide
inch and a half. Obviously, you can create the measurements
that work best for you based on your design and
your style of the head bond. Once we have the pattern, we can measure how much
material we need for blocking. But before that, it's important to understand how
the fabric works. Cinema and rum are
woven fabrics, so it has bias and a grain. The bias runs at a 45 degrees diagonal angle to the straight grain and is a
stretchy side of the fabric. In millinery, you will always want to use woven
fabric on the bias. Place the pattern on the bias
side of the crum and add 57 centimetres on each side to allow enough excess material
for stretching and blocking. Cut out two layers
of back rum or 34 layers if using cinnamic
straw or lightened back ram. Blocking a head band or a hat requires a lot of
water and stiffener, both of which damage
wooden head blocks. For protection, we will need to cover head block with a layer of clin fill or a salvan bag without any prints making sure to smooth out all
bumps and creases. The layer of plastic will also keep the back room from
sticking to the wood, making it easier to remove the molded
shape after blocking. Even if you're using a polysyn head block or
any other had block, you still need to cover it with a layer of cling
fill or self back. Spread the back rom
generously with step water. This will soften the fabric, making it more pliable and easier to manipulate
and stretch. Place the back rom on the
top of the had block. Pull the back rom
on the base around the block and secure
with blocking pins. Then pull the opposite side. Pull the back room as
tightly as you can to get rid of falls and then
secure with pains. Now stretch and pin the non stretchy side and then
stretch the opposite side. Once all opposite
sides are secured, pull and stretch the
rest of the fabric creating nice and
smooth surface. Continue pulling and stretching the rum as hard as you can, Binning as you go to work out
the folds and loose areas. Repeat the same steps
for each and next layer. If you are making a base
using a cinnami straw, the process of blocking
is absolutely the same. Simply repeat, stretch
the fabric, hold, secure, and then release, stretch, hold,
secure, and release. Once the b room is
stretched and secured, the shape looks smooth
with no loose as of folds, then well done, the blocking
process is finished. If you use a stiffened backrum, we don't need to
do anything else. The process is complete and
now we can leave it to dry. However, if you're using a non stiffened backrum
or cinnamic straw, we need to stiffen the fabric to make it stiff and
st when it dries. You can either e a water based stiffener or dissolve a concentrated
stiffener with water. The way you stiffen the straw. Pour some stiffener into a bowl and apply to your
blocked headband using a paint brush or spray directly on the headband
base using a spray bottle. Make sure that stiffener gets
right through the layers. If you do not have
ready to use stiffener, you will need to dissolve
your stiffener in water. Typically, you will need one part stiffener to
four parts of water, but you can always check it on the manufacturer's instructions for your particular brand. Leave the back room on
a head block to dry. If you are in a hurry, you can use a head dryer
to speed up the process. Otherwise, just let
it dry naturally. Well done on accomplishing
blocking the head band, and now we're ready to
move to the next step.
4. Part3. CUTTING OUT THE SHAPE: Once the fabric is dry, we need to make sure that
both layers have bonded. For this, we will do a
little bit of ironing. Sometimes when material
tries, it naturally moves, and that creates little
folds on the sides, and ironing will help us
to flatten the surface, as well as it will help for
both layers to bond together. You can use a little
bit of water, just a tiny bit of water spraying on the head
block on the fabric. Water helps to extract Stipa, Stipena acts like a glue and under heat and
pressure of the iron, It helps for the layers to bond. Preheat your iron
into a medium heat, making sure that
steam is turned off. Cover your blocked ground
with acing paper to protect the am from burning and transferring sticky
stipena onto the iron. Once the iron is hot, begin pressing the base. Press and for learning purposes, I will take the
baking paper away so you can see the way
I'm ironing the cm. Don't press and hold, but iron in the always
moving circles. This will help to
spread the heat evenly. Keep on pressing
with the iron and make sure that the
folds are flattening. Continue ironing until both
layers are bond together. It should look like this. See both layers stick together. This is the result
we are aiming for. Continue ironing
as much as needed. Once ready and you're
happy with the results, place the pattern on
the blocked backrum and secure it with the pins
to stop it from moving. Use talk or pencil to
trace the headband pn. Once finished, take the
pins of the head block. You can use pliers to
make the process easier. Once finished, carefully remove the blocked back rub and cut the shape
following the line.
5. Part4. WIRING THE HEADBAND BASE: We just blocked this
lovely headband. The next step is to secure the headband by
stitching the wire. Wiring the edge of the
headband is essential in order to support the headband and help
to keep the shape. For this step, we
will need milliner y 1.2 millimeters measuring tape. Glue, not necessarily,
but it might be helpful, matching thread, but
for learning purposes, I will be using a
contrast thread. Small scissors, for
the thread, pliers, for the wire, for
cutting wire, art clips. They also not very essential, but they're very helpful. It's good to have them and also needles and
simple if you're comfortable working with
it, and tailor pins. Use a measuring tape to find the total length
of the headband, placing a tell pin at the start can make it easier to get
an accurate measurement. Measure the headband
carefully following the edge. Do not rush at this point. The exact measurement of
the wire is very important. So my measurement
of the head band is 77 centimeters or 30 inch. I will add additional 2
centimeters for the overlap. Now, as we know the
measurements of our headband, we can measure and cut the
required amount of the wire. Measure the required lengths of the wire and cut it
with the pliers. The measurements of my head
band is 77 centimeters. I will add another 2 centimeters
for the overlapping. Altogether, it's 79, and I'm
cutting with the pliers. Here's the wire
for the headband. As the wire comes a
little bit curved, I need to straighten it. For that, I will twist the wire to the opposite
direction to flatten it. I'm placing the re in the center along the
edge of the headband. You can adjust the as you
place it on the headband. Clips will keep the in
so it doesn't move. The overlap of the who
always be at the back. The H Okay. Well, that looks lovely
and now we need to secure the wire with a wire stitch or a blanket stitch and
a double thread. Start your stitches from
the top right here. The first stitch simply goes around the wire to
secure the thread. The next stitch is about an
inch inch and a half away. I start my stitches right
next to the overlap. Go through overlap
the wire and stretch. Then at a distance of inch and a half or an inch, go through. Leave the loop and go through
the loop and stretch. Inch and a half, go into
the loop, and stretch. Go into the loop and stretch. Stitches have to
be tight so that the wire is secured
and does not move. Here at the bend of the
y. I will make stitches tighter to each other to secure and keep
the wire in place. Keep on going until you
finish securing the wire. Make your stitches
strong and tight so that the wire does not
move around at all. Okay. When you get back
around the overlap, make sure stitches are
extra tight and close together so that the two pieces of wire are joined securely. However, before that,
place your headband on your head and make sure that
it fits your head perfectly. Our head is slightly
high at the back. Hence, you might need
to adjust the wire, pressing together or pulling
apart to make a perfect fit. Once happy, finish
with the stitches. For extra security,
you can apply a dp of glue on the overlap area
to keep stitches in place. Lovely. Now, our head band
base is completely ready, and we can move on
to the next step, applying padding foam and
styling our head band.
6. Part5. PADDING THE HEADBAND: In previous lessons,
they learned to inquiring how husbands. Admin classified lens ing style. Now, we will learn of adding padding foam to create the volume and height
of your head band, designing your own style and giving you a freedom
of creativity. For this step, you will need your blocked
and wired headband, padding foam or
awarding Yo glue, a hard glue, if that's
what you prefer, sharp scissors, cutting board, sharp cutting knife, a
marker, and our pattern. How to choose a
perfect padding foam. Selecting padding foam, it's important to find
a balance between softness and firmness to maintain shape and support
the final fabric layer. Ideally, it has to
be soft to touch, but firm material that
holds the shape and becomes a strong foundation and supports
the final fabric layer. Also, it has to be a
material we can easily trim with the scissors in case we would want to
customize a shape. I find upholstery firm foam to be an excellent
choice for the purpose. Alternatively, warding
can also be used, although it might require multiple layers due
to softer texture. Okay, so let's begin. Place the foam on the cutting board and apply
the headband pn on top. Use tailor pins to secure
the pn so it doesn't move. Trace the outline with a marker, leaving an additional
one or 2 centimeters on both ends here and here. Because of the curved shape, the foam shrinks when
applied and requires additional lengths to
cover the entire headband. It's crucial to have
extra material to cover the entire headband
as streaming axis is easier than dealing
with a short fall. Once finished, take the
pins out and remove the pn. Use a sharp craft knife to
carefully cut out the shape. I tried using sharp scissors. However, I personally found
that using scissors is much harder and more challenging for achieving a clean
and neat result. Here is the padding
and it looks lovely. I must say that
it's really hard to achieve those very sharp
and neat sides and edges. In this case, I'm using
sharp scissors to trim the sides in order
to get even surface. Let's place the foam
on the headband, standing from the top and
going down the edges. And I can see that even though I added a centimeter and
a half from each side, the head band is still
slightly longer than the foam. What I will do, I will
stretch a little bit to the foam so that it will cover the entire lengths
of the headband. Now we will secure the
padding foam on the headband. For that, we will use Yoho glue. Apply Yoho glue onto the
top of the headband. Taking care to work in a small
sections due to the quick, drying nature of the glue. Press the foam in place
and hold for a few moments until the glue sets and
securely attaches the foam. I start attaching the foam in
the middle of the headband. It will help me to adjust
the bedding foam equally. Continue this process
of applying glue, pressing and holding
the foam until the entire length of the
headband is covered. If you're using hot glue, the steps are
absolutely the same. The glue tries really quickly. Continue pressing the foam
until the glue completely dry. Now, is the perfect moment
to decide whether to maintain the current shape
or trim it to your liking. Regardless of your style choice, I recommend gently
trimming the lower ends of the headband to get rid of sharp edges and achieve
a softer finish. Feel free to soften
the top corners of the foam to create a
rounded head band shape, or keep it angular for
a more geometric look. This is your head band, and your creativity
should guide the way. Personally, I prefer
a rounded style, so I would trim the edges
to achieve that desired. Carefully use sharp seizes to trim the shape step by step, take your time and avoid
rushing it's better to be precise than to cut too
fabric or mechanistic. Well done. What an amazing job. We successfully
finished crafting our bespoke headband by blocking the base and
adding the padding. And now we are ready to
move into the next step, and I think the most
exciting part of this course is covering
the headband with our.
7. Part6. COVERING THE HEADBAND WITH FABRIC: Welcome to the chapter
where we will learn how to style and cover a head band
with your choice or fabric? This is one of the
most creative steps of the course and obviously, your choice of
fabric will affect the total look and style
of the finished piece, transforming your
headband designs into true fashion statement. Have you ever noticed how
different fabrics can completely change the look
and feel of an accessory. It's amazing how something as simple as fabric can elevate
your personal style. There are so many varieties of fabric from luxurious silks and velvet fabrics to beautifully woven
patterns and prints. Each fabric brings its
own unique texture and personality to
your headbands. Selecting fabric is a very personal and
intuitive process. There is no right or wrong as this is a creative process of achieving a desired style that reflects your individual
taste and personality. I have prepared a selection of different fabrics that
I personally love. These are mostly woven and
stretchy fabrics, tweets. I also have beautiful
silky velvet that I like to accompany with a lovely
loose neat silver netting. These two fabrics complement
each other transforming into a bespoke fabric
that will create a luxurious one of
a kind headband. You can see how it looks
on a finished piece. Once you choose the fabric you would like to cover
the head band with, we can move to the next step. M. For this part, we will
need our choice of fabric, edded headband, or a
ready made headband, in case if you
don't want to make the entire headband from
scratch, measuring tape, tailor pins, Uh glue, or you can use a hot glue
if that's what you prefer. Pis ribbon, 2.5 centimeters wide or any other type of ribbon
like velvet ribbon, needles, matching color thread,
sharp scissors for fabric, small scissors for threads, Tarleton fabric and
an iron if required. Before we start, I'd like to share some helpful
tips with you. If you're working with
delicate thin fabrics, consider applying a
layer of Tarleton first to create a
smooth surface. Tarleton is amazing fabric. I very soft on one side, and it has glue on
the other side. You can easily iron
tleton underneath the original fabrics that you want to cover the headband with. This will help prevent
any visible layers or any imperfections underneath. For a better result, choose fabrics that are
not too thick to prevent any bulky plates forming on the lower edges
of the headband. We will talk about it
more in the next chapter. Okay. Let's begin. I need to choose a fabric, and I think I'm going
to choose this one. This is an absolutely
beautiful material, very soft to touch. It also will work
for casual wear and for special occasions. To begin, we need to
define the dimensions of the fabric required to
cover the entire headband. This process is similar to our previous
measurement techniques used for brom blocking. However, instead of
using original patterns, we will use headband itself
to measure the fabric. Because now we have
extra material, the foam itself that needs to be covered and considered as
additional measurement. Handle the fabric gently
without stretching it. Position the head
band on the by side. It is important to note
that cutting the fabric on the bis is essential to ensure flexibility in
the upcoming stages. We'll need our head band, k, ruler, and measuring tape. How do we measure
how much fabric do we need to cover the
entire headband? First of all, we need to measure the entire length from
one side to another. Use your measuring tape. And carefully measure
the entire lengths. So mine is 50 centimeters, and I will add about 3
centimeters on each side. So it's going to
be 56 centimeters. I'm measuring on the bis and I will carefully make
a mark with a chalk. Now we need to define how
wide our headband is. We're going to start
measuring from this side. It's 9 centimeters and I will add 3 centimeters
on each side. It's going to be 15
centimeters wide. We measure the fabric, and now all we
have to do is just to cut it with the scissors. Cut the fabric using
sharp fabric scissors. You can see that the
fabric is quite stretchy, and that's because
we cut on the bas. When you cut not on the bas, but on the straight side of
the fabric on the grain, the fabric does not move. Once finished,
place the fabric on top of the center
of the headband, gently stretching
it and securing on both lower sides with
the tailor pins. First, secure one side, then slightly stretch the fabric and secure the opposite side. This is why it's essential to
cut the fabric on the bas, allowing for a slight stretch and a flawless final result. Next, carefully fold and stretch the fabric over the non
stretch sides of the headband, securing it in place with the pins to keep the
fabric in place. Now as the fabric is in place
and secured with the pins, I will use hu glue to
securely attach the fabric. While hot glue is
an alternative, it may leave bulky
spots that might impact the overall feel and
texture of the headband. Start by applying the glue in the center of the headband on the inside part of
the headband and smoothly work your down to the lower ends of the structure. When you reach the ends, neatly tuck the fabric inside, making sure to avoid any bulky areas that could affect the headbands
comfort when born. Stretch the fabric
and neatly fold. Trim any axis fabric to
ensure a clean finish. Secure this section with
a few stitches and trim off any remaining fabric before proceeding
to the next step.
8. Part7. STITCHING THE RIBBON: Well done, we just covered our headband with
this fabulous fabric. To add the finishing
touch to our headband, we need to cover the fabric underneath to create
a smooth surface. I recommend using a 2.5 centimeter wide petition
ribbon for this step. But feel free to choose any
ribbon that suits your style. For a touch of luxury
velvet ribbons can provide a truly
elegant finish. To add the finishing
touch to our headband, we need to cover the fabric
to create a smooth surface. Start by placing
the Petain ribbon along one side of the headband. Fold the edge inside to prevent any framing
and gently tuck the corners to ensure a clean and seamless feet along
the edge of the headband. Just a note, I am
tucking the corners of the ribbon top to fit the
width of the headband. If your headband design
is wider than the ribbon, simply fold the edges over and leave the
corners as it is. Secure the ribbon in place
as you move forward. Be careful not to
stretch it too tightly. In fact, it's best to
keep it slightly loose. When you reach the end, fold the edge in the same
manner and secure it with pins. L eave a little extra
length just in case. Then trim the axis. Begin your stitches
from the inside of the ribbon to hide the knot. Next, precise stitches to secure the Pease using
a matching thread. I will be using thread so that my stitches
are visible to you. So through the small
loops of the Pitsem to ensure neat finish and minimize
visibility of the thread. Stitch through every
second or third loop with a running stitch
formless finish. Well done. You've just crafted your very own stylish
headband ready to wear. Congratulations
on your creation. You can either start wearing
your headband as it is, or you can create
and add decorations. The possibilities are endless. Embellish it with veils, feathers, flowers,
and the same fabric. As a special bonus, I'll show you a simple but
beautiful technique on how to make decorations
using felt and fabric.
9. Part8. DECOR: Creating decorations is the most amazing
part of millinery. I love trying to work
with different materials, combining different skills and techniques and see how
it might turn out. Today, I would
like to share with you one of my most
favorite techniques. It's absolutely easy to follow. Absolutely effortless. All we need is just these
fabrics and materials, and you can create stunning
decorations for your, had bands, and hat pieces. This is exactly
the technique that allowed me to create
these little decorations. They're very cute,
and they bring a lot of char to these had band. What materials do we need? We will need felt just
the basic wolf felt. You can either purchase a brand new felt
capilin, or cone, or and I would recommend use some pieces of felt that are left from
your previous project. For example, I have this ivory felt from one of the heats
that I've been making, and I will use this particular piece
because that's all we need. We don't need a of
fabric. We will need. Pins, tailor pins, fabric. Obviously, I would
like to choose the same fabric of the headband, ironing board, or I'm
using ironing cloth. Patterns. I have this box of
different patterns from all different projects that I have created
over the years. Today, we will be using
just this pattern. Circle and a pn of the leaf. But you can choose any
other partn that you like. You can create a brand new. You can find
something on Google. You can draw something of your own shapes.
Everything will work. We need scissors for felts, scissors for threads, needles,
and matching threads. We will also need baking paper, team iron, and one of my
most favorite materials. This is bonder web. This is a fusing fabric. I would say it's a
dry glue fabric. The purpose is to fuse two
different fabrics together. This is exactly
what we will need. We will be fusing felt
and the fabric together. For that, we will
need bond the web. You can purchase
this material at any fabric shop or almost at any fabric shop or at some selected Mlinary
suppliers. Let's begin. In order to start, first of all, I need to prepare felt. And by that, I mean, I
need to flatten this felt. This is how I usually keep my felts in the draw so
that they take less space. Obviously, I have a
lot of little pieces. So now what we need is
to flatten the fabric, and for that, we will
be using steam iron. Simply pre on, and
steam the fabric. Now let the fabric to cool down, and then we can continue. The next step is to create
shapes using our patterns. I will create one
circle and one leaf. I will place the pattern on
the felt and using chalk, I would trace a and
cut the shapes. Now, I will turn the felt, and I will apply bond web on top and the
choice of the fabric. Obviously, I would like to use the same fabric that are
used for the head band. It doesn't matter how
you place the fabric, whether it's on the base or not. The result will be
absolutely the same. Now I will place
the baking paper underneath and I will place
a baking paper on top. The next step, I will
press with the iron, no stem until the
bonder web melts and both layers bond together. How do we know that
both layers has bonded? Try to pull the fabric. If it stick to the felt, it means that the job is done. If it still comes off, it means that you
have to place it back and iron a little bit more. Now, my layers has bonded and they are securely
attached together. Now I can turn it
back where I traced the patterns and
I will carefully cut the patterns
following the line. As I said, it's a very
easy to follow technique. Only a few materials
are required in order to accomplish
this decoration, and our patterns are already felt from one side and
fabric from the other side. The next step would be to
shape those beautiful pieces. This one will shape
into a beautiful leaf, and this one we'll try to manipulate somehow
with the steam. We'll figure out how we'll
just go over the flow. For that, we'll need
steam of the iron. Place the decorations
fabric side down, so we don't damage the fabric. Use steam. To soften the felt. Once the felt
softened and steamed, we can mold the shape. What I would try to do
is to press and shape these leaves into an
amorphic floating movement. We can also try to fold the leave and then
twist it like this. Then you can take your
head band and place it on the headband to see
how it will look like. I purposely chose
white feel to create a contrast because the head band is quite a dark navy color, and it's nice to add
a nice fresh color like ivory to create
a beautiful contrast. Now we'll shape the rest
of the decorations. The more stem you apply, the softer the felt becomes and the easier it is
to mold a shape. Now fold it in half and then twist and
mold the decoration. Fold the shape until
material cools down. Once it cools down, the material adopts
the shape like that. Now let's create a
shape for the circle. Again, apply a lot of stem. What I'm going to try
to do is to fold it in half and then again
in half and press. Then open up the sides, press the middle and
keep it in place until the material
cools down. That's it. All our decorations are. Now we can apply all
the decorations on the headband and see
the perfect position. Displace the decorations
and secure them with the tailor pins, trying
different positions. What is the most flattering way for the decorations
to be placed? And the second decoration, I think I'm going to
place the opposite side. So that you can wear the heat
band on both sides and will look absolutely lovely
from any direction. Now, once you happy with the
position of the decorations, the cure and attach them
with a matching thread. Well, our head band is finally ready with a lovely decoration. You can position it
on any side you like. You can even wear the headband. An side you like. This easy to follow
technique allows you to create so many different
types of decorations, flowers, petals, geometrical
shapes, whatever you like. It's a very easy to
follow technique. All you need is just
two different materials and a bond to bond
them together. In our case, it was felt and fabric that we covered
the head band with. You can try and experiment
with different materials, not just felt and fabrics. All you have to do is just take it forward and experiment with different materials and see
what results you can achieve. Obviously, by the
end of the course, I can't wait to try
the hat band on. It goes. It's unbelievably amazing to wear a hat is that you just
made with your own hands, and it gives you so
much satisfaction and a desire to continue
making even more.
10. THANK YOU!: As we come to the
end of this course, I would like to express
my deepest gratitude for choosing to learn illnar
skills together with me, and I hope you
enjoyed this course. I hope it was educational,
ful, and inspirational. Throughout our time together, we've explored various
techniques, materials, and design elements
to help you unleash your creativity and
craft headbands that are not only stylished, but also reflect your
unique personality. As you continue on
your creative journey, I encourage you to keep experimenting and
pushing boundaries and infusing your
own personal flare into your projects
that you make. Remember, the beauty
of spo design lies in the individuality and creativity that you bring to each piece. Once again, thank
you so much for allowing me to be a part
of your creative process. I wish you all the best as you continue to explore the
wonderful world of military. My name is Alan Schwab and I'm a head designer
based in London, wishing you all the best.
 Elena Shvab