Transcripts
1. Let the Magic Begin!: Hi. Ever wonder if those divine wedding
and red carpet dresses are crafted by some
mystical chosen few? Spoiler alert! They're not.
You can make them, too. I'm Tatiana Kozorovitsky and I'm here to demystify the
couture arts for you. Welcome to my class! Creating a one of a kind gown is an
unparalleled thrill. Whether it's for a delighted
client or your own daughter, there's nothing like seeing
a bride's eyes light up. Plus, if you adore sewing, wedding dresses are where the
passion meets the profit. Creating wedding gowns is one of the most lucrative niches
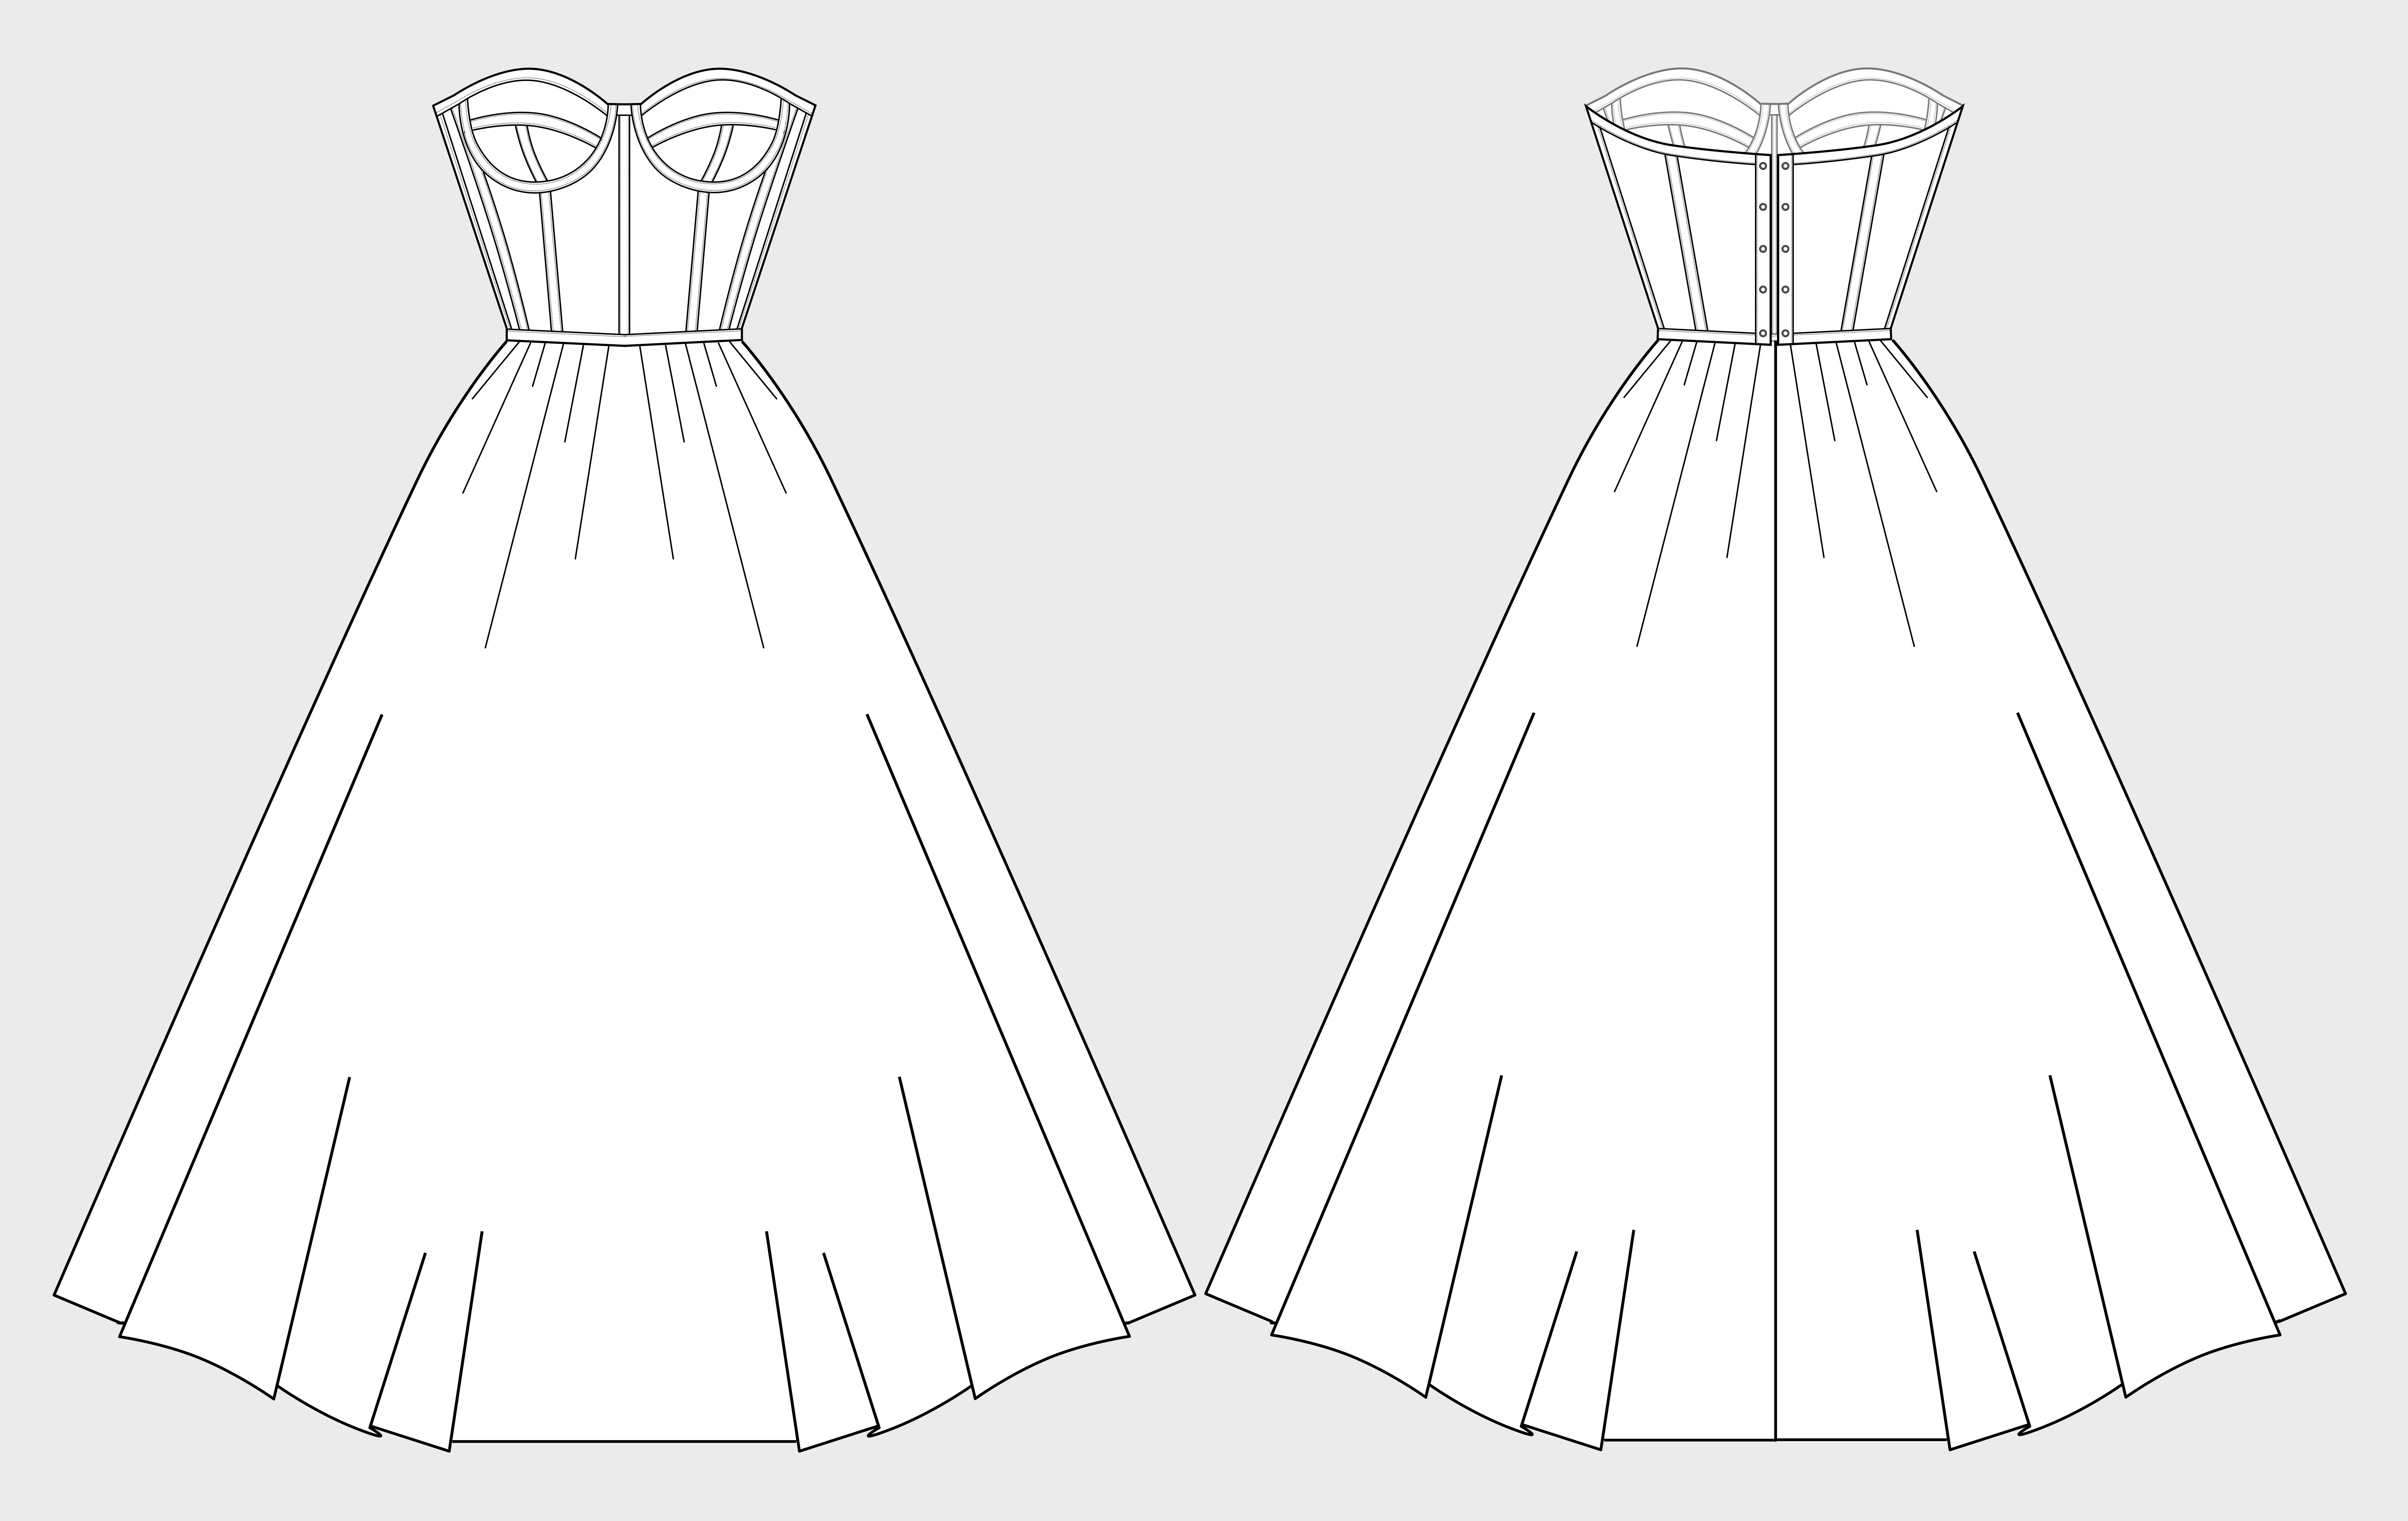
in the sewing industry. In this class, we will design a timeless Bustier corset
dress with an elegant, multi layered tulle skirt. This design offers versatility
and sophistication, equipping you with
the skills to create a wide range of styles
beyond just wedding dresses. This class is for everyone from seasoned dressmakers to newbies
with basic sewing skills. All you need is a sewing
machine and a smile. We'll cover every step together from
selecting fabrics and taking precise measurements to those all important
finishing touches. I will share industry
standard techniques to ensure your creations come together seamlessly and look stunning. Our skirt features
12 layers of tulle, easily cut into circles
and half circles. I'll reveal how to calculate the perfect number of layers
for that dreamy look. For those who like numbers, I'll provide all the necessary
formulas and calculations. And the piece de resistance, this class includes so
ready corset patterns in an astounding 112 sizes, ranging from XXXS to XXXL. Yes, you heard correctly, 112 pattern files to
accommodate any size, body type, and bust size. This is my commitment
to ensuring you achieve the perfect
fit on the first try. Experience stress free custom tailoring crafted with love. I'm super excited to
share this with you. Get ready to create magic. See you in the next video.
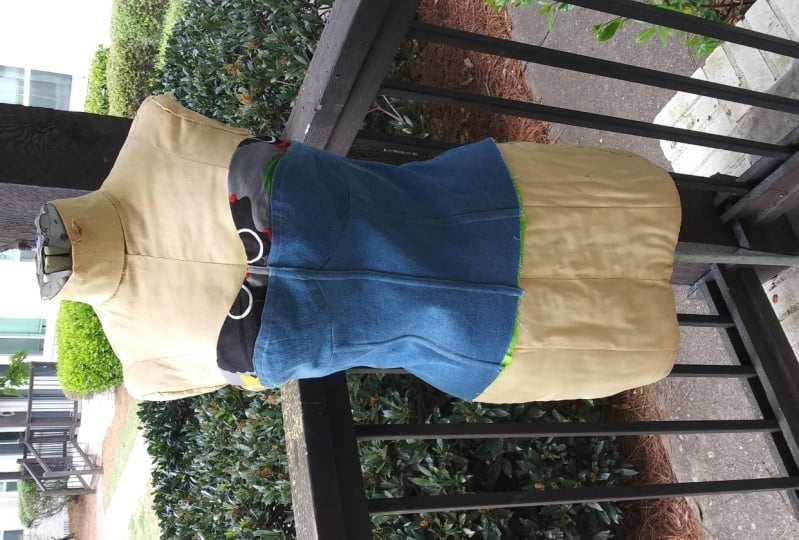
2. Measurements: We begin our work on any
garment with designing it. That is creating
its sewing pattern. The pattern design is based on the measurements taken from
a person or a dress form, and it doesn't matter
whether we alter the existing pattern or
design it from scratch. The measurements taken properly will be crucial in any scenario. To show how measurements are fundamental to
pattern design, I have pinned a mockup made from the paper pattern
details glued together. Explaining the rules of taking
a particular measurement, I will be able to
show which section of the pattern corresponds
to this measurement. Measurements should be taken in life size without stretching or weakening the measuring tape. For the convenience
of demonstration, the dress form being measured
is lying on the table. We will create a Butier
with cut off cups. For such a design, other
standards are needed than the ones for the construction of a garment with one piece cups. In our case, several
special measurements that have to do with the size of the cups are taken instead of the standard measurement
bust circumference. If the bust circumference
measurement is not required, we will first take the underbst circumference
measurement. It is taken horizontally
in parallel to the floor. Half of this measurement will
correspond to the sum of the segments on the pattern
along the underbst line. The underbst front
measurement is taken along the underbst line from one
side seam to the other. Thi additional measurement shows the position of the side
seam along the underbstline, and a half of its value will
correspond to the sum of the segments along
the underbstline on the front details
of the pattern. The waist circumference
measurement is taken horizontally. Half of this amount
will correspond to the sum of the segments of the pattern along the waistline. Waist front measurement
is taken along the waistline from one
side seam to another. This additional
measurement indicates the position of the side
seam at the waistline, and half of its value will
correspond to the sum of the waistline segments on the front details
of the pattern. Let's take special measurements for designing the
pattern of the cup. To properly take
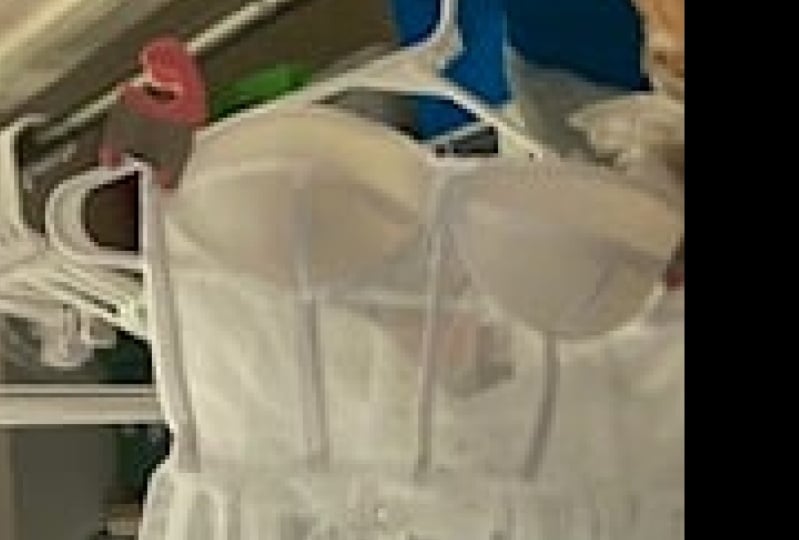
these measurements, the client must be
wearing a fine bra of the balconet style with the cups lined up
with underwires. A proper underwire
I have attached to our dress form will help me show you how to
take the measurements. For the vertical cup
arc measurement, draw an imaginary
vertical curved line from the top of the cup to the underbst line through
the apex of the bust. The required point at the underbst line is marked by the position
of the underwire. The value of this measurement
taken from a person will be equal to the length of the seam of the
bottom of the cup, plus the width of the
top detail of the cup. For the horizontal
cup arc measurement, position the measuring tape horizontally through the apex of the bust and measure
the distance from the outer side of the
underwire to the inner one. This measurement corresponds to the length of the
horizontal seam on the cup. The arc length of cup
insertion measurement. Taking this measurement from a person is a painstaking task, so you'd be better
off not to do it. Instead, get an underwire that matches the
size of the client, measure its length, and add
1 centimeter to its value. The resulting value will correspond to the length
of the arc for the cup. The length of the
underwire measurement is taken in life size. Take the underwire and
measure its length. For the top cup arc
length measurement, measure the distance
between the ends of the underwire in the arc
stepping up half a centimeter. This value equals the length of the upper edge of the cup. Corset center
height measurement. This is the distance
from the waistline to the lowest point of the
neck line on the front. Model back height measurement is the height of the back
detail at the center. This value can change
as a result of improving the smoothness
of the upper cutting line. This value also depends
on the distance between the eyelets and on the technique you choose
for working on this part. This is why this measurement
is called model. Top edge length without
cup measurement is the length of the top edge of the garment aside from the cup. Instead of taking
this measurement, you can measure back
below the bust. This is done on the back
along the underbst line. On the pattern, a half
of this value should be equal to the sum of segment lengths along
the underbst line. It is not a good idea to rely on this measurement
when measuring along the bust line because the
top line of the garment is often located below this
measurement on the pattern. Model length of the
side seam measurement. Normally, to get
this measurement, you need to measure
the figure on the side from the waist to the bust line and add one to 1.5 centimeters
to this value. When adjusting the pattern, the height of the
side seam can be changed to get a
smoother top line. That's why this measurement
is also called model. Waistline to the
underbst measurement. The position of the
waistline in relation to the underbst line depends
on this measurement. We take it from the underbst
line to the waistline. On the pattern, this
measurement corresponds to the length of the vertical
curve under the bust.
3. Bustier Pattern Printing: H In this lesson, we'll discuss how to prepare and use the Butier
pattern for your dress. I will be creating the dress on a dress form that corresponds to a size 75 B and a height
of 165 centimeters, about five feet 5 " or taller. To download the sewing
pattern set files, visit this URL and click
the Download button. After downloading, print the required pattern file
based on your measurements. The files can be printed using any standard home
or office printer. Be sure to select print at actual size or scale 100%
in your printer settings. The grid on each pattern
sheet represents one by one centimeters, 0.40 0.4 ". To print the pattern correctly, ensure your printer
is set to scale 100% or original size. The printed pattern includes
all parts of the Bustier, including the cup components. On one of the last sheets, you'll find the pattern
for making a foam cup. Additionally, the final sheet contains a pattern
for a push up pocket, if you wish to include one, as well as a drawing of a suitable metal frame
for this cup size. When you go to purchase
the metal frame, it's advisable to bring
this sheet with you. You can compare the
actual metal frame to the drawing to
ensure it matches. I'll be using a metal frame slightly shorter than the
one shown in the drawing. It's acceptable if
the frame you select is up to 2.5 centimeters, 1 ", shorter than the
one on the pattern, but it should not be longer. When checking the
fit of the frame, you can gently pull it sideways like a spring
to test the alignment. You will need these
paper patterns to create a mock up and determine if
the pattern fits correctly. If any adjustments
are necessary, you will make all
these corrections on this printed pattern. For cutting and further work, you'll need to print the
pattern on newsprint. Newsprint is available in both stationary and
needlework departments. It is thinner, semi
transparent and allows all pattern lines to be clearly visible on the
backside when printed. To print the patterns
on newsprint, you need to print the pattern in mirror image or
flipped horizontally. This ensures that you have patterns for both the
right and left halves of the Bustier and the parts
are symmetrically placed. Please note that the
printed pattern sheets, as well as the main
pattern sheets, include seam allowance tunnels and markings for the boning. On the cup pattern sheets, you will also find markings for decorative hems
and hem lines. If you made any adjustments to the pattern during the
initial preparation, be sure to transfer
all those changes to the pattern on the
news print as well.
4. Materials for the Dress: In this lesson, we'll go over
the materials you'll need to make the Bustier and
layered skirt for our dress. Marcosete fabric will be the main material for
sewing the Bustier. This Nylon mesh fabric is
stable in all directions, meaning it does not stretch
along the weft or the edge. Typically, it is used
as a bra cup liner or to reinforce the
bridge between the cups. However, in this project, we will be using it to cut
and sew the entire boustier. To reinforce the cups, we will use reinforcing
nylon netting, also known as corset mesh. This fine mesh fabric, often used to reinforce skirts or falbalas to help
hold their shape, has a cotton weave and
can crumble slightly. For the bias tape known
here as oblique bake, it will be used for
making waiters and edging in its fully
opened and unfolded form, the width is 4.5
centimeters, 1.8 ". With seam allowances pressed
open to 3 centimeters, 1.2 ", and in its pressed
flat folded state, the width is 1.5
centimeters, 0.6 ". Tunnel tape will be
used on the inside of the cups to hold the
metal underwires in place. This tape can comb
in different forms, such as with a
highlighted tunnel and a velvety texture on the front side or as
ready made tapes with one seam that turns the
fabric into a tunnel. Any type of tunnel tape
will work for our needs. You will need a pair of metal underwires that fit your size. These should have a height
difference of 2 centimeters, 0.8 " between the center and the side when positioned as they will be in
the finished cup. The lacing on the
back will be created using tape with
installed eyelets, which is typically
sold by the meter. The tape used here is 2.5
centimeters, 1 " wide. With a three centimeter 1.2 " spacing between the
centers of the Gromets. This double sided tape
allows you to wrap it around the vertical raw edge of the
back and sew it into place. To strengthen the Butier, plastic bones will be used. These bones are
sold by the meter with a width of 5 millimeters, 0.2 ", and a thickness
of 1 millimeter, 0.04 ". For the lower part
of the cup lining, we will use nude fabric, which in this case
is a thin satin. The Butier will have
removable straps which can be attached or detached
at the client's request. Elastic strap will be used
for these bra straps. This elastic band is
both stretchy and dense with a mat side
and a shiny satin side. We will use the mat
side as the front. For the straps, you
will need two cuts of 55 centimeters, 21.7 " each, along with four plastic
rings for straps, two plastic strap
length regulators, and four linen hooks to attach
directly to the Bustier. For the skirt, we will
use plain Capron tow. When selecting materials
for the dress, make sure to pay attention to the color of the tool when it is folded in several layers and preferably rolled
before cutting. Also, ensure the tool matches the color of the fabric
used for the Butier. Remember, white has many shades. If the marqueesett has a
slight yellowish tint and the tool for the skirt is icy white like pure winter snow, these materials will not match. Always compare the fabrics together to ensure their
shades are consistent. For the skirt
lining, you can use any light softly flowing fabric. Crepe chiffon will be used here. The skirt lining can be
either long or short and this choice will not affect the sewing technique,
only the cutting length. The lining can be
somewhat translucent due to the large number of
layers in the tool skirt.
5. Preparing the Pattern for Cutting: Before cutting the fabric, we must first prepare
our patterns. We'll be working with patterns
printed on newsprint. Start by cutting each pattern
piece out of the paper, leaving small sections
of paper around the edges to free the
pattern from excess paper. Mm. After trimming, I organize the pattern pieces
into three stacks. One right stack. Oh pattern number one, the
centerpiece of the Bustier. Oh pattern number two, the intermediate
pieces of the Bustier. Oh, these patterns
will be cut from two layers of
Marqusette mesh fabric. Two, left stack. Oh pattern number three,
side details of the front. Oh pattern number four,
side details of the back. Oh pattern number five, center details of the Butier back. Oh, these patterns
will be cut from a single layer of
Marquette mesh fabric. Three, center stack. Oh pattern number six,
top cup patterns. Oh patterns number seven and
eight, bottom cup patterns. Oh, these patterns will
be cut from two layers of marquisette mesh fabric and one layer of reinforcing
Nylon netting.
6. Laying Out the Patterns on the Fabric: To demonstrate how to lay out the Bustier patterns
on the fabric, I'll show you a graphic
representation. For the Bustier take
a 45 centimeter, 17.7 " wide piece of marquisette
and fold it as follows. Fold 28 centimeters,
11 " at one end, and 22 centimeters, 8.7
" at the other end. Align the pattern pieces
according to the arrows, ensuring they run parallel to the edge of the mesh fabric. For the cuffs, you will need an additional rectangle of
reinforcing Nylon netting, measuring 45 centimeters wide by 22 centimeters
long, 17.78 0.7 ". This will be layered over the
22 centimeter long section of the folded marquisete. After laying out all
the pattern pieces according to the
preliminary plan, ensure that all pieces
are laid face down. Focus on the section where
the cup details are located. This area should consist
of two layers of marquiset fabric folded
at 22 centimeters, with the fold on the
right side topped with a layer of reinforcing
Nylon mesh fabric. For convenience,
cut off the section with the cup parts and
set it aside for now. Before pinning the cup details, complete any additional
preparatory work. Now, pin the remaining Butier
details to the fabric. Remember to align
the pattern arrows with the lengthwise
grain of the fabric. I will be cutting
with a rotary cutter, so only a few pins are needed
to secure the patterns. Insert the pins using a sliding motion to avoid
distorting the fabric. Remember, accurate cutting is the first key to success
when making corsets. Once all the parts are pinned,
you can begin cutting. You may divide the fabric
into several sections and place them on the cutting
table for easier access.
7. Cutting the Bustier Body Parts: As a reminder, all
pattern pieces should be placed face
down on the fabric. When cutting, follow the seam allowance
lines on the patterns. As you cut out each
pattern piece, place them in a box that you
have prepared in advance. This ensures the pieces remain clean, undamaged, and organized. Continue cutting
until all the parts of the corset body are prepared. However, note that
we will need to revisit the center
back details of the Bustier as these parts will be adjusted to accommodate the tape with
Gromets for lacing. Since we're using
factory made tape, which has its own specific width and sewing
characteristics, adjustments to the
pattern are necessary.
8. Adjusting the Pattern for Lacing: To avoid getting the cut
fabric pieces dirty, I will demonstrate the
necessary adjustments on the paper pattern printed
on regular printer paper. Before you start making changes, have your tape with grams, a ruler, and a pencil ready. I'll use a felt tip pen to
draw the changes for clarity, but in your actual work, you should avoid using such pens. The tape we are
using has a width of 2.5 centimeters, 1 ". What's crucial here
is determining the width of the back
piece that can fit inside the tape and how much of the tape will protrude from the edge of the piece. Start by trimming off
the seam allowance from the center
of the backpiece. Next, insert the pattern into the tape and measure how much the tape protrudes beyond the edge of the pattern. In this case, the
protruding width is 1.2 centimeters, 0.5 ". To maintain the original
width of the back piece, you need to trim
1.2 centimeters, 0.5 " from the pattern's edge, which corresponds to
the protruding width of the grommet part of the tape. Measure the width of the
original pattern before cutting. In this example, it is
9.6 centimeters, 3.8 ". No after trimming
along the marked line, reinsert the pattern
into the tape and measure the distance from the tape's edge to the curve. The final width of the pattern
with the tape attached should still measure
9.6 centimeters, 3.8 ". This adjustment ensures
the center back pattern now accommodates the width
of the lacing ribbon. Remember, if you're using
a different ribbon size, the protruding part may vary, apply the principle
of this alteration to your specific situation. Now, take the center
back pieces out of the box and starting from the finished edge of
the fabric piece, not from the edge of
the paper pattern, Mark 1.2 centimeters, 0.5 " away from the edge and
draw a cutting line. Repeat this for the
second pattern piece. Finally, cut along
the marked lines to adjust the patterns. This ensures the
width of the center back pieces is correct
for the lacing ribbon.
9. Preparing the Cups for Cutting: In this lesson, we'll focus on preparing the fabrics
for cutting the cups. Before pinning the cup
pieces to the fabric. There are a few preliminary
steps to follow. Each cup will be cut from
three layers of fabric. Given that these
materials are thin and delicate and the cup pieces are small and challenging
to work with, it's crucial to stabilize
the layers before cutting. This will help ensure
precise sewing, better alignment, and a
clean, high quality finish. First, gather all the paper pattern pieces that
you'll use for cutting. If you're sewing a
variation like mine, not using a foam pattern, you can use this paper
pattern for our purpose. Start by trimming all
the seam allowances from the paper pattern pieces. Then take the two layers of
marquisete we folded earlier. Place the Nylon mesh
fabric over them and staple the layers together to prevent
them from shifting. Using a thermal pen, which
can be erased with heat, trace all the cutout parts
along their contours. Precision is not critical here, but remember to
flip the patterns over to make the
cutting symmetrical. The lines should be faint,
visible only to you. Within the traced areas, you'll need to stitch
the layers together. Prepare several
needles with thread beforehand and
avoid making knots. Hand stitch within
the circled areas of the patterns to secure
the fabric layers, ensuring they remain
aligned during sewing. This step helps eliminate defects like unevenness
and ripples. After stitching the first piece, cut the thread without
making a tack. Continue this process
for all other pieces. The direction of the
stitching doesn't matter, and the stitches
can be of any size. The key is to avoid
tightening the fabric. It must stay even and flat with no shifting
between the layers. Once the stitching is complete, lay out the paper patterns on the stiff nylon mesh fabric. Position the pattern
pieces face down, aligning them roughly
with the stitched areas. Most importantly,
ensure the patterns directional arrow aligns with
the fabric's grain line. Pin the patterns in place
using a sliding motion. Now, the cups are
ready to be cut.
10. Cutting the Cup Parts: After preparing the fabric, cut out the cup pieces
and store them in a box to keep them
clean and organized.
11. Cutting the Lining of the Cups: Next, we'll cut the lining for the bottom part of the cup. Pattern number 13
includes two patterns, one for the lining and one
for the push up pocket. The pocket pattern should be cut along the slant
line indicated. I'll be using a piece
of Marquisete remnant to cut the push up pocket. While the lining will be
cut from shiny satin, with the shiny side facing the body and the mat
side facing out. Before cutting, quilt
the entire area where the pieces will be cut. In this case, it's not necessary to mark
the stitching area. Simple hand stitches will suffice to join all
the fabric layers. Cut out the pattern
piece from the paper. Then take the quilted
fabric plank. Fold the quilt in half with
the mesh fabric facing up. Although the direction of the grain isn't
critical at this stage, I'll still ensure
that the arrow on the pattern is parallel
to the fabric edge. Position the pattern
so that the area after the slant line lies on
the quilted section. Pin the pattern in place and cut it out using scissors or a rotary cutter,
whichever you prefer. Repin and make notches along the seam allowance
on the pocket line. On the backside, draw a
line between the notches where the marquisete was cut to form a
pocket for one cup. Flip the cutout piece over, and using just the paper
and a layer of marcosette cut along the pocket line to create the second cup pocket. In this way, you can
cut the cup lining and the push up pocket
simultaneously.
12. Determining the Length of the Tunnels for the Bones: Oh. With the cutting
process complete, we can now start preparing to
sew the body of the corset. Besides joining the
parts together, we'll need to attach a ribbon to form the tunnels
for the bones. First, we need to determine the required length of the
ribbon for the tunnel. Take your paper patterns
and measure the length of all the highlighted gray
lines, summing them up. Use a tape measure, starting each new measurement from
where the previous one ended. For the fore part or the
front half of the corset, excluding the
center front piece, the ribbon length is 82
centimeters, 32.5 ". Multiply this by two to get
164 centimeters, 64.6 ". Next, add the length of the center back
piece of the corset, which is approximately
25 centimeters, 10 ". The total length of ribbon
required for the tunnel is approximately 189
centimeters, 74.4 ". First, we need to
calculate the total, take 82 centimeters,
multiply by two, then add 25 centimeters. This gives us a total
of 189 centimeters. For those using inches, it's 32.5 " multiplied
by two plus 10 ". The final result is 74.4 ". Please note that this length is an estimate to help you prepare
the bias tape in advance. The exact length may vary
during the sewing process.
13. Preparing Ribbon for Hems: All right. In this lesson, we'll prepare the ribbon for
hemming the waiters. The original ribbon comes
pressed flat in half, with the seam allowances
also pressed inside. The first step is to fully
open the entire strip, exposing the seam
allowances along the full 189 centimeters,
74.4 " length. And then carefully
press it flat in half. Once the ribbon is pressed, you need to draw a marking
line on the folded ribbon. For a five millimeter wide bone, the ideal width for
the weiter will be 1 centimeter, 0.4 ". From the fold of the ribbon, mark 1 centimeter, 0.4 ". The remaining 1.2 centimeters, 4.5 " of ribbon width will
serve as the seam allowance. This 1.2 centimeters,
0.5 " is included in the seam allowance of
your pattern and is the optimal size for sewing
the ribbon onto curves. Use a thermal pen, one whose ink disappears
when exposed to heat to carefully mark the entire length of
the prepared ribbon. We'll begin sewing
the corset body, starting with pattern
piece number one, the center front piece. In the center of this pattern, there is a buttonhole
that will be sewn slightly differently
from the others. Therefore, the
ribbon for this area must be prepared differently. Measure and cut the
ribbon according to the length of the
center buttonhole. When sewing, the seam allowance should be 0.5 centimeters, 0.2 ", half the
width of the hems. This allows for
precise positioning of the ribbon on the pattern. The seam allowance tunnel width will remain at 1 centimeter, 0.4 ", while the seam
allowance itself should be reduced to 0.5
centimeters, 0.2 ". In other words, the width of the ribbon from
the fold should be 1.5 centimeters, 0.6 ". Accuracy is crucial here, as any discrepancies will affect the neatness of
the final stitching. To recap, mark 1 centimeter, 0.4 " from the ribbon fold for the seam allowance tunnel
and 0.5 centimeters, 0.2 " for the remaining
seam allowance. Trim the seam allowance, leaving only 0.5
centimeters, 0.2 ". This way, you can attach the prepared
ribbon to the center line of the front piece and sew a
precise machine stitch. Now let's move on to
the sewing machine.
14. Preparing Pattern #1: In this lesson, we'll focus on preparing pattern
piece number one, which involves careful
handling and stitching. Without removing the paper
pattern from the fabric, start by working on
the semicircular areas of the cup sleeve. Make sure the tack is turned
off on your sewing machine, and then stitch
along the drawn line of the cup sleeve on both sides. The stitch length should
be set to 2.5 millimeters. Next, remove the pins and carefully separate
the paper pattern from the seam allowance along
the stitches on both sides. Be cautious not to tear the entire paper
pattern as you do this. Oh. Once the seam
allowances are clear, it becomes easier to detach the rest of the paper
pattern from the fabric. Set the paper pattern aside. You'll need it again shortly. Trim the seam allowances
close to the stitches, leaving about two
to 3 millimeters, 0.08 to 0.1 ". If your mesh fabric
is elastic enough, you may also trim the
remaining seam allowance. Turn the piece
right side out and press the edges
flat with an iron. Now, place the fabric pattern back onto the paper pattern, aligning the edges to restore the fabric pattern to
its original position. Pin the fabric pattern in place. When you pin the fabric pattern back onto the paper pattern, you may notice some deformation. You might need to make
some adjustments to return the pattern to its
original shape and size. This is just the first stitch, so keep in mind that the
mesh fabric will undergo more deformation during
further processing as you sew all the
parts together. This is why I recommend
using paper bases when sewing with delicate
and very thin fabrics. It helps achieve
the best results. Now that the pattern
size has been restored, you can add reference marks. We didn't add any
reference marks during the cutting process. As notches are not
advisable on thin fabrics. Now that both raw
edges are hemmed, you can mark the
reference points labeled with the number two, which correspond to the correct
positioning of the cup. Initially, mark these with a thermal pen and later you can duplicate
them with thread. To secure the size of the ear, part of the pattern,
reinforce it by stitching along the
very edge of the piece. For pinning, I use
special very thin pins, the kind used in entomology, the study of insects. Remove some of the pins and stitch along the center
line of the pattern. Adjust the machine stitch
length to 3.5 millimeters. The paper pattern should be on the bottom and the
mesh fabric on top. Critically examine the
resulting pattern. The center stitching
should be perfectly even, flat, and without
any irregularities. Next, take the
prepared ribbon for the waiters and align its seam allowance with
the center stitch. Then sew the ribbon in place. Again, do this without tacking. Fold back the hems, noting that I have not yet removed
the paper pattern, even though it might make
it harder to remove later. For now, I'm keeping the
paper pattern on the fabric. Stitch along the very edge
of the folded back stitch. Then stitch along the
second edge of the ribbon. To ensure the hems are
the correct width, test them by inserting a test bone that you will
use throughout the process. The bone should fit
snugly into the hems, filling the entire
space without strain. I prefer narrow hems, so I aim for the
smallest possible size that fits the bone comfortably. The next step is to reinforce the vertical raw edges of the pattern with
the future hems. The prepared ribbon, which has a seam allowance of
1.2 centimeters, 0.5 ", will be sewn onto the two raw
edges of the pattern. Precision and neatness
are essential here. Only after this step
should you remove the remaining pins and release the pattern from the paper base? The time spent on this
meticulous work is an investment in the neatness and quality of your
final product. Here's what the
pattern will look like once it's released
from the paper. This is likely the most
challenging pattern you'll work on in this project. If there are any small bits
of paper left on the fabric, you can easily remove them
with a brush or needle. Any paper remnants left in the
area where the cup is sewn in will be hidden under the
cup and won't be visible.
15. Preparing Pattern #2: Now that Butier pattern
number one is ready, let's move on to
pattern number two. The process is almost
identical to the previous one. Begin by stitching along the eyelt on both sides
of pattern number two. Setting your machine
stroke to 3 millimeters. Remember not to use any
fasteners at this stage. After stitching,
release the pins and carefully remove the paper
from the seam allowance, ensuring you don't tear
the paper pattern. Then gently remove the entire paper pattern
from the fabric. Next, trim the seam allowance, leaving just a few millimeters. In areas with sharp curves, you can make additional notches to allow for more
accurate turning. Repeat this process for the second symmetrical
pattern piece and then sew the two
pieces together. After sewing, return
the fabric pieces to their corresponding paper
patterns and pin them in place. Even with careful
sewing and ironing, you may notice some
deformation when you pin the fabric pieces back to the paper patterns.
This is normal. Make sure to transfer the mark number four onto the fabric, which is crucial for
positioning the cups correctly. As with pattern number one, stitch along the
edge of the ear with a machine pitch of
3.5 millimeters. Again, do this without
using fasteners. Now, reinforce the edge of each pattern piece that will be sewn to pattern number three. This area includes
the buttonhole, which will be turned off
on pattern number three. Remove any pins that might
interfere with sewing. Even though you've
already marked the seam allowance
on the ribbon, double check before
you start sewing. The line for sewing
the hems will also be the line for sewing the
pattern pieces together. Unlike pattern number one, you can either remove
the paper pattern now or use a
different technique. Pin the paper pattern in the seam area and cut
the paper pattern, leaving only the part of
the pattern in this area. The rest of the paper
pattern can be removed. However, if you prefer, you can leave the paper pattern attached and remove it later. Repeat the same steps for the second piece
of pattern number two.
16. Preparing Pattern #3: With pattern number two ready to be sewn to
pattern number one, set these pieces aside for now and start working on
pattern number three. This pattern doesn't require hemming or any
special operations. Simply sew the ribbon for the future hem line along
the side raw edges. Position the ribbon so that
the marking aligns exactly with the stitching line and
sew the reinforcing stitches. That completes the work
on pattern number three.
17. Sewing Patterns #1 and #2: Now it's time to join patterns
number one and number two. One unique aspect of joining patterns in a Butier
like this is that the seam allowance
tunnels remain on the front side and are overlapped by the seam
allowance tunnels. Therefore, place the pieces
with their undersides, wrong sides, or paper
patterns facing each other. Align the stitching
lines and corners of the patterns
precisely using pins. The sewing line and the line
on the paper pattern of pattern bert will serve as your reference points for
joining the patterns. Make sure the patterns
align perfectly. There should be no fullness or gathering of one
pattern onto the other. If necessary, repin to
even out the lengths. After the patterns
are pinned together, sew along the stitching line, following the previous
seam allowance line. You can now turn on
the automatic tacking or do it manually. Remove the pins and
the paper pattern. If you'd like to experiment, try sewing one version without the paper and compare it to
another sewn with the paper. Here's what you should have.
The seam allowance tunnel is 1 centimeter, 0.4 " wide. The seam allowance
is slightly wider at 1.2 centimeters, 0.5 ". Now, trim the seam allowance so that it's narrower
than the welt. I leave about 8 millimeters, 0.3 " rather than cutting
it down to the raw edge. Next, fold the seam allowance
on pattern number two. Note that on the paper pattern
of pattern number two, this seam allowance
is marked with a gray strip that transitions into a
white seam allowance. Your goal is to straighten
the band so it fully unfolds. The backside of pattern
number two should lie flat without any puckering or overlapping of
the backstitch. Now, stitch along the very
edge of the folded ribbon. No tacking is needed here. From the backside, the pattern should appear completely smooth. After that, stitch along the second side of
the backstitch. Constantly ensuring
that pattern number two stays flat and smooth. Test the hems by
inserting a bone. Now that you've added thickness
from the seam allowance, make sure the bone fits smoothly into the hems without
any obstacles. The test should confirm that the hemming was done correctly. Repeat the same process
for the second side, joining the pieces on the underside along
the curved seam.
18. Sewing Pattern #3: Now that you've sewn patterns
number one and number two, it's time to work on
pattern number three. Keep in mind that when sewing
these patterns together, you'll need to join the
convex and concave raw edges. To simplify this process, notch the seam allowance
of the concave edge. This allows the raw edge to straighten and take
on a convex shape, which will match the shape
of pattern number three. The notched raw edge needs to follow this
convex trajectory. Remember, the patterns are
pinned underside, wrong side, to underside, meaning
you should see the front side of the corset where the waiters are located. The underside or wrong
side is the backside. And on the parts that still
have the paper pattern, the underside is where
the paper is attached. Scallop the raw edges, pinning them together
with precision, and then machine stitch along the seam allowance of
pattern number two. Once stitched, remove the pins and carefully remove the paper from
the seam allowance. Then from the entire
pattern number three. Next, trim the seam allowance, leaving about 8
millimeters, 0.3 ". After trimming,
unfold the backstitch so the pattern lies flat. Then turn the backstitch
towards pattern number three. This area, indicated
by the gray strip on the pattern will now
become a buttonhole. Sew the seam allowance
with two stitches, one along the folded edge of the seam allowance and the other along the second
edge of the ribbon. As usual, test the width of the waiters by
inserting a bone. The bone should fit snugly
inside the waiters, fully enclosed by the buttonhole without any room to move. Repeat these steps with the second piece of
pattern number three, sewing it to the opposite
side of pattern number two.
19. Sewing Pattern #4: H. If you're sewing along with me, you'll be pleased to know
that we've already completed the most challenging steps of
assembling the corset body. The most difficult tasks were sewing the
center backstitch, processing the cup eyelet and joining the
curved raw edges. Now we'll sew in straight lines. Your task is to attach pattern number four followed
by pattern number five. The lacing strap
will be added later. Just like with the
previous patterns, you'll need to sew
a backstitch along the raw edge of
pattern number four, where the gray stripe is
missing on the paper pattern. Carefully position the ribbon, ensuring the backstitch
is aligned correctly, and sew the ribbon onto both pieces of
pattern number four. H Now, join pattern number four
to pattern number three. Turn pattern number four with
the underside or paper side up and overlap it with the corresponding part
of pattern number three, pinning them together precisely. So along the stitching line. Once sewn, immediately trim the seam allowance without delaying or removing the paper, as it will be easy to
remove the paper later. Remove the paper pattern
from pattern number four. Next, unfold the back stitch so the patterns lie flat and
stitch along the ribbon edge. Don't forget to check that the
pattern is fully unfolded. Then stitch along the
second side of the weiter. Test the backstitch
by inserting a bone. The bone should fit
perfectly inside, and the fabric should wrap
around it without any issues. Repeat the same operations with the second symmetrical piece of pattern number four on the
opposite side of the corset.
20. Sewing Pattern #5: Finally, we move on to the last piece,
pattern number five, fold patterns, number four
and number five together, underside to underside,
and sew them. After pinning the pieces
together, sew the seam. Before finishing the seam, sew reinforcing stitches along the center raw edge of the back, attaching the paper
pattern to the fabric. This is where the lacing will be placed and you'll need to stitch a foot width
away from the raw edge. Now, carefully cut the
paper pattern in half, taking care not to
cut the fabric. Leave part of the paper
pattern on the edge of pattern number five and remove the rest of the paper
from under the waiters. Trim the seam allowance and remove the paper
from under it. Unfold the patterns,
tuck the ribbon, and first stitch along
the ribbons fold. Then along its second edge, which lies on the bend. As usual, check the
width of the waiters. Everything should be perfect. I've already completed this work on the second side
of the corset. Congratulations. If you're
working alongside me, the body of the
corset is now sewn.
21. Preparing the Cup Hems: Next, we move on to working on the cup details where we'll need to prepare
the ribbon once again. To determine the length of the ribbon needed for
processing the cups, measure the length of the waters with a bit of extra
length for saffety. You'll need approximately
30 centimeters. 12 " of ribbon per cup. So a total of 60 centimeters, 24 " for both cups. The seam allowance
width on the cups is 8 millimeters, 0.3 ". As usual, press
the ribbon flat in half and then draw a
line 1 centimeter, 0.4 " from the fold. This will be the width of
the seam allowance tunnel, leaving 8 millimeters, 1.3
" for the seam allowance.
22. Sewing the Bottom of the Cup - Patterns #7, #8, #13: Let's start working on the cups. It's crucial to sew all the
parts of the cup correctly, and the pattern
provides checkmarks to ensure proper alignment
of the corners. On pattern number six, the upper part of the cup, you'll see a mark labeled
with the number six. Patterns number seven and number eight also have
corners marked with a six, indicating that these patterns
will be sewn together along the curve marked with
numbers three and six. The point marked six
on this curve must align with the 0.6 on
pattern number six. Additionally, the edge of pattern number eight,
marked with 0.4, should align with 0.4
on pattern number six and 0.2 on
pattern number six, should align with 0.2 on
pattern number seven? First, make a stay
stitch along the line where the cup will be sewn
into the corset body. To ensure the stay
stitch is accurate, stitch it in the
same sequence as the cup will be sewn
into the corset eyelet. One, stitch along
the line drawn on pattern number six from point number one to point number two. Two, on pattern number seven, a line point number two with point number two on
pattern number six, and so along line two to three
on pattern number seven. The, on pattern number eight, stitch along line three, four. Four, finally, on
pattern number six, close the semicircle
by stitching along the line between points
a four and a five. These patterns
will now be folded into the cup shape
ready for sewing. Set pattern number
six, azide for now, and focus on patterns number
seven and number eight. These patterns should be sewn
along line six to three, which will be covered
by decorative egging. Following the same method
used for the corset body, where the waters
were sewn on curves without a gray stripe
on the paper pattern, attach the prepared ribbon
to pattern number seven. Carefully align the markings on the ribbon with the lines
on the paper pattern, and sew the ribbon without
making any fasteners. After sewing, trim the ribbon. Check your work by
turning the pattern over to ensure the
stitching is correct. Once confirmed, you can
remove the pins from pattern number seven
since it is now secured. Next, take pattern number eight and overlap it with
pattern number seven. Aligning marks number six and number three on both patterns, which will crete the
curve of the cup. Remember that the patterns are
placed with the underside, wrong sides or paper
patterns facing each other, so the seam allowance will
remain on the front side. Sew the patterns together using the same stitching
used for the ribbon. Be precise in matching
the pattern pieces, especially ensuring that
all horizontal lines align at points number
six and number three. This requires carefully docking the corners of each small piece. You can sew with or without tacking depending
on your preference. After stitching, unfold the
patterns and check that the horizontal lines
of the cup align correctly at points
number six and three. Before finalizing the
sewing of the batting, remove all the paper pieces. The paper should
come off easily, and the time spent
removing the paper will be rewarded with clean,
precise sewing. Trim the seam allowance
by one to 2 millimeters, 0.04, 0.08 " to refine it. On this pattern,
you won't need to sew a second stitch along
the seam allowance. Instead, carefully unfold the sewn pattern
to give it volume, fold the seam allowance, and stitch only
along its open edge. This completes the
assembly of the pattern. Now, revisit the check
marks on the cup parts. You've sewn the bottom
part of the cup. If you overlay the
removed paper patterns, you can transfer
the reference marks directly onto the sewn
pattern to avoid confusion. Mark number six indicates the arc where the bottom part of the cup will be sewn to the
top part. Pattern number six. The arc between marks
number two, number three, and a four with the
stay stitch indicates the line where the cup will
be sewn into the corset. Next, take the lining pattern along with the mesh pocket
for the push up pad. Pattern number 13. This pattern also contains
marks number two, number three, number
four, and number six. Flip the sewn cup,
bottom pattern over and position it correctly
with the lining pattern. Overlap the patterns, placing them underside
to underside, wrong side to wrong side, and align the marks accordingly. Without shifting the patterns, pin them together by aligning Mark number six with
the curve seam, Mark three with the
bottom curve seam, and Marks two and M four. Distribute the lining pattern evenly over the front
part of the cup bottom. Now, sew the lining to the front part of
the cup as follows. At the bottom, sew along
the stay stitch line. And at the top, hem
the width of the foot. This process connects
the front part of the cup with the lining. Afterwards, shape the
lining on the cup details. The lining pattern
design might cause some edges to extend
beyond the front part. However, the one piece lining should easily fit over
the two piece cup.
23. Sewing Pattern #6: Now it's time to
sew the bottom part of the cup to
pattern number six. First, sew a stay stitch along the upper raw
edge of the cup. However, instead of sewing directly on the
paper pattern line, sew 1 millimeter away
from the seam allowance. This will ensure that
the stay stitching doesn't interfere
with the final seam. After this, remove
any extra pins. Since a decorative
edging will be sewn along the seam where
the parts are joined, attach it as usual
to the part without the gray stripe indicating the back stitch on
the paper pattern, in this case, the
bottom part of the cup. The paper patterns have
already been removed, use the seam allowance marked on the bias
tape as your guide. Be careful not to stretch
the bias tape while sewing. And After sewing, trim the seam allowance down by about 1 millimeter, 0.04 ". Next, fold the
patterns together, remembering to align
the paper pattern on pattern number six with the wrong side of the
bottom cup pattern. Start by matching the points labeled number six
on both patterns. Insert a pin at
point number six on the upper cup
pattern and pass it through point number six
on the lower cup pattern. Use a sliding motion to secure the pin in the thickest
part of the cup. To ensure pattern number six spreads evenly over the
bottom cup pattern, notch the seam
allowance slightly. Sew the patterns together along the stitching line
of the bias tape. Align the corners
of both patterns using the stay stitch
on the lower cup and the drawn line on
the paper pattern for the upper cup,
securing with a pin. Carefully match
the patterns along the control lines using a vertical pin to pierce the
parts in the correct place, and then securing with a
horizontal pin nearby. Continue sewing the rest of the cup directly
under the machine, aligning the reference
lines as you go. Remove the pins as you sew. The quality of the stitching, ensuring it runs exactly along the line on
the paper pattern. This step is crucial. Once satisfied that
everything is correct, you can remove the paper pattern and trim the seam allowance
a bit more if necessary. Be cautious not to
trim too much fabric. If you remove too much, it will make stitching the
backstitch more difficult because
the difference in height will cause the
machine foot to slip. Trim just enough to keep the seam allowance
within the bias tape. No Start by sewing the reinforcing stitches
on the side of the ribbon. As you sew, ensure the
cup is spread out well. Once the first set of reinforcing
stitches is in place, sewing the second
side will be easier. Pay extra attention
where the fabric thickens as the machine foot may struggle to pass
through these areas. This is how the cup
should turn out. Even though the cup is made
from very soft materials, it should hold its shape well. Finally, carefully remove
all the extra threads that were used to connect
the layers of mesh fabric, taking care not to damage
the front layer of the cup.
24. Shaping the Cup Trim: Now that the cups are sewn, the next step is to prepare
a ribbon for edging them. An ironing board with
markings in the form of circles is a convenient
tool for this process. To determine the proper
curvature for the edging, take a suitable metal frame and align it with the drawn
circles on the ironing board. Based on the size of
your metal frame, choose the circle that matches
the curvature you need. For my frame, the second circle provides the correct path. Measure the perimeter of
the bottom cup part to determine the length of ribbon needed and cut the
ribbon accordingly. This will make the ribbon
easier to work with. Start by pressing the
ribbon flat in half. Then align the fold
of the ribbon with the chosen circle and begin to shape it into a rounded form. The goal is not to perfect the rounded shape
on the first try, but to gently stretch the seam allowances so that
the ribbon begins to curve. As the ribbon starts to
take on the desired shape, press out any unnecessary
creases that may have formed. Next, mark 1 centimeter, 0.4 " from the fold
of the ribbon. During the process of
forming the half circle, the ribbon's width
may become distorted. Therefore, it's essential to
ensure that the folded part of the ribbon remains
exactly 1 centimeter wide, matching the width
of your classic hem. Consistency in
width is crucial to avoid warping when sewing
the ribbon onto the cup. To achieve this, fold the
ribbon along the markings, pinning it in place while continuously checking
that the width from the fold is
indeed 1 centimeter. I'm working with a
cotton starched ribbon, which holds its shape well and bends with minimal warping. If you're using silk
or acetate ribbons, be extra cautious as they
are more prone to warping. Once the ribbon is
properly laid out, fix its shape by pressing
it with an iron. Then cool it with
a pressing pillow. Afterward, remove the main pins, recheck the width, and press
the ribbon flat once more. At this stage, the ribbon
should hold the desired shape. Now, set the correct seam
allowances on the ribbon. The seam allowance at
the bottom of the cup is 8 millimeters, 0.3 ". However, I recommend
setting aside a nine millimeter 0.35 " seam allowance on the ribbon
because you'll want to sew the ribbon 1 millimeter
above the stay stitch line. To do this, place a
ruler against the fold of the ribbon and mark 9
millimeters from the fold. Although this step
may seem tedious, it is crucial for ensuring the accuracy and quality
of the final product. Trim the ribbon along
these marks so that the seam allowance is a
consistent 9 millimeters. Additionally, to better
see the seam allowance, use a thermal pen to draw a line along the
fold of the ribbon. Do this carefully without
unfolding the ribbon, as unfolding could
cause deformation. Now, the sewing line should
be clearly visible and you can trim the seam alloance while keeping the ribbon in its
flat, press ed state. At this point, the ribbon
is fully prepared, and its width should be exactly 1 centimeter along
its entire length. The next task is to attach this prepared
ribbon to the cup.
25. Sewing the Edging to the Cups: Now that the stay
stitching has been completed and the
lining is in place, it's time to sew the
edging ribbon to the cups. Start by unfolding
the ribbon slightly so you can see the line along
which you should stitch. Carefully place
the ribbon inside the cup with its
fold facing inward, leaving the raw edges of the ribbon as the
seam allowance. Position the ribbon so that the marked fold is
slightly offset from the stay stitching
inside the cup by about 1 millimeter, 0.04 ". Begin sewing the
ribbon in place, constantly checking
underneath to ensure the ribbons
fold lies correctly. As you sew, you might
notice that on one side, the ribbon goes too
deep into the cup, while on the other
side, it maintains the proper distance from
the stay stitching. If this happens, reduce
the seam distance from the stay stitching by half on the side that went too deep. Don't hesitate to rip out the seam and redo
it if necessary. Precision is crucial here, as the position of
the ribbon will affect the appearance
of the cup. If the ribbon on the
second cup is sewn at a slightly different distance
from the stay stitching, the cups may not
appear symmetrical, so take your time and redo the stitching
until it is perfect. Once satisfied with the result, the ribbon should be
sewn in such a way that it slightly dips inside the cup, and when folded away, it should measure
exactly 1 centimeter, 0.4 " in width. You may notice that despite the seam allowances being
eight to 9 millimeters, 0.3 to 0.35 " wide, and the ribbon being
1 centimeter wide, the seam allowances appear
wider than the ribbon. This discrepancy occurs
because fabric tends to warp along slanted raw edges, causing the allowances to stretch slightly on
the curved edges. We will align and shape the
seam allowances later on. Repeat these steps
with the second cup. To make it easier to attach
the cups to the corset body, place control marks or dashes
at the level of the curve. These marks will help you align
the curve of the cup with the vertical curve of the
corset body during assembly.
26. Finishing the Cups: Now it's time to join the
cups to the corset body. The technique I'll show
you makes this process straightforward and doesn't
require any special skills. The most important thing is
to avoid mixing up the cups. Pay close attention to
the joint marks where the cup aligns with the center and side of the corset body. Remember, we made control
marks on the cup. One on the central part, one
on the intermediate part, and one on the curve in
the center of the cup. Start by aligning
the machined edge of the cup eyelet with
the reference mark, placing it against the
stitching of the edging strip. And securing it with pins. Ensure that the patterns
align perfectly. No corrections
should be necessary. Repeat this process
on the second side, aligning the horizontal marks on the corset body and the cup. Position the edge of the
corset body's ear against the stitching of the cup trim and fix the parts with pins. Next, align the
marks for the curve. This area will have
significant thickness. If necessary, reduce
the thickness by notching the allowance on the
vertical curve of the cup. Be cautious not to
cut too deeply, as this could cause the threads
to unravel from the seam. Once the curves of the cup and the corset body are aligned, secure them with pins. Spread out the eyelet and pin it along the entire
edge of the cup. The process should be
straightforward and precise. If done correctly,
as demonstrated, you should encounter
no problems. Use thin pins and insert them tangentially to avoid
distorting the fabric. With the cup securely in place, sew a machine stitch along the finishing stitch that was laid along the
ear of the cup. Set the machine stitch length
to 3 millimeters, 0.1 12 ". Make neat fasteners at the beginning and
end of the stitch. Once the cup is sewn in, the edging tape should fold away neatly giving the cup
a polished appearance. Repeat the same procedure for the second cup and then move on to working on the
back with tunnel tape. After sewing both cups, turn the garment
to the backside, trim the ends of the ribbons and prepare it for
the next steps.
27. Sewing Tunnel Tape: In this lesson, we'll sew the
tunnel tape to the corset, completing a critical step in securing the structure
of the Bustier. First, trim the raw
edges of the fabric, removing any excess ribbons. Next, we'll focus on the
upper raw edge of the corset, which will involve sewing
bias tape and hemming. Begin by marking where the
tunnel tape will be sewn. Since the upper raw edge will
be finished with bias tape, ensure that the tunnel
tape ends about 0.5 centimeters or 0.2 "
below the stay stitch, which indicates the position of the top raw edge of
the finished product. Mark the positions
on the back side, underside of the corset,
and on both cups. As mentioned earlier, factory made tunnel tapes come
in various types, but almost any kind will
work for our purposes. For this lesson, I'm using a velvety tunnel tape that has machine stitching
along one side, which gives it a
slightly rounded shape. Ensure that the cup trim
tape is turned towards the cup on the front side
over the top of the cup. Place the tunnel tape with its stitched side
against the cup, aligning its tip with the mark
you made 0.5 centimeters, 0.2 " below the stay stitch. There may already
be some stitches in the area where you'll be
attaching the tunnel tape. When positioning the tape, try to overlap these
existing stitches without going beyond them. Start sewing the tunnel
tape by stitching along its factory stitching line and over the previous stitches. Begin with tacking
to secure the tape. Lay the cup flat as you sew, ensuring the tunnel tape is
neither stretched nor loose. When you reach the end, cut
the tunnel tape at the mark, stopping 0.5 centimeters, 0.2
" short of the stay stitch. Finish the stitching
and make a tack. Now that the tunnel tape
is sewn on its inner edge, it's time to trim
the seam allowances. These seam allowances were left from when you
sewed on the cup. Be careful not to
trim them too deeply, as this could cause
the machine foot to slip during the next steps. Trim just enough so that the seam allowances
overlap the tunnel tape, but do not extend beyond it. Work carefully and neatly. Once the seam
allowances are trimmed, sew along the second
edge of the tunnel tape. As you do this, make sure that
the front finishing ribbon remains bent towards the cup and does not get caught under
the machine stitching. After sewing the tunnel tape, it's important to
test it by inserting the metal frame to ensure the tape is the correct
width for the frame. This testing step is essential, just as it is when
finishing any waiters. With the metal frame test
complete, remove the frame. Now, finish the cup by
folding the edging tape to the front side and sewing it in place with
machine stitching. And that's it. While
edging, sewing tunnel tape, and sewing the cup itself
are often considered challenging tasks in bra
or Butier construction, this method allows
these operations to be performed quickly, easily, and with
excellent quality.
28. Finishing the Top Raw Edge: We're nearing the final steps
of constructing the Butier. Now we'll work on finishing
the top raw edge. I've already measured
and prepared the necessary length of
bias tape for this process. The bias tape has been slightly stretched and
pressed to achieve a consistent width
of approximately 1.8 to 1.9 centimeters, 0.7 to 0.75 " along
its entire length. To ensure a precise and
symmetrical finish, particularly in the
area between the cups, follow this method.
Center marking. Fold the bias tape in
half and mark it center. You can use a heat pen or simply rely on the crease
line from folding. Turn the Bustier so that the
front side is facing you, identify the front
side of the bias tape, and align the center of the tape with the
center of the Bustier. Secure this alignment
with a pin. Pin placement. Look for the stay stitching along
the top of the cup. This stitch should
be 1 millimeter, 0.04 " above the
actual seam allowance. Where the stay stitching intersects with the
finishing stitch, place a pin 1 millimeter down
from the point of contact. This will ensure the
correct seam allowance. Align the bias tape
at this point, pinning it vertically
first to prevent shifting and then securing
it with a horizontal pin. Repeat this on the other side
of the Bustier. Sewing the bias tape. Start sewing from the center of the Bustier and work
outward in both directions. This method helps
maintain symmetry. If you begin from the edges, the center of the
Bustier might skew, leading to an uneven finish. Begin sewing without
any fasteners, starting from the
first pin fixed point. Ensure that the Bustier lies
flat and even on the surface as you sew a perfectly
straight stitch to the second pin fixed point. Continue sewing. After
removing the pins, unfold the Bustier
and the bias tape. Sew a machine
stitch 1 millimeter below the stay stitching,
passing over the cup. And continuing with the same
seam allowance to the end. This completes the
first section. Repeat for the other side. Turn the Butier around and sew the same machine stitch
on the second side. Make a small overlap
stitch in the center, aiming to hit the same stitches and sew to the first checkpoint. Unfold the cup, lay it flat, and continue sewing the ribbon with the same seam allowance. Check your work. Review the
stitches to ensure accuracy. Fold the seam allowance
to the backside and unfold the bias tape
to see how it tucks. To ensure the tape fits
well around the edge, turn it up on the seam allowance
and sew another stitch. This machine stitch should be 1 millimeter above
the seam allowance. By stitching on the seam
allowance in this manner, you simplify the process
of turning up the tape. Before proceeding, trim
the seam allowances above the cups and at the
center of the Butier, to make it easier to
twist the ribbon. Ironing carefully iron
the top stitching. Start by pressing the
ribbon flat in the center using special wooden irons
and cool it with wooden pads. If your ironing molds allow, clamp the ribbon over the cup in the correct position and
secure it with a press iron. Once the spot has cooled, remove the pins and
the cup from the mold. The ribbon should now be
securely fixed in place. Repeat this process with the
ribbon on the second cup. Take your time, as this is the most delicate and
visible part of the dress. Any imperfections
will be noticeable. Carefully and delicately, iron the cups
themselves as well. Iron the straight parts. Turn up and iron the ribbon on the straight
parts of the Butier, on the back and sides
from the wrong side. Use a wooden iron
to cool the ribbon, especially in thicker areas. Don't worry about achieving a perfect hem fixation
at this stage. In places where the
fabric is thicker, you may need to secure the ribbon with hand
stitches later. So it's okay if the ribbon doesn't stay perfectly
in place right now. Avoid ironing in one spot for
too long to prevent damage. Final adjustments. Take a critical
look at your work. If everything looks good,
the edging is complete. If you want to iron
a little more in some areas, feel free to do so. But remember that it's
easy to overdo it. Strive for a balanced finish
without excessive ironing. Insert the metal frames. Now is the time to
insert the metal frames. Remember that the colored tip of the frame points
towards the center. Insert the frame into
the tunnel tape so that it fits into the
specially allocated tube, not under the tunnel tape. Attach the upper finishing tape. Finally, attach the
upper finishing tape with concealed stitches to
the curves on the wrong side. This will overlap the ends of the tunnel tape and secure
the finishing tape in place. While sewing the ribbon
on the top edge, remember to use the test bone, the tool used to check the
width of the waiters in the seam where you're
sewing the ribbon to avoid stitching all
the way through. Keep in mind that plastic bones will be inserted into
the waiters later. Hand stitches. Finish by making hand stitches on
both sides of the corset. Avoid tacking the
ribbon on the cups as visible stitches will
show on the front side.
29. Inserting the Bones: M. After securing the ribbon edging along the upper
edge of the corset, you can proceed with
finishing the center back seam by attaching
the strips with gromets. First, process the upper
raw edge of each strip. Cut the strips according
to the height of the back, leaving a small seam allowance. Ensure that the last
hole on each strip is positioned above the line
where the skirt will be sewn. Prepare two strips
of equal length. To work the top raw
edge of the strip, determine the
height at which the top edge needs to be folded and fold it on both the front
and underside. Wrong side. This will mark the
place for the fold. Open the strip and use a needle to push
the corner inside. Then using the needle, fold the raw edges
of the strip inward, aligning the fold
with the needle. This technique will give you two identical strips
for lacing processing. As you may recall,
the paper pattern on the back pieces has
not been removed yet. It has been preventing
the open center raw edge of the back piece
from stretching. Now, as the raw edge
will be worked on, you can remove the paper. Next, take the ribbon with eyelet that corresponds to
the back of the corset, fold back the edge as far
as the grommets allow, and position the ribbon
under the piece. The transparent mesh fabric
allows you to machine stitch along the pattern while seeing the ribbon underneath, stitching along its edge. After this, wrap the
ribbon seam allowance around the seam allowance
of the pattern, almost like packing
the top raw edge of the back into
the lacing ribbon. Then sew another stitch
on top of the ribbon. Change the machine foot to a special single sided foot
that will allow you to get closer to the Gromet and sew a stitch that will
be the second line of the back stitch cutaway. Even if the cutaway turns
out wider than necessary, it is still essential
to test it. The second strip with gromts
is sewn on in the same way. After both strips are sewn, immediately trim the
bottom raw edges. To do this, fold the two
strips so that the gramat holes align perfectly with each other and trim the
bottom raw edge.
30. Sewing Removable Straps: Now it's time to insert
the plastic bones, pips. Before you start
cutting the bones, make a small mark on the corset from the bottom raw
edge of the corset. Measure 2 centimeters, 0.8 " upwards and make marks
on all the waiters. This will help you
cut the plastic bones accurately and ensure that they don't extend too far down, which could interfere
with the machine foot when the Butier is
joined to the skirt. Cut the bones with this in mind. They should stop
0.5 centimeters, 0.2 " from the upper edge of any waiter and end
at the lower mark. After cutting the bones to the correct length
for each cutaway, round off the edges by
trimming the corners. There's no need to use
special tools like files. Just trim the corners
enough to smooth them out. Also, don't worry too much
about the bend of the bones, as they will naturally take the desired shape due to
the warmth of the body. Insert the bones into
the back strap so that they are inside the
backstrap not underneath it. Push the bone down
to the bottom mark, but stop 0.5 centimeters, 0.2 " short of the
top of the waters. The bones should
not press against the upper edge as this could cause irregularities or bumps. Push the bones all the way into the waters under the cups. After marking the
length of the bone, cut one and then use it as a template to cut
the second pair of bones. This will allow you to prepare
two symmetrical bones of the same length for the right and left sides of the Butier, making the work go faster. You can use any
convenient tool like a screwdriver to help push
the bones into the cutaway. Okay. Continue measuring, cutting and inserting the bones in pairs, ensuring that they fit perfectly into the symmetrical cutaways, and extend to the very
end of the corset.
31. Sewing Removable Straps: For the Butier, I
provide removable straps that can be fastened and unfastened at the
client's request. For the straps, I use strappy elastic bands
designed for bras. This elastic band is stretchy, but also firm and elastic. My elastic band has a mat
side and a shiny satin side. I will use the mat
side as the front. For the straps, you will
need 255 centimeter, 21.6 " pieces of elastic. Four rings, two strap
length adjusters, and four hooks to attach the straps directly
to the Bustier. Start by removing all the hooks, as they will not be needed during the strap sewing process. To make one strap, leave two rings and one
length adjuster. Take the elastic band
and turn it face up. Insert the elastic
with the mat side up into the length
adjuster, creating a loop. Then tuck the free end of
the elastic into the ring, passing the elastic through it. Leave a larger loop in the adjuster to make
the process easier. Next, unfold the tip
of the elastic band and insert it back into the
adjuster inside the loop, creating a smaller loop. Holding the tip of the elastic, pull it up a bit to
enlarge the larger loop, allowing room to maneuver. Pull back all the loops of
the halter while keeping the tip of the elastic
band pinned to the halter. Set the machine to a
small stitch length, about 2 millimeters,
and sew the loop, making a few stitches
back and forth. Immediately trim the threads and the remaining end of the
elastic band on the loop. After pulling the ring a line and pull the other free
end of the elastic band. The adjuster should now be
in place on the halter, allowing you to adjust the length of the
halter if needed. This loop is similar to the one typically
made on bra straps. Thread the free end
of the elastic band into the ring with the
mat side facing up. Create a small loop
on the underside, secure it with reinforcing
stitches and sew the ring. Remove any unnecessary threads, clean up the sewing area, and trim the excess elastic. Now, you have a halter with its front side
being the mat side. The strap will have
two transparent rings and a length adjuster
on the back. Repeat these steps to make
an identical second strap. You can attach the straps to
the cups in different ways. One option is to use hooks on the ends of
the straps instead of rings and create small loops
where the straps attach. However, such a loop is usually slightly outside the
cup and can be visible. Therefore, I recommend a
slightly different approach. Attach one end of the strap on the cup at a distance
of 4 centimeters, 1.6 " from the tunnel tape, and attach the other end of the strap over the back curve. Use an al to bend and
open the edging tape. Pierce a hole at the marked spot and widen it with the al. This method creates a hole without tearing the
fibers of the ribbon. Instead, the fibers
separate to the sides. Insert the hook spout
into the resulting hole. Now, sew this hook
on the backside. If you plan to add decoration
on top of the cup, you can sew the hook
through the decoration. The principle of attaching
the strap is simple. Hook the straps
ring onto the hook. When the strap is taut, as you've provided for
length adjustment, it won't slip off the hook. This fastening method
works very well. Repeat this process
above the back curve. Poke a hole at the marked spot, pull the fibres apart and slip the tip of
the hook through. You can first sew this hook to the ribbon and then attach the finishing
ribbon to the back. This ensures the hook is
very securely sewn on.
32. Sewing Push-Up Pads: To make push up pads, start with pattern number 13. Remove the seam allowances. I use regular neoprene, about 2 millimeters thick, 0.08 " to trace the pattern. You can mark point number six to indicate the
top of the pad. Fold the neoprene in half. In this case, the direction of the thread
doesn't matter much. Pin both layers together
and cut them out. Next, sew around the perimeter of the pattern
close to its edge, leaving a small unstitched
area for stuffing. After stitching, turn the pad right side out through the hole. The resulting cushion can
be stuffed with any filler, allowing you to
shape it as needed, adding more filler in some areas and making
others flatter. Then close the hole either
by hand or by machine, and the push up pad is ready. Now, consider an alternative
method for making pads. Again, use pattern number 13 and remove the
seam allowances. This time, use a
ready made foam cup with an existing push up pad. Apply the pattern to
this cup and trace it. If you don't want
to raise the bust, using the push up pad for its intended purpose and just want to even
out the soft cup, use a part of the cup
without the filler and trace pattern number
13 similarly. Cut out the traced
pattern along the contour and mark the top reference
point for the cushion. Trim the pattern slightly
smaller than the drawn outline. You will end up with
a smooth piece. You can thin the contour by machine stitching
or leave it as is, adjust the shape
and thickness of the pad according to your needs. Insert the cushion
into the cup pocket, making sure it is
positioned correctly, as each piece has a
right and left side. Spread the pattern
inside the cup pocket, adjusting it as necessary. Each part has its own volume, so it might turn out slightly
larger than the pattern. With that, the cup filling is complete and the cup is
straightened out from the bottom. You can see the difference
between cups without a push up pad and those
with a push up pad. The cups look more voluminous from the front when
the pads are inserted.
33. First Bustier Fitting: Put the Bustier on a person or a dress form of the
appropriate size. This is essentially
your first fitting. If you tried on the
product before this point, you probably didn't get the
information you needed. We always sew corsets and Bustiers almost blindly until they are completely finished. Only when the product reaches
the stage of decoration, can you conduct a
full fledged fitting? This fitting will reveal either the strengths or
weaknesses of your product. That's why, in my courses, I devote significant time to
working with the pattern. I do this to ensure the
initial cut is correct, as it forms the foundation
of the entire product. The client makes the first
fitting, essentially, on the finished
product. Here's a tip. If you want to check the size
of the cup before cutting, I strongly recommend
making a model out of soft cardboard
or dense paper. Only a cup made
from dense material can show you the real picture. No soft mock ups
will help with that. So I put the Bustier
on the dress form, the very same dress form for
which this product was sewn. I checked that the Bustier is the right size for
the dress form. Everything turned out perfect. The fit of the cups,
the fit of the back. The lacing came together
just the way I wanted it to. The waist position is
in its proper place. Now, I can start decorating this Butier and then connect it with all
the layers of skirts.
34. Decorating the Bustier: You need to do the
decoration on a dress form. This is the only way to
maintain the correct symmetry, evenness of lines, and
accuracy of edging, et cetera. Decorating the Bustier
while it is in a soft unfolded state
is not advisable. This can lead to
skewing and asymmetry. Even if the product
doesn't correspond to the size of your
available dress form, still try to first pull the front of the
Bustier then the back, spreading it on the dress form. If your dress form
is significantly smaller than your product, you can always use
additional overlays and fillers to increase the
size of the dress form. Then put the product on it. If your dress form is significantly larger
than your product, then without trying to
align the side raw edges, pull the front first and then try to pin the back
symmetrically relative to the right and left sides with more distance between
the back raw edges. Avoid trying to lace
up the product. For decoration, I chose a
ready made ribbon with beads, sequins and beads sewn onto it. I will position this
ready made ribbon along all the waiters, simply following the
lines of the trims. I will initially secure the
strips with textile glue. Then these strips should be sewn on with countersunk
hand stitches. The decorating process is
always time consuming. Since the ribbon has beads and sequins continuously
sewn onto it, you need to fix the threads with textile glue in places
where the ribbon is cut. You'll need to think through the sequence of
decoration on your own. Due to the differences in
styles and materials used, the order of
decoration can vary, and there are no
specific rules for this. Consider everything
carefully before you begin. I will start decorating from the top raw edge
of the neckline, going around in a circle, starting at the
center of the back, through the front, and finishing again at the
center of the back. I strongly recommend
using textile glue despite the prejudice that
glue cheapens the product. In reality, top
makers use glue to preposition pieces to ensure correct positioning
and symmetry. The end of my ribbon
has the beads removed. I trim the tip of the ribbon, fold it up, and secure
it with textile glue. Use a small amount of glue, applying it drop by drop. Pressing with my fingers, I glue the ribbon in
its folded state. I attach the folded
tip to the edge of the lacing and start placing the ribbon
along the top edge. I don't use glue yet. I just pin it in the
desired position. When working, it's
best to get into a comfortable position with the entire piece
in front of you. For the moment, my position
is not the most comfortable, as I showed you on
camera how I would move. Now, I'll place the dress form comfortably in front of me so I don't make a mistake and
correctly position the tape. Having reached the
second side of the back, I cut the ribbon. Without waiting for
the beads to fall off, I apply glue to the
threads on the back side. I wait for the glue to dry. Only then do I remove
the beads from the edge so I can fold the
ribbon in the desired place. The end of the thread is also
glued from the front side. Then I apply textile glue to the backside along the
very edge of the ribbon. Now I can fold the tip of the ribbon without fearing
that the beads will fray. Once the glue has fully dried, I will remove any
excess threads. Do not wait for
the beads to start fraying from the cut
edge of the ribbon. Always remember to apply glue to the threads
on the backside. The beads can be removed
from the edge of the ribbon, as it's certain that this part
of the ribbon will either be folded or tucked under the fixed ribbon
in future work. The tip should be secured
and free of beads. Be sure to wait until
the glue dries. The rules for
securing the ribbon with textile glue
are very simple. First, spread the ribbon
along the entire line. Then remove only a
few pins, a few, not all, lift the ribbon in this area and apply
drops of glue. After that, return the ribbon to its original place and repin it to the product
and the dress form. The reason for this
is that if you don't repin the ribbon
to the product, you might not notice it
shifting before the glue dries. That's how you
carefully step by step, work along the entire top edge. The next step is to secure
the ribbon under the cup. I follow the same principle. The only difference is that I slip the tip of
the ribbon without beads under the previously
fixed horizontal ribbon. I pin the ribbon in place, then add a few dots
of glue to secure it. Oh I cut the ribbon where
the docking will occur and immediately
secure the strings of beads on the backside of
the cut end of the ribbon. I remove the extra beads, glue the loose thread,
and cut it off as well. I slip the tip under the horizontal ribbon and
secure it with one or two pins. Be sure to check the result
to ensure a good fixation. Don't forget to
secure the threads on the cut tip of the
remaining ribbon. Place the piece in front of you so you can see
the whole picture. I will do the same
with the second cup. I think the general
strategy is clear. Now I place the tip
of the ribbon under the perpendicular ribbon
at the bottom of the cup, positioning the ribbon exactly along the horizontal
curve of the cup. I'll double check this once I have the dress
form in front of me. I cut the necessary length, secure the threads with glue on both cut ends, both
front and back. I then slip the other end
under the perpendicular tape, spread the slipped tip
from the back side, and secure it with pins. Remember, pins are
your main helpers. When working with glue,
be very careful and neat, trying not to dirty the product. Use a moderate amount of glue when applying dots for securing. I won't show you how I glue ribbons on all the
curves of the booster. The principle remains the same. After securing the ribbon along
the horizontal cup curve, I will glue the ribbon along the vertical
lower cup curve, decorate the second cup, and then start decorating
all the vertical curves. One important note,
remember the marks on the vertical curves that we placed before
inserting the bones. These marks indicate where the inserted plastic
bones should end. I will remove the beads from
sections of 2 centimeters, 0.8 " below these marks. This will help us seamlessly connect the Bustier
with the skirt, as the beads won't interfere
with the machine stitching. All the decorative strips are now attached to the Bustier. They are partially glued and fully sewn on with
hand stitches. I'll finally trim
any unwanted threads along the bottom raw edge, and the boustier will be ready to be joined
to the skirts.
35. Determining the Number of Layers for a Skirt: Let's begin working on a
multi layer tool skirt. I have 36 meters, 39.4 yards of toll
at my disposal. Before we start cutting, the
question inevitably arises. How many layers will
the skirt need? There is a simple way to
determine the number of layers. It is enough to put your
hand under the layers, and having achieved the
desired transparency, you can count the number of
tool layers above your hand. If you want to determine
what the edge of the body and lining
will look like, you need to put your
hand so that you can see both the lining and your
hand at the same time. And after that, you can count the number
of layers you got. To achieve the airy effect, I will be using 12
layers of toll. The skirt will have
four full circle layers and eight half circle layers. Half circle skirt will
be the bottom layers. They will touch the legs
of the client because in the half circle skirt is easier to move and less
likely to stumble, and the upper four layers of the full circle will form
the silhouette of the dress.
36. Calculation for Cutting the Layers of the Skirt: Now a little math. Without it, you won't be able to
calculate the amount of fabric or the correct
cut of the product. Let's first calculate the cut for the layers that
we will cut in the style of a full sweep
skirt, full circle skirt. First, we should calculate the radius and cut out a
circle with this radius. We should get a circle
whose circumference length is equal to the
waist circumference. The length of the circle is
calculated using the formula, L equals two times Pi times R, where Pi is a
constant value, 3.14. We are looking for R, the radius, and the
length of the circle, which is equal to the
waist circumference is 66 centimeters or 26 ". From this formula,
we find the radius two times Pi times R equals
66 centimeters or 26 ". Pi times R equals 33
centimeters or 13 ". Therefore, R equals 33/3 0.14, which equals 10.5
centimeters or 4.1 ". Next, we will cut by folding
the material in two layers. Let's place the material
with the fold on the left and the two
free edges on the right. There's an edge at
the top and bottom. Our task is to determine the amount of material
needed to cut one layer of a full sweep
skirt or full circle skirt. From the upper left corner,
we'll measure the radius, which is 10.5
centimeters or 4.1 ". Taking into account
the seam allowance, I'll draw another line at a
distance from the corner, which is r19
centimeters or 3.5 ", adding 1.5 centimeters or 0.6
" for the seam allowance. The length of the skirt I'm
going to make is standard at 115 centimeters or 45.3 ". Therefore, taking into
account the radius of 10.5 centimeters or 4.1 " from
the upper left corner, I have to measure 125.5
centimeters or 49.4 ". I'll mark the cut of the
skirt in the figure. R equals 115 plus 10.5, which equals 125.5
centimeters or 49.4 ". Thus, I got the front half of the full sweep skirt or
full circle skirt cut. Now I need to cut the back
half of the full sweep skirt. For this, I'll use the
remaining piece of fabric. From the bottom right corner, I'll set aside the same values. With the radius of 10.5
centimeters or 4.1 ", I draw a line where the skirt
will be sewn to the corset, and at a distance of R one
equals 9 centimeters or 3.5 ". I'll set aside the radius
and draw a circle. This will be the cutting line, taking into account
the seam allowance of 1.5 centimeters or 0.6 ". In the same way from
the lower right corner upwards and to the left,
I measure the radius, which is 115 plus 10.5, equaling 125.5
centimeters or 49.4 ". Thus, the skirt will
have a length of 115 centimeters or 45.3 ". Now you need to find
the optimal piece of fabric required for cutting
the full sweep skirt. In the drawing, you
see a rectangle. If you connect the
upper left corner and the lower right corner
with a straight line, you will divide this rectangle
into two right triangles. We know the length
of the hypotenuse, which is line AC. This equals two skirt lengths of 115 centimeters or 45.3 ", to which we must
add two radii of 10.5 centimeters or 4.1 ". We get the length of
the hypotenuse as 251 centimeters or 98.8 ". AC equals two times 115
plus two times 10.5, which equals 251
centimeters or 98.8 ". We know the length of the left
cathedis of the triangle, which is line AB and is
equal to the width of the material 140
centimeters or 55.1 ". It remains to find the length
of the lower caths line BC. Knowing the length of one
caths and the hypotenuse, let's use the right
triangle formula. Pythagoras' theorem, A squared plus B squared
equals C squared, where A and B are the cathets
and C is the hypotenuse. Substituting the known values, A equals 140
centimeters or 55.1 ", and C equals 251
centimeters or 98.8 ". B equals the square root of
C squared minus a squared, which equals the square root
of 251 squared -140 squared, approximately 208 centimeters or 81.9 ", about 2.1 meters. Since the fabric
is folded in two, we need two such layers or 4.2 meters or 4.6 yards of fabric. Thus, we've found
the length of fabric required to cut one layer
of a full sweep skirt. Now, let's calculate
the necessary fabric for cutting a layer
of a half sun skirt. Since the half sun
is a half circle, we'll use the half
circle length formula to calculate the radius for
cutting the waist of our skirt. The full circumference
length is L equals two times Pi times R. Then the half circle
length is calculated by. The formula L one equals two times Pi times
R divided by 12, which equals Pi times R, and Tismst be equal to
the weistgircumference, which is 66 centimeters or 26 ". From this formula,
we find the radius R equals 21 centimeters or 8.3 ". R equals 66/3 0.14, which equals 21
centimeters or 8.3 ". For optimal material
consumption, I'll calculate the cutting
not for one half sun layer, but for two layers at once. I'll proceed similarly to the cutting of the
full sweep skirt, meaning I'll lay two half suns on one rectangle of fabric, but with a radius of 21
centimeters or 8.3 ". I draw a new layout
and calculate how much fabric I need to cut
two half suns on one piece. The one on the left will
have one side seam, and the one on the right
will have two side seams. So acting similarly to our previous calculation
of the full sweep skirt, I measure the radius, which
is 21 centimeters or 8.3 ". The width of the fabric is
140 centimeters or 55.1 ", and the length of the skirt
is 115 centimeters or 45.3 ". 115 plus 21 equals 136
centimeters or 53.5 ". If we lay out one layer from the upper left corner and the second layer from
the lower right corner, then the line drawn from
the upper left corner to the lower right corner will be the hypotenuse of
a right triangle. We know the length of
the hypotenuse or C, which is two skirt lengths of
115 centimeters or 45.3 ", to which we must
add two radii of 21 centimeters or 8.3 ". We get the length of
the hypotenuse as 272 centimeters or 107 ". AC equals two times
115 plus two times 21, which equals 272
centimeters or 107 ". We know the length of the left
cathodis of the triangle, which is line A and is equal to the width
of the material, 140 centimeters or 55.1 ". It remains to find the length of the lower cathodis or line B. Substituting the known values
into Pythagoras' theorem, A equals 140
centimeters or 55.1 ", and C equals 272
centimeters or 107 ". B equals the square root of
C squared minus a squared, which equals the square root
of 272 squared -140 squared, approximately 233
centimeters or 91.7 ". Since the fabric
is folded in half, we'll need two such layers, which equals 466
centimeters or 183.5 " or approximately 4.7
meters or 5.1 yards. Thus, we've found the
length of fabric required to cut two layers of
a half sun skirt. From the previous calculations, we can now find the
total amount of tool required to cut all 12
layers of the skirt, four of which are
full sweep skirts, and eight are half sun skirts. To cut four full sweep skirts, we'll need four cuts of tool, each 4.2 meters or 4.6 yards. Since the layers of half
suns will be cut in pairs, we'll need four cuts of fabric, each 4.7 meters or 5.1
yards to cut eight layers. Now let's calculate the
total four times 4.2 plus four times 4.7 equals
35.6 meters or 39 yards. Rounding that off, we get
36 meters or 39.4 yards. During the calculation
of fabric consumption, I repeatedly mentioned
that the layers of half circle skirts
will have side seams. It may seem strange why to make the seam on the side of the
half sunflower layers with one seam and not to
turn the seam to the back and simplify the
processing of the back cut. The fact is that the cut of the half sun has an
important feature. In a half circle skirt
with a seam at the side, the falling folds are
distributed evenly around the entire circumference and look the same from
the front and back. In a half sun skirt with
a seam in the back, the folds are not
evenly distributed. In the front, the
skirt falls almost straight and the entire volume is concentrated on the back. This option is perfect
for a skirt with a train. Taking into account
this feature, I choose the option of a half circle skirt
with side seams.
37. Cutting the Layers of the Skirt: Since the space here is limited, I will demonstrate
the cutting of the tool layers of the
skirt on a 14 scale. Let's imagine that you have
a large piece of fabric in front of you,
measuring 4.7 meters, about 185 " in length, and 140 centimeters,
about 55 " in width. This fabric is
intended for cutting two layers of half
circle skirts. First, fold the piece of
fabric exactly in half. It's often easier to
control the alignment by focusing on the edges
rather than the fold. Position the fabric horizontally
for easier cutting. Now, take one of the corners on the short edge that is more convenient for you and bring it diagonally to the
opposite long edge. Fold it diagonally again, holding the edge
with both hands. The layers may
separate slightly. Don't worry about spreading them inside the resulting cone. Just secure the folded part
of the fabric with pins. Next, take a measuring tape or ruler and set aside
21 centimeters, about 8.3 " from the corner. This is the radius
required for the waist. Place two or three marks
along this line. Solid line. Remember to add the
seam allowance from this line back toward
the corner, dotted line. From the first solid line, measure down the
length of the skirt, which is 115 centimeters,
about 45.3 ". For accuracy, do this several times along the edges of the
triangle and in its middle. You can connect these
marks with a curved line. It's more convenient to
cut with a rotary knife as it provides a smooth edge
without biting into the fabric, which can happen with scissors. If you use scissors, the hem will likely need
trimming afterward. Now, cut the first layer. Don't trim the top
corner of the cone yet. I recommend labeling
this layer immediately. Pin a piece of paper
with its name. In this case, it's
a half circle skirt with two side seams. Set the finished cut aside and unfold the remaining fabric. Locate the long side
of this remnant. Hold the corner of
this long side, grab the second edge and align this raw edge with
the fold of the tool. Without letting
go of the corner, fold the fabric
into a cone again. Secure the layers with pins and prepare the
fabric for cutting. Lay the already cut
layer on top of the newly prepared fabric for cutting the
half circle skirt. Since the cut layer is
also a half circle skirt, the marked radius and skirt
length will match exactly. You can trim both cones
together at the narrow end. Using the rotary knife, cut along the edges, using the finished cut as a template. Pay close attention to
the bottom raw edge to ensure that all layers are aligned and included in the cut. Finally, you can trim the remaining top corner naturally cutting along
the seam allowance line. If you've done everything
correctly, the leftover fabric, where the semicircles
of the skirt bases were joined will be no more
than two to 3 centimeters, about 0.8 to 1.2 " wide. So I've shown you how to cut
two half circle skirts with a radius of 21
centimeters, about 8.3 ". Cutting the layers of
the full sweep skirt, full circle skirt is done
in exactly the same way, except you will cut
off 4.2 meters, about 165 " of tool, and measure a radius of 10.5
centimeters, about 4.1 ". The skirt length
remains the same. For clarity, let's split the cut layers of
half circle skirts. This ensures that
we get one layer of a half circle skirt with
a fold and one side seam. And another layer
consisting of two halves, each with two side seams. Now that all the
skirt layers are cut, all 12 layers, we can
start assembling them. The first part of the skirt, which we will
assemble and fasten together will consist
of ten layers. The first two layers,
number one and two, will be full circle layers and layers three through numb ten
will be half circle layers. I strongly recommend alternating the half circle layers with two side seams and
one side seam. Let the even numbered layers be half circle layers
with one seam, and the odd numbered layers
be those with two seams. In the final step, we will
assemble the last two layers, number 11 and number 12, which will be the topmost
or outer layers of our full sweep skirt,
full circle skirt. Since the layers are numbered, I'll take layer number one, the full circle layer,
and begin sewing it.
38. Sewing Skirt Layers - The Sun (Full Circle): Place the sun layer you've cut on the table and begin by working
on the back half. Set aside the front
half for now. First, you need to stitch together the center
seam of the back. To do this, make sure to identify the
lengthwise grain which is more stable and the crosswise grain
which has more stretch. The back seam will run along the part cut perpendicular to the edge while the side seams will follow the
more stable side. After pinning the two back
pieces together at the top, mark a 20 centimeter about 7.9 " distance
from the top edge. Align the edges of the
pieces evenly and start stitching from the marked
point down to the raw edge. Gradually, transition smoothly
to the seam allowance. I prefer to stitch the tool
skirt layers while standing. This allows me to better
control the entire length of the raw edge and
align them accurately. Since the fabric falls
freely from the machine, my knees don't interfere, so the fabric doesn't stretch. The back seam is now ready. Unfold the sewn piece, press the seam
allowance downward, and overlay it with the
front half of the sun layer. Then sew the two
vertical side seams. Once all the vertical
seams are sewn, sew a stay stitch along the
top edge of the sun layer. Waste. I sew this
stitch 1.2 centimeters, about 0.5 " from
the top raw edge. This will secure
the top raw edge, ensuring that the gathering line remains below the stay stitch. Next, sew the reinforcing
stitches along the cut edge. The stitch width should match the width of
the presser foot. Continue stitching
until you reach the starting point of
the back vertical seam. The first layer is now complete. The second layer will be
an identical sun layer, and the third layer will be
the first half sun layer. Place the first sewn sun
layer on a special cone designed for assembling
full sweep skirts, full circle skirts. Align the top cutting line of the skirt with
your waist line, which is marked on the
cone with a white ribbon. Pin the top cutting
line of the skirt, aligning the side seams and the back seam along
the seams of the cone. Each layer should be placed on the cone
with the right side facing inward and seam
allowances facing outward. In other words, after finishing the layer on the sewing machine, do not turn it inside out. Instead, immediately
place it on the cone. Make sure to smooth
out all folds and pleats so the skirt
hangs evenly. This method keeps the
skirt from wrinkling, prevents static, and avoids collecting dust
or small threads. After sewing the
second sun layer, place it on the cone and
spread it out in the same way. Starting from the second layer, you'll likely appreciate the benefits of
using this device. Continue assembling the
skirt layers in sequence. The next layers,
starting from the third, will be half suns, which should be strung onto the
cone one after the other. After adding three
or four layers, hand stitch them together
using a simple basting stitch. Then continue to
sew and assemble the layers until all ten layers of the skirt are completed.
39. Sewing the Skirt Layers - Half-Sun (Half Circle) : The first layer will be a
half sun with two side seams. The second layer will be a
half sun with one side seam. We will continue alternating, sewing the layers of half suns with two and one side seam. And in the same order, we will string the layers on the cone to assemble the skirts. I sew the vertical
side raw edges of the first half sun layer
with two side seams. Having sewn the first
layer of the half sun, it is necessary
to draw a marking for the conditional clasp
on its back detail. To speed up and
simplify this task, make an ordinary paper template. This way, you will be
able to make the marking, first of all, faster and
secondly more accurately. Put the half sun
on this template, combining the side seams. And draw a line along
which you should cut the upper part of
the half sun layer. Try to make this cut
the same length. I have provided a 20
centimeters long cut, starting from the
edge of the pattern. For convenience, put a piece of colored paper under
the top pattern. Then you will be able
to see the marking line and you will not catch
the pattern when cutting. After making the cut,
it is necessary to make a stay stitch along the top
raw edge and along the cut. I lay the stay stitch at a
distance of half an inch or 1.2 centimeters from the
edge. I don't make a tack. Stay stitching along the top of the skirt will allow you
to control the length of the top raw edge and
bring in accordance with the necessary value of the waist circumference
measurements. At the lowest point of the cut, I try to pass the stitching as close to the
edge as possible. I put the third layer
of 12 on the cone, and this is the first layer of eight layers of
the half shell. As a reminder, put each layer on facing in seam
allowances facing out, matching the side
seams and back slits. Without taking it off the cone, I laid out an outline stitch, joining the three
layers together, as well as the back slit. Later, when we have to join ten layers of cut
for processing, it will be very difficult to put together all
the layers of tool. Therefore, it is better to join the tool layers in batches
of two, three layers. Try not to make any
knots or tacking, so it will be easier to remove the threads
of the markings. The fourth layer of the
skirt or the second layer of the half sun is a layer
with one side seam. In the layers of half suns with one side seam
that you will sew, try to alternate the
position of the side seam. The moment you make
the backcut markings, place the side seam alternately
to the right and left. I joined the fourth and
fifth layers together. Please note that you must
straighten each layer, unfold the hem, side
seams, pleats, and folds. This will make your future
work much easier and faster. There are now seven layers
of skirt on the cone. First, I joined the
layers in pairs at the waistline and the slit
with hand sewn stitches, and then I joined them together. Now all seven layers are
joined together into a single skirt with
hand bias stitches. I do not remove the
previous sweep stitches and don't let the amount
of threads confuse you. Almost all of them will
be hidden under the trim. Those threads that will show
on the face we will remove. And now we have ten layers
of tool on the cone. This is the bottom
part of the skirt. In the process of work, you have probably noticed that
with each layer, it becomes easier and
easier for you to put these layers one on another and position one relative
to the other. The skirt becomes tighter and the waistline is reinforced
with new stitching. But this may put
your guard down. Please don't be lazy
and continue to join the layers in
pairs or in a group of three and then
join this group to the overall skirt with
regular sweep stitches. Do not expect that you will
be able to easily join all these layers with machine
stitching without marking.
40. Sewing All the Bottom Layers of the Skirt Together: A. I've removed the ten skirt
layers from the cone. Even though all the
layers have been hand basted together multiple times, I will run a machine stitch
to secure them together. Next, I'll machine
stitch along the cut to secure all the layers
into a single skirt. Then I'll finish the
slit with bias tape. Sev, as you start
machine stitching, you'll be thankful for having carefully basted layer by layer. Skipping this step would make the process much
more challenging. First, I stitch
along the top edge. Now I sew the cut. Trim any unnecessary threads. The corner where the cut
meets has many layers. And if you find it
difficult to straighten the cut for bias
tape application, you can notch the corner. Make the notch before the
machine stitch that connects all the layers.
Check the cut line. You may need to
trim it, aligning the raw edges of all the layers to create a straight line. Remember, the skirt is still
turned inside out with the front side facing inward and the wrong
side facing outward. After aligning the raw
edges of the slit, open it up and
start finishing it with standard 1.2 centimeter, about 4.5 " wide bias tape. First, apply the bias
tape on the wrong side, then stitch it on
the right side. I finish the slit with
an overlap stitch. Press the seam allowance
flat so that it covers all the extra
stitches and sew it down. When you reach the
corner of the cut, straighten it out and
continue machine stitching. After finishing
the first stitch, make sure that you
haven't accidentally caught the layers of
tool below the cut. For added security, you can pin the layers under the cut
before sewing the bias tape. This ensures you
sew it correctly. I unfolded the bias tape to the right side and
completed the finishing. This is what the
finished cut looks like.
41. Sewing the Top Layers of the Skirt: We are now finishing
the top layers of the full sweep skirt, which are the two sun
layers on 11 and on 12. After sewing these
two sun layers, I place them sequentially
on the cone with the full sweep skirt facing inside and seam allowances
facing outside, aligning the side
seams and slits. These two layers should
now be sewn together, first at the waistline
and then at the slit. The skirt is still positioned
with the wrong side out, and the right side
remains inside. Next, I will trim the
slit with bias tape, just as I did with the
bottom layers of the skirt. I place the bias tape on
the wrong side of the slit, overlapping the joining
stitches and sew the ribbon on. When you open the
cut, straightening it into a single line, pay attention to
the bottom layer. It should also be
well spread out to avoid pinching it with
the machine stitching. After that, I unfold the
ribbon to the right side, turn it up, and sew it down. Since these two
layers are facing, the base of the cut should
be stitched at the corner. Fold the cut exactly in half and stitch it
on the wrong side. Again, ensure the seam
allowances are on the outside. Set a small stitch
length on the machine, about 1.5 to 2 millimeters, approximately 0.06 to 0.08 ", and make a tack forward and back at roughly a 45 degree angle. When you unfold the
cut to the right side, you'll see the decorated corner. Now the sewn ribbon
can be ironed. This will straighten it out and give it a neater appearance. It's best to iron the cut on a stand used for
ironing sleeves. Straighten the cut, trying to even out the length
and fix it with pins. Then iron and cool it
down with a wooden block. After ironing, the cut
looks much neater.
42. Cutting and Sewing the Skirt Lining: A. All the tool layers of
the skirt are now sewn, so it's time to cut and
sew the skirt lining. For the lining, I'm
using thin chiffon. Since I'm making a
light youthful version of this dress, the
lining will be short. The lining skirt will
be 35 centimeters, about 13.8 " long and cut
in the shape of a half sun. We've previously calculated and know all the parameters
for cutting, the radius corresponding to the waist circumference
of 66 centimeters, a boot 26 ". R 21 centimeters, at 8.3 ". The large radius, accounting
for the length of the skirt is 21 plus 35 almost
56 centimeters, 60 centimeters, about
22 " plus 13.8 ", almost 22.8 ", 24 ". This gives us the
piece of fabric with a small reserve
that we'll need. Lay the well ironed
fabric out on the table. Always remove the selvage
edge of the fabric. It should not be
part of the cutting. After that, measure
21 centimeters, about 8.3 " from the corner of the fabric
for the required radius, and from that point
measure 35 centimeters, about 13.8 " for
the skirt length. The total is 56
centimeters, about 22 ". In the 35 centimeter, about 13.8 inch skirt length, I've already included the allowance for
finishing the hem. The hem will be finished with a narrow rolled stitch
on the overlock, so the skirt length will
remain practically the same. Fold the fabric at
the 56 centimeter, about 22 inch mark. Be sure to check along the entire length that the
distance from the fold to the edge of the fabric is exactly 56 centimeters,
about 22 ". When cutting, you can
either fold the fabric into a cone or simply draw arcs
using a tape measure. Given the short
length of this skirt, I will use a more accurate
method by measuring the required radius
and skirt length with a tape measure
and drawing the arcs. So the radius is 21
centimeters, about 8.3 ", but we need to add
1.5 centimeters, about 0.6 " for the
seam allowance. Then from the 20 1 centimeter, about 8.3 inch mark, I measure 35 centimeters,
about 13.8 ". In total, from the corner, I measure 56 centimeters, about 22 " to draw
the large arc, which will be the
hem of the skirt. I use a thermal pen for this. Its ink will disappear at
the first touch of the iron. Next, I will draw an
arc with a radius of 19.5 centimeters, about 7.7 ". As the arc with a radius
of 21 centimeters, about 8.3 ", is the point
where the skirt will be sewn. This skirt should be cut along
the arc with a radius of 19.5 centimeters, about 7.7 ". I cut the fabric
along the drawn arcs. The cutting of the
skirt is finished. Some of the work I'll
do behind the scenes as these are simple operations
that you can handle. I'll overlock the two raw edges sew the back seam and leave a section for
a 20 centimeter, about 7.9 inch zipper cut. I will then machine
sew the back seam from the hem to the end
mark of the zipper cut. Next, I will press open the seam allowances on both
sides and hem the skirt. I will also sew a stay stitch, 1.5 centimeters, about
0.6 " from the top edge. Since the top raw edge
is cut on the bias at a 45 degree angle and
will definitely stretch, I made preliminary markings to more accurately place
the stay stitch. The lining skirt is ready. Note that this is the
only layer cut in a half sun shape with the
seam positioned at the back. I'll be using a blind
zipper for the closure, but I'll sew it in
the classic way, like a regular non
blind concealed zipper. The zipper is now sewn in. The finished lining
skirt is placed on the cone on top of the ten
layers of tool skirts, with the right
side facing inward and seam allowances
facing outward. I intentionally didn't
level the bottom of this short skirt
because the half sun will start to stretch
while hanging, causing the front and back
to lengthen slightly. Meanwhile, the
sides of the skirt will shorten due to
this deformation. I'm quite satisfied with this configuration for the
bottom of the skirt lining. Specifically, I want the skirt
to be slightly longer at the front and back and
slightly shorter at the sides. This way, the lining will take the desired shape under its own weight due to
natural deformation.
43. Preparing the Bustier for Joining with the Skirt: Now that all the
decorative strips are attached to the Butier, partially glued
and hand stitched, we can move on to
preparing it for joining with all the
layers of the skirt. As a reminder, the underskirt consists of ten
layers of tool and lining and the full circle skirt consists of two layers
of sun cut tool. Before joining the
Butier to the skirts, you should mark a
clear sewing line. To do this, it's enough to
place marks on all the curves. Let's start from the
center of the back. Both halves of the back
should be the same height. So mark the bottom
where the backs join. These marks should
be 1.2 centimeters, about 0.5 " from the
edge, as I suggested. While working on the Bustier, we sewed the curves,
joined the parts, and added decorations, so it's possible that the lengths of the curves may have distorted. Therefore, it's necessary to ensure that the lengths
of the curves on the right and left sides of the Bustier are equal
and then mark them. Assuming the seam allowance is 1.2 centimeters, about 0.5 ", I mark it on the curve
of the left back half and measure the distance from the top edge of the
relief to the mark. This distance is 15.7
centimeters, about 6.2 ". The symmetrical curve
on the right back half, I mark the length of
15.7 centimeters, about 6.2 " from the
top edge of the curve. In this case, the seam
allowance is 1.4 centimeters, about 4.55 ", which
is 2 millimeters, about 0.08 " longer
on this pattern. This discrepancy might
have occurred when I was inserting the PIP
into the backstitch, which could have stretched
the pattern slightly, or the curves could have distorted during the
decoration process. Similarly, on the next curve of the left half of the Butier, I set aside 1.2 centimeters, about 0.5 " from the bottom and measure its length from the
top to this mark. Then I move to the symmetrical
curve on the right half of the Butier and place a mark at the same distance from the top as on the curve
on the left side. I repeat this process for
all symmetrical curves. Once all the curves are marked, you can draw a
perpendicular line to the lacing as an
additional guideline. I'm not concerned
about drawing with a thermal pen because it will be easy to remove
these marks later. Simply applying a steam iron will cause the
marks to disappear. By doing this simple work, I can be absolutely confident that when
joining the skirt, the height of the
corset will be the same on both the
right and left sides.
44. Joining the Bustier to the Bottom Layers of the Skirt: Without removing the bottom
of the skirt from the cone, I attach the Botier
to the skirt. As a reminder, the
bottom of the skirt is made up of ten layers
of tool and a lining. The front side of the
skirt is facing inward and the wrong side with seam
allowances is facing outwards. I lay the Bustier face up, meaning the underside of the Bustier is against the
underside of the skirt. Mark on the zipper lining the
place where it should join with the Bustier so that
when the zipper is closed, the edges are at the same level. Next, I align the mark on the front side of the Bustier
zipper with the mark on the lining zipper and secure
this point with pins. If possible, it's better not to remove the cone
from its stand. Alternatively, you
can place the cone on the table as I do
for demonstrations, but this is less
convenient because you cannot move around
the cone as easily. After aligning the first marks, I wrap the cone with the
Bustier and align the mark on the second side
of the clasp with the mark on the second
side of the lining zipper. I secure it with pins. I deliberately drew
a perpendicular line on the lacing placet
of the Bustier. This is the line of the
future sewing seam. Try to pin the Bustier
to the skirt layers so that the sewing seam is perpendicular to
the lacing place. I begin pinning the
Bustier to the skirt, moving in a circle, alternating between the right and left
sides of the Bustier. The most important thing when
connecting the Bustier to the skirt layers is that the
boustier is perfectly even. There should be no
gathering or fullness. Distribute the skirt
under the corset so that any discrepancies in length are adjusted through the skirt. Remember, when
cutting the skirts, we included a seam allowance
of 1.5 centimeters, about 0.6 " at the waist. By raising or lowering the corset relative to
the joining stitches, you can adjust the waist
length of the skirt. Raising the boustier above the joining stitches
shortens the waist length. While lowering the boustia below the joining
stitches increases it. This allows you to find
the optimal position for attaching the Bustier. Do not change the
waist length of the Bustier under
any circumstances. Continue pinning the skirt
and Bustier layers together, moving around the circle
and referring to the marks on the Bustier curves that
were set with a thermal pen. I recommend performing this operation while
the cone is on its stand because
the skirt layers should be well spread out. The layers of tool should not interfere during
this operation and you want to avoid catching any extra tool while
pinning the Botier. Once the skirt is fully
pinned to the Butier, be sure to hand stitch the joining seam using a
regular basting stitch.
45. Joining the Bustier to the Top Layers of the Skirt: Once again, without removing the skirt layers and
Bustier from the cone, I place the last part
of the skirt on it, which consists of
two sun cut layers. I position it with
the wrong side up, facing inwards so that the front sides of the skirt
and Bustier are aligned. Next, according to the marks we made on the curves
of the corset, I begin pinning the top skirt, starting from the
back seam and evenly distribute it along the
entire waist circumference. I make sure that the
stitching for joining these two layers aligns with the marks on the Butier curves. This way, I find the
precise seam position for joining all
the skirt layers, ensuring that the front layer is sewn in accordance with
the corset markings. With all the layers of the
skirt pinned in place, I lay a basting stitch by
hand behind the scenes. Working with a
skirt on a cone is incredibly convenient
compared to doing it on a flat table. I constantly and
carefully ensure that the bottom layers of
the skirt are well spread out and fall freely. The same goes for
the top layers. When this is done properly, the joining process becomes
easy, quick, and precise.
46. Connecting the Skirt with the Bustier: Finally, I remove our entire
construction from the dress form cone and move
it to the sewing machine. I align the lacing of the corset parallel to the skirt cut and the
zipper of the lining, so I can sew along the
perpendicular line drawn on the lacing place. I feel the vertical
bones in the seams and try to determine which
presser foot to use and how to adjust it
so that the bones and beads do not interfere
with the sewing process. I position the garment with the top layer of the
skirt facing up, so the seam will be sewn along the front
part of the skirt. I adjust the machine foot
to the rightmost position, creating a one sided right foot. Throughout the process,
I carefully monitor the inner layers of the skirt to ensure they don't get caught
under the presser foot. Nothing should get
accidentally stitched. Taking my time, I set the
machine stitch length to 3.5 millimeters or even 4
millimeters and begin sewing. Wherever possible, I try to
sew below the layer joining stitches so that any
excess stitching falls within the seam allowance. I constantly use my fingers
to feel the position of the bones in the Butier seams to avoid
stitching through them. After finishing the seam, I critically examine
the underside. It's crucial that
all layers are sewn evenly and no excess fabric has been caught under the seam. Also, check the quality
of the stitching itself. Amid the many stitches, try to identify the one you just laid to ensure there are
no skipped stitches. Skips often occur at
various thickened points, so inspect the seam carefully. Remember, this is
the stitch that connects all the layers
of the skirt together. I then switch to a
regular presser foot as the single sided foot
is no longer needed. From now on, I will continue sewing with the
classic regular foot. Next, I sew another seam
within the seam allowance, using the width of the
presser foot as a guide, stitching parallel
to the first seam. Turn the piece over to check if the bottom tool layer was
caught in the stitching. Unfortunately, I did
catch the tool layer, so I had to undo a
small section of this seam and restitch it
to correct the mistake. Fortunately, I only needed to undo one stitch
to fix the error. This second parallel stitch compresses the thick Sam alloans which will serve as
the reference point when trimming the sam alloants. Trim the Sam alloans to a boot one to 2 millimeters above the stitching
all the way around, leaving a remaining
seam allowance of approximately seven
to 8 millimeters. After trimming the
seam allowance, I pressed it flat and removed all the marks made
with the thermal pen. Now it's time to finish the seam allowance
with bias tape. I'll use the same
ribbon that I used for all the curves and the
top of the Butier. I like this ribbon
because it's dense, stiff and folds
perfectly in half. Leaving a small technical
tip for hemming, I sew the ribbon on trying to stay close to the edge
of the skirt seam. I sew the first seam along the wrong side of
the skirts interior. Again, check the
quality of the seam to ensure that the front tool
layer isn't caught anywhere. Then I turn the skirt
so that the front side faces me and tucking the tape
underneath, I stitch again. The seam is along a path
with minimal thickness, so the stitching isn't
difficult at all. But you must
constantly straighten the bottom layer to keep it from getting caught
under the stitching. As you can see,
the ribbon covers all the numerous stitches that joined the skirt
layers together, including the stay stitching and additional stitches that were used to join the
layers one by one. All of them are hidden
under this tape, so there's no need
to remove them. The only thing to check
is if any threads peek out from under the sewn ribbon when the front layer is removed. In that case, it's
worth trimming them. Finally, fold the
technical ends of the ribbon under the skirts
underside and neatly hem them by hand. Congratulations. The dress is ready.
47. Conclusion : Congratulations on
finishing the class. It's been an absolute joy and honor to guide you on
your creative journey, whether you're just starting out or have been
sewing for years. I'm so excited to see
what you've created. Don't forget to upload
your photos below. I can't wait to admire
your beautiful work. Remember, the skills
you've learned here can be used to
create endless designs, play with colors, explore
different fabrics, and embrace the art
of experimentation. The sky's the limit. If you enjoyed this
class and found it helpful, please leave a review. It would mean the world
to me and helps others discover this class,
too. Got questions. Feel free to drop them in the class discussion
board or send me an email anytime at
info@dressmaking.academy. I'm here to help. Thank you
for joining this class. Now, go out there and bring more beauty into the
world. Happy sewing.
 Tatiana Kozorovitsky, Bridal Fashion Designer