Transcripts
1. Introduction: Hi, I'm Kara from coracoid designs and I have
a new class for you wanted to do for a really
long time about how to make your own
fo for palm pounds. I'm sure you've seen them
on knit hats all the time. They're super cute. And if you've decided
that you wanted to make your own net hat
at the palm, palm. I had gone to buy one. You've probably noticed that
they're pretty expensive. I would say on Etsy
or in craft stores, they can be as much
as $5 per palm, maybe even more if you went
to a nice knitting store. I figured out how to
make them myself. Just getting the fo for material and then doing a little bit of easy
beginner sewing. Then I can even show you
how to make them removable. If you're a customer wanted to take one off and put a
different color palm on, they could totally do that. I am going to take you through all the different steps to
make your own pom poms. I'll show you just how
easy it is and how much money you can save by
doing it yourself.
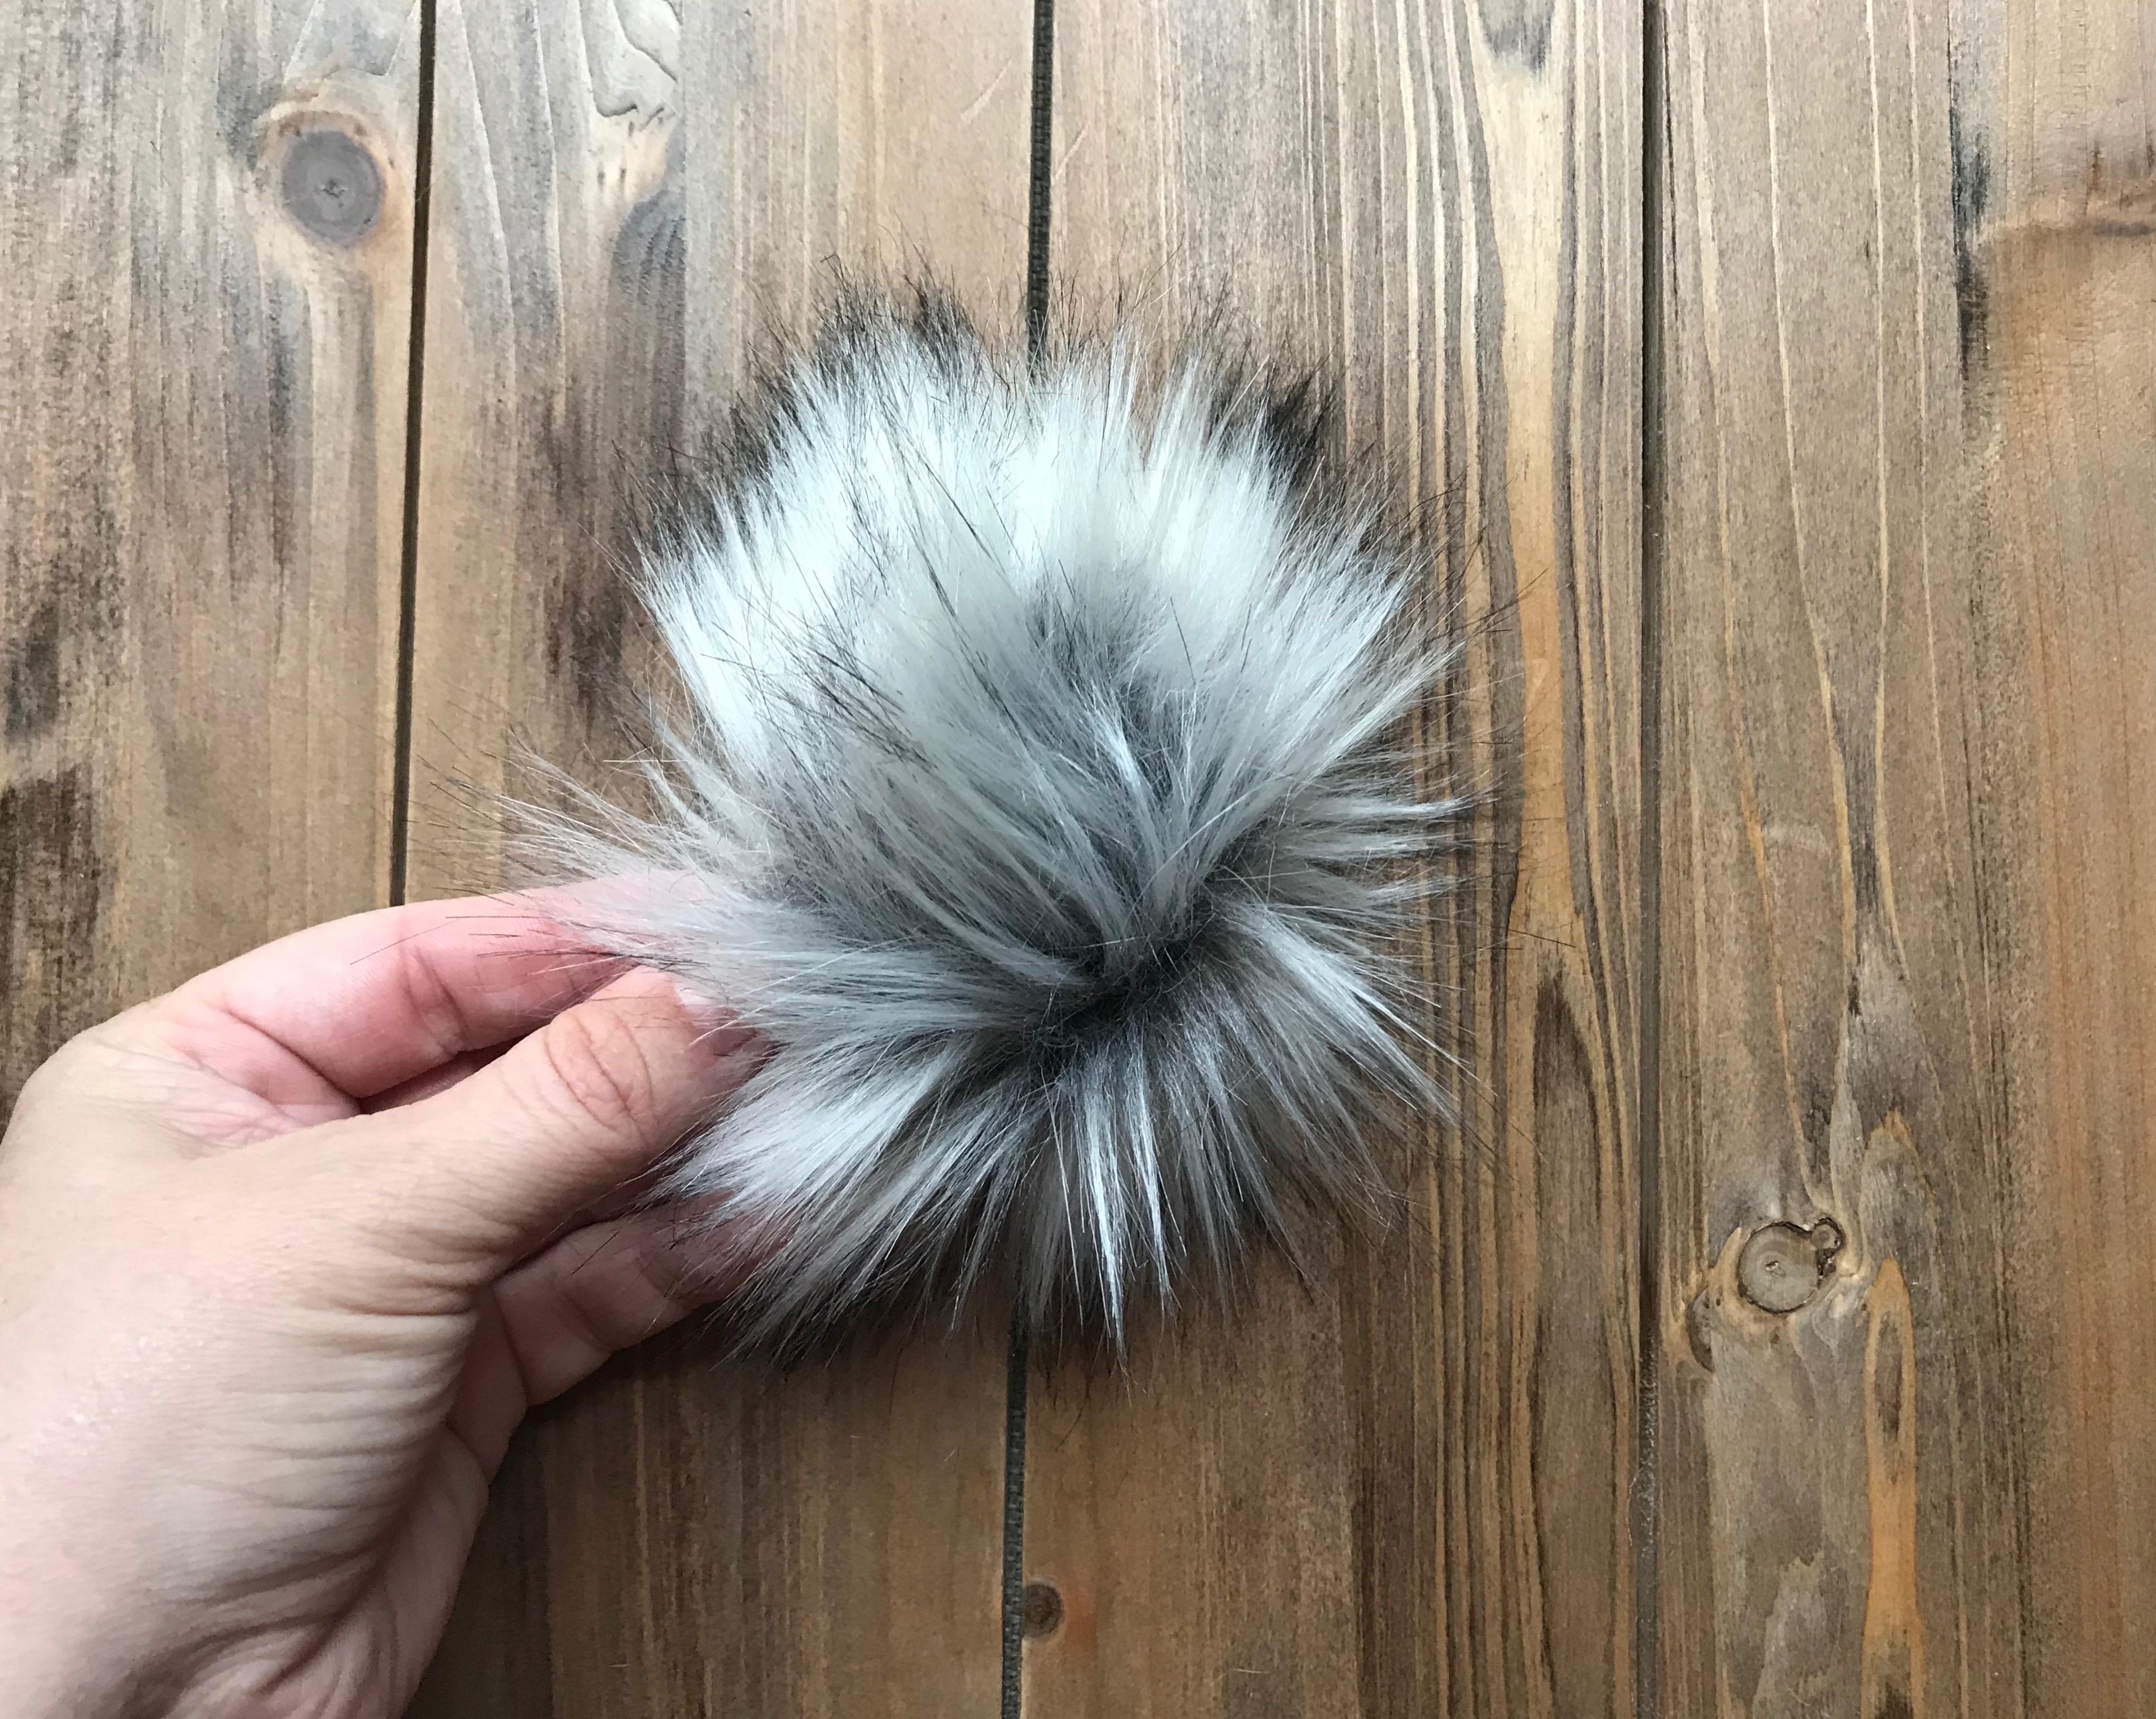
2. Pom pom fabric: Where can you buy
the fo for that? You need to make the perfect
fluffy pom pom for your hat. Basically, any fabric store like a Joann fabrics are Hobby Lobby, something like that
that carries fo for fabric is going to have
something that you can use. They sell it by the yard. And so if you look on the
side at the price of your fo for you're probably doing gas because some of them are like
thirty-five dollars a yard. But actually, you don't have to really worry about it because you are not going to need
a whole yard that would make you a ton of pump pumps. You could start off
with a fourth of a yard just like a
long skinny strip, which she could probably
get at least £10 palms up, not more out of that would take her thirty-five
dollars down to 1750. Lot of times these crafts
stores have sales or coupons where it's
40 or 50% off. If you took an
additional 50% off your little thing of fabric, you'd be down to
like eight or $9. For eight or $9, if you've
got ten pump pumps out of it, you'd be down to a
dollar or less per palm. Palm, I'm guessing you
even get even more. Maybe like $0.75,
something like that. And I feel like once you
get down to that price, it's totally worth
making them yourself. It's a little bit of extra time, but you can get exactly how you want them and exactly
the size you want. Just a really great price. So if you were going to resell, those are how the hats
and feel like it's much more worth it to
make them yourself. Here's some examples of
some really good for fabric that if there's something you have to just pick up
the fabric could feel it because a lot of the photo first were appropriate for a
costume or something, but they're not right
for a fluffy palm, palm, it needs to be
something where if you picked up that palm, palm, that it moves with the air, It's really, really
fluffy and soft. And an added bonus would be one that has more
than one color in it. So the inside of this as white, the outside is black. And so that gives you kind
of a cool depth effect. This is a perfect one to use. The one that's kind of my
standby is like a fox fur. Look. It's brown but it has some black and some lighter
color, isn't it? Just really, really
soft and fluffy. And if you're not sure if
it's gonna move right, you can sort of wad it up like
that and shake it and see, does it flow in the air? You can tell I've used
that piece a lot. You should know them
over to the back. They just have this nice
smooth fabric on the back with the person who's
cutting the fabric goes to cut off your piece. You actually don't want
them to use scissors, you want them to tear it. That way it won't lose In the fibers in between
where it's being hot. This is like some
kind of stuff that will shed off of
it if you cut it. Now eventually you are going
to cut it into a circle. But initially you
don't want to lose too much material when it's just being cut from the store. So if they don't know that
they're supposed to tear it, you can always suggest that
there's a lot of colors. Now, I'm guessing that
the fact that people make these into pump palms has made more options available. But this is like a rainbow
fabric, which is really cool. It will cost more. But again, use those coupons and sales and just get a
small piece to try it. Then here's a couple of pinks which are really
fun for kids hats. Or if you have a
navy blue color, looks really good with pink. Just experiment and look online for color
combinations that you like. Try one if you get it perfected and go back to
the store and buy more. Obviously, if they're
having a sale, that's a great time to buy more. You could also look online
for good deals on fabric. Right now, as I'm filming
this, It's October, so there's gonna be more of a costume fabrics
available than ever. It's, this might
be a great time to actually go pick some up. So that is, I think
everything you need to know about buying the fo for, like I said, just go to
the store, look around, find one you like, and get a
small piece to start with. And then when you're
happy with it, you can go back and get more.
3. Cutting the fabric: so really quick. I just wanted to show you what I meant about cutting or ripping the fabric rather than cutting it. So, um, what you need to do if you want to tear off a piece of this like if you want to just stuff it in your bag and work on it somewhere else, Um, you basically need to snip it and rip it, which is you would snip a little cut on the bottom of it, and then you just start tearing like that makes a perfectly clean cut where none of those fibers are going to be following off all over the place. So that's just a little pro tips snippet and rip it. Okay, first stuff. Once you've got your piece of fabric, um, cut to size so that you can work with it is you're going to trace your circle. So I've got this lid that I like to use as a pattern. Like I said, it's about four inches in diameter. Um, and you can go bigger or smaller kind of experiment, but that's just what I like. Um, so I'm putting it is close to the edge is like hands. I'm not wasting the fabric, and I'm just gonna trace around it. So of course, the backside of the Fabrice. So there is my circle when I'm gonna take my sharp scissors on, Cut this out. And here's where you get a lot of little fibers kind of falling all over the place. Um, there's not a lot you can do about that as long as you're doing a circle because you're kind of cutting against them. But it's not really a big deal because it's going to tuck up into the inside. The edges are, um and so you're going to still have plenty of for toe work with. You can see I'm not cutting on the line. I'm cutting a little bit outside of it. I just like my palm to be just slightly bigger, so I'm just kind of using that circle as a guide. But if I was gonna make, like, a child size one, um, I would probably adhere to the line or maybe even go inside of it or use a smaller circle. So there, cut it out. At this point, you can kind of set aside the fabric that you're not gonna use anymore and just work with this piece and then before you go any farther, you just want to take all of these little Shetty pieces and just get them scraped off of there. And that way they're not shedding on. You are in your hat when you get done begins even though I cut off some of the further still quite a bit there. That's what it looks like from the front. I'm just going to get rid of those extra pieces. You could just throw those away or you could even save them for future stuffings. You could actually do like 10 of these at once and have a little rounds ready for the next step whatever you want to dio.
4. Sewing your pom pom: So now that you have your faux fur circle cut out, you can start sewing it. So for the sewing part, we're gonna take that thick thread. Um, he want a piece that's probably at least 12 inches, maybe 14 15 inches long to see how plenty, um, and that thicker or larger I needle so that this will go through it. Just thread that you don't have to double it up for this. Just a single thread is gonna work. Fine. Should be doing this other way around. Pull out through leave yourself a little bit so it doesn't fall out. But otherwise it's just a single thread. Eso Then you're gonna take your circle. And this is where making the cut a little bit larger than the line is kind of helpful to, because I can, actually. So along the line that I march to keep this sewn part kind of close to the edge. So I'm just gonna go in hoc through the fabric and come back up, and that's about maybe 1/4 of a ninja. 1/3 of an inch. Pull the thread through don't pull it all the way through. Levers. Have a little bit of a tale. Remember, when you get back to the beginning, that's what will be left. And then I would say you're leaving about the same amount of space and you a little bit more to go under and up again. So just really simple basic stitches kind of following that black Sharpie line all across. And I'm just gonna keep stitching until I get all the way back to the beginning where I started. So while I'm doing that, um, I can sort of prepare you for the next step, which is gonna be You're gonna stuff this. Um, So, like I said, I personally like to use cotton balls. Um, because I just had some extra ones lying around and because you can adjust the fullness by how maney cotton balls you put in. But you could use any other kind of random stuffing that you have around pillow stuffing old fabric. You could use something little heavier if you want to tuba. In general, you want your palm home to be a light sort of a thing so it doesn't like sway toe one side or come loose. So a light, fluffy kind of a stuffing is the best, and that's why I tend to use carnivals. Plus, they're cheap, and you probably have some in your house already. So when I get back to the beginning, I have maybe like, six or so inches on either side. So I'm just gonna use my fingers to kind of open this up so that I can stuff it. So now I'm gonna take my cotton balls. Usually three or four is like the perfect amount. Stuff them inside of here, and then it's just a matter. It's like synching a bad closed. So you're pulling on both of those strings until it closes, and then you're gonna just tie a really tight not to kind of close that hole. Generally speaking, with a pom pom this size, it doesn't close all the way. There's, like, a little bit left open, So I will. What I will do is always high and double not here just to get it started closing. And then I will re thread this thread and put a couple more stitches in there just to make sure that it stays all the way closed. Now, this is the underside of your hat or your underside of your pom poms, so it's not really super important. But you would never want your stuffing to fall out if it was something really lose. So it's just a reinforcement, basically, So you can just go back and forth. You gonna make sure that you're picking up the fabric and not just the furry part, and that will allow you to tie another knot that will completely close the inside. Okay, so once you get to this point, you have two strings that you could use toe. Attach this to a hat, so you would just probably re thread this. Take your hat, which didn't have a palm home on it yet. And so it to the top, tie some knots, make sure it's on there really tight, and then you'd have a permanent pom pom. So it does not take many steps to get to this point. But I like to actually add a few more steps and so on that snap so that if I wanted to take this off, I could and put on a different palm. So in the next part, I'm gonna show you about that
5. Sewing on a snap: Okay, So for the final part, I want to show you how to sew on the snap. If you decide to do that, um, for this'll, I'm going to use a thick thread. Thank you. Remember, with this is cotton, but I think it might be, um so it's just like a quality thick thread that won't break. If somebody tries to kind of pull on that snap, I'm using a thinner needle. This time's gonna put my thick needle back. This just has a smaller I So that, um uh, this thread will go through it. But I will poke on there, and it will make it through this thick pom pom threat or thick pump home fabric a little better. Um, so I am going to start by cutting actually, this string off, since in this case, I'm not gonna be using it as close to the middle as I can. Just get rid of it. Um also wanted to mention the kind of snaps I'm using. I just got these out of Jo Ann Fabrics. You could order them online and bulk if you were going to do a lot of these, um, size two snaps and There's six of them and a pack. Um, so you have to break off the two parts and so on each part, so that part is going to go on the pom pom, and that part is going to go on the hat. So there's too little parts to it. Um, so you could start by taking a length of thread again because this is so thick. I'm not gonna double it. I'm trying to kind of save time anywhere that I can, uh, get, like, a 12 or 14 inch piece. Thread it through here, and I'm not tying knots or doing anything. I'm just kind of being really casual about it. But if you are a solar and you want to do a better job than I'm doing, feel free. I'm sure my grandmother would be horrified by the kind of casual suing that I dio. But really, I'm just trying to stick this snap on here so that somebody could take this pom pom on and off. It's nothing more complicated than that, and it won't be seen. So you kind of rest that in the middle of your pom pom. And I tried really hard to stick this needle through the actual fabric of this palm home and not the for. So that's what makes it take a little longer. Is trying to work that needle through the for, um, eso you pull it to where you have a little tail left and then you're just gonna go all around this snap and you're running the thread through the holes in the snap. There's quite a few of them, um, through the fabric of the pom pom and up through the hole like so. And if you want to know better what that looks like if you look on the back of the snaps, there's like a little guy there. That kind of shows you you're putting like three loops through each hole in there and just going all the way around till you come back to the beginning. Tie or not, and then cut off the excess thread. And basically the goal is to just get that snap centered in the center of your pom pom and tight enough that if somebody pulled on it, it would not come off all the way. So the final step is going to be attaching the other part of the snap to the top of your hat that you want to attach it to, Um, and it's pretty simple, similar to selling other part on you just want to make sure that when you so this on that so you're the crown of your hat is probably gonna have, like a little circle at the top. And underneath the final grouping of stitches, there's probably going to be like a ring. We synched up the top, and so when you go to so that on there and you have your needle and thread going through, you want to go through at least one layer, if not two of yarn. So it's really, really sturdy on there. So it's the same thing as with board cutting off your piece of bread, threading the needle. I'm gonna get really good at doing this under pressure and then taking that snap in positioning and in the center of your hat. And then I'm just trying really hard to go through more than one layer of yarn if I can. So you're looping at around that same piece that we have. Somebody pulls really hard on that snap, you know, it's got some reinforcement. It's not just gonna pop right off or become loose. And then after you've done two loops, if you go back into the fabric and then scooch on over to the next hole that'll complete like 1/3 loop, you can go around again, and you can get to a point with this thick yard where you're doing it pretty fast. And so if you're planning on selling these, you know, time is a factor and your pricing. So you want to make sure that you get good at selling these on and a sturdy fashion so that they're not gonna fall off, but that you're doing it pretty quickly. You could also try to match the threat a little better than I did. But again, this is not something that you're going to see all the time. So if we go back to my original half sample, you can see if you look closely under here that there's kind of the edge of the snap, and you really cannot see much at all from those thread lines. So if I wedge my finger in there, I can get that snap off pretty easily, and then I could switch out this palm for a different palm. Snap it right back on, ready to go. And I always do this little shake shake shake to fluff up my palms If you've packed them up and then took about taking them out of a box or something, they're going to get kind of wrinkly unfolded, So just give him a little shake and they'll come back to their original fluffy, perfect pom pom nous.
 Cara Corey, Knitter and overall do-it-yourselfer