Transcripts
1. Introduction: Have you ever wanted to capture a soft dreamy landscape
that feels calm and still, almost like a quiet
early morning. Welcome to my class
stillness in pink, a serene watercolor landscape. We will begin by going over the art supplies that I'll
be using in the class. Then I'll walk you through
the color mixing process. If drawing birds feel
tricky, don't worry. I'll break it down
using simple shapes. I'll explain how to create depth and a sense of
distance in the painting. Then we will start painting. We will take it slow
layer by layer. I'll guide you
through each step, starting from painting
that soft sky to adding that final detail. I'll also show you how to make some parts of the
painting feel far away, and others feel like
they are closer to us so that your painting
has a real sense of depth. But more than just
the techniques, this class is also about
enjoying the process. There's no pressure
to be perfect. By the end of this class, you will have a beautiful
painting and a calm, peaceful heart. So
let's get started.
2. Supplies needed: Let me walk you through
the art supplies that I'll be using
in this class. First, a pencil and
eraser for sketching. For brushes, I will be using Princeton Neptune
size six mop brush. This is for washers and
painting larger areas. Next brush is size six
silver black velvet. This is a regular
sized size six brush. Next, we need a detailer brush. I'll be using size
two round brush. Then an old brush for creating
textures in the painting. You could use any old brush
that you already have. Now, for paper, I'll be using Bohong hundred
percent cotton, 300 GSM, cold press
watercolor paper. It has a soft texture
that looks like this, perfect for creating subtle
textures in our painting. Now to place the paper, I'll be using a glass sheet, which will help
to keep the paper flat and also makes it easy
to rotate while painting. You'll also need a napkin or a tissue paper to
clean your brushes and wipe off the paints while painting and a jar of
water for cleaning. And masking tape. Here I am using two inch and 1 " tape to create
different sized borders. And finally, a hair dryer. This helps speed up the drying process
between the layers. That's all for the supplies. Keep them handy before we begin.
3. Color mixing: Let us talk about the
colors I have used in this painting and how
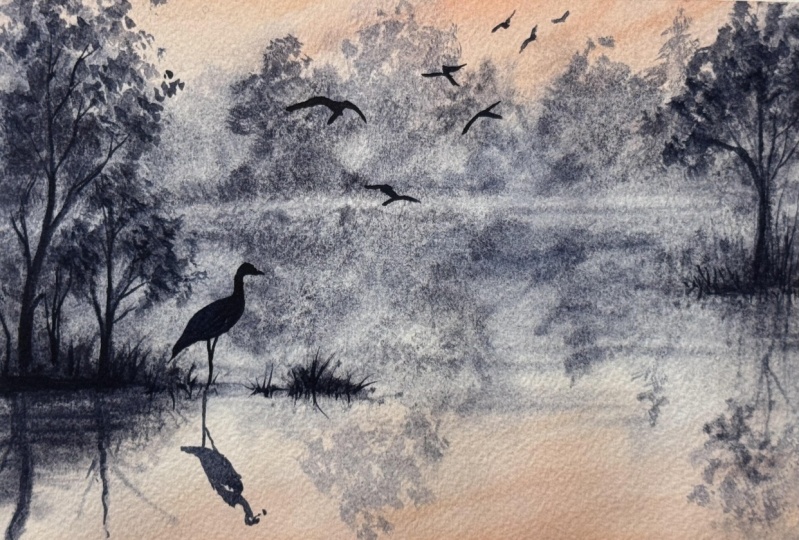
I have mixed them. To create this soft
peach shade for the sky, I have mixed Pyl red with
a touch of yellow ochre. This gives me a rich peach tone. I hope it looks peachy to you. So here I have shown both the rich version
and the diluted wash, so you can get an
idea of how it dries. That way you can match it
better while painting. Next, we have burned
tamber and pinch gray. When we mix paints
gray and burn tamber, it gives us an
almost black shade. For painting the trees
and other darker details, I've used pains gray and mix of burn tamber
and paints gray. So the details like
foliage, painting birds, the distant tree line, I've used these two colors. All right. So these were the colors that I've
used for the painting. You can use any similar
color that you already have.
4. Trees Techniques: Let us learn how to draw tree foliage for
this class project. I'll be using one of
my oldest brushes. It is from 2017 or 2018, and this was one of the first few brushes
that I have ever bought. I'm using it to dab and create the textured effect that will give us the impression
of tree foliage. You can create a dense looking
tree with minimal effort. So here you can see
it in the painting. All these brush marks are
created by this brush. You can look for your old brushes and grab
them for this project. If you don't have such brushes, then it's totally fine. You can use your regular brush. Now, to paint soft
distant tree effect, we will be using wet
on wet technique. Here we are applying wet
paints on the wet surface. This gives us a blurry, misty look perfect for
the background tree line. I'll use the same old brush for the background
trees as well. It is very easy to dab and create the bloody
effect, as well. So this is a sign
for you to not throw away your old brushes and keep them for
your future purpose. Next, for more detailed
trees in the foreground, we will switch to wet
on dry technique. Here, we apply wet
paints on wet surface. This gives us a
sharp or hard edges, which is perfect for
achieving detailed effect. So just to recap, we are using wet on
wet technique for soft and distant
trees and wet on dry technique for crisp and
detailed trees in the front. Hope that makes it clear.
5. Simplifying drawing : In this project, we
will be drawing a bird. If you find it difficult, don't worry, we
will simplify it. I'll try to simplify the figure
using geometrical shapes. Start with an oval for the body, then two lines or a
rectangle for the neck, a circle for the head, and triangles for
the beak and tail. Two lines for the leg. That's it. Once the
basic shape is ready, outline it the way you want. And later we will fill
it with black paint. Since we are painting
a silhouette, you don't need to add any detail. Wasn't that simple. I hope this helps. C.
6. Prepping the paper: Okay, so let's begin. I'm going to tape
down the paper. On the top and bottom side, I'm using 1 " tape, and for the left and right side, I'll use two inch masking
tape for a thicker border. Once you're done taping
down the masking tape, run your finger over the edges to make sure it is
tightly sealed.
7. Painting sky and background: All right. Let's start
the sketching part. So here we have a
little patch of land kind of peeking
out from the water. Right below it, we will mark
the reflection part as well. And there's a bird just
calmly resting on it. You will notice it's
reflection in the water below and marking
a few tree shapes. Bit to the right, there is
another piece of land just barely showing almost like it
is emerging from the lake. And in the distance,
we have horizon line, which we are keeping
very light and hazy. Okay, so I have just sketched
a few minimal guidelines. Nothing too detailed. Let us start with the
painting process. We will begin with wet
on wet technique first. So I'm going to wet the
paper using clean water. Here I'm using my mop brush. It helps cover larger
areas quickly and evenly. Apply multiple brush strokes
of water so that the paper absorbs good amount of moisture and remains wet
for a longer duration. Now let us mix the colors we
will need for this artwork. I'm planning to go with
a peachy pink tone. For that, I'm mixing a bit of
red and some yellow ocher. Once you have that
soft warm mix of pink, go ahead and apply on the top and bottom
areas of the painting. You could use any similar
pink of your choice. There is no restriction on that. I'm applying horizontal
brush strokes so that we have an even
distribution of paints. Make the paint very diluted and watery when you apply it
around the horizon area. Next, let us take paints
gray in medium consistency, and we are going
to dab the brush, creating the appearance of
trees in the background. This is to paint the distant
hazy background trees trees that are far away, often appear more bluish because of the atmospheric
haze and dust. Once we have painted the trees, we will also add the
reflection part. So with reflection, you
don't have to create the exact shapes because when you add these
horizontal lines, it suggests there's a sense
of movement in the water. It creates a sense
of rippled effect. I'll carefully apply tiny lines depicting a sense of
motion in the water. Recently.
8. Painting Distant trees : Now, I'm using this
old brush of mine. It's almost worn out and
bristles are all messy, but it actually
works really well for creating tree
foliage effect. I just dab it to create
that leafy texture. You can use any old brush
that's not in perfect shape. Just dab off the excess paints
on a tissue or a napkin. And then when you have
right amount of paint, you can dab it on the paper. I'll create the same thing in the reflection part as well. Once we have painted all the
foliage and the reflection, then take a fine liner
brush for adding the tree branches because we cannot have these foliage
flying in the air, right? So to connect them
to the ground, we need tree branches and stems. We are using diluted
and lighter tones to suggest the misty
appearance in the atmosphere. We will also add some
branches on top corner. You can add as many trees
you want. It's up to you. So this layer, after drying, it might appear much lighter. So based on the
level of lightness, we will decide if we need
another layer of trees or not. So let's see how it goes. I'll add some more
tree branches. And once we are done with this, we will dry this
area completely. I'm using my hair dryer to
speed up the drying process. If you want to let
it dry naturally, you can leave it for up to five, 10 minutes depending on the
temperature of your area.
9. Painting Mid layer Trees : All right, the paper
has dried perfectly. Now let us move on
to the next step. The paints look much
drier after drying, so I lopt for another layer
of distant tree line. For that, we will have
to wet the paper. I'm going to wet the paper using water spray bottle and then spread it well
using my mob brush. Make sure you don't pick
up the existing paints. Very gently, you'll
have to apply water. Make sure the paper is evenly wet and do not leave
any spaces dry. Now, I'll take the same
peachy pink colour for the sky and apply another coat for an
intense look in the sky. Next, I'll take slightly
darker paints gray. And with the help
of this old brush, I'll dart the brush and create the texture
of the tree foliage. At the same time, paint the
reflection part as well. Now, adding the tree trunk and branches using a
fine line of brush. If the paper is very wet, the colors will
spread very wildly. But when the paper is, like, semi wet, around 50, 60% damp, the paints will stay
in the same place and will create a blurry effect, which is ideal for achieving misty and foggy effect
in the painting. I've gently dabbed
the brush along the horizon line to create the
impression of the horizon. Moving to the foreground part, I'll apply the pins on the partly submerged
land in the foreground. And with fine line of brush I'm painting the grass
blades as well. Using darker paint,
we're creating the midground tree and
the submerged land. I'll also add the
foreground tree using the fine liner brush. Use darker or
concentrated paints to paint the foreground tree. Creating ripples in
the reflection part.
10. Details on mid layer Trees: I'll paint the bird later in the next stage because
if I paint now, it is going to create a blurry effect and the paints will flow
outside of the sketch. So to avoid that,
we will use wet on dry technique
in the next layer. Before leaving it to dry, we will paint all the
reflection of the trees. Do not leave any
trees unattended. Next, I'm going to add
a few more dabs of tree foliage to make the
horizon area appear dense. Also creating the tree foliage on the top and the bottom part. All right. Now, let us
allow it to fully dry. Okay, so the paints
have dried fully. Now let us add the
details using wet on dry. I'm taking paints gray
and burn tamber mix. So this will look like
almost black color.
11. Final details: Now using this dark mix, I'm adding a soft outline to the trees and
enhancing them with a few extra details like new
branches and subtle marks. I'm also mirroring some
of these detail in the reflection below to
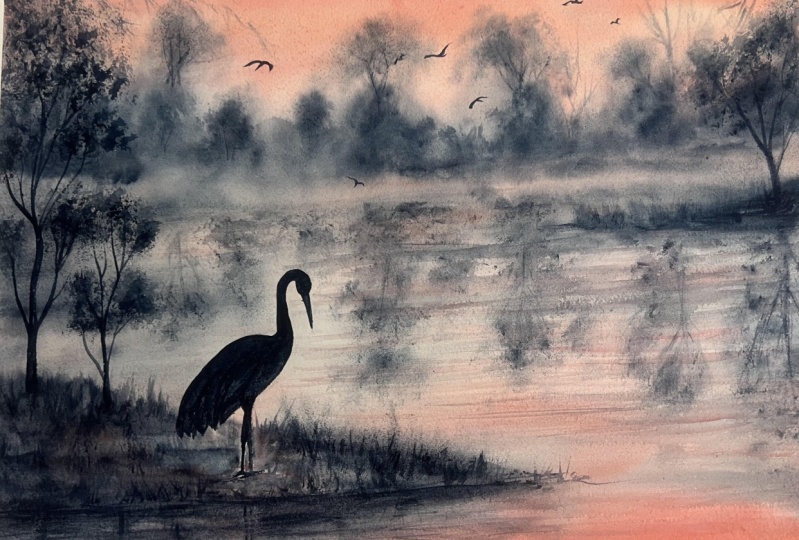
keep things cohesive. Next, I'll move on to painting the bird,
that is the crane. For that, I will
use a very dark, intense color and a fine line of brush to carefully fill in
the sketch we made earlier. I'll also add some grass
blades in the foreground part. And here's a tip. Add the
reflection at the same time. It is easy to forget
them later on, and doing it now keeps
everything consistent. Next, I'm adding detail to
the large tree on the left. So I'm adding the foliage
part by dabbing my brush. You could also use your
old brush if you want. Now, enhancing the
trunk and the branches. I'll do the same on the
right side trees as well, adding some darker
colored lines. I realized I forgot to add
the reflection of the bird, so I'm doing that now. Since the bird
appears quite bold, I'm making the surrounding
areas denser to match the balance and
contrast in that section. I add few birds freely flying in the sky to bring life and
movement into the scene. Finally, I'm using
this old brush to gently dab and create a
natural foliage texture. This adds a lovely
organic feel to the tree. I'll dab the reflection
part as well. Or. Adding some tiny little
birds in the distant area.
12. Conclusion: I Alright, let's peel off the tape
and reveal the final look. I hope you have enjoyed
painting this with me to share your artwork in
the project's gallery. I would really love to
see your recreations. And there you go.
This is how it looks. I really love how the pink and gray combination
has turned out. It worked beautifully
in this piece. The contrast of the trees
and birds against the soft, misty background brings everything together
perfectly. Three.
 Shanan Subhan, Watercolor/Gouache | Art Educator