Transcripts
1. Introduction: When I first opened up the
Roch Studio in Procret, I have to say I was
super intimidated. I knew I really wanted to try
and design my own brushes, but there are so many
options and settings and things to tweak that I
had no idea where to start, and I did what I do
best when I'm anxious. I avoided the problem. But what if I told you
that you can start small? What if I told you that by
choosing your brush that you already know and like and
changing only two attributes, you could tailor this brush and make it feel a bit
more personal, a bit more your style. Would that help? I know
it sure helped me. And I'm certain it will
send you on your way to creating your own brushes in a simple,
approachable manner. Once you're familiar with this friendly accessible method, it may not seem as daunting
to try and create brushes. I'm Ami, a graphic designer, illustrator, and visual artist. Come with me on this
very short journey, and I will show
you what I do when I want to tailor my
brushes to my style, but feel like it's too scary
to start from scratch. Ready? Let's go.
2. Your Project: Hey there. You made it. So glad to have
you here with me. We are going to have
a bit of low key, no stress fun today. The project for this
class is super simple. So here it is. After
watching the lessons, I would like you to show me
which brush you customize, how you did it, and
what the results are. If you can take screenshots of the steps, it would be awesome. But you can simply paint a sample of your brushes
that will look like this. Say, like, a wavy line
in two different sizes, just to show how
the brush reacts. And then you can post it
to the project gallery. If you're up for it, you could totally use it in
a finished piece. I sure would love to see that. In the next lesson, I will meet you on the iPad
to show you hands on how to customize your brushes in the simplest way
possible. See you there.
3. Simple Brush Customization : Hey there. Welcome back. We are here on the
iPad in Procreate, and I already have
a canvas setup. This size and
technical details are not very important with
what we are doing today, so just open up any canvas, and that will be just fine. First, you should choose a brush that you
like to use already. A few pointers I can give you is which brush feels natural for
you to draw or paint with? Is there something about the flow that you
particularly like? In my mind, there's one that
I really like that I think I could modify to get
a more personal feel. So I'm going to open
up the paint tool right here at the top
to go get my brush. It's a procreate
brush called plmsol. Don't mind the mess and all
the folders. Here it is. I like this brush because
it's a cool texture brush, but I especially love the way it reacts when I paint
and the flow it has. I think it's very versatile, meaning I could use it to add sections of texture to a piece, or just little details
if I dial down the size and put a little
more pressure to it. All in all, a great
brush that I think I can easily tweak either to add variety or fit my style a little more.
How do I do that? Super easy. I'm going to
open the paint tool backup, and to make sure I have a
copy of the original brush, I'll swipe left
and tap duplicate. If you forget this
step, no need to panic. It's quite easy to reset a
brush to its original state, but I like to save myself
a headache when I can. Now with my plum sole
duplicate selected, I'll tap it once more to
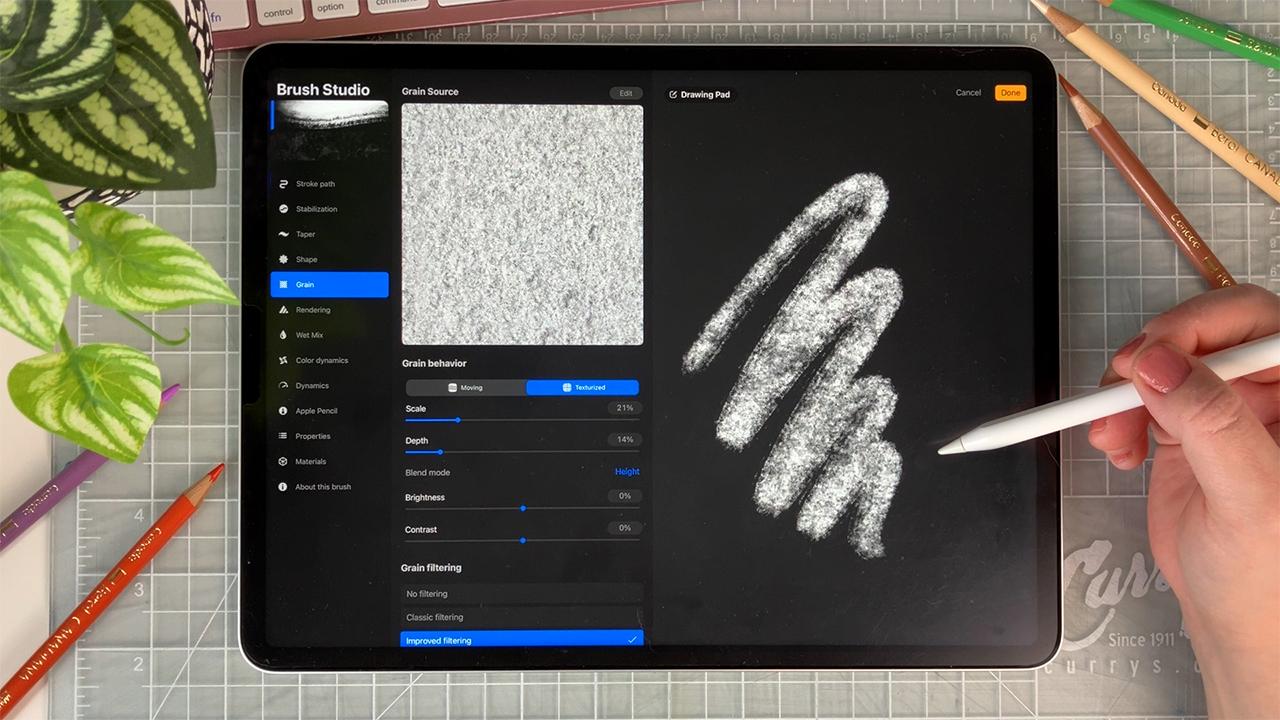
open up the brush studio, and this is where
the magic happens. Very quick tour of the brush
studio before we start. On the left, you will find all the different attributes
that constitute a brush. When you select an attribute, it gives you access to the attributes properties right here in the center
of your screen. On the right, you will
find the drawing pad. This is where you can
test your brush live. This means that you can change the properties of an
attribute and test the result right away
without going back to the canvas to clear
the drawing pad, scrub with three
fingers like so. But I said we would start
small, so here it is. No need to tore the
entire thing, because, as I said, you can personalize a brush by changing
only two attributes. And these infamous attributes
are shape and grain. In Procreate's own words, a brush is made
with a container, also known as the shape. And this container
holds a texture, also known as grain. So by changing one or both, you can customize your own brush in the simplest way possible. And since you chose a brush
that you already like, chances are you will not need to tweak the other
settings for this to work. And now there is a big bonus. Procreate has its own library
of shapes and textures. So, yes, you can
work with your own, but this will be
for another class. Today we are using the
Procreate library. Let's start with the shape. Tap the shape attribute, then tap edit right
here at the top. The shape editor will open, and now you will tap
import right here. This is where you
can choose between the source library
or other sources. You could completely use a grain as a shape and a
shape as a grain. But I'll keep things traditional to make
sure it works well. There really is a bunch
of shapes to choose from, and it all depends on what
you're looking for in a brush. I personally like texture
and a painterly type. Well, today, that's what I like. Who knows what
it'll be tomorrow, but that's what
I'll go for today. Once you have
chosen, you will see the preview on the drawing
pad change in real time. You are welcome to play with the properties in
the middle here, but I said we were
starting small, so I won't, just to show you what you can
do with so little. You can try the
brush if you like, but now it's time to change the second attribute,
the grain of the brush. We are going to go through
the same steps pretty much. Select the grain
attribute and tap Edit. Now you go to Import and
Choose Source Library. Choose the image texture
that speaks to you the most. Here's the big difference
with the grain. Once you have chosen
your texture, I suggest you tap an
auto repeat right here. These settings will help
your texture look seamless. By playing with the properties
here at the bottom, you can make sure the brush
works up to your standards. In my experience, it's not difficult when working
with the source library, the procreate source library, because the textures are
quite even and balanced. But still, I suggest
you take a look. Yeah. Around with the
different settings and see what works best. While grain scale and rotate
are quite self explanatory, border overlap and mask
hardness are a little more abstract and will change the way the sides of the repeat
pattern interact together. Sometimes a lower
setting works better, sometimes a higher setting, the real way to find out is
to try playing with these. When you have chosen what
works best, tap done. Once again, the preview
will have changed. You can try your brush
and see how it feels. If you'd like to try something
different, go ahead. It's so easy you don't
need to hold back. You can also tap
done on this one and duplicate it to keep
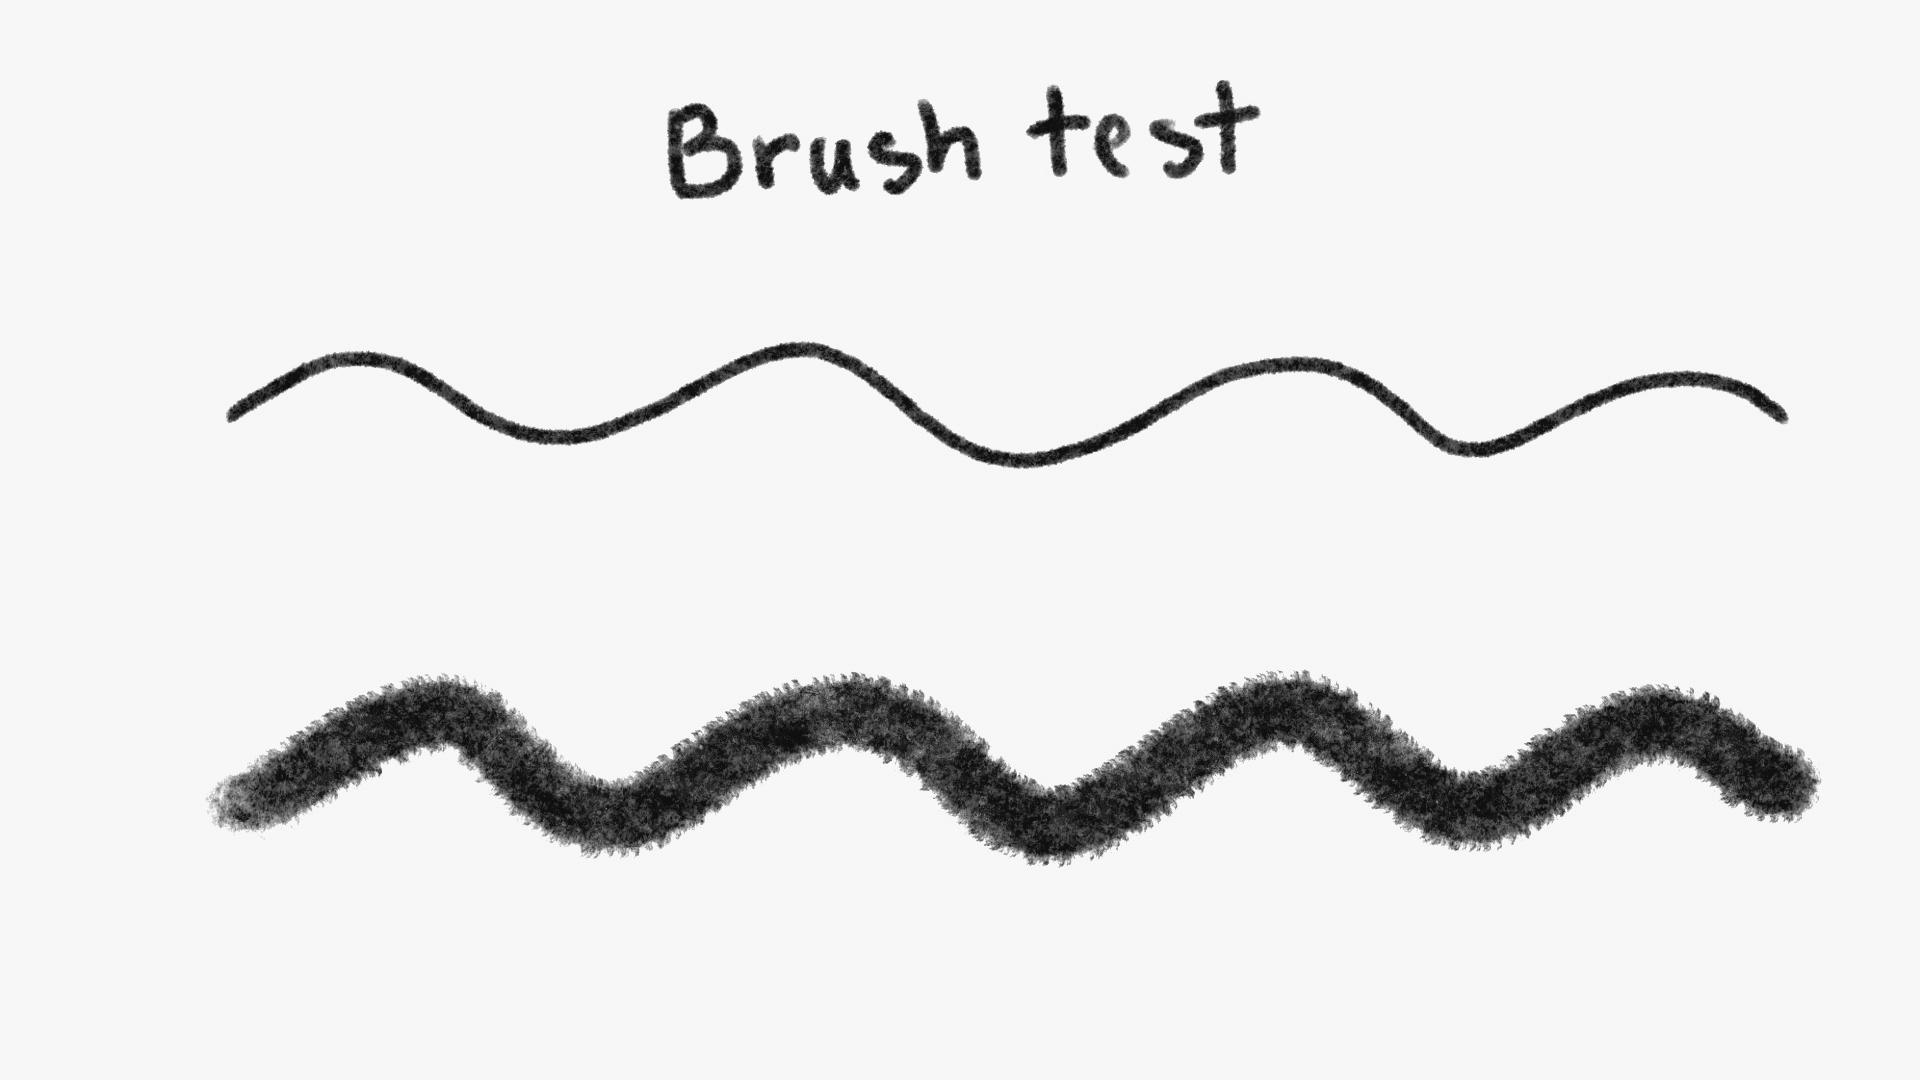
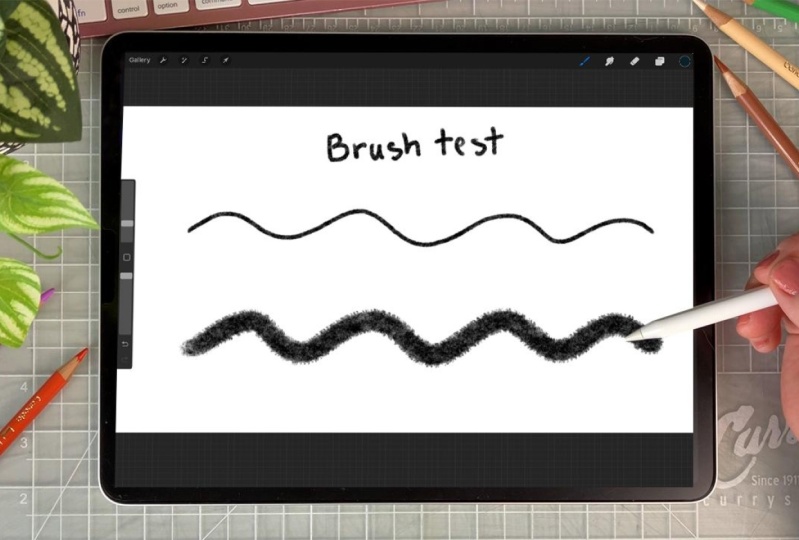
a copy as you wish. It sort of makes checkpoints. Okay, one last thing. I'll create a sample card
for this new brush now. On my Canvas, I'll
make a mark with a bigger size and
with a smaller size. Et's export this and post
it in the project gallery. When you post your own, I will give you feedback if you ask, and I cannot wait to see what
brushes you come up with. In the next lesson, a bit of
a conclusion. See you there.
4. Conclusion: Thank you so much for
participating in my short class. I really hope you found something useful
and that it feels a little less intimidating
to create a new brush now. Here's a very quick recap
of what we just did. First, we chose a good
brush that we liked. Then entering the brush studio, we modified the shape
and grain of said brush, choosing from Procreate
source library. Then we tested the brush
and hopefully created a sample card of the
result. And here we are. I would love to
see the result of your brushmking in
the project gallery. So don't hesitate to
share since getting and giving feedback is one of
the best ways to learn. If you could leave a review for the class, it would be awesome. It really helps me make each class better
than the last one. Thank you so much
for sticking around, and I'll see you next time. Bye.
 Amélie-Maude Bergeron, Graphic designer | Artist | Illustrator