Transcripts
1. Introduction: You a creative who likes
to do as much as you can by yourself when it
comes to your business? You came to the right place. I'm Ami, a graphic designer, illustrator, and visual artist. After a few years
working as an employee, I decided it was time
to do my own thing. During my years working as an
in house graphic designer, one of the areas I was lucky enough to touch
upon is packaging, and that's what we'll
be talking about today. The main goal of this class
is to give creatives without a graphic design background the means to create their
own product labels. Plus, I'm giving the class an unexpected twist for
even more accessibility. We are going to use
Procreate on the iPad. I'm so excited to
teach this class because I'm a big believer
in creative independence. As you may well know, procreate isn't made for graphic design, but it doesn't mean you can't
use it for that purpose. Many creatives already use the app for drawing
and painting, and by learning the basics, which you can apply in any
other software anyway, you will be able to create custom labels for your products. I suggest taking this class if you are a creative who likes
to do things your own way. Apart from the app, you will need your iPod and
a home printer, scrap paper for test, full sheet, sticker paper, a safety knife, a metal ruler, if you have one
and a cutting mat. The class project
is in two parts. First, I suggest
you follow along as I work on a label
for a scented kindle, and then you can go ahead and test what you
have learned on your own with a second
brief crafted just for you. To get there, we'll first learn about the
purposes of packaging. Then we are going to build
our label in steps from the label Skeleton to building our layout with type
two adding details. Along the way, I'll show you
some print design basics, a few typography fundamentals, as well as the specific
procreate tools that will help us design
at the right size. We end up the class by testing our design and then
printing a batch. So if you're ready,
let's dive right in.
2. Your Project: Your project for this
class is in two parts. First, you can follow
along as we create a label for a watermelon
scented candle together. Starting from a made
up client brief crafted just for
you by your Strui. We will design the label from
scratch using Procreate. We start by deciding how big our label is going to be and where to place
it on the candle, then I'll take you
for a quick toor of the procreate tools that are useful to us for this
specific project. Next is the part where we create the skeleton of our
label in Procreate. Then we'll talk about
information hierarchy, and we will continue with placing type to
create our layout. After the basic layout is done, we'll add details and graphic
elements to make it fun. We end the project by
testing or design, making adjustments if needed, and then printing a whole batch. It's a whole journey, but I've carefully prepared every step so it would be easy to follow. I can hear you telling me that you don't have the
candle with you to test out your label once
it's printed. I know. Let's look at a few
containers that you probably have lying around the house
and that you can test it on. I found these two containers and they're about the
same circumference as my kindle, as you can see. The only downside of the eagle brangar is that it doesn't have a separation
between the top and the bottom. However, the roundness
is the same. The only thing you can't test
is the height of the label. The little ental soup
jar is quite similar, and I'm sure most households have that laying
around somewhere. For the rest, I invite you
to use your imagination. Even just designing the label is where the learning
is happening. The principles will
be transferable to any other product
label you design. Once you have completed, the follow along project
comes the second part. In the class handbook, I've prepared a
second client brief for a strawberry
jam jar this time. You can now design the label for this product without me to
test out what you learned. You could also work
on your own product. Another great way to
assimilate your new skills. For the class, you will need your iPad and
a home printer, the procreate app, scrap
paper for tests, full sheets, ticker paper, if you can, or good printing paper with
glue or double sided tape, a safety knife, a metal ruler, if you have one,
and a cutting mat. That's it. If I were you, I would go to the projects
and resources tab right under this video to
download the class handbook. This is where you will find
the info to follow along. I'm super happy you're here with me to
learn something new, and I'll see you in
the next lesson, where we're going to
talk about packaging, label design, and the importance of creative independence.
See you, so.
3. Packaging, Label Design and the Importance of Creative Independence: Hey, folks, welcome to my
new label design class. I'm so glad you're here, ready to add a few
tools in your toolbox. Before we dive into
the thick of it all, I'd like to talk a
little about packaging, label design, and why I thought it would be a
good subject to teach. When we think about
it, I imagine that our first reflex is to think about packaging as
protection for a product, yes, it's part of
its use when we talk about outer
packaging, of course. But there is so much more to it. Packaging is like the
silent salesperson on your products shelf. It's a first impression. It's a way of communicating your brands identity and a crucial part of the
customer experience. In other words, a product's
packaging is like an ambassador of this
brand. And label design. Where does it fit into this? Well, I'd say you can think of a label as the
face of your product. It's a part of packaging because it wraps a
product like clothing. It definitely isn't there for protection when
you think about it. But it's often used to
share the essentials, like ingredients or care instructions or
legal information. But it's also a canvas for
your creativity, isn't it? It's a chance to tell
your brand story and connect with your
customer on a personal level, and once they connect
with your product, who knows? They might buy it. All in all, Packaging
has a functional use, safe for protecting your product and informing the customer, but it also has a marketing use, such as communicating
your brands identity or being aesthetically appealing
to your ideal customer, so they connect with the
product in order to buy it. One of the biggest reasons
I'm passionate about teaching this is the freedom and independence it gives
you as a creative. As small creative
business owners, we are used to do pretty much
everything by ourselves. In my humble opinion, being able to wrap your products according to your own standards, your own philosophy, and your own style is a
beautiful, beautiful thing. It puts you in complete control of your products presentation. No, I don't believe it's bad to delegate when you need
help. That's not it at all. But sometimes you might
need to do things at a small scale for a
special event, for example, or you might need
to cut down costs, and it sure will come in handy to be able to do those
things by yourself. It's like having a superpower. Here's another
reason why I think this class is worth
it. It's fun. You may know that I'm
a graphic designer, and for a few years, I worked in house for an
art materials company. We did a lot of packaging. We did the kind of
packaging that needed to have seven languages on
it, and let me tell you. It was a challenge
getting all of the info in there without
compromising the look. From tiny paint tubes
with a mountain of information to fitting everything
on a very small label. I've learned to think
creatively and find solutions. Here's how I see it.
Designing packaging is like solving a puzzle. It's about thinking
in three dimensions, considering the shape
of your product, the size of your label, and how everything
fits together. It's a skill that's not
just useful for packaging, but for problem
solving in general. You have a last minute
presenter wrap? Great. There you go. You can make it original with
those cool skills of yours. Here's an example of
something I did for a fan. This friend of mine is a
jewelry designer and maker, and her necklaces are very
delicate and high end, and she wanted to bring them
to an event to sell them. Very last minute,
she needed something to present the necklaces
to the customers. She asked me if I had any ideas. Did I? Here's what I did. I developed a dieline and since she only needed
a small quantity, we ended up printing the
thing that holds a necklace. I actually don't know
what it's called on watercolor paper because that
type of paper holds itself together pretty nicely
in addition to being classy and we cut them with safety knives
and metal rulers. The result is fun, It's classy, and it's exactly what
my friend needed in this precise case.
To sum things up. Yes, packaging
protects a product, but it's also what communicates the personality of a
brand at first sight. Label design is a part of packaging and it's a way
to inform the customer while conveying the vibe and the values of the company
behind said product. Also, I think it's an important skill to develop as a creative
business owner, because it gives you
creative independence and also because it's fun. Remember that this class is meant to help
you upgrade your product packaging with tools that you most probably
have at home. We are aiming for small
productions that you would prefer not to send
printing at the print shop. This being said, we are now
ready to jump right into designing a label that fits a specific object. See assume.
4. Designing With a Specific Object in Mind: Hello, and welcome back. In this lesson, we'll be looking at label placement and sizing. We are going to learn
how to decide how big your label should be
and where to place it. It might seem a bit overwhelming at first,
but don't worry. We're going to break it down. The object I'm working on today is this cute
candle right here. If it's your first time
doing this kind of thing, I certainly hope you're
following along with me. If you feel confident enough
to work on your object or if you're coming back
to this class to do the strawberry jam
project, that's awesome. You can follow the same steps and adapt it to what
you're working on. Now, first thing I'd like to
mention is that designing for yourself is completely different from
designing for a client. When it's your own
product, you're the boss. You make all the calls. But if you're working
with a client, there's a brief to follow
and that comes with its sound set of challenges.
Keep that in mind. The first thing I'm
going to do is look at how much info
I'll need to place on that label in order to get an idea of the kind
of space I need. When beginning a project, you should look closely at the client brief and pay close
attention to the demands. I also suggest crafting a brief if you are working
for yourself, by the way, as it helps you figure
out the info and getting clear on what's important
for a specific project. So Let's look at
what's important here. The name of the candle
is Watermelon Fountain, and it is for a company
called Clebery Lane. They specialize in
fruit scented candles and their products are handmade. They really want to show their fresh minimalist
vibe on the label. In terms of the info that the client wants,
there isn't much, so that means that we will have many placement options and the label will be able to breed. They even put the
colors in the brief. The last thing they mentioned is that they want their logo, but not as the most
prominent info. The process will be the same if you're working on
your own object or if you're doing the strawberry
jam brief. All right. Let's get started on
figuring out where your label is going to exist on the object
you're working on. First, things first. Take a good look at your
product. What shape is it? Is it round, square or
something more interesting? Are there any curves
or bumps to consider? For my kindle here specifically, one thing to keep in
mind is that since it's a circular shape, well, a cylinder actually,
we have to be mindful of where the information
stops being visible. What I mean is, since we
have a round surface here, when looking at it
from the front, the sides are receding in space. If there is a long line of text, this receding in space
will make it hard to read the whole sentence without
turning the candle around. It might seem like a detail, but this is an ideal
for readability. We want the person reading to be able to understand at a glance. I will probably need to make
sections of information to keep optimal
readability. Here's a tip. Measure the maximum length the information blocks
can have before losing readability and steer clear of that awkward space where you're not sure you can see
the info anymore. Your label can go beyond
that without problem. It could make the whole
circumference, it's okay, but you will need to think in sections to keep
everything readable. Next, think about the surface. Where can you actually
put your label? Is it just one side, or can you use
multiple surfaces? Should you split the information
on more than one label? It sure is easier when knowing exactly what
needs to go on the label. It helps determine where you place the label and how
big it's going to be. Don't forget that
you can be creative. You're allowed to
think about how you want the product
to look on a shelf. Do you want it to
stand out or blend in? Maybe you want to create a specific visual
effect when there's a bunch of the same product side by side or stacked on a shelf. You can give your label a
special shape if you like. But keep in mind that if you're printing and cutting
it yourself, which is what we're
doing in this class, it will be more
complicated to cut a batch unless you have a laser cutter
or something of that kind. With my candle here, I'll do
one long rectangle label. This will be enough
for all the info and also to get
creative a little. Since the candle is a cylinder. I don't have to ask myself on which side the label will be because it's basically just one continuous surface,
so that's that. I could do a label for the top. It would work on the surface, and I could add more
information on there, but I'll keep this for a
special future project. Maybe a future mini
class, why not? I have more than
enough space for all of my information
on just a front label. Now that I have a good idea of where I want to
place the label, it's time for the
very technical stuff, meaning deciding
on the actual size by measuring everything
right. Here's how I do it. For the height, I can use any kind of ruler and it
should work just like measuring anything
else. For the length. It's a little more
complicated because I'm measuring a cylinder. I like using a soft
measuring tape, the kind I also use to sew. It helps me follow the
shape to get it right. If you don't have a soft
measuring tape, don't worry. There's a very easy work around that you can use to
get the right result. You can use a piece of paper. Wrap it around while
making sure it's up right and mark where it
should begin and end. I like to do this step anyway
because I like to have a physical example of the thing I'm working
on in general. By doing this, you are
trying it out in real life. If all else fails, you can also rule your
ruler around your object. This method is sketchier,
but like I said, if all else fails, it will at least give you an approximation of
the measures you need. But for now, let's just use
the soft measuring tape. I have to decide how much space
I leave around the label. Do I want the customer to
see the color of the candle? How much is the question? But here, since we
will be able to see the product at the back
where there's no label, I prefer giving myself a bit
more space for the design. Another thing to keep in mind is the material on which
you're going to print this. When printing at home, you might be limited on the
size of the label. I already know I'm going to print on a full
size sticker sheet, a letter sized one that I'm going to cut
at the right size. My design can't be larger
than the size of the paper, but it's not really
a problem here. We also have to take the bleed and crop marks into
consideration. If I lost you
there, don't worry. We'll talk about these
two things later. Now, let's measure for real. From what I see here, I'll make my label 2 " high and 4 " long. The maximum length
for a text block should be about 2 "
long more or less. Don't forget that
these measurements can always change later. You want to have the closest
measures that you can before changing these
parameters drastically will strongly
affect your design. But changing for say an
eight of an inch won't do. Here's a recap of what
we did in this lesson. We pay close attention
to the brief in order to know how much text and
elements have to be included. We decided of the placement
and size of our label by observing the object
we are working on to evaluate the shape and
the available surface, and then we measure the
space where we're going to put the label and decided on a tentative
size for the design. With all of this in mind, let's jump to procreate
and see how we can achieve our mission with this
wonderful app. See you there.
5. Procreate: A Brief Introduction: Hi, folks. Welcome back. I'm so glad you're still here. In this lesson, we're
diving into procreate, one of my favorite apps
in the whole world. As you may know, procreate isn't typically a go to for graphic
design for many reasons. First, there's no
vector support, and the tools and options for professional graphic
design simply aren't there because this is not the intention behind the
app, but hear me out. As artists and small
business owners, I think we gain from
thinking creatively and trying new ways of
achieving our daily tasks. Plus, I'm thinking
accessibility here, and I'm thinking about
using an app that is already popular within the
artistic business community. I believe procreate can
definitely help us create simple, effective packaging if we know how to use it for
this specific purpose. Always for small batches and
home production, of course. You probably already know how to use procreate for
digital painting. But today, I'm going
to show you how you can use some of
the apps tools for graphic design
while incorporating digital painting or
drawing in there. Plus, the principles we'll cover here can be applied
to any design software, whether it's illustrator,
affinity designer, or something else entirely. I want to be upfront. This
isn't AD dive into Procreate. It's more like a quick tour
of the tools we'll be using. If you're already
a procreate pro, feel free to speed
through this part. But for those who are less
familiar with the app or only know how to use it
traditionally, let's get started. The first thing you see when you open procreate is the gallery. This is where all of
your artwork is stored. The first thing we need to know is how to create a
custom document. To do that, you see right
at the top to the right, there is this little plus sign right here.
Tap the plus sign. You have all of these
templates here, but what we need to do
is a custom canvas, and this is right here. You tap this little
plus thingy there. This is where you get to
customize your canvas. For now, the size of our
canvas does not really matter. Let's just do an eight by
ten canvas at 300 DPI. Let's do a quick
tour of what we are going to need in the
tool bars at the top. The first one is the actions, right here, the little wrench. In this menu, I suggest you pay close attention to the
ad tab right here. There's a few of the
items that will be useful to us to create
the label later on. First, the ad file tab. Adding a file, lets you import a compatible document
into your Canvas. It can be a JPEG, PNG file, a TIF TIFF file. We are going to need
this option later on to import the company
logo to the artwork. Another one of these
menus items that's going to be essential for us to
know is the add text item. Needless to say,
there's going to be written information to
include to our label, and this is where you go to
include text in a document. To access the text options, first, select the text. While there's a quick
menu that appears right over your text
when it's selected, I prefer having the
full menu to work with. To find this menu, look for
the little A's right here. This is where all of the options to format
the text will appear. The typeface, the alignment, kerning, all of
it is right here. They might appear at
different places in your screen according to
where you start from, but the trick is to
look for the AA icon. If we go back to
the actions menu, there are a few other items we are going to use later
on for the project. Amongst others, we are going to use the crop and resize item. This is where you go
if you need to resize your Canvas after
the work is started. We are now getting to the
item I really want to show you because this is the one that makes
all the difference. Here comes drawing guide. Let's tuggle this switch on. Most people use it to help with perspective or to
draw in symmetry. But today, I'm showing you
a completely different use. We are going to use
the drawing guide to build the skeleton
of our label, and we are going to use it as rulers to get a sense of size. Are no rulers in procreate, and this is one of the tools that are
essential to print design. With creativity, we can use drawing guides to
replace rulers. In the next lesson,
we'll really get in there and set up all of
the options that we need. But for now, just remember
that drawing guides are here. In the actions menu
under the Canvas tab, you can also access the Canvas information at
the bottom completely. In this section, you will find the dimensions of the Canvas, the number of layers you
have available to you, but mostly the color
profile information. If you need to change
the color profile on your Canvas after you have started working on it,
you can do it here. The last step of the
actions menu that I'd like you to notice
is the share button. This is where you
are going to go when you are ready to
print your project. Right next to the actions
menu is the adjustment menu. I'm not going to use it today, but it's good to know
that it's there. Same for the selection
and the transform tool. These you should really
experiment with. I'm not getting into
the tools at the right, since they are the very
basics of the app. If you need to get
familiar with them, the Procreate website has a really complete
handbook for their users. If you want to learn more, I recommend you check it out. As mentioned before,
you should really have a working knowledge of
Procreate for the project, and I just wanted to give
special attention to the less known tools that can be used to design the label. This concludes our quick
tour around Procreate. Hope you enjoyed it.
Here's a reminder of what we did in the lesson. We had a quick tour of
the Procreate app with specific attention given to the tools that will
help us design. Amongst them, we
looked at how to add a file or some text, how to add drawing guides. We also navigated the
Canvas information and saw how to
export our artwork. If you have questions, please
feel free to reach out. I'll do my best to answer
any interrogation you may have or find reference
to help you in your journey. Meet me in the next lesson to continue this adventure. Oh.
6. Some Print Design Basics: Hey, team. Welcome back to
this label design class. In this lesson, I want to
show you what it looks like when you have a document ready
to send to a print shop. We'll look at the elements
it should include, so when we'll go to procreate, you'll have a better understanding
of what our skeleton, as I like to call
it has to include. Come to the screen with
me, and let's have a look. Here is a document that I
designed for one of my clients. It's a simple double
sided gift certificate. The document is pretty
standard in itself. The first page is at the top and the reverse side
is at the bottom. But what I really want to show you here are
the crop marks. You can see them in every
corner of the document. They are used to indicate where the edge of the document is, or if you prefer, where the design will
be cut where it ends. Another use that they
have is to make sure both sides of the document
are aligned when printed. Most graphic design softwares
can generate crap marks automatically
according to the size of the document
you're working on. But sometimes you do need
to place them yourself. This will be our case today. And the reason we
don't just trace a black rectangle and call
it a day is precision. When cutting, if you are not 100% perfect with a rectangle, you'll get a black edge
around the artwork, which we really don't want. Cutting marks are
more forgiving. They are there to align the
cutting machine or your ruler and safety knife in today's case and make
sure the result is clean. Now let's talk about bleed. When an image or a shape touches
the side of the artwork, like you can see right here, we need to include
something called bleed. Bleed, as its name indicates, bleeds outside or extends
beyond the artwork. We put this there in this way because sometimes
when the design is cut, life happens and the cut may not be exactly where you
think it will be. Most of the time, it's because the cutting
machine shifts a little for some reason, but whatever the reason
when you have bleed. You are making sure
that you won't get a wide space
when this happens. Note that the
standard size is an eight of an inch or
1.125, if you prefer. It's about 3 millimeters
in the matrix system. Now, let's look at this little business card project
that I design, and that is printed
on a home printer. It's a little different. You can notice that I've already lined up 12 cards
on one cardboard. This is called imposition. Print shops do this by
themselves usually, but when you're
printing at home, you can do it yourself
to save some paper and use as much of the
printing surface as you can. There is one thing that's not ideal in this
situation here, and it's the absence of bleed. As you can see, my crop marks are aligned with the
end of the design. I chose to do this to
save on paper space because I know that
I will be cutting these myself with
a safety knife, but I would never, ever
in 1 million years, send this to a printer. I don't think they would
be very happy about it. Now, in both of these designs, there is something
that we don't see and it's a security margin. For the same reasons
that we need plead. It's also good practice to keep a security margin on the
inside of our document, and in this space, you won't put any
important information. It's okay to put
graphic elements in there if you intend
to have them cut, maybe not text or the logo of the company
if you can help it. You would risk it being cut
and we don't want that. I recommend a minimum of an eight of an inch for
security margin, but you can judge according
to your document, the precision of your printer and the precision
of your cutting. Wow. That's a lot
of information. It may seem
complicated at first, but once you put
it into practice, you'll see most of these
things are only logical. Also, the reason I like to do my technical setup before
everything else is that I find it easier to design with all the technical stuff
already taken care of. So many decisions
will depend on that. I prefer setting up my
space in the beginning. It's much easier
to think about it now because if the technical
specs change too much, you'll have to redesign. So I do it now, and then I
have fun being creative. Here's what we covered
in this lesson. We have looked at the
essential elements of a printed document such as lead, crop marks, security
margin, and imposition. Let's jump to procreate.
7. Setting Up Your Document in Procreate: Hello, and welcome back. In this lesson, we
are going to be using Procreate to set up the
structure of our label. We are going to go back to the gallery to create
our real new document. As mentioned earlier, I'm going to go on the plus tab here, and I'm going to
create a new Canvas, from a template. So a new one. Today, we'll be
working in inches. Here's a random fact for you. I live in Canada, and even
though the metric system has been officially adopted for
most purposes for years, and it's the only one
we learn in schools. The imperial system is deeply ingrained in our cultural
and commercial landscape. Also, many international
design standards and software are still based
on imperial units. This means that
designers need to be proficient in both systems to work effectively with global clients and
industry standards. When I was working for the
arts materials company, we measured in millimeters because the home
office was in France. The truth is it doesn't change anything while we are designing. The real difference is
when it comes to printing. The standard paper
sizes are not the same in the US and in Europe, for example, either way. I think it's essential for graphic designers
in Canada to be comfortable with both
imperial and metrix units. And personally, I think knowing two things is better
than knowing just one. So long story short we'll be working with the
imperial system for today, but don't let that stop you if you prefer working with
the metrix system. Just know that your
blade side should be about 3 millimeters and your security margin
at least that two. For the size of the canvas, I have my label size in mind, which is 4 " long by 2 " high. But I want to have a
lot of white space around it so I can sketch
and do some tests. I'll go for eight or
maybe ten by five. I'll go ten by five. It's really important that
you keep the DPI to 300 here because it's the
standard for print design. I'm not going to get
into too much of that. But if you are printing at
a professional printer, you really, really need to
have at least 300 DPI here. It's also better when
printing at home. Sometimes in some cases, you might only need 150
DPI, but it's rare. These are really exceptions, I really recommend always
designing at least 300 DPI. You can go bigger if you want, but If you go at 300 DPI, with your right size, you know that your label is going to be exactly how you
want it size wise. Let's go to the color profile. Let's make it short. RGB means red, green, and blue. It's the color system used for screens like computer
screens, TVs, and phones. This system is light based, and the more light you add, the brighter and closer
to white it becomes. CMYK means cyan, magenta,
yellow and black. This color system is
used for print design, and it is based in matter
or pigment, if you prefer. The more colors you add, the darker they become. Watch me as I add color
through these RGB sliders. The result gets paler and
paler until it reaches white. On the contrary, here I'm
playing with markers, and you can directly observe that as I layer the colors
on top of one another, the result gets
darker and darker. It is, in fact, way more
complicated than that, but here's what you
should remember. In the real world, when you
send a document to a printer, the traditional color
profile used is CMYK. Because they are dealing
with ink, which is matter. The standard for printing
is the CMYK system. When you send something
to a printer, you usually need to
convert to CMYK. However, today will
be working in RGB. The reason it's pretty simple. Home printers usually deal
pretty well with RGB. Plus, since we're just starting
and testing things out, working in RGB keeps things
simpler. Don't worry. If you'd like to
take your designs to a professional printer, you can always convert
them to CMYK later. But the design we're working on today should really be
printed on a home printer. And then the Canvas properties. Just so you know today since we are going to print
this on white paper, it's okay to have the
background color set to white, but you could also put a background color if you
wanted this to be yellow, so you wouldn't have to do a layer with your
background color. But we don't really
have to do that. Also just so you know, if you were going to print
on a transparent material, you could hide your background
and make it transparent. And now you can
create your document. Once our document is created, as you can see, there's no
ruler, no guide whatsoever. So let's do something
about that. In the actions menu, little ranch over
here, right there. You are going to go to
the drawing guide and put them on so you tuggle
this little thing in here. And then you have to go
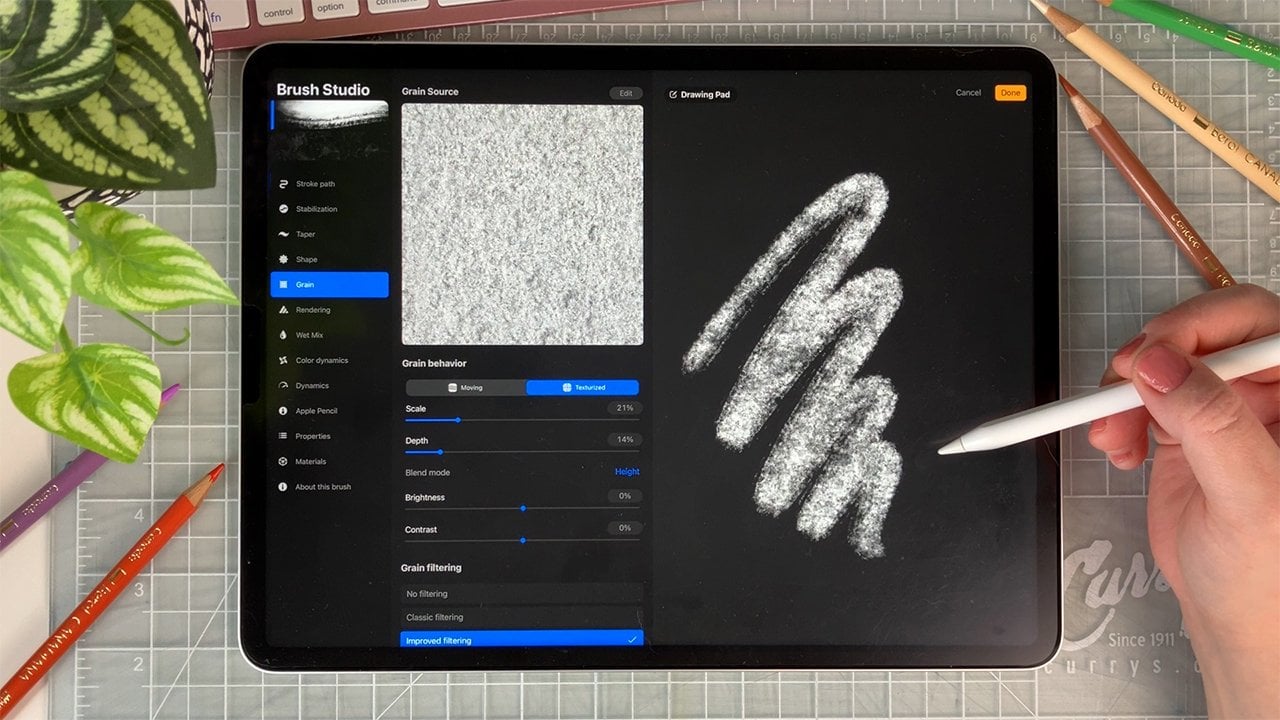
to edit drawing guide. Pixels will be of no
use to us because we are working on an artwork
that will be printed. The first thing I'm going
to change is the grid size. Right here, I'll go to inches. I like to use an
eighth of an inch as a unit because it's the smallest unit that
will be useful to me. As I mentioned earlier, the standard side for
bleed is this size, one eighth of an inch, and I find it very useful to
have this as my basic unit. From there, I can also
easily measure inches, half inches and
quarter of inches. Let's click done. Also, you can
adjust the opacity. And the thickness of your grid. This seems about right to me, but it's really a question of personal preference
right there. And click down. And now you have everything you need to build
the skeleton of the artwork. All right on a first layer, I'm going to measure
the size of my label, and I'm doing this to
give myself a reference. As I said, 1 " is
eight of these, so I'll measure it.
This is an inch. We said 2 " high, so twice that. As you can see, it's
a little tedious, but I find it's worth it because the app
is so accessible. It's worth having to go through
this little process here. We need 4 " in length.
This is my light. I could have just created
these two and duplicate them and put them there to
have my second set of guides. But it doesn't matter. I
want to create a line. If you didn't know, that's very useful for what
we're doing here. If you trace a line
and just hold it, it will make a
straight line for you. This is called quick shape, and it also works with
squares, rectangles. It also works with circles. Yeah, just a little
trick for you there. There you go. This is
the size of my label. 2 " high by 4 " in length. Apparently, I drew the rest
of my label on another layer. If it happens to
you. No big deal. What I want is all of
this on the same layer, so I'm just going to tap here, and then I'm going
to merge down. It's going to merge
with the layer right under. There we go. I'm going to rename this because I like to be
organized in my layers. I'm going to name this label. Now, what I want to do is
another layer because remember, the goal is to have
the same thing as we would have in a professional graphic
design software. We want the crop marks,
we want the bleed, we want the safety margin.
We want all of that. What I'm going to
do next is create another layer for
the crop marks. I'm going to go with a black because I want to see them well. Now I'm going to
trace my crop marks. This is why I made my guide. From my rectangle, I know that this is
the size that I need and I'm going to offset my marks a little so
that when I cut them, I don't see anything and trace as precisely as
I can my crop marks. I really really try to be on my guide to make sure my crop marks
don't touch my design. I'm going to draw them a
little outside of my bleed. Remember, we said bleed
was one eighth of an inch, this unit here, meaning my crop marks will be a
little outside of this. They don't have to
be really long, just enough for you to see them when you're going
to cut your design. This one is touching
upon the bleed. I'm going to erase it at. And now we are going to do
this on all four corners. As you can see, quick shape is really coming in
handy in this part, because if I was not
using quick shape, it would be all
wobbly like this. Well, this one is
good, but Quick shape. Make sure everything
is straight. The reason I want my crop marks on a separate layer is that
when I'm going to design, maybe I want them off. Maybe I don't want to see them. It's really good practice to put different elements
on different layers. You can separate your
artwork logically this way, and it will help you
in many situations. Now that we have the crop marks, I strongly suggest tracing on another layer, your
security margin. If I did not mention it, it's really really
good practice to name your layers in any app or
software that you use. Because when you
come back to it, then you don't have to search for what
you're looking for. If I named my layers, it will be so much easier to find my security
margin if I need to make adjustment to it than
if I did not name my layers. As I said, security
margin should be at an eight of an inch,
same as the bleed. That's what I'm going
to trace right here. But not in black, not in gray, I'm going
to be using say, sien like this because
I want to see it, but I want to know
that it's different from the edge of the artwork. I find it a little bold. What I'm going to do
is adjust the opacity. Say 50% would be good, I think. Yeah, like this. Perfect. What I will also do is trace myself
a center guide. Well center guides. On vertical, one horizontal. This will help me
balance everything. My center is right here. I'm also going to
do another layer. I'm just going to
name this one guides because I might want to add more guides
when I'm designing. The last thing I'm
going to do on my label skeleton is
grouping all of these. To group, I need to select the first layer I want to group, and then I s right to select all of the layers
I want to put in a group, and then I tap group here. This is the skeleton. You can
name it whatever you want. I'm naming this skeleton. I know what it means for me. I put this in a group, and now I'm going to center
everything because it might help me later when I'm designing to have everything
snapping to the middle. As you can see, it just snapped here in the
middle. That's good. Now I want to make it
snap horizontally too. If you can see it, we have snapping here on the horizontal
and at the vertical. This means everything
is centered. Perfect. There you go.
We have our skeleton. Good. Our document is set
up and we are ready to go. I know that this lesson
was quite technical. Actually, it's the most
technical in all of the present class,
but bear with me. When you master the
technical side of things, this is the moment your
creativity will be able to shine. It's comparable to a painter
mastering the medium. The more you master your
pigments, your brushes, and your techniques, the more creative and
successful you can be. As a re, here's what we've
covered in this lesson. We have set up the skeleton of our label artwork in Procreate, taking care of the
technical aspect of things in order to help
us get creative later on. In the next lesson, we are going to look at information
hierarchy. See you there.
8. Information Hierarchy: Welcome back. In this lesson, we are going to look
at the brief in the class handbook to establish
information hierarchy, because it will directly inform
the layout of the label. Basically, hierarchy
is about deciding what information is the most important and making
sure it stands out. It's important because
you want your customer to find the information your
product has to offer quickly. If they connect
with the product, they will take a closer
look and read the rest. If they can see what
they're looking for, chances are they will move on to the next product
quickly enough. We see information hierarchy every day without
really noticing. You can think of a magazine
cover, for example, the cover story or the biggest journalistic
file will be bigger. You should see the title or the cover photo
before the rest. Sometimes the name of the magazine is more
evident, though. These elements should stand out. If the title of
the cover story is the first thing you
read when you look at the cover, it's
a job well done. Another example would
be a movie poster. Most of the time, the main character's
face is huge and in the middle with the
other characters behind or in the
background right. That's hierarchy in action. We want people to see that first and then everything else. This way, you are guiding the viewer's eyes
through your design. Once you know what information
is most important, it's time to make it stand out. We have a few tricks up
our sleeves for this. The most obvious one is size. Yes, bigger elements usually
have more importance. However, I'd like to point out that bigger is
not always better. Sometimes what you will
need is white space. White space around
a graphic element will also make it prominent. Placement, color, and
contrast are also important. These are only a few,
but it's a good start. Now, let's look at our brief and see what
should stand out in it. I have the client
brief, right here. This is the class handbook. On page two, you
have the brief for the label design for
A Kendall Company. This part right here is the
information that we need to include along with
the logo of the company, and the colors that the
client AK A M asked for. We're not talking about
color right here, but we are looking at the info, and we are deciding what
needs to stand out. All right. So here we have the name of the
candle, watermelon Fountain. It's a handmade soil walk skdle. We have the volume here, the time it takes to burn. We have a little warning, caution burn within
site and the website, which is not a real website. Don't try to go in there. It's just a website.com. We have a choice
of the two logos. We don't have to decide
which one we are going to use here because it depends on the layout of the label. What we need to do is
decide which one of these information needs
to be put up front. This one is an easy one. I think it's quite obvious that the name of the
candle is very important. Wow, that's a big marker. Anyway, this is very,
very important. Of course, we are
going to need to know m the name of the company
that does the candle. But it's not what I
want to show first. I really want people
to know the name of the candle because this
will tell them the scent, which is watermelon
and it will give them the whole
vibe of the thing. I'm not even sure the
logo of the company will be on the front of the label. Yeah. My most
important information is the name of the candle. Then what can be very
small This we need to see, but it doesn't have to be
this big unless it's like a real selling point. If the client asks you to do something
with this, like, Yeah, this is our big sale argument, then you are going to
do something with it. But today, no, today we want
just the name of the candle. This is probably this is
going to come second. This one here, because
it's an argument. It's soy based, so I
don't think it's organic, but it's natural and this is going to be very small and we need to see this well. The website. I'm thinking we probably will have
a section with this and a section with the company logo,
and website, maybe. Maybe the website will
be with the name. We'll see. But the most
important part is the name. Quite simple after
all, don't you think? The neat thing is, once you know what's the most important
piece of information, it really helps you decide
how to build your layout. To sum things up.
In this lesson, we looked at the
information hierarchy. We decided what should
stand out on our label in order to get our message across and connect
with the customer. In the next lesson,
we'll work with typography to get our
layout down. See you there.
9. Finding Your Composition With Typography: Welcome back, artists.
In this lesson, we will be talking about
typography and layout. This is the logical next step now that we have
figured out hierarchy. The best advice I was ever given concerning layout was to
place typography first. One of my graphic design
teachers always said that, and it has served
me well ever since. Now that I think about it, it probably had something to do with the fact
that placing what matters most first will
help make it stand out. Let's dive into that. I'll show you how I choose fonts and how to import them to procreate if they're
not already there. I'll show you how to import the company logo
that's in the brief. Note that for now, we are doing
everything without color. This is the way I
prefer to do it. I like to get everything
in order first, make sure I have a
strong structure and then get playful with color. Importing a font to
Procreate is very simple. There probably are
many ways to do it, but here's the one I prefer. First, you need
to have the funds in an accessible folder. Then, all you have to
do is split your screen between your files app
and the Procreate app. Select the funds
you wish to import, and then drag and
drop them to the app. As simple as that, you
will now find them in the Apps menu with the different styles
that you imported. Let's look at how
to combine funds. I already chose the
funds for my designs, and I'm not going to show you the whole process
of choosing them, but I'll give you a few general and
basic principles to help you choose your own. They apply to every situation. The first principle
is less is more. More than three funds in the document starts
to fell all over the place you are a
complete typography master. I suggest sticking to two
funds to ensure good results, especially on a small
document like a label. Second principle is that
when combining fonts, you will want to
think about contrast. Two fonts that look alike, but not quite will probably
clash together just like when you pair two colors
together that are a bit to alike,
but a bit off. It's better to find fonts that are clearly different
in their shapes. This is why I chose Avenue
and read as font pairing. Let us look at them closely. As you can see, the
Avanir type face is very round, very regular. It has a super
modern feel to it. The O's are circular, and the as are double story as. My second font is more swirly. The letters are less
round and more elongated. If you look at
the's and the A's, the shapes are different
from the first font. All in all, it has a
more whimsical vibe, which is often the case
with script fonts. These two fonts also
answer pretty well to the overall vibe that the
client wishes to convey, which is fresh,
and minimalistic. I can give you a
few general cues as to finding the right
vibe for your designs. Usually, sire fonts have
a more classical look. They give an
impression of strength and an overall notorious vibe. San sire fonts look more modern, still classy, but in a
more streamlined way. Scripts, on the other hand, lean towards a more romantic
inspirational vibe. These are very
general guidelines, but I'm sure you can see it. What I'd like you
to retain from this is that fonts that
work well together in combination usually have good shape contrast
between them. They should also fit
the overall vibe, even if they don't
answer to it in the same way and never
forget that less is more. Importing the company
logo is very easy. In the actions menu,
under the Ad tab, tab Insert A file. The company logo is in the
resources under this video, and you should download
it to your iPad. Then you can simply select it
from your folder and voila. Now is a good time to copy all the written information from the brief to your Canvas. You can split your screen and
copy the info from the PDF, then add text to your document. This way, you are
sure not to make any mistake by
retyping everything. I like to put all of
the info at once in my document because it helps
me visualize the layout, even though it looks like
a mess in the beginning. You can also apply
the fonts you choose, even though they probably are
going to change later on. Now that all the information
is copied to my Canvas, I'm going to try my hand layout. I have to be honest here. I usually do a big
brainstorm before this step to find a
concept or a graphic line. But I want to keep
things simple here, and we have enough
information in the brief to create
something solid. One thing to think
about when working on my layout is to create
a strong focal point. You will see me working towards this as I play around
with the elements. For this, you can use size and placement to draw attention
to the most important text, and don't be afraid to
leave some white space. It helps to improve readability and create
a sense of balance. Plus, white space will work to strengthen
your focal point. I'll get rid of some of the
elements that I don't need, like the name
doubles, for example. We already established that the most important piece of information is the
name of the candle. This is a good element
to place first. If you remember well, when I measured my
candle surface, I established that the
maximum length for a single block of
information is about 2 ". Beyond that, it's unreadable. Now that I look at it, I think it could be
2 " and a quarter. So what I'll do is create
a guide for myself. This way, I'll know how
long my blocks can be. For this, I'll measure 2 " and a quarter on my grid
and draw a rectangle. I'll be able to move this
shape around for reference. I will align the rectangle with my security margin and then align some info to the left
edge of the rectangle. Also, I'll place the rectangle in the skeleton group
because it's a guide. Now, I'm placing the name
and it becomes my reference. Second most important
piece of information is the handmade soil walk
scandal. Let's place this. A good guideline when
sizing your type is this. Characters under eight points in size may be hard to read. I'm keeping that in mind as I place the smaller information, such as the volume and the number of hours the
candle takes to burn. Even though I don't want these two elements to
be at the forefront, I still want them to be seen, so I'll make them a bit bolder. It's a case of trying
to balance how much we see them and how
well we can read them. Can you see what I'm doing here? What I'm doing is
I'm taking this line here and I'm using it to
align my information. It's not perfect
yet because it's procreate and we don't
have snapping guides on. But I'm aligning the
information aligning left to create order
in my information. As I'm working, you can
also notice that I'm regrouping the information to create logical focus points. Proximity between
elements creates a visual connection and when regrouping
related information, you ensure that customers
get the info they need. Handmade soy wax candle
qualifies watermelon fountain, and it is logical to
have it right under it. As you can see, I'm headed
in a direction where there's going to be one block of information in
this section here, and I'm going to use
that part of the label, probably to put
the company logo, and also the cosin
burn within sight. Next challenge is placing
the company logo. We want it to be seen, but it is mentioned in the brief that it's not the most
important piece of info, so I'm not going to put it
on the front of the label. I don't like the fact that this information here appears
bigger than this one, even though it's not, I see it before I see handmade
soy wax candle. And I don't like that, so I'm going to adjust it. And look, we still
have the contrast between this type
face and this one. We still have a lot of
contrasts, so that's good. And I still see this one
before, and then this one. And I'll make this
a little bigger. I suggest you work on this
until you're satisfied. With the cues that
I've given you, you should have a few
tools to guide you, but don't forget
to trust your too. There's a few things you can try if you're not sure of yourself. For example, you can create
an alternative layout. When both layouts are advanced, you will be able to compare and choose which one
works best for you. You can also take a step back and look at it
from a distance. It works for painting, and it sure works
for graphic design. And one last trick,
take a break. When your eyes can't
see anything anymore, leave your desk and
come back later. A few things to remember when
working on your own layout. Align elements together to create order and visual harmony. It will also enhance readability by creating a clean
and organized look. Elements that belong together
should be close together. This helps guide
the viewers eyes and makes your design
easier to understand. Also, try alternative layouts. Look at your design from a
distance and take a break. Anything you need to
see more clearly. When you're satisfied, give yourself a little
pat on the back. All right. We've
covered a lot of ground since the
beginning of this class. Here's a recap of what we
covered in this lesson only. We've learned that
it's good practice to start our layout by
placing typography first. We've looked at how to choose fonts that have
the right vibe for a design and how to combine them following a few
basic principles. We also looked at how to
import fonts in procreate, as well as how to import a compatible file
from your folders. Then we have explored
the concept of alignment and proximity and learned a few layout
tricks like creating a strong focal point
and using wide space. Remember, typography
is a powerful tool. When you have strong typography, chances are your
design will work. But I'd like you to
especially remember to not be afraid of experimenting
and having fun with different
fonts and layouts. Sometimes you will
find a cool layout almost by mistake while
trying something else. Don't hesitate to
explore your options. Also, I'd love to see
what you're up to, please post your project in the resources and
project tab down here. It's a space for us
to share thoughts, ideas, and I can give
feedback if you'd like. So please don't hesitate
to chime in there. In the next lesson,
we'll play with graphic elements and details
to refine our label design. See you there.
10. Adding Details and Personality to Your Design: Hey, folks. Welcome back. Now that we've got
a solid foundation with our type and layout. It's time to add some
personality to this label. In this lesson, we are
going to use color, shapes, and or illustrations
to elevate our design. Think of this step as hair
spray on your hair do. It will stick
everything together. We have a good
thing going, and we want to make sure it's
the best it can be. Let's get creative and
have some fun. All right. Let's talk color. Color is another super powerful element, and it can definitely change
the whole mood of a design. In fact, I encourage you to do a quick research on
color psychology to get an idea of how color affects the vibe of a piece and
the viewer along with it, or how certain colors are associated with
certain moral values. Color theory is a
whole other thing, but I don't really encourage you to try to do a
quick research on color theory because this
domain of knowledge is so vast, it would be impossible to
do a quick research only. It's a real Pandora's box. So anyway, in the
case of the candle, the client, AK A M, has provided the colors
associated with the product, which is a great starting point. But if you're choosing your
own colors for any reason, make sure they match the
mood of your product. Let's look at the brief
and put those colors in the palette dedicated
to this project. What I'm doing here
is I'm actually copying the Hx color code given by the client to pick exactly the right
value in procreate. In the color tab at
the bottom completely, you can choose the value option. This is where it's possible
to paste the value directly. Then you can add it to a
color palette if you wish to. I personally like
to have swatches of the color on my Canvas
on another layer, so then I can pick
directly there. I take this chance to also
paint darker swatches of these colors to have a
few options to choose from. Now it's time to
explore my options concerning graphic elements
that I want to add, so I'm going to
start experimenting. Let's try a line to
separate sections. Oops wrong layer.
I'll have to go back. Actually, let's keep
things organized and group the text in my layers so I can keep graphic
elements separate. And let's delete
everything we don't need. As you can see,
I'm taking time to try different brushes
before committing to one, and you definitely do that too. Okay, double line is fun.
Let's work with that. We have a fruit theme here, and I'm thinking
illustrations would be fun. Let's draw a few melons and
see what I get out of it. Also, I'm choosing to keep
them very, very simple, and minimal, so it fits with the vibe asked for
by the client. Adding colors from
the colors given by the client works really
well in this case. I'm drawing a set of three
because uneven numbers have a tendency to work,
especially for dynamism. They're all in the same spirit, but different enough that
it smells like variety. I keep them organized in my layers to be
able to select them easily when needed.
Here's a secret. Colors look different on screen than they
do when printed. Those super bright colors you love on your favorite website or web interface might not come out as vibrant as you'd
hoped when printed. So it's a good idea
to steer clear of the extremely vibrant
colors in the color wheel. Also, if you're
printing at home, as is our case in this class, it might be a good idea
to go easy on the ink. Too much ink can make your paper soggy and ruin the result
you were hoping for. They're pretty
cool. I like them. Before I rescale the melons, one thing I want to
do is duplicate them. I think I've
mentioned it before, but when you work
in graphic design, it's really good practice to work in a non destructive way. This means that if you need to, you can go back and you don't
have to do it over again. I'm probably going to
scale down these melons, but I want to keep a copy
of their original size. I'm going to duplicate
and once it's a double, I'll flatten it because
then it's going to be just easier to move it around. I'll do it with
the three melons. Then these three, I'm going to group and give them a
cool boy band name, I guess, original melons. That's awesome. I'll put them at the bottom and lock
them. This is melon. One, I guess. Melon two. And Melon three. All right. Ah, they were visible. That's why these are more
opaque than I remembered. And now, let's place these
melons in a balanced way. I want to try
something different for my separation
because I think the first one style doesn't
fit the new melons at all. And I like the melons, so let's adjust this. I'll keep the old line
to be able to compare, but I'll work on a new one in the same water style
as the melons. I need to put this
separation under the tight group,
because as you can see, it messes with the contrast of the information here because
the color is over it, and it's transparent, but still we want this
to be more readable. Oh, Last idea. I'll add seeds to
the separation. It's fun. Whenever I'm
designing something, even if I like my first try. I usually do at
least another one, and if I'm presenting
to clients, there will usually be
two or three options. Even if I do like this,
what I've done here, I'm going to do
something else and I'll try to make it quite different so we have
something to compare it to. What I'm going to
do is I'm going to take Everything I did here. Let's unlock the
skeleton because I'm going to group
all of this together, and this is going
to be design one. Then I'm going to
duplicate this, call it design two. This one, I'm going to move
right in this corner here. This is Design one. I'm
going to lock it there. My second design, I will not need the graphic
elements that I did. I'll keep the type, but everything else,
I'll delete them. And I'll move all of my
design two. Right here. I'll hi my colors for now. We have to keep the
same vibe because the client specified
that it was to be fresh, it was to be summary
and minimalistic. But I can use
colors differently. What I'm going to do
is I'm going to try blocks of colors to
create sections. Let's regroup the info
a bit differently. I feel like I should try to
have this information in a organic block of color, if it makes sense, and
it's going to be reversed. I'll use the same rushes, so we have the same vibe
because this part worked. Maybe I'll make it a
little less equal. Yeah, more organic,
more transparency. I like this. But the type though I like it. I like the first one where everything is black,
but the illustrations. But since we're trying
something else, D NFO here, I'm going to
use the second color. We will actually have
to use a color that's a bit. Well, that's an option. Since I want this to
be the main focus, I'm going to put these two in green also because
I'll show you. If they're red, by the way, you can change the logo by. It's a PNG, so you can tap
on the layer to select it. Go to Alpha log, and then you will be
able to paint over. You'll need an Pac brush, and it will change the color. Actually doesn't do what
I thought it would do. I thought it would give more
importance to this here, but what it does is because this is all
of the same color, and then this is green. This actually has a little
too much importance because because it's contrasted. What I'll do is I'll
take this layer and use the same dark green that
I've used, like this. Now this is going together, less important and this is the focus because
of the shape. Yeah, that's another option. I actually think that both work, but I still prefer this one. And there you have
it. You should now have a pretty eye catching
and effective label. As a reminder, in this lesson, we played with color
and graphic elements to elevate or lay out to the next level all the
while making sure we were keeping our higher key
intact for readability. Do remember that
practice makes progress, and I encourage you to
keep experimenting. Don't be afraid to step
outside your comfort zone. Also, don't be afraid
to show me what you've been up to by posting
in the project gallery. I would love to see
what you come up with, and I will give you
feedback if you want me to. In our next lesson, we are going to test out
our design. See you there.
11. Testing Your Design and Making Adjustments: Hello again, so glad you're still hanging
out with me today. We have come a long way since
the beginning of the class, and this is the part where we finally get to test our
design onto the product. See what it looks like and make any adjustment
if we need to. I suggest using cheap printing
paper for this step at least for the first test because we're still not sure
everything is just right. I personally am always trying to cut down
on cost where I can, and this is a good
place to do it. First thing to know is that you cannot print directly
from Procreate. So you do need to export
your artwork to print it. And this is what I'm going
to show you right now. I will not go into details
with the sending to printer part because this is not what this class is about, and there are many ways to do it depending on your network setup, for example, but I will show
you how I do it my way, and then how I test my design. All right. Now is time
to test our design. I prefer this one, so this is the one
I'm going to be printing with design
one selected. I'm going to put it
about in the middle. Very important at this stage, when you are going to be
printing in your skeleton, you need to turn off your
guides they're already off. Security margin two. If you still had it visible,
turn it off. This layer here off the label size really
needs to be off. But we are keeping
the crop marks. Perfect. Now, we are
going to be exporting. In the actions menu,
the share tab. We are going to share as a PDF in the best
quality possible. I'm going to save to file. This is my test one. I'm going to name it, so
I know what it is in all of this. And save. Now, as I've mentioned before, there are many ways to print, according to your setup, your network, what kind
of printer you have, what kind of iPad
you have probably. But the way I do it is I
just go to the navigator. I choose my PDF, so
it's my test one. Then I click share here, and I have the print
option right there. My printer is over Wi
Fi, so it's right here. Whatever you do, you should
never scale the design. We have designed up to
here with a specific size, and this is print, so we want this to print
at the right size. I don't see an option here, but if you have an option that says scaling or it
gives a percentage, usually, it needs to be 100%. There's no scaling. All
right. Media quality. Well, for now, I'm
going to keep it normal because it's just a test, but I'm not going to go at draft because I want to see
if everything prints well. What I mean is whatever
the options you have, don't go to the
lower quality one, but you don't have to go
to the best either because we're trying to save on
resources at this step. Normal should be fine. I'm going to I have plain paper. That's what I'm going
to choose here. Print in color,
one copy is good. I don't have any
presets for now. Lay out, I want this
to print only once, and this is actually a scaling. If I were to put two here,
it would be smaller. No. Only one. There you go. Also, keep in mind that
my starting document was 10 " long by
I don't remember. It's four or five in
height. I think it's five. This will be okay if I print in a letter size paper
format because it's 8.5 by 11 or 11 by 8.5. I'm okay right there. It's as simple as that. I'm going to print this and
I'll be back with the result. This is the most exciting part. Here's my label. Oh, I love it. It's really cute, so so cute. Here's what you have
to look for here. First, you need to look at
the size of your fonts. Is everything big enough? I know like this and
this is very small, but still very readable
and since I don't want the customer to read
that first, it's fine for me. I really like it. Also,
Does the color print well? I have to say I was not
sure about the green, but it's really beautiful.
It prints well. If your color is too pale, what will happen usually
is you have a color that's too vibrant and it's
an unprintable color? You have to change that.
The logo is very clear. And what I like the
most is it breeds. It's minimal, but it
does have some impact. Now we have to try
it on the object, so we are going to cut, and you will see why we
have the crop marks. So I have my safety knife. And I have my metal ruler, and here's what you have to do. Usually to cut a design, you will align your ruler
with the crop mark, and you will make it so you are cutting outside the design. So if you make a mistake, it will not cut the design. Be careful with your fingers. You do have to keep
pressure on the ruler, but be careful not to
cut your finger here. Fingers on the
ruler and you cut. Do this for the four sides. Safety first. And we are going
to try it on the candle. Going to place it as
centered as I can. What do we have to check here? We already established
that I was going to have one block of info here
and another block here? Is everything readable? I think this is a little long. The water melon fountain
could be shorter because I'm not sure it's
easy to read at first site. This is one thing
I want to change. Something else I want
to pay attention to is does everything appear
together logically? These obviously go together, and this is the more
practical info. I think this is good. The
only thing I don't like on this one is the length of
the watermelon fountain. I could try to put
it on three lines, but then I would have much less space for the illustration. I may try it, but I'm not
sure it's going to work. Now it's your turn to assess how you did and what
you need to change. I'm going to try the changes, print one last time,
and see if it works. We are back in the document. Now one thing I was
certain that I needed to change was this
was a bit too long. I'm going to do two
versions of this. I'm going to first, go to the type section and take these two and scale them
down just a little. This should be good. The reason why I scaled both down is that
if I scaled only this one, this will gain importance
and I don't want that. What I wanted to
try on one B is I want to try watermelon
fountain on two lines. So and I keep my alignment here. But as you can see, there's too much space
between these two words. I'll go to my stings
and there you go. However, I'll need
to scale it up now. I am not sure what works best. Maybe I should sleep on it. Well, this does give more importance to
watermelon fountain, and this is what I wanted. I'm not sure why I have
a hard time deciding. This is the last test that I'm printing to see that
everything is all right and also to choose
between this label and this one because I'm not
sure which one I like best. Same as the four, we
are going to cut. This is more readable.
This length is better. But this one is really good, though, isn't it? Yep. It's this one. Wow. Great job,
guys. You did it. Your label is done. I hope you're proud
of yourselves. Before we move on to
printing a batch of labels, there's a few
things I'd like you to remember from this lesson. When you're ready to
test out your label, export it as a PDF from Procreate and print with
your preferred method. I find the simplest is
to print over Wi Fi, but you should choose
what works best for you. Before going further,
take a break. Examine your label, try it
on your product if you can, and make sure it's readable that everything prints well that
the design can breathe, and also that your
hierarchy is still working. Make any adjustment
you need and print one final proof to make sure the adjustments or
tests are okay. And now that this is done, I'll see you in the next lesson. We are going to print a batch
of labels. See you soon.
12. Imposition and Printing a Batch of Labels: My back. We are almost
done with the class, but before we sign off, I want to show you how you can print a whole batch
of your labels if you need to in a more efficient way than printing them one by one. What we are going to do
is called imposition, and it means that
we are going to place more than one label
on a sheet of paper, placed in a that is going to be easy for us
to cut in batches. You print a document
in a print shop, the printers usually do
this step on their own, and it can get complicated
for book printing, for example, but the one we're doing today
is very simple. It can be quite practical to know how to do
it on your own. Remember, when I showed you the imposition of the business
card that is home printed, we are going to follow the
same principle in procreate. While we are on the subject, I really want to remind you
that the way we're going to do it today works when
you're printing at home, but I will never encourage you to send this
to a print shop. When you have your artwork
printed with a professional. You need to be way
more strict and precise with the technical
aspect of things. This lesson is
really meant to give you a way to do it yourself in the simplest way possible with tools that you most probably
have at your disposal. This being said, let's
jump right into it. Now's the time to print
a batch of labels. To do this, we are going to stuck a bunch of them on a page, aligned together, so
they are easier to cut. This is called imposition. I'm going to show you the
method I found that works best. In order to work in a
non destructive way, Let's go back to the gallery. Let's make a copy
of the artwork. To make a copy, I select it, and then I duplicate it. And I will rename
this one, Imposition. C to your new document. We are going to delete
everything that's not our label. Now what I'm going to do, going to duplicate this
one to keep a copy, hide it, and my copy, I'm going to flatten it, so it's easier to move around. Now to save us some trouble, we are going to select
both these layers, and we are going to
not resize them, but have them in the
center of the document. This is important because
when we are going to resize, we don't want to cut
this because it erases the layer if we re and this artwork is
outside of the Canvas. Center this doesn't really
matter if it's perfect or not. Center this and now. We are going to go
to the actions menu. In Canvas, we are going
to go to crop and resize. Now, in the settings, adjust the width and height, so it matches the sheet
we are going to print on. I want to have a
vertical document, so it will be 8.5
large and 11 high. Click De. I'm going to
change my drawing guides to a quarter of
an inch because I don't need to be as
precise with this step. I just want to make sure
my labels are aligned. Okay, now we're just going
to check that our label is the size we designed it in the first place because
from my experience, procreate is not very
precise with this. Let's align our crop
marks to a guide, and we are going to count. Two, three, four, so that's 1 ", one, two, three,
four, that's 2 ". It's a bit bigger, but it's going to be fine. It's not too much bigger. We could adjust it. Make sure it's exactly
the right size. But we really don't
have to. There you go. Perfect. Now comes the fun part. Here's what we're going to do. We want to have multiple
labels on one sheet. You have to consider the
margin of your printer. I'm not exactly
sure what mine is, so I'll try to play
it safe and put it as close to the edge as I can. But leaving a little leeway
because this might be cut. I want to have at least a
little of my crop marks. That's good. Now, we are going
to duplicate this label. This is Cp one, duplicate, and then we are going to turn
snapping and magnetics on. You can adjust these
settings. I won't. I don't really mind, but you can adjust these to
your preference. Now, we are going
to move this label. As you can see, you can
overlap the crop marks, but make sure you don't
overlap the bleed areas. But to save on some space, you can overlap the crop marks. You can. This is Copy one. Well, copy one of copy one. Let's duplicate it again. The goal is to put as many as we can on one
sheet. Same principle. It seems that I can't
Maybe I can push my lock a little and try Oh, no, I don't want to risk it. But we have some
space around here, and I think we could put one
or two in the other way. This is not standard practice. If you send stuff
to the printer, I'm not sure they're
going to do that. But we are printing at home and we have more
flexibility on that front. I'm going to try duplicating
it. Turn it around. It's super easy because
I have snapping on, so we are going to turn
90 degrees p easily. And I'm not sure. Okay. Here's the thing. I'll turn this off for a moment. I can do it, but as you can see, I'm going to be pretty close to the other crop
marks around here. So I'm going to do it, but I have to make sure that I don't get mixed up
in my crop marks. Let's put this one around here. Maybe even Yeah, that's good. As long as you see, I
will be cutting here. So I won't be touching
the other quote marks. I should be good. And I'm
going to duplicate this one. Turn snapping on again, and once again, moving it. Now it's just a question of what you think you can
handle in terms of being mixed up or not Now that we are sure that
every label is aligned. I'm going to group them, select the group and place the
whole thing in the middle. So now we are ready
to print one sheet, and I'm saying this
because don't just go and print a whole batch of ten sheets of five
stickers on them, because if something
is not working, you will be very
angry with yourself. So we are going to export APDF. It's amazing. Let's try one to make
sure everything works. But right off the bat,
everything prints well. The logo is clear, and the colors are okay. Of course, it's on
a home printer, so it's not perfect and there
are different qualities, but I'm satisfied.
Let's cut one. I forgot to show you. The The advantage of imposing your labels that
you can cut in series, you just cut this one here. Cut this one here,
and it goes faster. Also, you have less paper waste. See, the more you have in line, the easier it is to cut. Of course, this one is not a perfect imposition. Cute. I have to say I don't really get tired of printing my
own stuff at home. Even though I have
the means to design my documents professionally and send them to the printers, there's something about printing and cutting stuff myself. I really find joy in it. And I'm a real advocate
for simplicity, which means that sometimes
for a small batch, I prefer doing it
myself if I have time and resources
as a reminder. In this lesson we looked at how to change the
size of your document, so it matches the size
of your sticker sheet, how to duplicate and align multiple labels so they
would be easy to cut. Lastly, we enjoyed
the final result. Here we are. Great job. Now that we've been through
the whole process together, it's time for you to
test it out on your own. In the class handbook, you will find a brief for
a strawberry jam company. I strongly encourage you to take the brief and
show me what you got. This is a really good way to
test out your new skills. Go ahead and have fun and don't forget that practice
makes progress, so don't be afraid to
try different things. And please share your
project with the community. It's such a great way to grow. I would really love to
see what you worked on, whether you followed along for the candle or if you
worked on your own object. Of course, the Jam label. I would definitely
love to see that. In the next lesson,
we are going to conclude this class.
See you there.
13. Conclusion: Congratulations, folks. You made it to the end of
this label design class. I'm so happy I got to spend a little time with you
to share a few things. We covered so much since the beginning
from the purposes of packaging to why these notions can be important in
your creative business. We've looked at how to create a label that fits a
particular object. We jumped for a quick to see which functions of the
app we're going to help us. Right after, we set up the
base of our label document, and then We looked at
information hierarchy, which led us to
composing the layout of the label,
starting with type. Next, we added details and personality to the design
to make it special. We've then looked at how to test the design and make
adjustments before. Finally, printing a whole
batch of the same label. Following all of this, you might also have tried the whole
process on your own, starting from a client
brief for a strawberry am Mason jar that was given to
you in the class handbook. Wow, I have to say that's
quite the program right here. I really hope you
found something for yourself and for your
business in this class, and please do show me what you did in the
project gallery. I will look at
everything that is posted there and of course, answer all of your questions. I would really appreciate it if you took the time to
review the class. I really wish to make every one of these classes
better and getting feedback from students is a great way to know what
worked and what did not. So please leave a review
if you can. On this note. Thank you so much once again for sticking around
for this class. I hope to see you
in my next one. Bye.
 Amélie-Maude Bergeron, Graphic designer | Artist | Illustrator