Transcripts
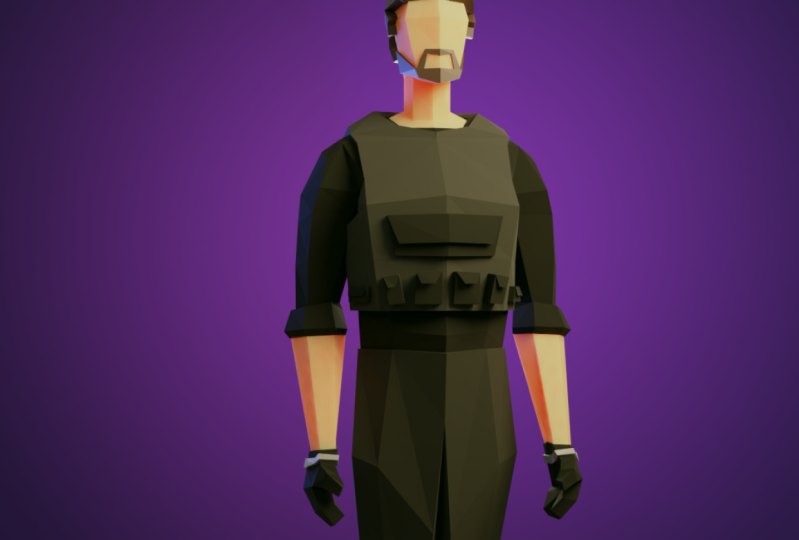
1. Welcome to the course: Hello, welcome to the course. My name is Thomas, and as the course all about, how do you make locally Heritage inside of Blender. So what will we be covering in this course? We will be covering how to model your character on you have to be simple reference image that we added in. And then we're gonna go over how to make the clothing and props for your character. Then we're going to go over how to rig it and wait painted, which is basically telling what will bring you little adjusts of the mesh. And then we'll be going over materials to add colors, your character, how to add some last lighting and backgrounds and stuff to make it the final render looked lead, render it out, and then go to compositing, add some color correction and other stuff to make it look even better. So who is this course for? If your brand Ninja blender, this is not exactly what I would recommend. There are some courses, course from Southern Shari 3D link down below. And I think it's a pretty decent course if you need a blender, if you're semi intermediate, like you know the basics of Blender and you can use this course. You can wave your brand if you mess up or don't understand something. So this is what Marfan result look like and you might begin in something similar to that. So if that looks cool, measure strap and enjoy the course.
2. Settings and addons: Before we get into the course, I wanted to show you quickly what my settings are and what Adams I have enabled. So first off, you go to Edit Preferences and then you can see what atoms I have so far this course, you're going to need Node Wrangler because he had this enable that. Basically what this does, it just helps with the capacity. And yep. And then the other add-on I have is loop tools, which is also very useful. Basically hopeful for just a modeling process. As of what I use, I use right-click Select and space bar to play. You might have different ones. You might be eating, click Select. But I'm using replicable of course, as all stuff that I've done custom, I'll change my mouse button, asked for to be the little things so to change views. So that's why we must see this pop-up. And we are so often like enact change like the camera and stuff. And then I also have cameras. Have you said to my fav, you can find these in the settings or just F3 and saying alarm bell on camera view, it's a typo here. Right-click on it and add, add shortcut for solving for b. Sorry that, and then it's got a foreign animal would be by defaults, the key will pop up on the screen right now, as should be below your Escape key. If you have a full-size keyboard, you can move around or just use 1, 2, 1, 3, and 7, and 8 on the number.
3. Part 1: Making the body: You've got, so here we are on a PC. So step one is you are a secondary needs to have a base measure reference. So I'm giving making a male 1. So we'll go find that now. Okay, so that one can put a reference image. So I will go firemen. Then you click Load reference image and can see here I have listed now. So I'm going to lower the opacity of us tickets to 0.2. And I'm going to put on my screen cascades so you can see what I am clicking. Okay, so you step on, the chart was up. So she said and then g x2, the center of his body now could drag it back and then go to top view. You shift the corrected the planting and minimum G1. So important reference image, they're gonna load reference image and then good capacity and change to Islamic law. I prefer 0.25. And then Jesus said, and then g x again. And then once I have done this, I'm going to go, gee, why drag it back and it shifts the rotates 90 sadly, and E a lot of data. So step one in this process is to go and make the best of shifting and add a mesh tube. I got. And once you've got your cube, good edit merge program. So I console body scale this down and then go Control R and add a new print down the edge. I'm going to select the left side and x vertices go to the modify the sound and Modifier mirror. Okay? So now what will happen is if you pick one side, it will be affected on the other. So that is quite useful, especially since we don't have model each side of it. Okay? So step two is to start forming body so we can as a clipping because if you don't have it, you can see that they can go they can pull apart. If you have clipping, they will stick in the center, which is a pretty easy phonology, and we can start shaping it to the body. So G be an extrude and then get it like that. Okay? And it may be evident love as one minuss body. Drag this one down slightly. And then we can go to Saudi and thoughts writing He's back on the y axis and it can serve as the drowned out the body. But some parts would be flatter at the back is a lot flatter than the front. And yeah. So there Just as adopt this one to be in the chair. Okay. And then this will be here. And then drag this back. And I'm just using the guidelines you can see like this part will be like here. So you can kind of get the rod-shaped. You can see over here, we can line that up on each side like this. And then we can start at the bottom. So there Yeah. Sounds a bit more. And yeah. Okay. So that's kinda like the basics of the body. So step two is to go and work on the pulp is blocked. So 32 the sum. And then we can start shaping those $4. So the legs are going to come out of here. So obviously. So yeah, just get the right shape. That looks fun. And then once you going to do is you're going to add another a tube down the SAR. What this does it just hope it help us was that route up the body but so we can go select balance edge, drag it out on the x. And then we can select this edge. And drag has been slacking. I've just helps it out a bit more dimension. And then we get a 600 piece for the legs because we don't have square legs. So next, we're going to go select colors as round this out a bit. Because sometimes even g. And then we can select these two faces and go to Extrude double autoclaving. Because if we extruded with clipping, then I'll just go in. I'll show you or do you like that which you don't want? So turn off limine, execute for the legs. So we're going to make our legs a bit further outside are going to be exactly in the center because then it kinda mess up with the mirror. Let's go through down to the knee and extrude down to the ankle. Okay. So in this case the reference images and exactly lined up. So touchy, kinda fun to follow it. So, yeah. So it's just gets like the right shape. And then you can add some edge loops. They're more detail. Maybe another one at that rule, rampart and leg works at another one on the bar. And then a star, Kevin make the globe lot datum have these cyclase. Let's make them a bit, even with more muscular than the image here. And I go and mess up the positioning of all the vertices windier in sod view. If you use creatinine them. So you can undo it, go back to front view and double-check that badly. Okay. So then let's maybe add another one on two legs. And then drag this out. Okay? So now I'm going to add an edge loop here. I kind of like a little boat that ball. So we're going to go to vertex select ABC and G and a control and make a snap. Again, I'm going to leave this side because you need to make it up. Got it, we got it back. You can kind of change shape of it, slipping back on L1. And yeah, it's good. Labels drag this back a bit. Okay. And yeah, that is looking clot NAS class I show about this. Okay, that looks better. And let's go work on the shoulders and then you can go do the opposite. So for the shoulders, like for the neck, what we can do is we can go Control B and then beveled Gauss and Prezi. And you can see it will create a triangle like this. Okay, s going to be for lack the neck. So let's go ahead and delete this. So x faces and use K for the snap to grid. You can see right now we have eight. Was it evolves out of phase as a file, files out. So what we can do is just J and J. Bevel this little machine. Oh, okay, What we're gonna do is gonna go k and then we're going to split the data hub mid central them like that. Okay, and then select this. And then what university is Edit, Preferences, Add-ons, and then search tools like that's OK. And click on the little box. Thought you could do downstairs W sniffles, several, and it creates goal circle. And then, okay, so now we have a circle so we can just fix the rotation. And yet they ask again, a lot better to being part of an egg. So now we can go extrude this up for the neck and get mapped also, it's actually drag this down a bit. Let's try this up before the muscle over here. And yep. Okay. Okay. That's what being caught mask. So let's go work on the arm drawn on. So as you can see here, is like the shape of the shoulder. So maybe we can just go with enough tool to cut this out. Okay? And that's kinda the shape we want. So now we can select this and go extrude out and put it there. And thought making a bit of a shoulder shape. That's okay. So let's do the setback, the peak of the shoulder, and then we can extrude it down later for like the indent a, we round this out a bit more chromatography. You see if it looks fun. Okay, go and then we can go select this screw down. And then W2 tools circle and then rotate those skills down. And extreme now again, rotate scale. I can scale this up. Advert for m and the skirt at a, another Edutopia for the shoulder spot there. So this is like three at the end of this. And then just drag these, these are seasonal but you guys can see they're not cutting into each other. Okay. Maybe I'll just back a bit and dried nice with the back. And then rotate o, make this a little bit more rounded here again. And it's something I like to add is admin eight. Now the edge thing. Just for a boss IP and he trusted IP like this. I'm going to drag with some of it. But it like that. And usually the basketball I got the sun like this. So for a theater dock there and then trust it will be more likely that direction. Okay. So IgE found that looks quite nice. Commission the muscular ones and we'll kind of want to be going in that direction because of omega. Okay? And then we can go now and also actually make the score. That score is Lisa at that scale down. I'll show for a common lock these proportions in the reference image. That looks fun. And then let's go. Modal e times and feet hex, go.
4. Part 1: Making the hands and feet: Okay. So yeah, well, start making the hands and feet. So there's just go select these and you can see you. They're not perfectly round citizens. The loop to loop tool circle them again. And yeah, their scale and on the x and extrude down, we can go S 0. And then that will make it flat on the set axis. If and then Mao, we're going to drag this down at the bottom, track this back, pull back the foot, and then see that it's kinda of whack on the front. So sorted that. And then maybe drag this like this. Okay? The select this face, extra outs on the y axis. Gi tract goes back. As you can see, this looks nothing like what we want. So let's drag this out. So that's kind of way, That's where it should end. Okay? And then strike these all the way back. And then what I like to do is I go Control B at Babel story like this are kind of thunder symptoms. Let's go add another edge loop. And as you can see, if we add edge loops and eat the sun doesn't go into bone subsidies got J and J again. And then now we can change of shape of the foot and maybe drag it down like this. Maybe I think that for the soils are way too big. Drag this down, drag that shape. And let me draw this out. But I didn't change the fact of which I think that's laid out too far. Yeah, I'm pretty good at being choosed anyway, so it doesn't need to be good or whatever whatever looks nuts. Maybe drag this one. Yeah, that helps it to bits. And for the hands, the hands can easily be quite difficult. So I'll just, I'll go. So has to be quite difficult. Someone's going to select these and usually the way as you do it is I do them in a MIT style, which looks like this. I'll show you. So you can see here, this is what would be considered a MIT style hand, which is basically it just records down. So this is what hat mit Stahl had would be Z. That is like the base of the hand. And think through that for the rest of the fingers. In a normal just says like having a hand block like this. Okay? So that's basically what we are going to be doing. So okay, so let's go back to this and let's start working on the hand. So you can see also this back, the spot over here. And then I usually like to rotate this scale up on the wall and it rotates and interact with them. And that's not a good thing for the hand. So let's give it the rod shape. And then usually so we could do it like this for the hand. And then we're going to extrude outs of this. Okay, good. And then extrude out again for the third part. So as you can see, this is kind of going off in a random direction. So is this when the scale it down? So let's try this out. And remember that the hand shape hadn't panned of a shape, shape of a hand. And let's get this guy and drag this down and back again. And industry like this. That's okay. And then this extrude idea, and it rotates and achieve a slide. Okay, so strikes up. And then just select these j Omega. Let's just talk a little bit. And the sexes face and it's going to be a little thumb to be the scales in a bit and they extrude down like that. And then if you're not happy with how like rectangular it is, we're going to select these loops, old circle. Then you Harry helps one for Tom. And that again. Sorry, I didn't have marshalled and keys on. And yeah, I got it. So there you go. There all the hands. So maybe I think these are way too low, so let's drag it up a bit. And yeah, that looks pretty good.
5. Part 1: Making the head: Okay, so the last section of doing the character is to make the head I got. So as you can see, we already have the neck protruding up here. So you can just go directly onto making the head. Okay. So step one is we're just making a new object so you get your curves too large. And we ship this, add in a cube sales down by parasites for the head and name control to, or I should draw one here. And you can plot the subdivision. What control one does is it add a subdivision surface modifier with a solution of two, of one. So you can see that it changes depending on what our press. Okay, so let's have this center. We can delete it left off at a mirror and clipping. And then now we can start shaping us for the head so we can ask. So we're going to say I have to remember to line up the vertices. So like one-to-one. So at the vertex, oh, actually, yeah. So what I usually do is I go, I've added in a chore. So I'll go like naff tool here and enough tool to here. And then I got, so it's kind of stuff in the beginning, but it will kinda make sense. So let's strike these pieces up and then join this with J. Delete these two faces, and then join these with f, my basket. Yeah. So I can see we kinda have a jaw shape going and then let's go extrude this in. So this is for like the back of the head. I go bump. And I think that's part of the skull. And then so that's kind of what this is. As I hope you enjoyed it into the body. So let's extrude those vertices. And then because eat the space and try and roll together with F and then F here to join there again. So let's join these two together to control J, m. Then go to intima again, f, f, f, these two join, join these together with j and F. All right, so let's say because ego that we have this part. So we've been asked to add some more detail to the face. So let's just use enough tool, drag it out there. And yep, I got, so this is way too odd. So the start changing those so we can drag this down for the chin, drive this in their forehead. And then let's select this, drag it in there. Yeah, We'll work on this now. Backs the drugs in. Okay. So let's write these pieces out. And you tried the face, not a bitch. Make make it a stronger tool. Again, that's looking or NAS. Yep. Okay, Yeah, so that concludes the first part of the series, or I guess so that completes the first part of the course, which is making the base mesh. Let's go to step two.
6. Part 2: Creating the clothing: So I'll just quickly sketch out a change in base spatial bit and after, just look into it better, so there's anything, so just select the parts that you want for the pants. And a few select something that she doesn't want. You can just use the same tool and middle click to deselect. And you can shift the cross-section. Okay? Now that we have this, I can just go start a bit, shift the p plus selection. Okay? So now that we have this, we can go and add fab icon. And then I'm going to drive the wasteland of these plant stand out too much. And now we can go at a is the verb again. Drag it up. Okay, so to make the shirts, do indeed exactly the same thing. Just see, select the whole buddy. I got selected a bit too much. Middle click at that back in. These guys Shift D p by selection. And then we can go select these, maybe rotate scale extruded down, maybe because g, We don't want these will, these will be tucking into the bands. Okay. Actually, I'm just gonna go with mixed Troodon. Bit better. I got that works. And then let's just drag these alphabets. And here. And then we can go add in a layer file. Let's make it a bit. And then maybe just maybe without all the muscles of it. So it doesn't look good. You can see this jacket is not exactly that flooded. Yeah, that's looking caught nouns. The I'm just going to change. Yeah, let's go with same thing, having Dr. rolled-up sleeves again and then put scales of it. And then usually the way I'm a rolled-up sleeves little button so you can see all the vertices probably. I'm just going to extrude and in scale. And then just G, G to C and then D, this one like that. So like has the same thing, maybe skills down, but yeah, that looks quite nice. Cool. So that is kind of the first thing. Before we do that, let's just define the economic capital G and edge slide. As you can see, it sometimes gives some errors. So I guess you could like blow it up, make it higher, but we'll just go and join. Drag up the slip fall maybe. So just get an error because with this piece, you can see, I guess we do this plus j over here that will help it. If we selected these two vertices and joined them. You can see that all of the whatnot but nasa and also make sure that you don't have interference with the shirt. Okay. And yeah, that looks pretty good. So I'm just going to drag these over the pans wherever the shirt. Yeah. That fits in quite nicely. So let's go add in the bulletproof vest style. So we can just select this one, shirt, Shift D, and then go to oversee, apply the mirror modifier. And then we can go to solidify that ONE RIM, which basically means that there won't be two layers. Because if I show you right now, if I take those, you can see like with a wireframe that these two layers is like a face on this side and the side. So if you have it only room, you can see it doesn't have the inside. So we can apply this again. And then now this will be our base for making the bullet proof vest. So you can delete the whole shoulder portion and the middle arm at that, and then select the bottom of it. So you can do the same thing to add mirror autopilot, just delete it left off at a mirror and they go. Okay, so now let's clean this up. Maybe leave that in Edge started. Let's just keep this in Greece K for the knife tool so that we can cut. So it's just left clicks. Sometimes they get messed up into SONA snap to the edges anymore. So then you'd have to enter to apply it. And then just started again with pressing K again. They are stuck around that whole loop. And I'm just going to select all these edges as UCS X1 from the Han, which we don't want to. Okay, that looks like all the faces that indeed phases. Okay. There's one more than get. Yep. And then subtract the style says write these in a bit. It's asserted, eat this edge in the middle. And then Edge dot again. And then maybe just delete this bottom edge. Okay, Let's go add the solidify modifier then and thicken this up. Okay. Three, drive it out. Yeah. There you go. We have the bold professor shirt and pants. So next, let's go work on the, Hence gloves and the boots. Gloves, helmet and beats. See in that lecture.
7. Part 2: Gloves, shoes and helmet: Okay, in this video, I'm gonna be showing you how to do the head, the gloves, and defeats Scott. Okay, so this is going to be much of the same process as other ones. So just select the hand 50 p bar selection. When we add a solidify modifier. And then I think I selected the hand properly. So let's do this again. Get everything shifts the P selection. If you wanted to add details like structural stuff, you could do that. So just applying the modifier. So I think this might be a bit too thick, so it doesn't go. I changed it to you and you remember that usually more useful. And then we could go at like an edge you are summing or just use the knife tool like this. And the other side. Like you'd probably go through the entire thing and then extruded out loud. Just go through that so you can see it kind of goes all the way around so that they're just going through k. So you make your way around. And what that just cuts through? Maybe because it goes underneath that sailboat. Okay. So I'm going to cut here. Okay? And then the sum is an approach to energy. Okay, so now we can unhide the thumb and then we can take this over here. Okay? And then the, and then you can select that whole edge with hold Shift. Hold, Shift, left-click and right-click. And then extrude or just shifty selection and add a solidify modifier. Okay. And there you go. You have like a strap on top of it. Okay. So yeah, I say add that in and then we can unhide the body match and exposed shoes. You could leave it very much similar to these feet. So just saving just, you can use these old tests to scatter w because you don't renew so far. And then just take this bottom extruded down. Let's change shape sadly. Usually just rotate back there. And the back. Rotated. Push it out like that. Maybe drag this back. Yeah. And then yeah. Okay, cool. So this is my cheese. And then for the helmet, we can just take the head. So just select the face like this actually has taken on the back. I was little shifty. And then just hold Shift and Alt S to scale up as also as trim fat and slightly different, more useful in this case. Then we can just Edge slotted into a shape or edge data just moved into a shape, kinda block. Okay. And solidify as always. And then, yeah, we not going to add the glosses in right now. You can just leave it like this, okay?
8. Part 2: Hair: Okay, in this video, I'm going to show you how to do the head of your character SMS, going to have the summer quickly and it's going to be the same process. So we're going to select any parts of the body that we want to adhere to. Certain I wanted the hair. Yeah. And then maybe later I'll be it like it is in the character. So at acidify and basically significant in this pattern, shows up the bursting of both sides in edit mode. And then Edge slider to get like an good plan. I kinda wondering just so it's got to change you face and the extrude and Control to snap to the face. Do you change this so you can snap your change to a stopping. So we can snap to this edge because we want to do it there. And then maybe add an edge loop over here. Select all four faces F to join. Let's change to vertex snap, and snap it to the first stop until I turn off the beam because that's mixing it up right now. Turn it back on. And then we can go back to your face, snap, drag it down. And then, yeah. So I like to go with more complicated sometimes with sculptures like this. Sometimes you get some more simple, but yeah, sometimes it looks quite nice. Okay. So strike us back. We can extrude these down, drag them in, so scoot back, back to you and then drag it in. Okay. So, yeah, there you go. Yay, have some hair. You do the same thing for B. So just select these two pieces shifted UP and then drag this down. Here. We just leave it like that. Maybe good. Maybe just extrude out this edge select with vertex snap. And then just started been again burger now on to add the robust arthropods. Like buffet, skin shifty. This shape it like this, like this. And then this O system, this is drag this edge down. Just inset. Press D for boundary. Edge. Oops, patrol our control, our faces, range of shapes lightly. And then instead of five. And they go.
9. Part 2: Pockets: Okay. I wanted to add in some pockets like they have on the best that they have. Some going to cleanse the bundle us that if I modify again and then just do the same thing, shifty, P and G. And you just, let me just get back a basic shape for all the pockets that we want to add it in. And then we can insert a file, this. Okay, so this a polymer. Click on any brim on the first syllable and then just go delete the edge of this one, delete the vertices. Okay? And then now what we can do is press R and then again, okay? So insert it like that and then Control R. And you can see it deletes all the edge vertices and then delete, okay? So now we have a bunch of different squares to work with. So now we can just change them to random pocket shapes. If you want to know another way, instead of using the mirror modifier, you just click on this little button up here, options and the mirror, and you can see if we move it changes. Okay? So actually I'm going to split this one in half. Okay? This is where the mirror modifier is better. It does not affect it if it has like if you add edge loops or whatever. So I'm just going to delete these, add in a actual mirror modifier. I go. So we can just make these slightly bigger. Let's just use face now, but it's going to be quite useful for this. And then delete this face. This is going to be just a bunch of different pockets. Same thing here. Just bear bullets, get a smaller thing. And yeah. So I'm going to just make, I'm going to delete these top two. And then I'm going to make this one until I get an AST big pockets away. Maybe if we put up flipping, drive the mirror above it so that the Slidify works before we afterwards. They get like a nice big pocket. Okay, let's make this one taller. So you have these. And then, so what we can do now is above this OH, blob then changes to any room and then just select all these different edges. I was just marijuana fires again. Mirror and then select all of these clipping on an extrude out. Okay. This is just like the pocket. All the pocket, all the flap, whatever. So you just excreted in bulls get the shape of the mold because I'm just going to leave this one without unnecessary add addition to it because sometimes they haven't black poking out the top. So like say What? I'd like an average local summing to be in here like this. So then we could just add in a cylinder, change the six vertices. Scale this down, get a algebraic. Put this in the pocket like that, and then Shift D. You'll notice is, but whatever the agar, and maybe we could just mirror and select this q. But the thing is the mirror, the same and this 1.5 mirror and yeah, Beggar, you have pockets on your character.
10. Part 3: Materials: Okay, Now we're going to be doing some materials on our character. So all you have to set up materials is absolutely shading tab. If you want to do that, you can just spit your view in half like this and then shading shade edge over here. Select this secondary object to anatomy physiology. Embrace the new button. Like I said, I can see it pops up with a node group of diodes. And you can go to preview just for the shading part. So now we can start using secondary colors and then these are proper SIG and I've cheated of, yeah. So maybe it's changed to change your roughness all the way to one. Let's just make all of these X11 soon as choose the material. Let's make these two like a green green metal. Let's take it back. Then. It's like an olive green place. Sex, a metal out of rough, doesn't really show up anyway. So this is the green methyl colors don't really show up that well in low poly registries, like solid, rough colors. And yeah, so let's just add like a green color. Change your refers to one. Let's make the pants like a green, yellow. That works. Okay? And then we can select the character if you want to make. So I'll show you how to make sure your friends can tell us. So if you wanna make a Watson color, can change it to be like a peach color and then add some sample surface and subsurface color to red. And you can see that will make it black color. Maybe make it a bit there again. And that's how you create like a white wine skin color. Jamaica to black. Ethnic, whatever. You can change it to like an orange, make it darker. Change the subsurface slightly. And yeah. So maybe that looks a bit too red. So like that. And yeah. So that's how you make two different skin colors. So yeah. So novels in here. So I'll just go over like our blood and so on. She blogged kind of hard color to pick. So like if I'm doing a blonde by issue found like a color palette or none. So we can just choose a hair color such as trade a brown, change roughness. And then you can select the same thing for the biota and the mustache. And you can see for the gloves. So maybe you just make it like this, like olive green. Well, this changes. You'd like a black if you wanted to change specific parts. So I'll just say the tips of the fingers and then add the new material. New, change the color of green. And you can see now it's absorbed different color to the rest. And then you could instead do that with like the pan safe. You wanna do like split in half, creating new material or just choose another previous one. Spike, That's why we need to do that, but yeah. Brake of visual interests, whatever. And then yeah. So now we can go add a sudden for the color for the boots. So let me see. I probably also just black, black or brown. So let's just treat it like a brown color. And then we can maybe add the same color in here, which is material 000 eight. And yeah, so apart, want to spend a bit more time picking a nice color palette and stuff for your character. But yeah, so that's the basics. Maybe even by changing some of the pockets to present to you a change color. Like that. Quite a bit. And yeah, so that is materials for your character. One thing I forgot about was the helmets, so we're going to just choose a color for that. So I'll just press Alt H to unhide it and maybe give it like the same color as the pants. I think actually just switch the color of the jacket and the fans and then maybe make this a bit darker? Yeah. Quite like that come about? Yes. So this mess around with it until you get something at you luck? Yep.
11. Part 4: Rigging: Hello and welcome back to us. In today's video, I'm gonna be showing you. In this video, we're going to be covering how to rig your character. Okay? So step one is the quickest way to read a character is it's got to Edit Preferences, Add-ons, and in search for rigor, rigor far, and that's okay. And you can just click on the little box to enable that. Once you enable it, you go to armature and basic, basic human. Okay. Do you see it pops up with this character of a great moment. So I'm going to scale it up to my character. And then Muji beaker, probably the skeletal character down to it. So let's just do that. So it's just Control R to the select everything other than the rig. Change the pivot point to 3D cursor so you can press the period key on your keyboard, or just click here and change it to 3D cursor. Okay? And then what you can do is just scale down. So same size as the thingy. Okay? What happens now is if we go press Control a, control your visual Jiangxi to mesh or control a scale. You can see all the different modifiers change. Though. I guess we could apply modifiers, but we can just whatever. Let's just leave it all. This will just undo, change about sars back. And then we can scale this up applied. Okay? And then what we'll do is go to Edit mode. Click on this little button and turn on this mirror. Which means that if you edit one saddle on the other side. So now we can start shaping the bones to the character. So what I like doing is just unhappy or Hardin everything, CSAC, the rig and the character. Then you can just like select parts of the character that you want to like. This would be the rest. And then Shift S and Cursors you selected. And in edit mode you can just shift this lecture to cursor. It just make sure that's in the center of character. Can take some time, but definitely recommended to get the best results. So we don't need this many bones in the next administers all bones and center. And we said one neck bone, 1 for the head. You can probably like dissolve one, a couple of these and the body. Let's make it like to subdivide it. And we have 3D. Okay, so now we have three body of three bones of the body. Good luck Bob, where it was. I'm going to delete these two, the polis ones, the bones, and that's just one. And I'm just going to delete these two bones in the back was just one Lisa other side. As basically all the bones are going to add except what we're going to add some more into the Haden's terms, get added to the rest position for each part, right into the knee. Gi, get back into the middle of the foot. There, maybe drag it in. And I get in. Then we can go select your target is alter, click, select, Shift S history selected, and then select the sandwich. But they're tamping again. Shift desk because I was going to take this part. If this guess we selected the E, if this production to go through and use anything for the thumb, that we're going to just select these four vertices. So actually the GSA make goes to select it. If this actually because dogs on the students, same thing, then we give it to the end. Actually, I'm going to want to take this volume, this point. I can select that. Okay, that's good. We as an eater named these all because he wants some sort of naming convention. That is just fix this cookie span. So let's just make this pelvis. Some are just give it a new name. Doesn't matter that much for these parts. Just going to name the torso, neck, head, forum. And this is going to be up finger 0 0 base. But I'll finger tip base. But o. And then said, oh, yeah, okay. And then what do we, do? We actually going to delete this hand on the left side, which is actually the right. And then just select all of these fingers and thumb. And then just go, Let's just set the goods to build origin and then go to shift the object and symmetrized, I go. And then you can see here that all the fingers now have our pool, the rata. Okay. Nothing. All of these are named properly? Yeah. Okay. So now we can go on to wait 18.
12. Part 4: Weight painting: Okay, so now I'm going to teach you how to do where painting though, the way painting is basically applying certain parts of the mesh to the right now blenders and know what part of this mesh to move as birdlike with this bone. So we've gotta tell us how to do that. So what you can do just to start off this lecture, it'll give us old age to unhide everything as reference images, the arts. So what you can do now is just select everything and then the bone. So make sure that burn is highlighted in yellow and then Control P and with automatic way, as you can see now, if we go, if we select the armature and go into, you know, resect the armchair going to Control Tab to go into pose mode. And then we can see, now if we start like movie and stuff, you can see it starts going. And that's nuts. So as you see, some of it's not wait for you to correctly. So you can see like it's affecting and I was part of the arm and some of these patches which is not good. So let's go to edit mode of the partners and then we can go to firstly me show you so you can see it says wave paint. If you don't wear pink waves, I went, could hold down weeping. If aggregates are busy. Go to this little button and then symmetry and stake, that's useful. For me to see that the green part is effectiveness. If I go to Edit Mode, vertex groups is also considered like the white paint. So E is going to Edit Mode, select what you don't want and press Remove. And you can see now they aren't green. We can change on the upper arm and B and I think that shoulder, I think there's a gap. They can see if rotated. It doesn't affect the pouch. So we're certainly affect the vest as much because the face, especially like stands no. There we go. Um, let's do it anyway with a bomb. And they do the same thing with the body. So let's just select the sod of it. And then maybe just open this is OK, select the best the property. And they may be sampled inside and then remove it from Oran. And upon selected piece, no one. And then we could do the same equal in the body that is, put these on the bone. That means that we can see how it's affected. And they have good back out to object data properties or from o, remove reef. Then cosine, That's looking better. Most of the time you went easy, lift your arms up that hard because you'll use the shoulder bone and make it look better. Let's actually go back to the Aparna and then click on this little button and click on the monitor and then begin the lats and the images every old age considering bring back our little professed. I don't want it to be constantly having to hard or the reference images and stuff. And these little buttons, whatever they pulled, this is just for me, those as well. So we're on that. I'll do the other one. Forum. And also they'd be infected by hand. Yeah. Okay. And now let's first remove happened here. See you once the patronage a thumbs up on that one. See if Thumb doesn't want any of these. No. Okay. So now if we start posing like this. Okay. So you can see the bottom is affected, which you don't really want that much. Then maybe we can remove remove the chest on these, but make it a bit more accurate as well. So this actually is rename this to tool, so that doesn't seem to work that well. But actually might be useful is if we just combine these and then compounded to the jacket pressing Control J. So just select the only room on the B, then by the mirror. And then you can select these and on yeah, I, the mirror back in. And then back these two Control J. And then if we run the automatic way it's fixed arms and they actually help at all. Let's undo all of that. A data. This helps a bit with my painting. But yeah, so let's just select this bottom part. This is going to be completely effective by the polis. Let's remove this upper part, which move from torso and chest. And then actually this whole part should be affected by torso. Yeah. And then this part up here would be affected by my chest. I go, I passed that sun. But the mirror modifier P4, the Anja, and get the bugs like that. Okay. Let's just move the bottom one from the torso. Okay, we just want to change the t-shirt, polo shirt. We have some of that from there. You can leave this top one. Will remove. It should be a vector in it that much. That's looking for us. Let's check the head, the uploader we can plan. Okay, so the B8 and homeless on being affected by the NIC, which is good. And you can see the neck is sloppy we had with the head. So maybe we can clean up that the goods, the head. And they just ignored a wireframe. It helps quite a bit going to subtract. This is the other way of changing weight paint to the stereotype of this. Head shouldn't be changing that much. I guess it could be doing them. Better effect this shift f tried low. So you can see right now the next been affected more than the possibility that maybe we just got away pains and add a little bit on there too. Neck. Go to draw out a bit. And we do painted a bit more that we don't get any more clipping. Okay. I think we actually did review a little bit from the body on the neck. Go to subtract, make sure that it isn't affecting too much of the body. You get as a change, how much it affects it would shift if maybe you say change it but done the best. So it should be effective in that pod on the body. And it may be, it should be effected. Changes a bit. I think I need to change it on the t-shirt because it's being pushed down. So that's why it's looping through. Okay, that looks good. Let's change the shoulder way paints now. Because the light, the shirt and the body is affected more than the, the, the t-shirt and the, though, let's go to 0. What is it can if you have interfering weightings and masker shoulder, anything else that making it that much also, just again, so let's remove a little bit from chest. So from the top of these pieces, you don't take it down to blue, but their parents are to each other. So at a farm, if you move the way, paint from it and then assess a change, or let's make it a excellent lists. Make it through whatever. Because the shoulders are parents and to that bone. So it will basically this removable to go away pain too, then I should just leave it in the center. That's good. Let's maybe change church a bit as well. Ange, chest. Subtracting better around the neck. On sites like this does change away from another body for the shirt. So here we don't want it to clip through the other clothing. Does the neck? Neck the reason it's clipping? And we could even add more to it. There's making a clip. Either see this, change things and see if that helps the clipping. I'll get let me through. Maybe IT subtract a bitch or maybe if we change the way paint on the body, whatever, that's fine for now. Okay, just change a model, but that's fun, but she looks a bit better when it's frozen anyway. Turn off the stopping or the hubs. Like right. Now let's work a bit on the next now, you haven't changed your budget. So usually what I do is just like a person like this, it's the main problems. Yeah. Maybe their business kinda pull this spring to affect that. Now we have to change it on the rest of the stuff. The body, we paint, our own. We're going to get as far it helps to get a better result. I go That's looking a little bit so it doesn't clip through that. Okay, for some reasons, but gal signal to meet in the middle. You might change the mesh. It's not be. What helps sometimes the news clipping and you can fix it is to be true. So let's just remove it. Okay? And then let's work on this little cough again. But maybe this remove a bit from the back and then apply some to the knee. Like this helps the shape a bit. Discounted balance so to them either way too much on the best, but we'll do let's see if we can the foot has any problems. No, not really. Sometimes the hands, I'm inclined to D select the sum controlled p.sit. Keep offset. Now if we move it to the thumb, will follow with. Okay, that's fun. So you can see that it affects the entire reason. Waypoints them are, oh, that's fun. There'll be a range. As you can see, we don't want this to be hand faculty, not the entire hand. Though subtract. Then you should helps us deposed in and then knock-on effects it on the mesh. Again, this is a G to the skin. And go here. Under relax anyway, I can try to figure out private downshift live, right thumb tip. I think we need to change this and get a bit complicated, but goodness. But easier to work with it here. We've been affecting the TI had. Let's see if that helps. One thing that I can hope like especially with this, is going to say by close to the skin, is we can just delete that, just select everything other than like the top of the hand, like this. And then go to this, turn on your pod. And then just join it to the body. And then M will, just before I do this, I'll save the character separately. Shifting h. You just got to get. And then what can be helpful to selecting this hole and peace. And it just felt like this Hobbes believed versus old age. And they join these two together with Control J. And then if you as m by distance, you see it from your six of these and then evacuated Android have any clipping problems? I can well, and yeah, that is where 18. See you next one.
13. Part 5: Rendering and compositing : Okay, so now that we have finished painting, we can get on to doing a send up a pose and then rendering after that. So you can already see that we already have it. That's probably the way pinch. So that other clip me because he had distributed over there. So I'm going to go through and draw onto it, put them in that working songs that were there. And I got. So now let me just teach you how to pose the character. So if you know how to do, move in and softens up the blender, like we saw from rotates, then you kind of do a really healthy. So it's an acme ESOL is you got to viewport display in front in the armature tab so that you can see, I can see all the brains are on top. So what you can do is start posing deselects bones if you impose mode. So once you've actually just good pose medical chops out. And then I could just thought like rotating stuff. And yeah, at this, you can see there C13 had like a split stance. There. You can rotate the foot. Rotate. Okay. So they're both legs. Then like both arms. Maybe you want to have a cycle and then have a look at you. Okay? So that's a preview. That's a decent place. And the next off we're going to just go Shift a to at a camera. And image can do is press Control 0 of key bounded it to my boss. So I can just do that. And you give a review, navigation or triangulation wrapped around it and change your gut and Saturday shift f. And then you can click and Shift F. And it'll pop up into this view. And you could eat a bastard move. And then W, a, S, and D to move around and enqueued straight up and Q to go down. And then if you wanted to go faster or slower, the movement to scroll with the mouthfeel. Okay. Let's get like a position that you like. I'm just going to say it's aka the resolution to 1080 by 1080. But you can change the focal length if you want. I'm going to change like 70 million. I go like that. And then you can go into rendered mode. So by default it was like this bowl actually, it will look like but spare. So what you can do is you can put in HDR and will actually look like goes like this. So what you could do is you can put an 800, which basically whether it is, It's been Columbus colored pink, environment texture and then open, which wanna do is, I don't know what the SAS chord, but lookup HDRI Haven and go download and HDR from there. And then you can press open. I have HER folder. So you can see the file type is HDR. And then basically it's a 360 degree image with color would laugh and division so that it can actually launch your scene with like actual shadows and last, which weren't happened if you use a normal PNG. So now we have like a whole like basic lasting. So I'm gonna change it to 0.5. And they are going to go to the camera and click on transparent. So you can see here it's the whole 360. We damage the transparent background. So I'm just going to click on rare vision. By the way, asked to change from EV two cycles, as well as taking a while to render. I've changed the viewport samples to 10 and then added a viewport. The noise, sometimes the skin crash your blender. So make sure you save before enabling viewport. You can like when you add these affiliate are changed by and open image de-noise because I don't have a GPU that can support the optics. If I do all I didn't even an automatic machine crashes my PC. So be careful with that. Make sure to save it before hand in case you don't lose your whole project. So once you have this and I'll just de-noise whatever signal it on us. Viewport display. I'm going to split my senior and a half and then I'm going to I'm going to change this to the therapy View and click on the scene last and world. Just for now, you can actually see what the rendering without it completely well enough. So I'm going to add a lot of you here. Let me actually differentiated like you're going this RR to get like a free hand rotation. I'm just going to set up two lamps versus both area. Lamps shift a area and you can see it gets rendered left. You can see that some Latin, so let's just bump up the strengths are in the Latin tab. Let's change to a 100 maybe. Ok. And you can set the room last of the background. Let's paint a 100 and scale it down a bit. You change your position till the law, it's actually affecting the character. Maybe make it brighter and brighter. And maybe changed color sloshing you, make it like a bluish. And there you go. You've got like a basic Latina p character. So now if you want to add a background, you could go and do it like Photoshop or whatever. But this was like a whole sea. But let's add a background. So let's add in more plain and add an object Constraint. Copy rotation changes and click on, Change the camera. Okay? So now it will say they'll have the same rotation as the camera. So if you put this in the background, says, gee zed, zed. And then you can see. So now we have a black, painful the background. So it's going to shading and the setup like a procedural material for this. I'm going to drag it further. And then I'm going to go add a gradient. And then I'm just going to say, but you can do is go to Edit Preferences, Add-ons, and look up Node, Wrangler, little box to enable it wants you to do now is you can left Control Shift left-click, and it will automatically pop in the texture into viewer, which just makes it easier to view it. So now, and what you can do is press Control T. And that will pop up with these two nodes. And then you can affect the gradient like this. Let's change it from linear to a quadratic, quadratic sphere. Thank a circle. So let's just change the location. I'm just holding Shift. Essentially. Just apply the scale that down That helps. Yeah. And the drugs up. Okay, so now we have a sphere. So Let's go look at this one Control Shift left-click, and then plug the color from the gradient into the principal BSD. If I've got that piece on-center, whatever I got. Now, we can go add a color axis, shift a cholera, cholera. And then now we can affect the colors of this gradient. So you can select Change the painting is. So I'm going to make it like a doc, docx can do color desaturated to do. And then the center will be lucky. Or we can change feel like the watch and in the middle, make it like a melon color. Spring the Watts up a bitch. Obligates leave it like this with these colors, and then add in a lattice point. Drag it in front of the plane. Haha, the character at this, and then drive up loop the power. Let me just make it you invest 1000. Yeah, and the sea, you have like a nice background for the character apps and I can change the color to anything, make it even be a base color, but whatever inactivates a one single color. But whatever, because changed like the roughness and the specular, you don't last effect as much. But yeah. And then now you can see we have awesome anatomy right now. There are two sets us up for like a final render. You can just change the color management and use curves. So if you change the colors now, like this, okay. I'm looking quietness. Or you can just leave it like this I will do in the next button. So what you wanna do use RDDs, reset my samples to a 100, de-noising, click on Render and deed vote. That's my usual settings. Png, compression 0, depth 16, resolution, telling about NAD. And yeah, we can go render image. This is the probability to the recording lag a bit. But yeah, this is written render. Okay, so now you can see it's rendered are completely. And now we can do some compositing. So let's just close this out. Don't worry, you're not going to lose edge. Now you'll still be able to get it later. Let's go to compositing. And you can see just as this big thing. So you just click on Use nodes. And you can see here as you're an image. So I'm going to just drag this thing down because we're needed. Split this in half and changes to a image editor and change it to render results. The disease, Yes, You image and you want to save it in our town, not have to do combustion. Just click on Image, Save As, and then name it so that I was reading whatever, Save As an inch. And then we can just carry on into combusting. So I'm gonna change this to a viewer node. So what happens if you just Control Shift? Left-click, you pop up with a viewer. I don't want to see disrupt now. Does this connect to it? And yeah, so what happens right now is this is what we rendered out and this is what has happened in the compositor. So I'm just going to go Alt and then ultimately Shift, shift and right-click and joins them together. You can just move this one and then we can just add on there, it's on the app. So once you can do now is you could go add a glare or something if you wanted to add some. Blue. Doesn't work that much because we don't have much zebra brought stuff. But yeah. So if you had like a lot on the background, I can change a lot intellectually. Artwork, but other end work Gracia. If you want to add some color grading, there are a couple of things that you do. There's a color balance which pulls up this node. So you can just change, this is because he disliked the dots or the image. You can change the color of them. This, you can see if you want to make the darks a bit bluer, make the highlights but orange and brighter. And the middle a bit of that red lycopene, that blue, like that. And the cooler color. You could do a color correction and read, I bet node. You can use RGB curves, which is quite nice. Same thing as my color management. You could just change it with curves and stuff. Yeah, I quite like the color bands. One. You could, if you wanted to add a vignette your image, you could go at a mosque and change it to a Lisp. The ellipse mask. With this, if you use control shift right-click, you can see it's just a circle of radius circles and let's just change the width and the heart. Yeah, okay. Okay. And then what this does is we can add a layer and then drag the X and Y. I guess maybe drag down that with the notch. Okay? What happens now is if we plug this back in, we can just move these fluids and then add a and it's a mixed node. And they can put this one as the bottom one, the blur, and then change it to a multiplier. And then you can just change down the FAQ. And yeah, so you can see that just adds a vignette, your whole image. You see like this. And this is without it. So yeah, fuse want to add it in later. You could add you could just make that like a blur. So you could change that to say, yeah, then you plug in one image and the image into chaos. You have a blurry, blurry version. So it like this or something. And then you plug that into the bottom of this multiplier and then you change the FAQ, see the blur. So again, meet invert this way like that. So you can see like the center is not blurred and in the outside is blurred. So you'd want to change the width and half of us, for some reason blurrier, deeper. Cbo, really saturated. But a lot, but yeah, so that's kind of one way to do it. Probably have a better oh, I think it's a multiply. Yeah. If you mix it. So this is Dr, widths down. You can see the alsos again of a bird. But yeah, you gotta get an image that you want. A moment. You're gonna do the blur. I'm going to add the machine. Does I shoot the image? Image? Which much? Hey, that's collected by a 100. Maybe not that much. Just pick it up and try up. Maybe. Because we pluck the head of the top surface disk, drive it up on the wall like that. And you can see that the bottom is blurred and yet God like that. And yeah, so then we can just go to Image, Save As, and then render on, pause it while I probably missed all that. But yeah, that is compositing.
14. CLASS PROJECT: All right, All the class project, all you have to do is just washed through the entire course, follow along with it and make your character. And once you've done that, I just uploaded to the class project and to other people, but to see what you've done. Yeah.
15. Bye: When do you Thank you guys for sticking around to the end of this Skillshare class. If you've found any problems with this, please let me know. And if you've struggled through it, need help getting through Savannah things. In the description, you can go to my father where you can get some one-on-one coaching with myself and yeah. Just
 Thomas Potter, 3D freelancer and content creator