Transcripts
1. Welcome to the course!: If you learn how to do sculpting and you want to learn it while making a pretty
cool-looking males also, just like this one, then you're in luck
because today I'm losing you to the
basis of sculpting and called the tools that you
need the basic brushes that are most commonly
learning how to use them and how to actually sculpt this character so that it's
been through the course.
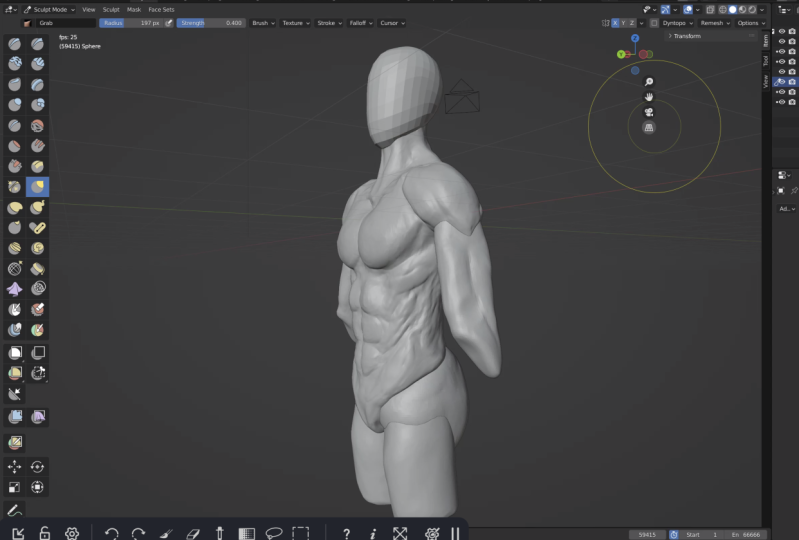
2. Sculpting for begginers: So the simplest
way you can either just go click on the sculpting
worked at the top left, or you can change
your senior self. So usually what you do see, get rid of the Taiwan
because you don't really geared for when
you're sculpting. And you go click on
this and change it to the national cheated. So you go select jewel cube. Let's just delete
everything again. And then it sometimes helps us get a little
black the floor. And the thing is, okay. And then what you can
do is you wanna go add a sphere and then
just subdivide it. So I'll use control
to subdivide. Or you can, we can just
go out and apply it. And now we have something
just to start off with, okay? And then what we can do, if you want to change
up the look of it, you can go click up
here and add a Mac app. You can add a custom one
by clicking on Settings. And you can see where mockups or you can just
add your own one. And so you can just go fast on the Internet or just go back gaps and choose
one over here. So you can see there's
quite a few of them and are usually prefer working with like
this one is pretty cool. And also just like the default, the default one, this one. So it's up to you. You can choose whatever, but I'll keep it on
this one for now. Okay? And then what you're
going to do is you in such objects and go Control
tab and go to sculpt mode. And you can see on the left side, we have
a bunch of brushes. We can pull this out and you can see you can see all the names or you can
just have two like that. So that's what you want. And then you can go, you can see all the names. If you want to learn,
like the hotkeys, unesco shifts space and
you can see it pulls up this menu with all the
brushes that you can use. And then so are we, I'm giving you the
hotkeys for some of them. So the most common one. So the common ones, you G, for grabs you can
see over there. And also you're going
to need some mirror. So if you don't
have this enabled, you can see it's not mirror, It's not on either side. If I click on X, it's mirrored across x-axis. And you can see
now it's mirrored. So it's just very
useful because it saves literally half the time. So we're going to be
selves in a male. Torso means like a
neutral position. So we won't have to need the symmetry because there's going to
be in a position. And then at the end you
can pause it if you want, and you can save a lot of time. So I shall we spin this earlier. But when you ask scopes in
there to redraw the hold left-click and you can
see it draws and you can do Control left-click and
then it will start removing. So we have done while
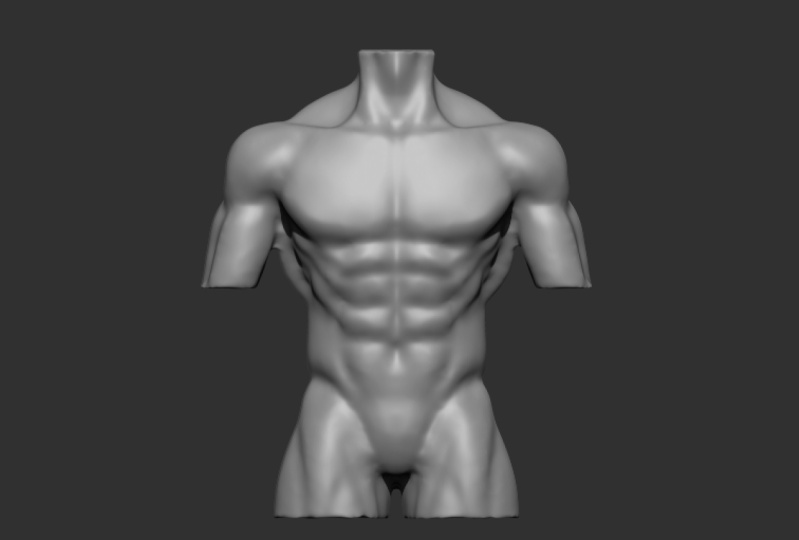
the explained earlier. Go look up on reference set
up such as muscular male. So what you're gonna do first
off, some in front of you. And I work with a
tablet right now. So I'm a graphics tablet. You can eat a mouse,
which is perfectly fine. It's just, you have to pay
for graphics tablet you want. But basically you
don't have any unbound and in a republic behind
bar joints out of it. So what I'll do is I use
old and middle click. And you can see it kind of
like switches between views, which is pretty useful. And yeah, so usually
to the Grab Brush, military does exactly
what it sounds like. It grabs. So you can go just
like drags down. And then surgery is
going to give it like a torso shape like this. Flatten this part art. See it's like for them, but
there's flooding all pelvis. You're going to
drag this out for the for the pelvis
and just give it like a shape for the was
it the ribcage. So rounding this out a bit. So you could add like
butyrate with rap harsh, but a simpler way is going
to shift space at six. So what that does is it pulls up the script brush, as you
can see that we have. And what that does is
you can see it kind of luck removes parts
of it from there. And so is this a quicker way of recruiting parts of the mesh
and like fattened that out. And then if you wanted
to smooth something out, you can hold Shift and draw. And you can see it's smoothing. But if you wanted
to do like less, like not be as
powerful goes Shift S. And then you can see
it takes you to smooth brush Shift F and
lower this like this. I should have
explained that first, but F is for the Sassy brush. So if I go to clay
strips over here, which is Shift Trace them too. You can see if I go f, you can see it changes the size. And as it changes
the radius up here. So you can see that this
small, you see here has big. And then Shift F is the
strength sequence c. If I wake us, see below, you can see it
doesn't change much. And if I go see Baja and
a chain is quite a bit, and then you can see you can change it up
at the top here. So if you don't want
to use Shift F and F, well, so these are all
little buttons over here. Basically that is
pressure sensitivity. So if you see, i've, I go here. You can see it changes
with the sensitivity. So if I go largely, does this, FLO
hard, it does this. And you won't have this
if you have a mouse, but so say you don't want
to change the radius with how hard you're
pressing, you could do that. As you can see, it changes slightly,
you change a lot. So not necessary but
just something to do. So Eugene is common
just to take off the radius so you don't want
it to change as you press, but maybe you do,
you never know. And then if you want something, you have something
called the ramus. You can see at the top
right, reimagined like this. And basically what
this does is it's two black redo the topology. So you can see, if I got to
drag this out like this, you can see this is not great. And the way you fix this is
by going control our walks. You first you go Shift
R and you can choose the size of how big
you want it to be like this. And go Control R. And you see like this
and a fulls it with like a concrete mesh. And just a quicker
way of adding details and like fixing partway, you have low topology. And yeah, so let's just
carry on sculpting. So I'll use the the
snake hook brush, which basically just
pulled it out very easily. That's money control
our two mesh like us, and then use the blob or inflate brush to build up the
shoulders a bit like this. And I go across like that. You can see sometimes it's easier just to
add in the arms. So I'm going to go Shift
a cylinder at this. And then your scale Zed. So you'd say to us to do the local. And you can
see like that. And then I'll just select
it and mirror modifier, mirror system error object
to be the body like that. Okay? And then I'm just
going to fix a starkly so you can see this will
not be rounded like that. And then this would
be like flat. Okay? So I'm gonna get the crease
brush, which is over here. Or you can use Shift C. And then you can see it just adds up the preceptors,
some Boolean. I'm doing the the ribcage. So I'm just gonna mark
it out like this. And then you can see
we have it over there. So this is usually where would be the thinnest
part of here. And then you would have
the pelvis poke out, which is the Blackburn
structure there at the bottom. So you'd have it like
a bony part over here. So you could use the Shift C
to add a crease like this. Okay? So this is kinda
the Muslim W here. And I'll get the script
brush and kind of spirit, put it like this. And then z there. And then I'm going to
round this out of it. So usually in like a male
character, you will have it. They have very defined lats. Lats are the big muscle at the back that helps to pull ups. So you would go, you're like blocket
in like this. So just add small resolution
to shift our language a lot. So you can see the labs is
basically it's the muscle that girls start this and then
goes across like this. Then you have the
shoulder blades which kind of goes like this. So you have like a
square piece over here. And this is basically a
burn that connects to the to the arm like over here. So you can see it. We'll
go back over here. Poke out like this. Okay. So then you have the
shoulder muscle. So gotta go clay strips again. It's just racing to
and then you'd have the shoulder muscle
on top of that bone. So that connects to the
brain over here, like this. And then you have the the the clavicles
or the collarbone. And you can see the collarbone. We're going to ikea and
you split it off there. And then it usually goes
in a shape like this. Maybe it's making it the better grow that see like
they say it's made. So you can see if I go Shift, Shift C to go to the brush. So I go like this. And then yeah. And then straighten
it out a bit. Okay, cool. And then I'm going to add a
neck sum's gonna go shift a sphere, drag this up, and then we can just go, you put x marine lawn and
just drag this up like this and shape it to
have like a neck. And then you can
even add a face. So you just go out
to us via shrugs up. Think of it like a face shape to something simple
to the community. So you could look at if we
did not put x mirror on. So let's go at it again. So we can just drag it down, pull it out like this. Drag the face down slightly, and then drag the
face of it like this. So good, it's all for you. Let's go to the rod shapes. You want the tail
to tip like that. And yeah, so let's drag
this face forward. So I think it's next to big. And then.
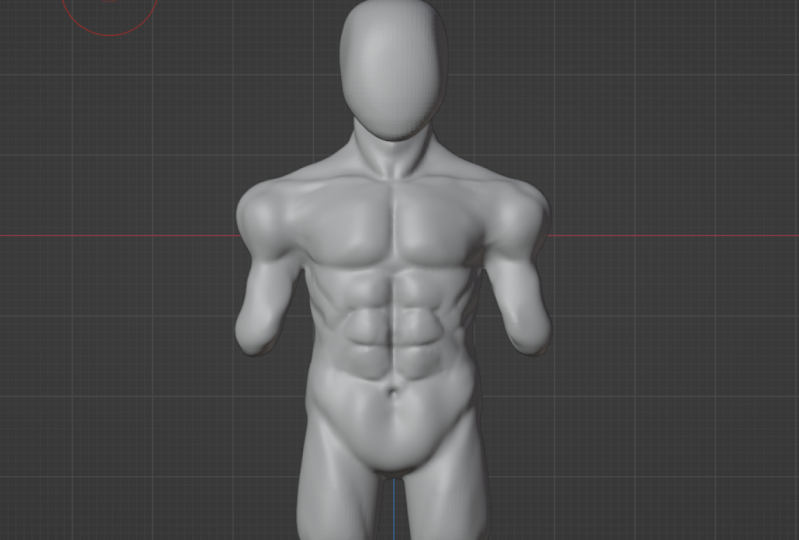
3. Sculpting the torso: Maybe too much of a dent
in the side of his head. Group doesn't really need to be that good because it's just a block art of the head. Cool. So just give
it a better job. So there, maybe make
it a bit smaller. Cool, That's good. Not
just makes it easier to make the neck or
the whole upper body. So it's during these do
together it's Control J because it's got bowed and then Ctrl R so we can really
measure everything. Okay. And then another
big muscle in the neck, the neck is that this? So you go drag us down. So it goes like this and then your traps and
it goes up your neck. So you can feel that's the back, that thing at the back
of your neck like this. And you go Shift C, you got
to do this, the crease. And I'm gonna increase on the
middle or just even taste reps second shift space too. And you can see,
I'm going to just crease down the middle because that's got OK, the middle there. And in this opening over here. Okay. And then you have it over here. And then you can kind of dig in there and maybe
speed it out of it. Because you have your
neck muscle over here. So you can create that in. And then you have your
windpipe over here. Okay. And then you have some maybe it's pulled up the
last bit there. It's like a muscular man. And then we can go here. This is for Trump still. So usually it helps us to go to the scale partially in
the tissue space FAD 6, and then just flatten out a bit. So this is kind of all
the muscles that we have. And then added them,
the chest muscle. Since the chest
IS goes from like the render view and then
it goes into the shoulder. So Big-O pull it up like this. And then yeah. So it goes and attaches
to the ribcage, this and then goes
across like this. So this is b where
you're like competence. So pulled this up here. You can add the
crease on the middle and then it usually
tapers out like that. So there and then you'll see
you'll have like a tape. I like this because
your shoulder is built up over here or
front head of the shoulder. And then what's the shape
of the shoulder here? So then you'll have your so
your shoulder bone over here. So bigger. So have like a dimple over
there at the shoulder. And then we can increase
this because this is work where your
shoulder muscle is. And then you can see this. O n luck here. So C Control 2. I should have explained
this before as well. You use Control 2. We just draw a
normally to like do it and use Control
to do the opposite. So if I go clay, you can go back
and draw and I can go remove if I hold Control. And their saga increases
over here and there. So you can see it. So
this is the back muscle, this is the front facade
and it's the front. So the front attaches to
the collarbone at this. So you can see OB up here. Okay. I guess thicker. You can see that there. And then the shoulder attaches to it and
then it carries on. And then you have the
shoulder blade like this. So it goes through the back. And then this one, this muscle attaches to this bustle
of the bone up here. It says get rid of this. And then you can see that this muscle will say this one will go attach to the shoulder
blade that goes here. Okay. Then you have a
YouTube muscles over here. So you have like one that
goes here and click there, and then another one on top of the shoulder blade like that. I got. And then your
latch is over here, so it covers like a
lot of your back. You want to add the crease in the middle for vacuole
back, back, the oval. I've clever decrease in
the middle, you whack. You know, I mean, and then I'm going to
increase board out there. And then you have a
muscle that kind of goes like this and
attaches to the lats. And then three people there. And then the lats. Let's
just get back to the front. So you'll have, you have a couple of muscles
that go down here. It's called the serratus muscle. And basically what it
does is it connects, It's not part of the obliques. So that's what you'll
see on like real people. They have just black between
the lat and the front. They have like
these big muscles. So basically those around. So you would usually
sensible resolution. So usually have it luck. You build it up like this. So you have a couple of them. This. And then your crease
in the middle of this shifts eat go crease. And then you would go like,
cut them off like that. And then you have the
flat oblique muscles, which are not part of the abs. See you rarely see
them as real people. That much on little people. But you can see, so this
will go down like this. And you get the spray brush and you and you go
flatten it out. The bottom part, not
these upper pots, okay? So like that. And then the square root
to find the alphabet. So Let's go over these. So it depends on
how rip they are. If they have astronauts. But you have it like this. So they sometimes go
connected like this. It depends on genetics. But yep. So you'd
go at it in here. And then we go at another one. So that's still kind of
six-pack and then you have your bottom that kind of
connects down to the middle. Okay? And then if they're
super repeats, this will be slightly different. But you can see this
muscle, The wasn't bone. This pushes it out and then you have a muscle
on top of it like this. Then that will kind of go
up like this and connect. And they don't want
us to be here. Okay. So it kind of goes
connects here. And then, you know,
that other muscle that connects to the lats, this is over there
and it goes on top. So you can see like
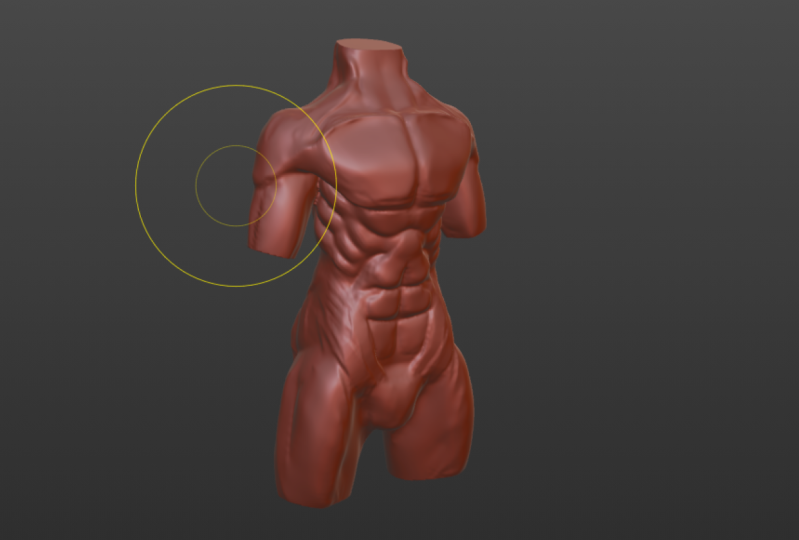
this. Okay. So if you wanted to welcome glands
to my screen is because I have some anatomy references up there just to make sure I'm not getting
completely wrong ways you've read reference,
I'll cheating. Okay, so I'm gonna do that. This whole muscle carries
that green up here. Maybe we can flatten
it out of it. Okay. And there it's, I'm using
Shift to smooth it out. Go back to this
crease brush with Shift C. I think I
increase this out. So I'm going to pull
this up a bit there. And then you can see some. So we have this muscle
is just sat there. I think we go. So we kind of have the
basics of everything. So if you want, we can go out in the legs,
which might help with it. I'll actually just
do the opposite. So for the arms communities,
I think sculpt mode, firstly, apply the
scale because you can see we have the
scales of whack. It's ago, control a scale and
then go to sculpt mode and go to shift Odyssey helping
the 3D meshes controller. And then go to G for the Grab Brush and then
see Eugene plugin, pull it up like this, like that. And then you can see it's
kind of like Gary there, but it's not it usually. It's kind of pointed into
this corner over here. You can see, I guess. So usually have like you would have like a fat
pad over here on the chest. And then this would kind
of go on top of it. And then the boss, it kind of connects
into this crease over here between the chest and the the chest and
shoulders with that. So then we go grab this, drag this over to the left
like that. And then we go. So you have the child sit
at the back like this. And then you only really
have definition of here, but very low body fat. But you kind of have, I'll
show you what it looks like. So you can see it will kind
of have like a bunch of muscles so they
can't have choice, say go up like this. And then that connects
to the alert. And then the muscles
kind of joined together. So it goes like this, goes around and it's mainly
the biggest up here. And I go and then but most likely you won't see it because of how I
like fat pads and stuff. And so we can just go and
shorter than you anyway. So you can see like this. And then you'd have
like a crease over here and then build it up. And then other side
of the possible on, you can see it's three measured. On the side over here you have another muscle called
the brachialis, which is just a
muscle on the side, kinda pushes out the
MST, the AMA bit. And then over here on
the inside would be carved in because there's
something over there. It's just lock downs
with wearing like a CI. If you do this, you can kind of
push it far enough. You can actually feel
the wind like up. Yeah. So yeah. Stuck there and then
maybe drag the basepair, go to the routes even
more to the left. And then pull that
up a bit more group. And then you can see, so you would have the
sharp elbow here. So that's and that'll be
connected to the muscle. And then the arm would carrying go into
there and listen school. That kind of gives us an
idea of what's there. And then begins to go add
another cylinder for the legs. Just kinda started off. So does anything Apollo-scale and it's out of mirror, mirror. And then it can go G and
drag it down like this. And then we can read mesh. So you can see that
the leg muscle usually it's kinda flat
at the back surface. The control space six. And do you like this? And then we can go crease on the middle because
that's kinda what the muscle looks like there. And then its pulled it up. Saudi can kinda use grabs.
You see, what was that group? So then I'm going
to just pulled up. So the muscle kinda
crosses overlap this. And then you'll have like
a slot indent over here. So there. And then set kind of helps the
overall aesthetic. And then you have the
buildup about here. Basically. It will just be like us
kind of squarish thing. So this and then rounded out. So basically the muscle
disco is down and then it connects through
kind of like this. And then kinda goes around. And then you'd have like
an indent over here. So it kind of goes like this. Cool. Okay, let's do a bit more work on the front so you can kind of see
the abs will be up. Yeah. Good. Reference.
Group. So the bottom one, because you would have your
belly button over here. So it kind of depends
on the person, but yeah, so you
kinda just crease it, but you get the basic EPS go in, make it more powerful there. And then you kinda just
buildup on the top, go the kind of have like a flap of skin over top of there. And then this so you
have like the bottom, like this, the COO. And then we can go see the
muscle kinda go back there. And then you have
this over here. And we can kind of
flatten this a bit. So they're going to make it too because it gives
them a ball feminine look. Okay, So there and then probably go
increase on the middle. I hope it will. All even just go with the clay strips AND
non-black how big the gap is? As I said earlier, they
all based on genetics. So we can usually be built up
in the middle and it kinda, kinda smoothies out of it. And they'd kind of creases
again at the end there. And then we will have
a downward there. And then, and then you have like a loss
one that's kind of connecting is very short. And then maybe make
this one a bit shorter. So when we told us one
of the thigh as well. Cool. And then go to scrape as make these a bit thinner.
Lot Aaron's. And then we go crease on the middle group. So they're, they're kinda
be a priest in the middle. Cool. And then the old way
down the side is because the oblique muscles like
this just going down. And yet they're not
ready that noticeable, but it's still there. And that's where you kinda see this like blades kind of thing. That green outside.
Cool. So the chest wall. So there so DUG tape it
out a bit more to the end. Depending on how
big the chest is, depends on how much the
collarbone is Divan. So you go like this. And then so like if you have
a very big built-up chest, then it will just
kind of attach to it and then lacked bubble
else like that. But then if you have
a very small chest, then the collarbone will
be a lot more development. Okay. So Ngugi kinda have
like a big part of it? Yeah. Definitely
over to the rat. Does much to the middle
like that and then flattened it out there. Sometimes it will have luck, like kind of going back there. And that's just because the whole muscle kind
of goes like this. It goes through there. So the whole things like that. So then you can kind of
see each lacking Siebel, everybody that you can see, like the whole thing, like Oh, each muscle
strand going across. So they're seeing kind of have like three parts to the
bottom part will be built up. And then you'll have like
another part that goes up here. So you kinda have like
a bump there. Cool. That's why you have that bump. And then the crease over here, the ad that muscle
underneath it up like that. And then sometimes you have like the whole at the top of the clavicle over
there you have a bump. And then like there. But then sometimes with the
luxury starts over here. Cool. And then if you ever like ready there, maybe better. Maybe this then pull over
here. It's a bit too big. Cool. So it's pulled up
the Trump's bit. And then maybe make the
shoulders of the bigger. Okay? That's looking pretty decent. So usually for the males, but you will have it like
going directly down like that. Not like whereas the
female habit like this and then go down. So you want to be more
straightened out? Okay. There we go. And then let me just
do a mock it up. Yep. So there and there. Cool. So I think he may be too thick. So that's kind of
his body out of it. I think that's better. And then if you want to
reconstruct joining the body, the body together, so that's
the arms to the body. So you have to go Jewel a
visual geometry to mesh. Just realize that my camera
got up, but whatever. So between these
two back together. So they could show j and then control are
sometimes can be helpful. Just leave that part for a while because it's just easier. I don't have any easier when they have
blocked the joints together. So you can just look at
a couple of references but to see how the god of
just smooth out together. But then this muscle
will kind of go cross the shoulder
on top of that. This muscle is one that
goes down further. And then sometimes it
kinda like a smoothies out there if you have
the body fat for it. And then you kind
of have it built up over the shoulder
and then you'll have it like a crease over here because I would
like fat or muscle. So there maybe is there and there. So for the shoulder blade, maybe it's too close together. There are three
fatty in some parts. These parts are joined together. Small abs, it's kind of hard to get it, but It's because it's very
subjective when so many varying depending on
like the genetics and stuff. So yeah, you have to kinda
look look at reference and see how each different is for
each different person. So yeah, I got it. So it's not going back in, so maybe easily
inflate or Blob Brush. Yeah. So sometimes
that's helped to have your arms at angles that is and how black the
weird things that the middle change at all. But yeah, yeah. Yeah. Yeah. So I think looking pretty good. Maybe you can define
this these false again. Let me get out of it. I think it is nice
to go back further. And you can see this
looking pretty decent. If you want to be worth
a bit more of the head. So you just do there. Then just put a
bit on the skill. So they're ready to do it, but maybe a smaller it's very finicky to get a
little portions, right? Okay. So yeah. So it's pretty easy if you want because it's not doing
that in the legs together. So Control J and I just
joined these kind of muscle over here and there. And then at the back
it's kinda flat and because of the two
big muscles there. So I'd have a crease
in the middle as well. There. Three, but then outside. And then if you have alcohol, body fat will probably
be smoother here. And then you could do them like this. And they go, ooh.
4. Finshing touches: So just some quick
finishing judges, if you want, is you can just go. So maybe you've just given
me get rid of their head. And they weren't going to
do is go add like a box, scale up and then
put it like that. So we're just going to use
these as billions like this. Select this one, add a
Boolean, like this one. They're like a NGO add some
cubes are built there. They're there. We've got a conduit
or civilians or any displaying the model there. And then what you could do is, I have an add-on
called automatic. We can go and able to to in
air Preferences Add-ons. And I'll see you all tomorrow. And you can see it should o it. Okay, that makes sense. So if we drag this up here, There's no mirror to the SOP, then you go unheard. This one needs to be
married and SEC the body. Okay? And then do the same
thing as the cube. And then sometimes
there's helped in that last to make it flat. And then there's
anything at a billion. And then just select this one. And then we have an OS, sculpt them like this. And then if you want it
now you could go add some like some imperfections, some non them asymmetric
symmetry or yeah. So, yeah, that's it. Hope you enjoy the class.
5. Class project: Okay, so for the cross-product, or you're going to do
is follow the course, sculpture, character, and set. Just take a screenshot
of it and send it in the class project section.
 Thomas Potter, 3D freelancer and content creator