Transcripts
1. Intro: Hey, if you want to
learn blender in 2022 with Blender
three-point one, then it's a course. You, I'll be taking you
through some simple concepts, going through everything
that you need to know to make a very
simple character. Animator add some
textures and rendered out into a simple
animation like this, water say, steel
frame like that. At the end of the course.
2. Important: keybinds: When he first
started in Blender, it will look something
similar to this. So you will have an option of left-click
or Rosling select. By default it will be
left-click select, rocket select, in my
opinion, is better. And this is what a lot
of tutorials will be in. Sometimes quite hopeful
to be on there. You'd have to click
on Right-click select if you're really kicked off and then you like left-click and it
will select stuff. Then you can just go to Edit Preferences and
then go to K-map. And you can see
select left rats, rats, and then you can leave
the rest like this, okay?
3. Basics of the interface: So first off, I wanted
to go over this, the kind of like a
general interface. So basically this
main parts of a here is called the 3D viewport. Now as the top-left of
every single window, you see that I have
this little square. You can see it's down here. It's appear as over
here, and it's over. Each piece has this little link. Now, what you can do with this is you can go and change it. If you click on here, you can see this one is 3D Viewport. You can change it to a bunch of different things
which we will be going over later and you can learn about in other tutorials. You can see this
one 3D viewport. This one is called
if the Outliner, Basically this will show every object that's
in your scene. So if I have a Cuban here, you can see the cube shows up here and any object
will show up here. And you can have collections
to manage all of them. But whatever, you have this plot which is called
your Properties tab, and this will basically
have a bunch of settings. So like this is the Modify tab will have like your renders tab. Basically he just has a bunch of settings that we will
be going over later. If they're relevant. You can also resize everything. I've got to drag like
different parts. You can see how just
going to hover over, pop up with a little
arrow like this. You can drag up and
down to resource. If you want to get
rid of something, you can save it. I'll put my mouse over here on the top part and drag down. You'll see, you get
rid of it like this. And now I only have one of
them. You want to add one? So I can go put a
cat and drag down. It's basically how it
works is if your mouse is above and you drag down,
that'll get rid of it. But if your mouse is above
and you drag up, it will add, you can see it access
or you can just right-click and then you
can see virtual exhibit. Or you can right-click
and join areas like this. And then you can
change the properties. And that's just the
basics of the interface. Now basically those
has to be at the top. You can see it has a bunch
of different presets, but we'll talk about that later.
4. Moving and object mode: So in the bottom right, you can see what I'm clicking over here with those little overlay.
Just a better blender. I don't remember that much, but you can basically
just see what our click and it just makes
it a bit easier for you. Let's go through the
basics of Blender. First off, when
you're in your scene, you can use the middle mouse
button on your keyboard. You can see like
this, I've clicked middle and this will
pan around your scene. You can use this little icon in the top right and
just left-click and drag on it and we round. You can also click
on these buttons and they will take you
to different views. Or you can use one on
your numpad, by the way, 37, non, non, we'll take
it to the opposite. So one is in front view. So three is for
sideview, seventh, which of you, you click
None or do the opposite? So you can see one non
will take you to back. You can see over here back orthographic three non
would say you left, seven is top, down bottom. And the, now you can assert your shift
middle mouse button. And that will do it like this. Pan. You can also click this little button over here and we'll do the
exact same thing. Then you can scroll up and down, obviously to zoom in and outs. You can also do
Control middle wasn't. Then you can just use this top little thing to zoom in and out. And also, if you see right now
we're in perspective mode, you'll see it says
user perspective. If you want to get them
to a flat version which is called orthographic
install Blender. Use click on five
and now you can see that five of your numpad. And that will change you between orthographic and perspective. And you can also see up here, it will change
between them as well. And it assumes useful tip is
if you hover over something, you can see it will
sometimes, well, a lot of the time,
probably the shortcut that you need to enable
it will activate it. You can see it says number five. Here it says number 0. Number 0 will take you to
camera view like this. And then you can see up here, it doesn't actually
publish, pop up with that. But a lot of the things, if you hover over stuff, it will show you what
are the key boundaries. Now let's just
quickly go through. You can also, using
right-click selection, you just click on that
and you can select stuff. It will be yet if it's yellow, then that means it's yellow. That means a selected. If you hold Shift and
select something, you can see this is the orange or yellow outline
is the axis of selection. The other one is the
orange outline is the still selected but
not the acts of one. If you select multiple things, you'll see the rest
of them will be orange and in the main
one would be yellow. If you want to de-select stuff, you can press Alt and
select everything. Press a cool. Now, if you want to select
something, if you went, at least you can press X to delete or you can express
actual click button like that. If C Control Z works, what you wanted to, if you
want to add in something. Firstly, you see this thing
in the middle of the screen. This is called the 3D cursor. Now if you left-click,
you can see, you can move it
around like this. And if you're leaving
the middle user Shift S, cursor tool, the origin. And this sigma
basically told Blender where she's born in
new objects you add. If I put my cursor over
here with left-click and I can shift a NGO mesh cube. You can see it
spawned over there. And I can delete this. So X deletes, Shift S
curves, tool origin, shift a, mesh, and z, I can go get one of these. It depending on what you need. You can either get
kind of just depends on what you're making to choose what type of
objects you want. I'll show you here the monkey that is included with random. Now, you can see it's
added in the middle because we have our 3D
cursor in the middle. There's something called to
actually change an object. So Rancho, you can see, we can press G and that
will move it to rotate, an S to scale. And we can't do
anything much else. Besides that, you change
the actual object. With the moving,
rotating and scale. You can always lock
them to the axis. So you can see this orange
line is the x-axis, those Greenland is the y-axis. And then the up
and down and said, You can't see it, but you
can enable it like that. So you can see we have the
accesses in our scene. If you go to scale
and I go into Z, for the z-axis, you can see we scale up and down
like this or x. We're going to go Shift Z. And I'll scale on locking
those it like this shift guar, you can see like their Shift X. You can see I like that. And you can use these to just
lock anything if you didn't rotate because a watt or rotor
on the waxes will shift. Why don't really do that
much but rotate your bar. You can see it like this. And you can assume scale, move. It just a simpler way of doing everything with
the movie in itself. That's just, that's
just kind of how you can move,
rotate scale stuff. And this will apply
in edit mode.
5. Quick tip: Managing the outliner: So to manage your outline at the top branch, to manage it. So I'm just going to
duplicate a couple of objects like this so you can
shift even duplicate. You can see over here,
we have a couple of objects and they
all show up. Yeah. Now if you want to manage
all the stuff in your scene, you can see we have
a lot in the camera. So say I wanted
to move this into its own collection so we can separate them from
the actual objects. And we can just go m, new collection, name it. So I'm gonna say
camera and lots. Let us, you can see now we
have our own collection. You can rename it. So if I press F2,
click on this guy was an object's something that you can start renaming
stuff and reorganizing it. And you can just like
hard whole collections. And just a quick way to organize your scene with the
hierarchy of Atlanta.
6. Quick tip: Hiding objects: So if you want to hard
and hard and object, all you have to
do is press H and then Alt H too hard and unheard. You can do everything
you can watch. And then Alt H, you're going
to see in your top rots. You can see how hard and
unhide everything. Yeah.
7. Basics of edit mode : Basically object mode is basically where you
can set up your scene. You can change everything
in it, the composition. Now your cameras set
up your lats wherever. But edit mode as we actually can change the object itself, you can move around
the points in this thing and change
the actual shape of it. So let's show you
about edit mode, okay, So all you have to
do is go into edit mode. Firstly, I'm going to
switch this out for cube, something that's selected with rock-like extrapolates, Shift a. And you can see we pull
up this menu again. I'm just going to add in a cube. Now to get to edit mode, or you have to do is press Tab. Or in the top left you see object mode is
clearly to edit mode. Now what you're
gonna do is we're going to go over the basics. Right now. You can see we have
each individual point and you can select it like this. These are called vertices. One is just a vertex to have the three
different selection modes. You can see up in the top-left
corner, we have the dot, which is the vertex
select, Edge, which is Edge Select, and the face which was
a face election. Now you can cycle through
them just by clicking them. And you can see it's
just like edges. And then you can see
we can select faces. Or at the top of your
keyboard, your best one, follow vertex select to CO2H select, and
three to go to phase. Three, you can cycle
through just quickly, going through instead of
just swapping each time. But you don't really
have to remember it all. And if you forget the keyboard
does not show to you. Then there's a quite a few different operations that you do inside of enamored. I'll
show you a couple of them. Yeah. So obviously G, R, and S still works over here. They are universal between
enamored and object mode. And we can go over, and there's a couple of
different tools down here. You can hover over them
to see the keyboard. So you can see I just wanted
to extrude region as this e. Click on E, you can see you have this extra part
extruded out like this. You can also lock
it to and access Serrano's automatically
on the normal. As you see, it will
always extrude like that. You can change it to like X, like their shift or something. You can just choose one of those options and what it down. That's extruded. It's pretty simple. You just do it like if you
want to add a custom number, like as how much
business you want, you can tap that earn and drop your keyboard like
water visa or 12. You can do it like that
or you can do negative. And it'll do the
opposite of getting an opportunity back to positive and gaps you can put it into. If you had blackness
specific distance, you want to extrude it. Now we have it. Next on the list is for inset. So you can see it basically just insets it and then have a
separate face in the middle. So you can do the same bank. So you'd like extruded osteon. There's just insensitive
slightly like that. You can do the same thing. You have a couple
different settings. If you select something
and it's edge, you can see at the top
of your screen you have quite a few
different options. So you can see confirm,
enter or left-click. It doesn't matter that
much, will escape right-click to cancel
its thickness. So you can see if
I take those down, the thickness will change. You can tap into
custom number and I'll set up how much it once. Control. Control is basically
to change the depth. You can see depth control
to tweak like that. And then you can just hold it. You can't raise up a
number, but whatever, I guess, if it messes up, you just go back. And then if outset, which is kind of like
the opposite of it, you see, he was messing around
with some of the tools. Boundary b will have it if you have like
a mirror modifier. We're against that
later, but it's fun. And then our individual, if you have multiple pieces
that exit like this, these hold Shift and select
them, you can use R. And then if I press I to insert, you can see Individual, you'll see you can extrude it. You can do incentives
individually on each time. I'm just going to
Control Z and undo. And we'll show you the next one. The next one is bevel.
If I select this face, see how my face select
mode of cycles, top face and then control B. Control B. Because he, it
bevels it like this. And then you can
scroll up and down the mouse wheel if you want
to change it like this. And then you can tap on a custom number and jump
left really that much. If you want. There are a couple of, a few old p, the profile. So you can see you can
change it like this. You just pee and then you want to change back to width you
use per se again. You can start really that
complicated and there's a better way of doing it
called the bevel modifier, but we'll get into that later. We'll talk about modifies. And then you have the
next one which is edging, which is Control R. This one you just put your mouse wherever you want
it and it'll pop up with this yellow line is left-click and then you'll see
that will enable it. But you can put it
in where you want. On the other line of phases, you just have to choose
where you want it orders right-click and that
will leave it in the middle. I have an edge droop that June dislike split
southern half with it. Then you have this which
is K for the knife tool. So you can basically you just
draw a holding left-click. That's sometimes be
useful if you draw like a custom shape or
something like that, then you don't really need to worry about the
other ones for now. But let's get into modify it.
8. Quick tip: Duplicating objects: Quick tip. If you
didn't catch it. If you want to duplicate
something, it just Shift D. If he's like something,
you can just Shift D to duplicate it like this. Yeah. Just
9. Modifiers : So modifiers are very
useful and very powerful. So basically what you can do to access them
is going to click on this blue little
wrench and this bull. Basically, if you go add modify, it will pop up with a bunch
of different options. Don't worry, you don't need
to know what they will do. Asked all the women
what they will do be diesel blender
for four years. There's only a couple that
you rarely want to use. Let's get a better
objects. So let's just go to object mode again. So just press Tab
again, x the lease. I go Shift a and add in a cube. I'm going to add modifier. Let's add a subdivision surface. Once you can see, it
just basically adds more resolution to object
and make a smooth. You can see it kind of
just like soft transitory. It has a box and then circle so it kind of
smooth out the box. You can change the levels
and the whole basic mean. How many subdivisions that is, how detailed, how complex, how many vertices it's added. Okay? And what you can do
is you can add more. So it's like this is Mathura
and some of them array or you can just
change accounts and you'll see how many times
they extrude it out. You can change the factor
so how much it moves? You can see it like this. Then finally, just
click the X, a pebble. Remember what I was talking
about the bevel modifier. Let's delete that some revision
and I'll show you how to use the bevel modifier.
Basically the same thing. You can change
them out segments. And the angle is basically, if you change it to be, you can limit the angles. So if something is lower
than 30% of 30 degrees, then it won't be beveled. Profile. Same thing if I drag up
the segments because he uses you can see you
can change like that. That's called the
Belmont via Berlin. Brilliant. Yeah, basically billion. We can get into that later. It's not very useful. Bold. So we add subdivision. And basically with modifiers,
they always stack, say, I add a subdivision
modifier and then I add a bulb. Basically what it'll
build your space. It will play because it
starts pulling up the object. Now, what happens now? If I drag this above the subdivision and I go
back to the beginning, so you can see that the part
is the tarmac and our space. You'll see it'll just
pulled it like this. Now why is that? The reason is, is because the Modifier Tab is built
on like a hierarchy, and it will go from
the top to the bottom. So it does the bold first
and then the subdivision. If I go, You can use these little lock icon so
you see the screen that will hard it and you can
enable and disable it. So basically if I
go back to getting down and our persuasive,
you see nothing happens. Choose this. Let me turn off the subdivision
and put the belt on. Space. You can see in bold it
piece by piece like that. Now, if you add some
dimension back on, you see it as the same thing. But if we move the
subdivision backup, you can see bold it piece
by piece because it has a subdivision first
and then does the bulb. You just got to keep
that in mind when doing the stuff with modifiers. You can go through,
you can test them on our decimates will basically just like lower
the detail on it. Sigma is always a couple of
them and another useful one. So say we want to mirror it because you want to use work
one side and the other. We don't really
have to work with like mirroring
everything manually. So it's going to go Control
R to add a control, to add EDU buggers. Left-click, right-click
live in the middle. And I'm going to
go to front view. I want to delete the left side. I was going to face selection, select the face x phases, phases, x vertices like this. And you can see we delete
the left side and we add a mirror modifier like this, and we drag it
back up to the top just to make sure that
it works properly. And you see now
we have emerging. And if we go select
some edges like this. So you can hold left-click
and you can drag select the box and g, You can see it mirrors
on either side, which is pretty useful. And then something that you can see if you've got a clipping, you can see it will
in the middle, if I select something and
g, it weren't pull away, whereas it clippings off. You can see it will
separate like this. I'm going to leave the clipping on because it's quite useful.
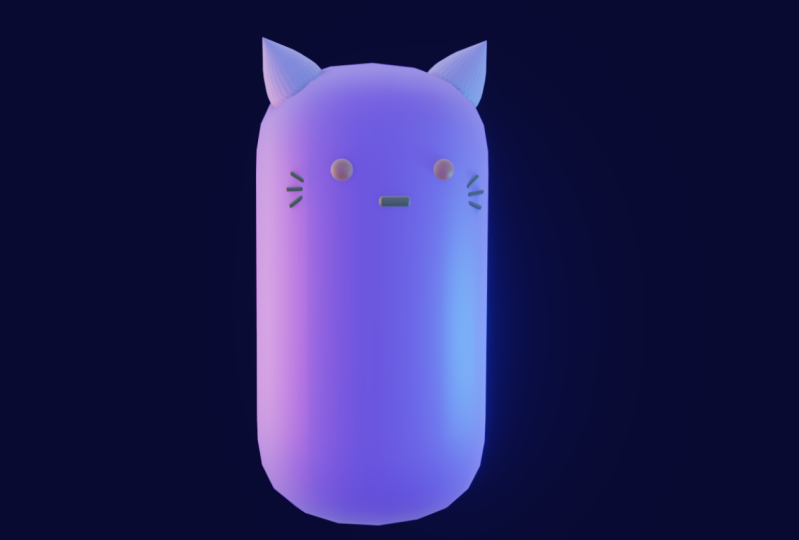
10. Make a simple character: You've got, so let's set
up a simple character. We can go into more details
of some more things. So what I'm gonna do is
I'm just going to go, we're just going to set
up a simple character set begins just render
out something nasty. And I can show you some
more details on Blender. I'm just going to go and delete these two things that I've seen. If you see here, I will just
have a brand new scene. I'm going to select this
camera, which this, this is what it looks
like. They suddenly up. I'm gonna stick with them. So just shift, right-click
both of them, X delete. I'm just going to select
this cube and a mode and go to Modifiers, add modifiers, subdivision
surface like this. I'm going to add an edge
loop in the middle. Let's Control R. Then I'm going to go to
Face Select like this, selected up here, and
then select the top, select the bottom with Shift, and then just go scale z. Then what we're gonna do, you see with the
Boolean subdivision a kind of like
subdivides like this. So what we're gonna do
is you want to select this middle edge,
select an edge. You can just go alt
rock click like this. And I'm going to
Control B to bevel. Okay, so that we can just
control how much you see, how much sub-dividing like this. You could just round off
the corners a bit more. If you want more resolution, you can just bump up the levels and just make sure that they are not the
same and the render, and we bought, if you
want this to be soft, like a new edges, So you can just go w
sheets throughs like that. And outcome data distribute only have like a
bean cut a shape. You guys have changed
it just by scaling up and down on the
z-axis doctors.
11. HDRI and Lighting: If I go to Z rendered, you can see a bit of time. This is the rendered mode in EV. Ev is EV is a real Tom engine. Africa. After those render
tab over here, you can see it says EV. Ev is real-time. So you can
see if I go around the scene, it, It's all real-time. If I change this to cycles, you can see it kind of
has like some green and it lags a bit like
when I rotate it around. And this will obviously be a lot worse whenever more
complex model. But I'm just going to
leave it on EV for now. We can set up our scene. So if you go into this role tab, you can see that we could change the color of our background. You can do that. You can set up a HDRI, which is like a 360 degree
image with lots of textures. And I was going to go to click on this
little yellow button, change to environment extra open and then you can get
an H draw from Azure. I have it. Okay. So if you, once you get H drive or
you have to do is go to Google and search
up HGRI Haven. 0 dates you polyhedron. You can just click on browse and you'll see a pop-up here. You can go through and
you can scroll through and find a couple
of different ones. I am currently
using micro pop-up. Popular one that I use is I think I use this 11 of
them, old Copenhagen six. And you can just
go through this, find one that you lock and now you have your H drive and
it's your changes trends. You can do that by changing
the strength value down here. If you wanna get rid
of the background, you can go click on this
little camera again. I got onto film, transparent like this and add to render with a
transparent background. Then let's go onto
some materials. Let's add some lots
now to add a lot. So I'll just go to
front view again, go Shift a to add a lots area. This same thing applies with rotation, moving and scanning. You can just rotate like this. Softwares are rotated g to move. I'm gonna go to top view. Then we'll rotate
G to move again. I'm going to go to the top, which is this green light bulb. I want to change this sauce
and then drag up the power. So I see we have lots of here. I'm gonna go back
to the top view. 79 pad again, Shift D to
duplicate and put it down here, rotates again with R. And then we can change
the size again. This, okay, so now we just have this cool looking
lots in or I'll see. And now we can set up
some simple materials.
12. Materials: In certain materials. So let's just click or
add some simple Rs first, what we can do is
just add a shift a to add an a mesh UV sphere. I'm going to go
basically if you want, you can go z wireframe and then you can see it will
take you like this. You can see three everything. And put the hours like here. I'm going to go to side view and then go back to solid view. So z solid G, and
drag it forward. So that's the odds
are coming through. Now, we want this
to be able to us out as well. There's
not just one. So we're going to add
a mirror modifier. So I'm going to go to mirror the Modifiers add
modifier. Mirror. As you can see, it's
not really doing anything because we
wanted to mirror it over. And mirrors will be based on
this little origin point, which is this yellow dot. So the way we can get around this is with the mirror object. Click on this little eyedropper and choose the bean
shaped like this. You can see now it's
mirrored across like that. And let's add some Texas now. Obviously there's going to be on these ads on a second beam. Zed rendered and go
to the Material tab, which is this little
red circle thing. And you can see we already have the material applied on it. And let's just add a cup. It's exhibit base color. So we can choose any color here. So we're going to choose
a simple blue color. You can change some
settings like roughness. Do you see they'll
change how rough it is. I feel to make a
metallic metal texture. You can add, drag the
metallic all the way up. You can see you can create
a nice-looking metal. Specular or basically
mean how much of the lots effects it was it. Yeah, that's really
the only options you need if you'll make it large. So say we have these Rs and click New to make
a new material. Scroll down and go
to the emission. I can drag this up,
give it a color. I'm just going to
give it a yellow. And then drag up the strength and change this base
color to black. And so it's just the hours. Now as you see, it's not
really growing that much. So what we can do is go to this camera icon and go to blue. Maybe that's too much. Let's just drag the
strength a bit down. We get to some measure
on settings a bit. So it's not like a glow
around the actual body. Okay, cool. So now
we've got this glowing, ours and this blue character. This was looking kind of nuts.
13. How to animate your character: Let's go over a
bit of animation. First off, you see
if I move this body, you can see it moves around and the arms don't go with it. So what we're gonna do, we're gonna select
the Rs and then just shift select the body like this. You want the yellow
at the body to be outlined and go Control P, Control P and keep a transform. Okay, I see if I'm select
the body and move it, you can see it moves around. Now when want to animate, I'm going to drag this up so we can see our actual Tom on. And this is basically
like how many frames, so we have to see it properly. Yeah, you go, basically, what we can do is go click on keying and actually
it's upstream. But firstly, if you want
to animate something, you can see I'll press N and
I'll pull up this rod panel. And you can see it shows
location, rotation, and scale. Now what we can do is we can keyframe any
of these values. So the easiest way to select r, you can see a pop-up
with this whole thing. So you can choose one of these. So save our choose location. And you'll see it pops up in yellow on these locations,
solders over here. And at the bottom
you can see it has this little yellow dots on the first frame,
which is over here. Now if I go to frame 20 and say, well, let's just say frame 30, I've got a g and drag it forward and oppress
our location again. If I go back to
the beginning and then press Space to play, you can see it moves in
between these two keyframes. Now you can do this
with anything. Now, if you want, you can keyframe the rotation
to say at the end of your rotation keyframe for both sides and then go
back to the beginning. Rotation at the end
because our is zed, say 90, probably the other way. Negative 19 mutation. You can see now it
goes like that. Yeah, that's kind of the
basics of animation. And now what we can
do is we can also, as you see it kind of like
a smooth in-between them. So if you go press
a to select both of the key or the key
frames go T, linear. You can see it's
like a straight line instead of like
easing in and outs. You can use constant, which you'll see it
will snap in-between. And then you have a couple
of different effects. You can do like this. Looks quite nice.
You have elastic. It will look weird, but if you want to, better, help so much, but then you have
bounce like that. Okay? Also, if you wanted to
move them in between, you can just drag selects, use hold rots and drag them. And you can just G and move
them around like batch. If you want you have
to press a insect, both of them when
you change you them. So you can just go through them. Yeah. That's kind of just basics of how you do everything. Now, if we want.
14. How to render an Image in EEVEE: If I had to remove stuff
around the viewport model, so many hearts to use
some simple modifiers. We've gone over how to make this simple bean
character like this. And we've gone over how to read lots it and
add some colors. What we wanna do
is we want to get this ready to render it out. I'm gonna give it a
simple background. And then we're going to
show you how to render it. What we're gonna do first is I'm going to go to front
view so you can trace morning and I'm going to
shift a and mesh plane. And you can see we have
this paint around. I'll see now I'm going
to drag this below him. Let us just g z. And I'm going to scale
up and go tab to go to Edit Mode is going to
go to edge select. And I'm going to
select this edge and the back and go E, z. Actually going to undo. I'm going to select
all three edges around the sides like this. You had an E. Okay? Now you see if we go
out of subdivision right now, the curtain, the
background box or curved. You can see here's
going through the edge. So what we can do to fix this is you can
add an edge loop, because if we go add edge loop, it will only go out like
an edge loop around here. It will only curve from there. We're gonna go tabs go
back into edit mode, or add an edge loop
with Control R. And you can see like this, I'm gonna put it down in the middle and then just drag it back
a bit and put it. There. Are no hard what is
currently doing? You can click on this
little icon here. And then I'm going to
add another edge loop in the middle, like this. And you can actually scroll up if you want to add two
of them like this. And then left-click,
right-click. There you go. I would've enable it again
with a little button. And you'll see we have this
stuck seamless background. Now, I just want to
animate several took. You can go to stereotype new. So maybe we want to make it
darker, color like this. And then we're going to drag
the roughness all the way up or even all the way down. Ready, Let's just drag this up. You can even drag the specular down if you wanted to not really affect much like that. Now, let's set up a
camera so we can actually render those data camera. Just go Shift a and go
add a camera like this. I've got a z wireframe. You can see there's the camera
in the middle of senior and how you get those to be in your lacking from your view. So you'd get somebody
that you like and then grab my full-size keyboard. You can just press control
alt and 0 on the numpad. That's okay. Then if you wanted to revert,
you can select cheese zed, zed, and then that will
pull it in the middle. Like this. Then z rendered. You can see this is what
our render will look like. Okay? Now I'm gonna go over
the differences between EV and cycles and how to
render out in either of them. With your output, you can change your
resolution over here, you can see it will change the aspect ratio of your camera. You can change the render
region which has any red, sorry, in cycles,
get to that later. You can change your frame rate. So if you say like 240, you can see you tomorrow at
the bottom will go very fast. You can choose it to something, you could change it to custom, but wherever you, how false it'll play if
you press Space. If you go to the frame range
will basically be like how long your town honest. You can see the output. You can change lag
between JPEGs, PNGs, how the color depth, wherever you have a couple of
different options on here, you can go through and
choose whichever you want, and that will change
when you export. As you can see, this
is render itself. You can see it's all real time. You can move around
and stuff like that. You can also go and add some effects like the
ambient occlusion and bloom, or like screen space
reflections or just sometimes makes
more realistic. But yeah, so whatever. But yeah, it's fine. This will be rendered
quite quickly. You can just go to
Render, Render Image. And you'll see we
get, as you can see, we get our final
render just like this. Now if you want to save
this, you can just go Image, Save As, and then choose somewhere
that you want to save it, give it a name, and you're done.
15. How to render an Image in cycles : If you want to
change the cycles, you can go rent agent cycles. Now, I'm gonna change
this to my GPU. Gpu is better like there. So you can just change it
down here with the reverse. So sometimes you have to
just do it like that. You can see it has
all these little noise dots that we can read off. Now if you don't want it to render outside your care review, you can just go over
to this little printer and agreed upon render region. That's now also if you want
to change your resolution, you can choose it under here. And you can just choose
your file format under the output. If you're Indian animation, you can treat your frame rate, but that's not really
that relevant. Basically with your cycles because he'd like every
time it removes some noise, it's called a sample. If I change my
samples to one move, you can see this is
what one sample, It's like an average
change this to ten. You can see it's already
started removing samples. Maybe it's on the noise
music, a denoising. So if you change it to
like a 100 samples, goes all the way up,
so it goes through, removes all the noise. Then you can add de-noising. Say it starts at 100, then almost has changed
to something lower ten. You can see it goes through
and then it gets to ten. You can see now it's
a lot smoother and it's now just removing
noise in the background. And this is basically quite cool because we don't have to
render it completely, but we can still get
it quite now us. And then what you'll do is go and set it up in
your render settings. I want to choose let's
say 100 samples. Denoise will use optics Ed
better just from a GPU. But be careful if you have
the wrong one in my crash. Remember, save your file Control S and you can
choose like your desktop and I can name
character, Twitter. Whatever. It doesn't matter. You can always misspell
everything out also be van. And just in case it does crash and you
just go render image and you'll see that it pops
up with this thing like this. It will go through everything
exactly the same edges, has high-quality and will take quite a bit
longer to render. Then if you're rendering an EV.
16. How to render an Animation: We've set up all seen and
reverse I have animation. What we can do is vertically
the largest will change. You see if we move, the lights
will change quite a bit. What we can do is if we
go back to the beginning, we can go and what to set a, something called an empty
esophagus. Select this. I'm going to go Shift a
empty plate next Osaka. I'm going to select this. I'm going to go
select these laugh, and then I'm going to select
those emptying and go Control P, keep transform. Now if we move this
empty, it works. Now I'm going to select this
guy, copy the location. So obviously we're just
gonna go selectively eat the empty cut our location. They go to frame, what do we end on frame
40 and then select it. And then copy this
location value over here because we only
moved onto the wall. So you're going to select
OK, that is empty again, same value, paste it
in. And then I again. I see If we go to the arrow view because you can
have a 0 in and I'm proud, I go z rendered in space. You can see it will go in-between like this and the
last one, she follow it. Now, if you want to animate, actually isn't lambda properly, because we changed the pulsar. I'm thinking of it
so we just go T, I think I use cin, sorry, dough or whatever
work out Lanza properly. Cool. Now to render out
your animation, it will basically render out
in a bunch of black frames. We're going to go, or you can actually rent it out to a movie, but you have to have
FM big installed, but yeah, it's a
bit of a headache. I'm just going to
render out in frames and show you how to
stitch it back together. Some are going to change
this and choose JPEG. If you have a
transparent background you confidential with JPEG, I'm going to change quantity
to a 100% and choose a folder to render to
make a new folder. If you wanted to
make a new folder, you can just go click on this little folder
icon at the top. Name it as a character
animation selected. Except I've got I can go
Render, Render Animation. Now it's better if you're
rendering this all the cycles, because there will
be a lot quicker. So EVs a lot better if you
working with animations, because if you're doing cycles, each frame will take quite
a long time to render. We have those, render it out. And now we can go and
stitches altogether. So if I open up the
folder that are rendered or frames to show you, okay, So you can basically
see there'd be a bunch of frames like this bug, but wherever I can just go, you can see it just has
the whole animation. So what we're gonna do here
is can we go back to Blender? You can see over here, what
we can do is we can control and I'll pull up a new file
and just go video editing. You can see this is the
video team workspace. Go Shift a and add a movie. I don't know, maybe your
shift a at a image sequence. Then go find your
folder and then go to character animation
and just press a and then Add Image
Strip, give you a space. See it renders like that. Now, what we're gonna do
is we're gonna choose FFmpeg video and choose
output to wherever, except gives you,
give it a name, and then just Render Animation. And yet, That's your
animation done. First. You have to change the end frame like this and render
animation again. So it won't just carry on going.
 Thomas Potter, 3D freelancer and content creator