Transcripts
1. Intro: Hi there, My name is ****, no, I'm an illustrator
and designer and art director at Disney. But on the side I like to
make are for myself and sell it at art fairs and online. I started selling at fairs in college with
a group of my friends. We created this greeting
card line called love notes. We started at a local fair. It was Jack low art
fair and Pasadena. Since I started, I have expanded into some national art shows. And in this class I
will teach you how to take your art from
the very beginning all the way through
to selling it online and in different fares. I'm also going to show
you some resources on how to print your work. If you make pottery, this might not be a
one for, one for you, but it will be a really
good starting point for how to maybe market your materials
and start selling them. So let's get started.
2. Step 1: Make Art: Step one is make the art. If you haven't watched
any of my other videos, I have some tips on how to
get started on digital art, which is where I make
most of my work. But if everything is
oil painting or if yours is fashion and
apparel or pottery, make your art, trust yourself. It can just be a
passion project first. And now we're starting
to monetize it.
3. Step 2: Print & Pack: Okay, you made your good job. I'm proud of you. Now it's time to get printing. If you've made your art by hand, that will be your
very first step. So I painted this on
Canvas with acrylic paint. I want to be able to sell
this multiple times, so I made it into
high-rise print. I converted it into
an eight by ten, which is a pretty standard size. Here's another example of an eight by ten prints
that I've made. This was a digital painting. I actually used a
brush that made it look painted by hand. Here is a five by 75 by seven are good size print to have. You can test and see which
prints are bestsellers. And then from there
you can expand and make multiple
sizes for ease, I also still make
greeting cards. We put the envelope
inside so that you can see the art on the
front of the card. And I always have a
look on the back. Okay. So where did I print
all of these things? Hey, by intense, I print at this company called finer works. They're really awesome
because they do print on-demand and it's not
that expensive to print. Maybe like one or two of
these prints at a time. One of the other
benefits is they print on archival matte paper, which is actually
resistant to sun damage. So these are really
high-quality prints. I always print them
in matte finish because I don't really
like shiny papers I know works is also really helpful
if you want to ship it directly from finer
works to your customer. For my five by seven
prints, I use moo.com. They have postcards, flyers, business cards, greeting
cards, et cetera. And I would say this is a
little bit more expensive, but they have this
really nice soft touch to finish on there, five by seven postcard. And you can do
different paper weights and that will help make
it feel really nice. I also print my greeting
cards at moo.com. It's a pretty straightforward
interface and very easy for printing or printing
my business cards. I go back-and-forth between Mu and you printing so mu again, really good but
not the cheapest, but really high-quality
you printing, I would say, is a cheaper version
of printing. You can print all of
your work on this site. I think what you start to
lose is quality over time. However, business cards are
free and people are going to take them if it has good art and if it has your information. So I kind of lean towards
you printing for that, you'll notice I have
some plastic bags that I put the artwork into protected. You can buy that on clear
bags is the website. They have all these
different sizes. You can get eight by
88 by 10.5 by seven, your greeting cards sizes. They also saw that on Amazon. You'll also see, I have these little stickers that
I put on with prices. I would say, you don't
need this right away. If you want to
have your business feel a little bit
more established and you can take this
extra cost and do it. So I actually print these
stickers on mu as well. And I also put my
logo on everything. I make stickers on Sticker Mule. And I also get buttons
from sticker meal. These are cute like one or
$3 purchases for customers. A few other things
you might need for packing is bubble mailers. I get my bubble
mailers from Amazon. I am really fun and I like
to have them BE their iridescent or this teal blue
to match my mermaid theme, I want it to feel like there is a whole brand voice
coming with my artwork. I also put in
custom tissue paper to kind of wrap my product. I've also added a sticker that says All hail mail along
with my business card, and along with the thank-you. So this is all what I
put into one package. I got the tissue paper from no issue and the stickers
that went along with it, I actually ordered
through no issue as well. I don t think this
is something you need starting out and it is definitely an extra cost that you would be
responsible for. I talked about where to print
all of your art pieces. It's all a lot of cost. So maybe if you're
just starting out, you just want to print one or two of each thing and it cost too much money to
buy from mu and from you printing and
from finer works, et cetera, et cetera, et cetera, plus you to get the clear bags. I hear you. So
just starting out, you might want to print at home. Printing at home is
more effort, less cost. So this is what I did. I found a local paper warehouse that has all these
nice Nina papers. And you can kinda get up to like ten or 15 pieces
of paper for free. And then if you really
like that paper, you can go and you can
order bulk like 100, 200 pieces of that nice papers. And then you go and make
sure your printer is printing on best quality. And I go into InDesign. I put the greeting card
are on the right side. I put the logo on the back and make sure their crop marks
are set for the printer. And then I print it out and
I cut along the crop marks, either using an
exact dough knife or a little cutting board, like so. And then I fold with a bone folder to make sure
that crease is kind of like then I packaged it in an envelope and in a
clear sleeve myself. So a lot more upfront
work, a lot lower of cost. And the last thing
I'm going to talk about before we move on is there's a lot of money
and it is a lot of work. How can I raise capital
or how can I get some money up front to help me out for this book in particular, I started a Kickstarter, so I created an
account and I said, I'm going to make an art book. I really want to
publish a book and I put all the information
upfront into it. I talked about the art
that I was gonna make. I made a special print just for people that were patrons
of my Kickstarter. And I raised enough money
to make this in batch. There are a lot of good people out there who are willing to help and support small
business and support the arts. So get started.
4. Step 3: Selling Online: Now we're going to sell online. I showed you how to
print everything. I showed you how to
package everything. Where are we selling it? There are a few places that
you can sell your art and here is where I sell mine
at D is still my favorite. I think Etsy is a little
bit over saturated, but you can still
get good traffic. And it's a very straightforward
and easy process as you start out
selling your art. So Etsy, you have to
build an account, build a profile, and
start photographing art. What are the tags that
go along with it to help people search
for your art. So e.g. if I'm selling a mermaid print, I would say mermaid
under the sea, ocean, beach, home decor,
fairy tale, fantasy. Those are kinda the
tags that I would use to hone in people's searches. When someone orders
something through Etsy, it will create a
shipping label for you, can purchase that,
print it and then you can put that on your packaging. So it's very easy at home, even if you have low
or small inventory, it's very easy to
get started on Etsy, I also sell on society six, which is really nice
for passive income. I have one or two
prints that really do well and sell all the
time every month. It's finding your niche
on that platform. So maybe what you have
on your SD is not the same as what you put on
your society six e.g. Miami Society six has a laundry chart that's
the number one seller. And my Etsy shop really sells good at greeting
cards and calendars. And then there is case two phi, which sells phone cases. That is really good also
for passive income. I think I was invited
to sell on case defy. So I have some really good
turtle art that sells there. The one thing about
case is that you can't sell any other phone products
on a different site, your exclusive to case divide. Another good one is Shopify. It's a little bit
more ownership of an online business
than Etsy, e.g. personally, I'm not
really ready for that type of selling online. So I stick with he says I
just takes N case defy. There are a few
other ones out there I've heard of in print which you have to be accepted
to be an artist on there. But it's another good
avenue to look for. And it's really good
to be appreciative of these customers because
you are small business. So two things that I
do for that is there is a return code on Etsy. I showed it on my little
thank-you card that I do. But it also can e-mail out to customers and say,
Oh, return again. And you can get 15% off
on your next order. And it's nice to also share
a little extra goodies. So let's say they order an eight by ten print
and a little card. It might be nice to
throw in a sticker or an extra card or
an extra discount, or you can give them a nice little handwritten
note to be like, thank you for
supporting my shop. Thank you for supporting
my small business. It means a lot.
5. Step 4: Selling In Person: Step for selling at fairs. Maybe you don't want
to sell online first, you want to sell in
person and kind of get a good understanding of who your customers are or
what products really do well, here are my tips for that. First, you want to research your local area
and see what kind of local fairs there are for me, there are a ton I
featured when I was in Orange County at something
called mermaid market. There was a farmer's
market I sold at some of the fears that I've heard
of that are in the LA area. Our Jacques Loeb art
fair, unique LA, renegade craft fair, West
Coast craft, mortgage Berg. So that's actually a food one, but there are a few
art vendors there too. Look into your local area and see what fairs are
available to you. Eventually you can start
selling at bigger fair. I've also shown
at designer Khan, which is basically Comic-Con
for Art and Design. And I've shown in Artist Alley, which I would say a
designer Khan is one of my most successful
events and one of my favorite events to
show up because you get this kind of like
following and this fandom. And people really, really
appreciate art there. If you are a stationery
designer or if you have surface design or if
you want to start like marketing and selling and
making this something big, you can look into shows like surtax and the National
Stationary Show. I have been to both. I've never exhibited there. There are bigger brands
that come through like Hallmark and Paper Source and other big retailers
that are looking for new brands and new
businesses to kinda bring in and add to
their collective. Okay, So you've found the list of shows that you
want to exhibit at. You want to be featured at. How do you get
started with that? So the first thing you
have to do is apply. There's usually a fee upfront
to apply for the show. It can be anywhere $35-500. If you're a really
big shows, it can be thousands of dollars to exhibit, but we're probably not there yet if we're just
getting started. So you have to apply and you have to have
your business name. You usually have a
website that you share, photos of your work. So if you've already started an Etsy shop, everything
will be covered. You can put your Etsy
URL for your shop. You can show photos that are from your Etsy,
showing your artwork. And then it'll usually ask
for a description about you saying what kind
of art you're selling, what size would
the price points, especially if you're a new, I think it's good
to say that this is my first show or I'm really
excited to get started. They might even ask
you for what you're boost setups have looked like or what they
will look like, which if you're brand new,
that might be something hard to show or
even think about. So that's what we'll
talk about next. Let's talk about the
supplies you'll need or the decor you'll need
for your booth set-up. So the first thing
that you'll need is a tent and chairs and a table. So you can get table and
chairs from Target Walmart, super cheap, no big deal and attend to you can probably get from Walmart at some fares. You can rent the tent and
the table and the chairs. So you can look into that too. If you don't want to
purchase something, if you're just testing it out, maybe just rent from your
vendor for the first time. You also probably need
displays for your artwork. For me, I have a turning rack that has
the greeting cards on it. I have a few stack within
displays to show my cards. And then I have one white metal one that's going
to kind of bigger, that holds my eight by
ten prints and my books. You can get a lot
of these on Amazon. You'll also want to core
that fits to your theme. So I have a lot of
tablecloths that are sparkly or look like a mermaid that fit in
with my aesthetic. I also have little fairy lights that string out and
put around my art. If there is a holiday show, I'll put some white sparkling Garland and you'll also
probably want signage. You can print a big banner that has your name on
it, maybe your logo. For me, I actually
use a letter sign that has my logo
on it, my prices. Another thing I've been
seeing a lot lately is QR codes that have your Venmo QR code and your newsletter QR code
and maybe your social, depending on what
you're trying to get people to look
at from your booth. And sometimes people
aren't really even using business
cards anymore. They'll just have you start
falling their social channel. Another thing you'll need at your show is the Square Reader. It will hook up to
your bank account and they will send you a square fog that can
read credit cards, they can tap them or insert
if it needs to be a chip. And the last thing you'll
probably need is a wagon. So I've got my wagon from Walmart and it's just
really helpful to bring all of your supplies from
your car to the event anytime that you are traveling
back and forth, fuel okay. Super easy. And that's
all the stuff they need for your fair. Don't stress out about it. Take a deep breath. You can start small. You don't necessarily
need to buy all of these things
right off the bat, but just keep them
in mind as you start to build out
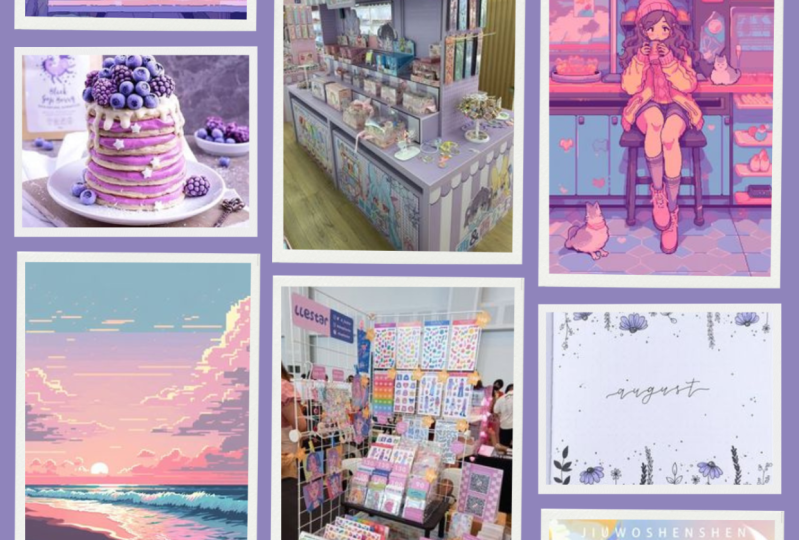
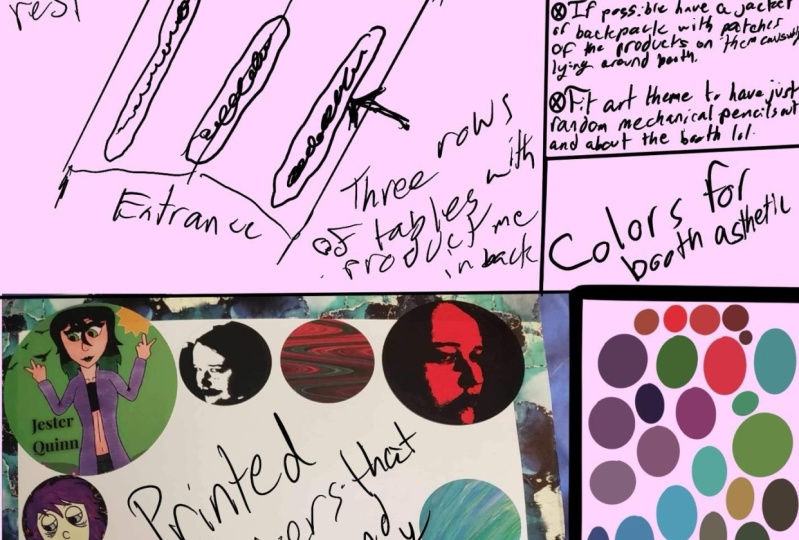
selling at fairs. That actually brings me to our mini project is going to be, we are going to
create a mood board for what we want our
booth to look like. So the best way to source and look for material is
to go onto something like Pinterest or search these fairs and see what other
people have been selling. So if you go on Pinterest and
you search art fair booth or creative booth set-up aren't set up those
kind of things. You will be able to see
different trends of setups. There are some people
that have been using those kind of wireframe walls. I've seen a lot of
those wooden peg board with shelves to put their art. If you are into fashion, there might be some
portable racks for your designs
and your fashion. What we're going to
ask you to do for this project is to put
together a mood board of your dream aesthetic or look for the booth that you are
going to have in the future.
6. Step 5: Sell Yourself: This is a lot to
take in and a lot of work to put in for yourself. So good job now that we have everything
set up for selling online and all the supplies and vision you need to sell
in person at fairs. You also need to think
about this next step, step five, which is
selling yourself. No one is going to
know who you are unknown is going to be able to buy from you unless you
put yourself out there. And that means all the places
we've talked about so far, but also on social, make sure to create a social
channel just for your art. If you haven't already, make sure to show your process, people are really interested
in small business and creators and they want to learn from you and
they want to support you, post about it, talking about the process of
making your art and then turning into something
that you can sell online, show you packaging your work. They probably would
love to see that you take so much time and effort into each little
piece that you send out and then make sure to use social when you're going
to be featured at a shell, you want them to know
to come and visit you. You can show the setup, you can show you packing for
the show and then give them information and kind of tagged to whichever fair
you're showing that. You can show your
displays that out and you can repost other
artists as well. So something that my favorite
friends and I like to do is we will do new artists Fridays or we will feature in SPO from
different creators. Keep that in mind.
7. Step 6: Next Time: Step six is really important the postmortem
for your work. So check in with what is selling
and what is not selling. Check in with the expenses. That makes sense and
what don't make sense. Check in with what pieces are, what niche or what style is doing really well and make
more of those things. It's really important
to do self-reflection on the work that
you've put in and to think about what you wanna
do moving forward, e.g. I. Make calendars. And the calendars every
year are mostly mermaids. Everyone really loves
those calendars. And so I did a Zodiac Calendar
of mermaids previous year because I was noticing that zodiac signs were very popular. I only wanted to sell those on the
calendar for that year. And now that the year is over, I started selling those pieces as eight by ten a mermaid zines. And they perform really
well because everyone really liked them from
where they are in calendar. But it doesn't make sense
to sell them in a calendar and as a print at the
same time because you're losing sales on
one or the other. So thinking about those
things and paying attention to your audience
and what people are liking, but also staying true to
yourself and your creative.
8. Class Project: Now it's time for your
main class project. I would call it a challenge if you're not ready to actually be selling at a
fairing yet or if you haven't been accepted
to a fair Yeah. This one is really for you. I want you to take all the
art that you've printed. I want you to take all the items that you've bought
for your fair. And I want you to
set up a fake booth and take photos of it. It's something that you can show when you're applying at fares. It can be mini content for your social and it can get you really excited to start
selling out of booth. So just take a few pictures, setup maybe on a
table scape show where your art would go, where your business
cards would go, where your signage would go, and then share it.
9. The End: That's it. Thanks for
taking the class with me. I hope you are really
excited to sell your art. And if you don't,
follow me already, please do and show me what
you've been working on. And I will take a look. And I love sharing new artists and up-and-coming talented. So please feel free to reach out and thank
you for watching.
 Hail Nowak, Illustrator / Art Director / Designer