Transcripts
1. Introduction: Hi, I'm Emily. I'm an
artist from New Zealand, and I teach drawing
and painting classes. Welcome to this portrait
drawing tutorial for beginners. It's true portraits
are difficult. They're complex, and
it takes a lot of drawing experience to be
able to get a good likeness. But I wanted to create a tutorial that would
give beginners a taste of what portrait drawing is like and give you
a place to start. In this tutorial, we'll cover
basic face proportions, shapes to use for the
features of the face, and how to identify
light and shadow, which is really important to create the shape of the face. Now, the end result of this class won't be a
finished portrait as that can literally take days to achieve with layers of
shading and refinements. Instead, think of this class as an exercise in learning
to draw portraits. I'm confident you'll gain
a good basic understanding of drawing a simple
front view portrait, and you'll get a result that actually looks
like a person. It will be useful if you have beginner skills
like being able to sketch lightly and being able to shade different
values of gray, but you don't have to have any portrait drawing
experience at all. Now is your chance
to give it a go.
2. Materials & Step 1: Finding The Axis: Just before we start, I
want to reiterate that this is a beginner
drawing portrait class, but it's not going to make you an expert at drawing
portraits overnight. What it will do,
what I hope it will do is show you what to look for so that it's a place to start
with drawing portraits. There are rules to
portrait drawing that you can use to
check your drawing, and that's what
we'll cover today. The key rules or strategies
for putting a face together. Also won't be a polished
finished portrait because the shading takes
a really long time. That probably is
the hardest part of a portrait once you
learn all these rules is then being able to spend the time to build up the shading. And it also takes
some experience. So that's something
you can work on as you practice other portraits. We're going to work
through four main steps, and we're going to work
through them quite quickly. So do pause the video
if you feel like you need a little more time
to complete each step. For materials, I have a MAs technico
mechanical pencil here, and it's maybe about a two B, but I'd recommend you
use maybe an HB pencil. I'm using this one just
because it is nice and dark and quite thick
for the screen. So you'll be able to see
it clearly on my paper. But I am going to be
using it quite lightly, and that's really key as well to use your pencil
nice and light. We're going to be putting
down a lot of lines at the start to measure
proportions and things, and we want to be able to
adjust those as we go. Um, so you're going to
need an eraser as well. Hopefully, your lines are light enough that you don't
need to rub out too much. But an eraser, I like
these party erasers, but any eraser is fine. And we may use a little bit of tissue later on if we want to do some smudging
for our shading. Just again, with the
pencils and HB pencil, using it light means holding
it a little bit further back and just brushing
it across the page. So if you're holding
it like this, there's a lot of pressure
down on the paper. And you'll get harder lines. There are a lot
and darker lines, which are a lot harder to erase. So if you do find that you're drawing quite dark
with an HB pencil, then a two H pencil might
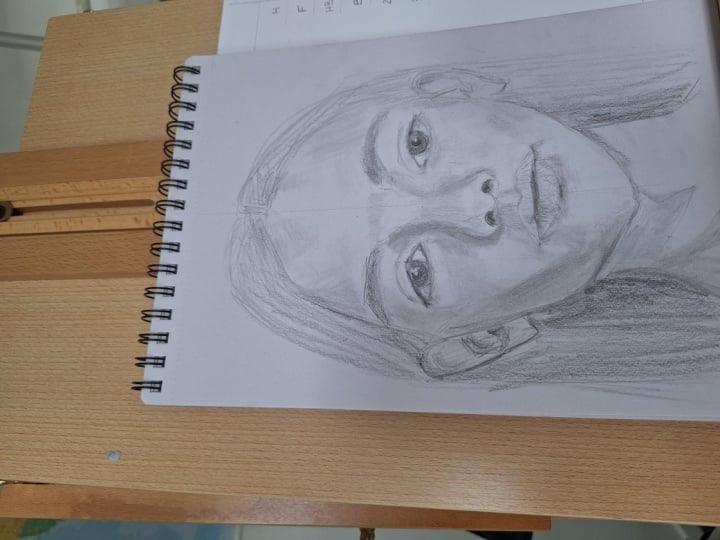
be a better way to start. So this portrait up here is the one that we're
going to be drawing, and it's a fairly neutral face. It's quite plain
and it's front on. So that's the best place
to start with portraits. Once you get things
turning to the side, you're getting a whole
lot of perspective being applied to the face, and that can mean things are a bit distorted
and maybe not quite the way you think
they should be where we have a face front on the
eyes are the same size. You know, it's a fairly
even or symmetrical face on each side of the face. And that's different when you have a face that's
three quarters. You have one half
of the face is a lot bigger than the other half or the amount that you can see. And this face is also pretty
much straight up and down. So if you're tilting the head, that just means everything
has to be on an angle. And we're going to start
by thinking about that, thinking about the
tilt of the head. First thing, though, is to just make a mark on your page for the top and the bottom of where you want this
to fit on your page. So I don't want to
make it too big. I always say a drawing about
the size of your hand, maybe a touch smaller, not too small, not too big. We don't want to
spend ages on this, which we will have to do
if we make it really big. And if you wanted to
print this photo out, I have it in the
resources for you. And that means that you
can also draw over top of your photograph,
your printout, and it's going to
help you with some of the proportions and the things that we're
going to go through. So I'm going to make just
put a mark here and here just to kind of indicate how
big I want that face to be. It is about the same
size as my hand. And then we're going
to draw what I call the center
axis of the face. So we're not dealing
with ums method here. Lumus method is something
that everyone wants to do, but it's actually
quite complicated, and it requires an understanding of three D forms and space. We're going to stick
with something that's very two dimensional, just height and width. And we're going to look
at the central axis, and I call this the central
axis method. For that reason. And so what we're looking
at is we're looking at the line that goes
between this point between the eyes through the
recess of the chin there. So if I draw a line
between here and here and sort of cut through all the bits of the face
that's sticking out, I'll get a nice straight line. If I was to do that with
a face on the side, it means from here to here,
you're cutting through all of that nose and mouth that
might be sticking out. We don't follow the
nose because then we're going to get things that
are all sorts of wonky. We're thinking about that point and that point in
a straight line. So if we have a look at
that on the screen here, and let's switch
screen so we can have a bit of a bigger view. So here's the central
axis of the face. And if you really
study that photograph, you might see that
the center line, the vertical line is just on the tiniest little
bit of a tilt. We're going to treat it as if
it's straight up and down. But I just wanted to point that out in case someone go, Oh, someone comes back to me and says it is actually on the tilt. We're going to treat it as if
it's straight up and down. It's a very, very
minor adjustment. Maybe it's, you know, one degree of what it is in the photo. So just sketching
a nice light line. I'm going to do mine
a little bit darker. So that you can see
it on the screen. But make sure it's
loose, sketchy. Remember, if you
need to hold your pencil a little bit further back if you find that you're
pushing too hard, even just, you know, an inch or so and sketching that line out. And then we're going to put
the line through the eyes. What we need to do is figure out where does that line occur
along this line here. So is it halfway? The general
rule for faces is that the line of the eyes is halfway between the top of the
head and the chin. Now, when no say the
top of the head, we're ignoring the
hair that sort of pops up over the
top of the skull. So we're thinking about the
top of the skull, the chin. Where does that line of the
eyes occur along that line. So if we make a comparison between the top half
and the bottom half, let's see if they are
exactly the same. So that's the top half,
and what I'm going to do now is I'm going
to move that line down and we'll see
how it compares with the bottom half.
What do you think? I'd say it's pretty
much exactly the same. Maybe this top half is a touch shorter
than the bottom half, but it's so minuscule, it's not going to
make a difference. So I'm going to make sure I put a line halfway between
here and here, that's going to be
my line of the eyes. And we've just got to
start by guessing. So I'm putting something in, and then I can take a
pencil or something, and I can check that these
are indeed the same. So I'm just going to line
up the end of my pencil with that horizontal line and then mark it with
my finger down here. And then I'm going to check
that against this one. We do it this way. I'm basically just
comparing these two, and I can see that my one at the bottom is a
little bit bigger. So if I want this halfway, I'm going to bring it
down just a touch. We can check that
again. Lining it up here and with my finger. Maybe it needs to come down
even just a little bit more. Just doing it in
little increments. This is why we're keeping
our lines nice and light so that we can
make these changes. I think that one that's kind of in the
middle is the one I want. It's about here. It doesn't matter if
these lines are sketchy, if you're keeping
them really light. So lighter than minus
should be almost invisible. So we've got the tilt
of the head now, which is just pretty much
straight up and down. If the person's head
was tilted to the side, then this whole axis
would be like that. Now, we think about
the width of the face, and I tend to adjust my drawing as I go,
my portrait drawing. So I'm going to figure it out, but I'm also going to be
aware that it might change. I might, you know,
put the eyes and the nose and the mouth in
and maybe only, you know, then create more space above
and below and to the side. Hopefully we won't
make too many changes, but especially the
sides of the face, sometimes I find that
they need to be adjusted. And the general rule for the width of the face
compared to the height of the face is the
width of the face is normally three quarters
the height of the face. So we'd find three quarters. That pencils not long enough. She's my procreate pencil. We'd find three quarters. And we check it against there. But let's check it
against the photo first. So the thing is people's faces are all slightly different. So someone might have, you know, a bit of a wider face or wider
skull than other people. Some people have, you
know, more narrow skull. And so this is not
always going to be exactly three
quarters of this. So we always need to check, even though it's a rule,
we need to check it. So there's the
width of the face. I'm going to turn it
around that green line, and I'm going to compare it
to the height of the face. So that's maybe a little bit
less than three quarters, actually, of this one here. So it doesn't quite come down to three quarters of the height. Now, if you have the
photograph printed out, you can do the same
thing with your pencil. You can check. Same way I've
done with that green line. You take the measurement
on the photograph, you measure it across the eyes, and then you compare it to
the height of the face. So we've got that
comparison now. The width needs to be a little bit less than three
quarters of the height. So here's a little bit less than three
quarters of the height, and marking it with my finger. And that needs to be my width. I probably got it pretty close. So let's put a little mark
there and a little mark there. But keeping in mind
that this could change.
3. Step 2: Placing The Eyes, Nose, Mouth: That's the first step,
and it's pretty basic. We've just found the height
and the width of the face, the cross section, the
placement of the eyes. But it's really important, and so is the next
step when we start to place the features on the face because if
we make an error at this point and we
build on top of that, then we're going to end up with something that doesn't
look like the person, maybe doesn't even
look like a person. And my goal for this class with you is to make sure you get something that
looks like a person. It might not look
exactly like her because getting the likeness
does take a lot of time, and there's a lot of very
subtle details we need to observe and be able
to put into our drawing. But we want it to
look like a person. We don't want it to
look like, you know, something sort of distorted
and weird looking. So these first steps, the first two steps,
really important. They might seem a
little bit boring. You know, you want
to get to the eyes, and you want to draw something
that looks really good. But doing this work first is going to get
you a better result. And even though I might not
do it quite as rigid as this, I would always put in
that cross section. Might just be a real
quick sketch like that, and maybe a top and the bottom and just a guess for the width. So it might only
take you, 30 seconds to do if you're
doing a portrait, especially one from life
or something like that. So the next step is to start placing the different
parts of the face, and we're going to start
by putting the eyes in, and then we're going to find
the thirds of the face. So the thirds of the face are another rule
that we can use, and they are this space here from the forehead
to the eyebrow. I hope you can see
that right from the eyebrow to the bottom of the nose and from the bottom
of the nose to the chin. And you could try this
on your own face. Usually they're about the same. So forehead to
eyebrow, hold that, move it from eyebrow
to bottom of the nose, move it from bottom of
the nose to the chin. So I think my face kind
of fits that role. But, you know, if you
have someone with a longer chin or a
longer forehead, then those thirds might
not be exactly the same, and that's where we have to do some measurements
on the photograph, but we start with
that general rule. Before we can put
those thirds in, we're going to find the
placement of the eyes, and you'll see why in a moment. And the eyes the general
rule for the eyes is usually you
have an eye space. So here's an eye length. You have an eye length
between the two eyes as well. So it's kind of like
you've got one, two, three eyes across the face, and then maybe
half an eye length on either side of the eyes. I'll show you what that looks
like on our photograph. So these two eye widths, and can you see that
between the two eyes, from the inner corner of one eye to the inner corner
of the other eye, there's a similar
kind of length. So it's like we've got one, two, three eye
lengths across there. And then on either
side of the eyes, you see just here, and here maybe about
half an eye length. This one on the left might be a little bit bigger than
the one on the right. But the main thing is getting
those three eyes across, and this is where we
really have to take a guess and then just just done work
from there. We can't. There's not really any
way to kind of figure out exactly where
these marks should go. But I'm just going to put some marks in thinking
about one, two, three eye lengths across, and then making sure I've got half an eye length
on either side. So when you've been
doing this for a while, you get pretty good at
measuring these spaces by eye, but say you'd put in
your eyes like this. We tend to think of eyes
as being quite big. Actually, I have a
problem with drawing eyes slightly too big,
usually in my portraits. I'll see what happens
with this one. But if we look at
that, can you see I've got an e here and eye here,
they're about the same. But in between, I've only
got half an eye width. So then we know that we need
to make some adjustments. Leave those marks there, do some slightly bigger
marks and measure from those and make
sure you've got about the same space between the eyes is the length
of the eyes themselves. So now I've got one, two, three spaces that
are about the same, and I've got about half an
eye length on either side. If you've got to
bigger space here, you're going to have to
maybe move this eye across, move this one across,
make sure you've got the correct space in
between the eyes again. So there's a bird
of adjustment here. That's why we're
drawing light and where we've got our
eraser if we need. And I'm just going to put in
a very general eye shape, and later we're going to give
these some better shape. But this is, you know, what we think of eyes as almond shapes, and they're often well, they are not almond shapes
when you look at them closely. But let's start with that, just to have something in there. And the reason we want
to put that in there is because we want to be able
to put the eyebrows in now. It's going to help us
get the proportions of some of the other
parts of the face. Now notice when I
put these eyes in, I've made the height of them about half the width of
them, if that makes sense. They could even be
maybe just slightly narrower if I look at her eyes. So that height there should be half or less than the width. So if you have them
big like this, we're going to get
distortion because we're going to be measuring
other things from these eyes. The thing we're going
to be measuring is the placement of the eyebrows, and it's usually about one
eye height above the eye. I know there's a lot of things
I'm throwing at you here. So do pause the video if
you need to and maybe rewind it a little bit and
go over what I'm saying. But if you think
about the eye here, I'm generalizing the
eye and the eyelid, and then the space
above it to the top of the eyebrow, so it's
not very straight. But can you see that space is about the same as the
height of the eye? So we've got the eyebrow
line in there now. The space is about the
same as this space. And the reason we want
to get the eyebrow line in there is so that we can start to put it in these thirds of the face.
This is another rule. Remember I showed you
on the screen before, forehead to eyebrow,
eyebrow to nose, nose to mouth.
Sorry, nose to chin. So let's put in the
placement of the nose. Usually this third to the nose and the nose to
the chin would be the same. But we can't just rely directly on that rule.
We've got to check it. So let's have a
look on her face. What do you think? Those
two thirds the same? I think they probably
are, but we'll check. If you've got the printout, you could be checking this by drawing over top
of the printout. But there's one third, I'm
going to move that down and see if the
space is the same. And I'd say it's pretty
much exactly the same. So that makes it
really easy because then we know that this and this need to be exactly the same. We can check, make a mark where you think the middle
is between here and here. And then we can do
a little check. I think I've guess moon
right if you need to adjust it up or down. So
there's the nose. And then we're going
to compare that with the top third of the head, which is the one
from the eyebrows to the hairline or the
top of the forehead. So you can see that
the top third is a little bit shorter
than these ones here. So we're going to
make sure that is reflected in our drawing. So we could again take a
guess say about there. And then we can check and make sure we've got these
two are the same. This one needs to be shorter. So you see that one there
is lower than my finger. Which means it's
shorter than these two. These two, measuring it with my finger there might be a little bit hard to
see on the screen, but there's one, two, see how they're
exactly the same. And then this one is
a little bit shorter. So take a guess and then
do your measurements, your comparisons with
some kind of tool. It could even just be a stick. Doesn't have to be a pencil. We don't want to use a ruler because unless you turn it over and you can't
see the numbers, it's not really about numbers. It's this is 5 centimeters
and this is 6 centimeters. It's about comparisons, so
it's fractions, really. So this is half of this. This is one third of this. The numbers just get in the way. The good thing about
fractions is we could draw our drawing really small. Really big, and no matter
what size we do it, this here is still going
to be half of this. If you're dealing with numbers, then you've got to do all
sorts of mass equations, and it gets pretty complicated. In this method, we can
draw from photographs, but we can also use this to
draw from real life as well. If you're drawing a
person from real life, you can't really use a
ruler with numbers on it. Unless you're getting up
very close to the model, which would be a little
bit weird. Okay. So here's the forehead
here's a chin. I'm just going to mark that
in a little bit wider. And now we've got to
find the placement. We've got the
placement of the nose and make it a little bit wider. We'll find the
placement of the mouth. And when we do this, we're
looking at thirds again, but we're dividing this
space up into thirds, and these ones are
not going to be even. So the thirds that
we use for this area here are we find the
center line of the lips, and then we find the recess of the chin just
under the bottom lip. So you see in green there,
the center line of the lips, the recess at just beneath the bottom lip
where the chin goes in. That creates these three thirds, but notice how
they are not even, and they usually won't be even. That one that the
bottom lip falls in is pretty much always
going to be smaller. So take a little guess. So I'm putting in these
three thirds here and think about the order of them in terms of the biggest
and the smallest. So for me, smallest one would be this one
of the bottom lip. Then the next smallest
would be this top third, and then the biggest one would be this bottom
third of the chin, so one, two, one, two, three. I'm gonna make sure
I've got that on mine. Maybe I need to
bring everything up a little bit so that I have that bigger one
of the chin there. So check your order. Do you have smallest,
middle, and then biggest? You might have to
do a little bit of adjusting there to
get that right. Again, it's a rule
that we can use to check against the
person we're drawing. They might have, you know, bigger lips or they might have, you know, really small chin. In which case, maybe find this third and this third
are exactly the same. So this is our center lip line. Let's put that in, and one thing we can
check here is where the corners of the mouth
line up with the eyes. Usually, the corners line up
with the pupils of the eye, and I know we haven't
put the pupils in yet, but you can see how that line or that corner of the mouth intersects with
the eye, at least. So it just gives you an idea
of how wide it should be. It doesn't quite reach
halfway across the eye. Something to check
now so that you make sure your smile doesn't
come or your mouth doesn't come right out to the edges
of the eye or it's not stuck within the corners of the eye. And the other thing that
we can check here with these putcal lines is
where the sides of the nose usually line up with the inner corner of the
eye. So let's check that. It's another one that's going to depend on how big the
person's nose is, but you can see in this
portrait corners of the eye line up with
the sides of the nose. I've drawn those in very lightly just so that I can get
my width of the nose. If I was doing a
portrait myself, I wouldn't be drawing
those lines in, but I would be looking
at those lines visually. I'd be imagining those lines. So it's quite a good idea to physically draw them in
when you're starting so you can get used to
trying to observe that alignment between the nose and the inner corner of
the eye and the mouth and, you know, close to the
iris or the pupil.
4. Step 3: Sketching The Features Of The Face: Great. So now we've placed the different parts of the face. We've got everything
in proportion. We've got this weird kind of mask thing happening
here, very generic. So we've just got these
sort of symbols for the eyes and the line for
the nose and the mouth. The next step is to
sketch in the shape of the face and then also sketch in these features in
more detail and make them closer to the
likeness of the photograph. So we'll take a more careful
look at the shapes of them. And there's a couple of
tricks we can use to put the nose and the mouth
and the eyes in as well. When we come to put in
the shape of the face, we're going to use angles, and I want you to really try hard to stick to
just using angles. You know, when we put in a chin, we sort of think of
it don't do this, but we sort of think of
it as being rounded, and then the jaw
is being rounded, this kind of egg shape. But that's very generic
like these eyes. We want to get
something that shows the expression and the
ness of this person. So if you look at the
angle of the chin, I've done a line
straight across there, but have a closer
look and look at where there is a straight line on an angle that fits along
the line of that chin. So that's quite important.
It's a likeness, a point of likeness for
this particular person. That slight angle, the
chin, don't overdo it. It's just, Oh, I've
pretty overdone mine and make sure you don't lose your
bottom of the chin mark. Just a very slight
shift from horizontal. Then if we look at the jaw, again, looking at angles, see if you can get an idea of the angle of
that side of the jaw. We can change this
and adjust this, but we want to put something
down first, have a go. The angles on either side
of the jaw are different. This one is a
little bit sharper. Then this one, which
is a little shallower, just a touch shallower. And then coming up to
the sides of the face, we're coming up to probably about here to that
point that we had. But see where the
angle takes you. It's not straight up and down. There's a slight angle there. Remember, these sides of
the face can be adjusted, and I generally do
have to adjust those. And then as we come up
this side of the face, we've got that angle, maybe
another slight angle there. And then this one seems to
be a little bit straighter. What are some other
key angles you can see around the top of the face,
around the hair line there? We've got one coming
down a little bit, one coming down on this side. Maybe an angle,
something like that, and this one's got quite
a strong angle like that. So putting in the angles first, and then we can add the curves. So here's what I see. The
key angles of the face that are going to give
it the likeness of this particular person. So go around your face. I'll leave those lines up
there just for a little bit. You can use those. If
you've got it printed out, it'd be a good idea to draw those on top of your printout. And then once you've
got those in, then you could add
in a little bit of roundness if you want
to join these lines up. Keep looking at the
photograph as you do this. So if I just join
this up like that, it's not really
following the shape of that side of the face. It's quite a subtle curve. Make changes if you see them. If you find that when you go around again, something's
not quite right. I think I had this a little
bit too straight here, and then you can round things
off just a little bit, but keep those nice
strong angles. You're just rounding off
the corners a little bit. Now, we've got an even
creepier looking mask. Let's just do a couple of
checks before we go in and start putting in the rest of
the features of the face. One way you can check
the position of the nose and the width of
the eyes is to think about a triangle or an angle
that joins the corner of the nose here to the
outer corner of the eye. And you could draw this in very lightly just to
get a feel for it. It looks like that.
And what we're looking for in our drawing is just that we've got a
similar kind of angle. If your angles are like this, more like 45 degrees, rather than above 45 degrees, then you know your
eyes are way too wide, or maybe your nose
is too narrow. And if your angles
are like this, then you've got the
opposite problem. Either nose is too wide
or eyes are too narrow. We're looking for
that kind of angle, that relationship
between the eyes and the nose. You want
it pretty close. I mean, if it's not exact,
down to the degree, it's probably not
going to be a problem because we're going to
do a bit more sketching on these eyes and this nose as well, so it may change slightly. But generally, we want
that triangle shape. The other thing we can check is look at the corners of the jaw, wherever you put those
angles in and think about where they intersect
across the face. So one thing I notice is they're on slightly
different levels. This one over here is a little
bit lower than this one. And you can see that this one on this side intersects with
what would be the lower lip. So I've got that in the
right place. It's great. And I've got this one a
little bit lower intersects more with just underneath
that bottom lip. And when I put these angles in, I'm pretty good at
drawing portraits now. I've done a lot of them, and so I've got that
pretty much straight away. You'll probably find that you need to adjust
things like this. And that's why we have all
these checks in these rules. So check that this angle
of the jaw comes up to about the bottom lip when
we align it horizontally, and this corner of the jaw here is slightly
higher than that. Put in the here
and we're going to do this the same way we
did the edges of the face. We're going to
think about angles. We're going to think about
here, here, down here. Look how straight that is. It's got a slight
curve at the bottom, but it's almost straight down a little bit
of an angle here, another one here, another
very strong angle there. It's not straight up and down. So again, these things
are going to give you the right likeness of the person rather than just sort of sketching something
around like this, which is quite typical when
you're starting out during, you want to look
for strong angles. This one here comes quite
close to the side of the head. We've got to leave a little
bit of room for the ear. That one's going to
come straight down. This one here, maybe this one's a little
bit lower, I think. You can adjust things, you
don't need to stick exactly to the top of the skull
that we put in there. If you feel like you need to make the hair a
little bit higher or lower, you can do that a
strong angle in here, a bit more space for
the air on the side. Then we can put in
the neck as well. Think about how it aligns
with that corner of the jaw. You could also draw
find the angle, but also draw a straight
line up with that angle, thinking about how
it intersects. It almost comes just about
the corner of the eye. So mine's about right there. And then this other one
is straight up and down. Again, looking at where
comes inside the corner of the jaw and just goes
through the eye there. Can you see how, if
you've got one thing wrong and you use that
as your guide like this, everything else is
going to be wrong. So if I had my eye and it
was too small, remember, we measured the distances
of those eyes or we made sure we had three across the
center, three eye lengths. If this one was too small
or say it was too wide, we made both eyes much wider than the
space in the middle. Then when I go to
put in this neck, and intersect the eye, it's
going to be way out here. So again, those first
steps so important because they set the foundation for everything else that
you do on top of that. Round off the here a
little bit if you want to. We're not going to
do much shading or anything on the here
because it's not the focus. We really want to get
this face in here. So we've got to put in the ears, take a look at the ears
in the photograph and think about how you
could align them. What can you match
them up with in the portrait to get them in
the right place on the face? So we can look at the
bottom of the ears. I think the one on the left is slightly lower
than the one on the right, but again, it's such
a small difference, I'm not going to
worry about that. See how that falls
below the nose. It's probably about the
top of the top lip, and we haven't put
the top lip in yet, but you can get an idea. So that's going to tell us where the e is starting at the bottom. Or where it comes down to
where the lobe comes down to. And then we can also look
at the top of the ears, and again, one slightly
higher than the other. So the top of the ear is coming just across the
top of the eyes there. This one on the left
slightly lower. So again, putting in a mark that aligns with
the top of the eyes, and then this one is going to be just a little
bit lower than that. And to put in the
shapes of the ears, we're going to keep
it really simple. Again, not a main feature of this particular
class or drawing, but we've got this angle, this one, and then this one. So again, angles, you're sick
of me talking about angles, but it's so important to override what we think
we should be drawing. So we think of an ear as
being rounded like this. We draw that. We're going to get something that looks cartoonish. The angles are the way to start, like putting down a skeleton. And then you can
build on top of that, and then we can go through and round things off if we want to. But we've got that
nice strong angle, correct angle of the
side of the ear. This one on this
side, we've got, have a look and
see if you can see the angles, three angles there. I'll be slightly different
than the one on this side. And this one comes out
a little bit further. Still using really light lines. Mine is darker than
yours should be. So once we put in those
angles really lightly, then we can curve things off. Take a look at the curves
that you can see there, and you're basically going through and redrawing it again, but you've got that guideline now of the angles underneath. So you're not going
to exaggerate curves and make it
look cartoonish. It's a bit of hair coming
just in front of this one, a little bit in front
of this one, too. We're going to put
in the features of the face in more detail. Is there anything about your portrait that
needs to change? We've checked the alignment
of the nose with the eyes, the alignment of the
jaw, maybe, you know, the side of the face here, check that and make sure you
don't have it too white. Mine might be a little
bit white on this side. There's a bit of an angle
that comes in here. The side comes in a little
bit here, too, as well. So quite straight
coming up to that ear. I might have gotten a little bit too far in on that
side, actually. So again, angles, see, I'm only drawing
with angles when I put that side and this side. Even though I know
it's kind of curved, the angles at each end of curve are what's going to give me the correct
shape for the curve. So once I've got
those, and then, yeah, I can curve over top
of that if I want to. Just go round your drawing, see if there's anything that looks a little bit off
that might need to change And it's a little bit hard at this stage because we
don't have the features in so there's a lot that isn't going to
look like this person. It's very mask like, robot like. Now that we're going to
put it in the features, this is where we can try and get a little bit more likeness. But even if we don't get
the likeness, hopefully, you've got something that looks like a person or is
heading that way. Okay, let's get
these features in. When we do this, we want
to make sure we don't override any of
our structure that we've got down here,
meaning, you know, we don't start
drawing the eyes in a different place so
that they don't match these proportions that
we've carefully measured, you know, the inner corner and the outer corner of the eye. The actual shape of
them could change, but we need the proportions, the width of the nose,
width of the mouth, all of that to stay the same. Can get rid of all of these
lines now if you want to, and that sort of depends on what you
want to do with this. If you want to have it as more
of a diagrammatic drawing, so you can see all the
things you've done, then you might leave them in. But we are going to
do a little bit of shading in the next step. So I do want to get rid
of some of these lines. And if anything looks
way too dark in yours, then maybe just erase that
a little bit as well, just to push some of
those dark lines back. That looks pretty creepy now. Okay, let's start with the eyes. I tend to start with the eyes and then move to the
nose and the mouth. Another nice way to
start might be the nose, and then you're moving outwards. But I mean, people
like drawing the eyes. It gives a portrait
some character and you start to see what
it's going to look like. So the rule for drawing
eyes is that they generally have three
angles along the top, one, two, three, and two angles along the bottom
that are a lot flatter. So if we zoom in
on her eyes now, Can you see those
three angles there? The top is a curve, but there
are angles to that curve. That's what we're looking for. If we want to get the likeness of this particular
person in her eyes, we need to get those
particular angles in there. So we've got one, two, three angles along the top, and shallow angles, one, two, along the bottom. So that's what we're
going to put in. And on the other eye, we'll probably treat
them about the same, but if you look
closely, they are different. Each
eye is different. I've got one, two, three, and then one, two. You see how slightly the angles of them are slightly different. I'll take those lines away and see if you can see them
and we'll draw them. So the key thing to
remember is that the bottom part is shallower. We'll start with the top and
you start on either side. One, sticking to
your proportions. Two. You can draw in
whatever direction you want, three, and then just making sure these
ones are shallower. One. This one's actually quite flat across
the bottom there. It's almost horizontal. And that's made the eyes
a little bit narrower. That's okay. And then we can put in the
iris and to put in the iris, I'd look at those triangles
of white on either side. There is a bit of a curve here, and I'll allow you
to draw a curve now. We can break it down to angles, but they're very small angles, but notice how the curve of the iris hits the
bottom of the eye, the bottom eyelid, and then it starts again over
here on the other side. And we're looking at that
triangle shape there. It's a lot smaller on this side. So rather than drawing
a circle for the iris, we're looking at the
spaces either side. Maybe mine is I wonder if my
eyes are a little bit big. I did say that, I tend to
exaggerate the eyes a little. It might be okay once we get
everything else in there. And then look at the crease
of the eyelid above the eye. That also has three angles, one, two, three, doesn't always
follow the eye exactly. You see this little
one on the side here? That little angle
is quite sharp. And then we've got one
that's horizontal, and then we've got
one that comes down here at about 45 degrees. So there's so much
detail even in these initial structure stages. The more work you
spend on these, let's put in the
angles of the side. Have a look. Look at the
photograph as you're drawing. Find these angles.
But the more time you spend on these parts
of the drawing, the more accurate your drawing
is going to be in the end. So we could draw a
lovely eye that has, you know, beautiful eyelashes
and lots of detail. But it's not that I because we haven't got the
correct angles. We've drawn a generic or
a cartoon kind of eye. So I just made this one
a little bit shorter. I think I was missing a little
bit of space on that side, which maybe means that all
of them need to come in? No, I don't think so. I've still got that space between the eyes. I think I just had them a
little bit, a little bit too. They were just getting a little bit too long on either side. And then again, looking
at the white of the eye here to get an idea
of where the iris goes. So if you look at the white
of the eye here and you put it in and your
iris is like an oval, then something's gone wrong. You're kind of flicking
your eye between the two spaces between the shape of the circle of the iris and then this
negative space in here, they need to match up in the same way that they
do in the photograph. And we can put the pupil in it's a little
bit hard to see, but I like to draw in the
pupil and also draw in that little white highlight, which is just hitting
the side of the pupil. Look at the pupil and
think about where it sits between the top and
the bottom of the eye. And this drawing this photograph is pretty much in the center, maybe slightly above center. And then I'm going to
actually shade that in now since we've put
in the details. And when we do our shading,
we can do more later, but we're going to
keep it pretty basic, almost just like
coloring in the values, and then you can do more work
on it later if you want to. These eyes are quite dark, but we can add in more dark later once we see how
everything else is looking. Oh, we got to put in
this eye lid crease, and this one's
different to this one. So we're going to
angle coming up here from the inner
corner of the eye, and then this one just
kind of fades out. We can put in the eyebrows. Hopefully, things
will match up with our eyebrow line still. So again, angles, what
angles can you see there? One, two, three, and
this one is one, maybe only two
angles on that one. It's a bit high, my angle. So always looking and adjusting
as you see new things. The bottom of the eyebrow might not match the top
of the eyebrow. So I've lost a bit
of space in here. I've definitely done
something wrong. I think my eyes
are just too big. So what I can do is
just try and bring them down just a little bit
without changing too much. Just bring that upper eyelid
crease down a little bit. I can bring the eyebrows
up a little bit, as well to make sure I've got
enough space between them. It just means I have to be
careful about this distance, but I mean, it's easy
enough to change, as well. You know, I could change
that forehead a little bit. But think about
what happens if you change that forehead,
which I just did. But, if I change that
forehead height, I'm changing its relationship to these other two thirds that
we already figured out. And so that could cause problems
later on down the line. And this eyebrow, we're
going to put in as well, and just putting it in is
kind of a shaded shape. The angles are really important. The strong angle there. This one is a strong angle
across the top. Maybe I've gone a little bit low with that eyebrow, as well. Okay, for the nose, our general eye shape
looks like this. Our general nose
shape is we have a circle or even a
strawberry shape for the ball of the nose. Can you see that part at
the front of the nose, and then we can have two
leaning ovals for either side, the wings of the nose. And it looks a bit silly there, but this is just for trying
to visualize the shape. Let's keep it a circle, just
make it a little bit easier. And to put something down that has a little bit
of three D form, remember our edges of
the nose are here. We don't want to go
outside of that, so I'm going to put down a
circle, two leaning ovals. And usually once
we put in those, that kind of gives
us the nostrils. Now, do have a look at the
shape of the nostrils. Again, if you can see angles, then put in those angles, there's two quite
strong angles here. And then the sides of the nose, strong angle there,
strong angle here. And then, you know, we
can rub out those lines if we don't want those
shapes in there, but it just gives us
some form to work on top of as we come up
the side of the nose here, you can put in a very
light line there that's actually going to be that shadow on the
left hand side. This one here, the
side of the nose, you can hardly see a line. So if we put a
hard line up here, we're going to get that
cartoon effect again. There's very little
difference between the top of the nose and as you come through to the cheek in
terms of how dark it is. So we're going to keep
that really subtle. This side here, we
can be a little bit stronger with the
shape because there is going to be a shadow that comes down the side that
we're going to be shading. Okay, so we've got
the nose in there. Let's put the mouth
in. For the mouth. We're looking at the
center line of the lips, and you've usually
got six angles. So one, two, three,
four, five, six. It's almost like, you know, kind of a bird shape and then a little bit of
corner on the side. For this particular
expression that she's got, it's more of a line
across straight across the center and then down and
then up, down and then up. So look for those angles. I'll draw them on the screen. One, two, three, four, five. 12, three, four, five. There's a lot of detail in
that center part there, but you see it's pretty
much straight across there. Look at the angles
on either side. This one, I think is a little
bit higher than this one. And then let's put
in the top lip. We want to keep
this really light a little bit like the
side of the nose. Notice how the top
of the top lip, there's no lip liner. It's not dark, like the
center of the lips here. And we can put in two
very shallow angles for the cupid's bow there, and then maybe one or
two angles coming down looking at where they match up with the corners of the mouth. Sometimes the corners
of the mouth go out further than the
edge of the lips. Looking for angles, bottom lip. We've got that
recess of the chin. So maybe just
slightly above that, we've got pretty
much a straight line across and then
coming up to meet with those corners of the mouth or corners of
the center lip liner. And the chin, I'm wondering if my chin might need to
be a little bit bigger. But can you see that ball of
the chin in the photograph? It's something like
that. I'll take this op away and see if you can
see that underlying shape. You see how that juts out in
that sort of rounded shape? Even though we still
got this angle down here, we want to keep that. But we want to get that sense of the chin projecting forward. So I put that in that
circle in there. We can always erase
it if we want to, but just to kind of get
some of the shape. A
5. Step 4: Adding Light & Shadow: So you can see how I was
adjusting things as I went. We've got these rules
of the thirds of the face and how things
line up generally. But we also want to be
using our observations. So if you see something
that's not quite right, don't just sort of fiddle around and see if you
can get it right. Think about what it is
that you need to change. So I made the chin a
little bit longer, which is okay, actually, because I made that forehead
a little bit longer, too, so it's probably
going to be okay. Overall. Nothing here is too dark that I can't change
it now if I needed to. So if I, you know,
made that forehead too long or made that
forehead longer, made the chin longer, and
then suddenly realized, Oh, the center third now is
going to be way too short, then I could, you know, bring the nose down a little
bit and bring the chin down even further because I haven't gone too dark too soon. It would be a pain because I would have to move the
mouth and everything, move the ears, move the jaw, but I could do it if I had to. But those changes that
I made were, you know, that's maybe 2 millimeters I made the change
there of the chin. It just felt like it
needed a little bit more. My eye is reasonably good, and I can see some of these other shapes
that I'd have to fit in the shadow shape
and that sort of thing. Don't worry too much about that if you're not
seeing those things yet, it does come down
to subtle details, and that's how you get
a really good likeness. But we are focusing on getting something that
looks like a person. Hopefully you've got something
now that is looking like, you know, sort of
a regular face. Nothing is too distorted.
That's the key. That's what I want you
to learn how to do. Everything else comes
with time and practice. So we got one more step to do, and that is adding in
the shadow shapes. And she looks probably not a
lot like that woman there. I am going to tweak
a few little things, but some of the likeness
does come from the shading. So at the moment, her
face is really flat. But can you see that strong
jaw and cheek bone shadow on the left hand side? So that shadow on the left, that is going to make her face turn to have a different
plane of shadow. At the moment all of this is
sort of flat on one surface. So it's actually going
to make her face feel a little bit narrower, which I think this needs. And also the cheek bones. If we put a bit of shading in
there above and below them, we'll get those sticking
out a little bit. So the shading actually
changes the face quite a lot. It can make things
look more accurate. And so what we'll
do now is we're actually going to draw
in those shapes of shadow that you can
see a little bit like I draw in this
shape of the chin here. Stuff that we can rub
out if we need to. Hopefully, we can just
shade over top of these lines, and you won't
be able to see them. So super, super light, I want you to try and find
the shapes of shadow. And what we're looking for is parts that are either
shadow or light. So we're trying to divide
the face into two parts, light parts and shadow parts. Can think about the light coming from this
side of the face. It hits the nose here, that side of the nose is light, but look at this side
of the nose is dark because the light's coming
here, nose sticks out. There's a shadow
on the other side. Same with the sides of the face. The light is coming
from this side. The mouth and the chin
stick forward a little bit, and that means that this side
of the face is in shadow. So start by drawing
in the strong one. Whatever is the strongest
thing you can see, and for me, it's this
angle coming down here. Think about how it
comes down on an angle, and then there's a shape
that comes up to the mouth. It may be down here and
curves around the chin. So that is the shadow shape. Can you see that
in the photograph? It probably comes up. It does come up around the eye here. There's a bit of light reflecting on the
side of the face. But either side of that,
there's some shadow. So here's what I'm
looking at. You see how within that pink
line is all dark, it's all in shadow. This is a really valuable skill to be able to break things
up into light and dark. It's going to give your
face three dimensions. So once you've mapped
in that shadow, have a look for another shadow, this one on the
nose, and, you know, where I see the edges of the shadow might be slightly different to where you see them. But I see a shadow
on the left side of the nose and coming up here, and it comes just
inside the eye, the corner of the eye, and then it goes up to the eyebrows. It's another shadow shape
there, something like that. Look within the pink
lines in the photograph, all the values in
there are dark. Under the chin here as well, there's a really strong shadow. Look at the shape of that. It's got a bit of a
jutting part there. I've got the tendons of
the neck coming down here. So using angles again, breaking things up into angles, looking at that shape
of shadow there. And then the here is going to be a dark shape, especially
down this side. The strong shape of dark there. And when you put
in these shapes, you might also see something
that's not quite right. So I think maybe this angle in mine maybe feels like it's
just just a touch too high. So I'm going to lower
that just a little bit. Think about where it aligns
with everything else. And maybe this one is a little
bit too angled, as well. And so I'm seeing
that when I put in these shapes of shadow. And so making those very,
very small adjustments. I know they're tiny and you might not be
able to see them, but those are what bring
you closer to the likeness. So you got that shadow,
that shadow, that shadow. Those are the main ones, but
even within this light side, there's a bit of a shadow here. There's a light part to the
inner corner of the eye. There's a little bit of a shadow coming down that
side of the nose. We can put that in
very, very lightly. The sides of the forehead. So the front of the forehead
is in direct light. This side of the
forehead has a shape. You look at it and decide
what kind of shape it is. Have to make a decision,
so we have to say, Okay, it's got these edges, not just sort of start shading. I mean, you can
just start shading, but you're going to get
something a lot more accurate if you actually define
where that shadow is. This one as well. It's
very hard to see, but I know that this
side of the face is not as brightly
lit as the forehead. It's a bit of shadow there. Maybe we could even put in
these shapes of small color, but just above cheekbone. You see the highlight
on the cheek bone there and the highlight
on this cheekbone. So just above that,
there's like a strip. Of pinkish color. And there's a darker color
than everything else. So that can be
shaded in, as well. Okay, so we're going to start
shading and we're going to do the darkest shape first. So I'm going to start
shading in this. Now, when you're shading,
we're going to keep it very generic shading. By that, I mean
just up and down, blocking in that shadow shape or side to side or on an angle. Okay. So whatever direction
feels natural to you, I'm using a reasonably blunt pencil and trying
to use it more on its side so that I can
get a smoother finish. Other than holding
it up like this, you're going to get
lots of scratchy lines if you hold it more on its side, and just let it brush back and forth across the paper,
holding it quite far back. You'll get something that
feels a little bit softer. Oh, all of this error
is in shadow as well, and we didn't put any
details in there, but we'll put the
shadow in first, and we can do some
details over top. There's also this shadow here
that I forgot to mention. The filtrm is that little dent
just below the nose there. There's a peak here and a
peak here and this side, because the light is not
reaching it is also in shadow. So you can mark out that shape. It comes down from the nose
to the lip there and there. Get rid of all
those lines there. If you've got this
printed out, again, you could go over the
printout and actually draw around where you
see those shadows. So all of the side of the
nose is in shadow here. Nostril underneath the nostril, there's a bit of shadow in
this side of the filtrm there. So can you see by
putting this in now I've got a side to her face? The shadow creates the form of the face, and that's
really important. There are more subtle
shadows as well, like just under the nose here, the filtrm just under
under the bottom lip. But this shadow here creates that three
D form of the face. It's showing the shadow
side of the face, which is really important. We can put a shadow here. This one can be a
little bit lighter. Maybe under this
cheekbone, as well, I can see it's a
little bit of shadow. I haven't marked
that one out and we can put in the color that rosy color above that cheek
and same with this one. Now, I've marked all those out, so it's easy for me to
just fill in the shapes. If I hadn't marked those out, then I'd have to look
really closely and make sure that I'm not shading where I shouldn't be shading. There's a little bit
of a shadow under here, so I haven't
marked this one out, but it's just a little touch there that comes
underneath the cheek. As soon as we put the here in, that's going to make a
big difference as well. But let's also put in
the shading of the lips. It's not so much that
the lips are in shadow. Sometimes the top
lip is in shadow, but it's more that
they are a dark color. There is a bit of a highlight here and a bit of
a highlight here. And above that is darker, probably the darkest
part of the lips. Maybe a little bit darker
on this left side as well. So we are kind of coloring
in a little bit here. To get something down. So
if you're happy with that, if you want to, you could
give it a bit of a smudge. You don't like that. Liny look. Don't mind the liny
look. It depends a little bit on
your paper as well. And with the tissue
to smudge it, you're just putting
your finger under it and really light
touch, not scrubbing. And if you've got
quite a dark patch, and then you move
to a lighter patch, you'll need a new
piece of tissue. You see the graphite
coming off here. We don't want to put
that back on the page. This papers not great
with the smudging. You see a bit of the
marks coming through. So it's not bad. It's starting to become closer to
the likeness of her. I'm just flicking my
eye back and forth between the photo
and the drawing. Maybe you can do that with
my drawing as well to see anything you can see
that needs to change. I know it doesn't look
exactly like her. So why? What is it
that's not right? I can see at least one thing. So one thing I can see is, I think the eyes
are slightly too big, but apart from that, this chin is not coming
across far enough. So if we look at this point the corner of the chin, there's
one there and one there. I draw a straight line
up, vertical line. It's pretty much in line with
this corner of the mouth. Minus way over here. So putting that in
a little bit more accurately is going to change a few other things
like the angle of the jaw, which I have to
re look at again. It's bringing it a
little bit closer. It's a small difference, but just makes her face shape a little closer to what
it is in the photograph. And was just lengthening that chin Every little
thing I notice and change to make it more
accurate is going to bring it closer to the person that I
want it to look like. It's going to make the likeness better with every little change as long as it's
the right change, a change in the right direction. One other thing I notice is
I'm just looking at the eyes. In this angle of the eye here, I don't know whether I got that wrong in the first
place or it's just sort of somehow flattened itself out as I was drawing
around it again. But her eye slants up a
little bit more than that. You see the difference between
the photo and my drawing. So I need to correct it. I'm
not going to rub it out. I'm going to try and draw it first, looking at
the photograph. And then I can rub out the
line that I don't want. So when we rub out something
and then try to draw it again and then usually end up rubbing it out and
drawing it again, we don't have a guide to see
the change that we've made. So keeping the first line in there can really
help with that. I think iris is a
little bit big. Bring it in a little
bit on each side. And once you're happy with that, you can go even darker
because her eyes are brown. It's looking close
already with that one. It's a bit of shadow here on the eyelid and a bit more shadow on the inner corner of the eye or in a corner of the eyelid. Just do a check of
this eye as well. And this one it's got quite a strong line
of lashes there, so maybe we'll darken
that up. Check the angle. And again, maybe my
iris is a little bit too big and looking at
the shape on either side. And then coloring that in dark, you see the difference the
dark irises make as well, because she does have dark
irises in the photograph. And so once we put
in the dark here, that's going to make a
big difference, too, and take it closer
to the likeness. So I think we'll do that. We've got our base shading.
We'll put in the dark here, and then we can
have a fiddle with some of the other things we'll
need to put in the ears. Just put in the shading of
the nostrils now, actually. Just darken those
up a little bit. Hopefully, you still
got the shape in there, but if you don't
have another look, should have another look anyway, because every time you look, you see things a little
more accurately, I think, it's sort of like your
eye gets used to it after you've looked at it a few times and you start to see
it more clearly. So I'm going to put in the h, and this could get a little bit messy because we'll be working from one
side to the other. So you can always get a piece
of tissue or something. If you want to put that
over your drawing, if you get smudges
on your hands, I don't usually
worry about that. Make sure we've got
that jaw line correct, and we're going to put in
the shape of the hair. Now, this is a good way to check the shape of
that jaw line as well. I look at the shape of the
hair, this shape and here. So here, I've got
quite a long line, and maybe not quite
the right angle, it maybe needs to come
up and out a little bit, and this part will
be a bit shorter. Around the shape of the ear. I'm almost outlining this now because I know it needs
to go quite dark. Especially the shape down here. If you want to put in a bit
at the shoulder, you can. And all of this is
going to be quite dark, but I'm going to push a little bit harder and I'm just going
to draw straight lines. I'm not drawing here so much, though it kind of suits
the texture of here. I'm more just locking it in getting something
darker there. And you could switch
to a darker pencil, too, if you need to,
like, a two B pencil. This part of the he is
a little bit lighter. So using straight lines. And we've got this part
here is quite dark. So again, I'm just
blocking it in. If I was doing a really
finished portrait, then I probably wouldn't
use these sorts of lines. I'd shade more of a soft layer. I can do that here
with cross hatching or something and
then smudging it. But this is more just to get those values
in there, you know? Quite dark here. Look
at the difference between the skin and the hair. This part here this
edge here is very dark. We're gonna keep the
hair pretty loose. I'm not gonna go into much
detail about drawing the hair. We just want to
get something that feels dark and not blond. It felt like it
was blonde before. Now, the dark line on this side. So I'm following the shape of the here on the side,
but I'm not shading. This isn't here, so this is
not the way you shade here, is basically what I'm saying. It's more that I'm just
I'm blocking it in, and I want to keep the same direction
as the here, really. But you could do
all of this up and down just straight up and down, and it would do the same thing. And very dark down
beside the neck. And looking at that
shape of the jaw again, we got an opportunity
here to double check and make sure we've got
things in the right place. You can take more care
with if you want to. I'm aware of time and I don't want to spend a whole lot of
time where I'm just shading. This also shows you
that, you know, you can treat it quite rough. Eyebrows quite dark. Not drawing here for the eyebrows single here.
I'm looking at the shape. Remember those angles
that we found? We need those same angles. Keep looking. So every
time we look again. Eyebrows quite important, quite important for
the expression. The angle of the eyebrows is quite important, is
what I meant to say. You might have noticed I'm
kind of a loose sketcher. I keep things, maybe
a little bit messy. You might be someone
who doesn't like that, and you could go through and carefully outline the shape of that eyebrow if you want to. That would be completely fine. It would just be your style
being different to my style.
6. Adding More Details: So I think of getting
something that looks a little bit
more like here. Like I said, it's not the goal
of this particular class. We want something that
looks like a person, definitely looks like a
person, which is good. There are a few things
that we can tidy up here. We're going to fix up the ears, put a little bit more
detail into the ears, just a little bit,
and we're going to bring a little bit more
darkness to the mouth. Then from there,
it's really going to be up to you how much more
you want to do on this. I'll probably speed
up what I do. But at the moment, we've got a range of values, I have a range of values
that really just goes from white to gray, not really even dark
gray, maybe the eyebrows. But if you look at
the photograph, there's some really,
really strong darks, like the iris and the pupil. And as soon as I
start to put in that, you see the difference between
that one and that one. I didn't even push too hard, but as soon as you start to
put in those dark darks, you're going to get something
that has a lot more impact. So that's something that I'll do after as well,
and you can do that. Don't really want
to do that until we're happy with everything else because it's harder to
erase dark pencil, basically. Let's quickly do the ears in a little bit more detail in
that mouth because the mouth, like the eyebrows, so important to getting the
correct expression. We'll focus in on these ears. We're not going to do a whole
lot of detail because what happens with detail as it
comes forward in a drawing. We don't want these
ears to become more important than the eyes
and nose and the mouth, but we can definitely
give them something. And I'm just putting
in this line of the side of the face here. And as soon as I do
that, I see maybe my ear is not quite
white enough. So I'm just going to
adjust that if I can. I haven't gone too
dark with the here. You see, I can just
erase it pretty easily. There's another good reason to use your pencil
more on its side. It's like you're laying
the graphite on the paper, more on the surface of the
paper rather than pushing it hard into the grain
of the paper. So I'm just going to make
that ear a little bit wider. Another small change,
all these little changes take it closer to the likeness. And I still want all
of this air to be in shadow because it is in shadow. There's no light
in there at all. There are lighter
and darker parts, but overall, they
are all in shadow. It's a bit lighter
down here than it is, you know, in the
center of the air. And then I'm just going to use
my angles again looking at where the inner part of the ear is maybe three
angles, one, two, three. And you'll notice that, you
know, when I draw these, I do a couple of lines for each one because I'm
figuring it out as I look. I'm not just going,
Okay, it needs to have three angles,
one, two, three. I'm looking and I'm adjusting
the way that my pencil moves as I observe it and, you know, take note
of what I see there. And then at the top
here, again, angles one, is to create that
fold of the ear, one, two, three, maybe a
bit of shading in there. And that might be all we need. Take a look at it and
see what you think. Maybe a little bit of
shading in here, too, because it's just the
bottom part of the lobe and maybe this ridge
that are lighter. So we've got an ear. I've got
a dark outline around here. We don't want outlines, ideally, but that will become the
shading of the heir. You see, when I put
in that shading, the outline just disappears. Okay, so there's one ear. We'll move over to
the other. This one is a lot more in light. It's checking the top, the
height of the top of it, still lining up with the top
of that eye. That's good. Feels a little low. And then same thing,
putting in some angles. It's put in the side
of the face here very lightly because it doesn't
have a strong dark line. And then the inner
part of the ear, again, lightly because
it's not in shadow, there isn't a hard line there. Just put in two angles, and then I'm going to put
in the angles of the fold, the top of the ear, one, two, maybe just
two for that one. And then just
anywhere you can see a little bit of shading there, maybe a little bit
just underneath this part, it's
going to be a ridge. And a little bit
underneath the fold. It might be all it
needs, you know, just a few little things. And if you look up close,
then, yeah, it's weird. So that's not an
era if I isolated that and just looked at just that ear part.
Then it looks alien. But when we look
at it from afar, in the context of
everything else, it looks like an ear.
It's not a feature. The front of the
face is the feature. We've got the lips
to do, and then I'll leave you to finish
it how you like. The important thing
we want to get with these lips is the darker value. So I'm going to use
two B pencil here. You could use even
darker if you want. I'm looking at that
center lip line. And I'm just going to
work my way across. I'm shading rather
than drawing it. And I'm looking for
any subtle differences that I can see in the angles or even little bits
that come down or up. You see I'm shading it? If I do all these
things with hard lines, they're going to
look really weird. So even though,
you know, this is a line that goes through
the center of the lips, where they join together
or close together, it's a soft, soft line. And shading is what's gonna give you that soft line
rather than, you know, something like this, that doesn't match the
quality of this line. And there's a few little
shaded bits that come up. Doesn't need much. And then I'm just going to shade
a bit darker there. And you see underneath
the bottom lip here, there's, again, a line, but it's soft and dark and soft and disappears
as you come this way. Very, very subtle. This side of the lip is a little bit darker
than the other side. That's really quite
tricky to see. And part of that is I know that it's in shadow because the lips sort of turn around
the front of the face, light's coming from the left. So when you learn those
things about form, you kind of know
what to look for. It might be a little bit
extreme that part there. It looks almost like a fang. I'm just gonna get rid of that. It would be fine if
I had shaded in, or if I did shade in
all of the bottom lip, even darker, which
could afford to go because you know,
it's not white. It's pink, and pink
is darker than white. I'm just looking at that
lip and that top lip. I'm making my
little adjustments, trying to find things that
are closer to the likeness. Maybe this comes up
a little bit more. No outline around
the top of the lip. There might be a little
bit of shading up there, but no lip liner and no outline to the
side of the lip, too. Look at where it just
disappears into the side of the face there. Two
little highlights.
7. Finishing Up & Next Steps: So I think my portrait looks a little bit happier than the one in the photograph. Maybe I think just the
corner of this mouth, something here that needs to
change about the shape of the top lip and this little
corner, the angle of it. So really, really tiny
tweaks like that. It's crazy what a
difference they make to the likeness. That
takes a bit of time. It takes time in terms of, you know, months or years, but also it can
take time just in terms of finishing
this portrait. If you go take a break and then come back, you're
going to see something new. You're just giving your
brain a little bit of time to get used to it. And to forget about some of
those things that you might have been a bit obsessed
with trying to get right. And you see things overall, and then you might zoom in on something else that you
didn't pick up before. I've got maybe a little bit
less of a strong angle, it needs a strong angle
down the side here. But what I'm going to do now
is I'm going to go through pretty much going to do
the drawing gain over top, and this is what the
portrait drawing process or any drawing process is like. You're refining with every pass or every time you
come back to it, you're making refinements,
you're making changes that take it
closer to the likeness. So I'll basically go
over everything again. But as I do that, I'm
going to look for any little changes in shape. I'm also going to
look for any changes in value that I need to add
anywhere I need to go darker, like the side of the eye here, the eyelashes, just underneath
this side of the eye here. There's some darker parts that
need to be added in there, this side of the eye. I don't think we
added that one in. Just beneath the eyebrow there. And then I'll make a decision when it's close enough, still when
it's finished. I'm also going to go darker, with these dark shadow areas. What I think you could
do if you want to is go through and look at the shapes,
maybe take a break first, and then come back and
just look at your shapes, compare them to the photograph,
look at your angles, see if there's anything that stands out to you
in your drawing is not being correct and really analyze that
in the photograph. What are the angles
in that photograph? Are you just drawing what you think you want it to look like? Or are you actually looking at that photo I've got it over
here to the left of me, so I'm looking at it
as I taught to you. But you actually looking at
that photo and seeing angles, seeing shapes of light and dark? That is what's going
to get you a likeness, not just drawing something
that looks pretty, like a nice almond shaped eye. We want to look as close to
that likeness as we can. Hopefully you've got something
that looks like a person, that was my goal and that you're happy with what
you've learned from this. But yeah, that would
be the next step. Look at your angles,
look at your shapes. Just do one more assessment of that once you've had a break. If you want to take it
even further than that, then you could look
more at your values, and I'm going to do this. You can look at the
darks and the lights. We've divided the face
up basically into light. And shadow. But
within those shadows, there's going to
be darker shadows. So I could go through and
add in a darker layer here along each of that cheekbone and coming up here underneath
the chin needs to be darker, the hair needs to be darker. And then within the lights,
there's different values. So really, a lot of this white in here
should be shaded in. If you look at the photograph, the only parts I
would leave white are down here and the very
lightest parts I can see. So across the forehead just here across the top of the brow line, maybe up through the forehead.
I keep that really light. I keep the cheek bones white because those are
the lightest parts. Everything else needs to be darker than the lightest parts. So technically, you know, all of this here
would be shaded in. A light value apart
from that part. The nose would be shaded in, a light value apart from that. See that little
highlight on the tip of the nose there. We
didn't draw that in. There's no point
drawing it in unless you're going to put
in the shading. I thought it would look like
a wart on the end of nose. But as soon as I shade around that and have that
little highlight there, I can bring it back
with an eraser. That's going to give the nose
a bit more shape as well. So to go over that, again,
there's two options. First one is to take a
break and then go through and check all your
shapes and check all your angles and try to find, let's say, three differences between your drawing and the
photograph and correct them. Take a really close look
at that photograph and adjust your drawing so that it matches the photograph
as best you can. Second option is to do that and then also go through
and adjust your values. If you're feeling like
you're up for the challenge, see if you can add
more values into the shadows and more
values into the light. I hope you've
enjoyed this lesson, and I hope you've learned
something from it, and it's given you a place
to start with portraits. So you think about those
steps we went through. You can apply those to any
portrait that you're drawing. If you want to
practice portraits, I'd stick to just this face on view so that you're
not having to worry about perspective with
the distortion of the face. Looked at the cross section, the central axis
of the face first. That's always the first step. Then we looked at
the placement of the features using the
thirds of the face, and we found the thirds of
the lower face as well. And then we sketched
in the shapes of the eyes and nose and the mouth a little bit more accurately, using the angles
that we can see. And then we went through and
we shaded the shadow shapes. So those are the four hope there was four that I mentioned, but those are the four key
steps that you really need to stick to if you're wanting to
go forward with portraits. Can go into the Lumos
method and other things. And there's also
the Riley rhythms and the Sarowhad they're really good just for bringing more knowledge to
what you're drawing. But if you're a
biginn of portraits, stick with this
central axis method, this cross section of the face. Stick with a face
that is front on, make it as easy as
you can for yourself and really get used to
some of those rules, applying those steps before you move on to something
more difficult. And then you'll be a
lot more prepared, and you have a lot more fun if you start to then
look at faces on different angles or start trying to use the ums method as well. Thanks. I'll see you next time, I hope you go find
some more portraits and give them a go
using the same steps.
 Emily Armstrong, The Pencil Room Online