Transcripts
1. Intro: Hello, my name is Tole, and welcome to the first course, in this series of courses called sketching with Tole. We have this courses, we are going to fill our sketchbook from the first to the last page, we are going to explore some ideas, I'm going to teach you basic fundamentals to drawing, we are going to find ideas and subject matter to draw. In subsequent courses, we are going to dive deeper into different areas, such as look at different types of tools we can use, our pen, ink, watercolor, colored pencils, crayons. We are going to have some fun projects together. We are also going to look at more complicated, or complex our drawing techniques, and we are also going to tackle different subject matters, we're going to draw people, draw vehicles, plans, or basically anything that we can think of. I have been using sketchbook since 2009, and I cannot wait to tell you how much I love sketchbooks, and why I sketch in the first lesson. But before we jump into the first lesson, I have something to ask you, do leave this course a review so that you can help other students know whether this course is any good.
2. Why Sketch?: Why sketch? Why use a sketchbook? Well, there are many advantages to drawing, and drawing is just one of a few ways to communicate. For example, you can use spoken language to communicate, you can use text to communicate. With drawings, you can use visuals to communicate. As the saying goes, a picture is worth a thousand words. Sometimes it's easier to just show. Sometimes it's just faster to show rather than to tell. For example, with this scene with people sitting by the road, eating their meals on the short tables and stools, on chairs. I can definitely describe this scene using words, but it's easier for me to draw this and show it to someone so that he or she can know what it really looks like when I'm describing this particular scene. With a sketch like this, people can tell how short the chairs really are. You can also see some children eating at the roadside stores with their family. You can see how crowded this scene really is. Showing visuals is a great way to present ideas and to describe things. Whenever I go overseas for a holiday, I would usually draw, instead of write down, my packing list because first of all, it's really fun to draw the things I bring and also be able to see at a glance what are all the items. This packing list is very useful when I pack for future trips, because I can tell at a glance just by looking at all the items here, what are some of the things that I may miss out. If someone were to ask me, what do I usually pack when I go overseas, I can easily just send them a picture of all these items. Drawing can also help with your memory. It can help you remember things more vividly. Some people may take notes to remember, some people draw. All the sketches in this travelogue sketchbook were drawn on location. Whenever I look back at all these sketches, I have very fond memories of the places I have visited, the people I met. I can remember, not just the scene, but things that are happening outside of the scene as well. From this particular sketch, I remember it was drizzling and I was seated in front of a shop and there was this dog that was trying to take shelter in front of the shop and a dog was always coming over to look at what I was drawing. This sketch was drawn inside a shop that was selling shoes, so the employees of this shop actually invited their friends to come into the store for a barbecue inside the shop. I happen to pass by the shop and found this really interesting and I went in to sit down and sketch this. I was able to remember a lot from this sketching trip just by flipping through the pages compared to looking at the photos I have taken from the trip. Because when I was drawing these sketches, I was actually spending a lot of time looking at what's in front of me. I can spend maybe one hour to two hours to draw. While drawing, I was focusing on the scene intensively so I can really remember the scenes very vividly. This, by the way, is the captain or a crew using his legs to steer the steering wheel of the boat. Drawing definitely helps with memory. The more time you spend on your drawing, the more you will be able to remember what you are drawing. My favorite form of sketching is actually urban sketching, which is sketching on location. I picked up urban sketching in 2008 or 2009. Prior to me learning sketching, I've been on many holidays before, and I wasn't able to remember much from those trips before I learned how to sketch. After I learned how to sketch, I was drawing all the time when I was overseas traveling, and I was able to remember all those trips very vividly even without referring to my sketches or photos. Sketching can help you develop your creativity. Sketching is a really fun and relaxing hobby to have. You don't need to be talented to draw. All you need is to learn the right skills to get you started. You will definitely make mistakes along the way, but all those mistakes will help you learn. The more mistakes you make, the more you will learn. Sketching can be a therapeutic experience. Sometimes you can get so engrossed that you are lost in the moment, and before you know it, several hours have passed. Some artists call this being in the zone. Sketchbooks can be used for different purposes, so some people may use sketchbooks to develop visual ideas. Others may use sketchbooks as a journal. For example, for me, I have a lot of travelogue sketchbooks that I've filled up over the years while I travel overseas for holidays. Some people create masterpieces in their sketchbooks. We can really use sketchbooks for anything that you can think of. Why not use loose sheets like this? I also draw on loose sheets of paper, but I prefer to use sketchbooks because it's easier to refer to your artworks. You can have sketchbook like this on your shelf. You can pick up the sketchbook very easily, flip through a few pages to get inspired to remember things. That's why I love sketchbooks. You make this tremendous sense of satisfaction when you look at all the sketchbooks you have filled. When I look at all the sketchbook I have on this shelf, I always get inspired to create more art. Looking at this old sketches that I have drawn almost 10 years ago, also reminds me of how much I have improved. I can also look at all the old mistakes I used to make and learn from those mistakes. Sketching is a skill just like how writing or playing music or riding a bicycle is a skill. It's a very useful skill that anyone can pick up, that anyone can learn. In this course, I'm going to teach you the basic fundamentals when it comes to sketching, the fun that you can get when it comes to using a sketchbook. In the next lesson, we are going to talk about the sketchbook.
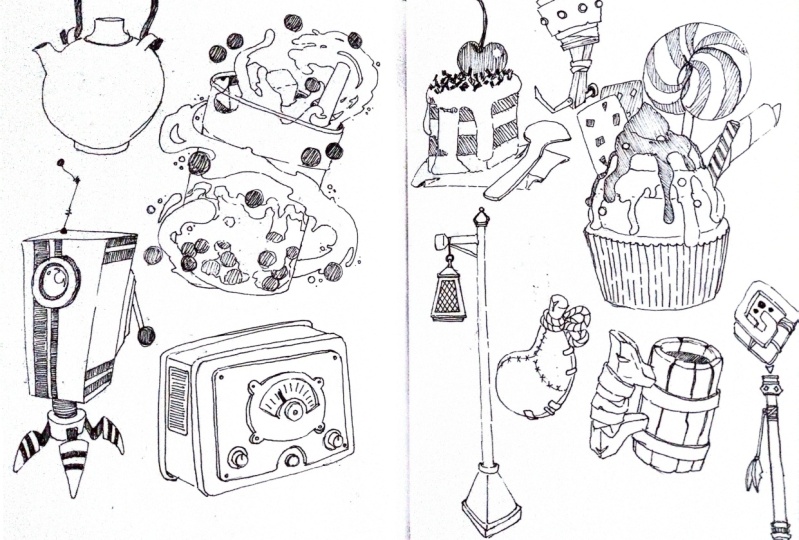
3. My Influences: In this lesson, I'm going to show you some of my influences. I'm going to show you some of the sketchbooks that I collect and also how other artists are using their sketchbooks. These are just some of the many sketchbooks that I collect. If I show you all my sketchbooks, this lesson will probably be two hours long. These are sketchbooks that I flip through very often just to get inspired. Whenever I have a drawing blog, I will flip through the books to get ideas on things to draw. This sketchbook is from Mattias Adolfsson. He is an illustrator who likes to draw from imagination. You can use your sketchbooks for doodling as well. In his sketchbook, you can see a lot of wonderful, detailed drawings from imagination. It can really help improve your creativity. This is definitely a sketchbook I would recommend you check out. I'm not sure if this is still in print, probably not, but it doesn't matter. You can find his art on his website, which I will provide. This is a wonderful sketchbook, and this is just one of his many sketchbooks. I'll also look at instructional books. All the drawings in this book were actually drawn from imagination. However, the artists, they actually have a lot of experience with drawing from real life because you do need to know how to draw from real life before you can stylize your art. In this case, stylize your character or anything that you draw. These are drawings from imagination, and these are character designs, creature designs. Once you are more comfortable with drawing, you can draw all things. You can draw people, creatures, animals, vehicles, street scenes. You can draw basically anything. This is a fantastic book as well, but this one is actually not sold to the public. But you can find more of his work on his Instagram page, which I will also link in this video. This is another instructional book. This one is on painting. You can use your sketchbooks not only for pen and ink drawings or with watercolor, but some artists actually use their sketchbooks for painting. In this sketchbook, there are a lot of examples, a lot of instructions. One reason why I like to look at sketchbooks is because you can see what other artists are doing with their sketchbooks, you can learn from them. You can learn more and you can learn faster by learning from other artists, in addition to experimenting through trial and error on your own. This is a wonderful book as well. Not only can you draw in your sketchbook, but you can also use your sketchbook to create calligraphy. You can use your sketchbook to create all sorts of art, whatever art you can think of. This book is a book on calligraphy art and is not just on handwriting. You can see the artist, he or she actually uses calligraphy to create patterns like this, and it's really beautiful. I find it very inspiring to see all these artworks. This art is inspired by this photo. You can create art inspired by nature, you can create art inspired by the things that you see in the real world. This is a wonderful book by Denise Lach. All these sketchbooks give me a lot of ideas. I will often just flip through them just to get ideas, just to test out certain things. For example, on this page, this artist talks about using repeat brush works. Maybe one day I would try that. This artist is into botanical-style illustration, which is something that I do not draw often, but looking at the art, I may get inspired to draw something similar. This is a very detailed sketch of this bird drawn with pen and ink, blotting paper, some brushes, and there are some hatching lines here, we have a lot of details. You can learn a lot from the techniques used by other artists. This book is by Helen Birch. This book is by Felix Scheinberger. There are a lot of wonderful sketches here as well. A lot of doodle-type sketches. Felix Scheinberger likes to use his sketchbooks to sketch ideas. He would test out composition that may or may not work. These are just some of his sketchbook pages. Danny Gregory has published a lot of sketchbooks and a lot of instructional books. It's very inspiring to look at his sketchbooks and many of them are actually journals. It's sometimes very meaningful to read what his feelings are, what he is going through. There are a lot of instructions in this book as well, a lot of ideas that you can get just by flipping through. Let's take a look at some Japanese artists. This is Terada Katsuya, a Japanese illustrator and character designer. He draws a lot of characters because he's into designing characters, and all these are actually drawn from imagination. These are very beautiful sketches. I'm trying to flip through the pages very carefully because there is some nudity in the book. In addition to character studies, I believe he also has a lot of machine designs as well. See all these drawings are very worldly imaginative and his style is very, I would say Japanese or manga-like. To develop your style all I can see is just practice. Let your style find you rather than you go out and find your style. Your style will develop over time, so don't worry about that. Let me show you this book. Once you are comfortable with drawing from observation, you can use your skills to design scenes, so this artist created this book, probably with the help of reference photos and also with the help of his drawing experience, obviously. The line technique that he uses here is very interesting. It's a cross hatching technique but it's not just crosshatching, you can see other lines, they are not perfectly straight. All these horizontal lines are a bit wavy. The thing is, you don't have to draw a perfectly straight line to give you the illusion of a perfectly straight line. You can use sketchbooks to tell stories as well, such as the case with this book. This is Together by Luke Adam Hawker. This is a book on character designs. If you are into character designs, you can fill a whole sketch book with them. Some artists, especially character designers, like to use sketch books as well. This book is published by 3dtotal Publishing. This sketch book is from Carlo Stanga, an Italian artist. All these drawings were actually drawn with the help of reference photos but he uses a lot of imagination, a lot of creativity, to present the scene, to present the location. For example, here you can see this is Coney Island from Manhattan. You can see the crowd here. I'm pretty sure the roller coaster or this wheel here, they don't look exactly like this in this drawing, but they look close to something like this. Whenever someone looks at a drawing like this, he or she would be able to imagine how the scene is going to feel. Many of these sketches were actually drawn to make you feel something, for example, with this previous sketch, it's meant to make you feel like, this is a very busy place, very happening place and it's a very popular place with a lot of people. When you are drawing from your imagination, if you want your scene to be recognizable. if you want your buildings to be recognizable, you still need to use some reference photos. But this, as you can see, the drawings are heavily stylized, but still very recognizable. Some of the main buildings here, the popular buildings, are still very recognizable. For someone who has been to New York or Manhattan, he or she would be able to recognize the scenes, the locations very easily. I'm very inspired whenever I look at his book. This is a fantastic book. This sketch book is from Koji Morimoto, who is a Japanese animator. This book is actually meant to be flipped from right to the left. But I'm going to flip from the left to the right because it's easier for me. He uses his sketchbooks to sketch out movie ideas, compositions, and he also does character design. You can see his style, it's very stylized, it's very clean, it's very different from other sketchbooks that I have shown you earlier. Sometimes he mixes photos with art. There is a lot to learn from looking at his composition and also his character design. I love Japanese animation so this is a sketchbook that I really like a lot. These are pen and ink sketches with very minimal colors. That's something you can do as well. Just use pen and ink, black with very minimal colors. Let me show you another two books. The last two books I want to show you. These are movie art books. This one is from the movie Tekkonkinkreet. This particular book has a lot of beautiful detail, illustrations. These were actually used in the movie itself as background animation. It's very inspiring. I look at the amount of effort that the artist put in to create art like this. The composition, as you can see, it's very dynamic. We can learn a lot on composition, not just on composition, but also on perspective, the use of perspective. All the buildings that you see here were actually drawn from imagination with the help of reference photos. The Japanese artists, they would use a lot of reference photos just to capture the mood and the atmosphere such as the towels that are here in this bathroom. Check out this composition which is a view from within the washing machine. This is quite unusual. This movie art book only has painted illustrations. They look fantastic, but you don't always need to use colors to make your art look fantastic. This is another sketchbook for the same movie and here it only uses pencils. Even with pencils, you can create very detailed artworks like this. These are actually concept sketches for the background paintings that you saw earlier. These drawings are very detailed. Check out the amount of details for this temple. As you can see, sketchbooks can be used for different purposes. You can draw in them, you can paint in them, you can create character designs, develop movie concepts. You can also create calligraphy. There is no limit to what you can do with them. The limit is your imagination. Sketch books are very convenient as well because you can bring them anywhere, you can use them anywhere, and it's also very convenient to refer to them in the future because they are in book format. You can flip through the pages very easily compared to drawing on loose sheets of paper. I hope by looking at all the sketch books, it would inspire you to fill your own sketchbooks with your own art.
4. Types of Sketchbooks: In this lesson, I'm going to show you a different types of sketchbooks. I'm also going to talk about the things you should look out for so that you can buy a suitable sketchbook for art purposes. These are some sketchbooks I have, a sketchbook can be hard cover or it can be a soft cover, and they come in all sizes and format. This small one here is about A6 size and this is A5. There are A4 and even A3 size sketchbooks. A small sketchbook is compact and easy to bring around. It's not that heavy, so you can put this into your pocket very easily. You don't have to bring it back just to put your sketchbook in the back. A small sketchbook is great for quick sketches because the pages are small. Small pages don't allow you to draw that much details. This means you can complete a sketch very quickly. A pen and ink watercolor sketch like this will probably take me around 30 minutes to complete. If it's just pen and ink sketches, something like this, I may take 15 minutes for a page or if it's very detailed, then maybe 15-30 minutes. The larger the sketchbooks, the more time you will need to fill the pages. Take for example this A5 size sketchbook to complete a sketch like this, which includes drawing and painting, would probably take me 1-2 hours because the pages are larger, you have to draw more details, otherwise the sketch is going to look unfinished. For this aerial sketch of Ho Chi Minh City in Vietnam, you can see I have included a lot of details. Because this sketchbook is larger, I usually need to bring around a small bag or pouch to store all of this together with my watercolor box, my pens and brushes. This is a portrait oriented sketchbook. When you open the pages, you get a squarish type of aspect ratio, and this is good for subject matter or scenes where you want to zoom in close to the subject or scene. It makes you feel closer to what you are drawing. Whereas we have a landscape sketchbook, it makes you feel like you are further away. This is due to the smaller page, and if you want to draw across two pages, the scene will be made smaller, so it makes you feel like your further away, whereas when you have a portrait sketchbook like this, you can draw the subject or the buildings or the scene really bigger. It really makes you feel like you are there on location when you're looking back at your sketches. The advantages of using a landscape sketchbook like this is you can cover more space because it gives you this panorama page to draw on. Which format of sketchbook you prefer really comes down to personal preference. Personally, for me, I prefer to use landscape sketchbooks. This is a sketchbook I brought with me to Vietnam for a sketching trip, and the binding allows the pages to open flat. This allows you to draw across both pages. If you go with a spiral bound sketchbook like this, you won't be able to draw across both pages because of the spiral binding in the middle. When it comes to scanning the pages on a spiral bound sketchbook, the spiral binding can sometimes get in the way of the scanning process because certain scanners require the page or the paper to be in contact with the glass, and you can see here with this coming out like this, it's going to affect the scanning. With a spiral bound sketchbook, it's better to draw a bit further away from the binding so that it's easier to scan. If you are just going to take a photo of your sketch, then it doesn't really matter. The advantages of using a spiral sketchbook is, it allows you to fold the pages to the back, so this is actually more compact, compared to using a typical landscape sketchbook. With a wider sketchbook like this the width is over this wider areas. When you're holding a sketchbook, the pages and the cover, they can move around depending on how you hold a sketchbook, whereas for a spiral bound sketchbook, you can fold the pages beneath and hold it very securely like this. The two most important things about a sketchbook is first, the binding. The binding must allow you to open the pages flat and the binding should be durable enough for you to open and close the k countless times without the stitching becoming loose. To find out how good the binding is, you have to do some research online to look for reviews for those sketchbooks before you buy them because, you just can tell how good the binding is just by looking at the binding. The second most important thing is paper quality. You must choose the right paper for the media that you are using. For example, if are using graphite, or colored pencils, or dry media, you should choose a sketchbook with paper that is suitable for dry media. If you are using markers, you should choose a sketchbook, with paper that can absorb marker ink, without excessive bleeding to the opposite page. In this course we are dealing with pen, ink and watercolors. We need to use sketchbooks with watercolor paper and there are different types of watercolor paper and different grades of watercolor paper. Good-quality watercolor paper can be expensive, and good watercolor paper is usually made with hundred percent cotton content. For our course, we don't need to use hundred percent cotton watercolor paper. Before you buy a sketchbook, makes sure the sketchbook specifically mentions the paper is watercolor paper, or if there is no mention whether the paper is watercolor paper, at least make sure the sketch will mention the paper is suitable for wet media. When you use watercolor or non-watercolor paper, the colors can appear dull, the color's can appear washed out. It's also very difficult for you to blend colors softly and smoothly together when you are using wet on wet techniques. The paper may not absorb water or paint properly, so this can make water color look patchy. It's difficult to paint a smooth flat wash, or a smooth color transition on non-watercolor paper. Here you can see the paint is extremely patchy. When looking at water color paper, make sure to check the width or the thickness of the paper. Thicker paper is usually 300 GSM and above, and thicker paper allows you to handle heavy washes so you can use more water, and thicker paper is better for those of full on painting, where you would like to use a lot of paint. Generally speaking, for most watercolor sketchbooks, the paper width is 200 GSM, and that is actually good enough. Water color paper has three different types of surface texture. There are is rough, where the paper surface is quite rough, there is cold press, which is the paper that you see here. Cold press watercolor paper has slight texture, so this allows you to see beautiful granulation from the watercolor paint, and you can see slight texture even for the paints that do not granulate and I really like the texture of cold press paper. Hot press paper is paper that is smoother because the paper is pressed by a hot rolling drum. You can see this is the same blue that you saw earlier, but here you don't see any texture. You don't see any granulation. Cold press texture is fantastic for watercolor and most watercolor sketchbooks come with cold press watercolor paper. Hot press watercolor paper is also good for watercolor, but it's better for more stylized art works, illustrations, where you may want to draw more details, where you may need more precision. Smooth hot press paper is also more suitable for dry media, such as graphite pencils or colored pencils. If you don't already have a sketchbook, my recommendation is to get a watercolor sketchbook with paper that is cold press and is at least 200 GSM. Whether or not the paper has cotton content is not that important, but if you do have to budget, you can get a hundred percent cotton watercolor sketchbooks. Those are the best watercolor sketchbooks that are out there. But they're also noticeably more expensive. We're going to end this lesson by giving you some suggestions and brands of water color sketchbooks, you can consider.h
5. First Page Anxiety: Welcome back. It's now time for some hands-on drawing exercises. What we are going to do is to find some things to draw on the first page of your sketchbook. First page anxiety is actually a real thing with sketchbook users. The first page can be intimidating because it's a blank page. What do you want to draw on this page and you don't want to mess up your sketchbook, but it's also a sketchbook. It's a place for you to have fun, experiment, and for you to mess up as well. My suggestion for this page before the first page is to write down your name and contact information in case you want to bring this sketchbook out to draw on location and you accidentally lose your sketchbook. At least there are some ways for people to contact you to return a sketchbook to you. For the next page, which is the real first page, we can make this less intimidating by drawing things that are familiar to us. We can actually look for things at home to draw. You can draw the things that are on your desk or your kitchen table and if there are too many things you can focus on a single subject. Look for interesting shapes to draw. For example, here I have this mugs with stationary in them. So this can be an interesting subject to draw. I have some watercolor boxes here, but these are blockish in shapes, so they are not that interesting. However, you can open your watercolor box or set to draw the things that are inside. This is definitely more interesting compared to drawing this block. Look for items that overlap each other. For example, I have this bottle here which is in front of this bottle, which is in front of this bottle. If you draw something like this, you can create a sense of depth. You have elements in the foreground and also elements in the background. You may also draw things that are on your bookshelf. But this may or may not be interesting depending on what's on your bookshelf. So if your bookshelf only has books laid out neatly, then it may not be that interesting. But here you can see my books, they are quite messy. So there are a lot of different shapes. You have elements in the foreground as well as elements in the background and there's this dispenser, which is in front of those two bottles there, which are in front of the sketchbooks, which are tilted at an angle. This could be something interesting for me to draw as well. You can also look around in your kitchen for things to draw. There are a lot of interesting things to draw. If there are too many things or the items are all scattered around, you can actually focus again on a single subject. This wine opener can be quite interesting to draw because it has a beautiful design. When looking for things to draw, pay attention to the shapes that you see. For example, with these two mugs here, you can instantly tell at a glance that they are mugs because of the handles. But if the mugs were actually positioned like this, where the handles are not seen. It's a bit difficult to see what they are. So you can actually reposition things and you can also change your viewpoint. We have some cups that are behind, that are blocked by the bowls in front. If you're going to draw this scene as it is, it's going to look a bit weird with their cups like that behind. You may want to change your viewpoint or you may want to rearrange things. Let me show you what I have drawn on the first page of some of my sketchbooks. Now, most of my sketchbooks are actually travel log sketchbooks so I usually have something related to the trip on the first page. So here you can see I have my contact information written here and here I have a map that features where Vietnam is and this is the country that I visited. Sometimes I may actually draw my packing list on this page, but here I actually brought along a lot of items so there is not enough space on the first page to draw all of this. That's why I drew this on the second and third pages. With this sketchbook, I actually just skip the first page and went straight to drawing on the second and third pages. You don't have to draw on the first page if you don't want to. Or you can start by drawing on any page in your sketch book. You can draw all the things that are on your table as individual items on the page. So this can be your first page as well. On the first page of another sketchbook, I have this watercolor swatches painted. If you want to do it is I highly recommend you write down the name and pigment information of the watercolor. Because now when I look at this, I cannot tell exactly what these colors are. For this tutorial, I recommend you find something at your home to draw. You can certainly draw what I am drawing. Just note for the reference photo I have provided, I am actually not copying the photo exactly. I'm actually drawing from real life. The mug and the stationery looks a bit different compared to what you see on the reference photo. So for the first page of this brand new sketchbook, I'm going to draw my mug with all the pens and pencils inside. This is like a vertical subject, so it's going to take up half the page, which is why I also have my watercolor palette on the side here that I can draw here to fill up the page. If you have interesting stationery, you can lay them out side by side and draw a top-down view, like what I have done here. If you have a lot of pens and pencils, you can actually draw across both pages. You can plan your page however you want to. So this is where you can exercise your creativity. So let's draw. I'm using a fountain pen. I like to use fountain pens because I can refill them with my own ink. I will be coloring the pen and ink sketch later on with watercolor so I have waterproof ink inside this fountain pen. The first thing I want to do before I start drawing is to find out how much space I need to draw the mug. I have my index finger here to mark out the top of the mug and my thumb here to mark out the bottom of the mug. The stationery actually takes up more space here compared to the mug below. When drawing, pay very close attention to the subject that you are drawing. The more time you spend on observing, the more accurate your drawing will be. This sketchbook that I'm using is a cold press watercolor sketch book. So the paper actually has a good amount of texture. When you draw, don't leave gaps like this. Try to close up all the lines properly. You can draw fast or you can draw slow. If you draw fast, your lines will appear more confident. If you draw slower sometimes, at least for me, I feel like my lines are more stiff. So here I'm actually drawing the thickness of the mug. Let me draw the mechanical pencil here. Now pay attention to the curves. When you see a curve, you should draw a curve. Don't draw a straight line when it's actually a curve. We have one mechanical pencil here in front, we have another marker here. I can see the top of the marker, that's the top that I'm drawing and this is the clip and the bottom of the marker is curved. Of course, if you look at the marker from the top profile or from the side profile, these lines, they may be straight. Here I'm going to draw a bit faster. Now this sketch book, the paper has quite a lot of texture so if I draw faster, you can see some some the lines. They are a bit rough. There is a transparent ruler here. Now for this ruler, there are actually no markings on the ruler because the markings they have one of, but I'm going to use my artistic license here to add those markings so that it is very clear that when you look at this, you can tell it's a ruler. I have a pretty long pencil here. Let's draw this line to the back so that the mark curves to the back. If you take a look at what I have here compared to the actual reference, you can tell that I have left out a lot of pens and pencils, because while drawing I actually ran out of space but it's all right. It still looks like a mug with a lot of stationary. I'm left with this rather large space here. I'm going to draw my watercolor box a bit bigger so that you can fill up the space. I'm going to draw the big shapes first. Rectangular shape first. This time I'm drawing a bit faster. If you are not able to draw exactly what you see, it's actually all about practice. The more you practice, the better you will get and eventually you will be able to draw more confidently and also you will be able to draw more accurately. Notice for this sketch I've drawn the big shapes first and then I fill in the details within the shapes. If you're big shape is off, if your perspective is off, it's going to affect all the little details that you draw later on. There are three rows of watercolor pans, so I want to draw the three rows first before I put the pans within the three rows. My rectangles are not perfectly rectangular. It doesn't matter. You don't have to draw with that level of precision to create the illusion of what you are drawing. That is the charm of hand-drawn art. That's the charm of sketching. Before we paint over the ink lines, we need to make sure they are dry first. Here I have two cups of water. One is for washing the brush and this is for the clean water. I have my watercolor brush. This is the spray that I used to wet my watercolor. With watercolor, we paint from light to dark so I'm going to start with a lighter color. I'm going to start with yellow. That's just paint over the pen here and this marker is yellow, so let's have yellow here. Next I'm going to have orange here. Notice I did not paint within this rectangular box and note the paint actually went out. But for this orange marker, I'm going to paint within the enclosed area. Take your time to paint, there is no rush. Next, let's move on to the red. This is the red one colored pen. I'm also going to use the same red to paint this color pencil. Be very careful when you are painting colors that are next to each other. Because if this yellow is not dry yet and you have the colors land or touch each other, the colors may actually blend. If you want to have clean shapes like this, you should wait for the initial wash to dry. I see the colors blend into the pencil. Don't worry if this happens, just let it be because sometimes when you try to correct any mistakes on, it's going to make it look worse. I'm also going to use the red to paint this mechanical pencil here. Next, I want to wash my brush and pick up a new color and use that to paint here. Wash my brush again and pick up a new color to paint here. This darker color is mixed with ultramarine and burnt sienna, or some other earth color. You can also use burnt umber to mix with ultramarine. Now when you are coloring make sure that shapes are recognizable. Here for example, there is this mechanical pencil which will still be recognizable. I'm going to dilute my brush and paint this pen that is in front of the mechanical pencil with a very light wash. Now I'm going to paint the shadow on the side of this mug here. You don't have to use the same color that I'm using. All you have to do is to paint a light wash of whatever color you are using. We have a mug here and we can also paint the shaded side for this watercolor box. You can use ultramarine and burnt sienna. That's a very classic mix for painting shadows. I may also want to paint here. This is to make this darker so that lighter part is more obvious. To make this more interesting, I want to introduce some splatter marks. Using a clean brush, I'm going to pick up some paint here, make sure the paint is concentrated. I'm going to hit some paint onto the paper and this is orange. Some of the paint actually went over to the other page, but it's all right. The last thing I want to do is to write down today's date, which is the 23rd of September. It's good to write down the data so that you can refer to your sketch in the future. We have the first page handle very easily. In the next lesson, I have more drawing exercises for you.
6. Blind Contour Drawing: Welcome to the second drawing exercise where we will do some blind contour drawing. This is a fantastic exercise to train your hand-eye coordination, to help you warm up, to help you relax and you can get really fun results and if you think you cannot draw, you will find out that you can draw after you go through the exercise with me. You will be surprised by the results. Let's look at our reference photos all these photos are available for download and this is the main photo we are going to work with. I have also provided you with extra photos that you can use for practice purposes. All these photos have people in them. In this drawing exercise, we are going to be drawing a lot of people. Let's open up our sketchbook again. Just flip to the next page. Now for this particular sketchbook that I have here, these two pages are actually glued together. This means it's going to be difficult for me to draw across both pages. In this case, I'm going to flip to the next page where I can draw across the two pages very easily. I'm going to leave these two pages to draw something that doesn't require me to draw across the pitch gutter. For this exercise, we are going to focus intensely on our subject. We're going to spend more time looking at the subject compared to looking at what we have already drawn on the page. Yes, you can look at the drawings on your page occasionally just to check, just to see where you are. But what we want to do really is to spend more time to observe the subject. The more time you spend observing your subject, the more accurate your drawing will be. This exercise actually does a few things. It's going to help you loosen up. It's going to train your hand-eye coordination. We're going to start by drawing the person on the left side, and I'm going to start by drawing his forehead first. Now when you are drawing, focus on the direction of the line. Focus on where the line is going and where the line is turning. I'm going to draw the forehead first and this is the angle. As you are drawing try not to look at what is on your page and if you really want to look at what's on your page, just have a really quick glance. For this exercise, try not to lift your pen that often. What we want to do is to draw a continuous line. This is the ear, really pay attention to where the lines are going, the shapes that you are drawing. This is the hairline, and once again we are back to the forehead. Let's draw the back of the head. I've just realized that I've drawn this head a bit too big. Which is to say that the T-Shirt, later on, it's going to be drawn bigger as well, because it has to be in proportion. This is where I lift my pen just to do a very quick check to see where I am. Here, I may want to draw some details for the ears. It's actually quite difficult for me to see and I'm going to draw the eye here. Again when you're drawing, try to focus more on the subject. The drawing that I have here doesn't look very much like the person in the photo and it doesn't really matter. Because what we are trying to do here is really to warm up just to get some drawing going. This is the T-Shirt. Now, if you want to check your art, use a quick glance to do so. Now I'm drawing the thumb, the fingers, and this is the arm that goes down all the way, and then that's the elbow and now it comes up. We have the sleeve here. If you want to, you can actually go over the lines, like restate your lines like this. What I'm doing here is to draw the force of the T-Shirt and I want to draw the arm there and I can connect this. Let's draw the T-Shirt here. Let's draw the other arm that is behind. The other arm is actually like this, so I've drawn this wrong. I'm going to maybe make some adjustments here. Maybe I'm going to have fingers here. This is what can happen if you don't focus on your subject and you draw what you think you see rather than what you actually see. The last thing I want to draw is this person holding maybe some food in his hand. Next, let's move on to the lady which is beside him. For the lady again, let's focus on the shapes Let's draw the hair. I am looking at the subject without looking at my paper. So this is the neck area. I wanted to draw the face here and we have sunglasses here another sun on the left side. Lips, decrease. The T-Shirt comes out from the chin here. The sleeve goes down here, goes to the left side. There is a glass here with maybe wine or tea in it and we have another cup here with wine in it. I want to draw the fingers here and elbow, the fun thing about this blind contour drawing exercise is you can draw using the same photo gain and again. But your results, your drawings will always look different each time. This is the other lady. I am checking my drawing occasionally, but most of the time I'm actually focused on the subject. Next, let's move on to the guy on the right side who is stretching his hands out. It seems like there is a box of tissue or napkin in front. This is the box which I want to draw first because it's going to overlap the things that are behind. There seems to be a bottle of sauce or pepper there. I also want to draw the hand. The hand is right beneath the ear of this lady here so this is the hand. I'm just going to draw the hand for the guy and not the lady because the hand of the guy actually overlaps the hand of the lady. It's going to be a bit confusing if I have two hands here. I'm going to draw the bowl here with the food. There seems to be a handle here. We can draw the guy now, the t-shirt of the guy. Now if you want to be more accurate, you can start by drawing the face first so that you can get the features right. Draw the face first and then move on to other parts of the body. This will make the person more recognizable, but it doesn't really matter where you start because the purpose of this exercise really is to practice your hand-eye coordination. Let's draw the neck here, the t-shirt. This shoulder here seems to be right up here at the ear so it goes to the right side slightly and then comes down. We have the arm here and the arm is coming down at this angle and there is another glass of wine here. Here I want to have the hand behind wine and this is the table. Next we have a wine glass. This wine glass is more recognizable. We have one finger, two finger, and the thumb is here. The thumb goes down. This lady is wearing a bracelet. This line goes to the right side and goes up and then goes to the right side. This is where the hair is, the ear, and this is the hat and it goes up like this. When you're drawing, always ask yourself, what's the direction of the line? Is the line going up, is the line going down? The chin goes in this direction at this angle and this lady seems to be wearing some jacket. Let's draw the fold here and we can draw this side here and this is the collar. We have a button here, a shirt pocket here with a button and this line will come down. I'm going to draw to the edge of the pitch so just let the line go out of the pitch. We have the arm that goes down here and we have a watch. Notice as I'm drawing, I'm trying not to lift my pen as much as possible. The line went out there. Let's continue with the shirt here. We have a button here and let's draw this side here. The line goes to the right side and then comes out to the left side again. Let's add more details and facial features to the face. This is what I have. Even though I wasn't able to capture the exact likeness, I think I managed to capture the essence of the scene quite well. In this case, it's a group of friends sharing a meal, sharing some drinks at the table. Now in the earlier lesson, I told you not to have gaps, I told you to close up all the gaps, close up all the lines. But here you can see there are a lot of gaps, a lot of open spaces. All these open spaces here and the gaps, they leave a lot to your imagination. You don't always have to close up the gaps if you don't want to and the results can often be quite interesting. For this particular sketch, I really like this part here where I did not draw the boundary for the arm so you get this very interesting shape here. Even though I did not draw the boundary here, you can tell at a glance that this guy still has two arms, one here and one here. For this lady on the right side, I did not draw the arm here as well, the boundary here as well and it still looks all right and I have this horizontal line to represent the table. This sketch actually turned out much better than I expected. For your assignment, if you haven't been following along with me, go draw the same scene and use the other reference for those provided for more practice. In fact, right now I'm so inspired that I'm going to fill the previous two pages with more blind contour drawings.
7. Blind Contour Drawing (Bonus Video): Here's a bonus video on more contour drawing. Now, don't be afraid to mix and match materials. Here I'm actually using a colored ink pen to draw. I'm going to mix this later on with black. The main thing here is really to focus on your line art. Focus on observing your subject. Focus on where the lines are going. You don't always have to draw everything. You can also vary your speed that you use. For this sketch I'm going to draw much faster. When you draw faster, you realize that the look can be very different. For this sketch, I'm also going to maybe restate more. That means draw over the lines over and over again just to see the effect that I can get. This lady is actually holding a tablet in hand and a tablet is below the shoulder. However, for my sketch, I'm going to place the tablet here closer to her face. That's the finger that turn from her right arm and this is the other arm. I still have some space here, so I'm going to use a different color. When you're drawing, you can change things up, make variations. It's going to make your sketch look more interesting. For example, you can use different colors. You can use different types of media. You can use pen or you can use brush or markers. You can vary the speed that you are drawing with and you can vary the size as well. Here I have two rather big subjects. Now I'm going to draw smaller. Accidents like this can happen, but you can always use your accidents to make art as well. I'm going to try and push the ink around. The only downside to this accident is the ink will actually bleed across to the opposite page, but otherwise I actually like this accident. I will consider these to be a happy accident. This is another lady who is holding a coffee cup here, we have the fingers here. More ink leaking out from the pen. I do recommend you test out your equipment, your supplies first before you actually use them to create serious art because sometimes things can happen. This by the way is the drawing Graphik Line Painter and ink spills like this is quite common. If you want ink spills, sure, this can be a great or fun pen to draw with. Here, I actually have the other arm overlap this arm and I still draw the arm here. I really do need to clean this up because the ink is going to bleed over to the opposite page. But thankfully, this watercolor paper is actually quite thick, so there is no ink bleeding here. But I had another accident earlier, you can see the ink splotches here and unfortunately, there was too much ink and it actually went over to the opposite page. I still have some more space here. Let me try and fill in or draw another small sketch. This is one with a lady using computer. This lady has very curly hair, eyebrows, the eyes. We have the shirt comes down. Now when you're drawing across the page cutter, try not to put important things on the page cutter. For example, here, it actually cuts across the face, but it's actually not too bad in this particular example. You definitely do not want to have this line cut across the eyes or the nose or the mouth, it's going to look weird. You will learn all of these things that are not good. You will learn all these mistakes with more practice. This lady is using a computer and this space is already taken up by the guy here, but it's all right. I'm just going to draw over the guy's leg. This is the hand, we have another hand here, finger here. She's working on her computer. I may also want to draw over this guy here. Now when you use different colors, you can actually overlap the ink lines and you will be able to see the two subjects clearly. But if you use the same ink, same color then the two subjects are going to be merged together. Is going to be a bit more difficult to see the individual subjects. We have keyboard here, computer here, and this is the keyboard. This is what I have. I really like the sketch that I drew earlier, but I like this even more, mostly because I think the colors look lovely. Blind contour drawing is a fantastic way to loosen up, to relax and you don't really have to worry about the results. To make drawings like this, you don't really need to spend a lot of time.
8. How to Draw What You See: In this lesson, I'm going to teach you how to draw what you see. I'm going to teach you the basic techniques to draw from observation and you can use these techniques to draw almost anything. I'm also going to talk about the common mistakes that beginners make. Mistakes that sometimes even I make while I'm drawing and you may be able to identify some of these mistakes while falling along with this lesson. You may not know why they are mistakes or why the drawings may look a bit off, and that's where I will come in to explain those mistakes and how you can improve on those mistakes to make your sketch look better. Let's take a look at some reference photos. These are photos of Jeeps that I have found online. These are actually stock photographs from this website called Pexels.com, P-E-X-E-L-S.com. When we draw a subject several times, what we're actually doing is we are building the visual memory so that we can remember how the subject looks like in this case a Jeep and if we draw them several times, we will be able to remember how a Jeep looks like. If you draw them enough, you can actually draw a vehicle from memory. This is very similar to learning how to write alphabets. When we are trying to write alphabets, we would just practice writing the same alphabets over and over again until we either developed a muscle memory or we just remember how the alphabet looks. So drawing is a good exercise to help you develop your visual memory. Lets take a look at some of the different angles of this Jeep. This photograph was taken with the camera quite low to the ground. So we can see the lines are quite dynamic. The perspective, it's quite dynamic, and this one was with the camera taken maybe at this height here. So we can see the diagonal lines they are not as tilted as the earlier photo. When you're choosing photos to draw try to choose from different angles. Let's say you are comfortable with drawing the Jeep from the front, try to choose photos that feature different angles as well. Obviously, you can choose to draw any vehicle that you like. You can draw fire engines, trucks, sedan. This is another type of Jeep which is very different from this. You can see this is an open air Jeep and there are a lot of mechanical parts, whereas for this Jeep the body is very smooth, the design is very slick. This is a view from the back, so if you are comfortable with drawing from the front, try to draw from different angles, from different perspective, just to change things up, just to practice, just to develop your drawing skills. Because if you keep drawing the same thing over and over again you're not really learning anything new. This photo was taken from the side of the Jeep. It's a site profile. This is not an angle I would usually choose because when you look at the Jeep like this, you can only see one side of the Jeep. You cannot see the front, so you don't know how the front looks, and also drawing something like this is going to appear quite flat, whereas if you draw something like this you can get that three-dimensional view. You can see two sides, in this case the back and the side of the vehicle, so you get more information. Here as well and this is taken with the camera above ground looking top-down so we can actually see three views, the top of the Jeep, the side as well as the front. So now we have even more information regarding how this Jeep looks as compared to this Jeep where we can only see the left and the right side. This is the Jeep we are going to draw and after we've drawn this you can use the other reference photos for more practice and if you want to challenge yourself, you can draw a motorbike or a bicycle. Those are actually quite challenging. The main reason why I chose a Jeep to draw is because this subject is quite boxy, so it's relatively easier to draw and it serves as a good warm-up or practice. Don't be afraid to make mistakes, even for me when I'm drawing I still make mistakes occasionally and the more mistakes you make, the more you will learn. When you make a mistake, you can just leave it on the page so that the next time you flip to the page, you can see the mistake and remember what went wrong and hopefully try not to repeat it again. Now for this pitch here, I am going to draw several Jeeps. I'm going to draw one big one which is the one that I showed you and you can fill in the blank or white-space later on, on your own sketchbook with all the other Jeeps. I'm going to start by drawing the front of the Jeep first and I'm going to try and figure out how much space I need. I'm doing this hand gesture to see how much space the front of the Jeep is taking up. The front of the Jeep is about the same size as the size of the wind screens, so this should be enough space. Let's draw. When you are drawing as usual, try to focus on your subject more than your own sketch. You can glance at your sketch occasionally to check the proportion, the accuracy. The front part is organic, the curves are quite smooth, so I've drawn this shape first, we'll fill in the little details much later. Let's continue to draw the big shapes. By drawing the big shapes, you can simply find a sketch quite easily. So this line here, the top of the Jeep will go to the right side. This is about one unit. This is maybe two-thirds or half a unit. You really have to use your own judgment to see how much space is taken up by the different parts of the Jeep. The pen that I'm using, the ink actually is starting to bleed because the ink flow is too good, so it would bleed onto the pitch if I leave the pen on the paper for too long. I'm just going to try and draw a bit faster so that the lines look nicer without that much ink bleed. This is the left side or the right side of the eagle and we have this part here will go to the right side, curves down slightly. My proportion is slightly off of its latter than what I can see, so it's a slight mistake but doesn't matter. The more you draw the better you will get. As mentioned earlier, even for me when I'm drawing I still make mistakes occasionally, and it's also very difficult for me to draw and talk at the same time. Lets draw the front bumper. I can see the top of the bumper are slightly. These are the little things you should know when you are drawing. Are you able to see the top of the bumper? If you can, then you should draw that. If not, then don't draw that. Observe your subject and draw. There is this little protrusion here that comes out here, which is actually under the headlight here. Let me just draw the headlight just to get some placement. This is the side of the headlight. There are smaller headlights here. One here and one here and there is another protrusion here. Once you've drawn the big shape like this, you can then draw the little details inside. But don't get too caught up with drawing the details. Let's try and focus on drawing the big shapes in, so this is the front. We can see the side of the wheel here. Now everything that you draw, you should always draw them in relation to things that you have already drawn. For example, when we draw this wheel here, the bottom, the base of the wheel actually is directly below this part here or below the headlight maybe towards the left side slightly. Notice I place my finger here to represent the bottom of the wheel. So when I draw this wheel, I'm going to place the base here and then draw this all the way up, and we can see the bottom of the vehicle as well, so we need to draw that. Really spend the time to go and observe what you see. The more time you spend observing what you see, the more accurate your schetch will be. This is the side of the tire and this is the tire. Next on, let's move on maybe to the top here. You can draw or go anywhere you like. Sometimes I would just move around. I would draw from left to right usually and then top-down and then I may just go in different directions. Let's draw the windscreen. The angle here or that point here starts from the middle of the Eisen's plate. Let's draw that and the height is the same as the front of the vehicle, almost the same, so we need to draw the same height, make sure to get the angle right. This will go to the right side. That this angle here is not horizontal, it's slightly tilted. Always observe. Is the angle horizontal or is the angle slightly tilted? All these little things they do affect your accuracy. I'm going to draw this side here first. This line would go up like this and I can then join this. Sometimes I like to draw a line here and then I try to figure out where that line is going to end, and then I just join the line. Sometimes it's easier for me to draw this way. Then we have the front of the Jeep, we have the wipers. One wiper here, another wiper here. We can see through the windscreen to the window here. Next, let's move on to the side. On this side here is very compressed due to perspective, so the wave here is actually very similar to the wave here, the side here. When we draw, we need to make sure that we get the wave right to portray the correct perspective. Let's draw the line down slightly and push this line all the way down, and this is the cover for the second tire in the back. We can draw this. We can actually see the side of this tire, this cover. Next, I want to draw the side mirror here. For the side mirror, it's connected to the Jeep here. Comes all like this, goes up. Now, when you're drawing, it really helps to think about the lines as just lines. For example, when you're drawing the side mirror, do you think about you drawing the side mirror? What you're actually doing is you're just drawing some lines and once the lines are drawn, it will look like a side mirror. The reason you should think this way is because if you think you are drawing a side mirror, your memory of a side mirror may come in to affect your art, your accuracy. For example, we may know how a Jeep looks, but what we're trying to draw is to draw the Jeep that is in front of us. We are not drawing from imagination, it doesn't really matter how you remembered the Jeep. It doesn't matter because what we are trying to do is to draw the Jeep that is in front of us. Let's draw the side of the handles for the Jeep, and we can join this line. This line is not horizontal, it's tilted up slightly due to perspective. Let's draw the back wheel. The height of the back wheel is like this. I'm not sure what this unit is, but you can just measure it. I'm going to place the bottom here and I'm going to draw this ellips like this. Sometimes my ellips is not perfect and it's perfectly fine because the thing with hand-drawn art is your lines are not going to be perfect, and that's the charm of drawing with [inaudible] with hand-drawn art. Your lines are not going to be perfect. Let's draw the bottom here, the thickness of the tire. I can see some cable or wire here. This is the back. Let's draw the front here. The side of the tire actually starts from behind the bumper here, and goes up, comes down like this, it will end slightly lower compared to this tire here, due to perspective. You should not align a base of the tire here to the base here, it should be slightly lower. I'm going to place my finger there to help me and try to draw this ellips in one smooth quick line. Let me just practice first. Let's go. It's very satisfying to draw a perfect ellips, but sometimes you can see this ellips, at least for this sketch, it's not perfect. A sketch doesn't have to be perfect, not all your sketches in your sketchbook have to be masterpieces. If you think every sketch should be a masterpiece, you are really just stressing yourself out. When it comes to sketching for me, I sketch for fun, sketch for relaxation, so don't stress yourself out too much when you're drawing. If you make mistakes, just practice, just draw more; no problem. The details within the Jeep, it's actually very difficult to see because it's quite dark. I can see the rearview mirror, which is above the headlights. But in this case, I think I've gotten the proportion a bit off. If you take a look at the reference photo, you will notice that the headlight is actually right below the middle of the windscreen. So my propulsion here is a bit off. But even though my proportion is off, you can still see this overall sketch, it still works. Since my position of the headlight here is off, I cannot use the headlight as a positioning, [inaudible] help me to help me place the rearview mirror. I'm just going to place the rearview mirror in relation to this windscreen that I have drawn and in this case, the rearview mirror is in the middle here. I am really not able to see what's inside, so I'm just going to leave this part black. If you've used waterproof ink, you can proceed to paint this with watercolor later on, but I'm just going to leave this sketch as it is right now. Let's take a look at some of the mistakes I have made and I'll explain why I made those mistakes. If you take a look at this wiper here, the reference photo doesn't show the wiper length. The wiper is actually almost horizontal and then it goes down at an angle. When I draw the white [inaudible] like this, I'm actually drawing from imagination, which my imaginary wiper does not look like the real wiper, so that's one mistake here, so-called mistake. This is what can happen when you're drawing from imagination versus drawing from what you see. The other mistake is these black things here, the air intake grills here. I've drawn six, but there are actually seven. When it comes to drawing all this repetitive staff, if you can count them, you should draw them, but if you cannot count them or it's very difficult to count them, you can just draw the number that you would like. In this case, I drew six. The other mistake is that alignment is a bit off. You can see some of the grills are a bit higher, some are a bit lower; so alignment is a bit off. If you look at this line, if I draw through, this line should be smooth. But this line at the bottom here, it creates that illusion that it is not continuous from this line. Depending on the pen you're using, sometimes you may introduce ink blobs like this. Or when you place your pen tip on the paper for too long, the ink may actually bleed depending on the quality of the paper and also the ink that you use. Sometimes the ink blobs may look good, sometimes they don't look that good. So always test your supplies on the paper before you use whatever pen or paper that you are using. Steps here, they are not that clear as to what they are. Even though this sketch has some mistakes and inaccuracies, those are actually quite minor in a sense that when you look at the overall sketch, you can still tell at a glance that this is a Jeep. What is most important is to make sure that your big shapes are right, because if you get the big shapes wrong right at the start of the sketch, all the details that you draw within those big shapes, they are going to look a bit off. For example, let's say you've drawn this line here at the top, at this very steep angle, this will obviously affect the rearview mirror that you draw later on. Because you've drawn this angle too high, you have to connect this line down to the back of the vehicle and this line will be drawn at the wrong angle too. Because this line is drawn at the wrong angle, the lines for the top of the windows will all be drawn at the wrong angle. If you get the big shapes wrong, then it's going to affect all those little details that you are going to draw later on. This is how you draw what you see. Now I have a lot of whitespace left on these two pages, and I'm very inspired to draw more Jeeps. If you want to see me draw more Jeeps, you can check out the bonus video that I have provided.
9. Draw What You See (Bonus Video): Let's draw more Jeeps. This time I'm going to draw fast and loose because I want my lines to be more sketchy. I think I've ran out of space here, unfortunately. Resizing problem. I should have drawn this much smaller. Doesn't matter. I can actually draw this Jeep from imagination. Sometimes I'd do little sketches like this just to warm up. If I have problem resizing or getting the proportion right when I actually do my real sketch, I can take note of all these mistakes and pay more attention to all these mistakes. Drawing should be fun. Don't stress yourself out. If you draw something wrongly, just practice. The more you draw, the better you will get. That is the general advice that I always give to my students. Not enough space for the front tire, or maybe I can have this main Jeep here overlap the Jeep that I am drawing. Sometimes when drawing different things, different situations will appear and you have to make do with those situations. It's not too bad, It's not to bad. Let me draw the bottom here, and we have a side here. I see what's wrong here. I did not draw the front part of this Jeep properly. Let me just skip to drawing the next Jeep. The way these two Jeeps are drawn doesn't look that great because it looks like this Jeep is going on top of the bigger Jeep because the overlapping lines here are not that clear. There's no obvious overlapping lines. That's some of the mistakes that you can make when drawing but don't be too stressed out by that. As mentioned earlier, drawing should be for fun, for relaxation. If you really do want to draw accurately, you can plan out with your pencil first. Next, I'm going to draw another Jeep here. This time, I'm going to again draw fast. If your straight lines are wobbly, it's all right. You don't have to draw a perfectly straight line to keep the illusion that you are drawing a straight line. This is the front of the Jeep. We have the side here. This is the cover for the tire. It goes down here. This part here is right below the midpoint of this window. This line will go here to the bottom of this windshield here. This line would go up here, align with the wheel cover here. This line will go here to the midpoint of the windshield. When I'm drawing, notice I'm always drawing something in relation to the elements that I have already drawn. The headlight is here. This is the front. Notice my line, it's very wonky, it's very wobbly. If you want to draw a straighter line, you can practice the right drawing techniques. You can turn your sketchbook to an angle to allow you to draw straighter lines easily. Again, there are seven air intake holes here but I've only drawn four. This is the license plate. This is the bumper. Notice I've drawn the bumper block by block. What should have been done is to draw the big shapes first and then divide all these little shapes within the big shape, It would make the sketch look more accurate. This is the wheel and this is the bottom of the Jeep. Usually, when we draw vehicles, we are not bothered with drawing the bottom but you can actually see the axle or the part that connects the two wheels right below. This sketch is done. Let's put some handles here and here and some, not sure what those things are. Things that help open the door. We can see through to this open window here. Can we see the wipers? I think we can see the wipers. Let's just draw the wipers and maybe the edge of the Jeep here. Notice for this jeep, I have drawn it flatter compared to the photo. For the first Jeep I've drawn, the width is actually correct, but it should be flatter, especially this part here. Let's draw another one. I'm going to draw the white one. This time I'm going to draw starting with the windscreen first. I'm going to draw by not lifting my pen up as much as possible. Oops, my wheel is not that circular. Just try different techniques. You can also use contour drawing techniques to draw Jeeps. Who knows what kind of effect or what kind of look you can get. It could be quite fun to do that. This looks all right. The lines are way more wobbly than I expected. If your lines are too wobbly, obviously they are going to affect the accuracy. But in this case, it's not too bad. Next, I'm going to challenge myself by drawing this Jeep with a lot of parts. I'm going to start by drawing the front first. Again, I'll make sure that I have enough space for the front side here and back here. Let's go. Let's just jump right in. I'm also going to draw this a bit faster. Sometimes where you draw fast, you can get that sketchy look that you just cannot get when you are sketching slower. When you're sketching slower and you're more meticulous, sometimes your lines can look a bit stiff. We have the headlights here. I'm going to draw really fast. When you draw really fast, you don't have the time to think too much about things. All you can do is rely on your drawing techniques, which is to say that you have to rely on drawing what you see. Drawing the lines, you're not drawing a Jeep, you're drawing the lines. Then once you have finished drawing the lines, you can see a Jeep. We have ellipse here, let's start here. This ellipse will end here. As the pattern move up and down, the patterns are more compressed. Wow, the bottom here is actually not easy to draw. There are so many different parts. I may not be able to draw all of this that accurately. We have another tire here. Tire is here. We need to draw the pattern as well. I'm just drawing really quickly, very loosely. For this Jeep, we are not able to see the top off the bonnet. We can only see the front and the side. Unless your camera is high up in the sky taking a photo of the Jeep from the sky, you're not going to see all three sides of the Jeep. Let's draw the front. This is line is tilted up slightly. The line here will end to the right side of the Jeep. There is a circle here directly above the right side of the tire. I'm not sure what that circle is. This is the front cover. It could be a speaker or it could be a headlight, I'm not too sure. This line would go down here, go to the right side. This line here is actually higher than the midpoint of the tire, so we need to draw it higher. Let's draw the, I think this is the head rest of the seat behind. I'm actually not too sure. I'm just drawing the shape that I see. It doesn't really matter what that part is. I'm just drawing the shape. Sometimes, if you don't know that part, it's good because if you know that part, if you know you're drawing a seat, again, you may want to draw the seat from your imagination rather than the seat that you actually see in the photo. There is this exhaust here that goes up. This exhaust will come up here and go to the right side in a horizontal manner. There's some holes on the exhaust. This line would come down here. We have a tire here. The base of the tire is higher than the base of this front tire. We need to draw it much higher here. The tire is actually quite thick, so let me just draw a thick tire. This is the back and we can draw the bottom here. Wow, the bottom of this Jeep is really quite complicated. This whole part here is actually just black. I am not able to see what's here. I think this sketch is done. That was much faster than I expected. There are a lot more details here. Seems to be a handle here. This looks like a shovel. It's a shovel they have by the side of the Jeep. When you're drawing, you can identify all these little things. Now you know that they actually keep some tools by the side of the Jeep, whereas if you are just taking a photograph, those little details are not the things that you would remember. Let's draw the front here. This Jeep does not have a license plate. I believe the license plate is taped up here, so that's a little piece of detail that I notice. This is really fun. Now I can't stop drawing. Let me draw another one. I'm going to draw a back of the Jeep. I'm going to draw it here. This is the back of the Jeep. There is tire here and we have the back bumper, the lights here. This sketch, as you can see, it's very simplified. I'm drawing the big shapes. I'm actually not too concerned with the actual accuracy like how straight the lines are. I'm just drawing just to have fun. We have one window here, another window here, and this is the side mirror. This is the front of the Jeep. I can see some windows here. Let me just draw the back of the tires. I can see the bottom of the vehicle and I can see another tire here, right at the bottom. I'm actually shading with my fountain pen. Let's draw another Jeep here. This time I'm going to draw the top first. This is the front. We have one window here and one window here divided into two parts and one part. This will go all the way down. We have a rear bumper here, a light here. The handle is here. The door is here. This part actually goes down. Oops. My wheel well here is too narrow. Doesn't matter, doesn't matter. That's have a very stylized sketch here. This is the front. The front actually tips down slightly like this. We have the headlights here. We have another headlight here. We have the cover for the wheel in front. We have another wheel here. We can see this sketch was drawn really quick. I can draw something like this, maybe in under five minutes. This is a very stylized sketch. It's almost cartoony. When your sketch is too stylized, when your sketch does not look exactly like the reference photo you're using, it can look a bit cartoony. The more accurate you can draw, the less cartoony your sketch will be. Now for this final Jeep that I am drawing, I'm going to draw it really small. Here I'm just drawing the big shapes. When I don't have space to draw the small shapes, I would just leave them out. This is the key to simplification. You can try drawing some of the Jeeps like huge so that you can draw all the little details or you can draw those Jeeps small, like what I'm doing here, where you don't focus the details but you just focus on simplification. Drawing something like this doesn't take up too much time. The larger your drawing, the more time you will need to draw. If you do quick little sketches like this, you can actually draw a lot of these little sketches. Let's draw the lights here and one here. Try to have variation when you're drawing the same subject repeatedly. Try to draw them big, draw them small. If all the vehicles are looking to the left, then draw some that are looking to the right. If all the vehicles are facing forward, then draw some vehicles that are facing backwards. By having variation, you are going to make your sketch book pages look more interesting. This is me drawing a mini-Jeep. With this mini-Jeep, I am not able to draw any details. I'm just drawing the shape. This is cartoony, very cartoony, in fact. Some people may find it quite challenging to draw detailed subject. Some people just like to draw a looser subject, a more organized subject. Personality for me, I like to draw buildings, urban scenes, architecture, so I actually don't mind drawing boxy subjects like this. I like them. Now I'm going to use black to create more contrast and also use some watercolor to make those two pages look more lively. Let me just use this Pentel Color Brush pen to paint over the black areas. When you're painting with the brush pen, try to make the shapes obvious. For example, if I paint really fast, the edges are actually quite rough and the shape is not that obvious. What I want to do here is actually to go in and fill in all the rough edges to make sure that the shaped is very obvious. I've also added the shadows beneath the vehicles. Usually, the shadows beneath the vehicles, they are very dark, they are almost black. This is something to know when you are painting with watercolor or when you are doing tonal studies like this. This is what I have so far. I'm going to keep the color palette very simple. I'm just going to use yellow, orange, and red to color the Jeeps. Let's start with yellow first. Mix it with a little bit of red to get that orange so that the color is not so flat. Make sure you are using waterproof ink. If your ink is not waterproof, you are going to make a mess out of everything. As usual, make sure to test your supplies first. I've accidentally left out the black here, which I should have painted using the Pentel Color Brush pen, but let me just use watercolor to mix black instead. This is mixed with a warm red and Phthalo blue. Actually, you will get better looking blacks if you mix your own blacks. Because if you use just pure black, the contrast can be too striking. This is the colored sketch. I don't really like the look of the pure black against watercolor. This contrast is too strong for me, so with sketchbooks, you can test out different styles to see what you like and dislike. In the future, I will probably just mix the blacks using watercolor. If you take a look at watercolor paintings and watercolor sketches, usually the blacks are mixed with watercolor rather than just flat black. It looks very out of place here. This is the other sketch. This coloring style with flat blacks is actually used for drawing manga or comics. If you look at Marvel or DC Comics, they usually use a lot of blacks and they mix that with a lot of vibrant colors. But for watercolors, you really do want to mix your blacks with just watercolor. For blacks to work well in this case, you can use these for tonal studies. You can use blacks, grays. Basically use black for black and white monotone studies. Don't mix them with watercolor unless you like the look.
10. Doodling: In this lesson, we're going to have some fun with doodling. I hope you have been following along and filling your sketchbook with your beautiful sketches. So far all the sketches we have drawn were drawn with the help of references or reference photos. In this lesson, we are going to draw from our imagination. We are going to draw whatever that comes to our mind and since we were drawing Jeeps earlier, we can maybe draw some imaginary Jeeps from our imagination. The thing with drawing the subject matter over and over again, you can really help build your memory as to how a particular subject will look like. For example, if you draw a lot of vehicles, a lot of Jeeps, you would know how the vehicles look like. What I'm doing here is actually I'm trying to doodle this imaginary Jeep. This is 100 percent from imagination. We have some exhaust here that is blowing out fire and we have this back part here with maybe railings and it's carrying some goods, some cargo. I realize that if the exhaust is blowing up fire, the cargo may actually catch fire. Doesn't matter. It's just for fun. We have a driver inside with a funny generic face and we have some seats inside. This is the rear view mirror. We have the wipers here and this is the front of the Jeep. Let's have some statue or some insignia here in the front. Let's have the Jeep really big, this is a huge hint light here and a huge hint light here. We have some exhaust. The exhaust that I drew earlier was vertical. This time, I actually wanted to draw horizontal exhaust, but the first I put down was actually vertical. Doesn't matter. Blinkers on the right side. Bumpers in front, extra bumpers and maybe there is a hook here. Maybe there's a hook there and we can draw the wheels. Let's have really huge wheels just for the fun of it. This is the door here, the handle and because we have the memory of how the vehicle should look like, we can now draw something that is totally imaginary. Let's have a wheel here as well. This wheel is really big and has a lot of pattern here, a lot of the texture on the tire, on the wheels and we have a wheel here as well. Maybe some steps here because this Jeep seems to be quite high, so maybe we need some steps for the person to step onto the step to go into the vehicle and maybe we can have a logo here, just a funny logo. Let's have some exhaust at the back as well, blowing out some flames. Just have fun, just draw whatever that comes to your mind. Recently I've been really into drawing terrariums on my tablet. Maybe now I'm going to draw a terrarium as well. Let's have some texture here. I'm drawing the rocks. Let's draw a cactus here. This is a cactus with maybe two arms and these are the spikes and may be this cactus has a face. For some reason it has a face and we have some plants in front and this is the bowl that the cactus and the rocks are on. For the rocks, I'm going to place more dots here. Let me draw the pot. Actually I should have drawn a glass bottle to house all of this, but hey, it doesn't matter. These are little holes here for drainage so that the water can come out. If you look at potted plants, you will know that there are those little holes there at the bottom. Let's draw some leaves behind. These are spiky leaves and we can draw them overlapping each other. This would make this sketch look more interesting when we have overlapping elements and maybe I have a vine here, some vine with some leaves. This is really fun. Doodling is really fun. You don't have to be stressed out by how your sketch will look because we are really just having fun, we're just really relaxing. We're just really using drawing as a hobby to relax. Next, I'm going to draw my three-year-old daughter playing her doctor play set. In this play set, there is actually parallel pink spectacles. Is this the stethoscope? I think this is called the stethoscope. Now if you want to draw people or draw characters better, if you want to get better at drawing characters, definitely practice drawing more people because that's the only way you can help build your memory. My stethoscope doesn't look that great. My daughter is maybe sit down. This is her legs. I might have drawn the toes. Let's draw shoes instead and this is her medical kit with a handle. Let's draw some pill bottles, some pills. These are some pills. We have this. What is this? A needle and syringe. The needle and syringe actually has these two parts here for your fingers. You can also draw maybe monsters. Let's draw a monster. For this monster, I'm going to maybe draw without lifting my pen. Let's have a huge mouth with spiky teeth and a long tongue. Let's have the tongue behind the teeth and let's have some teeth at the top here. Let's have some eyelashes for no reason. Let's have maybe some hands with claws. Anything goes really. You can also write down some ideas while you are watching the TV or surfing social media so that you can draw later. You know what? Maybe I should just color this black so that we can see the mouth more clearly. This looks nice. You know how ridiculous those fashion shows are. Maybe let's draw some ridiculous fashion. Let's have a hat that has a lot of weird things coming out at the top and we have this guy or this lady here with really thick eye shadow and this person is wearing maybe a jacket, but it's not a simple jacket. This jacket has maybe some spikes here. My imagination is not as well as those designers. Let's have some necklace, some beads here, and maybe let's have this guy carrying a dumbbell for I'm not sure whatever reason. He or she is carrying a dumbbell and on the other arm maybe he can carry a soft drink, again, for no reason. Let me just draw the soft drink first. Anything goes, whatever you can think of, you can draw. Maybe this person is running. I'm going to draw him running. We have some socks there, some shoes. This is really fun. You will be very surprised by what you can draw. Some pockets here on the side, belt and maybe a snail. Yesterday, I was out at the supermarket, I was riding my bicycle going across the grass. I saw a snail, I almost stepped on the snail, which is why I have that snail here. Let's have a word bubble here, Oh, snail. This is what almost happened to me yesterday but I'm not wearing this clothes obviously. If you have no ideas what to draw, you can go online to search for ideas. Sometimes I use Pinterest to look for interesting things to draw. Wow, this shop looks really nice so maybe I can design a shop of my own. I'm going to maybe draw a two-storey supermarket perhaps. Let's have a sign board first. Let me draw the sign board first, let's call this supermarket, super. Let's have a shade here. This is the awning and maybe we have this thing here. Let's have the pillar here that goes down. This will be the shop front. There are some boxes, a table in front, selling goods, food, maybe selling some bread items, or maybe selling some cigarettes or vegetables. This is a supermarket, so it sells a lot of items. Let's have a step here, that goes in. Maybe we have one of those machine where you can put coins in and a toy would come out. This is the shop owner standing right right here in front with his or her hands by the side. Maybe he is wearing this strange apron thing. We can maybe a door here. Maybe this shop is beside this residential lock here. Maybe this shop is really also, there are some plants growing on top of the second floor. This is the second floor unit. We can draw some maybe there is this protrusion coming out to provide shade for the windows that are behind. For this window, maybe we can see some curtains and for this window we can see some blinds and we have some curtains again and there is a small bird here. Let's say there is a sign here. A sign board that is here and maybe we can have a beer bottle, yes, maybe promoting some beer. Let's have a bottle here. We can have the top of the building here like this. I noticed my drawing here is quite flat, there is no perspective whatsoever because I did not plan to have perspective in the first place, perhaps I should have planned to draw a two perspective shop, it would make this sketch look better. But doesn't matter, it still looks like a shop. Let's continue to draw. Once you know perspective, you will be able to draw buildings or interior scenes more accurately. All of that will actually, you have to pick up all of those mussel memory, and knowledge while you practice drawing. Inside the shop there are a lot of things, maybe we have shelves inside the shop selling all of this little goods, peanut butter, bread, groceries. Maybe we have some potted plants on the side. Maybe this owner likes plants. Maybe some plants here as well, and maybe another stick out sign board here. What should we sell here this time? I'm not sure what we should sell, let me just draw a star face because I feel like drawing a star there. Oh, I know, maybe the second floor is having this spa service. I'm not sure why I drew this face here. Let's write the words here spa, and there are a lot of birds here. Oh, my birds are not looking like birds. Maybe let's draw this oval shape with a spike coming out to represent the birds. There are a lot of birds here at the top. Maybe the person living here is hanging laundry at the top so we can draw some laundry here. Some cloths. When you're drawing from imagination, you have to work with what you already know. For example, if you don't know how to draw a face, your characters, the people that you draw me look a bit weird. When it comes to drawing face or heads, you should know that the height of the nose is about the height of the ears. After you know all these things you can stylize them. This by the way, is a self portrait. This person, I drew myself with lips that are too thick. It doesn't matter. What I want to say is in order to draw people, you have to know general proportion when it comes to drawing faces. Like how big a mouth should be relative to the whole face, how wide the eyes should be. When you look at a person's side profile like this. How should a side profile look? All this you will only know when you draw enough people, when you get enough practice. Otherwise, you will have to draw from reference. This is another idea that I had a few weeks ago. I was actually thinking of creating a Children book, talking about art supplies. In my imagination, what I wanted to do was to draw some watercolor pens like this. The name of this pen is called Gamboge and the friend is called Ultra Marine and they both live inside this watercolor palette box. These are two pages of doodle drawn really quickly. When you fill up many pages of all this doodle, it can be quite surprising to see what you have. While you are drawing some times another idea may just appear out of nowhere. For example, when you're drawing a car, you suddenly have an idea to draw a sea serpent and when you draw a sea serpent, suddenly you have an idea to draw some vegetables or sound weird looking fish. It's really fun to just draw aimlessly and minus sometimes. Doodling doesn't take up a lot of time. Let's say you have only 10 minutes to draw and you can only draw one thing at this corner of the page, we can leave the rest of the page blank and come back to your sketchbook again some other day, some other time when you are free. Doodling can also help you identify what are some of the things that you find difficult to draw or what are some of the things that you cannot draw? For example, I'm not sure if my snail is looking like a snail, so I may want to go and check a photo reference to see if this looks like a snail in real life or if this is actually just from my imagination.
11. Draw with confidence: In this lesson, I'm going to show you how you can be more confident when it comes to drawing. I'm going to give you two tips in addition to just practicing. When it comes to drawing, it's actually not very different compared to playing a musical instrument in the sense that the more you practice, the more familiar you will be with your tool, and the more familiar you will be with the subject that you are drawing. You can gain confidence with practice through the process. You will gain confidence naturally over time. When it comes to drawing, in addition to just practicing, these are two tips that I'm going to show you right now. The first tip is to always close your lines, don't leave open gaps. I'm going to draw this loaf of bread that I have here. This is nice because the shapes are very interesting and we get a lot of lines here. I also have another loaf of bread here. You can change the angle of this loaf of bread to draw from different angles just to get more practice, just to practice the tips that I'm about to teach you. I'm going to arrange it in this way and I'm going to draw this. The first tip, close your lines, don't leave open gaps. When you're drawing, you can use the contour drawing method that I taught you earlier. While drawing close your lines, don't leave open gaps. When you're drawing, try to avoid drawing like this where you have gaps. Let me show you an extreme example of what can happen if you don't close your lines. See how this cube looks versus how this cube looks. Just by simply closing your lines, closing the gaps, your drawing will look better. When you have gaps like this, it's not going to be very clear as to what you are drawing like which line is above which line? How do you know? You can't because there is no visual clue to help you. However, if you close the gaps like this, you can see this line here creates the illusion as if it's on top of this line on this side. Just close your gaps like this. When you're drawing, just try and close all the gaps. Now when you have lines within a shape, sometimes you can just leave the lines like this, you can leave a gap like this. But when you are drawing subjects that are solid, try to close your lines, don't leave open gaps like this. It's going to affect the illusion of your sketch. The second tip is, don't draw fuzzy lines. When you draw the line like this, don't draw fuzzy lines like this. It's not going to look nice. It's going to make your sketch look as if you are hesitant. When drawing, try to draw with just one line and one line will do. Here, for example, I can have this line coming out there. You can restate your lines by going over sometimes, but don't do that too often. It also depends on what you are drawing or what type of style or look you are going for. Here is this loaf of bread that I'm drawing. Don't draw fuzzy line, that will make your sketch look very hesitant, very shaky. As long as you can close your lines and draw without fuzzy lines, your sketch is going to look good. So for this sketch, as you can see, as long as you don't have fuzzy lines like this, your sketch is going to look confident, it's going to look good. Avoid fuzzy lines and always close your lines, avoid gaps when necessary. You can practice this two tips by drawing a loaf of bread. Or you can draw crumpled plastic bags or crumpled T-Shirt or crumpled laundry before fold your laundry. Just practice, and while you're practicing, just remember this two tips. Close your lines, avoid gaps and don't draw over your lines over and over again. Don't draw fuzzy lines because fuzzy lines may make it look as if you have made a mistake, you don't know what you are drawing over at the fuzzy line areas. Sometimes it's good to draw organic subjects like this, so you don't have to focus on getting this structure right. Here you can really focus on practicing your technique. Just remember these two tips and all your drawings will look better, look more natural, and look more confident.
12. Bye: I hope you have enjoyed this course. This is just an introductory course on sketching and using a sketchbook. We have only managed to view the first few pages of this sketchbook. So I hope you can join me in other courses where we will continue to work on this sketchbook together. Before you go, let me know what you think about this course, leave me a review. Thanks for watching. Thanks for following along. I'll see you guys again.
 Teoh Yi Chie, Sketcher, watercolour lover