Transcripts
1. Intro: Hello, my name is
T0 and welcome to the fifth and last
sketch booking costs. In this course, I wanted
to share a view to things to happen outside
of the sketchbook, sketchbook that you have
almost felt through the different courses and
lessons we have been to gather. I'm talking about things
such as scanning your work, sharing your art
online and finding people with similar drawing,
sketching interests. That's jump right in.
2. How to scan your art: Before you can share
our sketches online, you need to digitize
them and you can do so by scanning or taking a photo. In this lesson, I
want to show you the basic settings are used
while scanning my sketches and also the edits that I do to make those sketches look
more presentable online. This is the sketch I'm scanning and this is
a double-page spread because my scanner is not big enough to scan this whole thing. I need to scan this in
two passes is scanning. I will show you how to
stitch node whose scans to get us that the scan
looks seamless. In order to follow
along with this lesson, you will need a scanner
and of course, computer. If you don't have a scanner and you have the intention
of buying one, the ones I can recommend
would be the canon lie DC raise the epsilon V
series Colour scanners. I don't have experience
with 31 scanners. Those that can scan effects and print if you
want to buy them, do checkout reviews online. Void scanners where you have to feed the paper into the scanner because you won't be able to fit your sketchbook into a scanner. So look for scanners that
have a flat scanning surface. Those flatbed scanners, you
can get a good photo or art scanner for raw hundred one hundred
and fifty US dollars. And such. Scanners usually
scan up to A4 size. If you want to scan paper or sketch books
that are larger, I recommend you scan in
several passes because larger scanner is usually
significantly more expensive. It can be hundreds of dollars, even up to a $1000. The scanner driver
usually needs to be installed first
before you can scan. As you can see, my Athos
scanner is not big enough to scan this sketchbook. I have to scan this
in two passes. And to make it easier for me to stitch the two scans later, I need to make sure the
scans have some overlap. For the first scan
or I need to scan dis and photos second scan, I have to scan this so
that this area overlaps. I can overlay them
together to stitch them nicely regardless of their scanning software you use, you should have access to the settings which
you can change. You cannot change the settings. It could mean you are
scanning with automatic mode, so you can change
it to manual mode, two, assessed settings. Here I want to scan a color image instead
of black and white. For resolution, you can
choose three hundred. Three hundred is good. Nowadays, computer monitors are having higher and
higher resolutions. So if you want to
future proof your scan, you can scan up to 600 DPI, but that's going to
require mall all space. We are going to scan a fall. I wanted to fall to
save to my desktop. That's the name of the file for the file format
would choose tiff. This is uncompressed
file format. And here I need to uncheck combine into a single
document because I want oddest scanners to
be a separate faults for image correction. Choose none because
we want to do our own image correction using our own graphic
design software. If you wanted to
stitch multiple scans, you have to make
sure that each off the paper is flushed to
the h of the scanner. In this case, I'm going to put my sketchbook here and push it right to the edge so that
the paper touches the, each of the scanner. And it'll, here's how my
sketchbook is bent in this way. Makes sure you press your
sketchbook down lightly so that the pitch is in contact
with the glass surface. If the paper is off the surface, the scanner will be blurred. And now we can scan. For the next pitch. I'm going to move my
sketchbook now here. Once again flush the edge of the paper to the
h of the scanner. I'm going to move my
sketchbook to the right side slightly so that is scans pot off the
other pitch as well. The software you can use to edit your skins are Adobe Photoshop, which is a paid subscription. If you want something free, you can consider game or
if you want to buy or a software that is a onetime payment and maybe
consider Affinity Photo. Or sometimes you can even use your driver's software
to edit your scans. I'm using Affinity Photo. Many of the features that you
need to edit skins should be available with the various
graphic design software. The first thing I
need to do here is to change the orientation because this is not
the right orientation. So I'm going to rotate this
90 degrees anti-clockwise, and I have to do the same
for this sketch as well. Next, I want to
enlarge the canvas because I can't paste the pitcher because
there's not enough space. I need to enlarge the Canvas photoshop and Kim will have this
function as well, just that you have to
find out where it is. This is the original size
and dimension of the canvas. So we just need to
double the width here. And I'm going to click
here to unlock this. And type been a number that
is two times the size here. I'm going to put 7 thousand. If you don't unlock this when
you enter a number here, the number here
will also change, which is what we do not learn. And I wanted to Canvas to
increase on the right side. So I place my anchor point
here on the left side, click resize and you-all
Canvas will double. Go to the other fall and press the shortcut
is Control E or Command a to select everything. Command C or Control C to copy. Go back to your much
larger scan here and press Command V or
Control V to paste. Now we have the other scan
on top of the first skin. Now you have to zoom in. You can do that by pressing
Control plus or Command plus. Let's align this to
the second scan. To the first scan, you will have to zoom in really close to get the
alignment right. Here you can see
the scan is blur. So I am going to
delete the blur pot. I'm going to use
this selection tool here to select this area which is going to delete this, make sure you are
the correct layer. Don't delete the wrong layer. I pressed in it. As I zoom in, I can see
this area is still blur, so I will have to
delete this as well. Let me just move to
an area where I can see the scan is actually shot. This area is
definitely very sharp, so I'm going to delete
this whole area here to the point where
the scan is sharp. Sumi in again. Okay, so let's use
the arrow tool to move this against skin to
align it to the first scan. Now I have to meet that, the blurred image or
the second scan in such a way that I can align
these two very easily. Make sure they are
aligned properly, and just move the second scan
over with your arrow tool. On your keyboard. You can zoom out to take a look. This is the skin
that we have so far. I don't need the color
swatches so I can crop that out and I certainly don't need all this at the top. I'm going to use
the crop tool here. And I'm going to re-size the crop to crop out
all the unwanted areas. This here will go in. If you don't crop
it right the first time you can always
undo and crop it again. Okay, so let me press enter, and this is the skin. Now, as I zoom in, I can see the paper texture. Depending on whether or not
you want a paper texture, you can actually remove it. So for example, if you
want to maybe print this sketch at a print shop, then maybe you don't
want the paper texture. So let's say I don't
want the paper texture. What I can do is go create an adjustment
layer, four levels. The keyboard shortcut is
Command L or Control L, depending on the software
you use, of course, you may want to remember the keyboard shortcut so that
you can use it next time. It's quite handy. So here we have
several settings. You can go through the sliders by pushing or pulling them
and see what they change. That's adjust the black level. Here you can see the areas which are darker will be darker. Maybe at one that I'm going
to push it all the way to the H here where you start
to see the curve goes up. For the white and level. I'm going to push it
to the left side. The more you push
to the left side, the mod of paper
texture will disappear. You may wonder x2
into your scan to take a closer look at
the paper texture. Now I have to paper texture and now I don't have
the paper texture, but it also affects
other areas as well. So be careful how much
detail you are removing. Once you are happy with
what you have here, you can close this
levels dialog box. If you need to adjust
the levels again, the levels are actually here
under the Layers palette. Let's take a look and
see what we have. I think it looks good
except the clouds here are, they are a bit washed out in the process of
removing the paper texture, the whole image was
actually brighten. The very light gray area
here was actually brighter. So now we are not able to see that this is actually great. What we can do is
we add this area here to make it darker so that the adjustment
doesn't affect this layer. If you look at your
layers palette, there should be about then which allows you to create a mosque. So that Mosque is
now created here. And I'm going to choose
assault brush, a soft brush. And I'm just going to paint over the area which is
supposed to be darker. Now I'm going to
see it's darker. Usually fall very light
gray or very light blue. You will have this problem. So you may have to go in to remove the adjustment from
these areas here as well. Though, for areas which are
very bright or too bright, those areas you can
actually make them slightly darker so that
you can see the contrast, so that you can see this. Alright, so this is the completed skin which
is digital together, one thing I like
to do is to create some extra white border for my sketch on all the four sites. So I want to create a layer, an empty layer just click wild
is buttons here to create an empty layer and push
it all the way up. Just click and drag that
layer all the way up and go into the canvas
resize function again, unchecked, lock and push the
anchor point to the center. You have to push
the anchor point to the center because you want the pixels to be
added on all the sides. And I'm going to add 100 pixels, maybe 200 pixels,
to the foresights. Just enter the number, just add 200 pixels
to the wave and 200 pixels to the height. Click resize and
see what we have. We actually brought back some of the scan from aliyah because all those
details are actually stood there just at
your kind of see it. So on the top layer, which is the empty layer, I'm going to pick a brush, again, a soft brush. Choose the color,
make sure it's white. And zoom in and go. Paint at the extra
pixels at the border. Depending on the
software you use. Sometimes the software
would actually bring back the area that's outside. Sometimes the area outside would just be transparent image case. You can just make this whole year white and drag it all the way
down to the bottom. There are different ways
to achieve the same look. One way to paint the
H very quickly is to press the Shift
button and just paint. When you hold down
the Shift button, the cursor will lock to painting either horizontally
or vertically. Now we have the
extra white border and now the scan looks
better in my opinion. Yeah. Always save your fall constantly when you are
working with y'all, follow because
things can happen, the software can crash
for whatever reason. Always save your fall
SEL working on it. And now this added
is done and we can save as a JPEG to
share it on the line. To save it as a JPEG, you can go into File export, Save As just export. There are many file
formats you can use. The most common file
format for sharing photos and artworks
online would be a JPEG. I'm going to resize
this to one hundred, ten hundred pixels white
because I don't need to share the original resolution. And if you have to
lock icon here, it's also going to resize
the height proportionally. The file size now
is 600 kilo bytes. To reduce the file size, you can reduce the
dimension or the fall, or you can reduce the
quality of the compression. So I'm going to move
this from 100%, which has the best quality
down to maybe 70%. Anything around a 100
kilobytes is good. Maybe I can make this even smaller so that the fall
kind of looked at Foster, I'm going to change the
width to maybe 800 and see how this number updates. So now it's 70 kilobytes,
which is good. And I can click export and
save my fall onto my desktop. Next thing to do is to open
the JPEG that you have. Just save to take a look and
see whether or not you liked the compression quality or
if the size is correct. If there is too much compression
or if you're seems to be blurred and you
have to go in and export again with
different settings. So maybe choose a better
quality compression. It's really up to you. That's how you can
scan and stitch your sketches and
make sure to save your file constantly
because you'd want to lose your ADH and have to
redo everything again.
3. Share your art online: Now that you have
felt your sketchbook, my recommendation is to
share your art online. There are many advantages
to sharing your art online, to creating an online
portfolio or archive. If you feel like
you are a beginner and your art doesn't
look that great. Or if your art or sketches on, up to your personal standards, there are actually
websites where you can create a folder or an album and you can just draw oil
sketches into those albums. There are many
places where you can share your art online. I share some of my sketches
on my website, on my blog. And these are some sketches
that I created in 2013. That was back when I was
still learning how to sketch. And I usually just draw with black and white
and color or paint my sketches with
water-soluble graphite. This was before I switched
over to using watercolor. So the first advantage of
sharing your art online is you can see how you have
improved over the years. So those were my
sketches back then, and these are some of the
more recent sketches. These were drawn
with pen and ink and paint it with watercolor. I was on a document
at some of the sketch walks I have been
to with my friends. This our public sketching events held by the urban
sketches Singapore. And I've made a lot of
friends from this group. It's really fun
to be able to see all these old photos and the
Skechers MIT by not just me, but also by my friends, have also been on a few
overseas sketching trips, and I've also documented
some of those trips as well. For example, this
entry was written for the 2014 trip
to Bali, Indonesia. I went there alone
just for sketching. I went there for two weeks. And he saw some of the
photos that I've taken down for some of the
sketches that I mean, they're still remain very
vividly in my memory. I can remember the sights, the sounds, the
experience, the traffic, whether the food,
the noise made by all this bird's eye can remember all those things because
I have sketches of them. I have photographs of them. And I also have right up. Having an online archive is a great way for
you to go back in time to relieve those memories. Sharing your art on a block requires more effort because of lung is more suitable for
creating the long form content. You can combine odd with
photos, with images. We have tax and even with
maps to tell the story. Nowadays, people prefer
to share their art on Facebook and also on Instagram because it
requires less effort. This is my Instagram
page where I also share my sketches is very easy to
share your art on Instagram. You can just scan your art. I'll take a photo of your
ADH and share online. Usually I share my odd
we have some texts. Usually I will write about
a place that I'm sketching, all the tools that I'm using. I will also add some hashtags to help people discover my art. And it's very satisfying
to scroll through all the work that I have
created over the years. And that's the
other advantage of creating an online
portfolio or archive. You can get tremendous
satisfaction when you look back at
your order works. But Instagram, he
isn't that great for documenting
long-form content. So if I want to document my
sketching trips overseas, I won't be using Instagram. I would write about
my trip on my blog. This is a time-lapse
that I share it on my Instagram to assure
people my sketching process. There's this artists that
I know of their shares, his amazing ink
drawings on Twitter. Instead all on Instagram
or on Facebook. And he gets a lot of
attention as well. Where are you sharing
your work online is not as important
compared to sharing. You all work consistently
because with consistency, you can build an audience. We have time. For example, with this
artist Paul Houston, he actually shares his
amazing pen and ink drawings on Facebook as well
as on Instagram. And he has a lot of followers and subscribers
on two platforms. However, the mall platforms
or websites you use, the more time you have
to spend to manage those websites as well as posted content on those platforms. If you wanted to create a
career out of making art, that's where having
an online portfolio will be tremendously helpful. Because once you have a mass, this huge collection of work that you have
created over the years. These artworks are going to help people find and
discover your work. And I have actually received numerous commissions
over the years because of the watercolor
sketches that I've shared on Instagram as
well as on my blog, and also through the videos
that I've shown on YouTube. My recommendation for you if you want to create an art career is to share the work that
you want to be height four. So for example, if you
want to be hired to create architectural
watercolor sketches, then share your architectural watercolor
sketches on your website, on your social media. Once in a while, I guess
you can share more casual, odd or maybe here in this case, a sketch off my
two-year-old daughter. But you should try to narrow down and focus
on a specific niche. If you want to be hired
for our character design, share mostly character
design on your website, Oral, your social media pages. Regardless of where you
share your art online, I highly recommend
you at some tax. It can be shorter story. You can talk about the tools
and supplies that you use. You can write the name of
the place you're drawing. You can add some hashtags. Oldest hex will help make it
easier for you to such for your art into future compared
to the scrolling down long, newest years of work
that you have created. So we can save you
a lot of time. I hope you will share
your art online because I'm very confident that once you see the wolf that you have created
over the years, We'll few extremly accomplished.
4. How to manage social media expectations: In this lesson, I want to share with you some
tips on how you can manage your expectations
when it comes to sharing. On social media platforms. The first and most
important thing to know is everyone
stops at the bottom. Everyone starts with
0 or no subscribers. And it takes a really
long time and a lot of effort to Butte an
audience or a following. I started my blog in 2009 was shared reviews of
books and supplies. I was so sure my
sketches on the block, I remember having just hand to 20 or even 30 visitors a day off this several years
of writing now I have around three to 4
thousand visitors a date. I expanded to creating
videos on YouTube, and I started with
0 subscribers. Today I have over 250
thousand subscribers that I started to use Instagram where I have currently over 2510
thousand subscribers. I didn't actually post a
lot on Instagram because my focus is actually on my blog and also on
the YouTube channel. I can tell you what
we've experienced, that it takes a lot
of time and effort to abuse such a huge
audience or full wing. And it suddenly
very satisfying to have such a huge following. But I can tell you that it's
even more satisfying to be able to look at all the work that you have
created over the years. You should share your art
online for the right reasons. Personally, for me, I share
my art online because I feel like sharing
my art online and because it's a form
of self-expression. And because I want to create
an online archive where I can look for my old
artworks easily. I don't place a lot of emphasis on the number of views, likes, and comments that
are received for the art that I share online, I highly recommend
that you don't place too much emphasis or significance
to the number of views, likes and subscribers or
followers that you get. We have to work that your share because some of those numbers don't really have any meaning. When you are a beginner, when you start at the bottom, you're not gonna have
a lot of following. And each time you
share a piece of art, you are not going to have a lot of commands or any
comments or any links at all. If you attach any significance
or meaning to the numbers, that number is going
to make you few miserable for a very long time. Because as mentioned earlier, it takes a very long time
to build an audience. By not attaching any
significance to the number. You can actually make
yourself more happy. Having many likes or
many followers is not related to the or the
value of your work. Even if your work doesn't
have any comments or likes, it doesn't mean that
your work is worthless. There are incredibly
accomplished artist at work with movie studios or video game studios that have Instagram pages with
just a few followers. Not as much, not as many compared to less
accomplished artist. However, it doesn't diminish the value of their work because the work is good regardless of the number of comments or
likes or followers they have. When I started sharing
my sketches online, I also started with 0 followers and my earliest
sketches have very few who almost no commands or likes and that's
perfectly fine. What you should focus on
is actually on the number of artworks that you have
on your social media page. Like how much time
it takes to scroll down to the bottom
of your pitch. So if your pitch is very long, that obviously is
fantastic because it means that you have created
a lot of work over time. It's very satisfying to
look at all the work order sketches that you have created
over the months and years, focusing on the number of
likes and followers is a recipe to make you feel
miserable and depressed. I have been on this
forum where one of the top three popular
topics as always, people asking how they
can get more followers, how they can get more likes, how they can get more
people to look at art. As long as you're
sharing your art consistently online and make sure you add some
text to your art. That's going to help people
discover y'all, y'all. So the key to getting people to see your
witness actually consistency. This is an interesting photo. This is actually the old Mac
Pro computer from Apple, where the hot air or to exhaust would escape from
the top of the computer. I actually use the top of the computer to dry
my watercolor pens, and I share it
here on Instagram. People actually find it
interesting that I do this. However, when I share it on the computer forums paper were
angry that I'm doing this. The other thing to note when
it comes to sharing your art online is you're gonna
get some criticism. That's for sure. But don't think too much
about dose criticism. Because depending on what the
criticize or what they say, their main all may not
be value to criticism. If someone tells you how
you can improve your art, that is positive criticism. But when someone says they don't socks, that is subjective. And you don't really
learn anything from DOS negative criticism. So I won't even pay
attention to those comments. There are many haters
and trolls online, but I'm happy to say that the art community as a whole is generally speaking,
for every positive. When you share your work, people will give you
suggestions on how to improve. When you have questions, you can post your questions on your Instagram pages and
people may answer them, give you replies or answers
that you are looking for. Don't be disappointed when
your artworks are not reaching out to more
people and don't attach artificial
significance to the number of likes and
followers that you get. There are extremely
accomplished artists on Instagram were very few
followers simply because they just don't have
the time to share the app breathtaking
artworks online and don't compare yourself with
ADA RTOs as well because the comparison is meaning this. You want people to
look at your art, to think of you and
think of hostile and you don't want them to
look at your ad and think of some other artists. It's important to know how
to manage expectations. We have social media
because it can affect your mental health most of the time to a number of likes
or followers that you get. Just for illegal purposes. If you want to create an odd career focused on
building a good portfolio.
5. Urban sketching: In this lesson, I want to
talk about urban sketching, which is sketching on location are drawing from observation. If you have been
following along with my other sketch,
booking costs us, you realize that many of the sketches we have
drawn so far in our sketch books were actually drawn with the help
of reference photos. When it comes to urban sketching or sketching from observation, that experience is
actually very different. I stopped that urban
sketching in 2009, and I really enjoy
urban sketching. Whenever I look at
my old Sketchers, I'm reminded of the sights, the sounds experience, the rather the conversations that I have with
people on the street. So there are actually many
benefits to urban sketching. And the first benefit is, you can remember more often things that you
draw on location. Last, take a look at
some of the sketches I have drawn on location. Y, sketch on location
when you can just take a photograph
and capture everything. When your sketch on location, you are going to
spend a lot more time drawing and painting compared to the few seconds that it takes to press the shutter
button on your camera. And because you
spend so much time, you are going to be able to remember a lot more about
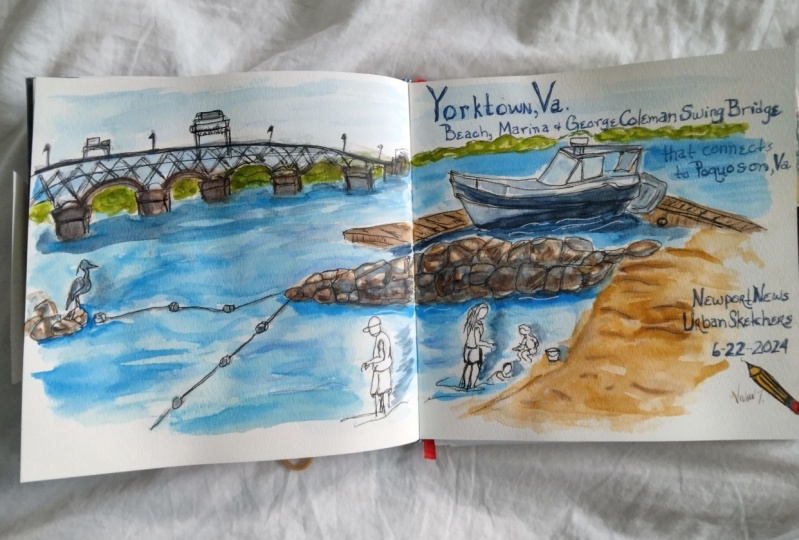
the scene that you draw. So for this particular scene, it's actually author temporary
market in my neighborhood. And I wanted to draw this
because this is a mixture if market that may not be there
one or two months later. So I wanted to
capture this scene. While I was drawing this, I could see how BZ
to market boss. And I could also
remember the weather, which was getting
quite bad because sit starting to raise or I had
to draw this really quickly, pick up my art supplies, right, my bicycle
and rush back home. I managed to finish
this sketch before the rain and this
is how it looks. And whenever I look
at this sketch, I'm reminded of this market. The people shopping
for their vegetables, potatoes, greens, or beans. It's a very mundane scene. But because I actually
drew this on location, it has a lot of meaning to me. This was drawn with the
help of a reference photo. I don't remember much of this
hint because the thing is, when you draw with the
help of a reference photo, you don't get to experience
the presence of being there. So you won't be able to
experience the sights, the sounds, the wider. So it's a different experience compared to sketching
on location. I remember that it was
incredibly 3D because the thunder clouds for
coming in really quickly. I had trouble with my
sketchbook because of the wind. The wind was causing the
pages to flip and I'm not sure if I
brought an eclipse, probably not because I remembered a pages
flipping off trying to fit over this whilst another
sketch drawn on location. So sometimes I would just
hit Alt to draw on location, just to walk around
a neighborhood, just to discover a new places. Just to give myself an excuse
to walk around and debts. What you can do with
urban sketching for this particular
sketch, nothing much. It happen that they, but I actually remembered
another sketch that I drew, which is very nice. Dislocation was actually at this treated by the site here. And while I was
drawing or sketching, there was a guy who came over and pause me a
can of soft drink, ice cold soft drink. And he said that it
was from his boss who is watching me sketch from somewhere in one
of these buildings. And it was really cool. And that's something
that I remember. That type of interaction
is not gonna be possible when you're sketching
at home or in your studio. For this sketch, I remember
I was there to record a YouTube tutorial and
it was a very hot day. I was actually moving
around with my skateboard looking for a perfect
view or seen to sketch. And this is the
scene that I drew. I remember it was an
incredibly hot day and I will sit outside or in
front of a car part. And there were a lot of vehicles coming in and
out off to carve out. It was really noisy. And the wetter was
really bright. And then thunder calls the ring clot started
coming in and I had to not to sketch and
paint really fast. Thankfully, I was able
to complete this. Most of this before
the rain started. I've probably touch up or edit some of the
details back at home. That's what I
remember about this in and I really liked
the shadows here on the side because it was a really sunny
day and there were some really strong cast shadows coming in on the slide here. This is another sketch
drawn on location. Actually, this was
actually just beside. This seem disingenuous
decided this thing. So if you walk down
the street here, you will see this beauty. I like to draw
architectural subjects. When you can capture their
physical form of the subject, it's going to really make you feel like you are being there. And depending on the scene
and composition you choose. Again, you can really make you few lock you up being there. When you look at our sketch, it brings you back
into the scene. That's the auditor abundance of sketching on location
or urban sketching. You get to choose your
seeing, your composition. You get to make
artistic choices. Artistic interpretation. When you're out on location, there is an inspiration. Because even the
mundane stuff can look for interesting when
you are drawing with them. This was drawn in China
at home in Singapore. I can't remember the things
that happened that day, except it's very busy again. It's suffer a hot day here in
sample is always very hot. And suddenly it was
thought to read. I remembered this scene because there was a friend who are sketching on
location as well. Actually, he was painting on this huge canvas and he pins in black and white
using black and white ink. When I look at this sketch, I'm reminded of my friend
who pains China Town. When it comes to
urban sketching, there are actually many
urban sketching communities around the wall. So if you joined the
urban sketching comunity, you can actually learn a lot from friends who have
similar hobbies. And when you're sketching
on location the first time, it can be very overwhelming
because it's one thing to draw and paint at home
where it's comfortable. You have oil tattoos
on your table. And you know, audit techniques. You have a reference
photo but a side It's very comfortable setting. However, when you're
sketching on location, it can be overwhelming
because they are probably going to be people standing
behind you watching you draw. And due to the weather, it's gonna make you
a few uncomfortable. Jolt techniques may mess
up or sometimes you may even forget to bring
your pan of paint. Brushes are clips, which
happens to me a lot of time. Now when you have your
friends with you, It's going to feel
overwhelming because you have safety in numbers
and it's always fun to check out what
your friends are. Drawing. You can learn a lot from your
friends, from other people. This was a sketch
that I drew at at a bicycle shop where I was waiting for my
bicycle to be repaired. And this was a
really fun sketch, quite challenging because
there are a lot of elements, a lot of bicycle on
tires and wheels, a lot of brand new
bicycles on display waiting to be sold to customers. And there's uncle who is
repairing my bicycle. And there were a lot of
people asking him how much time it's going to take
to repair their bicycle. And while this guy
was selling bicycles to parents who are buying
bicycles while their kids. I am actually very
satisfied with this sketch because I think I managed to capture the
scene really well. Also, I remember all the stories
relating to this sketch. I also remember the wife off
this guy scolding some kids because they were not
wearing their face masks because there's
a pandemic happening. So all those things I can remember when I look
at this sketch, these wars go on and
paint it on location. And it's going to be
quite challenging to draw and paint on location
when you are a beginner. But the thing is when
you do this often, it's going to become
second nature and it's going to get easier
with time as with any skill. The more you do it, the better you'll get. And it's a fantastic hobby. It's a great use of time. So time that you spend waiting like me
waiting for my bicycle to be repaired or me waiting at the bus station
or train station, waiting in a hospital,
or basically, reading time can be
useful drawing and time would just fly
by very quickly. When you are sketching. That's the advantage
of urban sketching. It's great use of time and it's a very meaningful use of time. While drawing this, I remember someone walking
up to me and sit. You mean? Yeah. When I'm sketching
out on location, sometimes I may meet on the France was sketching
on occasion as well. A lot of people may meet me because the urban discussion collinearity, It's really huge. Depending or regardless
of where you are, you're probably going to
be able to find or an urban sketching community
in your country. If you are, if you feel
intimidated to sketch outdoors, you can maybe message of
FY20 ADA Skechers that orange for meetup and go
out as gusher to gather. While sketching days, the
guy came out and talk to me, showed me some of his
sketches as well. You notice holiday mode that
you get whenever you are on vacation or when you are
in a different country. There is this sense of
heightened awareness that makes you look at
things closely. For example, you can
look at street lamps, you can look at people buying train tickets at
the train station. You can see how people
ought to coffee and when people taught
you notice the slang. You may also notice the
wider the humidity, the noise, the traffic. Now this heightened
sense of awareness is the holiday that
I'm talking about. You can get this holiday mood when you are
sketching on location because when you are looking at even the most mundane things, and you look at those as
subjects for drawing, suddenly theat going to look very interesting
and you're going to get this heightened sense of awareness and you're
gonna get this holiday. That is one big reason why I enjoy urban
sketching so much. Urban sketching is an activity that I highly recommend you try out because I'm very
sure you will love it. And I highly recommend
you check out the urban sketches
website as well to see what other people
operating around a wool. And maybe you can
find some friends through the urban sketcher
community as well.
6. Other uses for sketchbooks: In this last lesson, I want to talk about
what other things you can do with sketchbooks. There are many users
for sketchbooks. So for this particular
one that we felt was filled with random drawings, do those somewhere drawn from imaginations and
we're drawing with the help of reference photos. You can also have sketchbooks
with dedicated the themes. For example, this is just
a sketch book that I use for urban sketching. This is the sketchbook
that I use when I'm sketching on location. You can also have sketchbooks
to test out our supplies. This sketch book is
one that I used who create what a color
swatches just to see how the colors look. I'm not sure if I would
recommend you do this because the number of pages in a sketchbook
is gonna be limited, whereas the number of colors you can switch out is going to be unlimited halfway while creating all this watercolor swatches, I decided that I should probably
just used his schedule, wall drawing and state for
testing out powder mixes. You can also use sketch
books for challengers. For example, with this
particular sketch book, I came up with
ideas to draw based on the letters of the alphabet. So these are subjects that
stop waved a letter a, B, C, and I go through all the letters just
to get ideas to draw. You can also find drawing
prompts online on, there are also drawing a
challenges such as ink October, which happens in October. If you would create drawings, we've just black ink. There was also a watercolor man. There are a lot of
challenges that you can look for online or you can come up with your own challenges. This is a schedule I
use for testing out ideas to test out composition, do value studies just to see what are the
problematic areas. Before I create a more
detailed sketch, all painting, you can use your sketch
book for journaling, for keeping track
of everyday lives. This is a sketchbook that I
when my daughter was born. So these are the
sketches that I'm doing. The first few of these
little goal was one, I have many sketchbooks that I use as travelogue sketchbooks to document my trips overseas. This is a fantastic way
to experience travel, sketching at the same time. So when I looked
at the sketches, I'm reminded of the food places that I've been to the
people that I made, the weather, the
size and the song. And it's firm, memorable. Just looking at all
these sketches, Let me just flip this
particular Get back here. This was scheduled on
location and I was inside this shop where
they were selling canvas shoes and this
group of employees and their friends started having a barbecue in sight the shop. This was extremely
memorable when you look back at all the sketchbooks that
you have over the years, it's gonna be
extremely satisfying. And it's not just about the art, it's also about the
memories that you have within all of these pages. And it's why I love using
sketchbooks so much. When you look at all the sketch, when you look at all the
sketchbooks you have felt over the years is going to
be very satisfying. And it's not just above the art. It's also about
the collection of memories within the pages. And that's why I love to
use sketch books while drawing compared to drawing
on loose sheets of paper.
7. End: Thank you so much for
joining this course. And the other costs IS, I'm very lucky and thankful I'm able to share
with you my love for sketching and tips
and techniques that I have learned over the years. We've drawing, the
more you draw, the more you can draw
an odd or things that look mundane in everyday life are
going to start to look more interesting because
now you can draw. So I hope you can go onto
feel more sketchbook, more sketchbook pages and
see you in the future again. Bye.
 Teoh Yi Chie, Sketcher, watercolour lover