Transcripts
1. Sourdough Bread Loaf Introduction: Hello, everyone. And today, we're going to make
a sourdough bread. So for this recipe, I consider that you
have the material, at least scale, scrappers, forms, blade, and timer. This is the basic material
that you need at home. And even though I make this recipe in a
professional condition, the process will still
be the same for you. So for this recipe,
we're going to make loaves of bread on
sour dough, of course.
2. Ingredients: So the ingredients, you're
going to need some flour T 65. T 65 is the type of flour
that you can find in France. But it's a white flour, but not extra white, like the one you would
use for the pastry, the normal white flour
that you would use for white bread, 800 gram. You will need 200 gram
whole grain flour, tea 150, like we say in France, you will need 19 grams
of salt and water, you will need 620
gram, 620 gram. And Louvn so your sourdough, you will need 340
grams of louva.
3. TIP Fermentolyse: Notose basically is at
the very beginning, you're going to mix the
water and the flour only, and you're going to mix
together for like three, 5 minutes in a slow
speed and just time to have the ingredient
incorporated together very well. Making this is going to improve
the flavor of your dough, because you will have
already a slow fermentation. Very slightly, but
it's going to already develop the flavor
of your dough. It's also going to develop
the color of your dough. It's going to make a dough a little bit more creamish
into the color. The other purpose of the otolis, it start building
the gluten network, which means you will
need to mix it less after just because the gluten
network is already shaped. Also, if you mix less time, you're going to keep more
color into the dough. So your dough is going
to be more creamy is. Maybe you don't know, but the
more you're going to mix a in a second speed in fast speed, you're going to have oxidation. That means your dough is going
to turn whiter and whiter. And also, the more you're
going to mix your dough, the more it's going to be
tight and small bubbles, small holes and very compact. So we don't really want this. We want to have slow
and gentle mixing. That's why we do the autolyse.
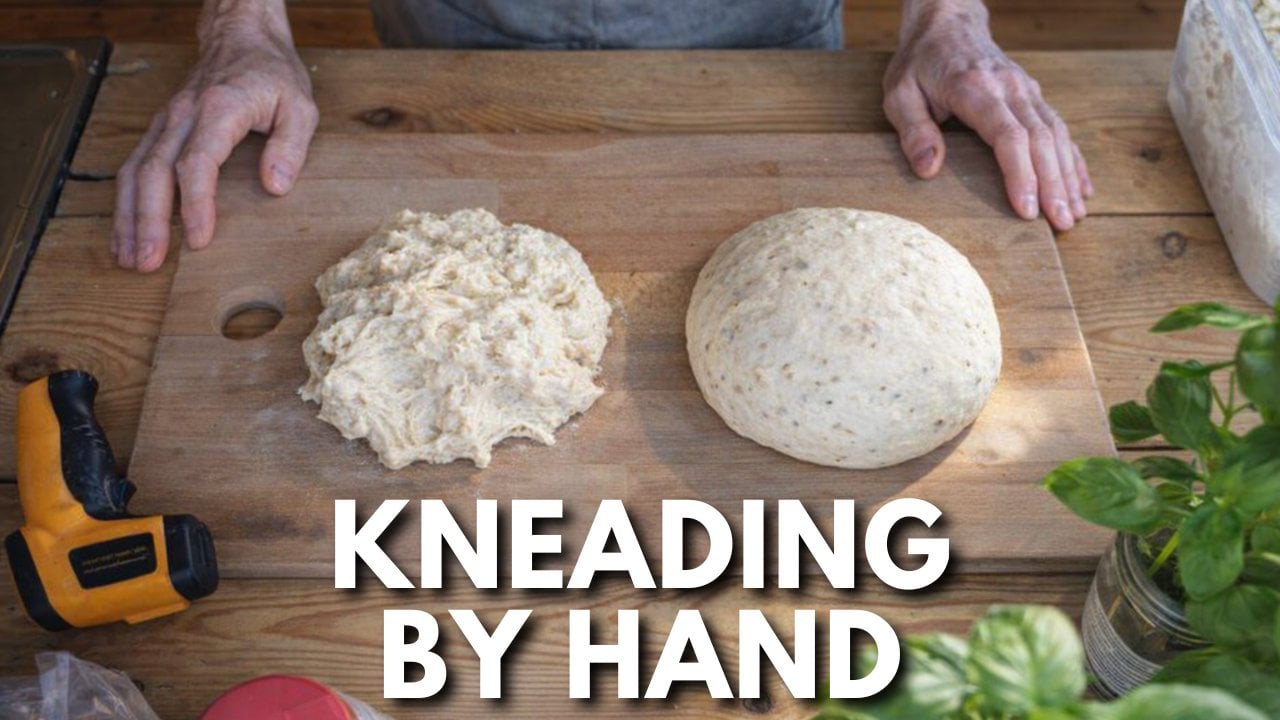
4. Kneading: This recipe, we do a
fermentol, not ntolse. The fermentols is
the same thing that otolis except that we put the levin at
the beginning also. The fermenttols have the
same advantages as otolis. And with the levin
already inside, it's going to start
developing the flavors, even stronger for the dough. So for this recipe, you can put the water and the
levan together, then all the flour
into your mixer. Then you're going
to mix roughly, like I said, 3
minutes, pretty much. You see, you don't have gluten network. You can stretch it. I just break and
nothing happened because it's roughly mixed. So you're going to
leave it 30 minutes, at least up to 2
hours if you want. You can try at home.
You can try to leave it for 30 minutes,
up to 2 hours. You will see the
differences and write it in a book like this
you will remember. So you see, after half an hour, look at the dough
how it is already. You can see the gluten is
already working because you can stretch the dough before it was just stretching
and just breaking, and now you can stretch it more. So after the resting
of 30 minute, you pour the salt
into the dough, and then you're going to start
mixing in the first speed, the time to slowly
incorporate the salt everywhere and give a
little bit of mixing, gentle mixing to your dough. So you're going to do this
for two or 3 minutes, and then you're going
to go in second speed. You should mix two or three
or maximum 4 minutes. And then you should have a
dough like this one, like, beautiful, like, very smooth, and that's what we want. Then of course, you need to check the temperature
of your dough. So if you don't
have a thermometer, it's not too much of a problem, but this is something
very important to get because you need to
have a dough at about 23, 24, up to 26 degrees Celsius.
5. TIP Temperature: So why we want to dough
23-26 degrees Celsius? Simply because it's
the range where you're going to have the best
fermentation for your dough. If it's under 23 degree and the more it's
going to be cold, the longer it's going to take
or even not develop at all. And the more it's going
to be after 26 degree, it's going to develop your
dough to prove and get the fermentation much faster and it's going to be much
harder to manage also. So you want 23-26 degrees.
6. Stretch & fold: You have two options.
First option, you leave your dough into
your bowl into your mixer. You just cover it with a plastic or with a tissue or you don't
want your dough to get dry, or you just take it out and
put in a different container. That's what I do because I
have a big amount of dough, and I still need to mix
other dough at work. And then you finally
check your dough to see if the mixing
is really perfect. To do this, you just stretch,
stretch, stretch it, and you should see
a very thin window. You should see through. That means your dough
is mixed properly. In the same time,
you can see here. I stretch my dough, let it go, and it comes back. It has some elasticity. That means the dough has already a little bit of
strength, which is good. Just after this, you also
cover your container, and you leave it for 45 minutes up to 1 hour to rest
at room temperature. After the first hour, you're going to give
a stretch and fold. The stretch and fold is
going to stretch the dough, it's going to fold it on itself, and it's going to give extra
strength to the dough. You just simply pull your
dough and leave it under. And as you can see, it
makes a big ball of dough, and it has already
some strength. And by touching it, you
will feel that it's hard. And then you leave it for another 45 minutes up to 1 hour. After the other hour, you give another
stretch and fold, and you should feel
that your dough is stronger and stronger. After this, you give
another rest of 40 minutes up to 1 hour
cover and leave it to rest.
7. Dividing, how to do: 1 hour later, we're going to
divide and weight the dough. So you take out
your dough, you put it on the bench you
want to work on. I recommend wooden
bench is the best. You're just going to divide your dough into the
way that you want. But for this recipe,
we weight every piece of dough at about 600
gram and 900 gram. And then you need
to roll them again. The technique for this is you take your boss hand and you need to pull it with your finger just to make a really
beautiful ball. It's going to give a
lot of strength to your
8. TIP More: Hello, everyone. And today, we're going to make
a sourdough bread. So for this recipe, I consider that you
have the material, at least scale, scrappers, forms, blade, and timer. This is the basic material
that you need at home. And even though I make this recipe in a
professional condition, the process will still
be the same for you. So for this recipe,
we're going to make loaves of bread on
sour dough, of course. So the ingredients, you're
going to need some flour T 65. T 65 is the type of flour
that you can find in France. But it's a white flour, but not extra white, like the one you would
use for the pastry, the normal white flour
that you would use for white bread, 800 gram. You will need 200 gram
whole grain flour, tea 150, like we say in France, you will need 19 grams
of salt and water, you will need 620
gram, 620 gram. And uvn so your sourdough, you will need 340 grams of luvn. Notose basically is at
the very beginning, you're going to mix the
water and the flour only, and you're going to mix
together for like three, 5 minutes in a slow
speed and just time to have the ingredient
incorporated together very well. Making this is going to improve
the flavor of your dough, because you will have
already a slow fermentation. Very slightly, but
it's going to already develop the flavor
of your dough. It's also going to develop
the color of your dough. It's going to make a dough a little bit more creamish
into the color. The other purpose
of the autolyse, it start building
the gluten network, which means you will
need to mix it less after just because the gluten
network is already shaped. Also, if you mix less time, you're going to keep more
color into the dough. So your dough is going
to be more creamy is. Maybe you don't know, but
the more you're going to mix a in a second speed
in fast speed, you're going to have oxidation. That means your dough is going
to turn whiter and whiter. And also, the more you're
going to mix your dough, the more it's going to be
tight and small bubbles, small holes and very compact. So we don't really want this. We want to have slow
and gentle mixing. That's why we do the autolyse. For this recipe, we do a
fermantol, not ntolse. The fermatools is
the same thing that autolyse except that we put the lava at the
beginning also. The fam Mtolis have the
same advantages as otolis. And with the levin
already inside, it's going to start
developing the flavors even stronger for the dough. So for this recipe, you can put the water and the
levan together, then all the flour
into your mixer. Then you're gonna mix roughly, like I said, 3
minutes, pretty much. You see, you don't have gluten network. You can stretch it. I just break and
nothing happened because it's roughly mixed. So you're going to
leave it 30 minutes, at least up to 2
hours if you want. You can try at home,
you can try to leave it for 30 minutes,
up to 2 hours. You will see the
differences and write it in a book like this
you will remember. So you see, after half an hour, look at the dough
how it is already. You can see the gluten is
already working because you can stretch the dough before it was just stretching
and just breaking, and now you can stretch it more. So after the resting
of 30 minute, you pour the salt
into the dough, and then you're going to start
mixing in the first speed, the time to slowly
incorporate the salt everywhere and give a
little bit of mixing, gentle mixing to your dough. So you're going to do this
for two or 3 minutes, and then you're going
to go in second speed. You should mix two or three
or maximum 4 minutes. And then you should have a
dough like this one, like, beautiful, like, very smooth, and that's what we want. Then of course, you need to check the temperature
of your dough. So if you don't
have a thermometer, it's not too much of a problem, but this is something
very important to get because you need to
have a dough at about 23, 24, up to 26 degrees Celsius. So why we want to dough
23-26 degrees Celsius? Simply because it's
the range where you're going to have the best
fermentation for your dough. If it's under 23 degree and the more it's
going to be cold, the longer it's gonna take
or even not develop at all. And the more it's going
to be after 26 degree, it's going to develop your
dough to prove and get the fermentation much faster and it's going to be much
harder to manage also. So you want 23-26 degrees. You have two options.
First option, you leave your dough into
your bowl, into your mixer. You just cover it with a plastic or with a tissue or you don't
want your dough to get dry, or you just take it out and
put in a different container. That's what I do because I
have a big amount of dough, and I still need to mix
other dough at work. And then you finally
check your dough to see if the mixing
is really perfect. To do this, you just stretch,
stretch, stretch it, and you should see
a very thin window. You should see through. That means your dough
is mixed properly. In the same time,
you can see here. I stretch my dough, let it go, and it comes back. It has some elasticity. That means the dough has already a little bit of
strength, which is good. Just after this, you also
cover your container, and you leave it for 45 minutes up to 1 hour to rest
at room temperature. After the first hour, you're going to give
a stretch and fold. The stretch and fold is
going to stretch the dough. It's going to fold it
on itself and it's going to give extra
strength to the dough. You just simply pull your
dough and leave it under. And as you can see, it
makes a big ball of dough, and it has already
some strength. And by touching it, you
will feel that it's hard. And then you leave it for another 45 minutes up to 1 hour. After the other hour, you give another
stretch and fold, and you should feel
that your dough is stronger and stronger. After this, you give
another rest of 40 minutes up to 1 hour
cover and leave it to rest. 1 hour later, we're gonna
divide and weight the dough. So you take out
your dough, you put it on the bench you
want to work on. I recommend wooden
bench is the best. You're just going to divide your dough into the
way that you want. But for this recipe,
we weight every piece of dough at about 600
gram and 900 gram, and then you need
to roll them again. The technique for this is you take your boss hand and you need to pull it with your finger just to make a really
beautiful ball. It's going to give a lot
of strength to your dough. Rounding the bread
before shaping is going to help you
for the shaping, because you already
have something round. Everything is uniform.
Everything is the same. So you can really miss
the shaping after this. So if you just leave it like you cut it, you're losing
some strength. The dough is just
going to be like flat, flat is everywhere. If you shape
straight after this, you don't give this extra
strength that we want. So rounding the bread before shaping is going to make
it easier to shape. Once you finish to round
all your piece of bread, you cover it with a tissue, with a plastic, and
you just leave it. Why cover it again, like I said before to avoid that
it get dry on the
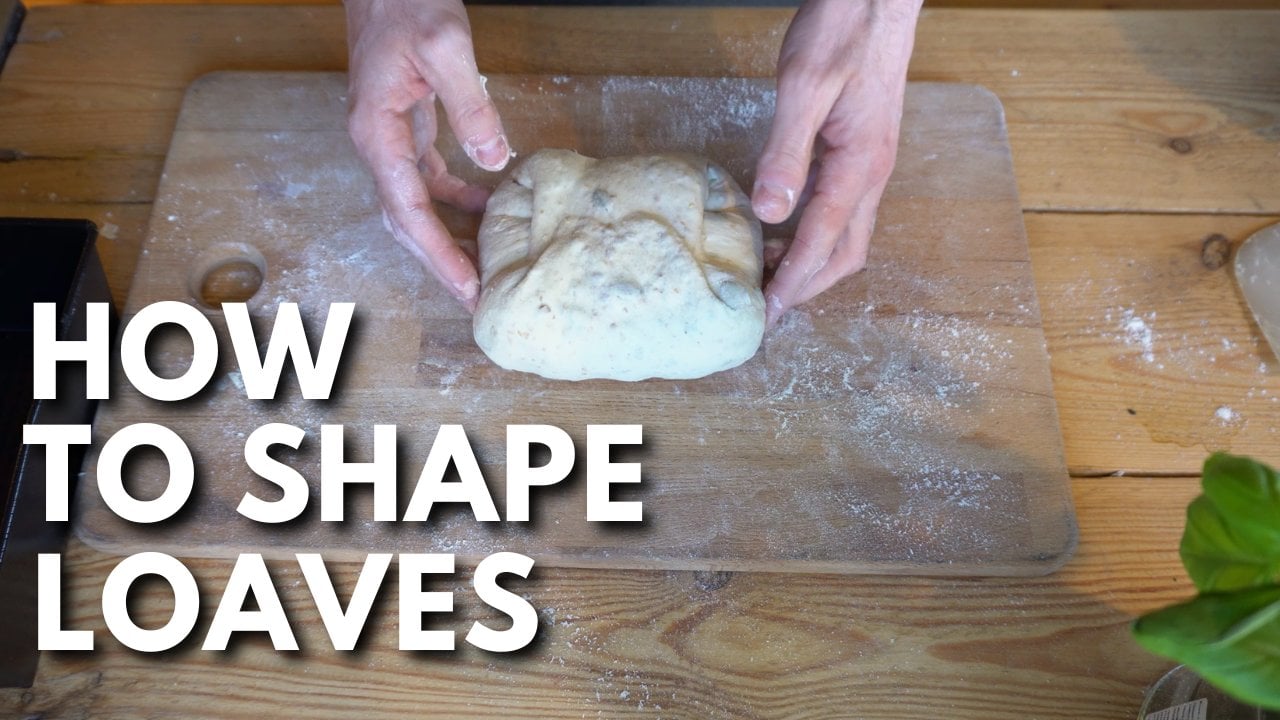
9. How to shape: As you can see, you take your
round, you flip it over. Then you're going to fold
the bottom to the top, and then you're going to
fold the top to the middle. And then you're going
to fold on the top, and you press, and then
with your right hand, you're going to grab the dough, fold it to the middle, and then with your other
hand and this part here, you're just going
to close the seam, closing everything
as you can see. Iva, you have a perfect shaping.
You have the seam here. You just rearrange a little
bit to make a better shape. And what I like to do
for this type of bread, I just put my shaped bread
into the rice flour.
10. TIP Why use rice flour: Because I use wooden banton. The first thing is
if I use flour, it absorb more humidity easily. Then into the banton,
it's going to be inside. It's going to stick,
and it's going to get some mold at some point. While the rice flour, also, you can get it, but it's going
to take much longer time. Second point, when you roll
your shaped dough into the rice flour and you put it
in the banton, your dough, the next time when
you're going to take it out from the
banton for baking, is not going to
stick at all into the anton because it
happened with the flour. If the flour is not put
while the rice flour, it's evenly spread
all around the bread. Also, your dough is not going
to absorb the rice flour. Very tiny. You won't see it. While the normal flour, the dough is going to absorb it and it's going to
kind of disappear, which that's why after it can
be sticky into the banton. I recommend the rice flour
for these kind of things.
11. More shaping: See you just roll everywhere, and then I put in the banneton. Personally, I like
to put my loaf upside down with the
theme on the top, because when I will put it
somewhere to go in the oven, I will put my banton like this, and the dough will be
already on the good side. But also, you can make
simply some round. And same way, you can
roll it in the flour, and you might think, Oh, I
don't need to round it again. Yes, you need to round it. It's like a shaping anyway. So you need to round it again, and you put it in the
flour into your banton and after shaping, you
put your dough into the fridge for 24 hours
until the next day, the next morning or
the next afternoon when you want to bake
your bread, okay? It's going to have a
slow fermentation. Just make sure your fridge is about four degrees,
five degrees. It's higher. It might prove
a little bit too much. Try to make it at
four to five degrees.
12. Can I bake ?: Of course, you can bake
your bread the same day. But the process of
making bread takes quite a long time,
few hours already. If you make it the same day, it's going to take
you the whole day. And it's better to have
a slow fermentation into the fridge to develop the flavors and the structure and
everything will be better. So I don't recommend to bake the same day,
but it's doable. So in this example, for this recipe, we put it
in the fridge all night. And the next morning, I
just take out my bread. I used to put the
bread on the boards. Like this, I put some rice
flour on the bottom, always. I prefer the rice flour. Bit more expensive but
much better to manage. It's not going to
give any flavor to the bread, just
for aesthetics. Can put normal flour also, but I think rice flour
is still better. Then I score the bread. Like I said before, I give
some tips about the scoring. But for this kind of scoring, if you want an opening
like this, not on loaves, but at least on the round bread, you can score like
this straight. So for this round,
I make a square. This one I make across. You can make every
design that you want. We try to score
like 1 millimeter, two millimeter, not and
straight into the oven. For the baking of this bread,
you're going to preheat your oven at 235 degrees, and you're going to
bake for 35 minutes. Don't forget to
humidify your oven, if you're not sure
how to humidify, check the course
in introduction, and then you bake your
bread for 35 minutes. Then you take out your bread, and you should have a beautiful, amazing bread to eat again
to enjoy for your meal.
13. Let's enjoy the final: Then, of course, you're gonna catch your bread
when it cool down, and you need to have something absolutely beautiful like this. So here, what happened. You
see it didn't open properly. Well, it happened sometime it
didn't get enough humidity. So if he didn't get
enough humidity, it doesn't open properly also, maybe because he had
a lack of strength, but the other one is
absolutely perfect. Here is really amazing. You can make the same at home. It's not so difficult. So I encourage you to
try to keep trying, keep working on this, and thank you for
watching this video. Hope you enjoy this recipe. I'm trying my best
for you to make some really good
bread and see you in the next video. Bye bye.
 Vincent Baker, Artisan Baker & Home Bakery Mentor