Transcripts
1. Introduction: Hello, everyone, and welcome for this course about home bakery. If you want to make bread at
home, some product at home. So this course right
now is an introduction. It's more about
understanding bread, okay? No following recipe. We'll have the recipe in the other
section of this course. As you may know,
bread is not magic. It's logic and fermentation. Thing of ingredients that comes together to finalize
one product. And there's many factors
to take into account. And once you understand
why you're doing thing, you can manage much
better your recipe. This course is for home bakers, or anyone who wants just
to learn about bread, want to make bread at home, and the one who want to
open maybe a home bakery or micro Baker sometime or
why not industrial bakery. It will be more focused
about home bakery. Ly because we're not going to have some professional
equipment, professional and professional
prover, professional mixer. We're just going to
do bread recipe, explains everything
with the equipment that we all have at home. And this is for people who
want consistent result, people who want to understand
why they do thing, and like this, they will have regular product with knowing
exactly what they are doing. In the next lesson,
we're going to talk about the autolyse,
the fermentolyse. We're going to learn
how to calculate the temperature of your water when you're going
to mix some bread. We're going to talk about
the bulk fermentation. Proving time, also the
equipment that you're going to need at least because we all should
have the equipment, but just in case you need some specific equipment that's cheap and you can
most probably afford. We're going to talk also
about stretch and fold, explain why it's important, a little bit of
shaping the dough, but shaping is much better with technical and
visual explanation. And this is pretty much all for this introduction
before some recipes. And this will give you some very important knowledge
to make your bread at home. So now we can just
dive into the lesson.
2. Autolyse: The autolyse is the very first important
rest in bread making. It's a very simple step, often misunderstood,
but very important. So the autolyse, it's the
mixing of flour, water, no salt, no yeast, no sourdough, simply flour,
water, mixed together. Leave it forest.
For about at least 30 minutes up to 1 hour. You can go up to 2
hours. I saw some Baker. They even did it for 5 hours. Generally, we do the
otools for a few reasons. It's going to hydrate
your flour fully. The flour is going to
absorb the whole water, and then you're going to
have much better mixing. It starts to develop the
gluten naturally, also. You will see the difference between the beginning of mixing water and flour and the end
after resting the otolse. You should have also slightly
more colorful dough, little bit more creamish. It's going to be easier
to mix also because there's already this process
of developing the gluten, so you will have
less time to mix, then less oxidation
to the dough and a much better composition
of your bread. Into the flour, you have some starch with the
composition of water. It's going to start
breaking into sugar. Once you have sugar, you're going to have a
beginning of fermentation. It activates enzyme
into the dough, and then your gluten starts
forming without effort to do. You just leave it,
the gluten start, and you already have a
very slight beginning of fermentation and
taste into your dough. So this is a step very important
without doing nothing, and you're going to give an
extra plus to your dough. You will have less
kneading to your dough. Your dough will have a
better extensibility. You can stretch it and
it will come back. At the end, you will also have
a better crumb structure, more bubbles, and it's
going to be much better. And there's a big potential for much more flavor
also into your bread. But there are some
mistakes to avoid. Do not put salt oyest. This is different thing.
No salt, no yest. Also, making autolyse far
too long with a weak flour. So you need to have a strong
flour at the beginning. Another mistake is to
think it's mandatory. It's optional.
It's something you can do to yo do and you
don't have to do it. You can mix first speed, second speed,
straight. No problem. But the otols's a
process itself, which only going to
give some plus to yod. If you have high
hydration dough, 70% of water, for example,
this is very beneficial. So I recommend to do it. Whole wheat or
very strong flour. You can do it also, of course, because they have a
lot and strong gluten, so it's going to do a very good beginning
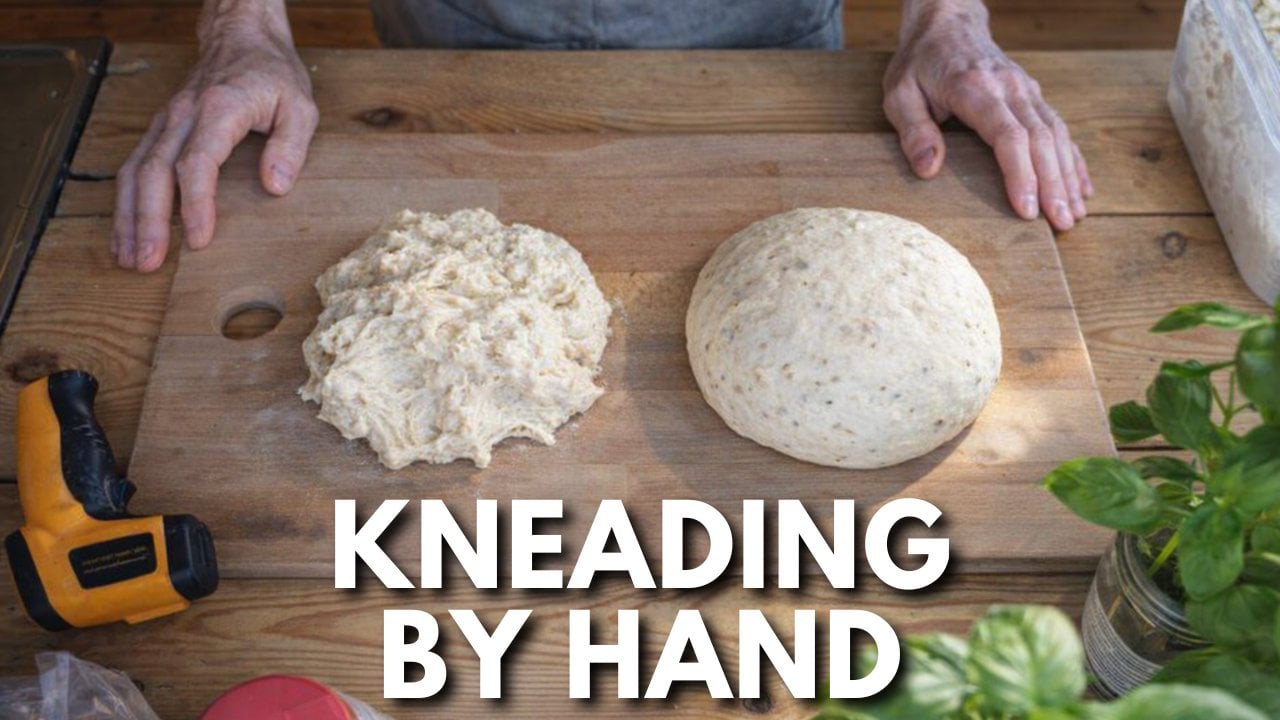
of fermentation. And then it's something very special for us as home bakers, it's going to really help
for the hand kneading. You really need autolyse if
you knead your dough by hand. You will see the
difference, definitely. Without otolse, it will just
break and it's going to be very impossible to knead
by hand at the beginning. So this is the otolis. Water, flour mixed together, led to rest for 30
minutes minimum, up to 2 hours, even
more if you want. It's going to develop
flavor, color, and the beginning of
fermentation and your gluten. So this is the otolis
and I definitely recommend you to
do it depending on your flour and your
bread you want to do. Ebola, we are finished
with the otos. Now we're going to talk
about the therm tolse.
3. Fermentolyse: So the fermatolss another
variation of the tools. It's a bit different, and some people might be
confused with it. It's something very clear and
for some specific use also. So the fermatols
is same as otolse. You mix water, flour. But this time, you're going to add your van your sourdough. Van sourdough, same thing, veFrench sourdough in English. You're going to mix those
three ingredients together, and you're going to
like the otolse, you're going to leave it for
us for 30 minutes to 1 hour. Probably not more because
there's sourdough, so it's better to be careful. First, it's going to save time because it has the same
process as autolyse. And if you watch the
lesson just before, you know what's the advantage of this. So you're
going to save time. You're going to simplify
also your workflow because you don't need
to mix the lava after and when you mix the
lover after into a dough already done can
be a bit problematic. It's not a big deal, but well, it's much better to do
thermatols like this, all the main ingredients
they already mixed together. It's useful when you
usually already do otolis, but you want an
extra fermentation with this one because you
make a bread with sourdough. So you're going to
save time. It's going to simplify your workflow, and you're going to get
a faster fermentation. In the fermentols you will have much better fermentation
at the very beginning. So you have to be careful also with the temperature
of the water. And the fermentation, it's going to start immediately, okay? As soon as you mix flour, water, lava, the fermentation is going to start at
the very beginning. And also, the structure of your dough is going
to change faster. This is why you leave it
a little bit less time. You need to take care a
little bit more of it, but there's a lot of
advantages about this also a stronger flavor and a
little bit more color also. So it has lots of advantages. You will have a faster
dough development. You will have a very
good extensibility also. As I said before, extensibility, you can
stretch your dough, it's going to come back,
and you're going to have a flavor development slightly
different from the oris. You will have a little
bit less control than the autolyse because
the fermentation start. So you need to be
much more careful. If you leave it too long, if you forget it, your
dough is going to weaken. You really need to
take control of it. Otherwise, you're
going to lose control. And the cons is
you're going to get slightly different
flavor development. Some people like it a little
bit more acidic. I like it. Simply when you have a
short production schedule, when you want to
make a sourdough bread a little bit faster. Also, when you have
a warm kitchen, it's going to start the
fermentation faster. So your bread is going to be
faster, which is very good. And when you want more flavor
in your bread, simply, we have seen the
otolsFlour water, the fermentols flour
water and sourdough. You now know the difference
between those two. But just before the
otolse or the fermentols, you need to control
the water temperature. And now we're going
to talk about this.
4. Water temperature: The water temperature
is probably one of the most ignored
topic by most of the home bakers because the water temperature
is going to control the speed of
your fermentation, and this is why it's
extremely important. That we work on
yeast on sour dough, the yeast or sourdough
activity will depend definitely
on the temperature. Once you have finished to knead your dough at the
final dough mixing, your dough needs to have
a special temperature, a range of temperature
to optimize your bread. And this is very critical. If you're not in this
range of temperature, your bread can turn
bad to really bad. And in general, when you
have the same recipe, but you have a different result, it might be most of
the time a problem of water temperature
at the beginning. So this is something
very important. So, like I said, when
the dough is needed, totally needed, we need
a range of temperature. This range is going
to be between 23 degrees Celsius to 25, 26 degrees Celsius. So your dough after mixing, need to be 23-25, 26, 73 to 77 degrees Fahrenheit. It needs to be in this range. This is really important. The room temperature,
how is it inside? If it's 20 degrees, 18 degrees, 25 degrees in summer,
maybe flour temperature. If your flour is stored in the same place or maybe outside
or maybe in the garage. You never know different
temperature and the water temperature because you can take some cold water. You can take some warm water. You can take some not too
cold, not too warm water. And also the friction of
your mixing in the mixer. The faster you're gonna go, the warmer your dough
is going to get. There's a simple
thing you can do. If your room is warm, let's say 25 degree. Then you're going to
take colder water. If it's cold inside your house, then you're going to
take a warmer water. When I say cold, maybe ten, 15 degrees, and when I say warm, maybe 20, 25, maybe 30 degrees, it also, of course,
depend on the season. If it's summer, then it's
going to be very warm, if it's winter, then it's
gonna be even colder. So even though usually you keep your flour probably
in your kitchen, so the room temperature
is the same as the flour. You need to remember
if it's warm, take cold water, if it's
cold, take warm water. If you want to go more
into specific temperature, there's something
that we take in professional bakery,
calculation to make. In summer, we're going to
take a number, which is 65. In winter, we're
going to take 70, 72. This is number for
summer and winter, okay? Between, you're going
to take maybe 68. So we're going to take
65 degrees Celsius. Celsius. I'm going to take the temperature of my
room, maybe 20 degree. I'm going to take
the temperature of my flour, maybe 20 degree. I'm going to put them together. So 20 plus 2040 65
-40 means 25. Okay. So 25 degree is going to be the water I'm going
to take from the tap. I'm going to take the
water from the top at 25 degree for the mixing
of mio, simple as this. If it's very warm, you
can go to 60 even. Don't ask me why this
number 60, 65, 72. That's how it is. That's
number that works. This is the most
complicated, I would say. Otherwise, summer, you're
going to take cold water, winter, you're going
to take warm water. Because first, you will have a predictable fermentation
with the right temperature, you will know how it's going
to ferment your dough. So better timing always
the same timing. If your water is too warm, your dough is going to be too
warm. It's gonna be faster. It's going to be a problem. If it's too cold,
it's going to be longer and longer and it's
going to be a problem. And then you will
have, of course, less chance of underpving or overproving of temperature.
Good final product. So a very important thing
is the control temperature. I would say it's a
professional habit. It's something you really have to do every time
you do your bread. When I make a recipe
in the next lesson, I don't tell you every
time the temperature. It's you who need to
calculate your temperature. And even at home, it
makes a huge difference. So this is really important. This is something
you really need to take into consideration. Like I said, after kneading, you need to have a dough
23-25, 26 degree maximum. Then what comes after this? The bulk fermentation. We call it in French pointage.
5. Dough Temperature: So of course we just talked
about the water temperature, and now we're going to talk very quickly about the final
temperature of your dough. Well, simply, like I said,
because it's going to indicate the fermentation
speed of your dough. It's going to predict
the bulk duration. Yes, of course, because
if your dough is warm, the bulk fermentation
is going to be shorter. If your dough is cold, the bulk fermentation
is going to be longer, and it shows the mixing impact that you
give to your dough. If it's too warm, that
means probably that you mix your dough a little bit
too long in fast speed, maybe also because you
put too warm water, but you know that it's one
problem or one another, so you need to fix it after. Like I said, the ideal range
is 23 to 26 degree Max. If it's lower, you're going
to have longer fermentation. If it's higher,
you're going to be a shorter fermentation. The water, the mixing friction, and the room condition, yes, because when you
mix, the mixing take some air ambient air and
put it into the dough. So if it's warm, it's also
going to warm up your dough. I would say, take
your temperature once only with the thermometer
after mixing. Do it every time, and then
with time and experience, you will know how to adjust it, how to adjust your
temperature of water, how to adjust the mixing time. But, you know, the dough
temperature is really a feedback of how you
prepare your dough before. It's not a rule, but
it's really a feedback. It's like tell you what you did right or wrong before mixing
or during the mixing.
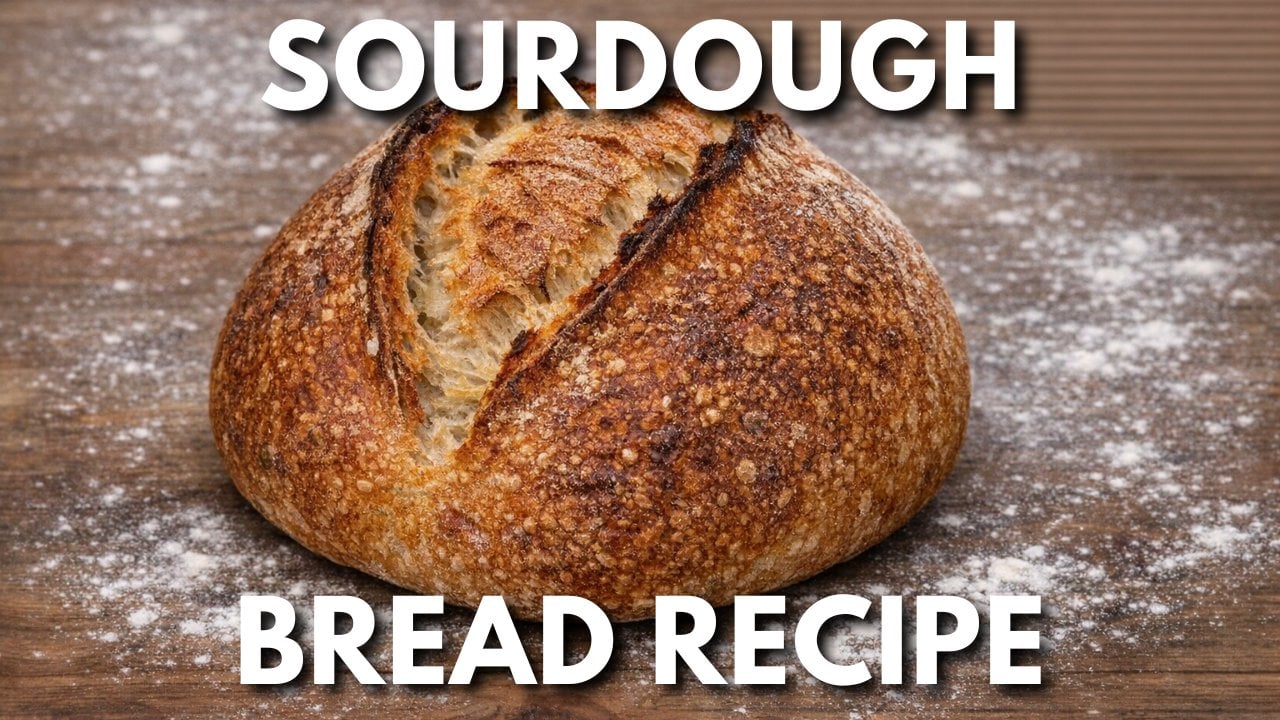
6. What is Bulk fermentation ?: This is the most important stage because most of the flavor and structure of the
dough is going to develop in this time exactly. It's simply the time between
mixing and dividing shaping. And your dough is going to start ferment in only one mass. You're not going to do nothing except leave the dough into one mass into a container
into the ball of your mixer. First, the yeast or the sourdough is going
to start produce gas. Then the gluten is going
to strengthen, okay? So it's going to be
stronger though. And then, of course,
you're going to have the development of the flavors. In general, the dough double up, so it's going to be much
bigger after some time. Also, the dough feels lighter when you're
going to touch it, like more air inside, and you're going to have
surface slightly dumbed. So in general, it's
like, more like this. After mixing, it
should be like this. And, of course,
you're going to have a beginning of visible bubbles, simply because you
have more gas, so you will have more bubbles. Because the time of bulk fermentation also depends on the temperature
of your dough. And it's going to depend also
on the type of your flour. If it's a whole grain flour, it's going to be harder
for the bulk fermentation. Gonna take a little
bit more time maybe. And finally, because it really matters for the
strength of your dough. But you need to be
careful because there are some common mistakes
that beginners often do. The first one, of course, is to end the bulk
fermentation too early. If it's too early, your dough is going to be small at the end. On the contrary, if you
leave it for too long, it's gonna be overproof,
more acidity, more fermentation
and flat bread. So watching the clock instead of the dough is not the
right thing to do. It's not because in
the recipe you see 30 minutes that it
means 30 minute. It's 30 minute, pretty much. You as a baker, you need to
check and control your dough. It might be a little bit
more, a little bit less, depending on the temperature,
depending on kneading. So the bulk
fermentation is this. You leave dough, your
full dough into one mass, and you let it rest for some time to start
develop the strength, the flavors, and the gas. And this is very,
very important stage because if you make a mistake during the
bulk fermentation, you can't fix it later. So what comes after
the fermentation, dividing and shaping Shaping I'm going to talk very
slightly about it because it's much easier to have a visual lesson that also you can watch
in another lesson.
7. Stretch and fold: The stretch and fold
is very popular step on the Internet and, of
course, in the bakeries. And this step is really
perfect for home bakers. And even in bakery,
we usually do, but maybe not as much as it
is done in a home bakery. It's kind of an alternative
of kneading also. If you give less kneading of
your dough for some reason, the stretch and fold is
going to help improve od. The strengthened fold is a gentle strengthening
technique, I would say. It happens during the
bulk fermentation, and it's a technique where you're going to take your dose, stretch and fold it on itself. Or you can also take one side, stretch it, and put it. Then you take the other
side, the other side, and the other side, finally, you stretch and fold simply. We're going to use this
technique to give some strength, extra strength to the dough
if your dough is a bit weak. So it's going to build,
obviously the gluten naturally. A, it's going to help it. Of course, it's
going to preserve the gas because
they don't get out. And like I said, it's going to improve the strength
of your dough. In genal, you have your
bulk fermentation. Let's say you're
going to do it for 1 hour and a half total. Every 30 minutes, you're going
to do a stretch and fold. Stretch and fold, it just
take literally 2 minutes. You stretch and fold, and you leave it another
half an hour to rest. You stretch and fold,
another half an hour, stretch and fold, and
another half an hour. You can do two, three
stretch and fold. It really depends on your dough. It really depends
on what you want. You need to check your dough to control the strength
of your dough. It's always a feeling you
need to have with the dough. We generally do it
like every 30 minutes, but I would say it can be done every 20 to every 40 minutes, even every 50 minutes. Me, I do it every 50
minutes sometimes. And you can give two to four
times stretch and fold. I can't tell you give
two or give four. It's like, even in my
recipe, if I do three, it's because of my recipe,
because of my flour. But maybe maybe you're going to be at home
and you're going to realize that
your dough doesn't need more because it's
very strong already. That case, you do just. So there's some common
mistakes you need to avoid. First, doing it too aggressively or too
strong. This is not good. Don't stretch your
dough until it just break into part.
You don't want this. Don't do it too many times. One on each side. That's enough. Don't need to over fold it. And then, like I said, it's
not like exact science. It's a feeling. So if
your dough is already strong and you're
going to do it, it's not going to be good. So don't do it if your
dough is already strong. Main benefit of the stretch
and fold is to give some extra strength
to your dough by a very simple technique
that everyone can do. And when you do it, I
recommend you to put some water into your
hands or eventually oil. If you reach, it's going
to give some flavor, but water is more than enough. Like this dough is not going to stick everywhere
into your hands.
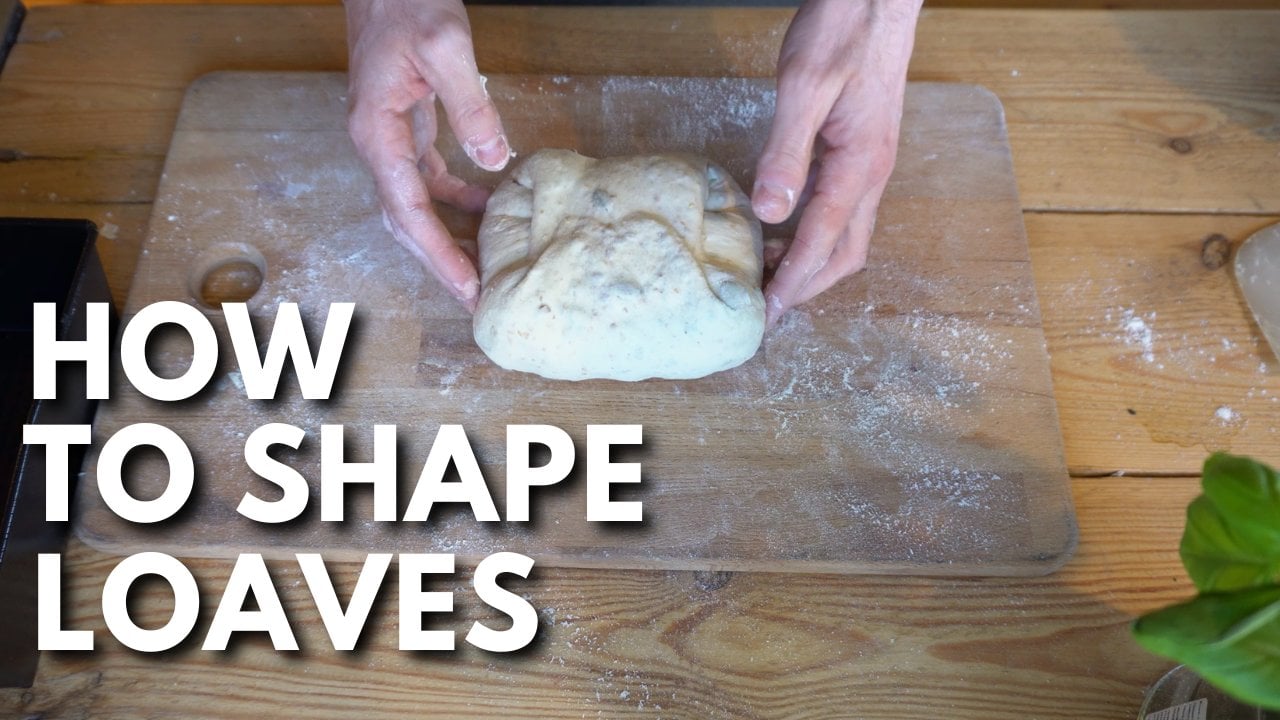
8. Shaping, a quick overview: So shaping your dough is not only for the aesthetic
side of your bread. It directly affects the crumb and the shape of your bread. The shaping is simply the final organization of your piece of dough, what
you want to make with it. It's the final creation of
the tension of your dough, and it's simply giving
direction to your dough, what you want it to be, for the final product, how
you want it to be. First, it's going to
trap the gas correctly. When you're going
to make a shape, the gas are going to stay
inside and then develop. It's going to strengthen
the structure of your gluten, of course. And obviously, it's going to control the expansion of your
bread in the baking time. The extension is going to be like the way you cut your bread. And if you just put a piece of dough like this into an oven, you don't know how it's
going to come out. But, you know, with the shaping, you can overshape or
undershape the dough. And what's it going to do?
If you overshape your dough, you're going to dig as too much. That means you're
going to make it very, very compact and you're going
to have a very tight crumb. And if you undershape, you're going to have
a weak structure and you're going to
have a flat bread. So bakery is always finding the right thing in the middle. Well, simply because the bulk
fermentation, for example, already the job of giving
strength to your dough. So you don't need to do
too much into the shaping. And finally, shaping
is more, like I said, guiding how you want
your bread to be at the end and not forcing
how you want it to be. So for the shaping,
it's very important for you to stay gentle
when you do it. You want to put the
tension on the surface of your dough and not inside in
the middle of your shaping. The dough needs to feel
alive and not squeezed. So you need to focus
on consistency, guide your dough how
you want it to be, repeating the same
movements all the time, and filling the dog
9. Final proof: It's simply the final
rest before baking. It's often confused with the bulk fermentation, but
it's two different things, bulk fermentation
before dividing, final proof, after shaping. So the purpose of
the final proof is a last expansion final expansion of the gas into your bread. You want to also
have a relaxation of your dough of your bread after shaping and simply you want to prepare your
dough before baking. And the difference with
bulk fermentation is that this fermentation is
much more delicate stage because you see your product, you made your product,
and you need to be really careful the
way you want it to be. But it's also very
important because this is the stage where you can
overproof your bread. And if you overprof
it, it's finished. You can't correct your
bread before baking. To check if your final
proofing is done, you're going to
press your dough. If it slowly come back,
it means it's perfect. If you have a very
smooth surface, you know it's done.
It's good also. If you push and it
stay, overproof. If it's hard, underproof. So if you overproof, you're going to have
a very flat bread, probably not a good taste. But if you underproof, you're
going to have a bread. After the opening, it's going
to explode and it's going to be very tight also.
That's not what you want. So this proofing, the
final proofing is really about the
readiness of your bread. It's the final stage
before baking, and it's also a very
important stage. During this step,
you're going to develop the last
gas for the dough, you're going to develop
the last structure of your dough and the last
guidance of your bread. If you miss it before baking, you're not going to have
the product that you want.
10. Steam, how to do ?: Also, we need to talk about
the humidity of the oven. So when you bake your bread, the humidity it's
extremely important. But it's going to affect
the final product. Without humidity, you're going
to have a very gray bread, very hard on the top,
not beautiful at all, it's going to be ugly and it's not going to develop properly. So it's going to be smaller,
drier and not nice. Humidity is going to
help you though when you put it in the oven. To develop. It's going to give a nice
cream with the golden color. It's going to be beautiful.
There's a few techniques to make humidity in the oven. Nowadays, some
oven, they already have this program. You
can put some humidity. The professional oven,
they already have. You push a button. If you don't have, there's
a few techniques. Technique number one,
we all this tray. You know, the black tray, the fries tray, we
call it in French. When you preheat your oven, you leave it inside. Then you're going to put
your bread into the oven. And at this time,
you're going to pour some water into
this tray straight. You can put like a
lot, 500 milliliter of water straight into the tray, and you close very quickly the oven, and it's
going to be enough. This is a very good first
option, another technique. Some people, they put
some stone in this tray. So you can find some stones. Some people, they put
some volcanic stones. There are some many types of stones that you can find
on Amazon on Internet. It's a little bit
like, you know, ham. The stones gonna keep the heat. And then when you're going
to pour a lot of water, it's going to make
lots of humidity. So it works a little bit better. I would say. I tried it once. It's just more annoying because you have to
manage the stones, which stay warm a long
time after you bake. So this is another
option, option two. Option three, you can
also have a ball, a metal ball or clay. You put it in the
oven with some water, same process all the time, and it's going to
make some humidity. First option. Some
people also, they spray, put water inside, and before putting your
bread into the oven, you're going to spray
all your bread a lot. So you spray your
bread before oven, you put them inside 3
minutes after you open, and you spray again
and you close. This is another option. Also, you can find some other small
equipment on Internet, Amazon to put water inside. So there's many techniques
that you can use. Me, I recommend the first
technique, the simplest one. The only problem
is just with time, your black tray is going to be a little bit destroyed or you can just simply buy another
train in the second hand job, for example, and you use
it just to put the water. So this is the main technique. First technique,
straying the tray, second technique with the stone, third technique, with the ball, and for technique,
you can spray. You can also combine
some technique. You can use the tray,
put water inside, but you can also
spray more humidity is going to be inside
at the beginning, the better it's going to be. I mean, of course, don't
make a ham into the oven, but you need quite a lot of humidity really
for the beginning. At half baking, you can
take out the humidity. You can even take out the tray. Your bread should be
beautiful and it's just going to bake your bread in
a dry environment. So it's really good also. You're going to make
it more crispy. And we do like this in
general in a bakery. So you have a few different
techniques for the humidity. This is a very extremely
important step. When you bake your bread,
if you don't have humidity, you will have a very
ugly and not good bread. So you need the humidity. Don't hesitate to
put a lot of water. If you put only one glass, this is not going to be enough. Now we go to the next one.
11. What do I need ?: And finally, we're going to talk about the equipment
that you might need for your home bakery and
to make bread at your home. You don't need professional
equipment to make bread. Skills are much more important. Once your skills are developed, you can have some
better equipment to improve your workflow. Of course, you're
going to need a scale. So you can take small scale like cooking scale.
It's more than enough. Just be careful if
you need to weight, for example, 2 grams of salt, 1 gram of yeast. If you don't have a good scale, it's not going to take the way. So be careful of what type of scale try
to get a good one. You're going to need eventually a mixer, if you want a mix. There's many types of mixer. You can have a
kitchenette for example, I don't really like it. Maybe the new one, they are
better. You can have Kenwood. There's many brand,
and there's many type. Just choose whatever you want. But you can also do
everything by hand. So don't worry, if you don't have a mixer, this
is not a problem. Of course, you're going
to need a bench scrapper. This one is metal to scrap
your bench, to cut your dough. You can have some
plastic one also to clean the ball of the mixer,
to cut your dough also. And if you use this
on your bench, you can destroy your
bench a little bit. If it's metal, Wood.
This is a wood table, so we don't want plastic
would be better. So this is very important. It's your choice.
Metal or plastic. Me, I have the metal one, but I always use
the plastic one. You're gonna need
also some forms. So for the form, me, I generally use this type
of form, very cheap form. Those ones are very cheap. I pay maybe two euro per form, and it was on I Express,
but they are really good. I have them for very long time, and they do totally the job. You can also have
some wooden baskets. You put your dough inside
and then you take out your dough before baking.
And yeah, it's a choice. It really depends on the
shape that you want to make and me I like this
because I like the shape. I like to have a hybred. So
it really depends on you. You're going to need an oven, so you should have
an oven, of course. You should have a time this is not really important because
you have your phone also, but I would say timer is better because when
you have dirty hands, you don't really want
to touch your phone. And finally, to cut your bread before putting in the oven, you
need some plate. And in general in bakery in
professional environment, we just have this type of blade. This is gillet. It's
to cut the bell. And in general in bakery, we always cut the bread
with this like this. You have four corner when one
is tired, you just change. It's not a safe way, so I don't really recommend you to use this if
you're beginner. Can buy some other
blade that you can find on Alex Express
on Amazon on many website. They have a stick,
which is much, much more safe. Me,
I like to use this. It's simple. I can
find them everywhere, and, yeah, that's my choice. As a beginner, I would
recommend you to have one with a
stick to hold it. The thermometer, I take
this one and it tells me straight the temperature inside
because it's a laser one. So it tells me the
temperature where I pointed. So a point it on
me, on the door, inside the room, the flour, and I will have the
exact temperature. It's instantly This is cheap, and it's really, really good. Also, you can have a Dutch oven. Some people they have this,
so you can check on Internet. I don't use it. I
don't really like it. It's just bother me. It makes it easier
if you don't want to bother to make humidity
into the oven. And first, I would say, you
don't need a spiral mixer. You know, it's like a big ball
and they have spiral hook. This is going to be for
more professional use. You're not going to need
a professional oven, a proofer, these kind of things. Forget, at least
at the beginning. When you have something like
this, like a thermometer, you should have some regular and consistent product at the end. So you know exactly
what you're doing. And it's going to simplify
your learning also, because if you don't
have thermometer, for example, if you don't have a timer, you're
going to struggle. So if you have this equipment, it's going to improve your learning time because
you're not going to waste some time
wondering why this happened this way and
not how it should be. So would say this is
the first equipment that you would need for home,
so you don't need much. Of course, I didn't say but a container to put
your dough avora, you just go with the flow
and you can make bread at.
12. Get ready...: So now we have talked
about the most important steps when
you make bread. I hope you understand
everything. If you have some question,
do not hesitate. Just ask me, ask on the page. I explain you everything like we learn it at
the Baker school. So, of course, it's much, much more developed in school. It takes much longer time,
and you also practice. And now you have the basics. You're ready to make
some super nice bread. You're ready to
follow some recipe. You can try the recipe next. You can experiment. You
can try new things. Hesitate. I'm really happy to help people making
bread at home, especially when I see
how expensive it is. Thank you so much for
watching this video. Thank you so much for
supporting me because, yes, you're supporting me also. So now you can keep
doing with the recipe. I see you there. Thank
you very much. Chow
 Vincent Baker, Artisan Baker & Home Bakery Mentor