Transcripts
1. Welcome !: Do you also find yourself
hesitant in front of a blank page unsure how
to start your sketches? How about starting
the line work with watercolor pencil instead of
the usual black pencil line? Have you wondered how you could add vibrant bold details and depth to elevate your work and have a more playful
sketch feeling? If yes, then you're
in the right place. Hello, I'm Barbara.
I'm an architect, author of several
urban sketching books, and drawing teacher in the architecture faculty
in Brussels University. And next to urban sketching, I fill entire sketchbooks
with tea cups. Sketching tea cups is my
favorite way to experiment, play, relax, and overcome
creative blocks. They're the ideal playground to try new techniques
without fear. And through sketching
countless teacups, I've discovered that adding bold colorful lines with
watercolor pencil, gouache, wax crayons, fine liners bring a unique and exciting dimension
to watercolor sketches. In this class, I will
guide you step by step in using these mixed
media techniques to enhance your watercolors, and due to popular demand, we'll sketch not only just
a teacup in this class, but a teapot too. Will also share some
sketches I made about ten years ago
showing you how these methods have helped
me evolve as an artist. And then it's your turn. No progress without action. Your class project will be painting your own
tea or coffee cup, adding if you want a teapot also and experimenting freely with
these exciting techniques. You can apply these sketching techniques to anything you like. I hope you experience the joy of sketching tic upps
as much as I do. And if you're eager
to continue the fun, check out my tickup
challenge class to dive in even deeper.
2. Don't Show This To Anyone!: So in this video, I
want to share with you some sketchbooks from
about ten years ago. This one is from 2017, so that's eight years ago. And I want to show it to you because it's very different
from what I make now. Like, these watercolors don't
have a lot of contrast. It doesn't have any
shadows, so it's very flat. And I was kind of afraid to put a lot of
pigment dark shadows. And so it's very flat. And I was just learning and you improve by
doing it a lot. So, I want to show this
to you to encourage you. And this is one
from ten years ago, 2015, you see, I started
already making cups. And so here I made
a little shadow, but there's no shadow on the cup or on the handle
or inside the cup. And so it looks very flat. But I kind of like it. It's a coffee cup I
got for my sister, and I did a lot of experiments also by
copying other artists. This is another picture. Here are some shadows
on the furniture, but not on the object. So it's all very flat. And this is another
one I made 2018, there's some improvement
compared to this one. So here are some
shadows on the table, but not really on the object. So this is new water
boiler for tea, and there are some shadow
in the cup and on the cup. And so this one starts
having a bit volume, but still it's, um, I kind of like this one. Don't be too hard on yourself. So I shouldn't be
too hard on myself. Here is another teacup, kind of like this one, too. At least the drawing is correct. It has these ellipsis. So the drawing is quite correct, and here's a nice shadow. But no shadow here. So it's these little sketchbooks
are for experimenting. And this way you can learn. Here are nice shadows. So that's how we improve
is by just playing around. Now I find most of
it looking awful. Here is another way I exercise myself is by
making little thumbnails. 2017 so just sketch
as much as you can. And little by little, you can see the improvement
and keep your sketchbooks so you can congratulate yourself
with everything you do. So enjoy enjoy the class, and please share your artwork. And don't worry if
you're a beginner. We have all been there.
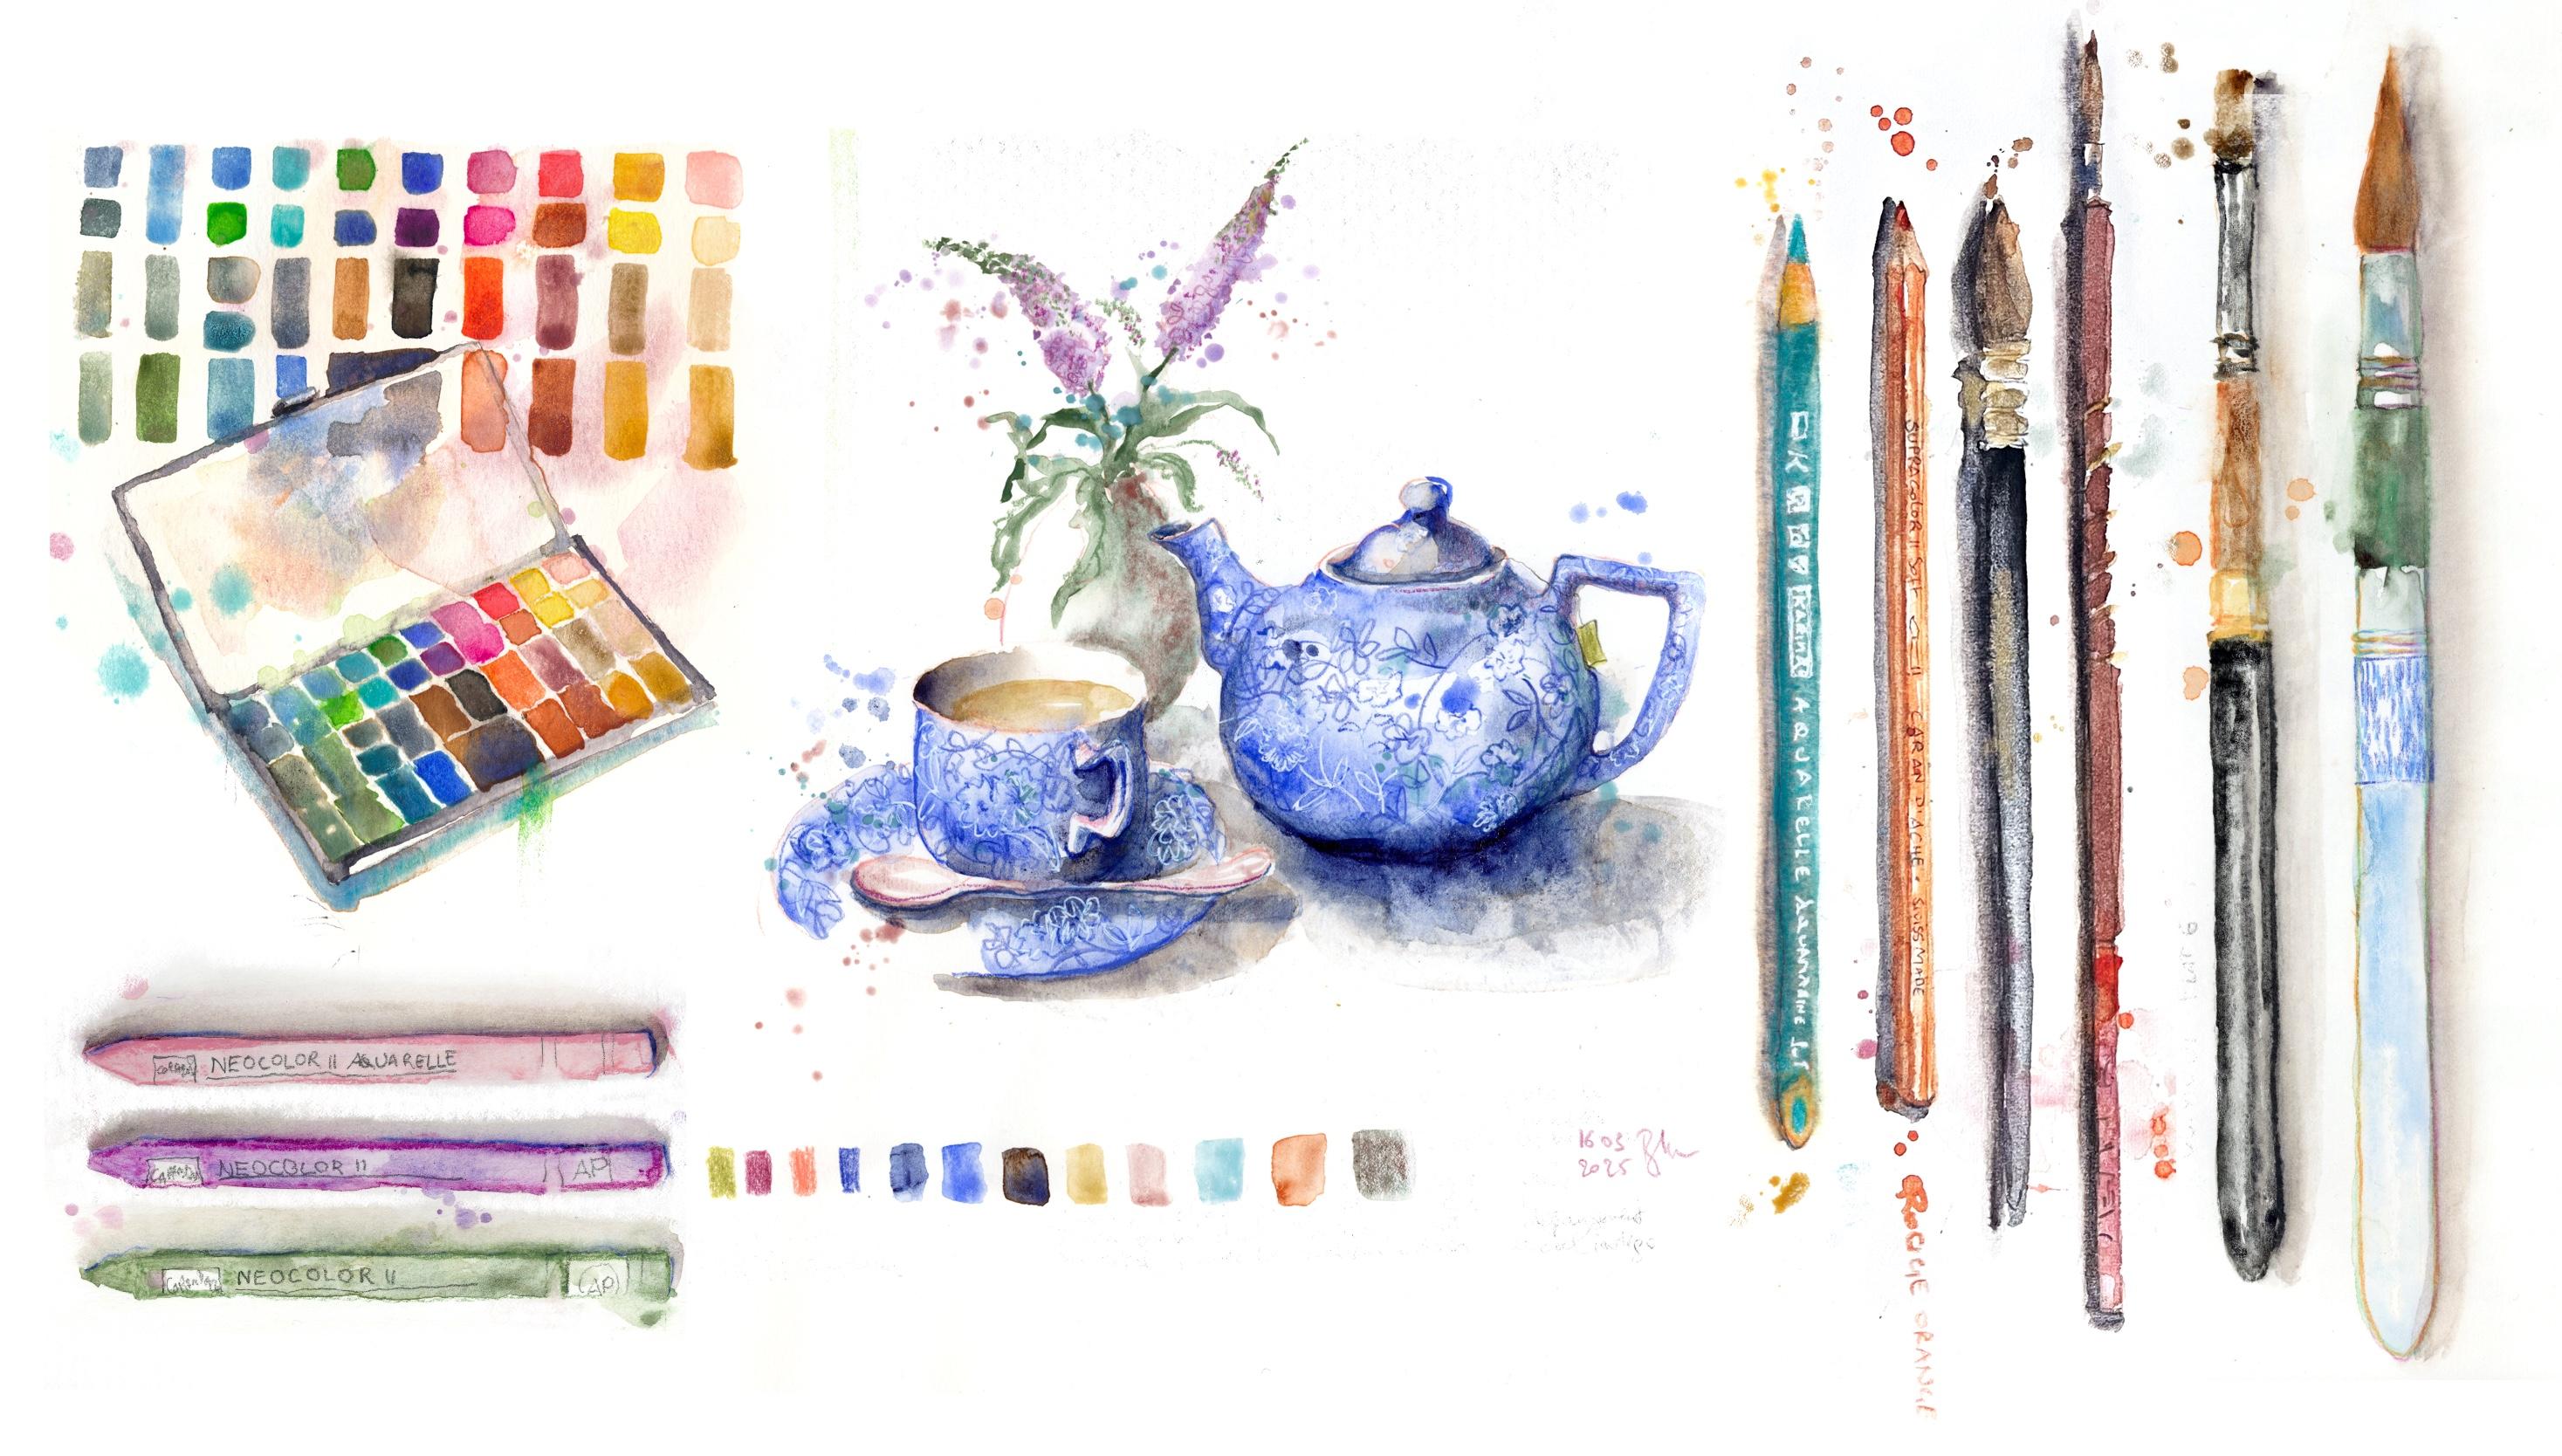
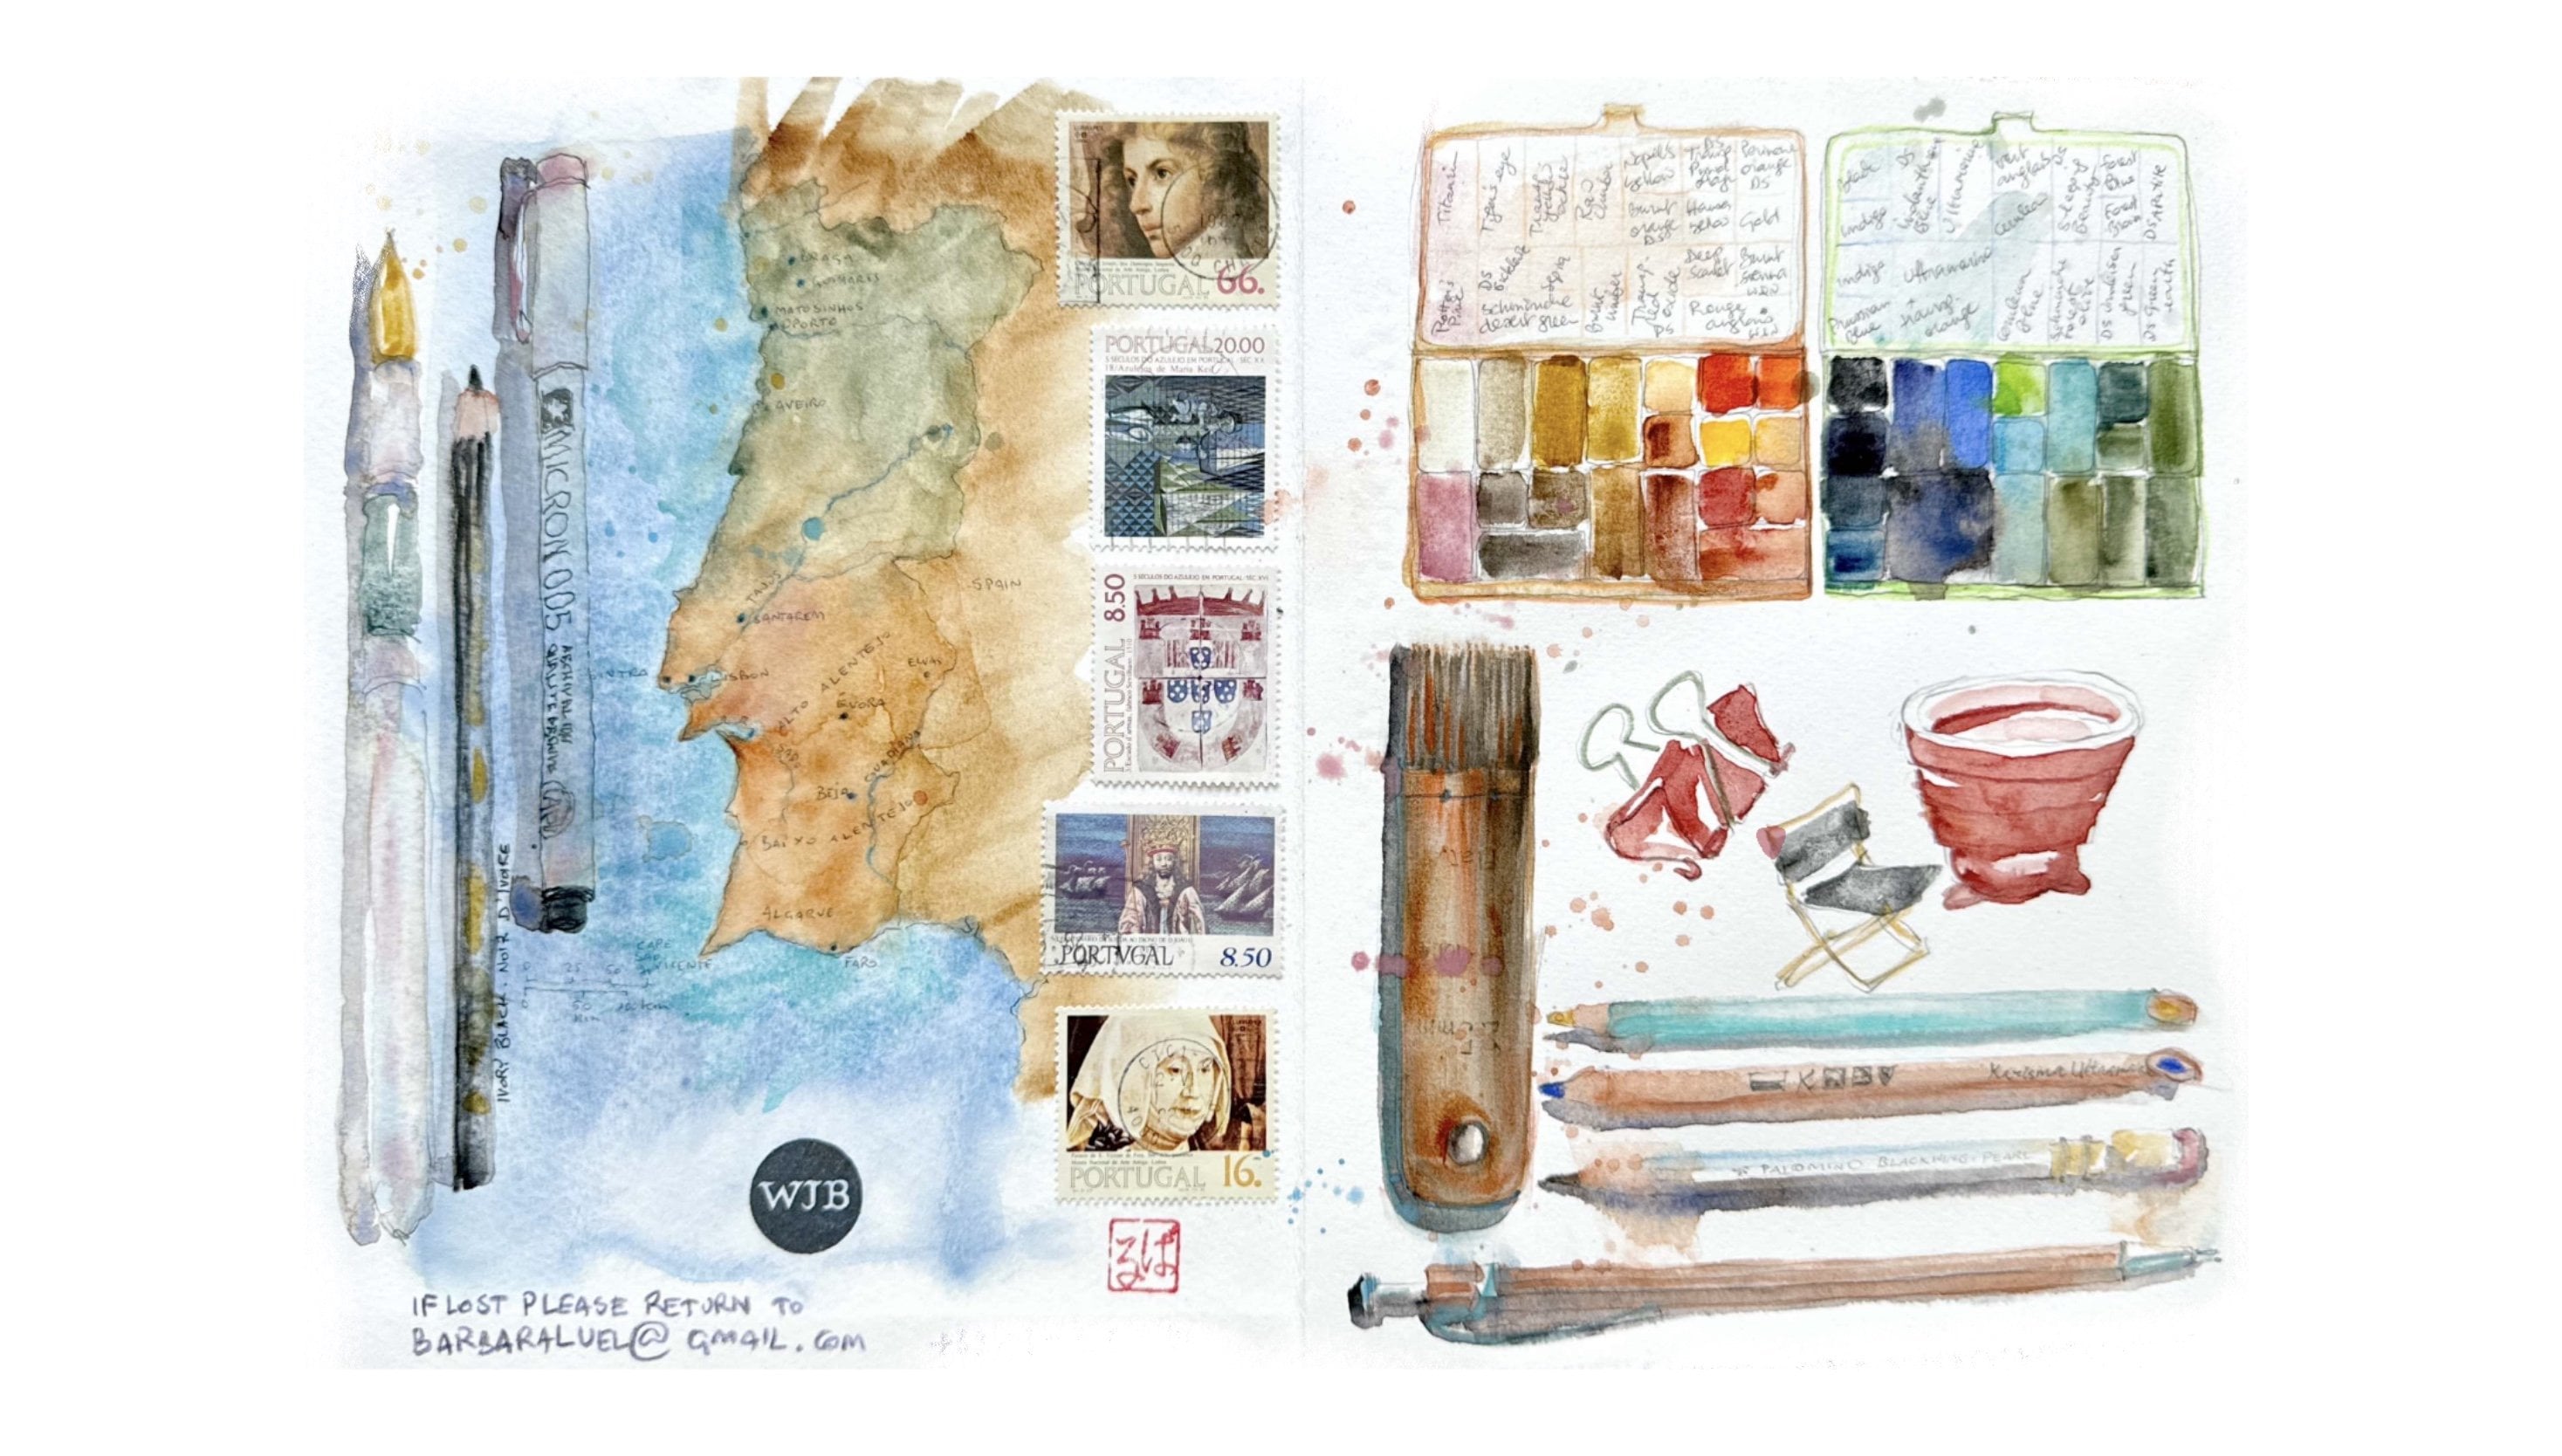
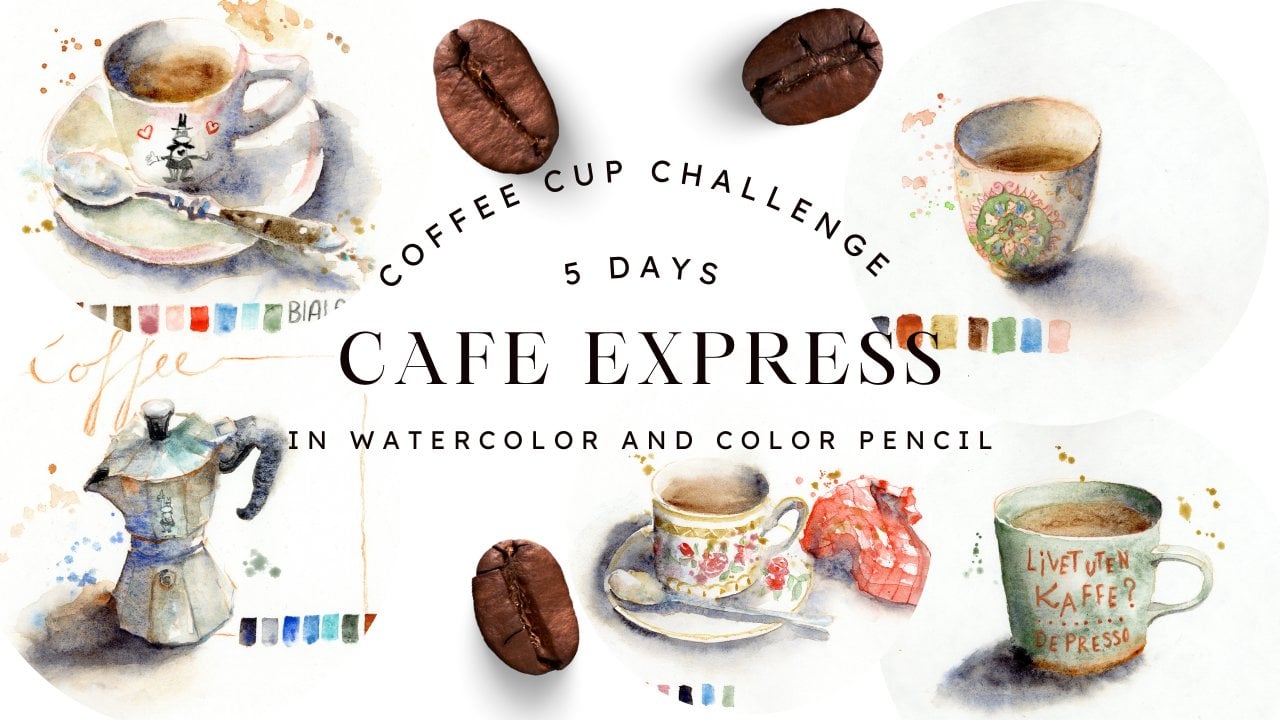
3. Materials: Hello, welcome in
the materials video. So these are the materials
that are used for this class. This is water soluble wax
crayons by Karen dash. So these are little crayons that you can dissolve when
you put water on it, but you can also just leave
them free on the page. They give these
nice greasy lines. And then I used
watercolor pencils. These are fabre castle,
pretour watercolor pencils. These are carnage supracolor
to soft watercolor pencils. And this is Museum
acral carnage, watercolor pencil, which is much softer than this
one than the ones. And I think the carnase
supracolor are my favorite. But the other ones
are also very good. And then I use watercolor. I have this palette with
Daniel Smith, Windsor Newton, and Schmincke and
Holbein watercolors, which come in a small palette. And then I used gouache. This is just a
white gouache pot. You can also have it in tubes. And then I used this sketchbook. It's a big a tree
size sketchbook, and it has very smooth
fabriano artistico paper. And I want to insist that
you use smooth paper. If you use color pencil, otherwise you will have a very different result with the color pencil on rough paper. Personally, I think it doesn't
work well because then you have the texture which
interrupts your pencil lines. But again, you don't
need to buy all these. I have all these materials
that I collected during several years like 1015
years and you can just use any materials that
you have at home and make different combination
in this mixed media.
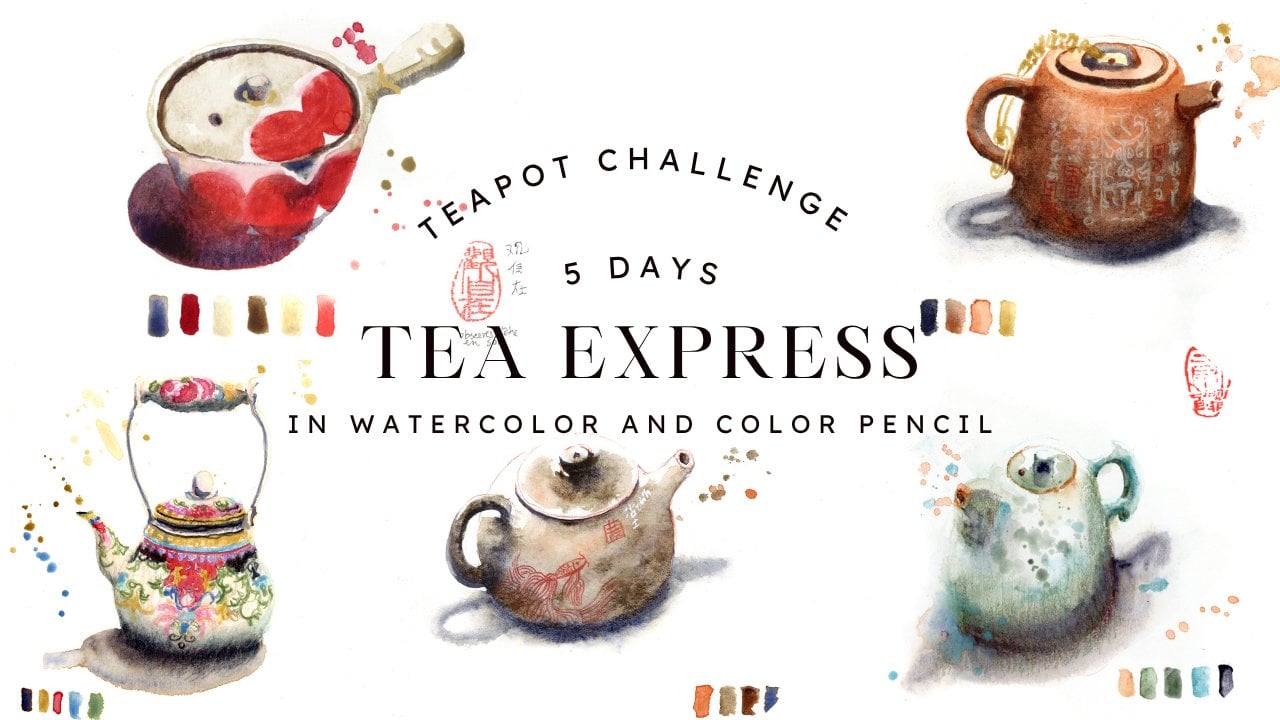
4. Sketching in Watercolor Pencil: Welcome to the tipot
sketching class. So for the drawing, I use pink watercolor
pencil from Tan dash. It's a museum,
watercolor pencil. And this museum range is a
very greasy, soft pencil. If you want to have smooth pencil lines for this type of
multimedia sketching, you will want to use
very smooth paper. This is a very big
sketchbook by Spanish brand, and it's Fabriano Artistico
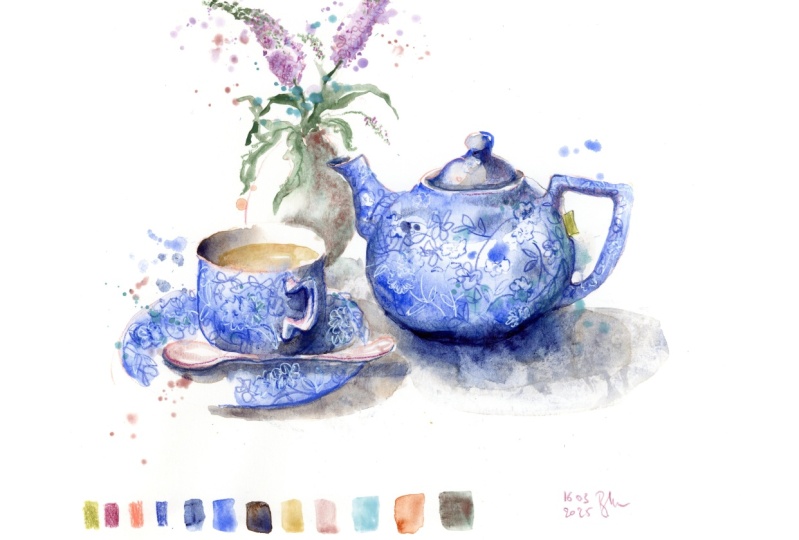
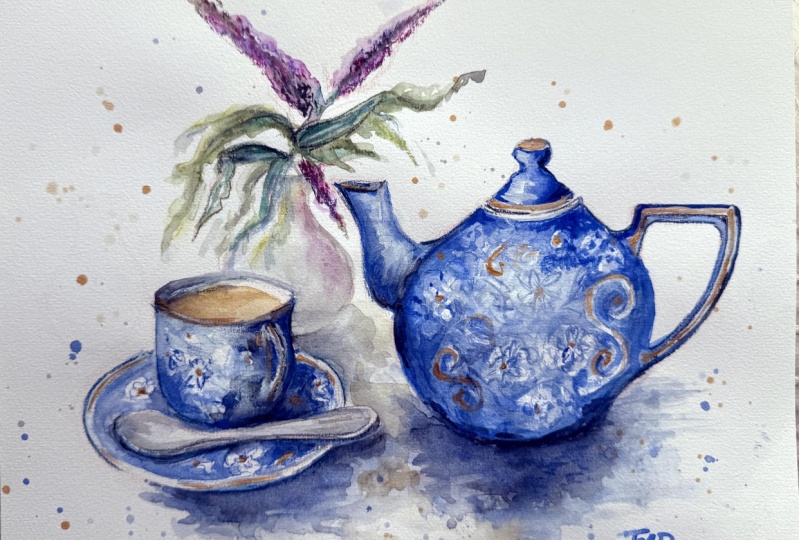
200 grams of sketching paper. So this is a lovely tea set that I photographed in
a nice hotel in London, so it's very british. And I love the design and
the beautiful blue flowers. So I draw the outlines in pink
because I think pink fits well with the blue flowers of
the teacup and the teapot. And I will afterwards, draw the blue flowers. The little vase is nice to connect the teapot and
the teacup together. So you will notice that
I move it a bit to the right to place it in between the
teapot and the teacup. That's the nice
thing of sketching. You can move things around
and leave things out. So I now sketch
the blue flowers, and of course, I will not sketch all of them and not
photographically correct. I will just suggest them. And before sketching,
I sprayed a little bit of water on the paper
to make some wet parts. So you see that when I sketch with this
watercolor pencil. So this is also Karan
dash watercolor pencil. When I sketch on the
wet parts of the paper, the color starts bleeding a bit. So this gives a
nice, lovely effect. And also the pencil becomes more intense when it
draws into water. So I just suggest some flowers here and
there and some leaves. And then afterwards, we will make a watercolor
wash over it. And then after that, we will add more details in
watercolor pencil and a bit of Water soluble wax pencil and also a bit of gouache at the
end to add some details. So the main thing is, of course, to have fun
and enjoy yourself. And I look forward
to see your teapots. You don't have to draw
my teapot, of course. You can just draw any nice
teapot and a picture or a real teapot you have
in front of you that's even better and have fun. And please share your sketches on the platform in the class.
5. Adding a Watercolor Wash and some Details: So let's put a watercolor wash over our lovely watercolor
pencil drawing. I first wet the teapot because I want soft edges
on my watercolor. Because I want the
tipo to look round. I start with Idantranblue, which is a very dark
blue by Daniel Smith, and then I start
with my shadow gray, which is a mixture
of ultramarine blue and transparent
orange by Winter Newton. I first put the wash over the
darkest part of the teapot to bring the shadows
out and then I ad, again, a blue in the
shadow grave because I want the shadows to
have blue wash in it. Then I make the shadow gray on the tea cup and on the spoon
and also inside the teacup. If you have too much paint, you can absorb it
with the dried brush. So you clean your brush
in the clean water, and then you squeeze the hair in the tissue
to dry the hair, and then you go into your
paint bottle or water bottle, and the dried hair will
absorb your paint. So I put a color chart for
you in the bottom of my page, and I add ultramarine blue in the teapot because I
love ultramarine blue. Although the teapot is not
really ultramarine blue. You can just use the
colors that you like most or the colors that
you have in your palette. You don't need to buy any
specific colors you don't like. Oh so I don't put
the wash everywhere. I leave the middle
part of the teapot white because there's light
shining on the teapot, and I want the teapot
to look round. And in watercolor, the white of the paper
is your light, actually. So I put also some
wash over the teacup. And again, a bit
darker blue where it's darker in the cup or where I want to have
a more intense blue. And afterwards,
you can make some white chopping sweet uh
in the flour motifs. I add some watercolor pencil in the wet wash of
the watercolor. And when you sketch with watercolor pencil
on the wet page, the watercolor pencil starts to bleed into the wetness of
the page, and I love that. It makes really juicy lines. For the tea, I use raw umber, and I will later add a
bit of light red in it. So just play around and don't
forget to leave white of the paper because that gives
more light to your painting. You can also wear about some watercolor with a
hard synthetic brush, but you have to be very careful
not to damage the paper. So with this paper,
specifically, this erasing doesn't work too well because it immediately
damages the paper. I So let's paint the flowers. I use some different kinds
of green for the leaves, and then I will use some purple also for the
flowers or some lla. I mean, I don't paint all
the flowers, of course. I just suggest some flowers. And afterwards, we will go
to make some details with watercolor pencil and with some watercolor water
soluble wax crayons. So as you see, also, I do a lot of splashing, and I love to splash
because it gives a playful side
effect in painting. And I also love
to splash because it links several parts
of the sketch together. So in the next video, we will add some more details in the sketch and also
more color pencil, some gouache, and some
water soluble wax crayons. I hope you're having fun, and please add other
media if you like, if you have some
nice art supplies in your drawer that
you want to try out. This is the moment to do it. And
6. Finishing the Details: So welcome in this third video. In this video, we will darken the shadows to bring in
more light and create textures and juicy details with watercolor pencil and
water soluble wax crayons. Here in the shadows, I add some textures with a
rolled up paper handkerchief. And the foldings in this
paper handkerchief will give some textures in
the shadow on the table, and this can suggest some
texture of the tablecloth. I also add Turquoise because
it's my favorite color. So, again, I want
to encourage you to just use your
favorite colors, although they are not
there in reality. It's your personality
as an artist. It's what makes your
paintings yours. It's the use of
your color choices. And now I will paint the
vase in a neutral color. And this vase will make
the teacup shape stand out and will connect the
teapot to the teacup. I use a neutral color so that it wouldn't come forward and wouldn't attract
too much attention. So the darker your shadows are, the more light you will
bring into your sketch. And also the shadows bring forward the
shapes of your object. So don't be afraid to go
darker in your shadows and also don't forget that your paint becomes a bit
lighter when it dries. So when you have a round shape, you want shadows that goes
mostly from dark to light. So what you can do is first wet your paper and then add paints. And that will make
your hedges soft. I'm going to add flowers
in different colors. Well, first, I add some white lines with
a white fine liner. So there are some white
flowers that I want to I make stand out in the darker washes, and then I add
some extra colors. I want to add some pink, of course, because I love pink. And then I'm also adding
some darker blue. This is like indigo blue, and I make the shadows a bit
darker with this pencil. This is also a water
soluble pencil. So I color the shadows
a bit of the shapes. I add the water
color pencil lines because I like pencil lines. And then I will also
add some blue flowers. With this dark pencil, I want to make the
shape come forward. And I also add some shadows in toquas
because I like toquas. So again, these colors are not photorealistic colors
of my reference object, but you just use the
colors that you like, and I like pink a toquis
and all kinds of blue. And I also love purple. I add some purple in the teapot in some different
places of the teapot, and these purple shadows will reference the colors of the
flowers next to the teapot. And then I add, of course, leaves and flowers also in blue because definitely my teapot and teacup don't
have enough flowers. I want to suggest more leaves
and more flowers like there are in the reference picture
because it's so beautiful. So I add different
kinds of blue. I add the ultramarine
blue pencil, and I add indigo blue and
Prussian blue pencil. And then I add
some round dots in the flowers to suggest the
shapes of the little flowers. I just make little circles with the same purple as I
used in the teapot and these let's add some water solub
Wax gray on lines. I add some of the wax
dots in the flowers. They are nicely crazy. It's no color too
from Caron dash. So be careful because you have water soluble ones and
non water soluble ones. So be careful what you buy. And I like to use it because it has a
nice, greasy texture. So I add texture to the
leaves of the plant, and I add some texture
to the flowers. And you can just add colored
lines wherever you want. And I finish with some light details in
white gouache paints. This is my favorite
synthetic brush from Escoda. It's the Boko range, and it's very thick brush, but with a very fine tip, and it's synthetic
and nicely flexible. So you can do broad washes, as well as very fine details. With this white gouache, I highlight some of the flowers
and some of the leaves. Because I think the fine liner, the white fine liner doesn't
always give a nice texture. So I hope you're having
fun with your sketch, and I'm curious to see what you make purpose is to play and have fun and don't
judge what you're making. And most of the time,
the result will be very good and satisfying. And most of the time,
you will be very happy with the result
if you have fun. So now it's your turn. Please post your pictures in the class project or
tag me on Instagram, so I can share your art.
7. Thank you !: So, congratulations. You made it to the
end of the class. I hope you had fun playing
with this watercolor and combining it with other media
with watercolor pen stil, color friend steel, wax creams, even fine liners and gouache or whatever you
want to act with, just to play and
relax and have fun. And that's how we make progress. So be sure to share your finished project so that everyone can enjoy it
and be inspired by you. And I look very much forward
to seeing all your project, to see maybe other techniques
you use. I'm very curious. And for more inspiration, you can follow me
on Instagram and subscribe to my
newsletter, to my blog. I share free YouTube videos when I discover new techniques or when I play around sketching. And please consider leaving
a review in this class. It fully helps me
grow as a teacher and allows other students to
discover classes that they love. And, of course, don't
hesitate to reach out with any questions for the
discussions in this class. I'm here for you whenever
you have questions. A piece sketching and thank you.
 Barbara Luel, Architect, Author & Artist