Transcripts
1. Introduction: If you're a beginner and want to learn a simple way to sketch, but you keep getting
one key shapes, This class is for you. I guess You've tried
drawing what you see directly next
to your reference, but it just looks a bit off. We decided to trace
your reference image. That's fine for an absolute
beginner to get started, but you can't sell
your artwork done that way for copyright reasons. More importantly, you won't really learn how to
draw independently. If that's you, then
this class will be helpful in this class. I'll show you how to break everything down
into basic shapes. Wait, I know that from some videos I watched
before I tried that. But still, my drawing looks
weirdly shaped in the end. Well, that is because
most classes out there only focus on what
I call secondary shapes. But skip on the importance of establishing an
overall shape first. In this class, I'll
first help you see the general shape any
object belongs to. And then we'll
break it down into smaller secondary shapes while taking notes where
each secondary shape is located relative
to the overall shape. And then we'll
proceed to drawing on the site while
looking at our draft. Finally, we'll clean
up the drawing. That does sound a
lot clearer now. I don't know what shapes to
break anything down into. Everything just looks
like a giant block to me. Well, don't worry, I'll walk you through nine
different examples, each representing a category
of commonly seen objects. Some are organic like fruit, flower, animal, tree, or human. Some are non organic objects
like household items, buildings, vehicles,
or electronics. By the end of our
nine practices, you'll see a lot of
secondary shapes. What you see may be
different from what I see. That's totally normal. And okay, these
exercises will help you get used to finding all those hidden shapes
and that's what matters. The goal of this class is to
help you learn how to draw any object based off of a
reference before you paint it. Since our focus is on
getting the shapes right, the sketch we're making in
this class is not intended as a final artwork with
all the shading and details that will
be a separate class. For another time, I'll be demonstrating everything
using procreate. But don't worry if
you don't have it, you can use any software or just grab a pencil
and a piece of paper. It's all the same as usual. A perk in taking my class
is you can download a lot of resources to help
you learn and practice. You can download all the
reference images I'm using together with
the breakdowns you're about to
see in the class. So you can keep practicing
during and after the class. If you do use procreate, I have an extra bonus for you. You can download some of my favorite pencil
brushes for sketching, totally for free as a bonus
of taking this class. What are you waiting
for? Grab the downloads. Get your ipad or
drawing pad ready, and I'll see you on
the other side. H
2. Introduction of Basic Shapes: There are many basic shapes you can use to break down a subject. We have ovals, circles,
triangles, rectangles, squares, trapsoids, pentagons, hexagons,
et cetera, et cetera. Some more complicated
shapes can be broken down into
even simpler ones. For example, you can
break an hexagon into two trapsoids and break a
pentagon into three triangles. In this class, we'll
just try to break every object into ovals, circles, triangles, rectangles, squares,
trapoids whenever possible. Occasionally, we use other
shapes if it makes more sense. In addition, we'll use straight and curved lines to connect some of these shapes.
3. Sketch 1 Mango: Let's start with the mangle. I hope you've downloaded
all the reference images. You can just open any
canvas you want in procreate or any other software. If you're using procreate, you can tap the wrench tool, then insert a file. Then navigate to where
you save the file, probably in your downloads, and then tap the mangle image. Well, now you have the
image in your procreate. You want to reduce the opacity of the reference layer so we can see it clearly enough to trace secondary
shapes from that. You also want to
add a new layer on top so we can draw
the basic shapes. Now you can use any sketch
pencil brush you want. For this class, I recommend using brighter
colors such as red, because that can
make it easy to see the shapes you're going to
draw over the reference. Right off the bat,
we can see that this mangle can be broken
down into two ovals, one large one on the top and
a smaller one at the bottom. We can then add each curve on each side to
connect the ovals. We can also simplify
the stem by using a skinny rectangle to
represent its basic form. The leaves look like
elongated hexagons. To me it's okay, different shapes than I do. You may see a leaf as made
up by a few triangles, and that's totally fine. All right, I'm going to
sketch this mangle on my own using the guidelines
we just made. You don't have to follow
me right now because I'm demonstrating the no
so good method first. And I'll show you the better
one after this, Just watch. First add a new layer and then
change the color to black. I'll do my best to
mimic these shapes. Now as rough sketch for P, I'm just going to
keep the breakdown as a reference on the side and then I'll draw
on the other side. As you can see, this method may be a bit
challenging because we don't know exactly where to put the shapes and how
big they should be. As a result, what I do isn't as slanted and it is a bit
misshaped. It's not too bad. But we can make it better to avoid the previous
problem we encountered. Let's try to draw the subjects overall shape first
before breaking it down. This is to ensure that
the basic shapes we did last time are all enclosed
within the overall shape. This mangle can easily
fit into a trapzoid. We can also add
simple guidelines by sketching lines across
the overall shape to mark important things like
where the two ovals would meet and where the
top of the mangle starts. Let's also add notches at
corners of the overall shape to roughly mark
where the stem is located and where
the leaves end. I see the top of the stem falls roughly around the very
top of the outline, but slightly towards the left. The left leaf ends at about
30% of the middle line, and the right leaf ends
just below the second line. Next, let's do the
shape breakdown. Again, the method is exactly the same as the one I showed
you in the very beginning. Similarly, let's set this
aside as a reference. This time we'll draw the
overall shape first. If you find it hard to draw the overall shape on your
own as the first timer, you can start by tracing
the overall shape on a separate layer and then
move it to the side. To use, let's attempt to
mimic the basic shapes now. This time also bear in mind
the noches which is marked. If you want to know if
you did a good job, just move the layer
where your new drawing is over the reference
image and compare the two. You'll notice some
shapes are misshapen. Shapes are placed
in wrong locations, maybe your overall
shape is wrong. But this is a great opportunity
for us to observe, again, where things are supposed to be and how they're
supposed to look and make more markings
on the reference if necessary to guide us again, this is how we improve. I strongly recommend that you
do that with every drawing. After you're happy
with your shapes, we'll be cleaning up
our rough sketch. You want to turn
down the opacity for the rough sketch layer and
add a new layer on top of it. You can increase your brush
size now if it's too small, this step will focus
on giving the subject more definition and making it look more like
the reference image. Try to be neat for this part. But don't strive for perfection, because this will only serve as our guide for your painting. Remember, a trick to draw neatly is to not
use too many lines. You can use one line
for the body of the mangle and use two
lines for each leaf, one for top and one for
bottom. And that's it. If you find your
lines too shaky, you can use the stream
line function to do that. Just tap the brush you're using. Then the stabilization
under stream line. You want to slide
the amount board to the right and try the brush
on the drawing pad again. You want the lines
to still follow you, but doesn't move with every unintentional shake
from your hand. If you notice it doesn't
follow you anymore, that means you've overdone it. So just slide it
back a little bit. All right, in the
end we'll just add some details such
as the mid rib of the leaves and the
crease connecting the stem and the fruit,
and now we're done. This is the entire process
of making a sketch. Before you paint it, it's
easier than you thought, isn't it? I'll sum
it up for you. You want to first establish an overall shape and then break the object down
into secondary shapes. You also want to mark
notches where to place the secondary shapes and draw the overall shape
on the side next, and place the secondary
shapes where they belong. After that, you want to
compare your draft with the reference image and
make changes if necessary. Next, you need to clean
up the lines with streamline function and
finally add details. With more and more practice, you'll probably not have to
go back and make changes. Some people are comfortable not having to draw the
overall shape first. But this method is still highly recommended
for beginners.
4. Sketch 2 Colorado Spruce: The entire Colorado spruce looks like an
elongated triangle. So let's sketch that. We'll also add an
optional vertical line in the center to represent
the halfway point. Okay, It's time to break
down to simpler shapes, but as we can see, the triangle is already its most basic shape. We can skip this step in this example and
then just use that. Okay, let's try to sketch this Colorado spruce on our own using the guidelines
we just made. You want to add a new layer and change the color to black? Since it's fairly simple, I trust that you don't have to trace the triangular
overall shape, right? You can just draw that on
your own, on the side. The only detail we
need to add now is all these little
ovals for the leaves. The ones on the top fall outside the triangle
a little bit, but the ones in the bottom are inside the shape. Remember that. Also notice the
top ones point up a little and the bottom
ones point down a little. I hope this one is simple enough to give you
that confidence boost. The following objects may
not be the same simple, but the method is
exactly the same. After learning the method, it's now time to practice
with more examples. The next example will
be much simpler, let's observe it first, and then apply what
we just learned.
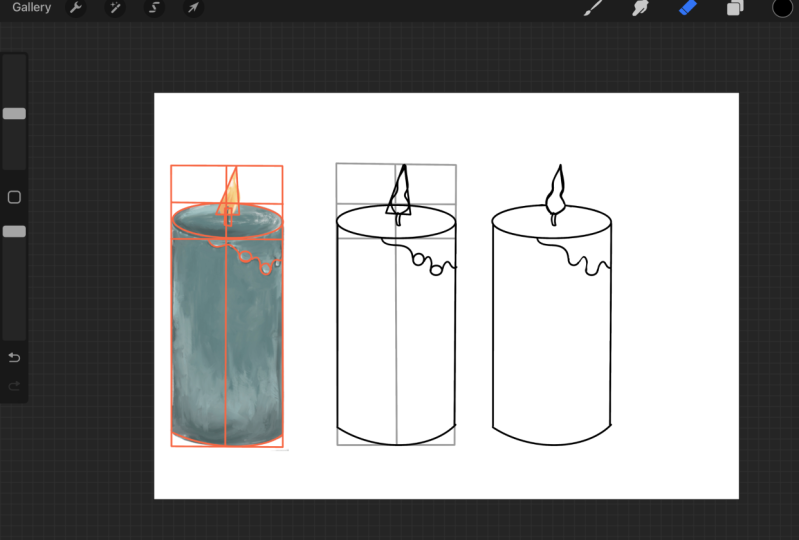
5. Sketch 3 Candle: The next example is
the candles we painted in my first oil class that
you can watch after this one. The name is Procreate
Oil Painting for beginners if
you're interested. If you've already
taken that class, you know there are in
total four candles, but we'll only be focusing on the longest one on
the right side. The entire candles overall
shape looks like a rectangle. So let's sketch that first. Before breaking it down
to simpler shapes, let's add a horizontal line where the candles body starts. And add a vertical
line in the middle of the rectangle to represent
the center of the artwork. We can easily see that the top of the candle
looks like an oval. The flame also looks
like a triangle and has a tiny rectangle at its
base, which is the wick. We can also observe that they're precisely in the
middle of the candle. That's easy. The wax
strip is shaped like tiny circles at the bottom with curvy lines connecting
them to the top. Let's also not forget the curve at the
base of the candle. Okay, It's time to try
to sketch this on our own using the guidelines
we just made as usual. Add a new layer and
switch to black. Use your breakdown as a
reference on the side. First, let's mimic
the overall shape and then add the
secondary shapes. Last but not least, let's
clean up our rough sketch. As usual, turn down
the opacity for the rough sketch layer and
add a new layer on top. You may want to increase
your brush size and streamline if needed. Try to be neat by using one line for each element
whenever possible.
6. Sketch 4 Poppy: If we look at this
whole flower together, it's obvious that we can contain everything in this
cardrilateral shape. For our guidelines, we can roughly divide this
shape eight thirds. The first section is where
the entire flower is, and the other two contain
the body of the plant. Okay, let's proceed to breaking this down into simple shapes. We will do this in
two steps instead, because it is a little bit more complicated than the
examples we saw earlier. First, would you
just the flower, and then we'll do the rest. The flower can be
contained within an oval. Let's sketch that for the
overall shape of the flower. First, in the middle
of this oval. The center is also shaped like
an oval, but much smaller. Now take a look at
the petals inside. I think it's pretty obvious
that they can all be broken down into
ovals and curves. We'll start with the innermost petals and then move our way out for the rest of the plant. We can be much looser
when sketching. Let's first sketch down the
main stem using curvy lines. If you don't want to add
notches as markings, you can take a mental note here. We first curve left and add
about a third of the length. Start curving right, and then there's also the intersection
with the other lines. Then another one third of the length down is
another intersection. Then we curve left in the end. If you take a closer look, this is an S curve. You'll find most lines in
nature look like and C curves. S curve is actually
made with C curves. Everything is pretty much just C curves or
mirrored C curves. Now let's take a closer
look at the leaves. They come in two shapes. One is diamond and the
other is like an oval. Let's use those to mark them. Let's also add the remaining
steps now using curvy lines. Okay, it's time to try
to sketch this on our own using the guidelines
we just made as usual. Add a new layer and
switch to black. Use your breakdown as a
reference on the side. First, let's mimic
the overall shape and then add the
secondary shapes. Last but not least, let's
clean up our rough sketch. As usual, turn down
the opacity for the rough sketch layer and
add a new layer on top. You may want to increase
your brush size and streamline if needed. Try to be neat by using one line for each element
whenever possible. For this step, feel
free to increase the layers of pasity
for the poppy image. It's easier for you to look at every detail,
especially the petals. Okay, let's also add the
details for this one. We need some fuzzy details
at the center of the flower. And also mark the petal and
the mid rib of the leaves.
7. Sketch 5 Fox: The next one looks
familiar, doesn't it? Well, it's a cartoonish fox. You can be more
creative with this one, and don't have to worry too much about precisely
capturing everything. It is a bit more detailed than
the other examples we saw, but don't worry, it can still be broken down into simpler shapes. The overall shape of this fox looks like this
quadrilateral shape. Let's sketch that first. Before breaking this fox
down into simple shapes, let's create our guidelines. Since this fox is
almost symmetrical, let's sketch a vertical line
to mark the halfway point. Next, you want to
mark the top of the head with a horizontal line. Lastly, let's draw
another horizontal line at the bottom of the head. Let's move on to
breaking down the head. As we can see, the head is
shaped like a stretched oval. But don't touch the two sides of the overall shape because we need to save some space
for facial details later. The ears are shaped
like triangles. Easy. Okay. Moving on
to the facial details. The eyes look like
slanted ovals. The nose is shaped like
an upside down triangle. The mouth looks like the
letter J, back to back. Did you notice that the eyes, nose and mouth are
perfectly symmetrical? That'll make our work
a little easier. Moving on to the body, the chest also looks like
an upside down triangle. At the same time the
legs are shaped like different types of
ovals. Let's ***. Lastly, the tail has
a big round area, which is connected
to the body with the curve and a
triangle at the tip. You can also add notches to mark where each element
starts and ends. Or if you're already
comfortable at this point, you can make mental notes and
compare your drawing with the reference later to
see how far off you are. Let's add some necessary details and refine this rough
sketch a little bit. First, we need to shape
the head by tapering its sights and adding
some hair strands. The ears also have hair strands and an extra triangle
inside them. We can also see that there is a curved division on the face. Let's add two C curves. As for the chest, it looks
like it's really fluffy. We need to make sure to
add those curvy lines. Lastly, the tail has these
spiky lines in the middle. Okay, it's time to try
to sketch this on our own using the guidelines
we just made as usual. Add a new layer and
switch to black. Use your breakdown as a
reference on the side. First, let's mimic
the overall shape and then add the
secondary shapes. Last but not least, let's
clean up our rough sketch. As usual, turn down
the opacity for the rough sketch layer and
add a new layer on top. You may want to increase
your brush size and streamline if needed. Try to be neat by using one line for each element
whenever possible. That's good. That's good.
8. Sketch 6 Boat: The next example we're going
to look at together is a stylized boat with
very distinct shapes. The overall shape of the boat looks like this pentagon shape. Let's block that in
for our guidelines. We can see a vertical line in the middle,
starting from the top, divides the overall
shape into two and serves as a guide on where
the tallest mast is located. The edges of the
boat can also be represented by a curve
from left to right. Time to break this
boat down into simpler shapes,
starting with the body. The top of the boat itself is shaped like a curved rectangle. As you can see, the right
edge is wider than the left. Make sure to put that into
consideration when sketching. Also add a smaller
one in the center. The life buy looks
like a doughnut. Let's just use two
circles to represent that. Proceed to the cell. As previously mentioned, the tallest mast starts from the vertical guideline
we added earlier. Use an ellogated rectangle for that and add a shorter
mass to the left. The flags are shaped like
different types of triangles, so let's break them
down using just that. Next, let's add some details. We need a line on the right flag and some
lines on the live buoy, and add some curves to the body. Okay, it's time to try
to sketch this on our own using the guidelines
we just made as usual. Add a new layer and
switch to black. Use your breakdown as a
reference on the site. First, let's mimic
the overall shape and then add the
secondary shapes. But not least, let's clean
up our rough sketch. As usual, turn down
the opacity for the rough sketch layer and
add a new layer on top. You may want to increase
your brush size and stream line if needed. Try to be neat by using one line for each element
whenever possible.
9. Sketch 7 Laptop: The next exercise
is about a laptop. I'll introduce
appropriate function in the end to make it easier
to create straighter lines. Electronics tend to have
a lot of straight lines. The overall shape of this subject is pretty
straightforward. I can see two rectangles. It may be challenging to sketch that because they're
in perspective, they're angled to make
it easier to draw. Imagine the left side as a spread out letter L and
repeat that for the other side, except it's much shorter or
smaller on the right side. We can also see
that the two Ls are connected by lines at
the top and bottom. Lastly, as a guideline, we'll be connecting
the two points at the center of
the overall shape, which represents the
division fold of the laptop. It's time to break this laptop
down into simpler shapes. The basic shapes of the top and base of the laptop are
already broken down. With the help of the
guidelines we just established for the screen. It is shaped like a
smaller rectangle located at the center right, that is parallel to the lines of the guidelines we just
made. That's easy. Let's add the keyboard and touch pad using the same method. Next, the reflections
on the screen are two diagonal lines parallel
to each other, also easy. Lastly, we can see the laptop has some depth and
thickness to it. Let's add that by
adding a notch at the upper left corner and also lower left
corner of the laptop. Next, we want to add
extra lines using the overall shape as a
guideline and curve the edges. Make sure the lines at
the top and base of the laptop are tapered
towards the tip. Okay, it's time to try
to sketch this on our own using the guidelines
we just made as usual, Add a new layer and
switch to black. Use your breakdown as a
reference on the side. First, let's mimic
the overall shape and then add the
secondary shapes. Last but not least, let's
clean up our rough sketch. As usual, turn down
the opacity for the rough sketch layer and
add a new layer on top. You may want to increase
your brush size and streamline if needed. Try to be neat by using one line for each element
whenever possible. For this step, I'll
introduce a way to make your lines straight when
cleaning up your final sketch. In case you didn't
know that earlier, what you're going to do is to try your best to draw a line. Make it as straight as you can, and don't lift your apple pencil for a few seconds
after you're done. This creates a straight line for you automatically
on its own. And repeat these for the other
lines you'll be creating. And then carve the edges
of the laptop if you like. The same method also
works for circles, ovals, rectangles, squares,
triangles, et cetera. Whatever shape you want to draw, just do your best to draw that. And don't lift
your apple pencil, and they will
correct it for you.
10. Sketch 8 House: For this house, we'll be using the quick shape function
I just introduced. For the most part, I want to use two shapes for the overall
shape of this house. That will be a triangle as roof and a square for the rest. This looks like the house we
when we were kids, right? This basically sums
up as art work. Let's add a vertical line at the center to divide
the house into two. And notice how perfectly
symmetrical this house is. That'll be easier for the
square and wall part. We can see that it can be divided into thirds
horizontally. The first section contains the very top of
the door, the arc, and some of the details, while the other two
sections contain the remaining parts of the
house, including the stairs. All time to break this house
down into simple shapes, starting from the
top, the chimney is shaped like two
rectangles, easy. The one on top looks thinner and wider than the one on the
bottom. Remember that. Meanwhile, the doors
arch can be represented by a circle connected
with lines at both sides. Make sure the base of
the circle touches the second horizontal
line which is added the lower step of the
stairs is shaped like a thin rectangle and its width
is the same as the circle. The top step is shaped the same, except it's a bit narrow. At the same time, the door
is shaped like a rectangle. For the details, we
can see that there are several elongated
rectangles. They're medium thick
near the roof, very thin near the
first horizontal line, quite thick at the
base of the wall. At last, the details at the top section of the
wall are shaped like CD's. So we'll draw some circles. Okay, it's time to try
to sketch this on our own using the guidelines
we just made as usual, Add a new layer and
switch to black. Use your breakdown as a
reference on the side. First, let's mimic
the overall shape and then add the
secondary shapes. But not least, let's clean
up our rough sketch. As usual, turn down
the opacity for the rough sketch layer and
add a new layer on top. You may want to increase
your brush size and stream line if needed. Try to be neat by using one line for each element
whenever possible.
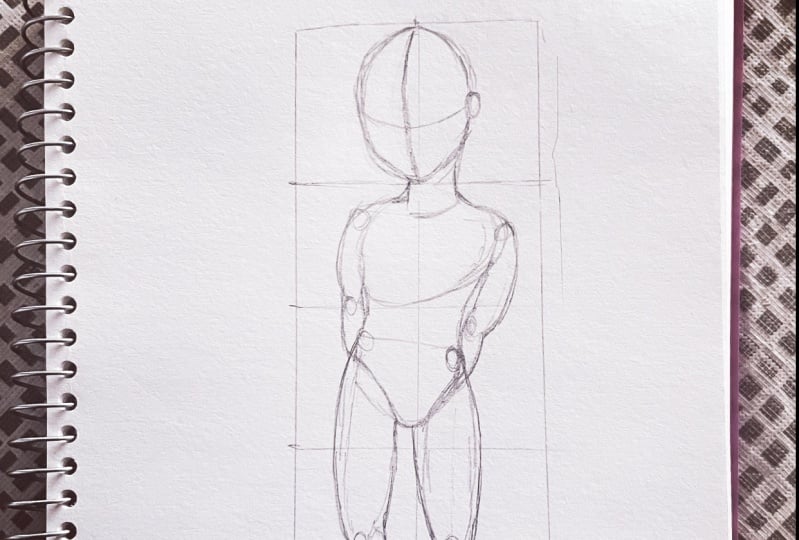
11. Bonus: Sketch 9 Human Figure: The last one is a bonus example where we touch a human
portrait briefly. This is more difficult than
the objects we just drew, and it actually deserves at least one entire class
dedicated to this topic. Let's look at this relatively simple pose and I'll briefly introduce the basics of drawing the human figure and
how to break it down. I'll also be using
different colors for the breakdown to make it easier to differentiate and understand. Don't worry if this seems
advanced because it is. And it's okay if you don't get this one 100% because I want to make another
class just for that. And this is intended to
give you a taste only. Let's get started. Let's first draw the overall
shape of this pulse, which can be simplified
with a rectangle. Also add a vertical line
at the center as a guide. This type is optional
for human figures, you can skip it in the future. This shape will contain the overall height
of this figure. Generally, human adults
have seven to eight body. Their body is seven
to eight heads tall, and toddlers and children
are five to six heads tall. You can see that a five head body applies to this figure because
it is a child. Now let's try and
break this into shape, starting with the
head, next torso, and lastly the limbs. We can define the head
shape and facial shape by using circles and curved
lines near the face. Let's also add
curved lines across the face to serve as our
guidelines for facial features. Using an oval for the ear and a cylinder
shape for the neck. Moving on to the torso. The chest area can be
represented by a big oval shape. While the lower torso looks
like an inverted triangle. We can connect the
chest and pelvis area with curved lines at the sides. Next, the limbs are all shaped like different
types of ovals. These ovals connect one
joint with another. It's important to
study human anatomy, to know the muscles and how this affects
the human figure. This can be done in
many different ways, but this is the
only basic method to represent those muscles. Okay, it's time to try
to sketch this on our own using the guidelines
we just made as usual. Add a new layer and
switch to black. Use your breakdown as a
reference on the side. First, let's mimic
the overall shape and then add the
secondary shapes. For human portraits,
it's particularly important to get each shape
as precise as possible. Our eyes can pick up on
anything that is slightly off. That's why drawing animals is harder than plants
and household items. I'll pay close attention where exactly each shape
starts and ends. Last but not least, let's
clean up our rough sketch. As usual, turn down
the opacity for the rough sketch layer and
add a new layer on top. You may want to increase
your brush size and streamline if needed. Try to be neat by using one line for each element
whenever possible.
12. Quick Reminder: When you sketch your notice, things like electronics and architecture tend to use
a lot of straight lines. Buildings, streets tend to have perspectives and
vanishing points. The site that's far away from you should
always look smaller. Organic objects like
plants, animals, humans consist of a lot
of curves and S curves. Or mirrored C
curves and mirrored S curves or combinations
of those above.
13. Project: Do you participate
in the project? All you need to do is
to upload an image in the project section of at least one sketch that
you've made along with me.
14. What's next...: I hope this class and
all the exercises we did together offered
you some clue for getting the shapes right
when you sketch based on the reference image after
finishing watching the class, you need to practice,
practice, and practice. Most importantly, you
need to compare what you do with the original image
to see what was off. After you finish, you can make changes right away With time, you'll get a better sense
of how big something should be and how far off two elements are supposed
to be from each other. If you like this class, you can also check out my
procreate watercolor class and procreate oil
painting class. They're both step by step
tutorials with a ton of free resources like
procreate brushes, color palettes, sketches,
et cetera, et cetera. You can also go to my website, Procreate Bundle.com and
find ready made stamps, coloring pages and all
kinds of procreate brushes. I'm currently working
on a few more classes, so consider subscribing
so you can get one notification when
a new class comes out. See you in the next one.
 Millie ProcreateBundle, Artist, Procreate Brush Developer