Transcripts
1. Introduction: Hi, I'm Emily. I'm an
artist from New Zealand, and I teach fun and practical drawing classes for beginners. In this class, I'm going
to share my simple process for sketching birds from
a side on viewpoint. We're going to use a
particular process to sketch a variety of different
sized and shaped birds. First, I'll share
my simple recipe for drawing any type of bird. Then we'll warm up with some
simple drawing exercises to become familiar
with the process. And then we'll draw specific birds using
photographs for inspiration. This is a quick and fun class. It's suitable for
complete beginners or for people who just want a
creative project to follow. We'll work on developing
sketching skills. So that's working quickly and swiftly to draw simple shapes and to add in just the details necessary to get a
lightness of the bird. Once you've learned the process, you might want to
take it further and work on a more finished
drawing in your own time. But for now, we'll
work on creating a collection of
simple bird sketches. I'll be working in pencil, but feel free to work in pen
or whatever media you like, and you might want to develop your sketches
with watercolor or colored pencil once we've
finished. Let's get started.
2. Materials: For materials, you're going to need a sketchbook that is big enough to fit three to
seven small drawings. You'll need an HB pencil
or a two B pencil, depending on what kind of
sketching mark that you want. So a two B pencil will give
you a much softer line. You'll need an eraser on
hand just in case and then any other media
that you want to use once we've
finished the project.
3. About The Project: The project for this class
is to create a collection of three to seven small
bird drawings on one page. You can think about
how you can bring those drawings together
in one collection. What's going to
make it cohesive? It might be the particular
style that you use, or it might be that you go through afterwards
and finish them all with a particular media like Ink Pen to tie
them all together.
4. The Recipe: In this lesson, I'm going to go over the different shapes and angles and lines that
we'll be looking at when we start drawing birds. So just sit back and observe
and take note of the types of shapes that we'll
be drawing and the process that we'll
be going through. The key to drawing
anything is being able to break it down
into simple shapes first. The two main shapes of any bird are the head and the body, and we can simplify
these by drawing ovals. I'd like to start by drawing
the oval of the head. The important thing to note here is the angle of the oval, which direction does
its long axis 0.2. Draw in this long axis, it'll help us draw the
angle of the head. For example, if a bird is
looking up or looking down. I use a long oval for the body. Again, put in the long axis to show the angle of the body. Now, obviously, this is not
the exact shape of the bird, but it's just to get something
down on the page quickly, and then we can build on it. Note how the ends
of the body and the head oval will overlap. Now, here's a key part
in our drawing recipe. It's a straight line of
the back and the tail. This is where we start
to change the shape of the body and join the tail, the body, and the head together. Sometimes the tail might be on a different
angle to the back, depending on the pose of the bird so that's something
to keep an eye out for. Now that we've got these
basic shapes and angles in, we can add the
curve of the body. Another important
aspect of the pose of the bird is the
angle of the legs, and we can simply draw these
as two straight lines. But try to get the
correct angle. If you can see the
shape of the wing, we can add that in with
either a curve or two angles. Once we've got these
bigger shapes in, then we can add smaller shapes
like the eye and the beak. Always look at how the eye
and the beak align with each other and how they align
within the oval of the head. Are they in the
center of the oval or maybe the upper right
quarter of the oval. So you can see the key
shapes are really simple. This is just made up of
ovals and straight lines. These shapes are a way to get something quickly
down on the page. Obviously, it's not our finished
drawing, but from here, we'd continue to
build up our drawing, sketch some flow lines and add surface details and
texture for the feathers. Before we move on
to a full sketch, we're going to do some practice drawing these key
shapes and lines.
5. Warm Up 1: Basic Shapes: For this warm up exercise, we're going to practice some of those components that we
saw in the last video, simple shapes and angles. Start by practicing
drawing some small ovals. Now, there are several ways
that you can draw ovals. You can use short light lines to kind of mold out
the shape of the oval. You might like to try drawing
the center axis first. The height and the
width of the oval, this can help you to get the
correct size on the page, and then again, using short sketching lines
moving around the oval. Make sure you have a curve
at each one of those points. When you're using this method, there is a tendency to
end up with a corner, so make sure you have a curve at the end of each
one of those axes. The third way you can draw ovals is using the
Hula hoop method, which is where you get a
rhythm going with your hand, slowly lower your
pencil to the page, move in whichever direction
feels most natural for you and keep that rhythm
going for a few rounds. Have another try at each
one of these techniques. Firstly, sketching
short light lines. Then drawing the axes first
and sketching around those. And then using ullpes. Now, use the same techniques, but have a go at drawing
the ovals on an angle. So imagine the
bird's head might be looking upwards or perhaps
this is the body of the bird. Okay. And then try some
different angles. You might find it helps to tune your page around
as you do these. Okay. If you can use the Hula hoop method
because it's nice and loose, but do think about which one of these methods works
best for you. How can you get the best
and most even oval. Now, simply practice
some curved lines. So these could form
the curve of the body. Move your pencil back and forth, creating an upside down rainbow shape and
change the angle. Now, let's control the curve
of these a little bit more. We could put three points
down to show the ends of the curve and the
center of the curve, and then use short light lines
to match up those points. Okay. Have a play around with these two
different techniques, rocking back and forth
to create a curve. That's a little
bit like the Hula hoop method where you're creating a rhythm and then lowering the pencil
to the paper. Or using points to map
out the curve first, which method works best for you? Next, have a go at drawing
some straight lines. These are the lines that could
form the back of the bird. See if you can do them in
one or two swift movements. Think about the hand
moving across the page. Yes. If you find that difficult and you want
a little bit more control, then use points, map out
two points where you want the line to go and then use short light lines to join
those points together. Try different angles. And you can think about
faking the line first. Get that rhythm going, try it a couple of times without
touching the paper, and then lower your
pencil to the paper, keeping the same swift movement. Have a think about
what you've done here. Is there anything that you want to practice a le bit more? If something feels really
uncomfortable and unnatural, then maybe you can find a
different way to draw it, that is more
comfortable for you. Remember, you can
turn the page around. You can work in any angle with your pencil that you want
to or any direction. Draw these shapes and lines
quickly and with fluidity. We do need to be able
to draw the angles and the shapes that we want and
at the sizes that we want. But they don't need to
have perfect edges, and they don't need to
be absolutely even. It's better to have something light and loose than something that feels forced and stiff because you've tried too
hard to get it right.
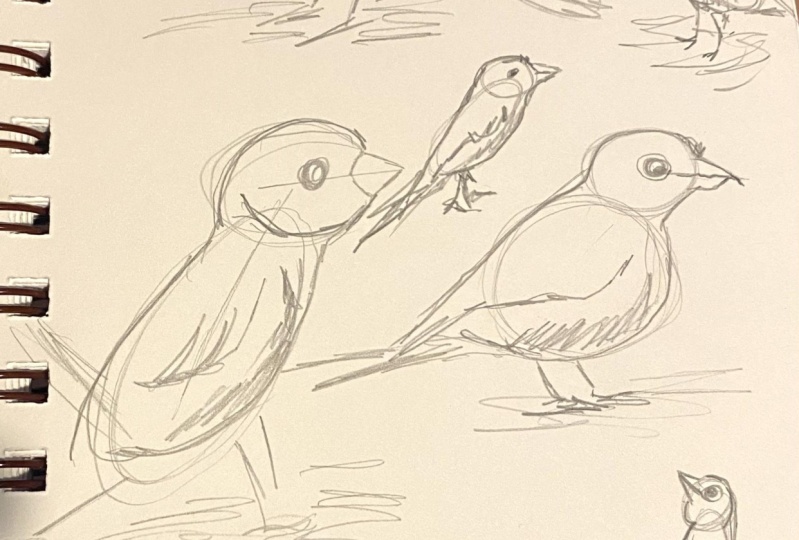
6. Warm Up 2: Quirky Birds: Now that you've
had some practice during the basic shapes, let's start to put
them together. This is just a way to
practice the process. So don't try too hard to
get a realistic result instead just have some fun
creating some bird characters. I'd like to start with the head, but you could start
with the body. We'll try both ways. Very lightly draw the oval of the head and then draw the
overlapping oval of the body. Add in the axis to
show the angle. Add a straight line for
the back in the tail. Then refine the
curve of the body. Remember that swinging upside
down rainbow movement, add the angle of the legs, and then add an eye and a beak. From here, we can
add some flow lines. Flow lines are edges that refine the shape of the bird and make it more organic
and natural. Try not to draw a dark, hard outline all the way around. Instead, use fluid curved
lines to refine the shape. We can refine the
shape of the back, the shape of the neck, and
the body and the wing. Use flow lines to curve off sharp angles and join
shapes together. Add a bit more
detail to the back. Give the legs some
thickness and draw some simple feet using just a couple of
slightly curved lines. Now, let's add some
very simple details, some lines and
textures for feathers. There might be some lines here
for the wing in the tail. And add a bit of
shading to the bottom of the body and
underneath the head. This gives a drawing a little
bit of weight in volume. Now, these drawings may end up looking a little bit cartoonish or simple and that's okay. We're not using any
photo references here. This exercise is just to
get used to the process. So let's try a few more. This time, think about
the angle of the head. Different birds will have different head shapes and their heads will be
at different angles. And also the angle can show whether the bird
is looking up or down. If you find it hard to draw
the ovals on an angle, you can always put that angle in first and then add
the oval over top. So think about the angle of the head that
you want to have. Then add on a body. Add the straight line for
the back and the tail, add the curve of the body. Then the angle of the two legs. Sometimes the legs will be
at quite a sharp angle. Sometimes they will
be more upright. Sometimes they will be further
back towards the tail. Then add the wing. Add
an eye and a beak. And then once we've got these simple shapes
and angles down, we can add some flow lines joining the different
parts together, the head to the body and
the body to the tail. And we can start to add a few extra details in
the bottom of the feet. And some lines for feathers. Put in a little bit of
shading under the body, and you can also put some
under the feet as well if you imagine that the bird is
casting a shadow on the ground. You see these two birds
are very similar, but I have a different
angle for the head, so they have a kind
of a different pose or a different
character about them. The legs are also at
a different angle. For this next one, try drawing
a different shaped body, like maybe a wider oval. You could draw the body in the head ovals first or you
might find it useful to draw the axis of each and
then put the ovals in. Add a straight line for the
back and maybe this time, put the tail at a
different angle. Add the curve for the body, angles for the legs. For this one, I've
drawn the wing as two straight lines
rather than a curve. And once you've added in
the eye and the beak, we can sketch some loose curved flow lines
around those shapes. Think about faking any lines first if you're not
sure about them. See what that fluid line
feels like before you put your pencil to the paper and keep it light if
you're not sure as well. Add your details. And a
little bit of shading. This one looks like
it's rolling its eyes. Or maybe it's just looking upwards at those
other two goods. Different birds will have
fatter or skinnier ovals and different sized ovals
so that the head and the body will be different sizes in comparison to each other. So try some different birds, just experimenting with the size of the body and the
size of the head. Draw quickly and loosely. And these drawings
can be silly looking. Don't worry about
them being realistic or even any particular
kind of bird, although you might start to
see some characteristics of certain birds coming through and you can definitely go with
those if you want to. But just experiment
and have fun. You'll notice I haven't
used an eraser at all yet, and the key here is to start off drawing those
shapes really light. They're just the framework
for your drawing, and then you can draw a bit
darker over top once you're happy with those main
shapes and angles. And even when you add
in your flow lines, keep it loose, keep it light. We want to be able to adjust these drawings as we go and
not have to rub them out. This one, I'm making a little
bit smaller and squatter. So both the head and the
body oval are quite round. This is maybe something
like a little robin or we have a wax eye here in New Zealand,
like a little finch. So maybe you can think
about some of the types of birds you have around you and just the general
shapes that they have. Again, don't try and
make these realistic, but thinking about birds
can give you some ideas for the shape of the head
and the shape of the body. Don't forget to add a
little bit of shading. And we're putting the shading on the underside of those shapes, the shape of the body and the shape of the
head because we're imagining that the light
is coming from the sun, so it's coming from
above the bird, and so underneath the bird
is where the shadow will be. This one, I'm going
to try drawing a bird with its heading downwards. Where you place the legs will make a big difference in
the pose of the bird. So if the head is
tilting forward, maybe the legs are on
a bit more of an angle just to kind of counterbalance that weight of the
bird leaning forward. Remember, you can
turn your sketchbook around as you need to. I'm keeping mind straight so
you can see what I'm doing. But when you're drawing
these angles and lines in different directions, it might help to shift your sketchbook
around a little bit. So I have used my eraser
for the first time here. I'm just playing around with a different shape
and seeing how I can fit that angle of the back to these
ovals that I've drawn. This bird looks a little bit
sneakier than the others, or maybe he's hunched
over from the cold. You can see I'm just drawing
over top of other birds. I'm not worrying about each
drawing having its own space, if it overlaps another
bird, that's okay. This is just an exercise. As your drawing
become a little bit looser and more relaxed as
you go through this exercise. If you're finding that
you're getting more tense and your hand
is stiffening up, maybe you're thinking
a little bit too much about trying to make
your drawings look good. See if you can forget about how good the outcome is
and just play around with these shapes
and keep the hand moving nice and lightly
across the page. This one, I'm trying
to draw a bird that is looking upwards. So I've got the body angled upwards and the head
angled upwards, and I've got those legs
on quite a strong angle. So maybe this is, you know, just a young bird that's
looking up to its parent. Generally, the legs start a lot further back in the
body than you might think. It's not like people where they are directly in the
center of the body. They're a little bit further back and they're on an angle. Now, I'm trying a bird
that is very different. I'm making the head bigger than the body just
to see what happens. Maybe this one will be a
little bit more cartoonish. So start with the
ovals, put in the axes, that straight line
down the back, curve of the body,
the wing, the legs. If it helps, you might want
to write these down in order, so you can follow the process. But once you've got
those main circles or ovals down and you've put in the straight
line of the back, you can play around with
the order in which you put everything else down if
it suits you better. For this one, both of
these shapes are very round and the body is much
bigger than the head. Put in the circle shapes
that line down the back. I find that line down the back is important to get in fairly early because that does help determine the
pose of the bird, whether they are upright
or leaning forward. I hope you've enjoyed having
a bit of a play around. Remember that process. We draw the oval of the head and the body first
and put the axes. Once you've got the
ovals and the axes, then we put that line down
the back in the tail. Add the curve of the body, draw the angle of the
legs and the wing, and then once you've got
those shapes and angles down, and then you can
put in the details, the eyes, the beak, start to add some flow lines around that map that
you've created. And then at the end, we add a
bit of texture and shading. This is a very
simple process for sketching birds
quickly and loosely. If you decide later that you want to take some
drawings further, just make sure you do
all of this process really lightly and then you can build up and refine
over top with your pencils or with
other media. Okay.
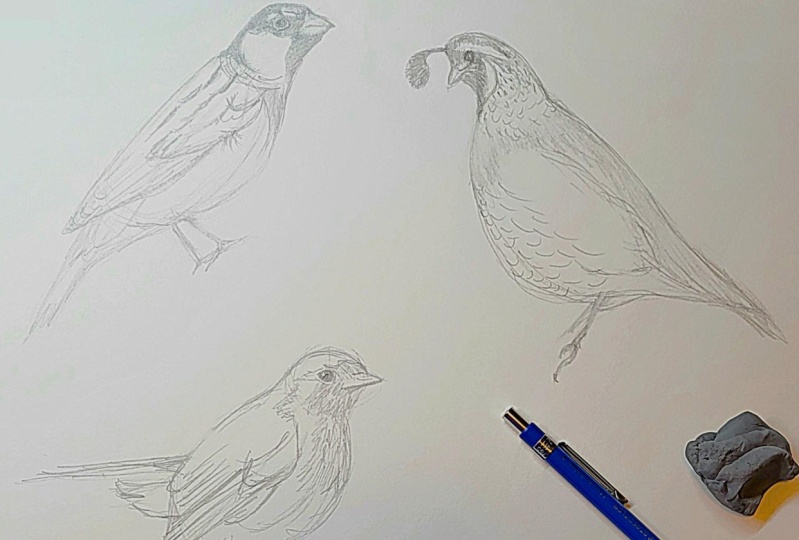
7. Sketch 1: Sparrow: Okay, now it's time to put these sketching skills that we've been practicing into use. We'll look at three
different birds and use photographs and have a go at sketching them using
the same process that we've just been practicing. So I suggest placing the
three birds on one page, and you might want to
just lightly sketch in a circle for where
each one will go. There will be a couple
of extra photographs at the end of the class if you
want to practice on your own, and maybe you can fit these
ones on the same page, too. Our goal is to get
a result that is identifiable as a
particular bird. But don't get caught up in the details or in trying to
make your drawing perfect. Drawing loosely and
quickly might seem well, maybe a little bit lazy, but it's actually a really
useful skill to develop, particularly if you want
to draw from real life or even just for testing out a
subject or a composition. Let's take a look again
at the shapes and angles of the sparrow that
we looked at earlier. But this time, we're
going to draw them. Look at the angle of the oval of the head and draw this in. And then look at the angle and the oval of the body and see if you can assess the
size relationship between the head and the body. So you could look at the
two ovals and say, well, the head is about a
quarter of the size of the body or whatever
makes sense to you. Think about the angle of
the head and the body. Do you need to make
any adjustments? Then we can add that
angle of the back, and it's a line that
goes straight down from the head to the
end of the tail. Now look with fresh eyes at the curve of the body
and add this in. Sketch and where the
wing is going to go. I'm just using two
straight lines to show the curve of the wing. And put in the
angle of the legs. Then have a look at
where the eye is placed in that top oval and
where the beak is placed. You can see the eye is not right in the center
of the head oval, but it's slightly up and
slightly to the right. It's in the top right quarter and the beak is in
line with the eye. We've got the basic
shapes and angles down? Now we're going to make this look a little bit more natural? Look at the edge of the sparrow and the way the
head joins onto the body? So the way the front of the head or maybe the neck joins
onto the curve of the body, and then the way the
back of the head joins onto that straight
line of the body. Are there any extra angles
that you need to add in there? Then how does the body
connect to the tail? Add some thickness for the legs. Then look at the
angle of the feet. I'm really just putting in
a couple of lines here. I'm not drawing every single
claw or toe of the bird. We're looking for things
that show the pose and the characteristics of this bird rather than tiny little details. Add some shading to the
lower part of the body. And I've got a tissue here. I'm just giving it
a little bit of a smudge to flatten out
some of that shading. If your initial axis
lines are quite dark, go ahead and erase them now. And now I'm looking at some of the patterns that I
can see on the birds. So we didn't do this in
our practice exercise because we weren't
drawing specific birds. But now we need to
look for some of those things that make this
bird look like a sparrow, and the patterns of the
feathers are quite important. So we've got this dark area. There's a little white
area above the eye. So I'm drawing
around any patterns that I can see around the
top of the head there. And then the patterns, I can see in the feathers on the wing. If I see anything dark, I can put that in quickly to show where the
dark parts are. So I'm just pushing a little
bit harder with my pencil. And it's important
that at some stage, you do add some darker values, even if it's just in
those patterns and maybe in the legs
where there would be a bit more shadow
because that's going to give you drawing a bit
more volume and depth. I'm just blocking out the wing here to make it a
little bit darker. Again, if you want to
give it a quick smudge, you can do that. Then
look at your drawing. Look at the photo.
Is there anything that you need to refine? Anything that just looks
way out that you can adjust or maybe something that something in the character of the bird that you've missed? Think about the
shape of the beak. The angle of the
back and the tail, the angle of the legs,
placement of the eye. These are all important things. I'm putting in a little bit of that surface that he's
standing on as well. So it's a really quick, loose sketch of a sparrow, just trying to get the likeness and the character of that bird.
8. Sketch 2: Quail: Next, we're going to move on to quite a different bird and a bird with a lot of character, and that is the quail. So think about where you want
to put this on your page. It is a bigger bird
than the sparrow, so you may want to
make it bigger, but it doesn't really matter if your drawing is smaller
than the sparrow. Let's have a look at
the angle of the head. Draw the oval of the head. And then have a look
at the angle of the body and also the size of the body compared
to the head. So it does have
quite a long body, and it's quite upright. Take your time at this stage, adjusting the shapes and
angles as you need to. From here, draw in the
angle of the back, and it may make sense to
create two angles here. The head is quite upright, so the back of the head
has its own angle there. Keep looking at
the photograph to see what angle or what shape
you should be drawing. When I draw in this
curve of the body, I'm bringing it out and around a little bit more
than my original oval. It's quite bottom heavy. Draw the angles that show
the shape of the wing. Okay. And really importantly
the angles of the legs. Look at where the eye sits
within the oval of the head. It's very close to the front, and then where the beak
lines up with the eye. The sparrow, the beak is
straight across from the eye. In this photograph, the beak is pointing slightly
downwards from the eye. It's time to add in
some flow lines. But first, I'm going
to get in some of these really strong
angles around the head. Rather than trying to
draw them as curves, angles will help us get
the correct character. Okay. Once you've got those angles, and you can soften them
off with some flow lines. See, I'm never drawing
one single line, but more a series of joined lines to keep things nice and loose
and adjustable. So I can change it as I go. Now, we can start to add a little bit more detail
around the eye and the beak and putting in some of those patterns
of the feathers. And of course, we've
got this funny, fluffy thing sticking
out the front of his head gives quo
its character. The legs are quite
a bit than sparrow. And I'm putting in a
couple of toes there just to show that it's gripping
around something. All of my lines are broken. There's never any
hard, solid outlines. And that's a skill that takes a little bit of
getting used to it. Just keeping your hand
moving across the page, letting it flow across the page. So this is a really good class to help you loosen up a
little bit with your drawing. Put on some of those dark
patterns on the head. Can you see the shapes of dark feathers and the
shapes of light feathers. Add in the dark part of the eye, but leave a little bit of
white for the highlight. And then we can use
different sorts of textures to show
the different types of feathers on the body. Think about the direction
the feathers are moving in and what kind of simple
pattern can you see? Add in a bit of shading to
the lower part of the body. In building this up with a
few layers because then I can use an eraser to bring out that pattern of white
feathers on the body. Don't worry if you don't have
one of these Tombomozeros, you can just use an ordinary
eraser Ue the point of it, or if you've got a party eraser, mold that into a point. Let's put a bit of shadow under the bird on the surface
that it's standing on. Again, to show a bit
of weight depth. We could add a touch more detail for the feathers
around the neck. And I've just broken up that line along the
back a little bit. It's quite heavy, and
I want the shadow to feel more like it's on
the other side of the bird, the lower side of the bird rather than the
back of the bird. And even your lines, if you've got heavy
lines or light lines, dark lines or light lines, they will create a
sense of shadow. I just notice there's
a bit of shadow on the bottom half of the
beak of the quail, so I'm adding a little
bit to the bottom half of the sparrow as well. These legs have a bit
of a pattern on them, kind of like little dots. And I'm just going to increase the shading down
here a little bit. So down the bottom here,
I'm using dark alliance because those legs
are in shadow. And in fact, everything on the shadow side could
be darkened a bit more. Have a look at the photograph and then have a look
at your drawing. Again, is there anything about that character
of the bird, the shape or the angle, the angle of the legs, angle
of the body or the head, or anything about the
patterns on that bird that really stand out to you that
are missing in your drawing. Keeping in mind that
this is a quick sketch. We just need the key elements
of the bird's character.
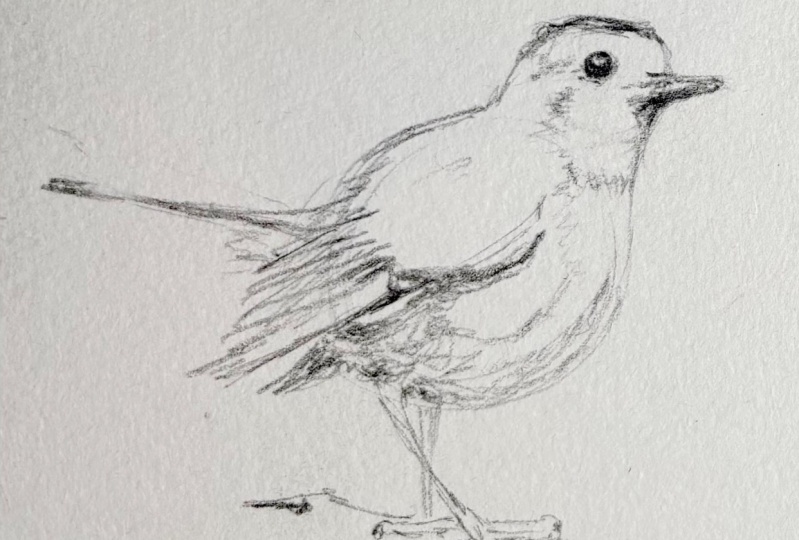
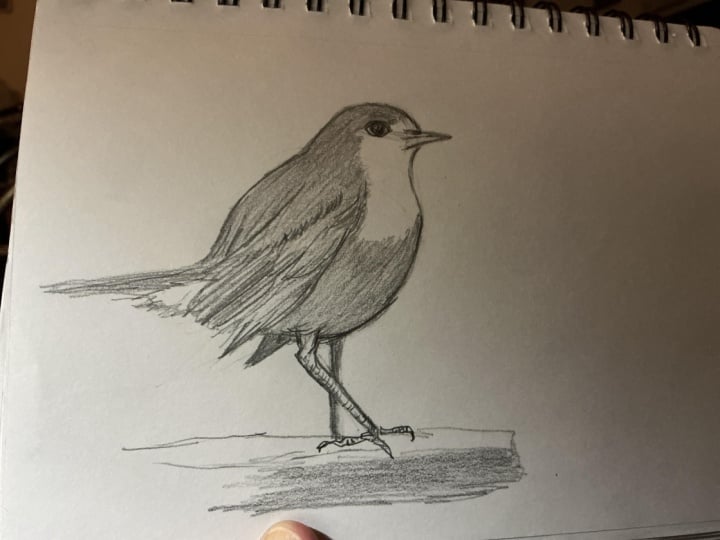
9. Sketch 3: Robin: For this third bird, we're
going to draw a robin. Have a look at the oval of
the head and the angle, which way is the bird facing? Looking pretty much
straight ahead. And then add the angle of the body and the
oval of the body. So both the oval of the head and the body in this bird
are quite round. It's quite a squat,
fat little bird, and we need to make sure our initial basic
shapes reflect this. Look at where the head
sits on top of the body. When you're happy with
those two shapes together, then we can add in the
angle of the back, and the angle of the tail, which is quite different this time to the angle of the back. Have a look at the curve
of the front of the body. How does it differ from the
oval that you'd put down? And then put in the
general shape of the wing using straight
lines wherever you can. We're simplifying everything
as we go in this stage. Have a look at the
angle of the legs, and also, where do the
legs attach to the body. They attach where that
curve of the body starts to become
more horizontal. And then find the position of the eye in the
oval of the head, it's almost in the center, and then the beak is
in line with the eye. Now, we've got the
simple shapes down, we need to capture the
likeness of the robin. So, have a look at that angle
underneath the beak that goes across the
neck and then look at the angles around
the top of the head. It's not a completely
even curve. So if we put those
angles in first, then we capture the likeness, and then we can start
to round them off with flow lines when we're
happy with those angles. There's angles around the
front of the body as well. Especially at the belly
is quite a straight angle there and also at the base of the body
where it meets the wing. Let's add some
thickness to the legs and add some simple
lines for toes. Try not to go too dark too soon, so you can see the two levels of darkness I've used there very
light for my first shapes. I'm getting a little
bit darker as I put in these angles
in these flow lines. Add some shapes for
the tail feathers. And then lightly sketch in the shape of
color on the body. So what is the shape
of that patch of red? And what shapes can
you see on the wing? I'm using my eraser
quite a bit here. I'm really trying to get
those angles, correct. After the shape of
the head in the body, it's the angles that are really important to capturing
the likeness of the bird. We can add in a
bit of texture for the feathers on
the wing and then add in some shading, again, mostly towards the bottom of
the body and under the wing, on the legs, anywhere
where there would be some shadow cast
by the bird itself. A bit of shadow on
the ground or on this rock. Have a
look at that eye. It's not completely round. It's kind of got like a bit of a straight eyebrow
across the top, which gives the bird
some character. And there's a little bit of a lighter ring around the eye. Now that I've noticed
that, I'm also noticing that it might be
in this cuail as well. The bottom half of the
beak is a little bit. It's got a bit of
shadow underneath it. And now add in some
feather patterns, following the direction of the feathers as they come around the head as they come down the body around the
bottom of the body. And don't forget those fluffy
feathers right at the back. Now we can start to add
in some darker lines. Once we've got everything down, we're happy with everything. We need to bring a little bit
of contrast to the drawing. So I'm adding some darker
lines around the legs, and just on the underside
of those wings. Just a few corrections here
to the angles of the legs should have done
that before I put those dark lines in,
but it's not too late. In this one, I'm putting
a little bit more detail in the foot and in those toes. You can see all three layers of my drawing in that sketch, those initial shapes and angles, the flow lines, and then the textures in
the darker values. But because I've kept the shapes at the start really light
and then built them up, it all kind of comes together as a really nice, loose sketch. Okay.
10. Improving Contrast: If you've got a darker
pencil like a three B, four b, five or six B, go through and add just
a touch more contrast, darkening up your darkest areas. Of course, we want to be
happy with those areas, make sure everything is
in the place that we want it before we go in and
put in these darker values. I'll also add another quick
layer of shading to enhance the shadow side of the bird if I feel like it's
not strong enough. You see the difference
that makes, just adding in that touch
of black here and there and into parts of the legs as well where there'd be a
little bit of shadow cast. I hope you enjoyed
sketching these birds with, but don't worry if they turned out looking a little
bit different from the photographs because this is just the first go at them. And if you have a
second go at them, I can promise you you will have learned a lot
from that first go. You'll sort of know
what needs to change. Maybe you made the head too
big or the head too small, and that'll come right
in the second go. So definitely have
another go if you feel like you haven't quite got
there with this first try. Sketching loosely and
quickly is almost counterintuitive to the way you learn when you're
first starting to draw. We want to be sure of
where the lines going, and we want to have control. And when you loosen
up a little bit, sometimes you lose a
bit of that control, but you gain a lot of energy, and you also gain coordination. The more you do it,
the better you're going to get at doing it. The drawing recipe
that we've used works for drawing birds from
a side on perspective. But with practice,
you could also adapt these shapes to draw birds
from different angles from the front or the back
using the same process of starting with simple shapes and then quickly building up detail.
11. Next Steps: From here, you could
take these drawings further if you want to ink them or color them
with other media. I've also included two
extra photos that you might want to have a go at
practicing with on your own. Can you follow
that same process, work at your own speed and build up those drawings
from simple shapes, keeping everything quick
and loose and fresh. You might even be able to
fit them on the same page. Thanks very much for
joining me for this class. I'd love to see
your work. You can post it in the project
section of Skillshare, and I'll give you
some feedback. I
 Emily Armstrong, The Pencil Room Online