Transcripts
1. Intro: Hello, and welcome to the
sweet strawberries class. In this class,
we're going to use relaxing painting
techniques to get loose, de stress, and have a little bit of fun in our sketchbooks. If that sounds like something
you could use, come on in. Hi. I'm Jenny Maclyn, the artist behind
Tiny Leaf Press and the creator of the
sketchbook snack series. Created the sketchbook Snack
series because I know how it's all too easy to get stuck
in our creative practice. Maybe you're burnt
out, overwhelmed or you just don't have a lot
of time for your creativity. Sketchbook snacks are
designed to be light, easy, and fun to do. No longtime commitments, pressure to create
a masterpiece, or complicated techniques here. Just creative play and
a smidge of siliness. In this class, we'll be creating a relaxing faux pattern of
sweet summer strawberries. First, we'll talk
about materials, the ones that I'm going
to be using and how you can substitute from
whatever you have on hand. Then we're going
to jump right into our final project where
I'll walk you step by step through my
process for painting a soothing spread of
sweet strawberries. Do you want to relax,
destress or just have a nice chill painting session in your sketchbook?
Join me in class.
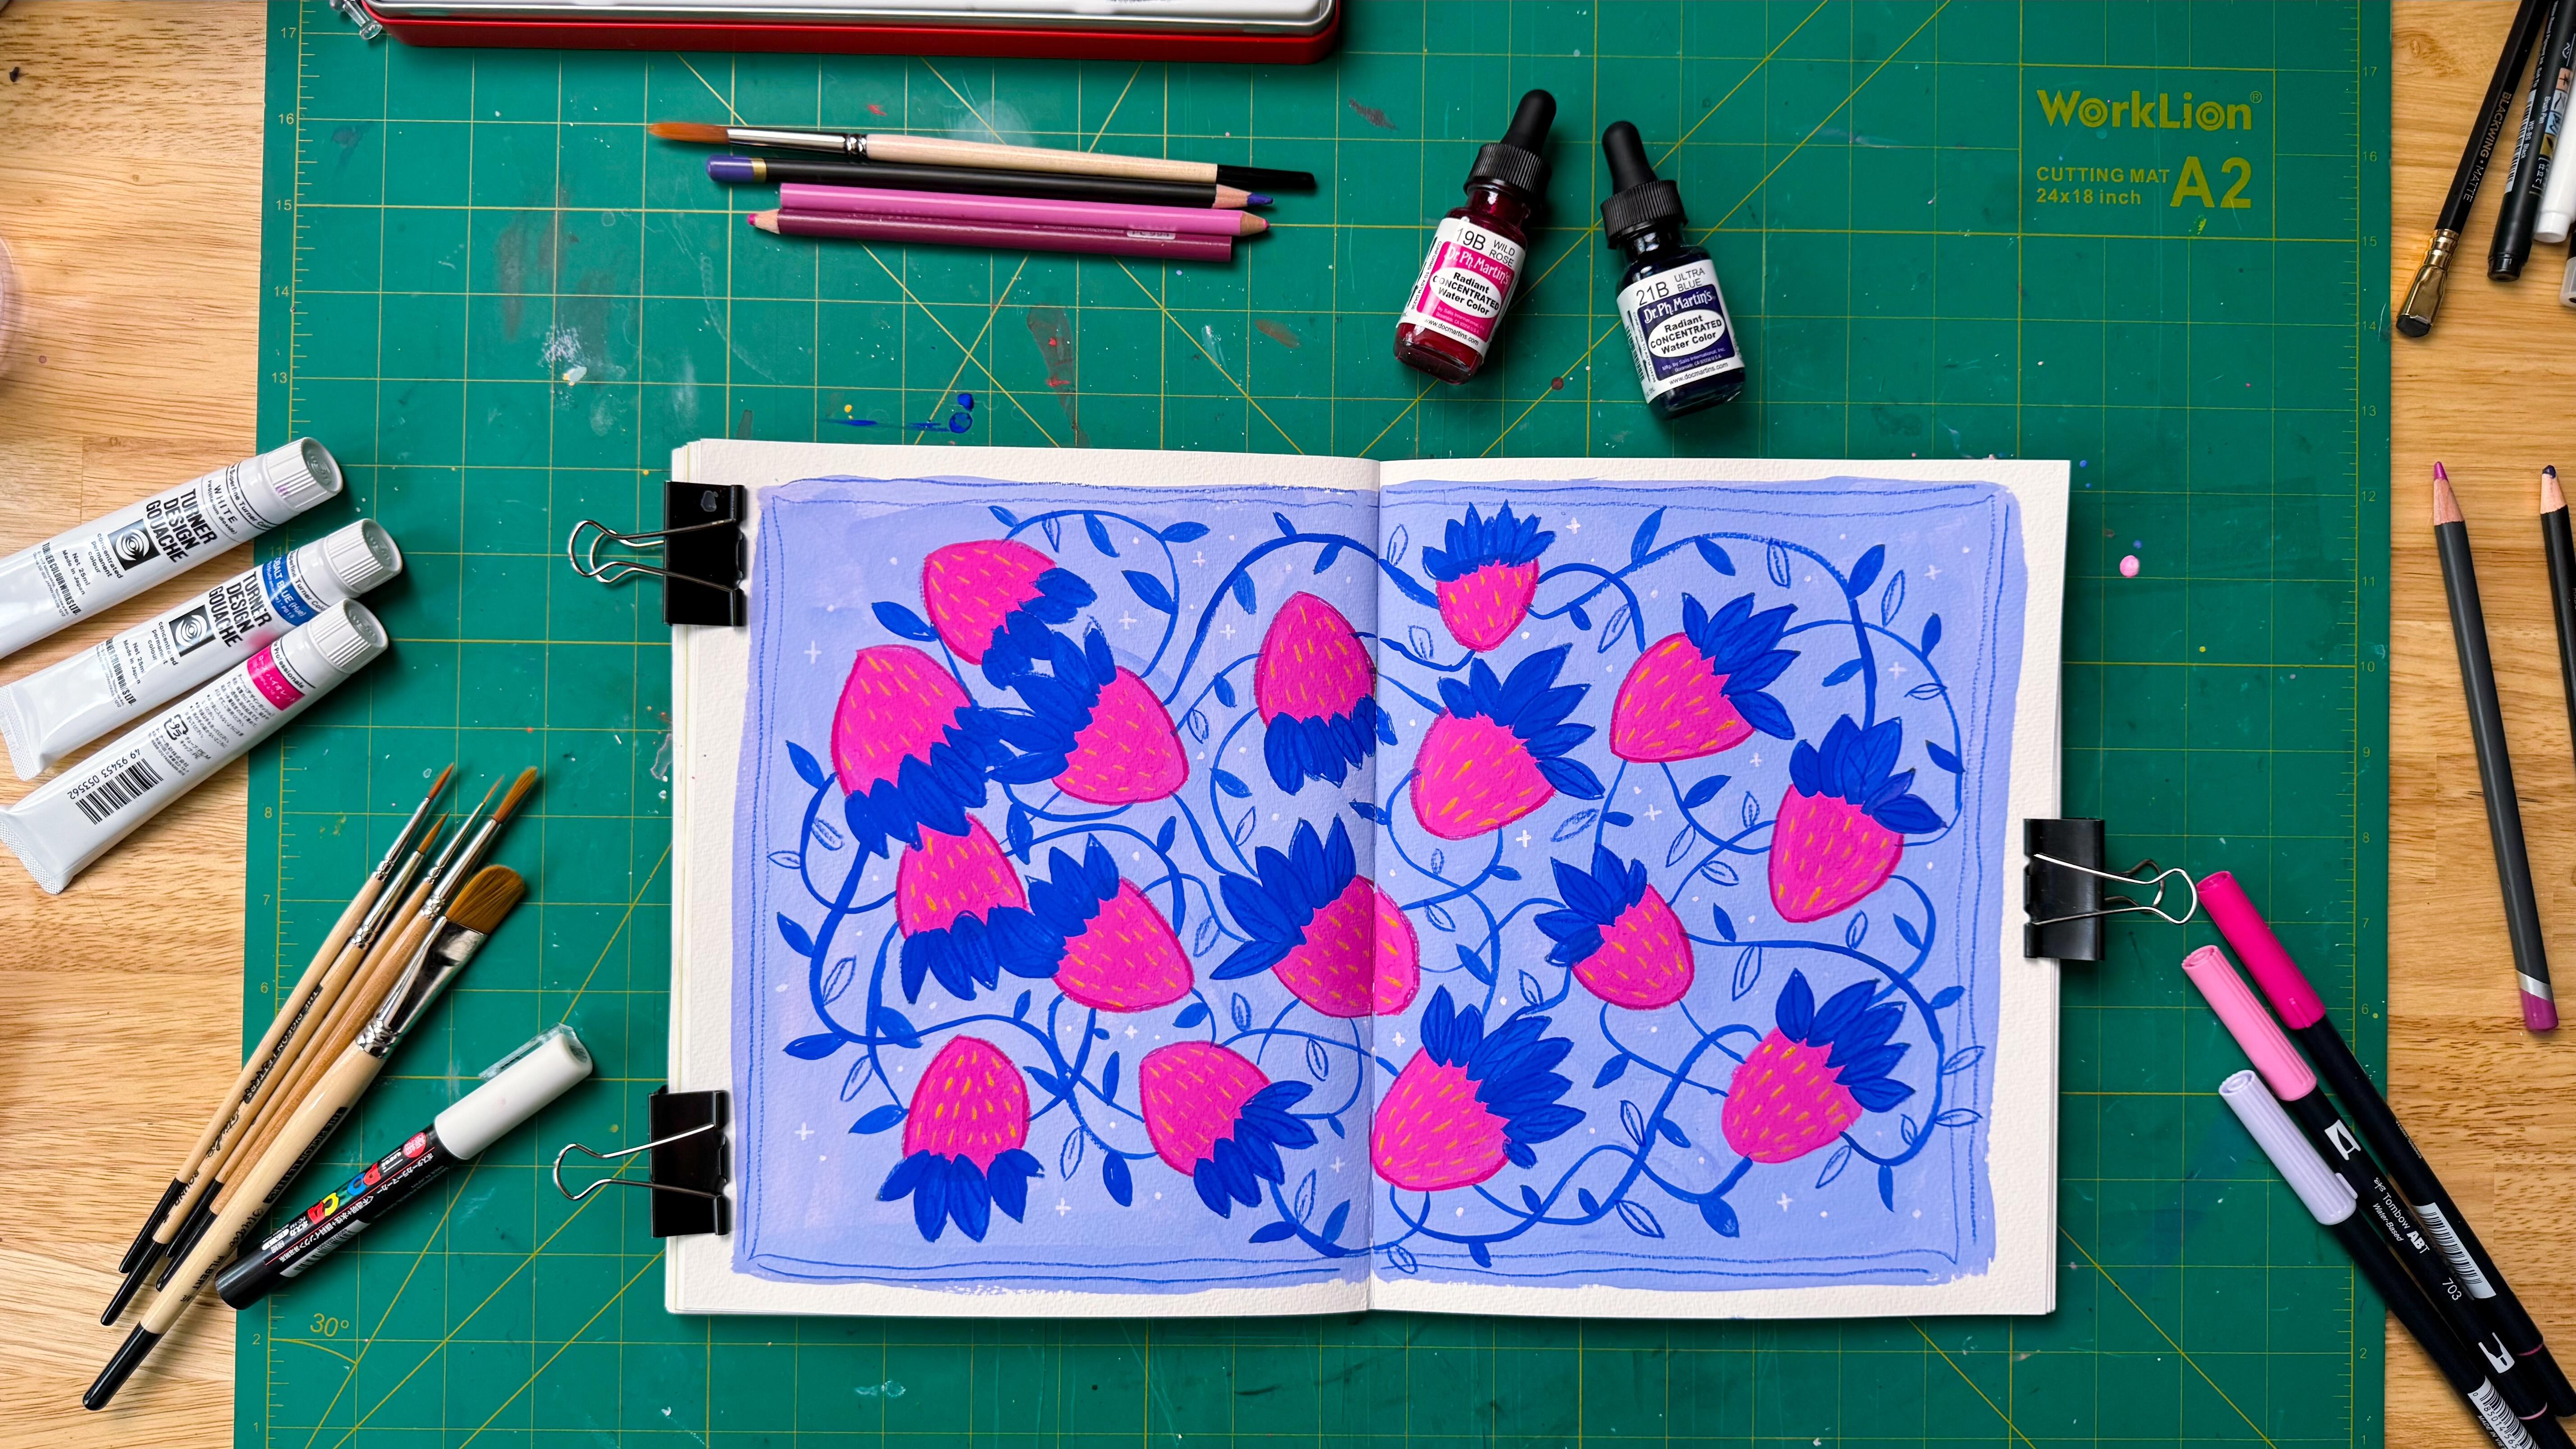
2. Materials Needed: In this lesson, we're
going to go over all of the materials that I used
for the final project. Just a quick note that
all materials and colors can be substituted
for what you have available. There's no need
to go out and buy new supplies unless you
want to, of course. For example, I'll be using traditional non acrylic
gouache for my painting. But if you don't
have any of that, you could use acrylic
wash. You could use acrylic paint or
even watercolor. You could even use markers, colored pencils, or crayons. The idea is just to create this fox pattern and have a little bit of relaxing
time in our sketchbook. So if you don't have
my exact materials or even anything like them, just follow along with
whatever you have on hand, and you'll
still have a great time. Hey, so first up, I have the different types of guash that I used for this project. I used a little bit of paint
from my CarendashGuah set, which is paint pans
full of guash. It's the dried kind,
not the tube kind. And then for my main colors for the strawberries and leaves, I'm using Turner Guash in
rose violet and cobalt blue. I also use these paint brushes
by the pigeon letters. I really love these brushes. You'll see me using
them in a lot of my classes because
they're my go tos. I'll link those below so
you can check them out. Any paintbrush is going
to do for this, okay? And then next, I used three different colors of
prism colored pencils. Any colors or brand of colored pencil is
going to be fine. You could also use
pen if you'd prefer a black line over
a colored line. I also used a white
pasca pen for a little bit of details,
and then lastly, the sketchbook that I'm using is this Strathmore soft
cover watercolor journal. This is one of my
favorite sketchbooks to use for wet media. It holds it really well, and it has a very nice
texture on the page. You can use any sketchbook
or loose leaf paper that you want for this project, make sure that it can hold up
to paint and wet material. Alright, so that's
everything that we're going to need
for the project. Go ahead and gather
your supplies if you don't already
have them because we're going to jump right into the next lesson where we're
starting our final project.
3. Final Project: Intro and Sketches: Alright, it's time to
start our final project. We're going to break
this final project down into four parts. First, we're going
to lightly sketch our motifs on the page
just so we can spread our strawberries
around the page nicely and not accidentally
run out of room. Then, using the
sketch as a guide, we're going to paint
in our background. Next, we'll add in our motifs. In this case, the strawberries,
leaves, and vines. And finally, we'll add some finishing touches and
details. Ready to start? Alright, the first thing that
we're going to do is draw the quick sketch of
our strawberry motifs. And I'm just drawing, like, very simple outline of the strawberries here
and placing them, you know, sort of random
spots around the sketchbook, but I'm really just trying
to get a little bit of space in between each motif, keeping in mind that we're
going to want to put some secondary motifs like leaves and vines in
here later as well. So I'll just go ahead and fill in my double page spread with these strawberry sketches
and try to space them out as evenly as I can so
that it will look nice at the end once everything
is all painted. I will see you in the next video where we're
going to start painting in our background using
this sketch that we're creating now as our guideline. Alright, I'll see you there.
4. Final Project: Painting the Background: Alright. Now that we have
our sketches on the page, we're going to mix up a
little bit of our paint. Whatever color you
want to use for your background color is what
you're going to want here. And because we are covering
the entire background, essentially minus these spots where the strawberries
are going to go, make sure that you mix up enough paint so that you
can cover that whole area. Otherwise, you may have some color
inconsistencies if you run out and have to
start a new mix. You're not mixing
your own color, of course, you don't have
to worry about this. So if you're just using
something straight out of the tube or
straight out of the pan. For my background,
I'm going with this light blue, almost
periwinkle color. So it does have a little bit of pink in there that's giving
it a purple undertone, but it is essentially
just light blue. So I've mixed my colors with a little bit
of white gouache and some water in order to get a painting
consistency that I like. So I'm going to go ahead and painting the
entire background. I like how it has these, like, streaky spots where you can see where the
paint brush has been, but I do want to
have full coverage. So if it's anywhere
where it's very thin or light or the
brush is super dry, you'll see me going over that. I'm going to speed this up so you don't have to watch
the whole thing in real time. And then it will be your turn. And while you're waiting
for your paint to dry, why don't you come back and
meet me in the next lesson where we're going
to start painting our strawberry motifs.
I'll see you there.
5. Final Project: Painting the Motifs: We are ready to begin
painting in our motifs. So the first thing that
we're gonna want to do is pick a color for
our strawberries. I'll be using this hot pink mix, which is just a mixture of the Turner designer guash that I mentioned with a little bit
of white gouache mixed in. Free to use any
color that you want or even to use a couple
of different colors, maybe an analogous color
scheme for your strawberries. I'll be using the same
color for all of them, but don't let that stop you if you want to try out some
multi colored strawberries. So go ahead and get your
strawberry paint and fill in the base layer of all our strawberries where we have these gaps in the paint. And then I'm going to go
ahead and speed this up just to show you how I did it, and then I'll meet you back here in a second
for the next step. Alright, we are
just about wrapping up the first layer
of our strawberries. And if you're using
paint like me, you might need a
little bit of time for your paint to dry before
going on to the next step. So pause here if you need to and come back when your paint
is dry for the next step. H Okay, now that the paint
for our strawberries is dry, it's time to add some
strawberry tops. I'll be using this
ultramarine blue for my strawberry tops, as well as for the vines that I'll be adding just
in a minute here. But go ahead and grab
your paint color that you want to use
for this and join me in adding in these
nice leafy extras. So I'm going to speed
up once again so you don't have to watch each
individual leaf being painted, and I will meet you back
here in just a second, and then we'll add
in those vines. Okay, we are all done
with our strawberry tops, and now we're going to
go ahead and add in some more background
interest by drawing some vines that
are looping around and connecting all of the
different motifs to each other. The way that I did
this was I just sort of chose a path throughout the different motifs and painted a thin line
with my paintbrush. We'll be adding a little
bit more leaves and details to these vines
in a later step. But just go ahead and
get that base line down for your background. Real quick, before we
continue on with our vines, we're just going to add
a little bit of detail to our strawberries and
paint in those seeds. Now that the paint is
fully dry and we want to give the leafy details a little bit of time
to dry as well. I'm using a bright
yellow for the seeds, which is a little bit
hard to see on camera, but it does show up quite
nicely in real life. You could also use
white or light pink if you're following the
same color scheme as me for something that's gonna show
up just a little bit more and have a little
bit more contrast than this yellow
that I've chosen. So while we're waiting
for those leaves to dry, we'll go ahead and add
these little seeds in, and then as soon
as that is done, we'll jump back over to our vines and finish those
up. I'll see you there. Alright, it's time to finish
up our leafy elements. So we're going to
switch back over to the ultramarine blue that
we used for our vines, and we're just going
to start adding in these very simple
teardrop shaped leaves and adding them
wherever it feels like there's a little bit
too much white space. We're going to add in even more leafy details
in our final lesson. For now, we just
want to add these in where it's feeling a little empty and we want something that ties that background
really together. I'll speed this up once again, and then I will meet you in the next lesson
where we're going to add in all those delicious
finishing touches to our fox pattern.
I'll see you there.
6. Final Project: Finishing Touches and Flourishes: It's time for the
finishing touches. In this lesson, we're going
to add those little bits of extra detail and just really add a little bit of flourish and sparkle
to our piece. The first thing
that we're going to be doing is going over the motifs with a colored pencil in a slightly darker color. So I'm just doing this
to add a little bit of an outline to each of
the motifs to make them pop off the page
a little bit more and add a little bit
of extra sharpness. If you prefer to
do your outlining in black or another color, go ahead and do that here. It's whatever your
personal preference is. And then I'm going
to speed this up. I'm gonna switch color
pencils in a second. So no difference there, just the color change
when I go to the leaves, but I'm gonna speed this
up so you don't have to watch that whole
thing in real time, and I'll see you in just a
second for the next step. Okay, remember how I mentioned
earlier that we would be adding more leafy
elements to our vines. Well, we're going to go
ahead and do that now with the colored pencil. And I'm going to copy that
similar simple shape. But instead of doing a full
leaf filled with color, I'm just going to
do the outline with a simple line down
the center like this. Just adds a little bit of
differentiation between the solid painted leaves that we have and adds a little
bit more visual interest. Feel free to add any
other leafy flourishes at this stage if you'd like. You could try adding
maybe little flowers with your colored pencil or some
larger leafy elements. Set your imagination
free here and draw whatever additional leafy
elements that you'd like. I will see you in just a second
where we're going to add the very final touches in a little bit of
sparkle to our piece. I have switched over
to a white paska pen, and I'm going to be adding
just little bits of sparkles and dots
all around the page, wherever there's a little
bit of white space that I think needs a little
bit of extra something. This step is totally optional if you like
your piece as is. I just always like to
add that little bit of extra magic to my pieces, and I think it really
ties everything together. And makes it just a
little bit more special. And after we finish that, that is it for our final
project. You did it. You completed your
relaxing faux pattern, and you should be so proud
of yourself for taking the time in your day for a
little bit of creative play. So I will see you in the final
lesson in just a second, and we'll talk about next
steps. See you there.
7. Next Steps: You did it. Congrats on
completing the class, and congrats on taking some time for yourself in
your creative practice. It's not always easy to do, so you should be really
proud of yourself for taking a little bit of time just to play in your sketchbook
and have some fun. Now, one of the beautiful
things about this type of project is that it's always there for you when you need it. You can repeat the exercise anytime you're feeling stuck in your sketchbook or you just want a relaxing
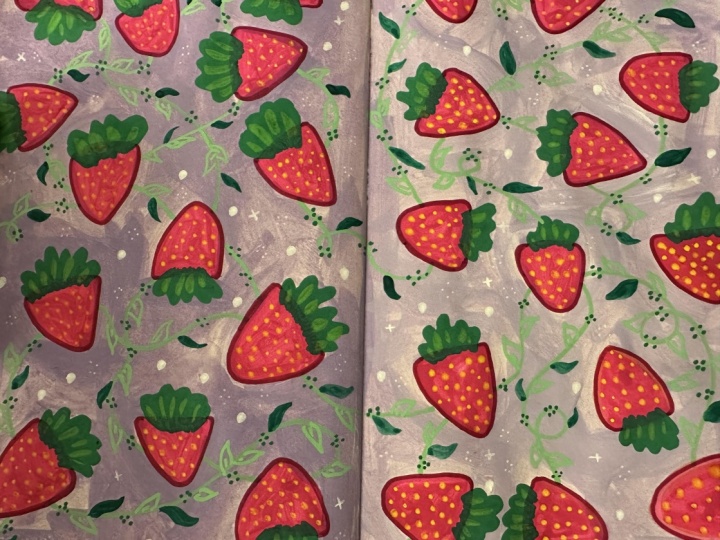
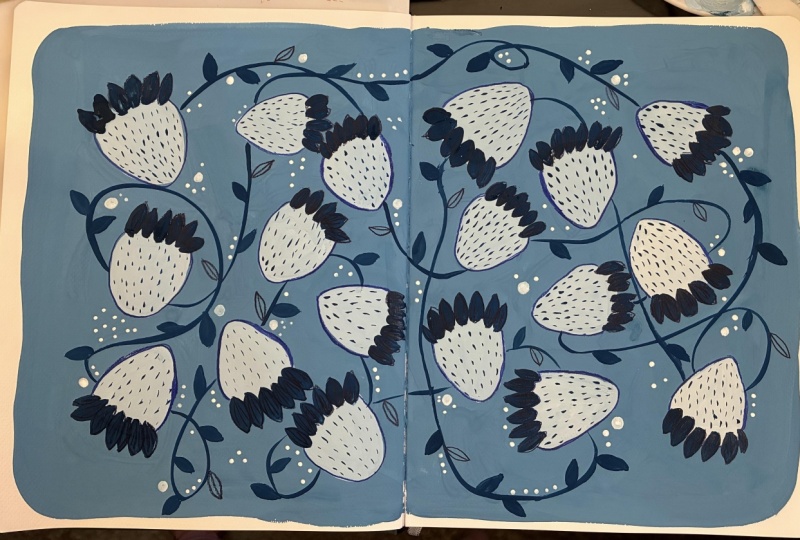
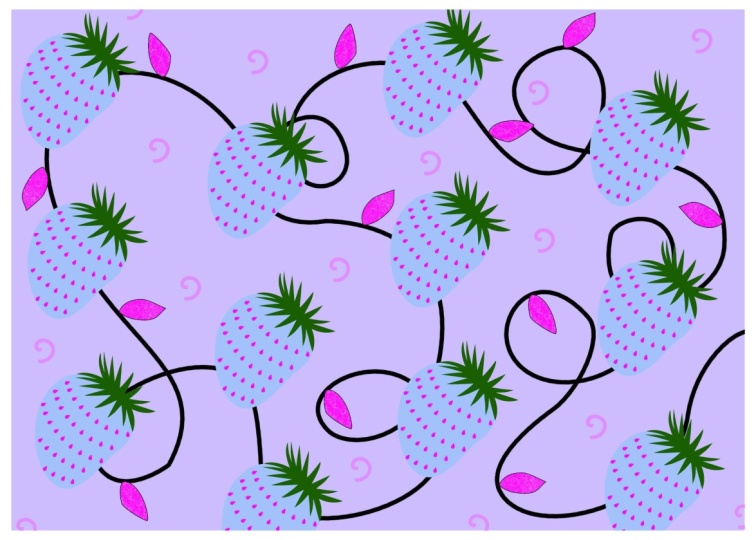
painting session. You can switch up the
colors, the materials, or even the fruit to keep
it new and fresh each time. I hope you enjoyed class and had fun painting
your strawberries. I would love to see
what you've made. Please share your project to the class gallery
here on Skillshare. It's very easy to do. Snap a photo of your sketchbook, head to the project and
resources tab under this class, and click Submit a project. I look at and respond to
every single project. It's one of my favorite
parts of teaching. You need another
sketchbook snack, check out my full list of
classes, which I'll link below. And lastly, I'm always
working on new classes. So if you'd like to be notified
when a new one comes out, be sure to follow me here
on Skillshare or sign up for my Substack newsletter
where I share tutorials, silly comics and sneak peeks
at my upcoming classes. It's completely free, and I share something
new every week. Thank you so much for
joining me in class. I hope you are able to
have a little bit of fun and relax at the same
time. See you next time.
 Jenni Macklin, Illustrator & Surface Pattern Designer