Transcripts
1. Introduction: Welcome to Sketchbook
SNAC drawing Caddy Cats. A Sketchbook snack is
an exercise that you can do in your sketchbook anytime you need
something light, easy, or fun to do. It's perfect for when you
have art block or feeling overwhelmed or when you just
don't know what to draw. Hi, I'm Jenny Maclyn. I'm a software engineer, turned Illustrator and surface
pattern designer. I know firsthand how frustrating it can
feel to be burnt out, overwhelmed or just
stuck with my art. Through much trial and error, I found that the best solution
to these feelings is just to stay loose and have a little bit of fun
playing in my sketchbook. Too often, we get stuck
in a cycle of creating perfect finished pieces for our portfolios or social media, and we forget to
take the time to create art just for ourselves. We really need the
time for play and experiment in order
to grow as artists, but it's all too easy
to forget to it. That's why I created
this series of classes. Playing in our
sketchbooks is not only refreshing for our creativity,
but it's also fun. If you spend the class giggling
over how silly looking your catty cats are, then
mission accomplished. Cats are known for being
mischievous masters of the Sidi and haughty,
yet cuddly creatures. At any given time, they can be found snoozing in a
patch of sunlight, accidentally on purpose,
tripping you as you're walking down the hall or plotting
world domination. They're also one of the most fun things to
draw in your sketchbook, which is why we're gonna be
drawing them in this class, but we won't be drawing
just any ordinary. No, we're going to honor
that mischievous nature and draw the caddiest
attitudiest cats around. We'll start with a quick
warm up exercise and talk briefly about shape and how we can use it
to make our cats. Next, we'll discuss the
basics of expression, and I'll demonstrate
how you can show off your cat's attitude
to maximum effect. Then we'll pick out
some materials and colors from supplies you
already have on hand. Finally, we'll start
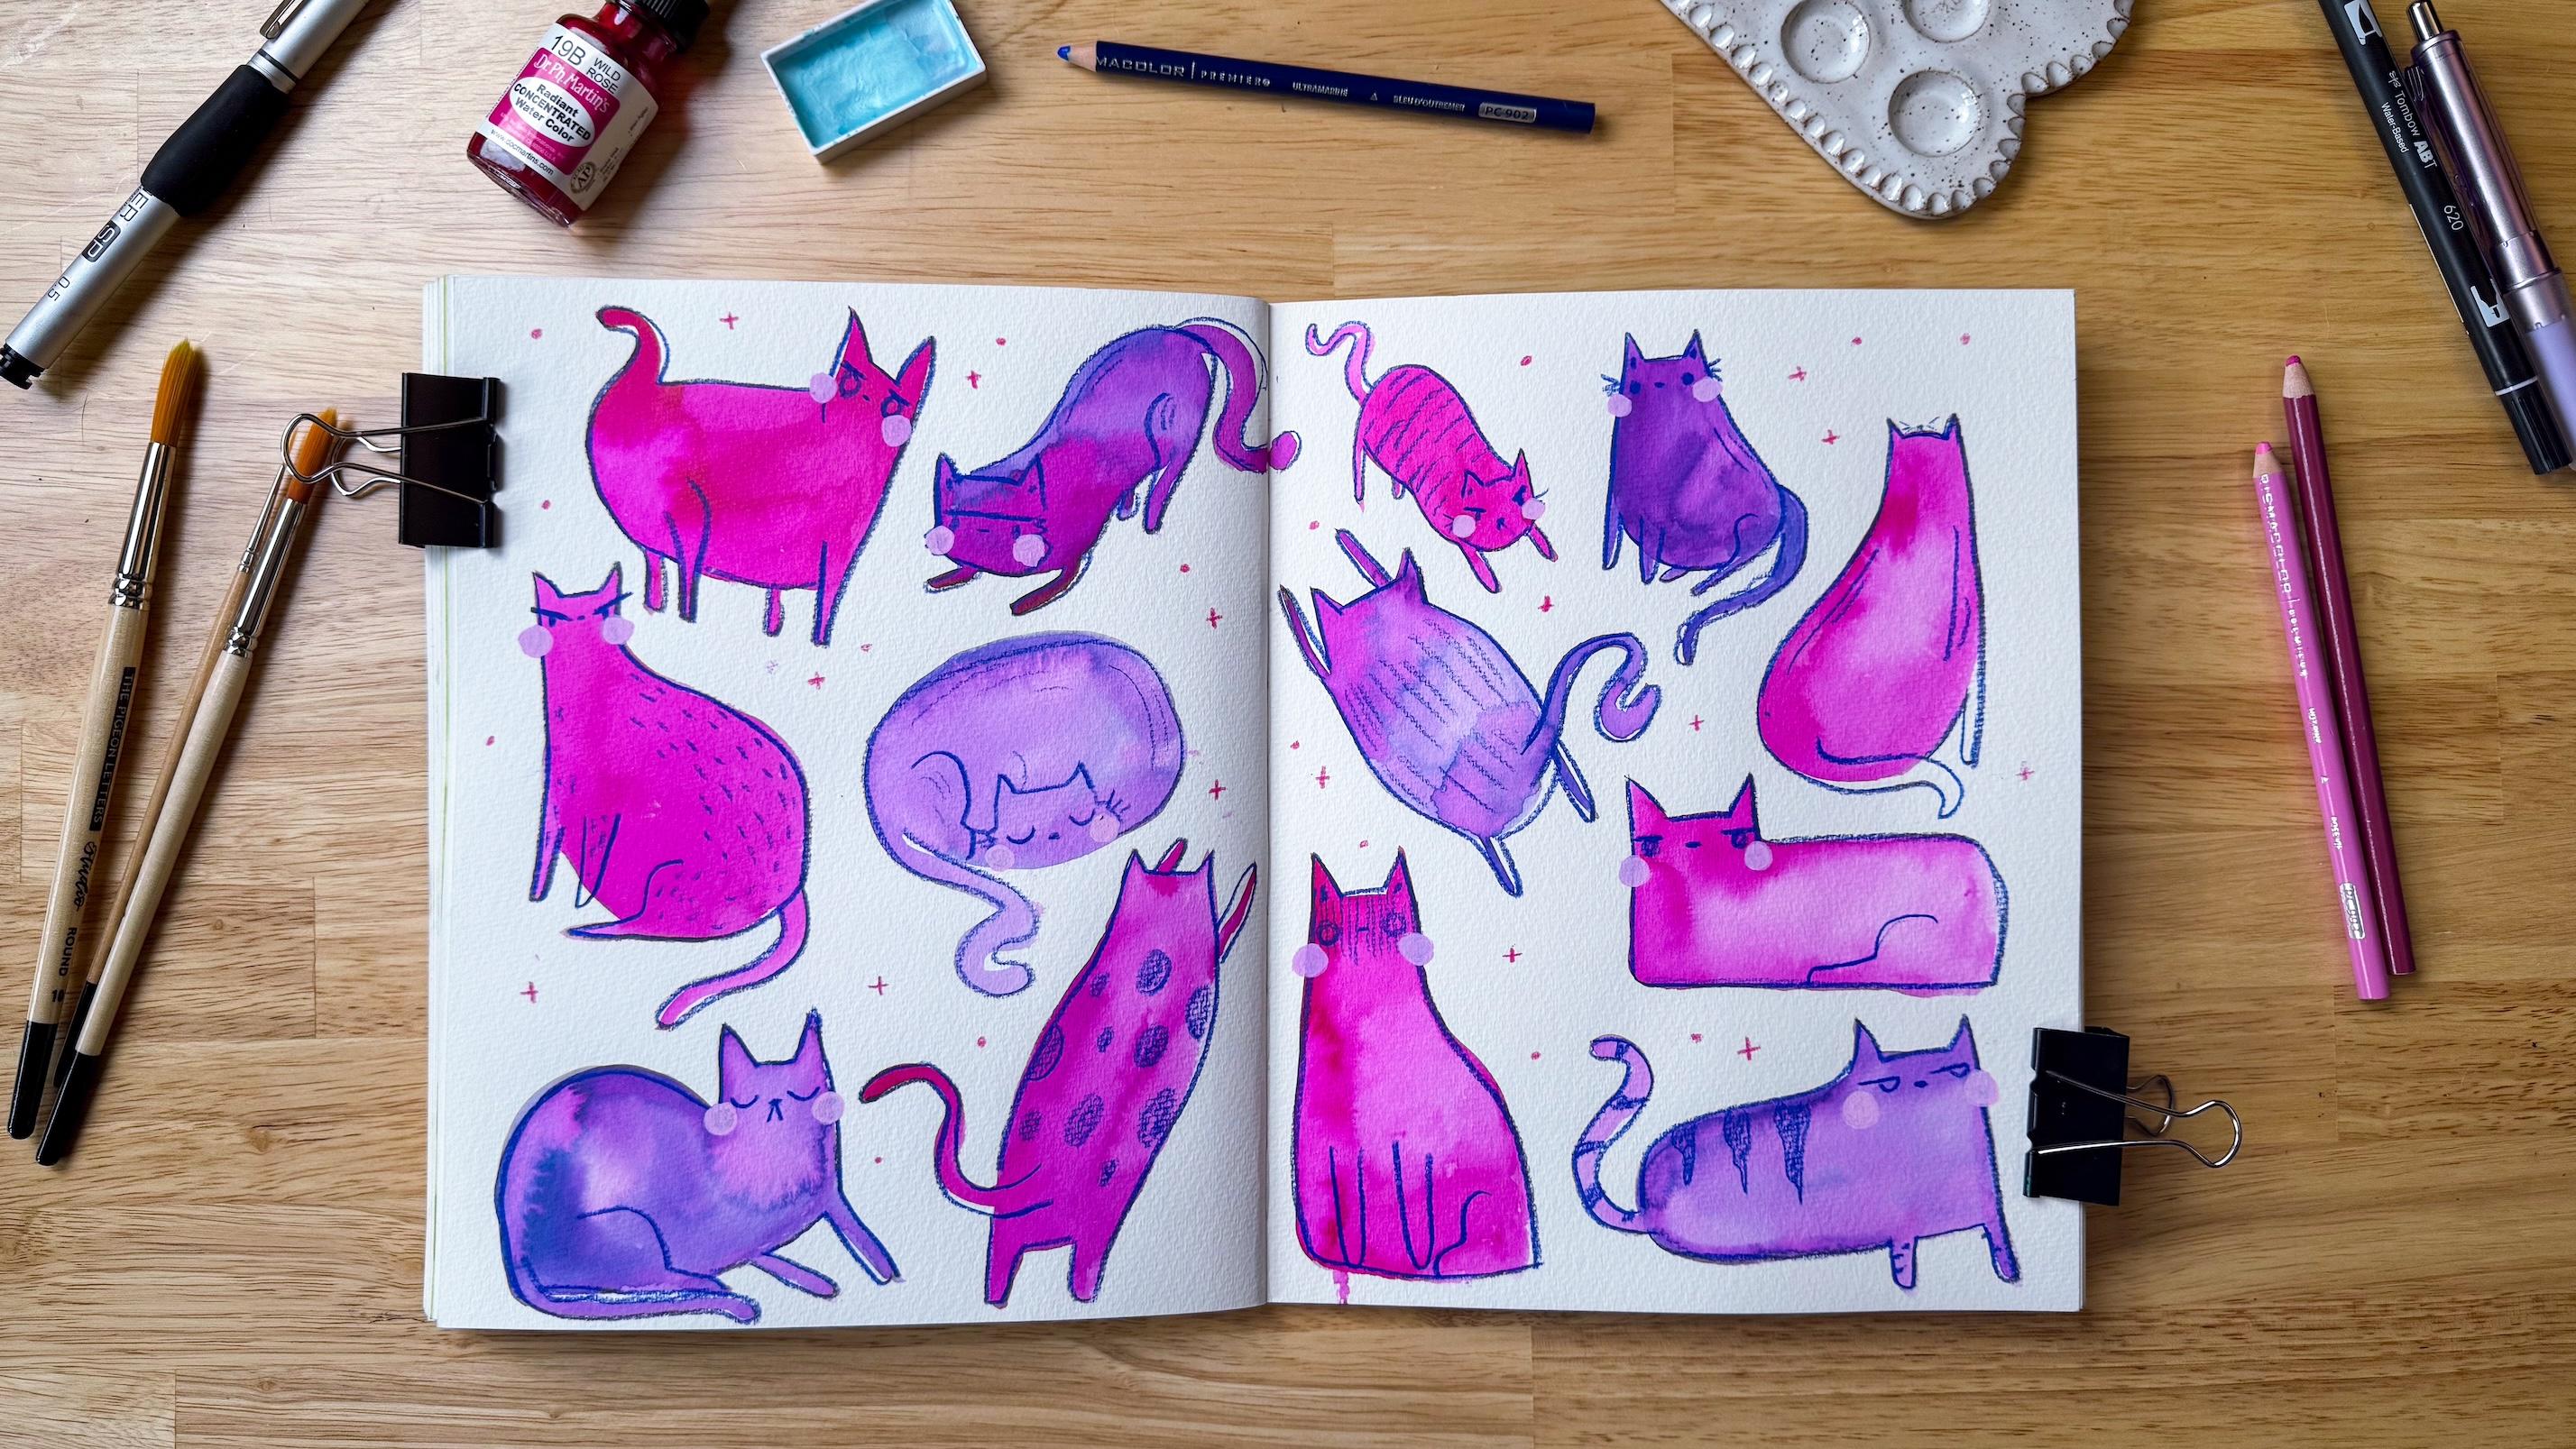
our project together. In this class, your
final project will be a double page spread
full of caddy cats, giving you their best side
eye and their rudest too. Are you ready to draw
some caddy cats and have fun in your sketchbook at the same time? Join me in class.
2. Warm Up: Anything Can Be a Cat: Literally anything can be a cat. Don't believe me.
Let's prove it. In this warm up exercise, we're going to take
everyday objects and turn them into cats. Why bother with a warm up? Well, just like with a physical
activity like a sport, warming up before we draw or paint helps us
do our best work. It helps loosen us up both
physically and mentally. It also helps take away
some of the stress of the fear of a blank page or
not knowing where to start. For this warm up, you'll need your sketchbook
or a piece of paper, a waterproof pen or marker, and a light colored
marker or watercolors. Go ahead and pause
the lesson here to go gather your supplies if you
don't already have them. On our sketchbook page, we're going to start by
drawing the outlines of a few everyday objects. Let's go ahead and start with
something nice and simple that everybody is familiar
with and that's just the box. That's our first one. That's it. I'm going to pop a
list on the screen here and you can
choose from that list, or you can follow along with me or you can come up with
your own ideas as well. I started with this box and
now I'm going to do a cloud. Let's do a cactus
house plant next, and let's do a car, a very simple cartoony car. Remember, this is
just a warm up, so I don't want you to
be too concerned about making your most
artistic pieces. We just want nice simple shapes. It can be messy.
It can be loose. It can be like, is that a car? It's fine. All of it is fine.
This is just a warm up. It's a nice little ice
breaker to ease us into our drawing practice
for the day the cars. A lot of windows, I
guess. I bought a lamp. That's a nice everyday object. And we'll do a mug. Perfect. We have
six objects here, and now we're going to transform them from everyday
objects into cats. Let's go ahead and switch over to Bar Marker and
I'll show you now. Starting with our box, the first thing that
we're going to do to turn our everyday objects into cats
is add a few key features. In real life, cats
have a lot of variety, but most share a set of
unique features that our brains can quickly scan
and identify as a cat. For example, pointy ears, whiskers, and a
long swishy tail. We're going to use those
features or a combination of those features and create our cats out of everyday object. Let's go ahead and
make a list in our sketchbook of these
identifying features. We've got tiny ears, squishy body, squishy tail, whiskers, button nose, big eyes. We can use a combination
of these features on each of our objects in order to
transform them into a cat. We don't need all of them, but as long as we have enough, our brains will be
able to look at the object and see it as a cat. Might be a cat lamp, but it will still be a cat. Let's go ahead and I'll
show you what I need. I'm going to jump it back
over with our marker, starting with the box, in the top left
corner, we're going to drag in some color like so, and we're just going
to fill that shape in, but we're going to
extend the shape a little bit further to
make these point ears. Let's do the same thing
out the back of the box. To make the tail.
For the first one, I'm going to go step by step and show you exactly
how I'm doing it, and then I'll speed
up the video to do the rest so that you can get
to your exercise faster. We've got the marker,
and we want to make sure it's dry too before
we try to draw over it, otherwise, it can get
a little bit funky. But we've got these pointy
ears and the long swishy tail. Let's go ahead and
add in some eyes, a nose, whiskers, and we can draw the outline
of the ears and the tail. Then we have our first
cat out the box. Now I'm going to go ahead
and speed up the video. What did I tell you?
Anything can be a cat, right? Now it's your turn. Choose 5-7 object and transform them into cats just like you saw on
this demonstration. I'll see you in the next lesson where we'll talk
about expression and how to give our cats
the most attitude. See you there? And
3. Creating Maximum Expression with Simple Features: In this lesson, we're going to talk about expression and do a very simple exercise
to get you comfortable drawing different expressions
on your cats faces. We'll use very simple features, and I'll show you a few tips and tricks so that you can get
started with expressions, even if you've never
done it before. Before we get started, a
really important note. Since we're drawing catty
cats that are uniquely yours, I want you to take the following
lesson as a guideline, but stick with what
feels right for you. If you already know how
you like to draw cats, eyes or expression,
stick with that. If you're a beginner and you aren't really
sure where to start, then you can follow
along with me. But I want to encourage
you to do a little bit of experimentation during
this lesson, as well, so you can see which eye
shapes, which expressions, and other things
that will ultimately contribute to your unique
style that you find enjoy. I'll be giving you some pointers and general tips
about expression, but you can take those and
apply them to your own style. If you don't feel
up to experimenting right now, that is totally fine. You can just follow
along with it. It's something that you'll get more comfortable with as you continue growing and
exploring as an artist. Let's go ahead and get started. You just need a piece
of paper like this or your sketchbook and
something to draw with. It could be anything at all, a crayon, a pencil, a pen. I'm just going to
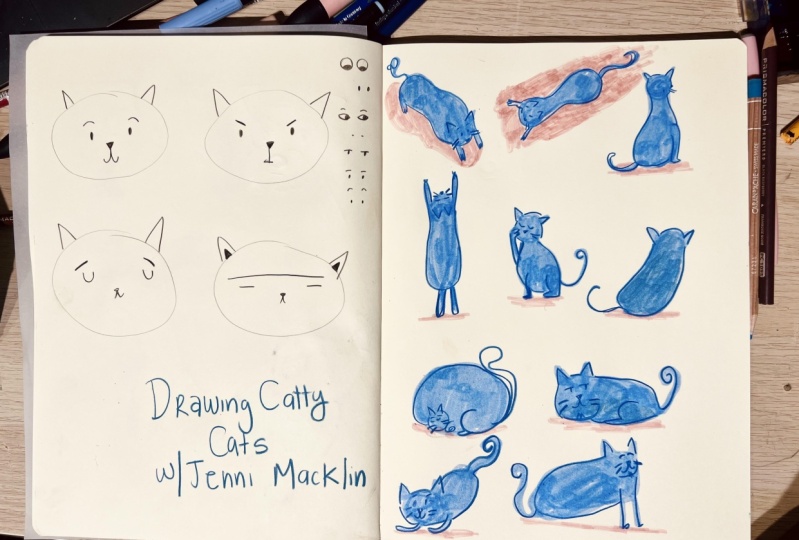
use this pen here. And what I want you
to do is start by drawing four circles
or ovals on your page. Just like this. They can be as
wonky as you want. They are for demonstration.
Purposes only. Okay, so here we have four
very wonky oval shapes. Now, what I want you to do
is add ears to each oval. Great. Now we've got the
basic shape of a cat's head. For the first two,
I want you to draw very simple dot eyes. So
let's go ahead and do that. Okay, so now we have
very simple dot eyes on the first two cats and
nothing on these cats. That's because I'm
going to let you fill in the eyes on here. We're gonna talk a
little bit about how you can use the eyes to convey
different expression. The first, let's go
ahead and add a nose. To each of our cats. Okay. And the nose is going to stay the same for all these because it's such
a simple feature. It's just a little dot.
Before we get into expresion, let's talk about
eyes really quickly. So I'm going to just make
a little line over here. And we're going to
draw some eyes. You can use two dots
like this or ovals. You could do little
U shapes like this, which usually indicates
that the eyes are closed. You could do the
opposite of the U shape, which is an upside down U, and that's usually also
the eyes are closed, but it's more of a
happy expression. You could do Xs. You could do straight lines. All of these are very simple, almost emoji eyes, right? But in combination with the other things that
we're going to talk about, you can use these
different eyes in order to convey a different
expression in your cat. So these are all very simple. You could also do circles. I like to do empty
circles sometimes. You could do circles
with pupils. And of course, if
you add pupils, the direction that they're
looking is going to also help you convey expression. You could do simple
almond shape like this. I mean, you could really do
anything you want here as long as you're making
eyes of some kind. I want you to use the one
that you like the most. If you have a favorite
already, stick with that one. But if you're new to drawing or you're new to
drawing eyes, you know, pick a couple experiment and see which ones that you like
the most for your cats. Okay, so let's go back
over to these guys. What I want to show you is how these two look very similar. Right now, they're giving
the exact same kind of neutral expression. Go to change this by
adding one element, which is our secret ingredient
for our cat's attitude. And that is eyebrows. So right here, this cat looks pretty neutral and happy, right? And we're going to
accentuate that. We're going to
give him some nice elevated curved eyebrows,
just like that. You can already see the
difference between these two. This one has a lot more
expression than this one now. And next on this one, we're going to do an angry cat. We're just going
to add two simple downward slashes
for the eyebrows. And now look at what a dramatic change that made from
the previous one. Right? Let's fill
in these, as well. I'm going to do the closed
eye expressions here, so we'll do the Us for this one, and I'm going to do the
lines for this one. Okay? And we're also going
to add eyebrows to these. And this guy, we're
going to do kind of like a smug attitude. So he's gonna just
have these neutral, slightly upward tilted eyebrows. And then this guy is just basically the expressionless
emoji, right? He is annoyed. You've just made a dad joke and he does not
think it's funny. So we're just going to add
a straight line like that. Right across. And you can see that unibrow shape adds
its own emotion, too. You don't have to do the
straight line fully across. You could also do just
straight eyebrows. Other options that we could have added to this is, you know, a curved upward curved
eyebrow like this, which would have made
a sad expression. Let me just draw
in the eyes there. Another really important
one for cats is the si die, which is just a straight line and a little pupil shape there. You can also do that with
closed dots like that. Okay. And now let's add one
final feature to these cats in order to give them just a little bit more
expression in each in. We're going to add the
mouth. Now, cats mouths are generally pretty simple. You've got the nose and these two little
lines like this here. You can do just like with
the eyes and the expression, you can do whatever you
want for your cats. I'm just giving you
some simple examples. So I'm going to stick
with this basic formula for these four cats here, but you could also do, you know, something like the smirk, the
line, something like that. I think we'll give
this guy a smirk. But I'm going to try to
translate it to this cat shape. So the first cat is happy, so we're going to just
curve those lines upward into a little
smile like that. And this guy is angry, so we're just going to leave those short straight
lines just like that. And then this guy's
feeling a little smug, so we're going to
do one line down. And then one line curved. So he's kind of doing
a little smirk there. And then this guy,
we're going to continue that
expression listing. We're just going to do a
little thing like that. Great. And that is a
very quick demonstration on how you can use simple
features like these in different
combinations to create a variety of expressions
in your cats. If you want to experiment more, you'll find an
expression et sheet, as well as some additional
references in the workbook. When you're ready,
I'll see you in the next lesson
where we'll pick out some colors and materials to work with in
our final project.
4. Materials & Color: In this lesson, we're
going to pick out some colors and materials to
use in our fornal project. I'll show you what I'm using. And if you have those supplies, you can use those,
but I want you to substitute anything
that you don't have. You don't need to go out and buy anything new for this project. The whole point is that it
is easily done at any time, and you can substitute
materials super simply. Since we want our
sketchbook snack to be easy and relaxing, we're going to use a very
limited color palette. We're going to choose just one main color for all of our cats, and I'll be using watercolor, but you can use gouache, marker, acrylic ink, even,
whatever you have on hand. I've gone ahead and gathered a couple of options
from my own supply. For my sketchbook,
I'm going to be using the sketchbook that I'm
using for our final project, which is this Strathmore soft cover watercolor
sketchbook. We're going to clip this open. And what we're going
to do now is just try out some of our colors and
see what we're feeling today. What is going to
make us the most happy to use for our caddy cast. So I've already got some of
this watercolor ink here. It's doctor PH Martin's
WildoseRadiant, concentrated watercolor. And this is what I have. Here in this little dish. So I'm going to go
ahead and try that first and see how that looks. You can see it's already
turned my water really pink, so that's gonna be a challenge
to mix with anything else. And it's very vibrant.
I do like that a lot. See how much pigment
we can get with just a little bit on the brush. Now, let's see. I'm gonna go for a little
bit of a mix here. This blue with a little bit
of this paint to create, kind of like a periwinkle
lavender effect. I really like that. Let's try
one of our other supplies. Next, I'm going to I've got this Derwent ink
tense paint pan set, and it has some really
nice colors in here. I'm going to try
out a blue color next to see how that look. I'm using the water brush
that comes with that set. So that's a nice option as well. And if we add a little
more water to that, we can get it even lighter. Which is going to help in our final project
because we want to add some details on
top of the base color. So if we have a lighter color, that's going to
be helpful there. Let's go ahead and try
out another color. So this is the set that this blue I used
earlier came from. I think I'm going
to go ahead and try this teal color here. I think it's Malachite
put that down. That is a really nice color. Now, another option if
you don't have any paint or ink is you could also use markers like we
used in our warm up. So that's gonna work
for you just as well. It might just take
a little bit longer to fill in the shape,
but that's okay. So just use whatever
you have on hand. I do like these colors here. So it looks quite nice together. Some other options
that you might have at home is an acrylic
ink like this, or I also have this pantone ink, which is a refill for
the pantone markers. But it does a really nice
job as using it like an ink or a liquid watercolor or something like
that. It's quite nice. If you have any
of those on hand, that's gonna work for
this project, as well. Let's go ahead and try this guy just to see what he looks
like. That's really nice. I don't know if I'm feeling red for this particular project, but I can see that working
out really well, as well. Okay, I think we've got
enough options here. Let's move on to picking
out our accent colors. I'm gonna go with this between this pink
and this purple here. I'm going to do both. I'm going to do both of
these for the main color. And then let's see, for the accent color, I need something
that's going to show up on both of these. I want to make sure I
have something that will work for the cheeks, and you can see how
this fades into. You can't even see on
camera where it goes. Yeah. See, you can barely
see it there. So that's not gonna work because we want to
make sure we have enough contrast between our accent color
and our main color. Otherwise, you aren't going
to be able to see any of the details we
draw on our cats. I'm going to go ahead and
try this darker pink color. That one's a little bit better. I think if we watered
this down more, then we'd be able to get more of that contrast
there as well. You can see it in that one.
That could be an option. Let's see. I do like this. I think this would be
good for our linework. Another option is using a fine liner like we
used in our warm up, so we can test that out as well. See if we can find
another accent color for this one, though. That could work
for some details, maybe like stripes or spots. But what I'm really
looking for here is something to use for
the blush on the cats, and that's what I usually
use that light pink for, but it's not quite showing up. I'll keep some options open, and we'll go with
the darker color when the watercolor
is more pigmented, and then we can maybe use the lighter color when
it's more watered down. Oh, go ahead and choose
your main color first. I'm going with these two. I would say keep it
to three at the max. One would be the simplest, and it's going to result
in a beautiful page. So if you want to
keep things nice and simple, go
ahead and pick one. And then after you've
chosen your main color, try and find some accent colors. I think two is a
good number there. Something that's going to
look good for your line work. Like this is what
the ultramarine colored pencil we're
going to use there. And then you can also use your
fine liner there as well. So I would say,
just go ahead and pick those out and then maybe
one additional color for details like the cheeks or spots or any other details that
you want to add Cheer cats. If you didn't follow along
with this demonstration, go ahead and pick
out your own colors and materials from
your supplies. I'll meet you in our
next lesson where we'll get started on our
final project. See you there?
5. Final Project: It's time for our final project. As a reminder, you'll need the following materials
and supplies. A sketchbook, watercolor or other materials to
make shapes of color, a cup of water, not
for drinking, a brush, color pencils or a fine
liner or something similar, and a smidge of patience while we literally
wait for paint to dry. Go ahead and pause the video to gather everything.
I'll wait here. Ready to go? Let's draw some caddy cats.
Alright, let's jump in. So to start, I'm
just going to get a little bit of this
color on my paintbrush, I'm start with those
blobby shapes. Because, like we
learned in our warm up, pretty much anything
can be a cat as long as you add enough of those recognizable features in order for our brain to see
it and go, Oh, that's a cat. So once we've drawn
our main shape here, then we can add in an ear. A ear will be here. Let's
do some pause here. Here we go. That's
our first shape done. Now I'm gonna switch to that purple color I created
in the last lesson. For the next shape, and I'll just alternate
between the two as I go. And remember, our
main goal here is to stay loose and
just have some fun. So don't worry too much about
being anatomically correct. If you're familiar
enough with cats that you feel comfortable
posing them or doing, you know, some action poses or something like that,
please feel free. But if you're more
of a beginner or you just want to have a
very relaxing session, you can go ahead and
follow along with me just doing blobs that will then turn into cats once
we've added those features. So here we go for
the second cat. You need a little
more pink in there. Well, that's quite
strong. That's okay. We're just gonna
go with the flow and see where the
paint takes us here. A little more water to
fill in these gaps. And I'm just gonna
extend this shape. And let's do tail
going downwards. I'm letting my colors mix on
the page a little bit here. If you prefer to have the pink or the purple
already mixed up, you can put it in a
separate palette like this. You don't need to just mix it on the fly like
I'm doing here. And like I mentioned, if
you're more of a beginner, sticking to one color is
going to be a friend. I'll keep it nice and simple. I just really liked the
combination of these two, so I decided to go for it, but absolutely no
pressure to add in a second color if
you don't want to. On the back legs here. And cats might be
a little wonky, a little weird, a little
silly, and that's okay. Now we're ready to add all
of our linework and details. I'm going to be using this
ultramarine prisma color, and I'm going to
just start by doing the linework around the cats and we'll add in
the expressions. And then, same as before, I'm going to do one or two examples in
real time with you, and then I'll speed up
the video so you can see everything before
you get started on your own project.
Let's jump in. So for this cat, I know that I have a
second ear over here. So I just want to
make sure I draw that in with the lines. Now that we're working
over our shapes, we can smooth some of those
shapes out if we want. Math them as they are
either way is fine. This is your sketchbook spread. So there we have the
first chat outline done, we're going to
give him will nose and He's the dot eyes and his whiskers. A little frumpy face there. I think let's give him
some stripes, as well. Let's see if we
can do some cheek, if it's gonna be
too dark, it looks like it might be a
little too dark. We could come in
with a posca pen and a light pink, and
that would be good, then. You will try that. And move
on to this little fella. Okay, we'll do this
and Bond dies here. Los He's gonna be more of
a startled looking cat. And I'm gonna go ahead from here and just do the rest
and I'll speed them up, and I'll meet you
back when it's time to add in defile touches. Now we have our initial linemrk. I'm gonna grab a pink posca pan, and we're going to try that. It's too light on
these prickle ones. Let's let that dry, then we can change that. But in the meantime,
go ahead and add some extra details
to some of so. Now, we're going to try and
fix these lighter ones. I think we can do that
with a second cover. That second hoding is really
gonna help it stand out. Okay, so there we have
our cheeks and details, and we've got an entire
page full of cats. And the last thing
that we're going to do is take our secondary
color here, and we're just going to add some little blurrises
to the page. It needs blank spots. And if your Posca
marker is still wet, like mine, be careful that you don't accidentally
drag your hand through it. All done. Now it's your turn. Go ahead and complete
your project, and I'll see you in
the final lesson.
6. Next Steps: Congratulations. You did it. How did it go? Do your cats look like they're plotting
world domination? I hope you had fun
filling pages in your sketchbook full of catty cats and drawing along with me. I'm so glad you
joined me in class. If you'd like to keep drawing, check out my other
class sketchbook snack drawing goofy dog. Where you can get
another delightful sketchbook snack just like this, except drawing some goofy dogs. I would love it if you
would share your work so I can see all of your
lovely mischievous cats. Be sure to submit a project
here on Skill Share and feel free to tag me on Instagram if you share
it there as well. You'd like to be notified about future classes that I release, go ahead and follow me
here on Skill Share. Thank you so much for
joining me in class. I hope you had fun and
I'll see you next time.
 Jenni Macklin, Illustrator & Surface Pattern Designer