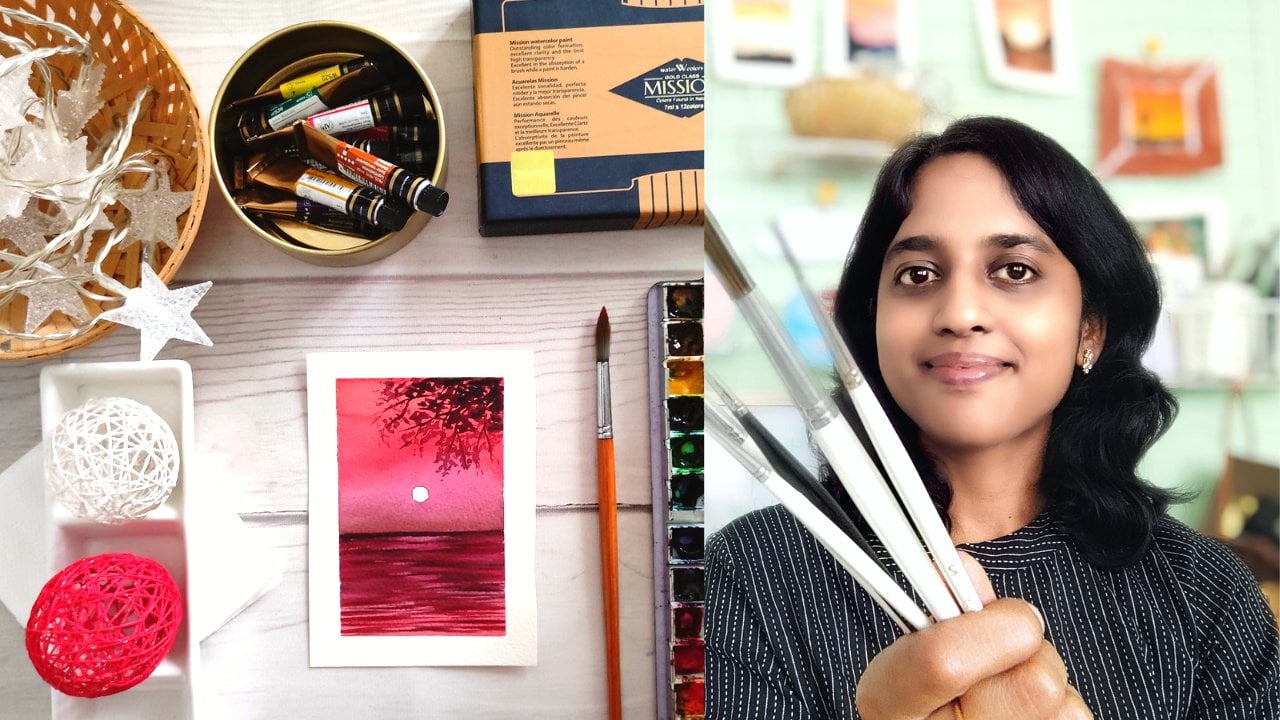
Transcripts
1. Welcome to the Class : Are you ready to unlock
the secrets of painting, mesmerizing evening
skies and watercolors? In this class, we will be
focusing on the art of mastering stunning evening
sunset skies and watercolors. I'm Jessica, an artist
and art instructor. I absolutely love working
with watercolors, and Sunsets has always been one of my favorite
paints to paint. In this class, we'll be
painting not just one, but six breathstaking
sunset scenes. From tranquil beach views to
serene mountain landscapes, each painting will transport you to a different
corner of the world. Let's take a sneak peek at the stunning artworks waiting
to be created in our class. Blending is the key to creating the soft seamless transitions of colors that bring our
sunset skies to life. Through step by step guidance, we'll learn how to blend
warm yellows to cool blues to add depth and
dimension to our paintings. In our blending
practice section, I'll show you how to craft the perfect evening
sunset back drop. This technique will elevate your paintings to new heights. Beyond the sunset skies
we'll also explore different foreground
elements that complement our
blended backgrounds. By combining these
foreground elements with our stunning sunset skies, you'll be able to create
captivating paintings. This class is perfect for
beginners and hobbyists alike. No prior experience is needed. Just a passion for painting
and a desire to learn. I worried about diving into
something new. Don't be. The lessons are bite sized and designed to
be beginner friendly. Whether you have hours to spare or just a
few minutes a day, you can progress
at your own pace and build your skills gradually. And don't forget to upload your work to
the project gallery. Sharing your masterpieces
not only inspires others, but also celebrates your
creativity and progress. Ready to join this artistic
adventure with me. Join the class, and
let's start creating sunning evening sky.
So the next section.
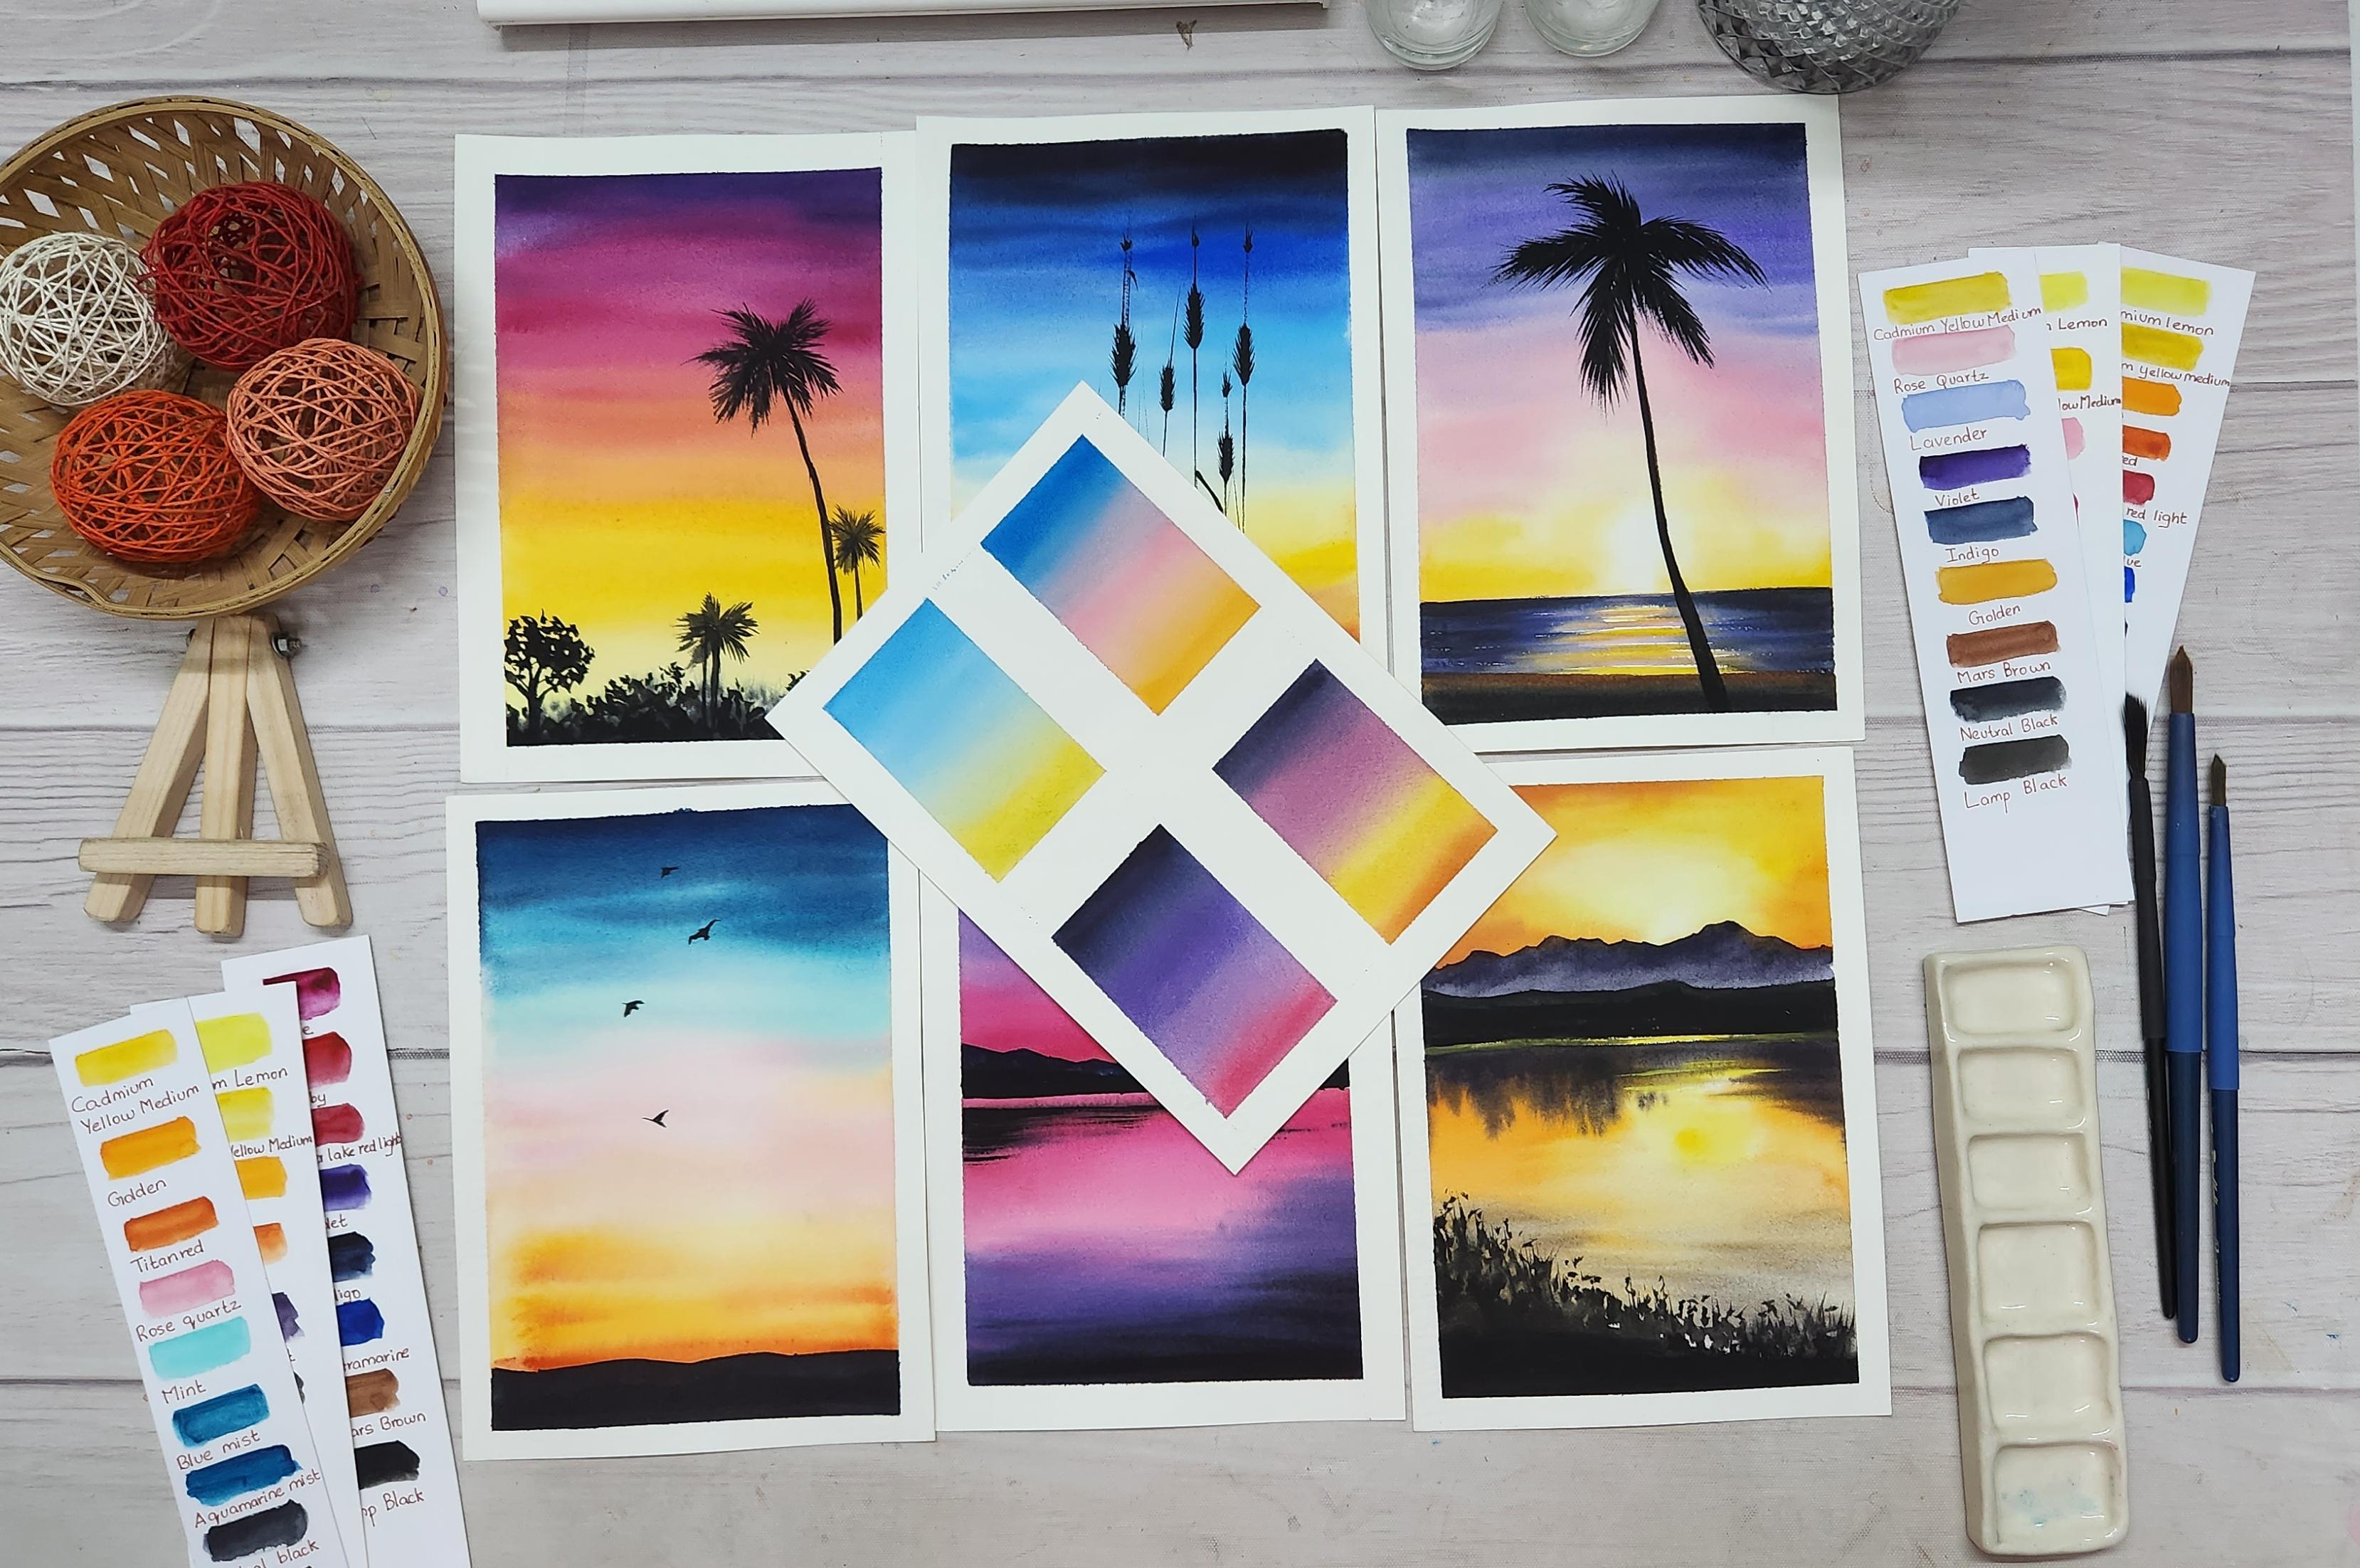
2. Class Projects Introduction : Welcome back, Let's
take a look at the six class projects
that we will be painting. The first class
project is going to be a vibrant evening sunset sky. We'll be having colors like
yellows, pinks, and violets. We'll be using the same
wet on wet technique that we are going to practice in the next session
for the background. We'll be using black
to paint slue tries. The second painting
is going to be a classic evening
sunset sky with shades of oranges,
yellows and blues. Again, we'll be using the wet
on wet technique to create the background skies
We will also be painting a beautiful golden glow in the background mountains, which is right below
the sunset sky. We'll also paint silt
mountains and reeds. The third painting
is going to be a beautiful beach
sunset painting. Here, we'll be using
soft basal sheets like yellows,
pinks, and violets. We'll use indigo for the
upper parts of the sky. We'll also paint the
background skies using the gradation technique. Next, we'll paint the beach, which is beautifully reflecting the evening colors of the sky. Finally, we'll finish off the painting with a
beautiful palm tree. The next painting is
going to be a simple, yet a relaxing sunset sky. Here we'll use
shades of oranges, yellow, pinks, and blue
for the background skies. Again, we'll be using
the gradation technique. Finally, we'll finish off with silvit mountains
and a few birds. The next painting is going to
be a Twilight sky painting, so we'll have
beautiful shades of pinks and violets and
a little bit of blue. The lake will beautifully
reflect the sky. Finally, we'll finish off
with silver mountains. The sixth painting
is my favorite, and it's a golden
hour sunset painting. Here, we have a
beautiful golden glow in the sky and the
lake reflecting it. We'll be using the wet on wet technique to paint
the background skies. We'll be using the same wet on wet technique to paint
the lake as well. We'll also be painting beautiful reflections
on the water. Finally, we'll finish off with
mountains and silt bushes. This one is going to
be really fun to paint to create the golden glow and also to add the
other elements. In the next section,
let's start practicing our wet on wet technique to
create the background skies. We'll be painting and practicing three
beautiful sunset skies. Thank you so much for joining. See you again in
the next section.
3. Materials You Will Need: Welcome back. Let's take a look at the materials
needed for this class. I'm using 300 GSM, cold press, 100% cotton watercolor
papers from Fabriano. These are my favorite papers and the best ones for wet
on wet techniques, which we'll be using
throughout the class. I'll be using A five size sheets for all the six class projects. You can choose a size that you are comfortable
working with. For the watercolors, I'll be using white knights
tiscte watercolors. I'll be using ceramic palettes
for mixing the colors. You can either use
a ceramic palette or any other palette that
is available with you. You will need two jars of clean water to
rinse the brushes. I'll be using round brushes from roblo or all the
six class projects. These are synthetic
hair brushes, and they work really
well with water colors. All of them are
round brushes with a fine pointed tip
when they are wet. I do not use a separate
brush for fine details. I use these brushes to get
the fine details as well. Next to tape down the paper. I'm using a cutting board. It's basically a
cutting board which I use as a boat to
tape down my paper. You can use any firm
surface for this. Next billet tissue papers to
tap off the excess water. You can use any other
old cloth as well. These are the materials required
for our class projects, so you can get them
ready, and of course, you can start with the materials that are
available with you. Thank you so much for joining. See you again in
the next section.
4. Let's Practice Blending : Welcome back. Let's dive into the magical
world of blending. Blending is like magic. It's how we mix colors to
make beautiful backgrounds. We will practice three beautiful backgrounds in this section. For the practice paintings, I've taped down A
five size sheet and divided into four sections. Let's start with the first one. We'll be using a wet on wet technique to get the
blending effects on the sky. For the wet on wet technique, we'll be making the background damp with a layer of water. Now, make sure there
are no puddles fund, but it should be
slightly glistening. As you can see, my paper
is slightly glistening. We'll start with a
first color yellow. I'm gently dragging the bristles of my brush across the paper. The colors will flow smoothly because the background
is still damp. Let's start with a
next color light blue. Leave some space above yellow and then
start painting blue. Then come back and gently blend the area between
yellow and blue. The upper parts of the sky will be painting with a
darker shade of blue. Gently blend the darker shade of blue into the
lighter shade of blue. As we know, watercolors
dry much lighter. So let's paint a second wash
with the same set of colors. The colors are mowing
smoothly here because the paper is 100% cotton
cold pressed paper. The gradation here
looks absolutely lovely from a blue to a yellow. Now, let's get started with
our next practice painting. Since we are learning how
to paint evening skies, usually the part
that is closer to the horizon line will have either a shade of orange or red. In this painting, let's
start with orange, closer to the horizon line, that is closer to the masking
tape on the lower side, and will transition to
pink and a shade of blue. Since we're working
with a ton technique, I'm making the background
dam. With clean water. I'm going over a second
time to make sure the entire surface is damp and make sure there
are no puddles formed. Let's start with orange. I'm loading my brush
with orange and gently dragging the
bristles across the paper. Now, before going on
to the next color, make sure you rinse
your brush dearly well, first with one glass of water, and then again, a
second time to make sure the residues of the previous color
are not on the brush. The next color we use as pink. Leave some space between pink and orange and
start painting. Then gently blend the area
between the two colors. The next color is blue. We'll use this on the
upper parts of the sky. Gently blend this into the pink. Use clean plain water to blend the area between pink and blue. Let's go with a second wash
with the same set of colors. This is totally optional. I generally go with a
second wash to make my paintings a little
more bright and vibrant, but there are times I stop
with a first wash as well. Now, if you take a look
at the first painting, it's completely dry and it's much lighter than
when we painted it. As you can see, gradation is coming out
really beautifully. I'm using clean plain water
to blend the area between the pink and the blue because I do not want shades of violet. If we're just going to mix
the pink and the blue, we'll get shades of violet, which I do not want in this. That's the reason I'm using clean plain water
to blend the area. One important thing to
keep in mind is to move the brush gently on the paper so that the colors
don't get lifted. We have a beautiful
transition from blue to pink to an orange. The third painting was
done the same way. We had done the second painting. Now let's start with
the fourth one. I'm starting with a
darker sheet of orange. And then the next color is a
beautiful yellowish orange. The next color we'll be using is a mix of violet and purple. We're using the same wet on wet technique for this
practice painting as well. Just like the other
two paintings, leave a little bit
of space between the color that we're
painting and the yellow, and then gently blend
both the colors together. The next color we'll
be using is Indigo, which is a dark shade
of blue and blend this into the mix of purple and violet color that
we had painted earlier. Let's paint a second wash
with the same set of colors to make the background
sky a little more darker. As you can see, the paper
is still glistening and shining because the
background area is still wet. We're able to work our gradation and lending beautifully
on the paper. If you take a look at
the second painting, it's completely dry and there's a beautiful gradation from
blue to pink to orange. Let's allow the fourth
painting to dry completely. In the fourth painting, there's a beautiful gradation from indigo to purple to
yellow and orange. Let's gently peel off
the masking tape. And here we have our four beautiful
practice sunset skies. Let me give you a few tips which I use while blending colors. Use a soft brush. Next one is work quickly when the paper is wet to
get the desired results. And the third one,
allow yourself to make mistakes because that's
how we learn and improve. A gentle reminder to upload your practice work to
the project gallery. You're free to add any kind of syilhuettes in the
foreground as well. Thank you so much for joining. See you again in
the next section.
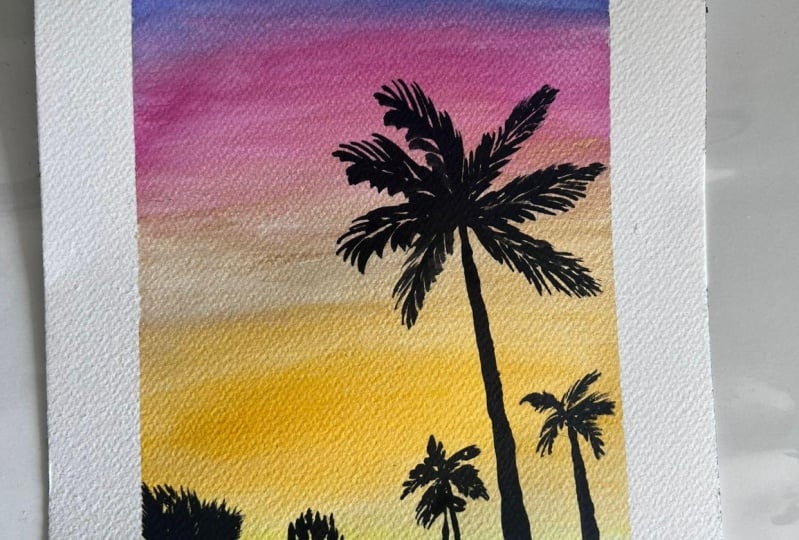
5. Class Project 1- Vibrant Sunset Sky: Welcome back. Let's start
with our first class project. It's going to be a
vibrant sunset sky with shades of yellows,
pinks, and violets. Let's quickly take a look at the colors needed for
this class project. Cadmium lemon, cadmium
yellow medium, rose quartz, rose, violet, golden, and lamp black. Let's get the paper ready for
the wet on wet technique. Here I've used an
A five size sheet and taped it down with
the masking tape. Make sure there are no puddles formed when you're making
the background dam. Let's start with the first
color cadmium lemon. Load the brush with
cadmium lemon and gently drag the bristles of
the brush across the paper. The next color we'll be using
is cadmium yellow medium. Let's gently blend the
cadmium yellow medium into the previous color
that we had painted. Next color we'll be
using is golden. As we're painting golden blended into the
cadmium yellow medium. The next color we'll be
using is rose quartz, which is a beautiful
pastal shade of pink. We'll gently blend
this into the golden. The next color is rose. It is a bit darker
than rose squats. When we're painting,
that's blend this also into the rose. As we're painting this color, I'm pulling a few strokes
into the golden as well. The next color we'll
be using is violet, Let's blend the
violet into the rose. Now let's start painting a second wash with the
same set of colors. This step is totally optional. But keep in mind, watercolors
dry much lighter. When the paint is dry, the shades will be a little more subtle and soft than
what you see now. This paper being 300 GS 100%
co pressed watercolor paper. The paper is still, and we're able to blend
the colors seamlessly. I'm adding another
layer with rose. Melena rose into the violet. Pull a few strokes into the rose squats and
golden as well. Before the background
layers dry completely, let's start painting the silvit
bushes in the foreground. Load the brush with
black and start painting bush shapes on the
lower side of the paper. Since the paper is still damp, the colors beautifully
bleed into the background, creating beautiful bush shapes. Let's add further
details by adding small dots and lines on the
upper sides of the bushes. This is just the first layer. We'll paint another layer
of silhouette over this. Let's paint a simple silett
tree on the left side. I'm using a fine tip
brush for the step. To add leaves, I'm using
the side of my bristles. Gently tap the sides of the bristles to get
the leaf patterns. Add some more details
with dots and lines, closer to the brushes. Let's paint a simple palm tree. Draw a short line with
the tip of your brush and draw and a plus shape, which is kind of curved and start filling it
with short lines. Let's draw another
tall palm tree. Here, I'm drawing the
trunk of the palm tree, and I'm tilting it a
bit towards my left. Since palm trees come in all
different shapes and sizes, you can vary the size and
the shape as you like. I'm making the trunk
of the tree a bit. Now, for the branches,
I'm going to basically do and a plus shape, which is a bit cd and we'll
start filling them with as. You can use a fine
details brush with a fine tip to pull long
thin lines for the leaves. I'm continuing the same step for all the lines
that we have drawn. O. Let's paint another palm tree on the right side corner. We'll follow the same
steps that we used to paint the previous palm
tree for this one as well. There are three palm tree
syllabts that we have painted. Make sure all three are
of different heights. If everything is in
the same height, it might not look
very interesting. Now that our beautiful
sunset sky is complete, let's allow it to completely and gently remove
the masking tape. I highly encourage you
to give this painting a try and upload your work
to the project gallery. You can use colors
of your choice for the class project and give
this beautiful painting a try. Let's take a quick look at the next class project
that we will be painting. It's going to be a beautiful, glowing evening sunset sky with shades of oranges, yellows, and blues in the sky, and we'll be painting beautiful
reeds in the foreground. Thank you for joining. See you
again in the next section.
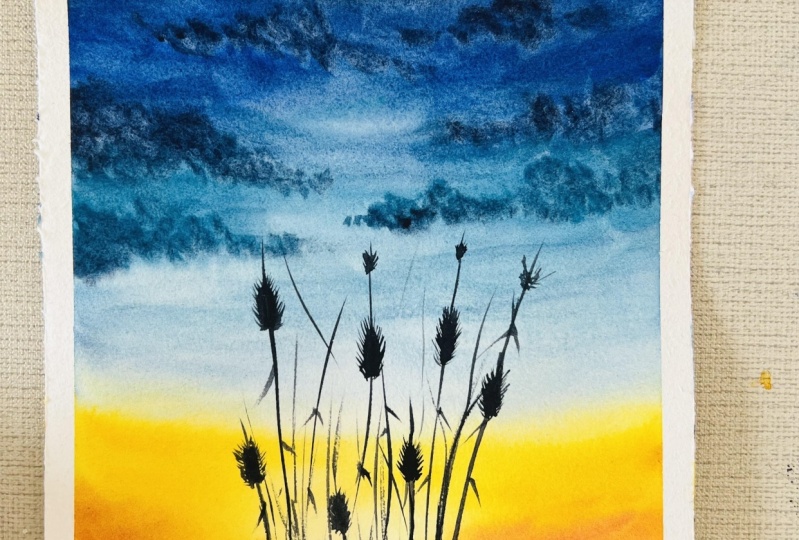
6. Class Project 2- Glowing Sunset Sky: It's great to have
you back. Let's dive into our next artistic
adventure together. We're going to paint a
beautiful, glowing sunset sky. Let's take a look at the
colors needed for the class. Cadmium lemon, cadmium
yellow medium, golden, titan red,
madder lake red light, celestial blue,
ultramarine, indigo, orange Ms, put mortem,
and lamp black. Let's prepare the paper to start our wet on wet techniques
for the background skies. I'm using a spray bottle and brush to spread
the water around. You can either use a flat rush or a round
rush for this step. Make sure there are
no puddles formed. Let's start with the first
color, cadmium lemon. Pull short strokes from the
corner towards the center. The next color we'll be using
is cadmium yellow medium. Again, pull short strokes from the corner
towards the center. The next color is golden. We'll paint golden below the first layer of
yellow that we painted, and again, add a
few short strokes with tightened red as well. This will give a
beautiful golden glow on the lower side of the sky. I'm using a damp
brush to lift up the paint from the center
to create the sun. We are trying to get
a soft glowing look on the lower side of the sky. Next, let's start painting the upper side of
the sky with dico. Endico is a beautiful
dark shade of blue. The next color is ultramarine. Let's blend the
ultramarine and dico. After painting yellow,
I'm starting with the blues because we know
when blue and yellow mix, we get a green shade. Green is a beautiful color, but I do not want it in the sky. Let's paint celestial blue
under ultramarine and lend the part between the
yellow and celestial blue with clean plain water. Let's paint a second wash
with the same set of colors. I usually like to go
with a second wash because it will make the
painting a little more vibrant, but it is totally optional. If you would like to finish with the first layer,
you can stop there. If you are doing a second wash, when you paint tight and red, make sure to keep the area
around the sun very light. Let's allow the
background to dry completely and then start
painting the foreground. Let's paint small hills
closer to the horizon line. I'm using orange mist
to paint the hills. I'm using a fine pointed
tip brush for the step. Let's paint the corners of the
hills with orange mist and the part right under the sun will use Mader Lake red light. Let's darken the corners
with capt mootem, which is again a
beautiful shade of brown. Next, I'm going to lift a little bit of paint from
the paper using a damp brush, the part which is
right under the sun to create that beautiful
glowing effect. Paint a little bit
of yellow under the sun and the corners
with lamp black. I'm trying to lift
a little more paint from the part under the sun with clean damp brush to see if I can add an
extra glue to that area. I think the glow
looks beautiful. Now let's allow that layer
to dry completely and paint the silt mountains
with lamp black. As you can see, once we
started adding black, the glow looks
absolutely beautiful. Now, once this layer is dry, let's start adding the reads. I'm using the same
fine pointed tip brush to pull these lines. Make sure to vary the length of the lines to add some interest. If everything is
the same height, it might not look
very interesting. Oh Let's start painting more details on the reads. Load your brush with black
and paint oval shapes on the upper sides of the lines. Next, let's pull short lines
from the sides upwards. Now we need to pull the
lines on both sides. Let's add some more details
on the upper end of the line. I'm going to complete all
the reads the same way. You can also paint one or
two leaves on the reeds. L et's allow the painting to
dry completely and gently peel off the masking tape
from all the four corners. And here we have our classic
evening sunset sky in watercolors with a beautiful
glow on the hills. I highly encourage you
to give this painting a t and your work to
the project gallery. Do try out the lifting
technique that we used here to create that
beautiful golden glue. It's a really interesting
technique to try. Let's take a quick look at the next last project
that we will be painting. It's a beautiful
beach sunset painting with palm tree silhute. Thank you so much for joining. See you again in
the next section.
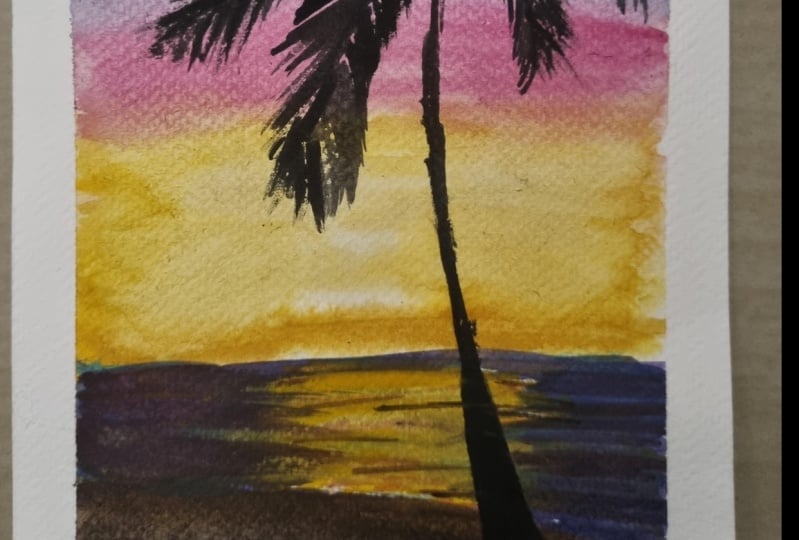
7. Class Project 3 - Beach Sunset Sky: Welcome back. Let's get started with our
next class project. It's going to be a beautiful
beach sunset painting with soft passel
colors on the sky. We have colors
from light yellows to pinks to beautiful
shades of lavenders. We'll paint a lake that is beautifully reflecting the sky, and we'll finish off with
a palm tree silhuett. Let's quickly take a look at the colors needed for
this class project. Cadmium yellow medium, rose squats, lavender,
violet, indigo. Golden, Mass brown, neutral
black and lamp black. Let's activate the water
colors by spraying some water. Let's get the paper ready for
the wet on wet technique. I'm spraying some
water and spreading the water with a round rush. Let's start with the first
color cadmium yellow medium. I'm leaving some space
on the lower side of the paper for the
peach waters and sand. And let's leave a little bit of space in the yellow section
as well for the sun. The next color we'll
paint is golden, which is mixed with
cadmium yellow medium. We'll paint this
below the yellow. Let's continue with rose squats, which is again a soft
pastel shade and blend it into the
cadmium yellow medium. The next color is lavender. Let's blend the lavender
into the rose squats, which again gives a
beautiful soft pastel color. The next color will
be using a violet. Let's paint violet
above lavender and gently blended into
the lavender as well. The last color that
we'll be painting for the sky is indigo. It is a beautiful
dark shade of blue, and let's blend this
into the violet as well. You can see the
pastel sheetes of the sky coming out
beautifully already. Let's paint a second wash
with the same set of colors, and again, this is
totally optional. When you're painting the sun, keep the area around
the sun very light. Let's allow the
background to dry completely and start
painting the beach water. I'm loading my brush with
Cadmium yellow medium, and let's start pulling thin
lines right under the sun. Keep the lines closer to the sun and the ones
closer to us longer. Make sure to space between the yellow lines to
fill in the other colors. The next color we'll
be using is lavender. I'm loading my brush
with lavender and I'm pulling thin lines on
both sides with this color. I'm using the pointed tip
of my brush for this step. We'll also define the
horizon line with lavender, and let's continue to build
the layers one above the other to show the reflection
of the sky on the beach. The next color we'll be using as a mix of violet and row squats. We'll use this color to
pull thin lines from the outer sides inwards
towards the lavender. Again, I'm using the pointed tip of my brush for the step. Let's further define
the horizon line also with the same color. Next, let's layer the
beach with a mix of indigo and the mix that we
already had on a palette, that is pille and. We'll use this color
to darken the corners. Now let's load our brush
with the row squats, and let's paint the areas
between the yellow lines. Again, I'm using the pointed tip of my brush for this step. Let's darken the corners
a bit more with indigo. When painting the beach, make sure to keep the
colors diluted so that they flow easily since you're
working with p here. Now, let's start
painting the beach sand. I'm painting mass brown
closer to the water. The next color we'll be
using is lamp black. Let's paint black
below the mass brown and blend it into the
brown a bit as well. D. D. D Let's allow this layer
to dry completely, and let's start
painting the palm tree. I'm using a fine pointed
tip brush for this step. I'm making the lower end of the palm tree a
bit more thicker. Since palm trees come in all
different shapes and sizes, you can draw the trunk of
the tree as per your liking. I'm tilting the trunk of the
tree a bit towards my left. You can even paint a palm tree
that is standing straight. Let's pull out a few
lines to draw the leaves. I was just wondering if I
could add another line, but I think this is good enough. Lathe the brush with lamblg
and start pulling thin lines, draw the lines that we have
drawn earlier for the leaves. Make sure the leaves
are thin and pointed. Let's continue to fill the leaves with the
same technique. I think some of the leaves
that I had painted are short, so I'm loading my brush
with black again and making some of the leaves
longer by pulling longer lines. Allow the painting to
dry completely and gently remove the masking tape
from all the four corners. Once you complete the painting, don't hesitate to upload your work to the
project gallery. And Feel free to try out
different pastel shades for the sky and don't
forget the palm tree. It's a vital element
to the composition. I can't wait to see
your recreation of this beautiful sunset beach. Let's take a quick look at the next last project
that we will be painting. It's going to be a serene
evening sunset sky with a few bird
silhouettes and mountains. Thank you so much for joining. See you again in
the next section.
8. Class Project 4 - Calm Sunset Sky: Back. Let's get started
with our next last project. It's going to be a beautiful, serene evening sunset sky, which evokes peace and calm. We'll be drawing birds and mountain silhouettes
for the foreground. Let's take a quick look
at the colors needed. Cadmium yellow medium,
golden, tighten red, rose quartz, mint, blue mist, aquamarine mist, neutral black. Let's prepare the
watercolors by spraying some water on them and let's
activate the water colors. Keep a tissue handy in
case you need them. I'm applying water and making the background
surface completely damp. L et's start painting the first color cadmium yellow medium. I'm using a diluted version of this paint for
the first layer. The next color that we'll
be painting is golden. As you can see, I have left a few gaps here and there while I was
painting the yellow, and filling those
gaps with golden. Let's the next color
tight and into the golden and add a few strokes from the left and right
into the yellow. I. Let's darken the horizon
mine with tighten red. The next color we'll be
using as rose squads. As you're painting,
make sure you blend the rose squads into the yellow. The next color that
we'll be using is mint, which is again a
soft pastal shade. Let's blend the mint into
the rose squads as we paint. Remember to keep
the paints diluted. That is you add a
lot of water to the pigments and keep it way. The next color we'll
be using is blue mist. And the uppermost
part of the sky will be using aquamarine nest. Blend the aquamarine nest into the blue mist as you paint. We already have a
beautiful soft pas sky. I'm darkening the upper
parts of the sky using the same color that
is a Marine mist. For this painting, I'm not
going to paint a second wash. I think the first wash itself looks really bright and vibrant. But if you prefer,
you can go with a second wash with the
same set of colors. Let's paint a mountain
silhouette with black. L et's use a fine brush to
add more details in the sky. Allow the painting to
dry completely and gently peel off the masking tape from all the four corners. Here we have our beautiful, calming evening
sunset sky in acalas. I highly encourage you to give this painting a try and try different combinations
for the sky and upload your work to
the project gallery. Let's take a quick look at the next class project
that we will be painting. It will be a beautiful
evening sunset sky, more like a twilight time and a beautiful reflection
of the sky on the lake. We'll be painting mountains in the middle ground and the beautiful lake
in the foreground. Thank you so much for joining. See you again in
the next section.
9. Class Project 5 - Twilight Sky: Welcome back. Let's get started with our
fifth class project. It's going to be a
Twilight watercolor painting with shades
of violets and pinks, with a beautiful sky
in the background, and the lake reflecting the sky, will be painting mountains
in the middle ground. Let's take a quick look at the colors required, rose Ruby, Mader Lake red light, violet, Indigo, ultramarine, mass
brown, and lamp black. Let's prepare the
water colors by spraying some water
and activating them. I taped down an A size sheet, and you can make the upper
half of the paper dam. Let's start with the
first color ruby. Remember, this is a first wash and make sure the
watercolors are diluted. I'm gently dragging the
brush across the paper. The next color we'll
be using is rose, which is a very beautiful color. As you paint, make
sure you blend it with the previous color that
we had used that is rope. L et's start with
the next color, Mader Lake red light, Blend it into the
ruby as you paint. Gently drag the
pigments from the pink. Let's start with the
next color violet. As you can see, it's
a very diluted wash and blend it with the
pink as you paint. The next color we'll
be using is indigo. We'll be using indigo for the uppermost part
of the sky and blend it into the violet to
give a smooth gradation. Let's paint a second wash
with the same set of colors. This step is totally optional. If you feel the first
layer is good enough, you don't have to
go with a second. L et's allow the sky to dry completely and start
painting the lake. I'm making the lake
area completely damp. I'm leaving a little
bit of space between the sky and the lake
for the mountains. Let's start with a first color. I'm gently dragging the
pigments across the paper. The next color we'll be ing
is Mader Lake red light. Gently drag the pigments
from the rose downwards. Let's add another layer
of madder lake red light. Now let's start for
the next color violet, and as you paint violet, blend it into the rose. The next color we'll
be painting is Indigo Blend indigo with violet. I'm pulling a few strokes of this color into
the rose as well. The next color we'll be
using is Lamp black. Like the previous layers, you'll need to blend the
black into the indigo. As you can see, the paper is still damp and I'm
able to work freely. This is because it's
a 300 100% wor paper. I'm loading my brush
with mass brown and pull a few strokes
into the pink. I'm loading my
brush with indigo, and I'm going to layer the mass brown that
we had painted, and I'm actually going to paint this indigo over the mass brown. We longer strokes closer
to the horizon line and make them shorter
as you come down. Let's lower brushwo indigo
and paint the mountains. Next, loader brush
with lamp black, and we'll be painting this mountain in front of the mountain that
which is painted. Let's define the horizon line
with a thin line of black. L et's pull a few strokes with
black on the leg as well. L et's allow the painting
to dry completely and gently peel off the masking tape from all the four corners. Here we have a beautiful
tight watercolor painting, and it looks
absolutely stunning. I highly encourage you
to give this painting a try and applaud your work
to the project gallery. Let's take a quick look at the next class project
that we will be painting. It's going to be a stunning
golden hour Sunset painting. Thank you so much for joining. See you again in
the next section.
10. Class Project 6 - Golden Hour Sunset Sky: Let's get started with our
sixth and final class project. It's going to be a golden
hour Sunset painting. We'll paint a beautiful, soft glow in the
background skies. We'll paint mountains in the middle ground,
in the foreground, we'll paint the lake and
bushes as sylhuttes. Let's take a look at the colors needed for
this class project. Cadmium lemon, cadmium
yellow medium, golden, titan red, shadow violet, mass black, lamp black,
and English red. Let's draw a sleeping line on
the upper side of the page. And another sleeping line below that for the horizon line. Let's draw a rough shape
for the mountains as well. You are free to draw any kind of mountain shape that you like. Let's activate the water colors by spraying water on them. Let's make the area above the mountain dam or a
wet on wet technique. Make sure there are
no puddles formed. Let's start painting the
first color cadmium lemon. I'm painting cadmium lemon
closer to the mountains, leaving a little bit
of space for the sun. The next color we'll be painting is cadmium yellow medium. I'm painting it around
the cadmium lemon. The next color is golden. Let's paint around the previous color
that we had painted. L et's low the next
color tight and red. Let's paint tight and red, closer to the mountains, and pull a few strokes into the upper parts
of the sky as well. Let's mix English red with the titan red that
we already had in our palette and we'll use
this for the next layer. I'm pulling short strokes on the upper sides of the
sky and from the sides. This will bring a
beautiful contrast between the part of the sky
and the corners. Make sure the center
part of the sky is still l and vibrant. Let's allow the sky to dry completely and let's start
painting the mountains. We'll be using shadow violet
to paint the mountains. You can adjust the shape of
the mountains as you paint. You don't follow the outline
that you had drawn earlier. You're free to adjust it to
your liking as you paint. Let's paint the upper parts of the mountains with another
layer of shadow violet. Let's low the brush
with black and paint the part between the mountains
and the horizon line. Now, let's start
painting the leak. Make the leak area
completely damp with water. Make sure there are
no puddles formed. Let's start with the
first cadmium lemon. Let's paint cadmium lemon right under the brighter
part of the sky. The next color we'll
be using golden. Let's pull short strokes
with golden from the corners towards the yellow color that
we have painted. I'm painting another
wash with golden to make the lake glow
with a golden glow. The next color is tighten red, which was mixed with a
little bit of mass brown. We'll use this color to pull short strokes on both
sides of the lake. Next, let's load the brush with diluted shadow violet and paint the lower side of
the lake with this color. As you can see, the
paper is still dam. Oh. I'm mixing some black with shadow violet. Let's use this color to paint the reflections
on the lake. I'm pulling both
long and short lines from the upper part of
the lake downwards. Vary the length of
the lines that you're painting to keep it interesting. My paper ist, so the reflections that we're painting are beautifully
blending into the lake. So we're not having
any hard edges, rather everything is
soft and blended. L et's continue to add
detail with the same color. Next, load your
pressure with black and add a few strokes
on the shadows. A few horizontal lines, and a few vertical lines. Now let's start painting the
foreground bushes as lids. Again, I'm noting my
brush with black and I'm placing small dots on
the area closer to the lake. Since the lake is still wet, it gives us the blooming effect, which looks really beautiful
for painting bushes. I'm making the bushes
on the left side a little more taller and the
ones on the right shorter, just to add some interest. Paint the lower side
completely with black. Now I'm loading a fine
details brush with black and pulling short thin lines
from the brushes upwards. These small dots and lines will make the painting a
little more beautiful. Next, load the brush with and pull a few
strokes under the sun. Let's load the brush with
dinu yellow medium and paint the part between the mountains and
lake with this color. Load shadow violet and pull short strokes on both
sides of the horizon line. Allow the painting to
dry completely and gently peel off the masking tape from all the four corners. And here we have our golden
hour Sunset painting, which is absolutely lovely. I highly encourage you to
give this painting a try. And don't hesitate to try out the other elements that we
practice in this painting, like mountains, the reflections, and the silvet bushes. Thank you so much for joining. See you in the next section.
11. Final Thoughts : Thank you all for joining me
on this artistic journey. It's been a pleasure
guiding you. Let's take a quick look
at what we have learned in the class and what we
have achieved together. Throughout the class,
we've mastered blending techniques using
the wet on wet method, allowing us to seamlessly blend colors and create
stunning sunset skies. Remember, blending is the
key to achieving those soft, dreamy transitions
in your paintings. For the final class project, I highly encourage you to give all six class projects a try. Each painting offers a unique perspective
of the evening sky. From vibrant hues to
serene silhouettes. Don't forget to upload your paintings to
the project gallery. It's a great way to
showcase your work, receive feedback,
and inspire others. Here are a few other
watercolor paintings that I've done using the same wet on wet technique that we
practice in the class. I urge you to continue exploring different color combinations
for your sunset skies. Mix and match colors to create your own unique interpretations
of the evening sky. Don't hesitate to
experiment with silhouettes and other
elements we've practiced. The sky is the limit when it
comes to your creativity. If you enjoyed painting with me, consider leaving a
review about the class. You can also follow me on Instagram for more
watercolor paintings. My Instagram handle
is Jasina disco Art. You can follow me here on Skillshare for more
class updates. Thank you once again for
joining me in this class. Keep practicing, keep creating, and remember to always follow
your artistic instincts. Looking forward to seeing
you in the upcoming classes, until next time, happy painting.
 Jessintha Reena, Artist and Art instructor