Transcripts
1. Introduction: Perspective is always
good to keep in mind when you even when
you're painting loosely, but you don't have to
get too hung up on it. Hi, I'm Nadine. I'm a watercolor artist
from Melbourne, Australia. Now, I mostly paint wildlife
for my day to day painting, but every now and
then, I like to paint a city scape
or a landscape. But even when I do do
something different like that, I still like to paint loosely. I really don't like having
to pay attention to detail. But even when you're
painting loosely, I think it is important to
keep some of the rules of perspective in mind
while you're painting to make sure you get
an effective painting. But having said that,
I'm a lazy painter, and I like to paint quickly, and I like to just
get on and do it. And I don't want to spend hours doing really complicated
technical drawings, getting two point perspective, three point perspective, getting everything measured and right. And I don't think you have to. So today's exercise is about keeping a few things
in mind while you're painting to get a
really good painting, but not having to stress about getting it all
really accurate. So I want to show you
what you can get away with to produce a
nice little painting. So the way that I've set this up is lots of individual
lessons, each lesson, although it's short is a whole painting from
start to finish, and I've put at the beginning of each lesson a photo of
what we're going to be painting during that
lesson so that you can decide whether you
want to do it or not. Now, it's all one
point perspective, so it's about as
easy as it gets, and I'll mention a few words about that right at the start. And I have set this
to intermediate, not because it's difficult. It isn't difficult at all. But because I want you to be
loose and free with this, the painting is quite fast. And I know that fast painting, although it's what I'm
hoping that you'll do, can cause consternation
for some people. So if you're a beginner, maybe have a little
look at some of the lessons first and decide
whether you want to do it. I reckon you probably could. But as I say, I know that painting fast can
be challenging, particularly when
you're starting out. We'll go through there's no reference photos or
anything like that, but we'll go through
the materials, and then we'll go
through a series of little paintings producing
little thumbnails. And hopefully by the end of it, you've got a better handle on just simple one
point perspective.
2. Materials: Materials for today, there's
no reference photo for this. This is just all
out of your head. I'm painting on 300 gram
archers coal press paper and a lot of these have got
old paintings on the back, so I'm just using up
scraps really for this. Some of I am painting on a board and some of
them I will tape down, not all just some
regular masking, regular pencil and erasor. Then for the paints, you can use anything
you want for this. It really doesn't matter.
These ones that have got a bit of color in them. I've used. I've got some Winsor
Newton yellow Oka and Burnt Sienna,
also Windsor Newton, French ultra, some Daniel Smith, Lavender, Indigo,
and Van **** brown. For all of these molotone ones, those are all in
Daniel Smith Indigo. It doesn't really
matter what you use, pick the paints that you like. In terms of brushes.
Now, this one matters. This is just a flat
brush synthetic, and this is good because it
gets all these shapes in. So to try and use a flat brush for this,
you'll find it easier. I've got this round one and the details of these are
on the materials list. I think I only use
this for one stroke, so don't stress
if you don't have anything you could use for
the bit that I use that for. You could even use
the flatbrush. I do have a little synthetic. This one, is just
a little rigger, and that's good for
getting the foliage in when we do the little
landscape painting. Other than that, you need
a palette a jar of water, some tissues, and I
think we're good to go.
3. A Quick Word on Perspective Before we Start: Okay. Before we start painting, I want to do a couple little
words about perspective. Now, there are 1 million
really good explanatory videos online about perspective, that can be a little bit dry and you have to
really pay attention. I mostly pay attention
to perspective, but I don't get
too hung up on it. I try and get the
best of both worlds of thinking about perspective but not getting
too hung up on it. If I show you what I mean, if I was to draw, if we go back to that
primary school one that we all do where we put
in the horizon line, we pick a point on
that horizon line where everything vanishes too, the vanishing point we've just
picked and we draw a road. I come out to the corners of my rectangle and this is a road, if I want to draw a
fence along this road, I can pick the
height of the fence arbitrarily here and go
back to my vanishing point. I'm going to have a
couple of fence posts that I know the top and the bottom of these
fence posts have to touch the top and the
bottom of these lines. But if I really want to do it properly and work out the spacing of these
fence posts going back. I have to do all this nonsense where I find a midpoint and find an intersecting
line and put them in properly to
get the spacing right. Now, I don't want to do that. I have no interest in
doing that in my painting. I want to be thinking
about these lines, but I certainly don't
want to have to measure distances to get back
because intuitively, I know that if I'm
drawing a fence that's disappearing down
towards the horizon, those fence posts are going
to get closer together. I don't have to be too
worried about that. That's what I mean when I say I loosely pay attention
to perspective, but I don't get to hung up. If I were to apply that
to say some buildings. If I've got my horizon line, I've got a vanishing point, I'm going to make it
easy and just bring those diagonals out to the
corner of my rectangle. I'm going to give myself
some nice verticals to suggest I've got
some buildings here. In this case, I'm going to put some windows
on these buildings. I'm going to again arbitrarily pick a height that I
want those windows at. Coming back to my
vanishing point. Then I'm going to
put in some windows. I know now that my
windows have to fall in this between these
lines that I've drawn. They're going to be
bigger at the side here getting smaller as I come down. I know that my roof line here has to follow this diagonal.
I have to have that right. Both sides, here
is my roof line, the way I've got some stuff. But what I haven't paid
attention to here, although I am using those
lines to get my windows in. What I haven't paid attention
to is the same idea here. I haven't decided that
all these windows need to be the same distance apart and I'm measuring
and moving back. I'm just roughly putting them in and a bit of a shadow
say on this side. That's what I'm thinking about when I'm
doing perspective. I'm paying attention
to my vanishing point, but I'm not measuring all the distance to
getting that all right. I can be a little
bit loose with that. That might be not
clear at all to you, but I'm hoping that as
we move through and do these little thumbnail
paintings it will become a bit sharper in your mind and you'll
see how you can use the horizon line and the vanishing point a
really simple one point perspective to get in lots of nice little scenes out and see how changing it
changes your painting. We'll start doing
some litt thumbnails.
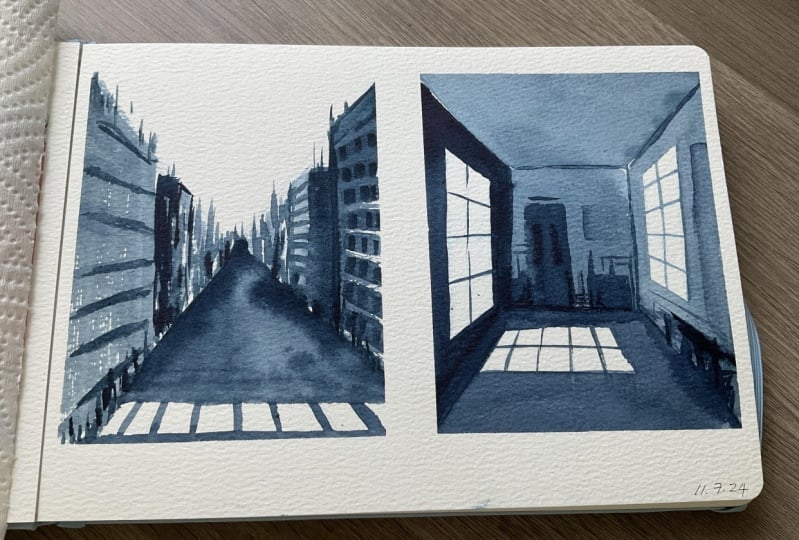
4. Central Horizon Line and Vanishing Point: We're going to keep it
super simple to start with. I'm going to do a rectangle. I'm going to put a horizon line. I'm just going to put it
straight through the middle. I'm also going to pick right in the middle vanishing
point right there. Now I'm going to
draw a series of diagonals out from
that vanishing point. I'm going to take them through the corner of my rectangle. Not for any particular reason, just I'm going to keep
things consistent and that's a simple
place to start. So roughly out. Now, that's all
I'm going to draw. What I'm thinking
about here is if you did my Venice lesson, this will look a
little bit familiar. We're going to do a
row of buildings, some sky and some water. I'm going to just
use the one brush, I'm going to use
this flat brush here and we're going to
just get going. Milky I've got in my well here. French tra. I might need to squeeze out some bit of
French ultra in here. I want to really milky wash. I'm painting flat at the moment. I just come straight
onto the d page. And just popping the sky. Not fussing, just
following that triangle, keeping it nice and rough. Then I'm going to do
the same thing down the bottom for the water. That's all I'm going
to do for those. Now. Because I'm keeping
this really simple, I'm going to assume that I've
got a row of buildings on each side and that they're all butted up
against each other. This line here is going to be my roof line on either side. Then I'm going to have
some verticals from my building and
they're going to come in and touch the water. Now I'm not going to wait
for this to dry because I don't mind if the shapes
bleed into each other. What I'm going to do is
make sure though I've got a little bit less water on my brush than I've
got on the page. I'm going to start
with some yellow ca. I've got a milky to
creamy mix of yellow aca. My paint has dried
up in my well here. I actually have to
get quite a lot of water into it to
actually get it up. It's probably better
if you squeeze fresh. Because of that,
I'm just going to drive that heel with
my brush a bit, so I don't have so much
water in my brush. Now going onto the page, I want to follow this
is my roof line. I'm going to put a
mark here and then I'm going to paint straight down. Go again, a mark
on that diagonal, then I'm going to turn
my wrist straight down. I'm going to go to
the other side, do the same thing.
Maybe one more here. Then I'm going to switch colors. I might pick up maybe some red. I've got some pyrole
reading here. The same consistency
paint on the diagonal, then turning my wrist and
bringing that straight down. I don't care if I get some
broken strikes in there. I'm not really
worried about that. Then I might I've
got a bit of a mix. I've got bc and some
bandit brown here. It really doesn't
matter what colors you use. You use
whatever you like. Another one, bit tricky
in the small spaces here. That's all I'm going to do
for my buildings initially. Now, I don't mind all
of this bleeding. Not fussed about that at all. What I am going to
start to do is think about this is my roof
line on either side. I want to put in a
couple of darks to show that that's
where my roofs are. Now, I could wait until
this is fully dry, but because I like things
mixing and bleeding a bit, I am going to put
the first layer in with some really thick. I've got some van ****. Brown in here. Really
toothpaste consistency. Again, if I think I've got
too much water on there, I can just paint
my tissue first. I'm going to follow
this diagonal. I'm just going to touch
in a couple of places. I don't want to paint
a really solid line. I just want to give the idea. I'll take another bit
for the other side. I'm just roughly popping
on the roof line. I will put a few more
things up in there, but just to get my eye in. Now I'm going to come out
actually and let that dry, and then I'll come back in
with a second layer. Okay. It's been 5 minutes.
I'm dry now. So now I'm going
to put in my first second third floor
of these buildings. To do that, I'm going to guess if this is my foremost building, but maybe I've got
a first floor here, maybe the second floors there. What I need to do to get these floors in is make
sure that the line I draw from here comes back to intersect
this vanishing point. Do the same on the other side. Maybe I've got a floor
there and a floor there. I'm going to take
my small synthetic. I'm going to pick up a little
bit of I think indigo. I want it really not much
I want these lines fine. I want to get some
paint my tissue to make sure I don't paint
a great big watch of paint like that on my page. I just want to.
There's my point. Just roughly come out. I've got the other one here.
That's all I'm going to do. I'm going to do the
same on the other side. Here's my first floor. I've got to come
into this point. Now if you can't eyeball this, you can put it in with a pencil. But because I don't need to be too tidy, it
doesn't really matter. Haven't got any paint there. Actually I need a
bit more water, a bit too gluey. Then this one. I'm just going to
strengthen that button. Now I've got my first floor, second floor, third floor. Now I'm going to do is
put in some windows. Here this is like the idea with the fence that I'm
not going to worry about the spacing of these windows going back other than to keep in the
back of my head, that as I come back towards
this vanishing point, the windows are going
to be closer together. Obviously, they're going to be smaller because I've got to fit them in between these lines. To put these windows in, I'm just going to do a
bit of a suggestion. I'm going to stick with
this small synthetic, pick up a bit of indigo, or I could pick up a bit of van dye, doesn't really matter. I'm going to just put
my hand flash and I'm just using the shape
of the brush to just put a couple of windows in
keeping it pretty loose. Of course, if you were doing
this for a real painting, you might want to spend a
little bit more time looking at the shape of windows
on these types of buildings. That's not
what this is about. Remembering now that I'm
getting a bit closer together as I come down towards
the vanishing point. Do the same thing
on the other side. You can also put your brush up, vary the strokes and come
up on the tip and do it. It doesn't have to be or flat. It just is good to vary the way you hold
your brush to get. You don't end up just
too much the same same. Okay? Getting closer together and smaller as I get
to the back here. Now I'm going to
pop a little bit of nonsense on the roof line. Let it dry, we'll
pop in a shadow. Sticking with the mix
of indigo and van ****. Paint my brush so
it's nice and dry. I'm just going to come along
and on this roof line, I'm just going to
paint some nonsense. Little flicks to suggest that there's a business
happening on the roof. On the other side, you
probably won't be able to see this underneath my hand. See if I can move my The strokes really towards the back here
should be getting smaller. I didn't pay much attention
to that. I am going to pop. I'm going to pop
this side in shadow. This side, I'm going
to leave in light. I'm going to pop just a
couple of little down pimes, while I've got this on my brush. Just a couple of verticals. Just to help my eye show
where these buildings divide. Now, the important thing here, you want to try and keep
them reasonably vertical. I don't want to paint the whole line in.
Just keep it loose. Broken lines are
your friend here. You don't have to get
it all perfectly in. I got to come out of that
again and let that dry. It's been about 10
minutes. I'm fully dry. I'm just going to pop
in a shadow here. Now, I need to remember, I'm
going to it really simple. I'm going to put this
whole side in shadow, but it's also going to
come into the water. But the shadow
when it comes into the water still needs to follow. Up to that vanishing point. It needs to be skinnier up the back there,
wider at the front. I'm also going to
pop in a couple of horizontals just to suggest some chimneys and that kind
of thing making a shadow, and that still has to
follow my perspective. You'll see what I
mean when I do it. All I'm going to do, I'm
going to take up, I think, maybe a little bit of indigo, and a little bit of
my French ultra, which is in the water. That's to French ultra. I'm just trying to
get a bit of a dark. Maybe I'll take it
from my top well here. I need to make up enough that I don't have to stop and make
more paint halfway through. That's really bad
when you're doing a shadow, that will
freak you out. I've got my puddle of paint. I'm going to come straight on and paint through
these buildings. This is why I needed it dry. I doesn't matter if those washes underneath
move a little bit, but I don't want
it to move heaps. Now, painting the shadow out, coming from the middle
and painting out to here. Now, I'm also going to
pop a few horizontals. I'm going to come,
but I have to drag my hand back this way. That one didn't quite hang on. I might just I did what I
just told you not to do. What I wanted, what
I was going for is really these shapes
that should be reverse. The smaller shapes should be up here really and the
bigger shapes down here. I can't do anything
about that now. I've got that on. I'm
going to let that dry, but that gives you the idea
of what happens when you have the central horizon line, central vanishing point
buildings in towards the center. The next one I'm going to
make you do is a series of little thumbnails where we think first we'll move
the vanishing point, so you can see what
happens with that. Come out of that, let that dry.
5. Moving the Vanishing Point Along the Same Horizon Line: Okay. Next, I want to have a
look at what happens when we change the position
of the vanishing point. So two rectangles.
Same painting. Central horizon line. One, I'm going to do
a vanishing point just off center here. This one, I'm going to come hard up really close to the edge. Now, just for consistency, I'm going to draw my lines
from my vanishing point out of my picture up to the corners of the rectangle down to the
corner of the rectangle. There's no reason that
these have to go here. They can go anywhere, I don't want to change too
many things on you at once. Same here. Really
nice and rough. I'm going to do the same sky and water with my French ultra. My water and my paint
are a bit mucky, so this will be a not
quite as bright a day. I hope I'm instilling
you in that it's okay to be messy
and a little bit rough. Now, we're going to do the buildings, same
way as last time. I'm going to start
with some yellow a car on that diagonal and
then straight down. Change colors. Okay. Now I'm going to do
the restating well, putting my roof line, so the really tooth
pasty van ****. Now here, obviously,
I'm going to be really steep because I've got a really sharp
perspective line there. Now, I haven't got
much pigment on there. I reckon I can do the plows
before it's fully dry here. I've not got much water
in my page this time. We'll find out.
Painting my brush. Picking my floor
and coming back to my vanishing line,
vanishing point. Again, if you would
rather you can draw it in first with a ruler so that you don't
have to wing it. Here again, very sharp. M the broken lines of
your friend here. Okay. So now I'm going to
pop in my windows. Okay. And then I'm
going to pop in my nonsense along the roof line. Varying my strikes
and just scribbling. Then on whichever side, I'm going to put in shade. I might leave the sides in the light put the shadow on this one like
I did last time. I'm going to pop a couple of
down pipes on the one here. I go room on this one, I might not bother too in there. Then I'm going to come
out. I'm just going to restate, that's blight. I going to come out
of that and let that dry and then
we'll pop a shadow on. Maybe 10 minutes and
I'm fully dry now. I'll pop just quickly pop
the shadow on. Same deal. I'm going to use a bit
of French ultra and a little bit of indigo. Milky to creamy wash. See how dark it is. That's
probably all right. Maybe do this side. This has settled into dry now, another maybe 10 minutes and before I compare it with
the first painting, I can sit here. M windows have disappeared a little bit when I
put my shadow on. Sometimes what you need
to do after you put on that wash is just
come and restate. If you need to. You
might not need to, but I just want a a
bit more in there. This side, maybe doesn't always disappear
and it depends how dry it was and how
hard you pushed. The other thing that I
can do, I can, if I want, just give myself a little bit of a line back just to redefine where these
buildings hit the water. Where is it? To help your eye. Really what I want to show
you then is the difference between here we had our
horizon line in the middle, vanishing point in the middle. Both horizon lines
in the middle, one slightly to the left
for the vanishing point, one right hard to the right
for the vanishing point. You can see how easily you
can change the way you're looking down that canal just
by shifting that one point. Now there are two other little thumbnails that I want to do around this painting
before we move on to a different subject and
in the different subject, we'll move the horizon lines. But two quick things that I
want to do before we do that.
6. Dealing With Different Building Heights and Spacing: Two more, two more
little exercises, I want to do with this
particular painting before we move on and give you
a change of scenery. What happens if I've got
my central horizon line, I've got my row of buildings. But I don't want my buildings to be right
next to each other. What happens if I
want a building here and a building here? My roof line is going to
follow this perspective line. But this face of the building, I'll be able to see
that because these aren't directly
next to each other. Here I have to have a
horizontal s there. Which also means if I'm looking at say my first floor is
here, my second floor, third floor, that's my
perspective lines going back. Here's my first
floor on this one. Here I've got to be horizontal. My first floor, here I've
got to be horizontal. Those two are following
that same line, but here I've got to
keep that straight. Here straight. That's what I'm looking at there if I've got a space
between those buildings. The other thing,
what happens if I've got a building here, but I want one in the
front that's shorter. How do I deal with that?
This building easy. There's my roof line. I've
not got one next to it, so I've got a
horizontal going back. This one, I'm going
to draw myself another perspective
line bit lower. Here, there's my roof line. And then I've got to
come horizontal here. This is the face
of the building. Here my front windows
and then here my side. That's a couple of
things that you can now incorporate into the painting that we just did. That's
what we're going to do. We're going to do
another one now that's got a little
bit of space in the buildings and
a little bit of difference in the height
of the buildings. Now, I'm sitting here trying to decide whether I want
to make it up as I'm going along or
whether I want to draw it in. Let's see how we go. My rectangle. I think
it might be simpler. Deciding whether I
want to do I might do my sky after I've
done my buildings. I'll give myself a couple of
buildings here on this side. I know that there's
my roof line, and it's coming back, I can see this side
of the building. This one I might join up. I'll just keep it
couple with space, this one is joining to that one. On this side, I'm going to draw one that's maybe
slightly shorter. There's my roof line,
it's going to come back. And then I might
keep those, keep it a bit simpler for myself. I've got a little bit of
variation in my buildings. I'm going to take my
flat brush again. I think I'm just going
to do the water first. I've got my French ultra. Then I'm going to
take my yellow aca. Now here, I have to think a little bit
more now because I've got the different angles. I've following my diagonal there and that can
come straight down. Following diagonal, and that
can come straight down, but this one I have to be careful that that
goes straight across. Come onto the other side. I do my short building here. My taller one there. Now this building,
I'm going to keep it the same color so that that's
the side of the building. I'm going to switch colors. So it's easier to see for these other buildings
that are next to. Didn't have enough
water in there. I might do a brown
one just in here. That one I'm going to make to make that one follow
that same diagonal. It's this building shorter, which means this red building, I need to come and put
a horizontal in there. Slightly filier getting
that shorter building next to the taller building. But now I can do the same
thing with my roof line. Actually, what I'm going to do, I'm going to do my sky
first before that dries. I didn't do the sky first
because I knew that the shapes. That's a bit tricky.
I can I don't mind if I touch to the building, but it just makes it easier. It doesn't really matter.
There aren't that many rules. You can do it either way. You can do the sky
first and then put the buildings or you can put the buildings first
and then do the sky. Don't like to be
too prescriptive. Now, I'm going to
do my rooflines. Here there, that way,
it comes across. I've got a little bit of
variation in my buildings now. I'm going to take my indigo. Now I want to do my floors, but here I have to be careful. Paint my brush. Paint my brush. I keep saying paint my brush, paint my brush on my tissue
is what I'm going for. If I come out here, I have to remember that
my line that's coming out here on when I get to
there has to be horizontal. Same here. Coming
through, this one, but that line, Coming through that line follows
all the way through. But here, it has
to be horizontal. Following going to come that way because my wrist doesn't
quite bend that way, horizontal, but
here following out. I'd give This
buildings really tall, so I could probably get
an extra floor in there. Then old windows, Here, I've got to make sure
that my the top of those windows,
they're horizontal. Getting smaller as
I'm going back. This one, remembering that the not in an angle
straight across. Then I'm going to do
my of nonsense again. And here bringing
stuff horizontal. I'm going to point a
few there as well. Then I'm going to be I'm going to handle the shadows
a little bit differently. I'm going to put some shadows on the faces of those buildings, but here I'm going to leave
a bit of light there, and then here I'm going
to put some shadows. I'm imagining that the
sun is coming this way. So I'm going to work
out what's going to be and what's going
to be in shade, but I need to let that
dry before I do that. In about 10 minutes. I'm dry. I could rub out
these pencil lines, but I'm just not going
to worry about it. I'm going to do my mix of Indigo and French ultra
and just test it. Now, I'm going to
come straight down on the front of these buildings. I might, look, you know, what? Let's leave a little
bit more light. I'm going to mix it up a bit. Leave some light there. Now, this is the side
of the building, so I'm going to leave a little
bit more light there and put shadow on the front, that red building, leave
some of it in the light. I go a bit heavy there. Then I'm going to bring
that shadow into the water. Unfortunately with the shadows, you have to work pretty quickly because if you damage
if you hesitate, you'll get streakiness in
the wash. Then on this side, Actually, what I would say. Sometimes if I've
got a painting like this and I know I want
to put the shadows on, and I don't really know exactly
where I want to put them, I would take a photo
of the painting, printed out, and then
paint the shadows on the printed out copy because although it won't
paint the same, at least gives you a feel for where you want to put stuff. Now on this side, the sun is coming through and hitting the face of those buildings, so I need to put this didn't
get enough paint in shadow. Okay. And that's where I'm
going to stop with that one. One more to show
you, and then we'll move on to a more
modern city scene.
7. One More Italian Building Scene: Okay. One more before we complete.
We change it up a bit. What happens if I want to do a building in the back
that I'm looking straight at? So again, you're going to be
doing these in your sleep. My diagonals. Now, what I'm going to do is I'm going to draw a rectangle. That intercepts those
perspective lines here. I'm going to keep my horizon
line there in the middle. But I'm going to
imagine that this is a building in a court, I guess, and then I've got
these buildings on the side. I'm not even going to bother
with the sky for this one, and I think I'll
make this pavement. I'm going to I'm sick
of the same colors. I'm just going to back
that pencil a minute for a little bit because
that's going to really make it a bit tricky. I'm going to use a little bit of lavender for this
building in the back, I think, just because I like it. So milky wash lavender. I'm going to put Yellow wa and Becana for my buildings
on the side here. I've kept the buildings all
touching each other here. I'm not having big and
little or spaced apart. Then I'm going to put I'm going to mix it up a bit
with my ground here. I'm just going to follow. Put a bit of nonsense in. I want to get to hung up here. I pop some stuff
in. Now of line. Same thing, just loose. On this building
in the back here. That's all I'm going to pop. I'm going to switch
to my little brush. Pick up some indigo, and again, do my floors, same
as the last time. My vanishing point is in there. I just rubbed it out a
bit, but that's okay. Can still see it. Just as pencil under paint is can be really
hard to get rid of. Okay. Now, a bit of
nonsense up here. Now, while it's still wet, I'm going to just put in. Now some little square windows, maybe there's a door or an
arch or something here. I can make it up as I go along. No rules. Bit of dark
underneath, messy lines. I keep picking up this
great lump of paint. I need that to come down a bit. Little windows that get
bigger as they come towards the front. On the other side. Maybe I've got maybe
there are some more, you know, I haven't really
painted many doors in. Maybe I've got some
bigger darks in there. Maybe I want one more. I just need little
nonsense marks in here. Now, maybe I'll put and then a few of my down pipes. I'm going to just define a bit where that hits come out and
let that dry for a second, then I'm still going to
put a shadow on this one, same idea as before. Shadow I'm not really dry, but you've done this 50 times, you've got the idea and I can be a bit messy with
the shadow as well. Sometimes it can be nice
when you're doing that thing to you don't know
what the shadows are going to be like you're not staying there in
front of the place, so you can make it up a bit. That gives you that
nice release of light on that building. So shadows can be fun. That's where I'm
going to stop with this little Italian old
building type number. We're going to move to
a more modern scene. Have a coffee, take a breath,
and we'll keep going.
8. Simple Modern City with Central Horizon Line and Vanishing Point: Okay. Slight more modern
city scene with this one. I'm going to keep the
base painting the same. I give myself a rectangle. I'm going to keep the same mid horizon line mid
vanishing point. Taking my building line out, I'm going to come and
intersect not the corner. I'm going to come
and bring it in slightly so you can
see what that does. On this side, same thing. Down the bottom, I'm going to come straight out to the corner. Now, what I want
to do in this one, I want to put a pedestrian
crossing in the front. To do that, I'm going
to give myself, I don't have to
put 1 million in, but I just want to give myself
a few perspective lines. Coming from my vanishing point, just intercepting this
front horizontal. So that I'm going to be able to see the direction
that my brush goes. I'm going to pop a couple of buildings in that have
got space between them, so meaning that I've
got a roof line here, but then they're coming back
into meet the next building. Maybe one on the other side, so I'm just arbitrarily just
winging it, making it up. I've got two where I can see the side of the
building there, which may stay when I paint, may not because we're
going to paint this very quickly, roughly,
quite abstract. I don't want much
fussing in this one. Now, the only other thing
I'm going to do because I am going to be painting quickly
and a little bit abstract, what will happen
is I'll start to put brush marks in
and then I'll forget to turn my hand to follow
my perspective lines. I'm just going to roughly
put in just a couple more to remind me that when
I'm painting these buildings, I need to follow these lines. Actually get that one in. This building I might leave as the side of it there.
Well wing that one. I'm going to paint
with one color. I'm using indigo and one brush. Might use a little
brush at the end, but I'm going to do
most of it with this. No painting a sky, not
worrying about that. I'm going to pick up a
milky wash of indigo. I'm going to start
on this building. I'm going to just drag my brush. Now here is where
I've got to remember, to turn my wrist to follow
those perspective lines. Keep it nice and messy, then I'm going to just
straight down there. This building on the side here, I'm just going to pull my
brush through like that. Really loose, really messy. Pick up some more paint, do the same thing on
this one over here. Leaving some light and
turning my wrist to follow those perspective lines and then drag a brush
stroke through here. My brush is very dry, so I'm getting these gaps in the pigment, which
is what I want. Here, I'm going to just follow that through
with big strokes. Then I'm going to
drag just a couple of a bit more precise
lines to follow my perspective lines just to sort out what's
happening there. Now, coming back in here, I just want nonsense. I've got my brush on the side. I'm making sure I'm following
my perspective line, but I'm not really thinking anything other than
making some brush marks. While this is still wet, I'm going to put a few more nonsense marks
around the place. And figure out where my road is. I'm just moving
from side to side, putting in more strokes. I might come here. I want you the
messier the better. I want this to be no
thought attached. I'm just putting in stuff. That will I've come
out of the page, so it looks a little
bit off there, but when I cut there, I have actually followed
my perspective lines. Now, that's all settling in, I'm going to think about
this pedestrian crossing. What I want to do, I want to
pick up some milky paint, and I'm just going
to paint back. Or forward, depending
on what you fancy, think, they might be too wide. Maybe I'm going to
go a few between, it doesn't matter if
your pedestrian crossing isn't completely
accurately spaced. Then I'm going to
fill in this road. Then when I come down to here, leave that gap and then paint. Across the front there. There's my rough
pedestrian crossing. Then I'm going to pick
up my little brush to ab is my little brush. While this is all drying, I'm going to take really
tooth pasty paint and just drop in some nonsense
into this wet edge. Flicky like we did
on the roof line for the Italian buildings,
some stuff. That doesn't have
to mean anything. I just want some things
going on in here. Okay. So that's my base painting. Now what we're going to do is we're going
to go through and do one where we move
the horizon line up, one where we move the
horizon line down, so you can see the
difference that makes.
9. Changing the Horizon Line: Now, we're going to do two more. This one, we're going to
vary the horizon line. Now, I don't normally tape down, but because I'm painting
these two side by side, and I keep getting caught when I was filming
that first one. I get thrown trying to
take the angle out of the picture because
I'm trying to come into my pencil edge. So I'm putting the tape
on so I can just keep painting and follow
the right direction. I'll tell you what I'm
painting what it is that I actually mean there I didn't
articulate that very well. Same drawing, but now
I'm going to pop. Then I can't turn my page when I've taped it
down like that. This first one, I'm going to
pop the horizon line low. I'm going to keep the
vanishing point in the center, keep it easy. This one, I'm going to
come slightly higher. Keeping the vanishing
point in the middle. Coming out my diagonals
to the corners or just shy of. Okay. Now what I'm going to do
is my pedestrian crossing. To make it simple,
I'm going to come straight down to the center, then just intersect those, and I'll make up my
mind whether I'm want more lines when I'm
actually painting it. Couple of buildings.
That one come off. Then the last thing
I'm going to put in, and I do think
this is important. I'm going to pop in
the perspective lines just so that I make sure
because I'm painting quickly, that I follow, I don't forget about these window
lines where they have to be with respect
to my perspective lines. And don't forget this one. So we're good to go.
Stick in with Indigo, really annoying me that I
can't move my page now. Really fast, really no thought. I'm going to start here. There's no reason that you don't have to start
on this building. It's just that's what
I did the first time. So putting my windows
in and following that perspective line roughly. This building here. Because I've got
that tape there, I can just paint straight
over and I don't have to stress too much about that. For some reason,
my brain couldn't hack trying to keep
within the lines. I'm just trying to make it
a bit easier for myself. Where's I think that's
probably line there. I'm just probably
going to edit quickly through this because this is just the same
as the other one. You don't need to watch
me ad nauseum doing this. Now I'm varying my strokes here. I need to start to see
I'm all the same tone. I need to now get different
amounts of paint on my brush and get a bit of variation in my tone because
that's all a bit. Changing the angle of my brush
as I'm coming back there. Now I'm going to
come down and think about my pedestrian crossing. I be heavier than I
want to be really. See if I can lighten
up a little bit. Painting my lines in. Then switching to
my smaller brush and putting a little
bit more nonsense. To past you paint. While this is still wet and just throwing
in some bits and pieces. I have very technical terms. A few bit more variation. Then I'm going to switch over to this one with our
high horizon line. And then I'm going to pop
in my pedestrian crossing. I can probably put two
in here. Let's say. That one wasn't
painted well enough. I good put one up there. An and then put a big
one in the front here. Was. Then switching my brush
and while it's all wet, just chucking in a bit more, nonsense with really
toothpaste paint. With city scenes like this, you can also or the tram lines, power lines, that thing, you can put random lines in without getting
into too much strife. Oh. Now, if I tend to use these as this
is my planning stage, if I was going to do a bigger
picture, a proper painting. This is a good place to
start to try and figure out what kind of
shapes you want. If I pull off the tape he now. With this, what I'm
hoping you can see is now the difference between
here's my mid horizon line. Here I brought it down
low and here I brought it up high to where
your eye level is, to where you're looking
down the street. Also this is a particularly
rough exercise, really abstract, really
mucking around with just different different
marks with your bruh. But that you can see that by
utilizing the perspective, and just a couple of things, just enough that having
a pedestrian crossing in there really tells
you what it is. You can convey the subject
without too much effort. We're going to change now and do something a bit
more landscaping.
10. A Quick Landscape with One Point Perspective: Okay. We're going to do now even simpler than the last
ones we've been doing. Just a vital landscape. I'm going to keep it in just
in go, just for simplicity, because I don't want you
worrying about color, I just want you thinking about
the perspective and tone. There's my horizon line. Maybe I'm going to come here
for my vanishing point. Going to do a river. We've got a waterway coming down here. I'm going to just for
for guiding my eye. I'm going to draw a couple of lines out from my
perspective point, my vanishing point, just to give me an
idea where I'm going. Now, I'm not going to do
anything much up here. I might put some
mountains in. Let's try. Maybe I'll use my medium brush. I go this one. I'm
going to take up some milky a indigo and just put a little bit
of a mountain in the back. Then I'm going to pick
up my big flat brush and really thick paint
now, really thick indigo, and I'm just going to
move it so that I'm touching that wet edge of
the bottom of the mountain. What I want to do
here is I want to leave some lights,
leave some gaps. Wash my brush. Then I'm
going to just my wet brush. I'm going to drag that
through following those perspective lines that
I put in other side as well. Now, because it's a river, I'm going to just muss
up my edges a bit. I'm just pulling that in, so I'm not completely straight. Switch to my small synthetic. I'm just now that's
a big lump pain, thick paint, possibly
not that thick, I'm just going to
touch that just to a few places along what I'm taking to be
the edge of my waterway. Now what I'm going
to do. Two things. I'm going to put in a
suggestion of reads, I guess, along the water. Keeping in mind that I want to follow my perspective lines in terms that the
reads are higher here. They'll be smaller
towards the back. I'm going to paint them in the
ground and into the water. Now, if this is really wet, wait until it dries off a bit. I'm going to start down
here I haven't got paint, so it's going to be a bit drier so that my lines will
be nice and fine. Here's my shore
line and these are. These ones are on
the actual reads, these are the
reflections down here. Now as I move back, I need those to get closer
together and smaller. This is like the
nonsense that we were doing on the roof line. Here I'm just doing it as vegetation on the
edge of the water. I'm going to do a little
bit on this side. Then I want to give myself, I'm going to put a bit
of a fence in I reckon. I'm going to take my fin
brush and I'm going to follow those perspective lines. Well, those two. I'm going to make this offense. I need a bit of water I need a maybe mi here
creamier consistency here than milk because I
actually need them to set. Now again, getting closer
together and as we go up. I'll put another line through. Then I'm going to decide
these reflections, I put the sun's coming straight on that
they're underneath but I'm not going to
worry about that. I'm going to just drag
a few lines out from those fence posts to just suggest a bit
of a shadow there. Now some of these tops of these, I'm going to just
pop an extra strop on just to tidy up the
shape a little bit. But I don't want
to get too fussy. I'm going to strengthen sure
is a little bit faint here. I'm going to pop a few more. I'm just wanting to walk
around a few more darks. Need a little bit of
strength in there. Then I'm going to
what I'm going to do. I think I'm going to do
a couple of big trees. What I'll suggest now. My perspective line from my vanishing point
will come out here. I'm going to do two trees here that would be following
this perspective line. I'm going to take that I need to make sure this is relatively dry
before you do this. I'm ta I forget what this is called. I remember out a rig. Not quite sure what
happened there. I've got this rigger brush, and that's what I'm going to
use to put in a couple of trees because I want
it to be really messy. I'm going to pop my brush
in my really thick paint. I'm imagining my perspective
line coming out here, so I'm going to
start about there. Because I don't want control, I just want some stuff. Then that will come. Maybe bring that down. I'll have to have some actual
solid branches in there. Then I'm going to do
another one about here. If I follow the perspective line there, slightly smaller tree. That was a bit much.
That was a bit thick. Then I need to probably
with this brush now, put a few branches in
so you can anchor that. I've got lots of
spaces in there. Just need to anchor
that a little bit. A few actual branches. And that's going to be doing a bit of a shadow that
way for both of them. That's where I'm going
to come out of that. To just show you
how simple it is to get a little bit of an
idea of the landscape. We'll do one more and then I'm going to let you
practice by yourself.
11. Inside Scene: Last one, we're going
to do inside a room. I've taped down just to make it easy for myself
because I want to paint straight out of the
painting. Is my rectangle. I'm going to give
myself for mid to high, Hrizon line, central
vanishing point. I come out to the corners. Then I'm going to
do a back wall. This is I'm looking
down the room, and this is the back
wall of that room. Okay. Now I'm going to do a
couple of windows in here. I'm going to guestimate the
size. I want them about that. But the bottom of
the top have to follow my perspective line. Top coming out. That's
my first window. I'm going to give it
vertical as well. Now the next window, I could do all my
cross points and measuring to make it the
same size as this one. I don't want to do that.
I'm just going to eyeball. I know that it needs
to be slightly bigger than slightly wider
than that first one. That's following my
vanishing point. There's my vertical. I'm also going to now put
some panes of glass in following that vanishing
line vanishing point rather. Maybe I'll keep that mid one. There are my windows, I can rub out that little
bit in the middle. Then on this side, maybe I'll have another window. Perspective line that way. Maybe I'll give this 13
panes, one, two, three. Then down here, maybe I've got
a bookcase or a fireplace. I don't know something
going on down there. Put something on that surface. I'm going to rub out, keep my vanishing point there
so you can see it. Maybe in here somewhere
there's a door. Maybe more bookcases or
something going on there. We'll deal with that when we
get to actually painting. We're going to stick with
indigo just because one day, I'll do a lesson
for you on color, but the indigo is
just it's nice. I can get good contrast. You can see what it
is that I'm doing. I imagine that there's
sun coming through the windows straight on so that these windows are going to
put light on the floor. I'm going to paint these
light areas first. I'm going to take
a milky wash of indigo and painting
like we did the sky. Coming down across. I've had my heater on in
here, so it's really warm. I've got to be careful
that my washes don't. This will dry quickly. If I get too much water in here, it will push up and
bloom into that one. I'm just going to
keep a little line of separation while I get this in just to keep
life a bit easier. Just making sure that my
angle there is right. I know I drew that fireplace
or whatever it is there, but I'm going to come
straight through it for now. I can see my pencil
lines underneath. Then I'm going to just pop
slightly thicker paint, my window paints in. Now, I'll do this back
one while we're at it. Again, I'm going to leave
just a little bit of a gap so that I got a big
wag of paint on there. That's not what I meant to
do. It doesn't really matter. I can't get it off. Going slightly darker
on this back wall. Now, while that's wet, I'm going to take
my smaller brush. I'm just going to start to the nonsense that we
did for the roof line, the reads, that stuff. I'm just going to start
to walk a little bit of that just to make use
of that wet and wet. Follow Here I'm horizontal, following my
perspective line here, throw a few bits
of something in. Not overthinking it. You know, I was saying there was
something in there. I've got to put that door in, but I'll do the door
with the bigger brush. Just some stuff. Doesn't
have to mean anything. Then I want to come
out of that that here you can see. This is
what I was talking about. I don't really mind it, but this wash has bled
into this one, and the water is
pushing out and giving me a bloom there.
Doesn't really matter. But I want to come
out of that and let that dry before
we come onto this, which will be darker, stronger and that's
where our focus is, these windows and the light that's been
left on the floor. I'm going to give
that maybe 10 minutes to dry and then
we'll come back in. Creamy mix of paint now. My big brush. Big puddle. Come onto here. I going to paint just so I can see whether I've
got the right intensity. I haven't got enough water to
see how dry my strokes are, so I need to get a bit
more water into my mix. More of a puddle. Coming up. Do making sure I don't cut
that window off too much. And that's the back wall. And down in between
those two windows. Preferably straight. That wasn't really very straight,
but that's okay. We'll live with that. Then I'm going to come the. The verticals, and then the Now, they're a bit
messy, but that's okay. Messy is fine. But
now we want to put the shadow on the floor
while this is all still wet. So that wall casting
a shadow there. Here's my bit. And then my floor. This is like the pedestrian
crossing we're doing. Now I have to figure
out my center line for each of these. Then the tricky
bit. Now, you could draw this in first
if you want to. M vanishing point is there, my perspective line
is coming out 20, two, three, four,
five, one, two, three, 45, then that is the
rest of the floor. Now, I'm going to just because I've made that I wasn't
straight on my wall here. It is important to try and
get your vertical sraight. So I'm just ussing up that
line a bit and I'll change. Maybe I'll put the door there because I didn't do straight. It's funny can't talk and
paint at the same time. I've got something happening bit of a do that probably
isn't dark enough, so maybe I'm just going to
drop a bit of paint in there. Again, varying strokes and
just putting in some things. I'm just going to tidy up
while that's still wet. I'm just going to pop some really strong
pigment in there. What I'm going to do,
I'm going to maybe suggest I'm going to
paint my brush there so I've got some dry strokes and just move some nonsense around because I need a little bit of
something happening, but I don't want
to go overboard. Because there could be
anything along this wall, maybe there's a picture or
something happening up there, and then I need to get
some stronger stuff happening down here.
I'll wet that. It doesn't matter what I
put down here as long as if I'm putting in these
lines that they follow that vanishing point. I'm just going to
strengthen up there. Now, if you want, you
can go through and put in lights and all
of little details. I don't want to do that. I just want to give the idea that I've got a room
with some stuff in it. I'm just going to take
my smaller brush now. Walk around a few little lights. You can grab yourself a picture of a room and have a look and you can put in ceiling roses and nice and all of that thing. You can go to town putting in your dining table, all of that. But I'm not going to do that. I just want to get
you to have the idea. As it dries off, it might
be that you have to restate some of the lines
to show what's happening. But that's really where
I'm going to that. Hopefully just getting the idea that you can use
the same principles that we did for the
buildings outside, you can use for an inside room.
12. A Final Word: Okay. So I'm hoping
that like me, you've now got a studio space, a painting space
that's filled with all these little
thumbnail paintings. And I'm also I'll be curious
to see whether for me, the ones that I like the best or all the tests that I did without
the pressure of filming. I'll be interested
to see for you, whether the ones that you
like the best or those that come once you've settled into it and have got a
bit of a feel for it. If you've done any
that you really love or even if you
don't like them, feel free to take a
photo and upload them to the skill share site
for me to have a look at, always happy to give feedback.
Thanks for joining me.
 Nadine Dudek, Professional Watercolour Artist