Transcripts
1. Line Portraits with Color Intro: Anyone feel a little disconnected from your
art right about now? Anyone feeling I've been out of practice for a
little while and now I'm really intimidated on
getting started. That's me. My name is Tammy, and I'm so happy you joined me
here on Skillshare. I have other platforms with
YouTube and Instagram. But here I love to
teach how I create. I always put a little bit
of myself into this and today it's about breaking
through that intimidation. I have come across
this single line art, the continuous line art
that I want to apply to my doodling ladies that
we've been working on. Today we're going to
add color as well. This spark has just inspired me. I started mass making again, so I know that this
is just for you. If you're wanting to get back
into doodling, this is it. Today in my class, I even
have an oops where I start pulling other
ideas with collage. Hey, hang in there with me. I've got some brush
calligraphy going on. This is a really
great beginner class, and if you have felt like
you are not an artist, I don't know how to draw. This is for you. I can't wait to see what
you're going to make. Please share your projects, whether it's finished,
unfinished. It's a process. I'm in process, and we're
here working it out together. I can't wait for
you to join me in my class on continuous line art, and we're adding
color to our doodles. Let's just jump right in.
2. Class Project: Before we get too far, I want to talk a little
bit about our project. The project that I'm doing
today is making cards. It's on a playing card stock, folded in half, and I doodle
straight on the card. We're adding color, we're
doodling around the edge. You could use found
words for your message, whatever you can do to get your doodles onto a final piece, something you're proud to share. I'd love to see that or even if it's just
your sketchbook. Share that with me. Show me your process. I would love to see this encourage you and I
know other students get so much inspiration and courage as well by
seeing your work. So please go to the post your project link when
you're done and add that. I can't wait to see your work.
3. Supplies for Drawing and Color: In today's class, we
have a few supplies. It's going to be extra simple. I have a sketchbook. I use a mixed media weight. It's 154 pounds. What I like mostly is
that it's nine by 12. You could use scrap paper. That's completely okay as well. Just as long as
you have something to doodle sketch on
that would work. I use a very soft pencil. This one happens to be a four B. It glides so smoothly. But the thing that's
really special about it is that it
erases very nicely. Today I'm using a
kneading eraser, kneading with as in a
K N EAD knead eraser. You can shape it to
erase as you like. As you mold it, the graphite
will start to dissipate. But if you just have a
regular pencil eraser, that's fine as well. We're going to
thicken our lines, draw our lines with
a fine line marker. I'm using 0.5.
Later, if you wish, we're going to use paint brushes
with watercolor pencils. I actually do a little
brush calligraphy. I highly recommend a Funosuke. This tip, let me see.
It's a soft tip. That means it has more bend
flexibility in the tip. And today I happen
to have a set of prisma color coloring pencils. And then please don't
be intimidated. Already said, this is a class about not being intimidated. I show you this because
I want you to know that you can buy pencils, open stock. And that's how I filled in
my set that came with say, 24 pencils with more colors. I've actually wanted to collect more flesh tone colors and then that's what this
extra thick tray is about. Over the years, if I
find them on sale, I've made a list of
the colors I have and I look for something
that I'd like to try. That's how this collection
grew watercolor pencils. I don't have a
preference of a brand, but I just wanted you
to show we're going to use them like coloring pencils and then add water to our image to do our painting with
watercolor pencils. For the card, I actually
was gifted this. This is card stock and
matching envelopes. And in this type of
card stock paper, it folds into a greeting card, and we're going to draw straight on top of
that greeting card. If you have regular card stock and you want to fold
it in half and use it, that would work as well. That is all the
supplies we're using today except for some
collage at the end, but that's optional,
that was just for bonus. I'm looking forward to
seeing you inside the class. Let's get started.
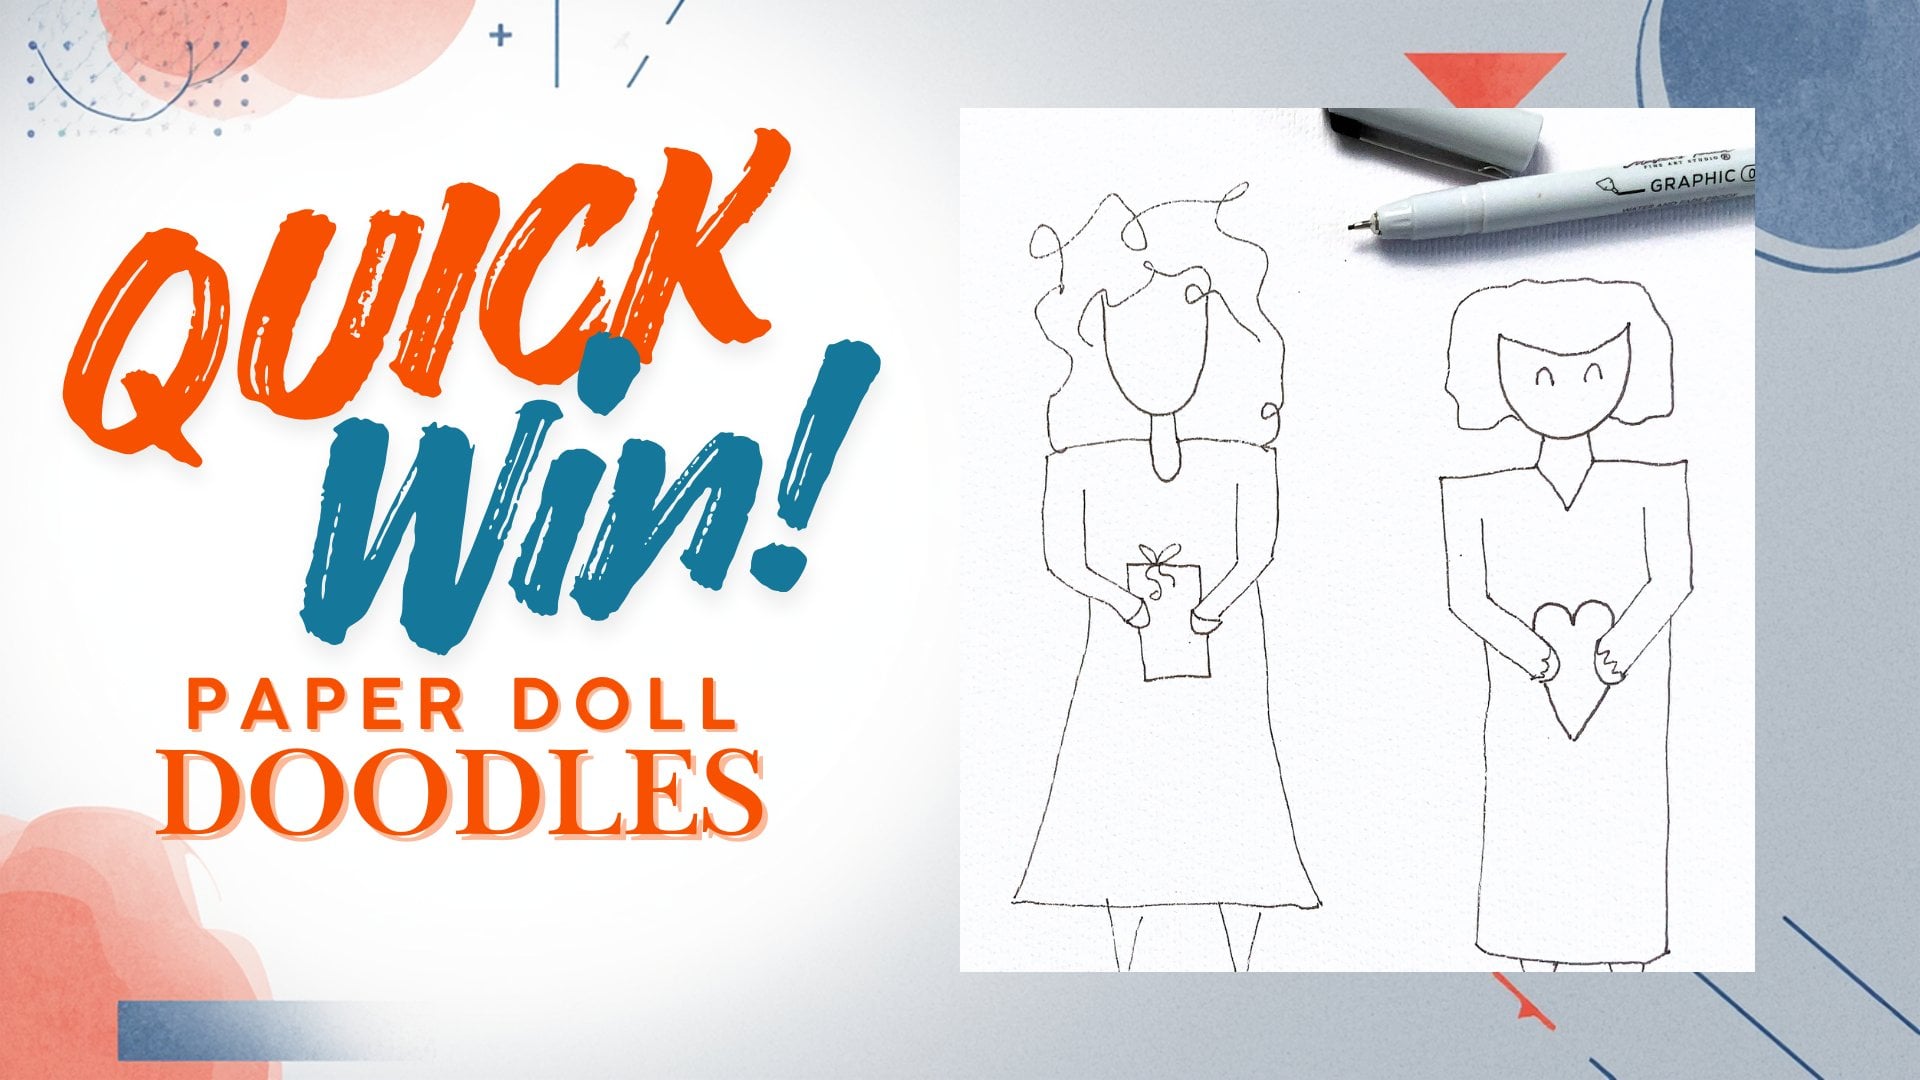
4. First Steps: If you remember my
introductory class, are you shape and the neck and the
shoulders and the arms. This is a really quick recap. I hope you watch the
original video because this is looking really sloppy to me. But the whole concept was
you can create I don't know, just fun hairstyles, right? All because you made a and a neck and a neck
line on an outfit. I thought this was so easy. My granddaughter could
make a person with this. Then I really started
experimenting. One of the ideas was
continuous line art. What I really liked
was this one swooping motion and it gave
this hair curl. Now, I did pick up my pencil
to work out the hairline. Was I going to do some
type of hair flip? I don't know. It was
just this little curl. I got so tickled and
so inspired by that. But here's something
else that I took from the image of line art of continuous line drawing was
how they did a neckline. And it caught my eye mostly because I imagined
a very fancy dress, maybe a flower on her shoulder. Maybe she's wearing a cape. But these swoops and curls really took off in my
imagination that I made several. I really liked that neckline, I wanted to share this
whole concept with you that maybe you could play with this and come up with your own
fun style of dress, cape. Maybe it's a jacket. I just thought this was what I wanted my girls to look like. I'm going to go over
this much slower with you and show you exactly my
thought process on this.
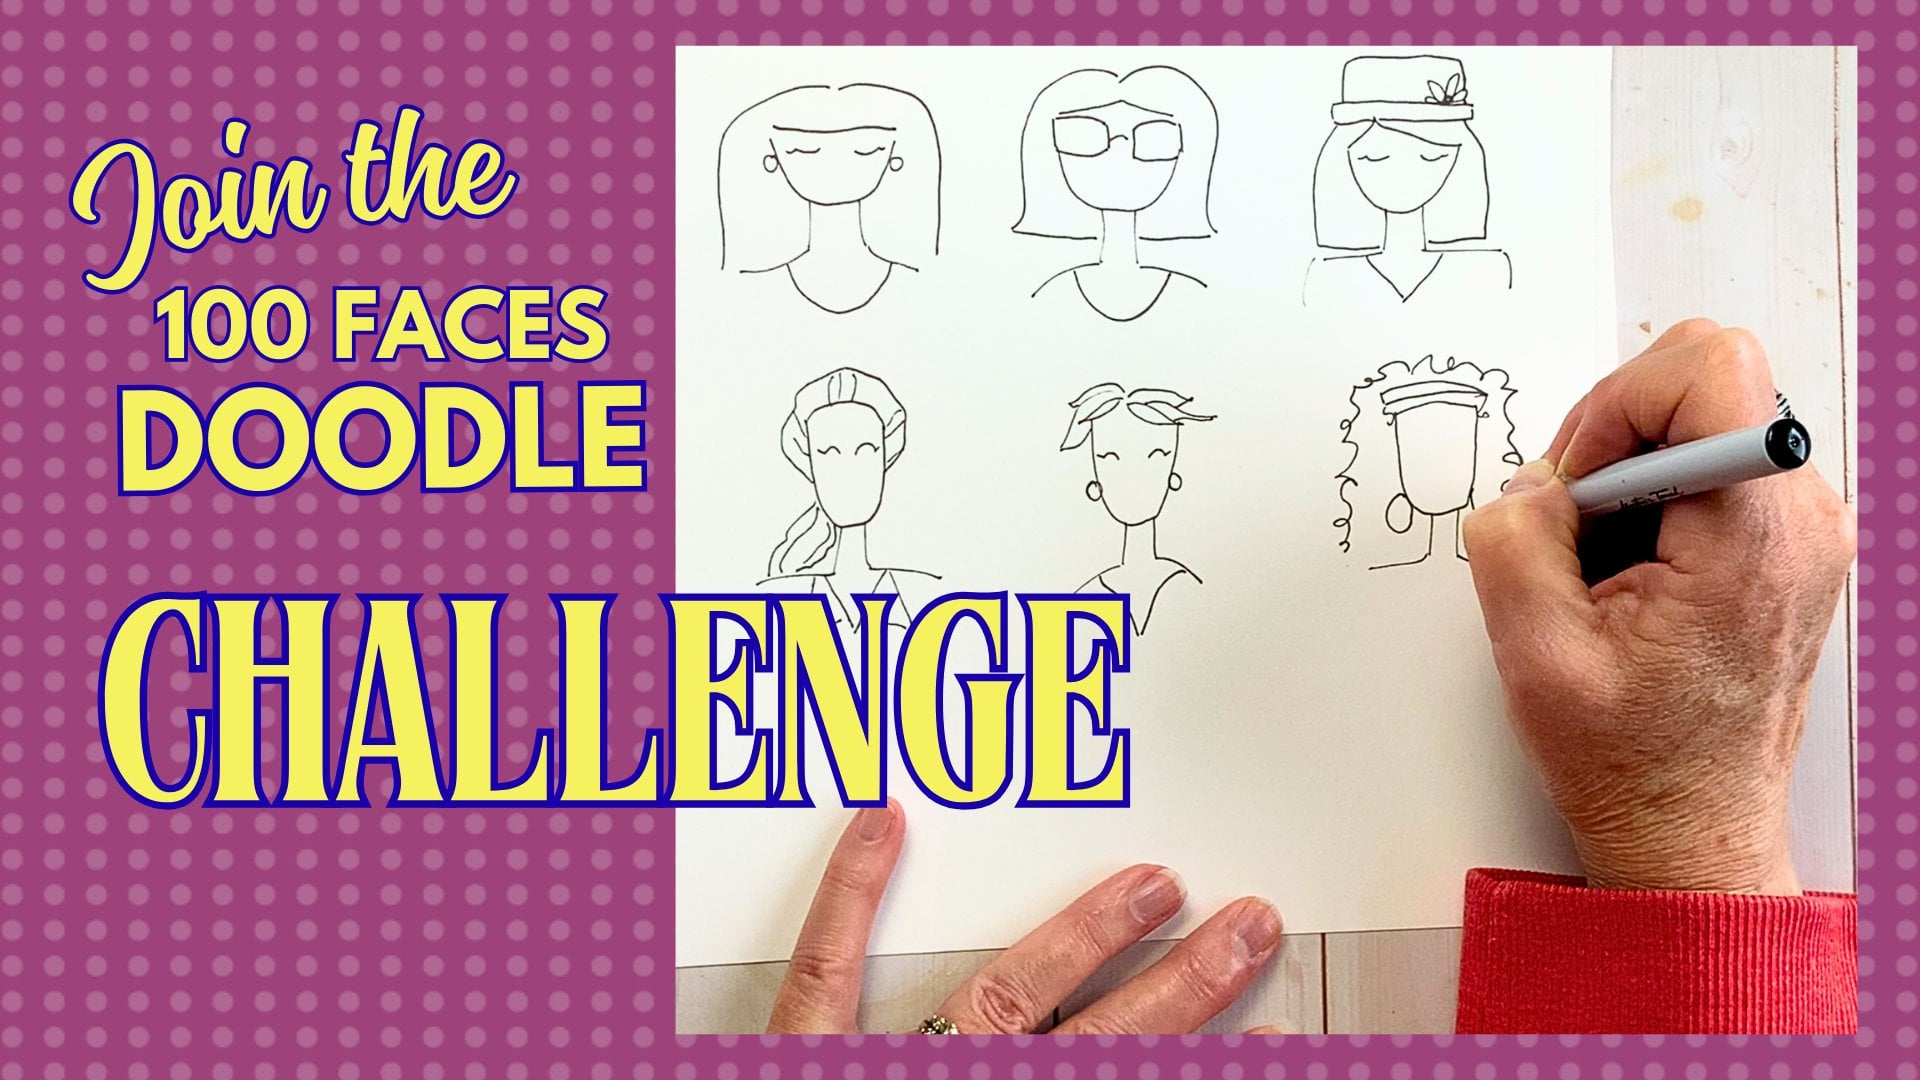
5. Headshot Ideas: A I'm calling these my headshot because I'm not going
to draw the body, but I am going to draw
this and I'm taking it up a little higher on
the right hand side. Swooping in for
this victory role. This is such a 40s
looking hairdo to me. I just think that's so fun. Then for the neck line, when I come down, I want to swoop and swirl and I can lift my
pencil. I'm okay with that. What do you think? Let's try this again.
We're making our U shape, right sides a little higher, swoop, get our curl. Let's work on our neck line. Maybe I'll start on this side. And I don't know, maybe we want a real big flip. That's a little bit
more 60s. I don't know. What do you think?
Maybe somebody with some really big hair. I'm going to put my neck in. Um really big volumus hair. This is just a really
cool way. I don't know. I just found it kind of freeing. Then maybe I did
something like this. Okay, maybe I just
turned this into a hat. Did I just make a brim on here? Maybe I just let
this shoulder line. I don't know. I can play
with this for hours. Because now I'm not
thinking about the body. What if it's a flower she's
wearing on her shoulders? What's maybe her
curls over here. Let's put her I'm going to extend her
shoulders out a little bit. How fun. How fun is that? Like, is she a redhead? Like, is this Marien
O'Hara? I don't know. Is this that girl? Just I found this
one single line. So fun. And then the
neck line freed up. Like, there's a necklace
or there's a flower. A brooch. I don't know. In this fun? I got so tickled making
these and they're so simple. I want you to make
several of these. Have fun with the hairstyles. Maybe it's a pony tail, maybe she's wearing
very short hair. Next, I'll demonstrate drawing six more headshots on heavyweight
paper for more ideas. I have my nine by 12 mixed media paper because
I'm going to color on here. I wanted a stiffer paper than my copy paper
that I had been using. Let's do some six headshots. H
6. Inking and Corrections: Before we color, I want to
outline these images in a fine line pen because I just
don't want pencil smears. I don't know, maybe
you're going to use watercolor or maybe you
want to fix some lines. Maybe there's a shape
you're not happy with. Get that all worked out so that you are happy with
moving ahead with these. I don't know, not a huge
fan of this hairstyle. But you know what they say. You learn something every time
you come to the art table. It's true. You find out
something about yourself, you find out there's
something you like. I think it's that line
I'm not a fan of. So I'm going to take
my kneading eraser and take that out. I'm always amazed. This is such a dark pencil. Yet it really lifts
off quite a bit. If you're going to be wanting
to correct your work, I would suggest this
pencil, the softest lead. It seems to lift really well. All right. Let's see what my
little gidgets going to do. I know I'm showing my age. Do you know, the story is
my mom named me Tammy. After the Tammy movies. If you don't know what
a Tammy movie is. You might want to look at
Debbie Reynolds and Sandra Dee. They made movies
about a girl named Tammy who lived on a river boat. They're like, Tammy and the Bachelor and
Tammy and the doctor, they're cute, they're fun. But I think that's how
I got my nickname. Was these movies, late 50s, early 60s that my mom apparently just adored,
and so here we are. I can't say that for all Tammy
that were born in the 60s, but I really think
that's true of me. We started on this side, right? And my little up de loupe took a little turn
there, which is fine. It's fine. And we're going
to make something with that. Maybe bring down her
dress a little bit. Okay.
7. Colored Pencils Part 1: Okay, so fun fact. Hm. I'm a collector. Please don't think you
need this many pencils. Um I over the years have
collected and collected. I love these woodless pencils. Aren't those fun?
I just love that. But I do have this big
collection of skin tones, and I layer and layer and layer. I'm probably going to have
to sharpen some of these. But what I mean by layering is I might start
with a particular color. So this pink. You're thinking, Oh my goodness. What is she a shell? But to go back over
it in another color. In different directions. Just because you
laid down color, go down the other way
in another direction. If you're not in love with
that, bring in a third color. And you could add in maybe
a bit of red cheek there. We're going to go bond, a yellow blonde for this hair. I think I'm going to
erase some of that. Up here. I'm calling this Tammy, I'm coloring her
blonde Sandra Dee and Debbie Reynolds in the movie we petite little blonde things. You can go darker on the outside and lighter here in the middle, giving some highlight to it. I'm filling it all in, but I'm also going over it in
another direction. Maybe we want to tone
it down a little bit. A little more golden. I think I'm going to leave
that highlight mark in there. Now, what about her dress? I'm leaning towards something. What is this a poppy color? It's called Rouge. Oh, no, poppy red. Poppy red. If I put in a little
bit of shoulder or down here for her dress
or cape or sweater. Oh, yeah, sweater.
That's what this is. I can imagine this being fuzzy. You can see it's
come up a little bit stripy because that's the way my pencil I had directed it. Let's go back another direction. Lightly fill that in a bit, come back and darken in here. There we go. That's really fun. Wish I had
my Maren O'Hara out here. Let's see. I think I'm
going to start her here. I think she's the
most Marin Hair. She did a lot of
John Wayne movies. I don't know if
you remember her. She was in the parent trap. She was known for her
fiery red had and temper. Too much. Or, look at that. Let's add in a darker red. If I colored one direction, I'm going to color in another
direction very lightly. Go over it lightly
and then add more. You can always add more. Let's see. Was I think this was Now, what always looks
nice with a red head. Come on. A green, like an emerald green, a beautiful I know
you think Christmas. But it just sets off that hair so nicely,
don't you think? I'm going to go
much darker green. Was this one, dark green,
obviously, much darker. Back 100 years ago when I
was homeschooling my kids, is when I started looking into colored pencils and the
word on the street was, prisma color is the one to get prisma color,
that's the one. And so I do own quite
a bit Prismacolor, and you can buy them open stock. I was collecting and
marking their numbers, their names to see
what did I own? What didn't I own? How could
I fill in my collection? I left some of this pencil here. I think that might be where some brown will be
along this pencil line. A little bit of dimension. There's just layering and
layering and layering. That just starts to
make it look Gosh, I almost said the word
realistic. God forbid. Any of this looks realistic. That is not my intention. These drawings are so simple that they
would look at that. I did not use my pen. I did not outline right here. I want to start with her flower. I think that's what uh that's what the pictures
was all inspired about. I didn't come in with a plan. I just knew I wanted to show you what you can do
with your drawings. What could you do with
these images that you made, these faceless images,
and a little bit of a continuous line experiment. I will definitely
say an experiment. When you find a shape
that just tickles you, that one continuous
line from chin to hair just inspired me. And for something so simple, this would make a great
afternoon project.
8. Colored Pencils Part 2: O Let's take her. Another brown. Alternating
the direction of your pencil. There was a time when I well, I think I started coloring my
hair before I was even 16. My mom colored her hair, she was a teenager and colored
her hair for a long time. I still wanted it to be, oh, I want to look natural. I don't want it to look
obvious that I color my hair. And so it was always,
okay. Where's the sun? Where's the sun
heading? Oh, it's going to be sun kissed hair. Everybody knows you were
coloring your hair. Come on. But let me tell you, there's something to be said to natural. I am Well, I was going
to say all natural, but I did pay for
my curls recently. You may have noticed
a little change. A little change. A big change. When I first got my permanent, I thought I looked
like weird outlie, what happened to me? Now I'm much more used to it. B 100 years ago, my mom permed my hair. I had very, very straight
hair, which is fine. There's nothing wrong
with straight hair. But dressing up, curling
your hair, is nice. Well, what's that
old saying, right? People want the hair that they didn't they
weren't born with. Here we go. I am I am
exactly one of those people. I love having a perm. It just feels like it's
always ready to go. I don't have to work
very hard at it. Then there's people who
if they have curly hair, it's all the work they can do
to make it straight again. I get it. I can imagine
what that's really like. What's all this conversation
got to do with any? It's just about color. You can notice color anytime. Pay attention to
what that's like. What's the grass doing? What are the flowers doing? How's the outfit draping? Do I want more? Do I want it darker in one area, lighter in another? Try it. This is your canvas. Go ahead and play
with it, experiment. The thing about that soft
pencil is the lead gets dull. But it feels so good
gliding on the paper. It glides so nicely. Carl, that's green. Put
that back. All right. Let's pull out these
ten different browns and blacks that you
have. There we go. Not many people. I don't know. I don't think I know anyone
who's been coloring lately. Is that something you enjoy? Do you even have
a set of pencils? I want to just demonstrate layering the colors
in case you don't have a huge variety of colors. Use what you have
and layer them up. Layer them up. Going to lay
down the lighter first. Look at that. That's
not particularly light. This one's called French gray. It's coming across a
little ashy for me. I want to tone that up. Oh, this is a nice combo. Burnt Ochre, man. I watercolor, I guess, and in colored pencil. I love burnt ochre. I don't know why.
It's not funny. I'm such a neutrals person. I think I want this
vibrant yellow. Do you feel like you're
working on your fashion. Let's pretend we're
in fashion school. What design would you do? Would you put a
pattern on her dress? As you can see, I'm choosing multiple hair
colors, skin tones. We're experimenting. This is your palette. You try out your supplies, you try out your products and imaginations and
see what you like, see what you're coming up with. Did we do this pinket? Reminds me, I think we have. This is that gray that had
been the base of another girl. I think I want to do
more pink on top. There we go. Look how
that's filling in. It's like all the white
of the paper is starting to disappear and it
looks more skin tone. I hate to put them
so close together, but I think this red. Now, even though it's
next to her red hair, it is a rosy color. It's not so much poppy as
it is maybe a fuchsia, a rosy what's this one? Yeah, it is magenta. Look how the accents fill in
when you press really hard. I think I did her cheeks. That's probably
pretty dark for her. I like it. I like it. All right. Here is your headshots.
Congratulations. Now, let's get onto our project. Oh
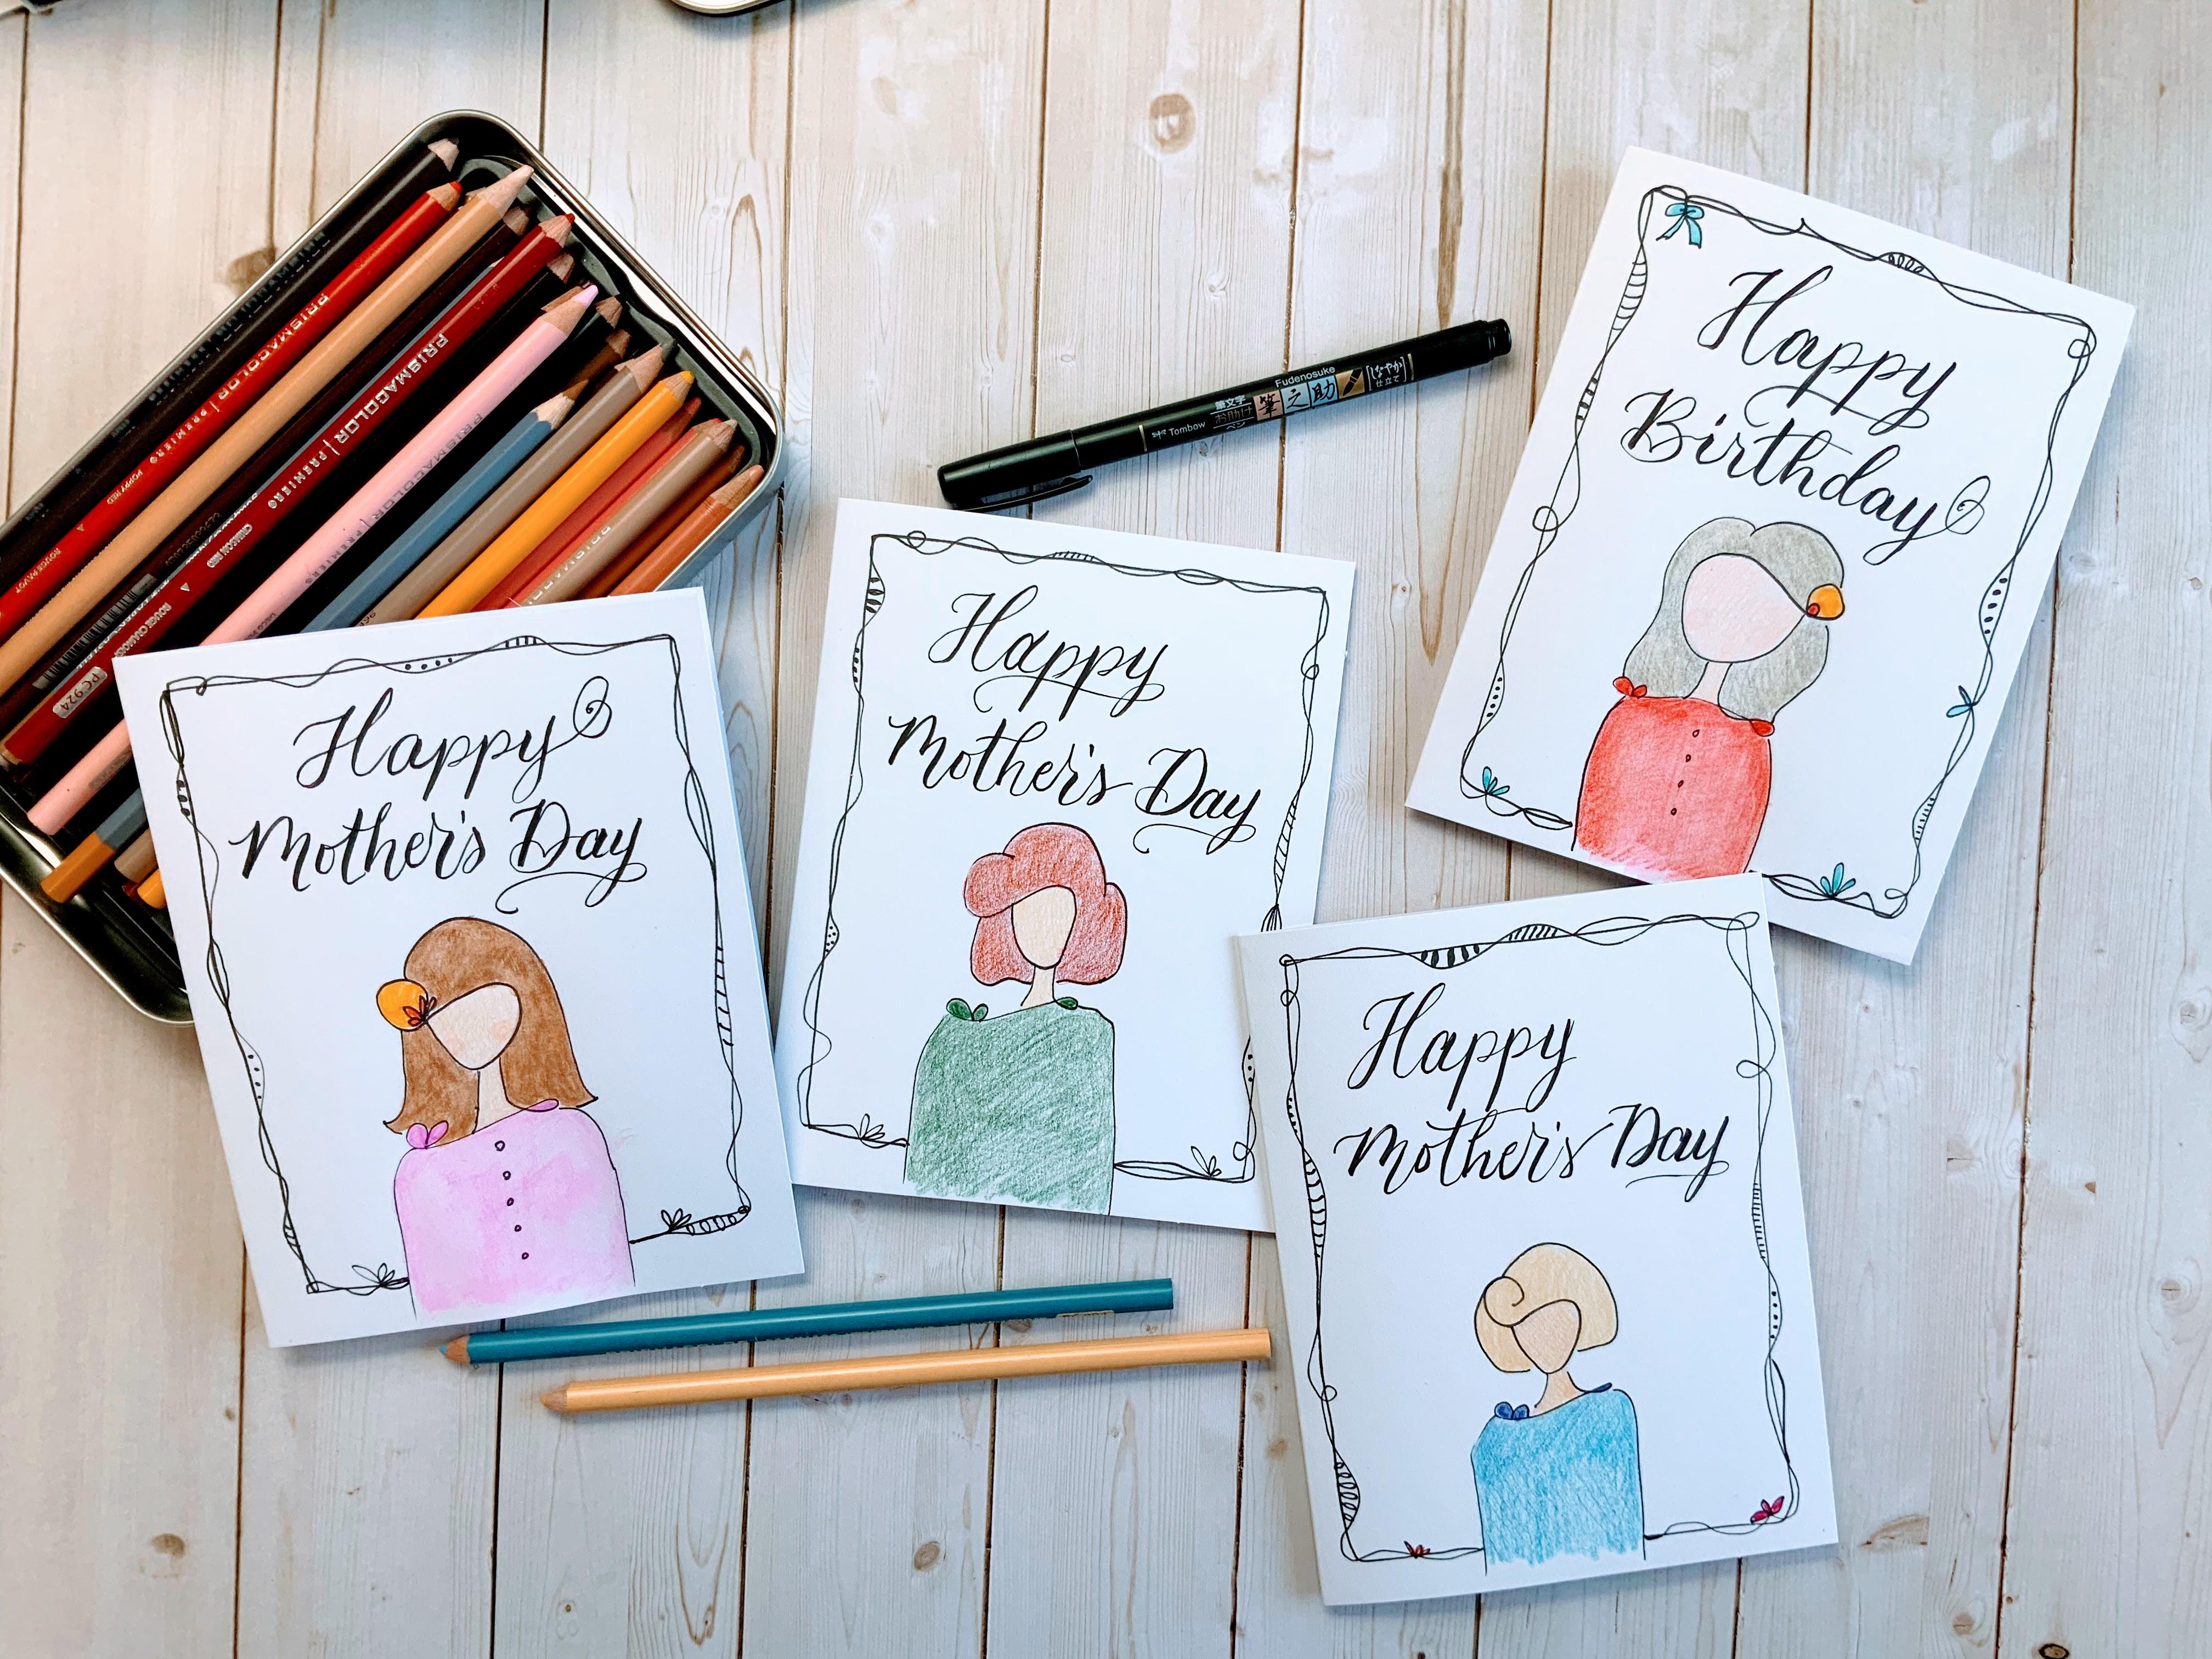
9. First Project in Colored Pencil: For a project, I hope
you are ready to just use your fine liner
and draw your image. I'm actually going to
draw it about here, I have room for lettering and I think I'm going to go with the Maren
O'Hara bouncy redhead. Look. And I'm going to come out
here like it's her gown. I'm going to frame this. You can leave it with a single
line or as I like to do, doodle my way up and
around swerving and curling big and small. Then I fill in some of these. I like to put
stripes, poka dots. If it's really thin, I might curve in another line. Let's I do maybe an oval shape. You can fill it in or
leave it just a circle. But that's more doodling, but we're going to take a
moment and color her in. Like I said, I think I'm
going to do maybe a red head. I think I'm going to start
with some brown first. I'm going to make it light
light, light, light brown. Actually, this is a dark brown, but I am lightly coloring it. This gift card is going to
be used for Mother's Day. There's nothing
like deadlines to actually get you motivated. But at other times, it's just so hard to start. I really was feeling
disconnected from making art. I was not excited. Even though this is a simple
drawing and it's really fun. I just couldn't get myself seated down at my
desk making something. Do you ever get that way? I don't know what
I was expecting. This is going to be
so intimidating. This is going to be a struggle. This is going to be
here we are actually making something that
doesn't feel hard, doesn't feel like a struggle. It's been a joy
creating and doodling, a very basic simple shape. I don't know if I've
ever mentioned this, but I studied psychology
in college and one word I remembered
was Gestalt. This Gestalt theory was about our minds
filling in the gaps. So that idea came to me when was enjoying making
these faceless people, these faces I was mostly the
concentration of the hair, how many different
looks and styles could you get one line. The idea of the Gestalt theory
of how our brain fills in, we know this is a face
and it's almost funny. How do we even know this? Just because there's
a neck line, just because there's a hair, just because there's no nose
or eyes, but we fill it in. We know that this is an image. And so we're calling it
a very simple doodle. A faceless doodle. But I just see such
elegance in it. I just see such
elegance in this. It's like they're going out
to the show, to a theater, a performance, and they're dressed in their capes,
isn't that what we do? We fill in a story of what we think's
happening, what's emerging. If that's a new word to
you, Gestalt theory. Now, there's way more to it, but I just like that idea that our brains know what this is with the most
minimal of detail. We already know what this is. In America, we celebrate
mothers in May. It's the second Sunday in May. But maybe you see a birthday. Maybe you see a Valentine card. Maybe you see a thank you card. I just love making for others. And when you finally feel confident and comfortable
in what you're doing, then that's what's
exciting about making. It's so appreciated.
I mean, come on. AI is everywhere. When you can do
something handmade, to me, this is so much more
of you going into this work. Let's go ahead and
write the greeting. Happy Mother's Day. There we go. A card ready to be gifted.
10. 2nd Project in Watercolor Pencil: This bonus card I thought I would bring in
my watercolor pencils. Let's see how we do with those. Let's work out my
darling lady here. And let's see about
her neck line. And her outfit. Then how about putting
this border on? I think this tip is really
starting to go flat. I didn't think I needed
to push as hard as I do, but not as easy as I
thought it might be. That means it's
gotten a long life. That's a lot of loop
de loops, isn't it? What if I add a little
bit of flourish on here, put in a few little
embellishments. A little bit on this side, maybe this will be a leaf shape. This will be some more etches. If you've taken my
class on doodling, you'll see how many things
you can make with a line and a dot and just
go crazy with that. Just like my regular
colored pencils, you can even just do your image
with a layering of color. What if we did part watercolor and part just colored pencils? Nothing wrong with that. That would make a
really cool effect. These are actually woodless
watercolor pencils. Isn't that wild? Like, they feel so
neat in the hand. I don't know how
to describe that. So we've layered a little
bit of watercolor pigment. Let's go ahead. Let's
choose a hair color. Will she be a brown? This is a watercolor,
Copper beach. I think I might shake my camera a bit when I do this technique. I apologize. My art table is my
old kitchen table. Use what you have. I think I might make
this a birthday card for a girlfriend who
has darker hair. This one's ivory black. Yeah, I like this look. Just softly rubbing
that color in. I know you're probably
really curious. What about watercolor pencils? Depending on how
large your area is, consider what size watercolor
paint brush to use. The only matter is how
often you're going back to the water to reactivate. So far so good. I like that blending of
the black and brown. I just got the tip wet. This is not watercolor paper. It's just a card
stock folded in half. It actually came in a set. It was cards and envelopes, so I know that they'll
match. I like that. Clean my brush off.
Coming over here to this, this fuchsia. Isn't
that interesting? You can get the same
pencils in watercolor or in or in regular
colored pencils. You saw how the hair blended. You really would
have a hard time finding the scratch
marks of my coloring. Using the side of my pencil, it goes a little bit faster, but I'm also losing a
little bit of control. Put these finishing
touches on her wrap. Maybe it's a brooch,
special pin. Let's go to this larger brush. It's called a quill brush. They hold a lot of water, especially you can lay it flat. This lighter color is still showing some of
my coloring marks. That's not a problem. I try
to use as little water as possible because of the
nature of this card stock. I can buckle a little bit. Just stick it under a heavy
book, you'll be good. To get those fine details. What if we add in a little color to that little floret there. I'm going to stay away from
my card in case I drip. But I'm getting the tiniest
bit of paint on my brush. Oh, isn't that vibrant? That is really pretty. As the pigment was wearing out, I've got a lighter floral
over here than that one. That's cool. Go ahead and
add in our sentiment. This is my nice tip. I'm running out my pens here. Birthday. I said
birthday, right? If you've ever been interested
in brush calligraphy, let me tell you, it is a
skill, just like everything. Getting the feel for lifting when you go up and
pressing when you go down, it takes some getting used to. Oh, I just know my girl. Oh, darn. Look at that. Hey, you know what I have? I was thinking of
embellishing my cards. So what if I go ahead
and work on that?
11. Bonus! Collage Embellishments: I was thinking of
embellishing my cards. So what if I go ahead
and work on that? Oh, that'll fix it. We'll totally fix it. Get a little gem on there. Um, spring green's
kind of pretty. Maybe I can add
that to her dress. Might be a little big. Anyway, go get some glue and
I'm going to be right back. Also I have a package
of gems here. That could be my
center of my flour. I have fabric fix. It dries so quickly. I really like how It's really made for
these type of elements. Now, I turn that flower upside down and then this one
will be right side up. One, because I liked
how the petals lift. You know what? I just thought? I think I want to add a little
bit of green behind there. See if I can add it in. Look at that. I was meant to be. Oh, boy, I'm really
in fort now, right? Nothing like filming
on the go on the spot. This has a tacky back to it. Let's see. I think that'll stay. I'm thinking I just
like the green. That's spring green and fuchsia. That's really nice. And maybe a larger gem. This is why a lot of
people like tweezers. There we go. Oh, I
really do like that. What do you think? I need something in the
opposite corner. All right. Now we're
starting to collage. That is not where I thought
I'd see this going. Now I think it needs
a cluster up here. Oh, yes. See how
they fall together. Something like that. Maybe maybe a light
green, a gray. Oh, that's funny, Tammy. You can't stop
collaging, can you? Everything gets a
bit of an accent. And touch that flour. You should have put glue
on the opposite side. It's very tacky. It's very sticky and it does
leave quite a few strings. But I love this stuff.
I love this glue. Doesn't need a gem.
What do you think? Jem, No gem. All right. I'm going to sit on it. I'm
going to think about that. What do you think? What a special treat. Handmade, a genuine
gift from the heart. I hope you enjoyed this.
12. Wrap Up: Thank you for joining me today. I hope this experience
was inspiring. We kind of broke through
that intimidation process. This dulling was so simple and yet so satisfying, as well. Don't you agree? So I can't wait to
see your projects. Please put them in
the project section. Now, thank you for following me. You can find me on YouTube, you can find me on Instagram. You could even share your
projects there as well. Tag me in that. I would love to see that
and encourage you. Also, if you would
review this class, I love your feedback. It helps me create new classes. It knows what
you're looking for, and that really helps me grow the space and what
I can provide for you. I'd love to hear that feedback. Good, bad doesn't matter. I love to hear all about this. Thank you again for
spending your time with me. I know that's so valuable and I hope this was
a great experience. See you next. Thank
 Tammy Prara, Making Matters