Transcripts
1. Wild and Fun Hair Doodles for Paper Dolls: Hi, friends. My name
is Tammy and today we are going to talk
about hair, big hair, hair extensions, lots of fun, adding personality to
our doodling people. If you took my class on
those doling paper dolls, these figures will
look familiar. But we're adding another
element to that. We are going to start giving
big hair to our people and using them in a way to work on doodling,
to add expression. In fact, I even snuck
in a little bit of adding a quote onto the hair. I love this concept because
it actually gives you an opportunity to be
expressive in a quirky way. There's no expectations
of perfection here. If you're brand new
at drawing people, wait till you see what
you can do with them. I do have an idea on
turning them into cards, maybe for Mother's Day
or spring or whatever. You want to fill
your journal but these concepts today are so simple that anyone can do these. I'm going to give you
tips on where to look for inspiration on the
supplies we need, and how to have a relaxing, fun time with no
pressure on doing something brand new and
maybe a little even strange. But we're going to
have a great time. I can't wait to see you on
the other side as we get into exploring adding personality
to our doodling people.
2. Supplies: The supplies today
are so simple. If you have a smooth paper
and a ballpoint pen, you can do this class. But today, I'm specifically
using a very smooth paper. It's a mixed media paper. It's about 154 pounds. It's a very nice white
and it's also nine by 12. It's giving me lots of
space to doodle and draw some bigger figures and giving me lots of
space to practice. But it's up to you use
something smaller, just a sheet of copy
paper would be fine. The pen I'm using specifically
in class was a food and suitcase and what is special about these is that
the nibs are flexible, but guys, my nib is
worn out to a stub. I just happened to have that. I was using that. You could use a fine liner, a ballpoint pen. If you haven't taken
my idea book class, go ahead and check that out. I show you how to make a
book to collect your ideas. For doodling, and
I actually work in a new one today
collecting some doodles. I like having an idea book because it gives me a
place to reference. When my brain takes a vacation, I like knowing I
can look up and see something and start recreating
that in my doodling. I also talk about a few
idea books for doodling. I really enjoy Peggy Dean. I also like Joanna Basford. These are some really
good doodling ideas. You may find a Zentangle book. I find them to be really
helpful in coming up with some new doodling
ideas as well. I also sneak in a
project where I needed a quote right on the
spur of the moment, I picked up this used copy, the Secret Garden and I just pulled a quote right out
of the book for that. If you want to do our
project and need a quote, go ahead and find your
quote book so you're not scrambling like I
was last minute. I look forward to
getting started.
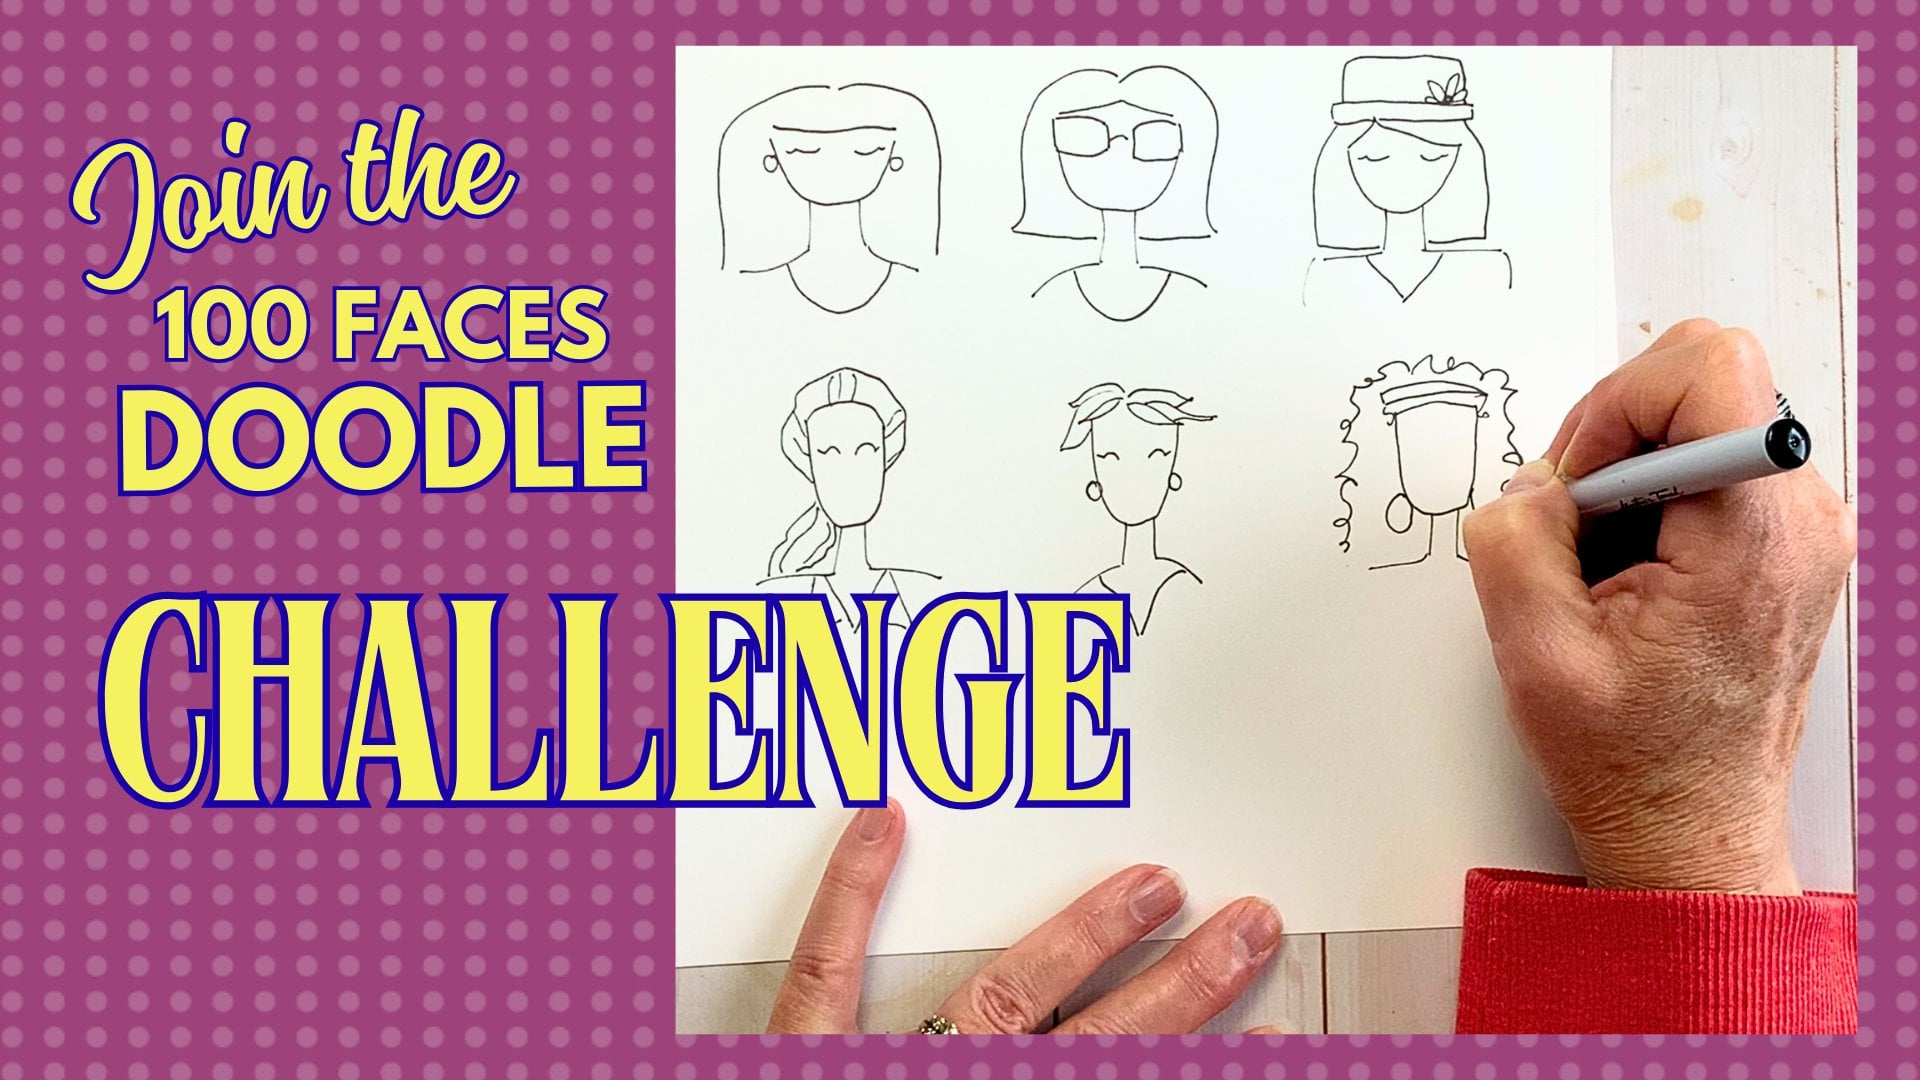
3. Sample People: If you've taken my
doodling ladies class, my paper doll class, you'll probably
remember this formula. A big, two straight lines, make a neck, two lines
out for shoulders, and two lines down for arms, the inner arm, the
bend at the elbow, you can cuff their
dress or sleeve, give little mitten hands, and maybe your dress. From here, we can do something
creative with the hair. How about this time
we do a swoopy bang and we'll come up way over the head and maybe the swoopy
bang comes down as well. We can have eyes that are
closed or they're looking down and maybe they're holding
maybe a flower or two, very simple, sketchy
doodly person. What I loved about learning this style was have a quick win, you can do with a few shapes
and have a person appear, maybe a couple legs depending on what your
project really requires. I'm going to draw another one because I want to give
you a couple ideas on how you can design something to then go
ahead and embellish. This one, I want to make
room for a background. So again, the, the neck, the shoulders, the two
arms, the inner arms. Boy, they really got that
way from me, didn't they? Little mitten hands, maybe
just some simple hair. Very simple basic,
maybe a happy person. If you wanted to put
a little tiny nose in, that's fine as well. Maybe they're even singing. Maybe this is a songbook. And her little feet. The thing I was time out
of background is to draw a box maybe this background will be where you're
going to embellish. You're going to draw
all your doodles in. Oh, look at both of my people, we're missing their necklines. I think that makes the
biggest final touch. Then this last one, I'm going to have
some crazy fun. I hope you find
this fun as well. I'm going to draw
her much lower. This is the fun part. We're going to maybe
somewhere about chin length. We're going to take
her hair up I said up. We're taking her air up. You might be thinking
Bridea Frankenstein, I don't know about this. Trust me, it's going
to be so much fun. From here, I want you to
add in more wavy lines, more strands of hair. But there's one thing
we're going to do. We're going to keep a
section that's open. In fact, I love
crossing my lines. I'm going to look at keeping
this section here more open, but that doesn't mean
we're done with hair. I'm going to just keep filling
in a few more waviness. Okay. We're getting there. We're getting there.
This is so fun. We're going to save this space, and we're going to actually
embellish on her hair that the arms aren't even going to be a real part of this formula. And we're going to have
a lot of fun with these. Practice making your people, your doodles because the
more you try and experiment, the more fun you can have. Your imagination can go wild. So go ahead, draw a few more. Keep drawing your people
because we're going to move on to practicing doodling. One of the things I really love is having
ideas ahead of me. So I can draw from them quickly, and I'm going to teach
you how to do that.
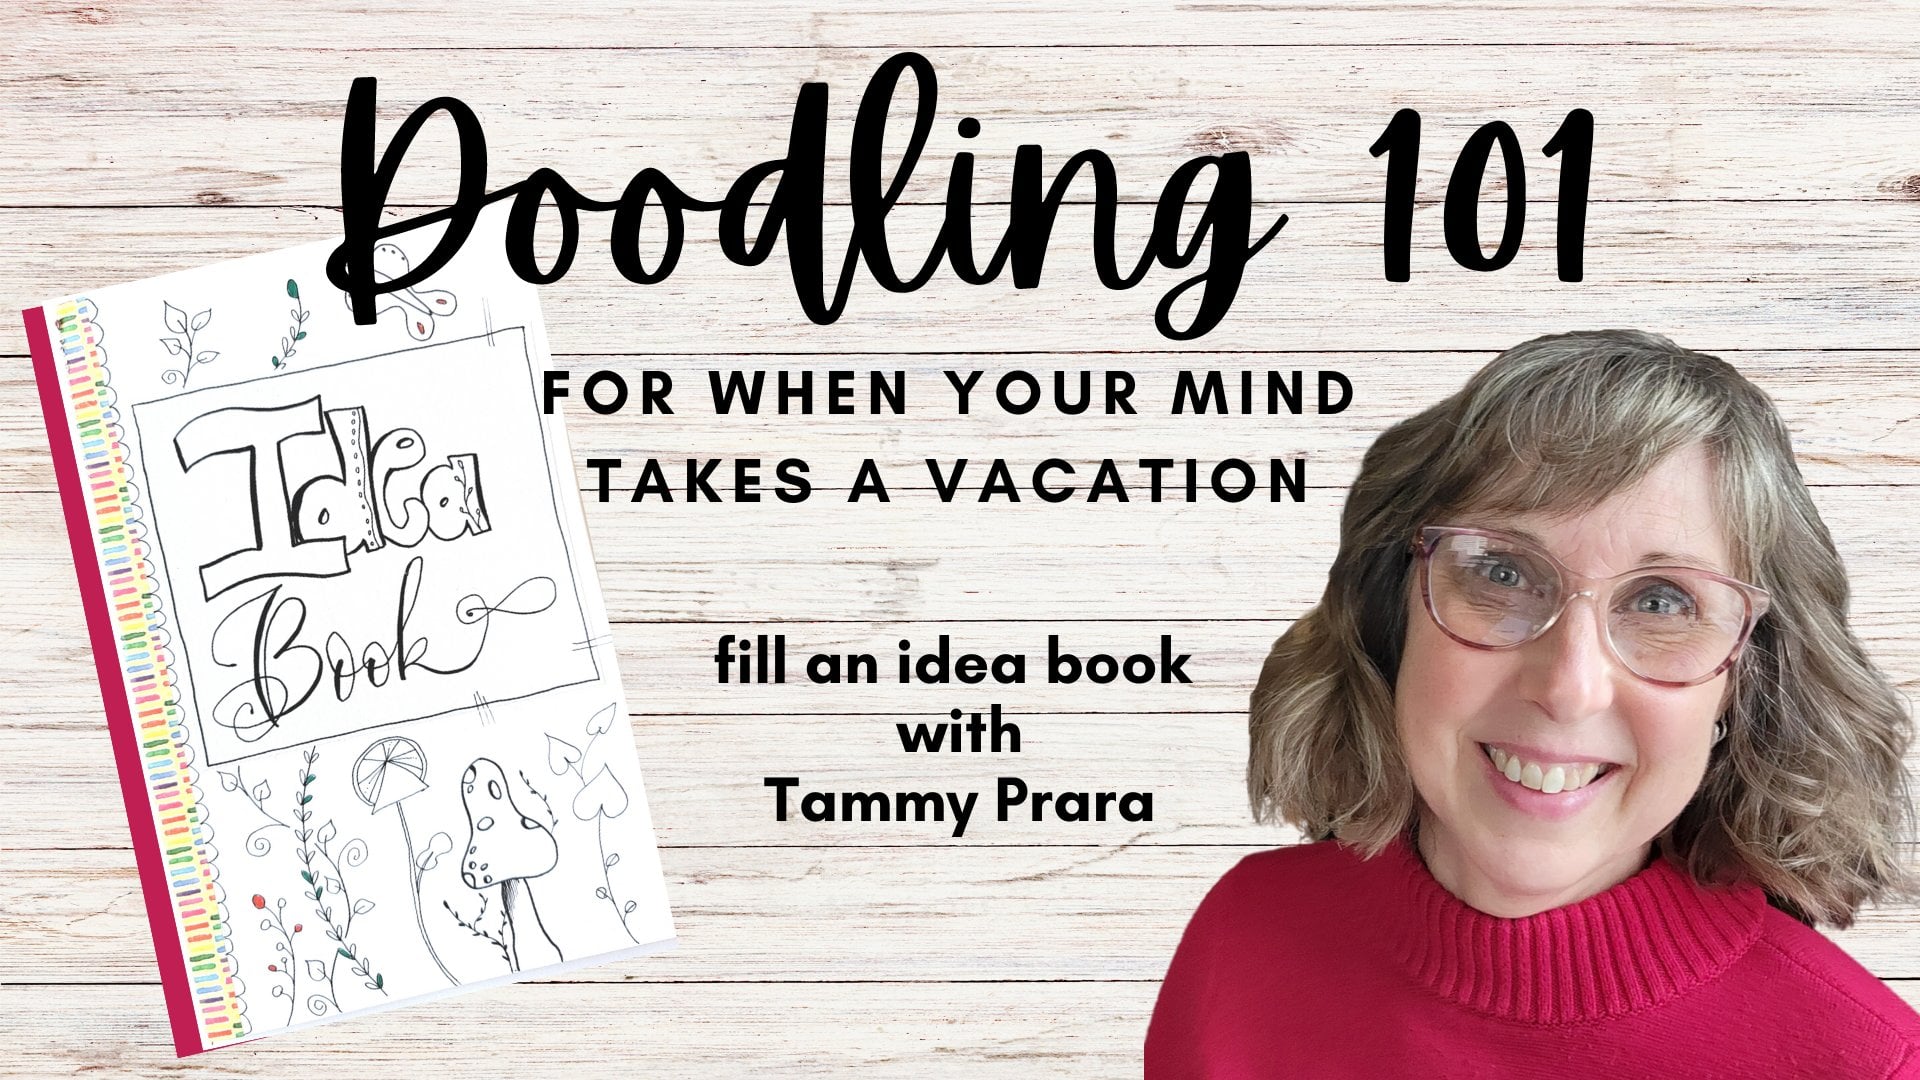
4. Doodle Ideas: Our doodles, I
want to remind you of a class I did
about the Idea book. This is a place where
you can collect doodles so that you always
have ideas ahead of you. Where I find my doodles. I have some favorite authors. One is Peggy Dean. I hope you've seen her
classes on Skillshare. This book I found taking one
of her classes, actually, and it gives you step
by step on how to make all these different leaf
shapes, botanical shapes. Even flower shapes are in here. This is a great
reference book if you're looking to make
some doodle ideas. Maybe you just stop at this. But if you want to
continue on and make a more realistic flower,
she gives you that. Another book I like
are Zen-angle. This is the ultimate doodling. But they really take
it a step farther with shading and adding in the
darker, darker elements. If you find a Zen-angle book, I hope you pick one up
because you will find more amazing ideas
on what to doodle. If you ever feel like you don't know what to do next or you're always
doing the same thing, you might find a lot of
fun in a Zen-angle book. A lot of great ideas
here, Johanna Basford. Her books are so amazing. This one, P coloring book
and instruction book. Step by step how to create flowers and then put
them together on a page. Aren't those beautiful? I often have come
to here and grab quick ideas like a circle
with a leaf shape, and then you add more and more until you've created
your flower. And look at this. I love her
little mushrooms up here. Really fun to watch and learn and to have ideas
at your fingertips. Look at all the little circles. Brilliant, adding
dashes into things. I love these ideas. Let's work on our own Ida book. My original idea book has
been filled in quite a bit, but I'm starting a new one. And so far, these are
some ideas I've had. Taking ideas out of
Joanna and Peggy Dean. I have I've used this
over and over again, little circles that actually
attach to the vine, adding big black
circles to a vine. This one's fun. It's just
an abstract flower shape. Bigger circle, littler circle
right there in the middle. This one I call a heart shape all the way down and back up so
that they curve on the top. They look like little
hearts or butterflies. What about an open circle? Begins and ends
right on your vine. You could color these in as
well or every other one. Look how many leaf
shapes you can try. One leaf inside of
another, a little line, no line lined with
dots, three lines. This one I was
practicing leaf shapes. This is attached to the vine, but this one's off the vine. This is one of my favorites
during Christmas, a very pointy holly style. How about an
abstract twig shape, branch off here and there
and maybe have couples, multiples on a little vine, off a little twig, Now, this is the beginning
of some flowers. If you think of it as
12:00, 3:00, 6:00, 9:00, it helps to even out how you're
doing your petal shapes. This petal just has an, an indent in it. Now, this one's more rounded. It's not a point. Looks
like a propeller. This one a wide base pointy tip. This one I just threw in, draw your line, come up. Now you've got a heart shape. Maybe you want to embellish
with some more black circles. Just a few ideas as we go into embellishing our
people with doodles.
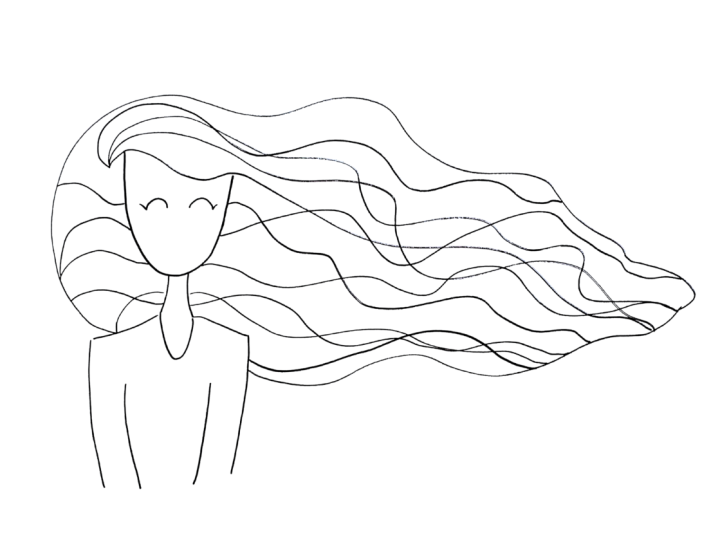
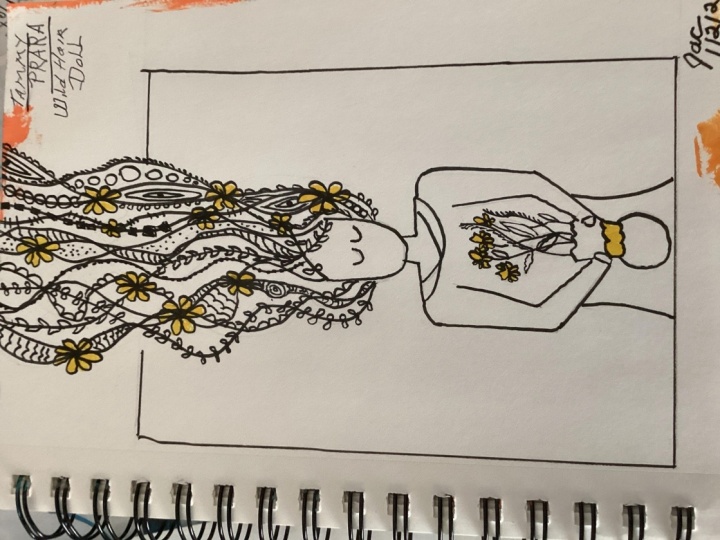
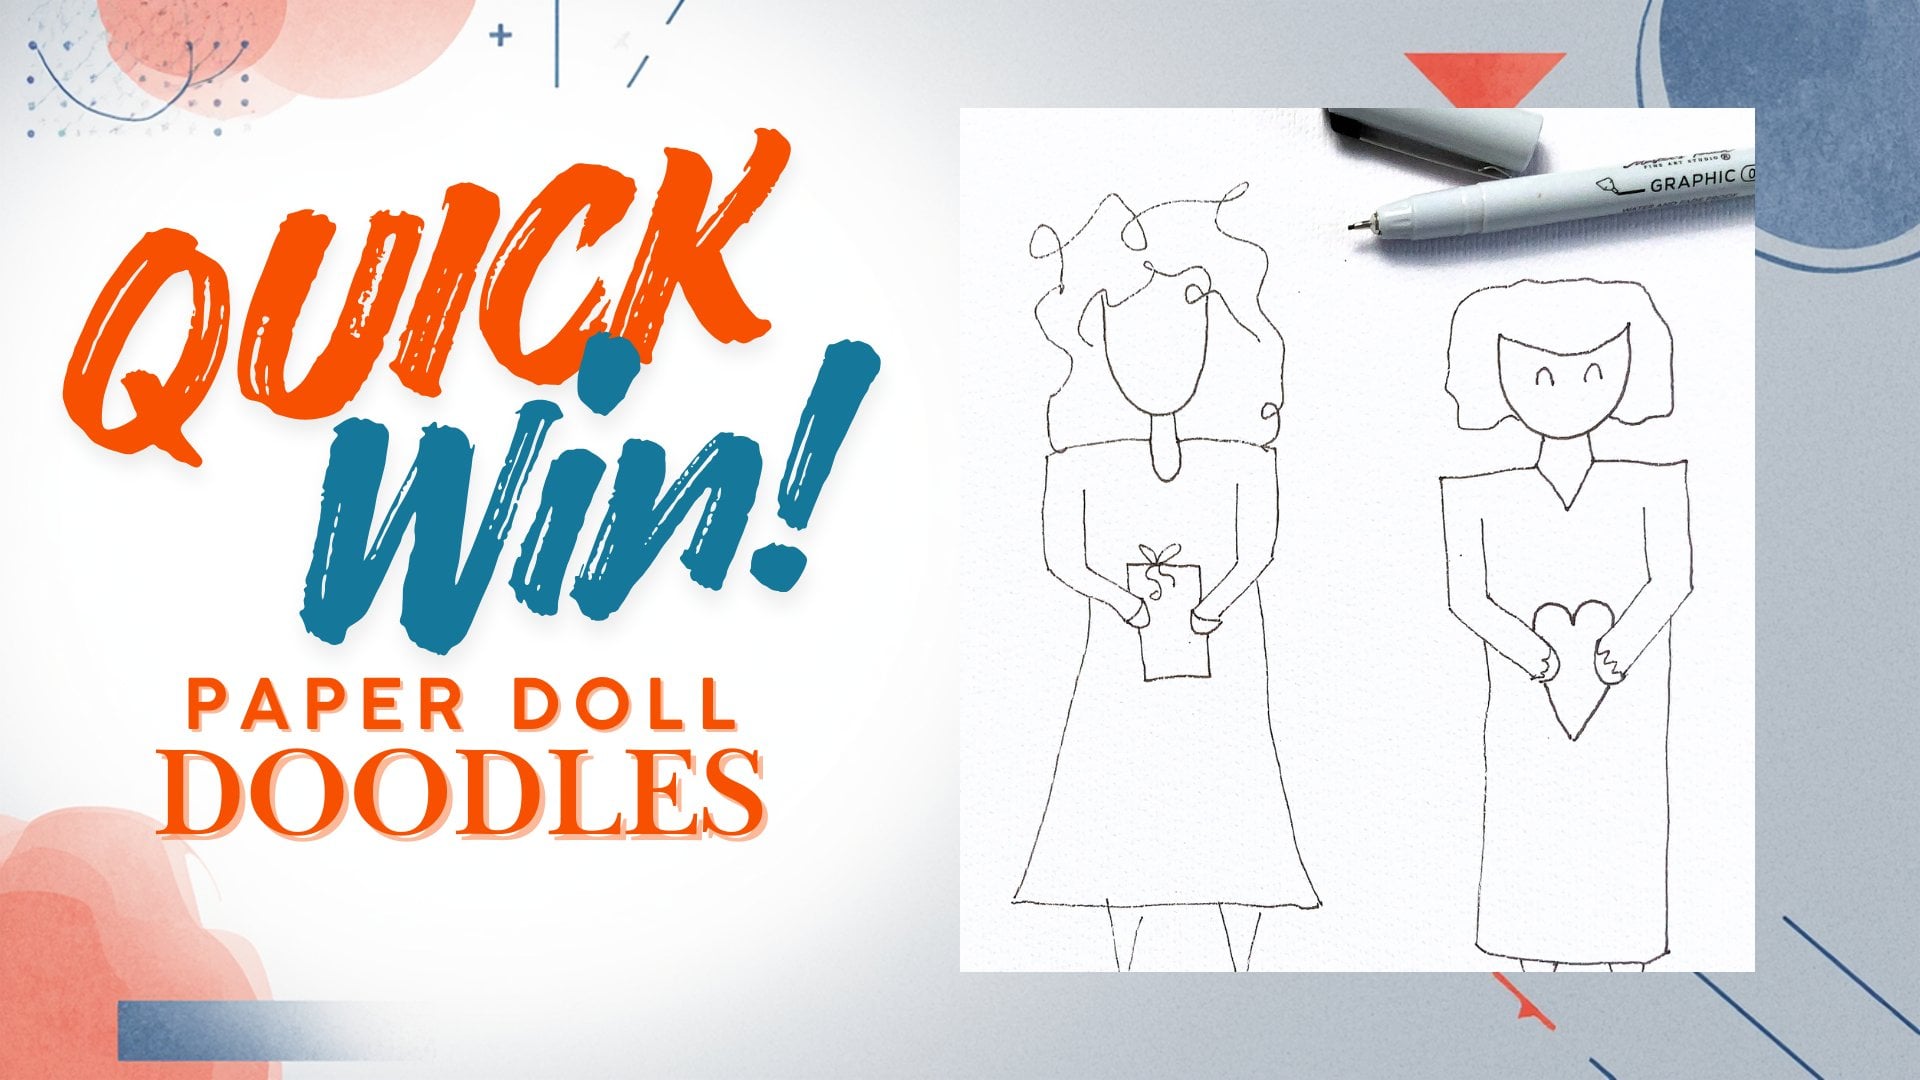
5. Hair Exentions: I wanted to take you behind the scenes of how I
prepped for this class. One of the girls I made was
someone who had long flowing hair blowing in the wind and the hair is
what caught my eye. I wanted to do something really fun and dramatic
with this hair. But more that I thought
about it, I thought, Well, that's really
nice for my sketchbook. How can I apply this to a card? I don't know. I
want to be able to use this project somewhere else. Then that's when I came up with the idea of having
her hair go up. Look at these two examples. If the hair goes up, then I can have a card. I could cut her out and
get her onto a card. And then I decided to
draw the background to remind me of where
this card is going to be imagine that being
the front of a card, a birthday card, a
Mother's Day card, something fun, whimsical. I want to take that idea
and draw it with you. So here's our ladies right now, maybe you want to
embellish her dress. Maybe you want to do your
doodling on the background, or maybe we can
doodle on her hair, which is what I
really want to do. Grab some clean paper, and if you've got your
ladies out in front of you, choose one that you really are a fan of and let's try
to replicate that. Because her hair
is going to go up, I want her to be
lower on the page. I'm going to put my much lower than I would do if I
was drawing a full person. I don't need a full person. I'm going to focus
on all that hair. I'll just extend the arms in
case we want to use them. I want to focus on all
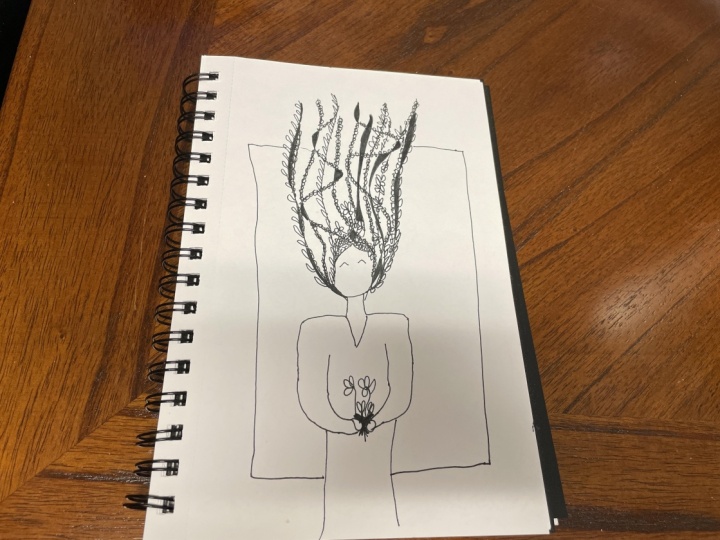
this glorious hair. One of my ideas had to do with
making a part in her hair. I want to use this point
for something very fun. I'm going to come out
about the chin length and wavy her hair all
the way up to the top. And then another a little right there
at that point coming up we could even do something further off of that
first hair extension. Maybe somewhere about the ear One of my ideas had to
do with this point. This point is where I want to experiment with one
of those flowers. I wanted a flower in her hair. And she would try
a few more petals. I could definitely fill that in. Maybe another flower over here. I really liked that shape. That wavy flower petal. Generally call these
fantasy flowers. They're not off
of a true flower. You know what I always
thought looked really cool. If this doesn't mean you're an earth child, I don't
know what does it. Putting a mushroom
up here. How fun? I just think that's so funny. I don't know that
just cracks me up. I'm going to start having fun. We're just doodling. This is a shape I generally put on most of my envelope bat. Maybe on a capital letter, I can put these side
by side leaves. One thing I also liked is
filling in black spaces. Maybe there's a spot that
here and there you might want to fill with a black line. One of my girls was doing the neurographic art where the corners are always rounded. Maybe her whole hairdo could be neurographic art
where every point is then rounded. Do
it, don't do it. Just relax and have fun. I was just having
a blast thinking of all what every line could be, what every space could be. I like the side
being neurographic. I think I'll do a little
bit more of that. Let's see, we talked
about doing black dot. I don't know, it's
almost like she's got little ribbons
tied in her hair. I'm okay with
designs overlapping. Designs touching. I mean, we've got interweaving
hair strands. I'm calling them extensions. This nib of my food and
suce has been worn down. It is not sharp anymore, and so I've been having
fun using it as my marker. This just reminds me
of maybe a butterfly or an ornament. That's so fun. A little baby leaf
on each of these. Leaves that alternate. Does this remind you of
spring at all? Are you? Have garden fever right now. Or are you enjoying sunshine
year round where you live? Something about these leaves, just kind of lend
themselves to coloring in alternating ones or
even fewer than that. Or maybe you've got a leaf
shape you are in love with. We'll fill that one in. Let's
put in some curly cues. I should have my idea look out. Make sure I've got
all my ideas flowing. About we can put in our
circle in a circle flowers. That one got away from me. Here. My hearts. Every garden child needs hearts in her hair,
don't you think? Lots of room for
leaves over here. How about the ones that
come out on a stem. I'm gonna call her good. I've had so much fun creating her and the whimsy of her hair. I almost want to get
my coloring pencils and start filling
it in, as well. I hope you enjoyed this lady. Make another maybe
trying her hair flying off to the right or to the left and see
where that takes you.
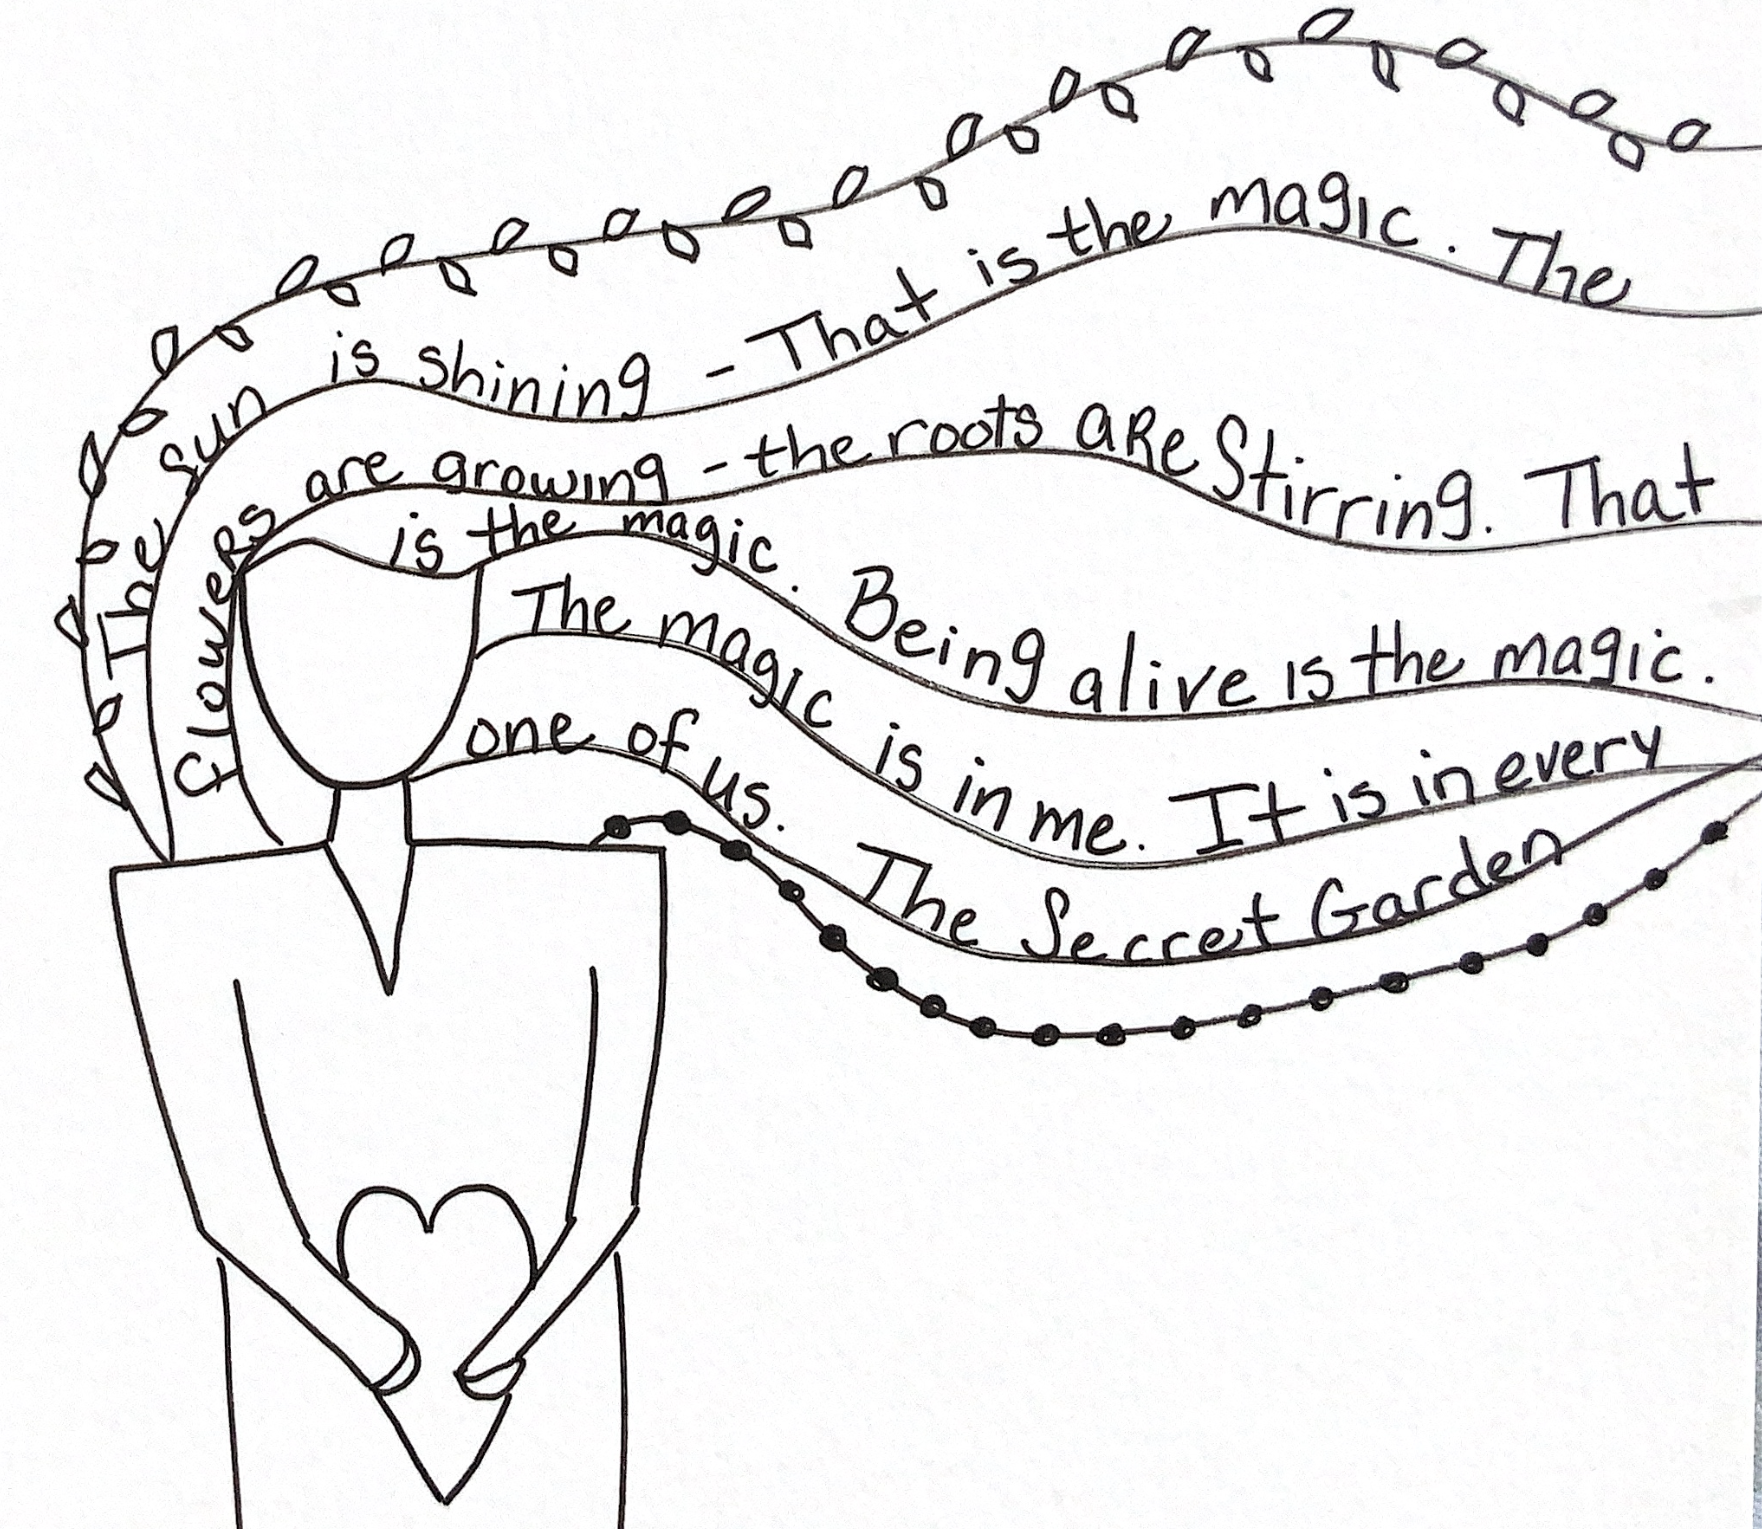
6. Quotable Hair: This design, I wanted to try
writing a quote in her hair. Let's imagine her hair
coming off to the side. I'm going to I don't think
she needs to be too low. I'm going to have as much
swoopiness as possible here. Giving myself lots
of room to write. One more. Okay. Let's see what
we can do with this. I need a quote. Tote. C, quote, cut, quote. Okay. I think I found my quote. Maybe because I have flowers
and plants on the brain, but I've got it from
the Secret Garden, and I'm looking at
them sitting down in their garden and he's going
to say, the sun is shining. That is the magic. The
flowers are growing, the roots are stirring.
That is the magic. Let's see how we
can fill this in. The sun is shining.
Should I curse of it? Sun. The sun is shining The sun is shining. As I continue to
write out the quote. I had some other ideas. Maybe you could use
these lines for quotes or for journaling
your thoughts. Use that space in unique ways. Make it books that
you've read list. Maybe you are spiritual, Christian, and you want to write out the verses
you're learning. Maybe you want to list
out your personal goals. How about listing out
the month's birthdays? One for every
month. Make copies. How about naming your
intentions on every line? What if you wrote what you love about someone
as a gift for them? Write out your affirmations. Make this a visual. Write out daily gratitude. There's other ideas besides
writing on these lines. What if you started experimenting
with lettering height? Or what if you started doodling inside the lines
or on the lines. Copy this image and use it over and over for
multiple ideas. And you know I love collage. What if each of these
sections of hair became a collage of
different colors? A I'm not sure how you feel about
your handwriting. I have practiced brush
calligraphy for many years, and it was a skill to
learn. Let me tell you. But when you find something
that means a lot to you, writing it in your own writing, there's something
about it that makes you feel like that
was your fingerprint. That was me being
a part of my art. I'm so enthralled with that idea that when
I make something, when I touch something, instead of just signing my name, I can doodle something. I can be creative
in that moment. Now, I hope that you
take away from this idea that being alive is a gift and that while you are expressing and
learning your creativity, that you have some fun with it. If the picture is not what you really were hoping
for, that's okay. In fact, I'm going to share in a little blooper reel
where this class started, and you won't believe how
silly these pictures are. But from there and a
little bit of practice, you can make something
you can be proud of. And I hope this was fun for you. Let me see your projects. I can't wait to
see what you want.
7. Back Story and Project: I promised you a blooper reel. So it's not exactly a blooper
where I'm making mistakes, but the mistake I made. So I want to share with
you what that was. I actually posed the
question to myself, What if? And this is my what if? What if I keep
doodling on her hair? What if I added eye balls? And then what if
I added a smile, and I'm I don't
know what that is. That looks like a
3-year-old. I don't know. I was so embarrassed. I thought, Let's work on eyes. Oh, boy, yeah, that's not. What if I had lashes on
eyes that are closed? These were questions I'm asking. What if her arms go out? Well, now that her arms are
out, what are they doing? So now I make this
balloon and her big hair. I was like, Oh,
yeah, that's not. Okay, that's horrid. This looks like a Santa belt. I don't know what
that is. Again, I worked on more hair or
what if she had ears. These are appalling. And so how I went from appalling to making something I was more comfortable with, I was actually eliminating
some elements, and that's where the
creativity actually grew. So please, if your
art looks like this, you're fine. You're
absolutely fine. You're welcome into my club. We can be friends because
we can learn together and I hope that this class
was encouraging to you and I can't wait
to see your projects. Share that in the
project section. I don't care if it's ugly art. Ugly art's included. I want to see that you've taken this class and
have enjoyed it. You experimented, you
tried something new. Good for you. I'm
very proud of you, thank you for sharing
that with me.
8. Wrap Up: Hey, thank you for
joining me today. I hope you had fun
because I sure did. I tried some new things today, and I love that quote idea
just came out of nowhere. I'm so glad you
were here for that. Now, if you haven't taken the drawing People's
class, it's super short. It's doodling paper dolls. I'd love to see you over there. But I want really is
to see your project. Did you try this class? Please upload that. I would love to see it. We always inspire each other. Thank you for joining me. I want and beg, please, would you
review this class? Let me know how you liked it, what you came away with. Even if there's something
I need to improve, I want to hear from you. Hey, I love for you. If you follow me on my socials, you'll see more of these
doodling pictures, and I hope they're
inspiring to you. I hope you take away some ideas, maybe even find some
doodling books to help you along your way of collecting things that
you want to draw. Again, thank you so
much for joining me. I hope you have a great do.
 Tammy Prara, Making Matters