Transcripts
1. Welcome!: Hi there, I'm Jennifer. A few years ago, I left the
classroom and found myself at home with an ipad and a
skill share membership. Since then I've created
countless patterns, numerous illustrations, and learn something new
about affinity designer. Almost every day, I
believe everyone is creative and I hope to
encourage you on your journey. Along the way, I found myself looking for
new things to draw. I came across the idea
of evergreen themes. Themes that are
always in style and seem to be relevant
year after year. Think flowers and fruits. If you're in need of art that has enduring relevance
and interest, then this class is for you. Drawing fruits is a safe, reliable choice for almost
any project or portfolio. Some experience with affinity designer too, will be helpful. If this is your first
time opening the app, I'm so happy for you. I'd encourage you to
check out my Intro to Affinity Designer
to class as well. This class I'll teach
you how to draw several fruits in three
different styles. We'll also look at the
Vector flood fill tool. Throughout the class,
we'll cover techniques and tools specific to
affinity designer. We'll put some of our
fruits together into a mixed fruit illustration
for our projects. Are you ready to
enhance your portfolio, create eye catching
illustrations, or just find the joy in drawing? Then let's get started. I'll meet you in
the next lesson.
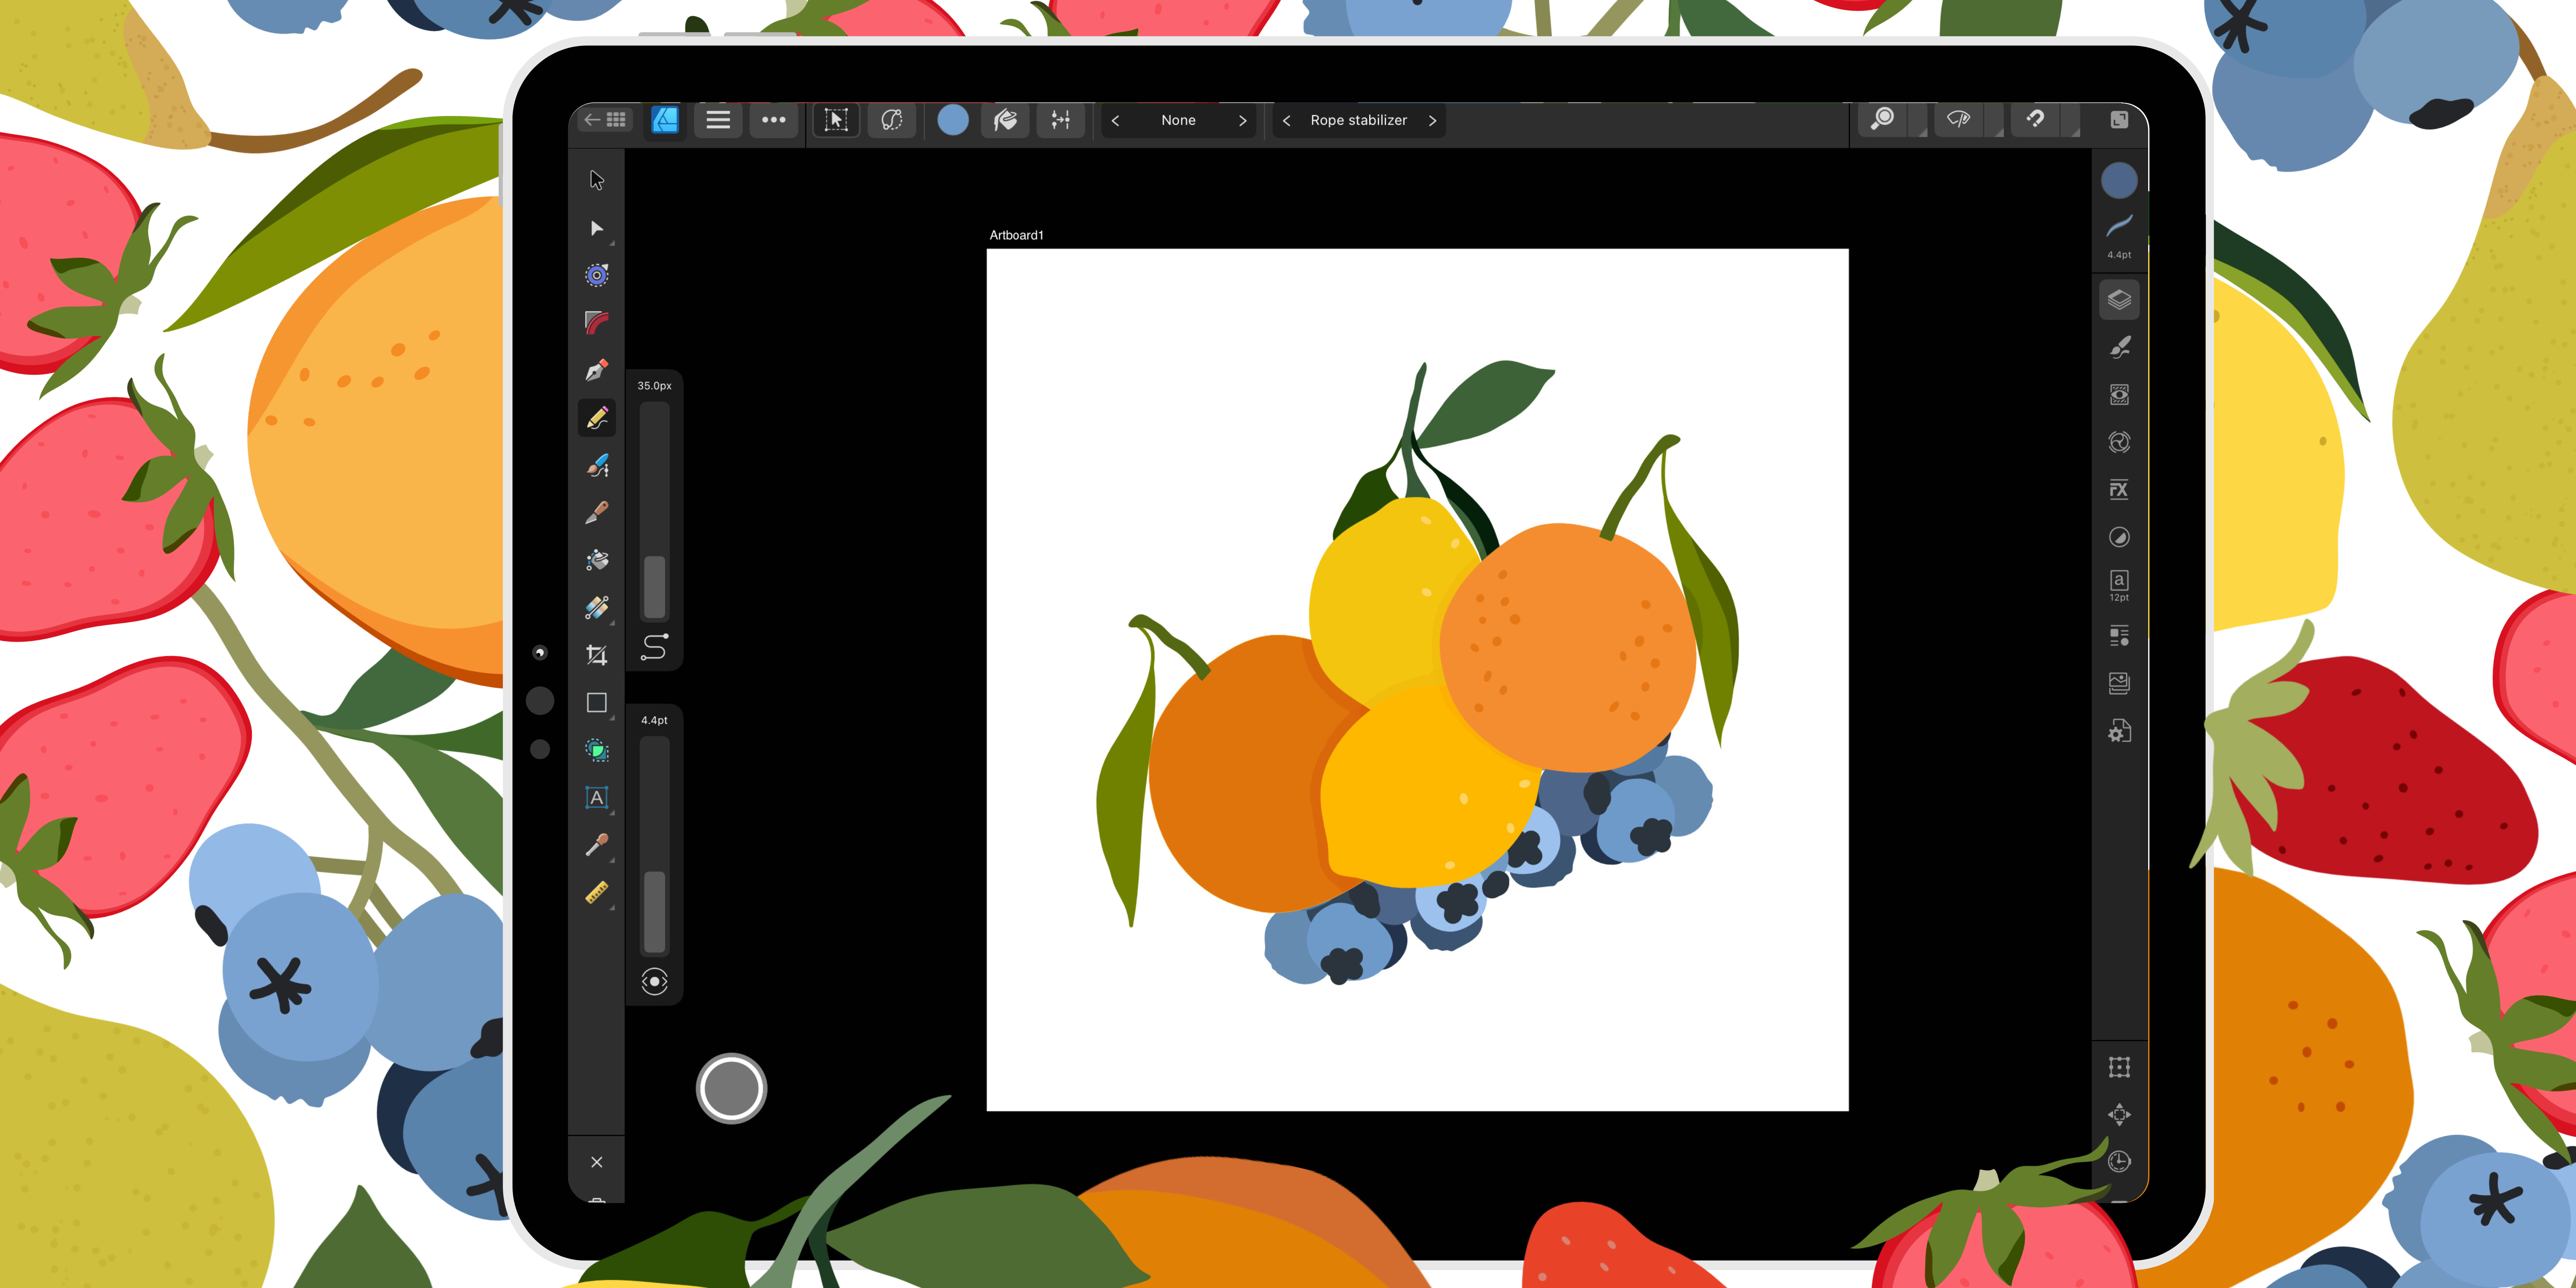
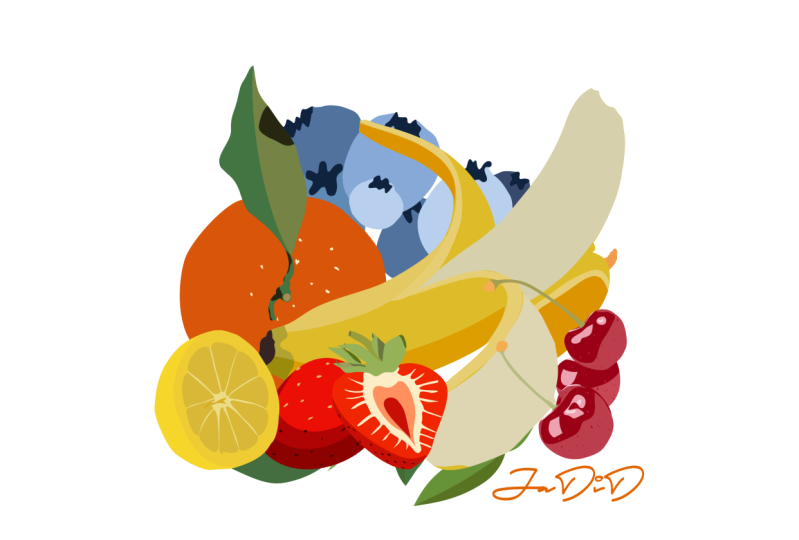
2. Resources and Project: In this class, you'll create a mixed fruit illustration
for your project. We'll learn how to draw several fruits in three
different styles. Your project should include at least three to five fruits. However, feel free to use the same type of
fruit more than once. I've included some outlines in the resources to help
you arrange the fruit. If you need some ideas, be sure to check those out. We'll be drawing in both the
affinity designer persona and the pixel persona. It took me a while to get comfortable using
the pixel persona. I hope it doesn't take you
as long as it took me. Then be sure to share and
upload your projects. Your project will encourage other students along
their creative journey. Remember to install the
latest update from affinity. I'll be working on version 2.3 I'll meet you
in the next lesson.
3. Vector Flood Fill: Before we get started drawing, let's take a look at the
Vector flood fill tool. Say that ten times fast, this tool can be
used for coloring areas to create new shapes. Once you've loaded a fill, the tool lets you flood areas formed from selected
overlapping shapes or curves. First, I'm going to
open a new document. Any size document will
work for this class. I'm just going to use the
social media square post. I want to make sure that I
do create art boards so that toggle needs to be on and then tap Okay in
our new document. Let's add two shapes. We'll use the rectangle
tool on the left hand side. Anytime you need to know
the names of the tools, you can always press
the question mark in the bottom right hand corner, which will give you the
names on each tool bar. The top context toolbar
actually shows in the middle. And then for your studios
on the right hand side, let's first make a rectangle
using our color studio. We'll select a fill color. This can be any color that
you'd like you'd like. You can make your outline just a little bit wider by increasing
the slider for width. I also like to tap on
where it says point and type in the
actual amount that I like, like a two point. Let's go back to the
rectangle tool and select a different shape,
maybe an eclipse. Using my move tool, I'll slide this ellipse over and resize
just a little bit. Looks like I have
my snapping on. I'm going to turn snapping off. Snapping is in the top
right hand corner. It looks like a magnet. I can tap that magnet to
toggle snapping on or off. I can also tap the
bottom right hand corner where it says enable snapping. Then you can check to see if this circle is filled or not. Right now the circle is filled, so I have snapping turned on. I want to turn that
off and I could tap enable snapping when this
circle here is not filled. So I know my snapping is off. Now I can move this freely. Let's go in and
change the color. On our layers panel, You can see the rectangle and the
ellipse are one layer. The fill and the
stroke are together. To use the Vector
Flood fill tool, let's remove the fill
color from each shape. Tapping the color dot for our
fill and tapping no fill. Now we'll select the
Vector flood fill tool. The tool is about
halfway down on the left hand side and it looks like a paint bucket and
tap vector flood fill tool. Now you can see we have only
one dot to choose from. I'll go ahead and select the
same colors I had last time. You can see by tapping
the rectangle, I now have my fill by using
the vector flood fill tool. If we look on the layers panel, we now have two separate
layers for our rectangle. One is the outline, the next one is the fill. Now the fill layer is
separate from the outline. We wanted to select
just our fill layer. We can now move this
as a separate part, a separate piece
of our rectangle. Let's make sure the
tool is selected. We'll load our color
on our layers panel. We want to make sure that
the ellipse layer is selected and then we can tap
inside to fill our ellipse. This is a different way to
fill shapes by creating a separate curved layer that you can then select and
use separately. Let's look at another way to use the Vector flood fill tool. I'll go back and actually
delete what we've done. I also want to make
sure I don't have a pill for my shapes yet. One of our shapes needs
to overlap the other. I'll select my circle, my ellipse, and the rectangle. And just drag them over so
that they are overlapping. Now that our shapes
are overlapping, we'll use the move tool
to select both shapes. You can check on the
layers panel to make sure that each layer is
highlighted blue. Select the Vector
Flood Fill tool and then load your color. We can tap into each part. To add our fill, I need a third color. Looking at our layers panel, we can now see that we still have an outline for each shape. Now we've created
three new shapes which if we select then
we can use separately. I'll undo what we've
done to look at the next way to use the
vector flood fill tool. This time I have both of my
shapes with a white fill. Using the move tool,
I'll select both shapes. This time we'll
look at the modes for the fill tool with
the fill tool selected. We'll see on the top context
toolbar some options. The first one we're going
to look at is in side. This is a circle with
the bottom quarter of the circle being shaded. We'll tap in side and
then load our color. Let's see what happens
on our layers panel. Now it looks like
we have some groups for our circle and
our rectangle. You'll now see that
the new shapes have been clipped to the ellipse, to our base, the new curve
and our new curve here. Our new shapes have
been clipped inside. If you'd like to
use both of them, you can by selecting the ellipse layer and
moving with your move tool. Or if you'd like,
you can turn off one of the new shapes
with your move tool. Selected. Move your new shape with only one of the
new shapes shown. The same happened
with our rectangle. Now our new shape is clipped to our rectangle,
to our base layer, which we can turn on and off and use together
or separately. Let's just a little
difference in how the Vector flood fill tool works with the inside mode selected. It attempts to create
the new shape and then fills and places them
inside the existing shapes. I'll undo this again. Now I have my shapes
filled with color. I'll use the Vector
flood fill tool with a different mode. This time we'll use in between. The in between is
the square that's in between the two circles. The move tool selected. I'll select both shapes
and then load our color. Looking at our layers panel, we can now see that we
have a rectangle outline, our new curve shape. And our existing fill color mode organizes layers
into an outline, the new shape, and the fill color which is not
clipped to the base layer. This breaks the fills
and the strokes apart into shapes and inserts the new fills in between the outline and the
existing color. The last way I'd like
to show you how to use the Vector flood fill
tool is with text. I've turned off all
of our shape layers using our artistic
text and art text. Going to type out my
name move tool selected. I'll make this a
little bit larger. I'll also give my name a color to divide my name into
different colors easily. I'm going to grab
the pencil tool. I'll use black for this and just draw a wavy line
through the letters. Select the vector,
flood fill, load, your new color, and
select both layers. I'm going to drag my curve
line for my pencil tool to the right to select
both the pencil line I just drew and my name. Then you can take
your pencil and drag through the letters being sure that you don't drag through any negative spaces
like in the E and my. Those will fill
with color as well. Now I can load a different
color and do the same to the bottom till I got my
negative space there in my E. So I'll undo and
try one more time, being careful not to drag my pencil through
that negative space. Now I can turn off
my pencil line. I quickly have a fun way
to add color to text. The very last way I'd like
to show you how you can use the Vector Flood fill
tool is to change your background color,
your layers panel, select your artboard, load your color then simply and your background
color will be changed. And one, I think this
is pretty nice because now you don't have
to draw a rectangle to make that background color, you can change it using
the vector flood fill. I'll see you in the next lesson.
4. Flat Style Blueberries Warm Up: With the new document open. Now I'll find my reference image using the stock studio
that's built into affinity designer using pexels. I typed in blueberries. I'd like to use the first image with the white background. Do a long hold and
drag to the artboard. Then I'll re size
just a little bit. Now we're ready to start tracing the outline of our blueberries. We'll start with the
layer that's in the back. The blueberries that are
in the furthest back, it looks like we have
one on the top below. There's one peeking
out back here, one down here at
the very bottom. And then there's another one
peaking out in the center. Using the pencil tool, I like a two point stroke. We can use a black stroke. We'll outline each of the blueberries that
are in the back. A part of the blueberry
that's behind another blueberry doesn't
need to be perfect. I'm going to use an auto
close feature auto closes on the top context tool bar. Now when I start drawing my
outline of each blueberry, trying to add as many details
as I can to begin with. Like all of the wiggles
and curves there. But when I get close
to where I started, I'm going to release
my pencil and it will automatically close the
curve the line for me. I'll do the same thing with the other blueberries
that are behind. Grabbing the details here and getting close to where
I started and releasing. I don't always use auto clothes, but for something like
this where they're going to be behind other elements, I think it is a nice tool and
it can save a little time. I do have the rope
stabilizer on for my pencil. The rope stabilizer
is an option on the context toolbar that you can turn on or off
if you'd like. You could also use
the window stabilizer or no stabilizer. I like to use the
rope stabilizer as it does make your lines
a little smoother. We have our
blueberries outlined. We'll use the vector flood tool. Within between activated, we'll also select
all of our layers. You can select a
layer by dragging to the right on each layer until they're
highlighted in blue. Next, let's load our color
using the eye dropper tool. I'll drag the eye dropper to each blueberry and
choose a midtone, something not too dark
and not too light. Then the color to
the right to load your fill and then
tap on the blueberry. Let's do the same thing
for each blueberry because we do want
them to be different. We don't want them to be
exactly the same color because we know
that everything in nature isn't really perfect. We can also come back later and adjust some of these colors. But for now, let's just use
our eye dropper tool and find a mid tone on our layers panel. We now have our outline
separated from our fill color. Now we can select the outline
layers and you can either turn them off if you'd like or you can
delete them for now. I'm going to group
them together. Rename this layer by
dragging to the left tapping rename layer Outline
and turn off the group. Now I just have the fill colors. I'll make another group. I have the outline layer selected with the
command controller. I'll turn on shift and tap the bottom layer to select
all layers in between, turn off shift and
then tap group, this group I'll
rename by dragging to the left as the bottom. Now I can turn off this layer and look at the blueberries that are on top or that
are in between. We're probably going to
need a middle layer. Looking at the
blueberries again, this blueberry here is in
front of the bottom layer, but it's also behind the
blueberry to the left. This one's going to be in
between these two should be on top and this one
should be on top as well with our pencil tool. Let's go ahead and outline
this in between Blueberry. Make sure we have a stroke. Let's outline the
blueberry that's in the middle or in between the
top and the bottom layer. Use our vector flood fill
tool, grab our color. Since this is only
one blueberry, I'm just going to turn
off my curve layer. But I will select both
layers and group them together and rename
the group middle. Turn off our middle
layer and now we have the blueberries
that are on the top. I'm not going to use
my auto clothes, I'm actually going
to turn that off. And I'll close these
by hand to make sure that they look exactly the way that I
want them to look. To close, you can
use the node tool, then drag each end
until they meet. That was a pretty nice closure there, so I'm happy with that. Back to the pencil tool. This one I need to
adjust as well. If you need, you can
drag the handles to make the curve a little smoother. You wanted to keep
your auto clothes on. You could, and then you could
still use your node tool to come back in and make
those lines smoother. Our outlines finished, let's select all three blueberries. Load the color into our vector flood fill tool
for the top blueberries. I do try to select a little
bit of a lighter color so that the darker
blueberries might be in back and the lighter
blueberries in front. Now we have our
three fill layers and our three outline layers. Drag To select all three
of those group together. Swipe to the left rename
layer and select all. Then I'll make a group for the top layer and rename top looks like I forgot to turn off
my outline group. I'll turn that off now. I can turn on the middle
layer and the bottom layer. Let me turn off my
reference image two to see what
we're looking at. We do have a lot of
different shades of blue, which I, I really like
this darker blue. This one is a little too light. I'm going to go and actually
just tap in and keep tapping until I find the layer
that this blueberry is on. And I'd like to change that color and make it
just a little bit darker. Inside the color will triangle. I'll drag a little closer
to the darker side, the dark end of this triangle. It's a darker blue. I like that. Now we can group all
three layers together. Rename blueberries. Turn on a reference image and
start working on our stem.
5. Flat Style Blueberries Warm Up Part 2: Using the pencil tool.
Let's draw in our stem. I'll find a color
using the eye dropper, and I want more
of a green color. Since this is a flat style, I'm really going to stick
to one green color. Let's see how this looks. We're at about a six point with our pencil tool
and our green selected. This is a flat style, so it is very simple, not very many details. I am going to drag my width
down just a little bit, draw our other stems coming off. Then we need maybe three
more stems down here. Let's group our stem together using the command
controller selecting shift. Having the first layer selected tap the bottom layer to select all deactivate our shift
and then group together, rename this layer stem. Now let's turn on
our blueberries and turn off our
reference image. Our stem is actually in
front of our blueberries. We need to drag our stem layer
behind our blueberries or underneath the blueberries layer with this layer selected. With my move tool, I'm thinking I may change
the color just a little bit, which of course you
can do, since this is your illustration,
a little darker. Green is going to
be a nice touch. Next, we'll draw our leaves with our pencil tool selected. We'll draw the
outline of the leaf. Change this back to a two
point for the leaves. To keep this simple, I am only going to choose
two, maybe three. I know I want this one
that droops down here, this larger one to the right. And then I'm thinking about
this little guy here. This will give the reader
just enough information that they know that there's
leaves off of the stem, But it's not going to
overwhelm our flat style. I'll use the eye dropper
to grab a green color. Then I'll start
drawing from the stem all the way down to the
bottom of the leaf. If you have on the
rope stabilizer, I find it's helpful to come to a complete stop before you
want to change directions, then drag back up. If I used my fill color here, you can see that
the fill actually continues all the
way onto the stem. Which I don't want. I just want the leaf, the end of the leaf here, to have a fill. My node tool, I'm
going to make sure that this node is dragged onto the line that's
made with my curve. Now I have a closed shape, we can use our
vector flood film. We have our leaf layer selected. Select our vector
flood fill can load the same green color and then tap to fill our closed
shape of our leaf. Grab a new color. Oops, I had the selected, so I'm going to press
the X to select. Select our next color. And we'll draw our leaf again, coming to a complete stop, the rope stabilizer, and starting again in
the new direction. Zooming in and with my
node tool selected, making sure that I have
this node on the curve. You should be able to drag
it on this yellow line. If it's not there, then just drag it over so
that it connects. Then you'll have a closed
shape with your leaf. We have our new curve
layer selected. We'll load the color into our vector flood
fill and tap inside. Then we'll do the same
thing for our next leaf. As you can see, we have our
outline and our fill layer. For each leaf, we need to keep our
outlines because that's what actually gives us our stem of our
leaf that connects. Create a new group
for the leaves. Rename leaves. The leaves now need to be
below the stem, or underneath. I'll tap on my layer, drag down below the stem. Turn off our reference image and let's see how we're looking. The last part,
we're going to add a few finishing details
to our blueberries. I'll turn on my
reference image and turn off my blueberries
with my pencil tool. Let's add a few details on top. We'll need a pretty
dark blue color. These details tend
to look like stars. Since we're going
for a flat style, we're going to
keep it simple and really just draw a few lines. Drag my width down a little bit. It's about a 12 point, which I think looks
a little bit better, Might be a little too large, let's bump that down to
about ten in the flat style. The details are also simplified, trying to look for anything that will give the reader
just enough information. But again, not to overwhelm, let's turn on our blueberries
and see how that looks. Next, I have a few that
are from a side angle. This one here in the middle
and this one here in the top. For this, I'm going
to try to replicate this shape by just drawing
a little squiggly line, a little shape up and over, trying to fill in that
shape as much as possible. This one will need a fill color for the main details I do like
using the same color, not having too many colors. Something I find enjoyable in the flat style will add
a fill to that as well. Let's turn on our
blueberries and see how we're looking like this. Although this needs to be
behind the blueberry on top. The move tool selected. Let's tap into this
layer and we can either re size so that it doesn't join, doesn't intersect with
the other blueberry. Or if you wanted you could
also re arrange the layers. Think I'm just going
to move mine a little bit the same for this one. I'll tap to get into
the layer size. I'm noticing we're going to have this little white
area peeking through. I'll tap into the blueberry
beside it and just drag a little bit of the handle over so that covers up that white area. Also going to have
a little area down here tap into that
same blueberry, drag a little further down. This little blueberry is also very similar to the
blueberry on top. Using my color wheel, I am going to make this
a little bit darker by dragging down closer to the
black part of the triangle. There we go, to give
a little definition. All right, I feel like
that looks really good, except I still have a little
white peeking through. Let's tap on this
blueberry on the bottom. Drag that up a little bit, now we have a flat style
blueberry illustration.
6. Save Assets: User illustrations
in our project. Let's save our
blueberries as an asset. We'll need to make sure
that our blueberry is in one group. I need to group my
details together. Then I can select all four
layers and group together. Now I can turn on and
off my layer and have my blueberry illustration
with my layer selected. We'll use the Asset Studio
built into Finity Designer. Third option from the bottom, we'll need to set
up our category for our fruits illustration. We'll use the hamburger
menu on the very top. Aside assets to create
or add a category. Category name is up to you. I'm going to name
the fruits and Tap. Okay, now we have a new
category within this category. We now need a sub category. Again, tap on the hamburger
menu and add sub category. Now we have a subcategory
and our assets because we have an assets line with another hamburger menu. This hamburger menu
allows you to add an asset from selection.
Let's tap that. Now you can see that under
our fruits category, we have our blueberries saved. We'll be able to use these
easily in our projects. I'll meet you in
the next lesson.
7. Flat Style Orange Practice: Let's open a new document and
insert our reference image. This image comes from the resources that
you've downloaded. Hopefully once you
haven't downloaded, you'll tap on the document menu of three lines like
a hamburger and tap place from place you can find where you
saved your image. Under my rests, I have
the orange tap open. Then we need to drag to place the image I
just drag from left to right and move and re size. We're only going to draw
the orange on the left. It's okay about the orange on the right not being
on the board, just like we did with
the blueberries. We'll use our pencil tool in two point stroke
with no fill and a black stroke to draw the
outline of our orange. If you need to lift up your
pencil like I just needed to, you can activate sculpted pots on the top context tool bar. And sculpt allows you to continue drawing
where you left off. I'm going to start
on this red node on the end by tapping
there and then drawing around as much as I can until I need to lift
up my pencil again. When I lift up my pencil, then your new line will form, And as you can tell, it's a continuation of the line
that I had started drawing. Do the same thing by
starting at the end with this red node and drawing
as far as I need to. Now with my node tool, I'll drag the red node to the blue node to
create a closed shape. I'm going to go ahead
and use my node tool to adjust a little bit of my curve. Now we have our outline. With the curve layer selected, let's choose our
vector flood fill tool and load some color
using the eye dropper. Again, we'll find a
light, mono, dark, more of a midtone color
to fill our orange with. Then I'll turn off
my outline layer. Next, select both layers and we'll make a group
for our orange. We're already quite warmed
up from the blueberries. This orange will be
a little bit faster. Next, let's use our pencil
tool to trace our leaves. Actually turn off
my orange layer. I do want this large leaf. I'm not going to draw the
one of the front again, just for simplicity,
just to make sure our flat style
really shines through. Then I will draw a stem, making sure I have a two
point and a black stroke. I do want to use my
vector flood fill tool, so I am going to close my stem. Could I've used auto clothes or I can manually move my node? Let's select our vector
flood fill tool. Make sure we have our
curve layer selected and then tap to fill and turn
off my outline layer. Head back to my
pencil tool and trace the outline of the larger leaf. No tool to grab that
node to make sure it's connected using our
vector flood film. Let's grab our new color
with the eye dropper. Now if you'd like to
use your outline, you can turn it off it, keep it. Or you could change that color of the outline to be the
green color if you'd like. That's always an option. Two is that you can change the color of the outline or you
can simply turn it off. A group together, a name, leaf. It was my stem that all grouped together and rename in my leaf. I'd like to be below
my stem layers. I'll drag below. Let's turn off our
reference image and see how we're looking. Last but not least, let's add some details. I like to use the rectangle tool to form an ellipse
by tapping ellipse, then my color, I like to
be a little bit darker than the base color of my
orange inside the triangle. I'll drag up and maybe
over a little bit closer towards the black
end of the triangle. Then I'll start drawing a
few ellipses, some circles. Let's add a fill
to that as well. I'm really just free
handing this right now. The move tool selected. You can drag the nodes for each ellipse to make them
a little bit different. You can also drag the
handle to rotate. I do like to try to change
each one so they don't look like they're Just
duplicate copies of the others. Then arrange your dots on your
orange until you're happy. Once you're happy,
let's make sure that we have all of our
details in one group. We'll name this layer details. Then let's select
all four layers and group them together as well. Now our orange is on one layer. We can head back to
the Assets studio, our fruits category. Tap the three horizontal
lines of the hamburger menu, and add asset from selection. Now we should have
our orange and our blueberries ready
to use in our projects. I'll see you in the next lesson.
8. Color Block Strawberry Warm Up: The next style is something I like to call color blocking, where we'll have large
blocks of color. Again, this is more
towards a simple style, so it should be quick and
easy. Let's get started. I'll use my stock studio again, and in pexels search
for strawberries. I like this image on the far right that has several strawberries
to choose from. We'll tap and drag
to my R board. I really like the strawberry here. This is the strawberry. I'm going to focus on drawing, trying to get this centered, the middle of my artboard,
that looks about right. The pencil tool, I'll
outline the strawberry, making sure I close the curve
and use the node tool to make any adjustments
that you'd like. With this layer selected, I'll activate our vector flood, fill with the eye dropper. I'll choose a midtone red
and turn off the outline. I know for sure that I
don't want this outline, so I'm actually going
to delete the outline. I'll turn off my
strawberry layer. Let me rename this first
using my pencil tool, I'll trace the leaves. I'm not going to get
all of the leaves here. Some of them all leave off, especially as we get
around to this side, to the right hand side
of the strawberry, This layer selected. We'll grab our flood
fill tool and our color. I'm going to delete my
outline layer as well. Name my layer leaves with
the pencil tool selected. Draw our stem. I'm going to select
auto clothes. I have a white fill here. If you'd like, you could use a fill color or the stroke and the film
rename my layers stem. And then turn on my other layers and turn off my reference image if you like the stem
where that you can leave it or you could drag
it behind the leams. I think I'm going to make it
show just a little bit more. Now we have our flat strawberry, but let's add some
blocks of color to this. Now we'll add a few details on the leaves as well,
with a different color. I like to do this by tapping on the strawberry layer and
duplicating the layer. Tapping on the three dots
and selecting duplicate. The duplicate layer is on top. I like to change this color to be a little bit lighter then I re size if you'd like to resize it so it's
directly in the middle. You could do something
like this if you like. You could even duplicate
this layer one more time and change the color
to be even lighter. Or if you prefer, I'll turn off my last layer, This second layer here, we'll actually drag so it's
a little bit off center. Maybe I want it all to be a lighter color on the top and
then have it off centered. Now on my layers panel, I can drag my duplicate
copy on top of my base layer to clip this
layer to the base layer. Now I have strawberry with
two large blocks of color. You'd like to turn on the
other duplicate layer, the lightest layer to resize. Something like that. Could
look very nice as well, noticing I have a
little dark red here poking out
from my light red. I'd like to increase the size
of that just a little bit. Now let's add some blocks
of color to our leaves. I'll turn off our leaves
layer and our strawberry, which I'll go ahead
and group together, rename Strawberry and turn
on our reference image. The color I want to add here is this darker green color
that's actually being made by the leaves
almost turning up a little bit and
casting a shadow. Or by the leaves actually folding in and up on themselves. To do that, we'll draw
with the pencil tool, these darker green areas, and then we'll clip them to our base layer in just a moment. Let's select a dark
rich green color. I can draw on and off of
the leaf adding a fill, Choosing a new color
for a second leaf, you can add the stroke and
the fill here if you'd like. Then maybe this one too. This one tends to have
a darker green area. I changed this leaf here
because I had selected. I'll deselect by pressing the X, choosing my new green color, and then drawing the
outline, that green section. Now I can select all three curved layers by
dragging to the right. Turning on my leaves, drag on top of the leaves. Our green detailed areas will now be clipped to the leaves. You won't be able to see any of the green that we were
drawing off of the leaf. It'll take the shape of our base layer which
is our leaves. Now with our move tool selected, if you'd like to move any
of these that we just drew, you can if you want it to be
a little bit more prominent. That one I think
looks pretty good. This one I'm noticing I didn't get all the way to
the tip of the leaf, so I'm going to drag out a little bit and
make that larger. Then of course, we
have our details. Let's add some of our dots. I'll use the ellipse
tool for this. Again, free to
draw them by hand. I have some that are a yellow, golden color. I'll
do a few of these. First I go to make sure
I have a pill as well. With the move tool selected, I'll tap and drag to make them a little more
of an oval, not a circle. And then we'll do
the same thing, the different color,
in just a minute. Right? Let's select
a darker red color, make sure we have our
ellipse still selected, then we have a fill of
our darker red as well. I'll group my details together
by tapping the top layer. The command controller
activating shift, tapping the bottom layer, turning off shift and
grouping together. Our details need to be on
top of our strawberries. Let's drag our details layer
above the strawberry layer. Turn off our reference image. Now we have our strawberry. If you'd like all of the
details to be the same color, you could easily
change them here. You could even
change and make them a little lighter or
darker if you'd like. Here is our color
blocked strawberry, if the save as an asset. Let's select all of our groups and group our
strawberry together. Head to your Assets Studio, cap the three horizontal lines, and add asset from selection
If you'd like to have more choices to choose from when you start
making your project, there's lots of other good, juicy strawberries here
that you could choose from. I do recommend that you practice and draw another
strawberry or two, so that you'll have more
to add to your projects. I'll see you in the next lesson.
9. Color Block Practice: For the orange and the
color block style. Go to and open a new document. Now from our asset studio, we can use our orange. I'll tap on the orange
and also tap Insert. Now we have the base for
our color block, Orange. After looking at this again, I think I'm actually
going to change the base layer of my orange
to a brighter orange color. We're actually going to turn off the details layer as we're going to add
some color blocking. And then we'll come back
and see if we want to keep those same details add to them
or make new details there. Orange layer selected. Just like with our strawberries. I'll come to the three
dots and tap duplicate. No, I don't need this outline. I'm actually going to
delete the outline now. I can change my orange color to be a little bit lighter
than my base color. Drag over towards the white
part of the triangle. Now, with my lighter
orange base selected, I'll drag over to the left to create our first color block. Now would also be a time, if
you'd like to go back and make this bottom
layer even darker, you could a richer orange, which means you might
want to go back and adjust your lighter
orange color. Or you could keep it the same with my new color
block layer selected. I'll drag this layer to
my orange curve layer. The clip the new color blocking
to the base orange layer. Now with our pencil tool, we'll free handsome shapes and add a darker area here where our leaf would be casting a
little shadow on our orange. I like to draw a little bit more than what I think
I'm going to need. Then I can come back
and change the shape. I'll drag my freehand
shape that I just drew to my orange layer. It can be clipped. It didn't quite get it
onto this base layer. I'll drag one more time all the way down
to the base layer. Now we can see that
it's clipped because we just see the outline
of the orange. The freehand part that
I drew is now hidden. The move tool selected. You can tap in sometimes you can tap more than once
to get into the layer. I can make some minor changes. You tap again, you can
activate your node tool. So if you want to make it a little more free hand looking, I'm going to change the
color here a little bit. Let's see how that looks. A lot of times I
like to zoom out, Step back, take a look,
and then zoom back in. And keep working with
my move tool selected. I do think I want a larger orange section showing
here and I don't want it to be, it's perfect. So I'm going to move
some of my handles here. Then I feel like
I am going to add another free handed color
block under the leaf here. I'll take the freehand layer and drag all the way
to the base layer, change the color a little bit our leaf, I'd like to have a
lighter section at the top. With the pencil tool, I'll
freehand make this black. For now, the shape mimics the top of the leaf
trying to get that same line. Now with our freehand
curved layer selected, we'll drag to our base layer of our leaf so it can be clipped. As you can see, now
we have our outline. We can see our green outline. After we've clipped
our freehand drawing, we can our outline, we turn off our
outline and we're also going to miss the stem. Since we used a stroke and a fill instead of our
vector flood fill, we can correct this
by drawing in a stem. I'll need to make the
stroke about two points. It looks like I had my
auto clothes on still. Let me deactivate that. Drag the layer that we just
created into our leaf layer. Now our leaf will
be behind our stem. Now we don't have our
green outline time. You're going to clip an
object onto another object, it's really best not
to have an outline. That's why our vector
flood fill tool works really well for filling in shapes and being able
to turn off that outline. Now I need to take
care of this color because we don't want
to leave this black. I am going to change this to
our original green color. However, for this layer like
to change our blend modes. Our blend modes are here
where it says normal. You can tap through to the different modes or you
can click on the name. And then you'll
be able to scroll through to find a blend
mode that might work well. The screen mode is working well. I also really like
to use multiply. With multiply, I like to
bring down the opacity. 25 gives a very subtle look. 75, of course, is
a little darker, and then 50 was in
between the two. As you tap through, you'll
see that there's some that don't interact very well
with the layer below. Although you never know, you might find something
that you like. Sodas are worthwhile endeavor to tap through
just a little bit. I think I'll go back to multiply
at 50% You'd like to add a little darker area here where the leaf and the orange may be touching or where
they're casting a shadow. Could do that with
our free hand. Again, trying to imitate
the shape of the orange, I had mine in, that green. I'm just going to be hard to see until we change the color
or add a blend mode. I'll select the curve,
the freehand I just drew, and drag all the way down to
the base layer of the leaf. There we go. Let's change
our blend mode to multiply. Let's have this be
pretty subtle at 25% move tool and a tap in, Keep tapping, keep tapping. Make this just a
little bit smaller. Now, back to the details. If you want, you could
turn on your details. Maybe move them
around just a bit, give it a little
rotation if you want to see if you could
keep using the ones that you've made earlier,
change the color. I think I'm going
to stick with some of these darker details, Although I am going to
add a few more details. I'm on my details layer. I'll select my ellipse again. I have my color selected. I'll start adding
a few more details using the command controller. I'll activate shift, make sure the first
layer is selected, tap on the second layer, Deactivate shift, and I'll drag all eight layers
to my details now. They should be in
the same group. Let's turn this down
just a little bit. Now we can add our
orange to our assets. I'll see you in the next lesson.
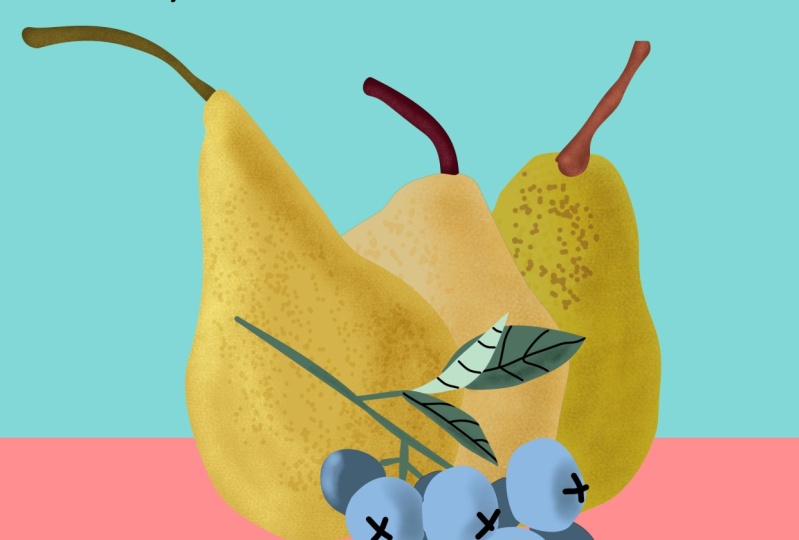
10. Texture Pear Warm Up: I have my new document open
and from here I'm going to place my reference of a pair. I have mine saved in
my files under recess, just like we've done before. We'll use our pencil tool to trace the outline of the pair. Remember, we can turn
on our sculpt mode if we need to pick up
our pencil at any time. Sometimes it's nice to be able to draw it and parts instead of feeling like you have to
do it all at one time. I'll use my node tool
to connect the curve. I'm also going to tap on the
blue line to add a node so I can make this a
little imperfect. With our curve layer selected, let's activate our
vector flood fill. Their eye dropper
will find a color. I'm really looking for
more of a green color, Not so much a yellow. And see what we can get. Drag the outer circle of the
color wheel closer to green. There we go, I like that. I'll tap on my curve layer, which is my outline and turn off the visibility
of that layer. Draw our stem. I want to make
sure that our stem closes when I get
down to the bottom. So I can use our vector flood
fill tool, but not quite. There we go. Our layer
selected will fill our color and turn
off our outline. I know I don't
want this outline. I'm actually going
to delete that. Then I'll drag my stem
below my pair layer. For now, I'll group my two
layers together for my pair. Then my stem layer
is below the pair. Let's switch over to
the pixel persona. We'll tap on the
designer icon and select pixel, the pixel persona. We have a few different options. I'll hold down the
question marks. You can see some of the names of the tools on the left hand side, what tools we have on
the context toolbar, and also our studios on
the right hand side. The right hand side probably
looks the most similar to what we see in the
designer persona. From here, we're going to use our paint brush to add texture. Our paint brushes look
a little different, since they are pixel brushes. You can toggle through each category just like you
do and the designer persona, or you can tap on the
name and then you'll be able to scroll through the list. I like to use some
of the sprays and spatters for adding
texture airbrush. Four is one that
we can start with. Before we get started
with our brush, let's make sure that we can
see our reference image. I'll select our layer, the move tool, and
drag to the right. Then I'll select
both the pair and the stem and drag to the left. Now we'll be able to see
our pair side by side. To start adding that texture, we'll start with a
lighter yellow color and build up to a darker color. Let's see if we can actually
grab something even lighter. You can also see your
color here as well. You could use the eye dropper
from here if you want to, or from the panel on the right. Then we can start
adding texture by drawing over the pair. There's long passes, just to add our first
base layer of texture, as you can see,
it's pretty subtle. You might not see much
of a difference yet, but this is where we'll
need to zoom in and zoom out to see some
of our changes. Our pixel layer that
we just created can be clipped our base layer by dragging on top of
our curve layer. Now anything past the pair will be hidden using
the same brush. Let's change the color to
be a little bit darker. I know there's a darker areas on the right side of the pair, at the bottom where
we have a shadow. And then at the
top, that's where I'm going to focus a lot of my time is trying to build up
some color in those areas. It may not look like you're actually doing a
lot to begin with, but once you in, you'll be able to see
that you have made a difference on this side. I like to draw more
of a curve shape. And then at the bottom, also just almost like a C
shape back and forth. You don't even have to
lift up your pencil. You want to be more
of a solid color. Let's choose a
slightly darker color. I think that might
have been lighter. Let's see if we
can get a little, we'll go back to the top
section of the pair. I'm going to do some passes
over pair you could, and then focus on the top
and the right hand side. I'm going to grab a really pretty dark color
for the base here. Start color, I'm going to
use pretty sparingly on the right and a little
on the top here. Let's add one more darker color. Actually let's
make this a little smaller and then
go back and add, there we go to add some of the dots that
we see along the pair. I like to use a brush
called the Magic Stipler. There's four different
options here. The two I use the most would be a variable and a constant. I'll tap on constant. For now, I have a
pretty dark color. I don't want the darkest color, but I do want a darker color. I think I'll go to
my recent colors and grab this one
that was pretty dark. Let's see how this looks. Okay, Y, It's very subtle. I'm not being able
to see very much. So let's change it
to a darker color and increase the size sum. Now we can tell that
this is too large. It's very dark, but it's
a little too large. Let's undo that. Drag our
slider down a little bit, and see, here we go. This is about the
size I was thinking. All right, I think I have
the right size there, although I'd like to
add a new pixel layer. Now I'll do the dots
stipling on a new layer. I'd like to do some
of these details on a different layer
so that I can go back and change maybe the
blend mode or the opacity. Let's look at that. Now I
have a normal blend mode. Could do multiply
with a 50% opacity. That's a little bit closer
to what I had in mind, or maybe even 25. Let's try 30. There we go. 30 is a little bit more
subtle than I had originally. I like having it on
a separate layer so I can go back and make some of those small changes after I've done a
lot of the work. Then we can also
add some texture to our stem using the same
paint brush as before. We can use our air brush. Let's get our brown color, then Choose a slightly lighter brown and see how that looks. I'll turn on my reference
image again because I do. Yes. The stem at the base right here and then at the
end is a little bit darker. I want to make sure
that I get that. Then I want to grab
that color as well. Maybe even one shade darker. Let's see if I can give
it up here. There we go. All right, so now we have
a pair with texture. Let's make sure we have
our pair in one group so that we can save as an asset. Select both layers,
the pair and the stem. We'll group them together. You rename the layer. Make sure with the move tool
that your pair is selected. Then head to the
Asset Studio and add asset from selection. Now we have another fruit that
we can use in our project. I'll see you in the next lesson.
11. Texture Practice: In this lesson, we'll use our flat orange and use our
pixel brushes to add texture. I have my new document
open and I've already inserted my
flat style orange. To add the texture, it is helpful to see the
reference image. I'm going to go ahead and place that reference
image again. This time I just need it to
be small and off to the side, just so that I can get some
ideas for color right away. I noticed that my orange is
a little bit more yellow. Let's take care of that
and get our orange to be a orange color. Let's grab an orange for now. I'm going to turn
off my details, then we'll switch to
the pixel persona. We'll use our paint brush again. This time I'd like to
use the nus spray, starting with a
lighter orange color. Start making some large
passes over your orange. Let's see, this is a
pretty fine texture. If you'd like to
increase the brush size, that could be helpful in getting texture without being as fine. Now my pixel layer has been automatically
by the assistant clipped and created
below my base layer. Select another
light orange color, maybe just a little bit darker. We want to start building up some areas to the right here, a little bit on the
left and then some on the leaf and a little
bit on the orange as well. I'm going to turn this
down just a little bit. Now I am going to start
focusing on making some large passes
on the top right. We're going to do a little
bit of that. There we go. On the left side here, let's choose a
slightly darker color. You can either lift up your pencil as you're
adding texture. If you hold it down it'll be a little bit
more concentrated, like I want a lot of
color on the bottom here, almost need a circle
of sorts over here. The pixel brushes do take a little bit of trial and error, a little bit of practice, just trying to figure out which brushes you like and how
you like to use them. There are a lot of good brushes. I would recommend
taking a little time to just flip through some
of the categories, maybe make some of
your own swatches and just see what each one
looks like by itself. I'm going to go back to
a pretty light color, go over the top again, I just like to do this
at the end to try to get to the light colors
to peek through. Still, especially
in areas where I feel like it might
be a little too dark or a little
too heavy handed, I do have some water
drops that I'd like to try to show as well,
using our paint brush. Let's go to the ink splatter. Increase the brush
size quite a bit, and then choose one of
our lightest yellow colors and see if we can get a little
splatter effect, looks a little too large, and bring it down a little bit. Let me go ahead and put this on. A new pixel layer, a new pixel layer, a new
brush, and a light yellow. Let's see if we can get some of these water
drop type looks. Since it's on a new pixel layer, I can go ahead and try
a different blend mode. Multiply maybe at 50 is
pretty subtle. Let's try 75. Let's go with 50. I do think
I want to go in and add an even lighter area on the
left hand side of the orange. I'll select my lightest yellow and drag to be even lighter. It could be almost to the white. I can go ahead and make
a new pixel layer, or I could draw on the layer
that I already have created. Let's change your color
to be even lighter if you'd like to see what your blend modes
would look like. Codoggle through
lighten actually works pretty well for this. It's also helpful
to see sometimes where you have a lot
of your texture, especially if it's
pretty subtle. Overlay would also
work well, hard light. Be sure to toggle through your blend modes to see if
there's something that works. Let's make sure we have
our group selected. With our Move tool, we can add our orange
to our assets. Add asset from selection. Now we have a textured orange we can use in our project as well. I'll meet you in
the next lesson.
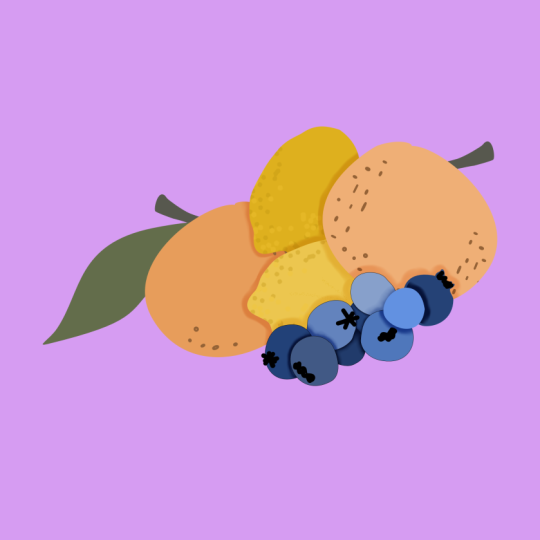
13. Example Project Idea: In this lesson, let's look at some of the outlines and how you can make your class project
a mixed fruit illustration. This is one that I've made using some assets we've made
together in class, and some I've also
made on my own. Outside of the class, I used an outline from your
resources and filled in each fruit based off of the color and the shape
that was given in the outline. I then added some shadows. Let's look and see how you
can make your project. Here's an example that you could use with a couple
of strawberries, oranges, blueberries and lemons. This one includes a pear. Then I'm going to work off
of this third one right now, which is two lemons, two oranges and a
blueberry from our assets. I'm going to grab our lemon and arrange that so that it fits most of
the space of the outline. Grab another lemon and
resize the orange. I actually think I want the color block
orange that we made. I have my fruit, I like to arrange them
on the layers panel. I know I want the blueberries
to be in the back. The lemons, I'd like to
be on top of the oranges. Then we need to start
adjusting some colors and maybe turning off some
parts of the fruits. I'll go back to my outline
group and turn this off. Since now I have the fruits placed where I want them to be. Now, I'm also noticing
that this orange, I believe I would like it to
be above one of the lemons, but not the other. We drag that between
the two lemons. And now this lemon, I just really want the body, the shape of the lemon. I don't really need
the greeneries. I'm going to turn off
the leans and the stems. This lemon, I'm going
to make it a little bit larger to hide some
of that white space. And I'm also going to change the main color of
one of the lemons, maybe something like that. The orange. I'm also going
to change its main color. Find my base layer there. I feel like I have a lot
of dots going for details. I think I'm going to turn
off these details and I'm also going to
turn off the leaf. Since I have one
already, actually, I might leave this leaf and turn off this leaf in just a moment. Although I do want the stem
to be a little different. Let me adjust. That also adjusts the placement
of the leaf. Blueberries. I'd
like the blueberries to be tucked in a
little bit more. They just pop out a little, then I think I can leave my
orange like it is, though. I might turn off a little of the color blocking for this one. Yes, let's make that more of a flat style orange and just have some
color on the leaves. Might actually duplicate and flip blueberries to add a few more blueberries
here on the bottom. Now I have an illustration
of mixed fruits. Using the different assets that we've made, changing color, slightly turning on or off
different parts of the fruit, really give you a
lot of flexibility.
14. Project Shadows: If you'd like to take your
illustration one step further, You can add shadows. Let's look at that for
just a few minutes. Now, I know that I have
this orange is on top. The orange on the left
is below the lemons, and then the
blueberries are in the. The orange, if we had a light
source coming from above, would be casting a
shadow onto the lemons. Lemons would be casting a
shadow onto the orange. Then the orange and
the bottom lemon, and this top orange
would be casting a shadow onto the blueberries. First, let's select our lemon. Using our pixel persona, we can add some shadows
using our paint brush. I like to use the basic brush. You can use a round brush
or soft round brush, but I do like just a
basic round brush. We're going to select
the same color as our lemon because we're
going to use a blend mode. In just a moment, we'll
add a pixel layer above making sure we're
on that pixel layer. We're then going to draw where the lemon would have
a shadow from the orange. Right now it's hard to see
because it's the same color. When we go to change our layer, the blend mode to
a different color, you'll be able to see
that even better. I like multiply then about 25% because we just want
it to be a subtle shadow. It doesn't need to
stand out too much or take away from any of
the other elements. Just a little subtle shadow. If you want to move your
shadow, you can. Right now. I'm going to move this
in just a little bit. Now we'll do the same thing. We'll select our lemon layer. We'll add a pixel
layer above you want. You can go ahead
and already change your blend mode to multiply, select the same color. Make sure you're on
the new pixel layer. Your paint brush selected. We'll draw in our new shadow. Now we need to clip our
shadows to the lemons. This pixel shadow
goes with this lemon. I'll drag my pixel
shadow to the lemon. Now it'll be clipped
to our lemon. Then I'll drag my
pixel layer here that I just drew to my lemon. It'll be clipped to the lemon. You might need to drag it
further down into the group to be directly on top
of that base layer. Now we can change
the opacity to be about 25% to select and make
it a little bit smaller. There you go. Now just
some subtle shadows. This lemon is actually on
top of the other lemon. This lemon will be casting a
shadow on the bottom lemon. We can make a shadow
on this layer. Again, here we have our lemon and our
pixel layer brush selected in the
same yellow color. I'm going to add shadow here. We still have our multiply
and 25% opacity applied. Now let's look at our orange. We have our orange layer create
a new pixel layer above. Select our paint brush
and our orange color, make sure we're on
our new pixel layer. Let's add our multiply
blend mode to our pixel layer and
then start drawing. We'll take our pixel layer
and clip our pixel layer to our orange finding the orange base layer
and letting go. Then let's change our opacity to about 25 Adding
shadows to the fruits, especially the ones
that are on top. Just add another layer of depth and a little complexity
to your illustration. Feel free to add the shadows or I can't wait to
see your projects.
15. Export and share: When you're finished
arranging your fruit, be sure to group
everything together. Arrange it how you would like. Choose a background color if you'd like a different
color than white. And then export your project by coming to the hamburger
menu and tapping. You can export as a Jpeg, you can export the
whole document. Tapping preview will
allow you to see what you're exporting
before you export. Then tapping K, you
will then be able to upload your project to the Projects and Resources
section on our class page.
16. Thank You!: Congratulations on
completing this class and learning how to draw fruits
in several different styles. I hope that you have
a nice selection of assets to use for
your next project. Thank you for being here. Remember to upload
your project to the Projects and Resources
tab on this page. Your work will inspire
other students. I can't wait and look
forward to seeing them. Lastly, a quick review of this class is
always appreciated. Feedback helps not only
teachers but also students. I'm honored. You
chose this class best wishes on your
creative journey.
 Jennifer Gottleber, surface pattern designer + iPad art