Transcripts
1. Introduction: I'm Jennifer, an elementary teacher turned self
talk creative. I began my journey by learning how to make vector
repeat patterns and found the process magical. Then I found Designer in
my search for an iPad app where I could work in vectors as I prefer a flat,
more simple film. Once I learned how robust
the Designer program is and that I could use my
iPad, I was impressed. I can draw anywhere now, on the couch or even in bed. Don't get me wrong, I
love other apps still. However, it's nice
to have some options and flexibility
from time to time. My work from Jenny
got designs has been selected for journal
covers by makers, printed on poly mailers,
and sold online. I found creative work
as a form of self-care and believe everyone
is creative. I hope to encourage
you on your journey. Let's dive into
the class details. In this class, we're
creating a unique, one-of-a-kind background
for your phone. This class is great
for beginners or anyone familiar with
Affinity Designer. Let's start with
the pen and pencil tools and use a model to trace. Then we will work on a string
of brightly colored lights. Together, we'll draw a
coffee mug, mittens, and a snowflake to keep
practicing with our new tools. As a bonus, let's try out your new design on
a phone mock-up, all done within
Affinity Designer, no need for another
program or app. You want to share your new
skills on social media, this mock-up will make
it super easy for you. By the end of this class, you'll be familiar with
several drawing tools and have a new phone
background for yourself or to share if you want. You can even put it
on an Apple Watch. I look forward to seeing
you in the first lesson. Let's get started.
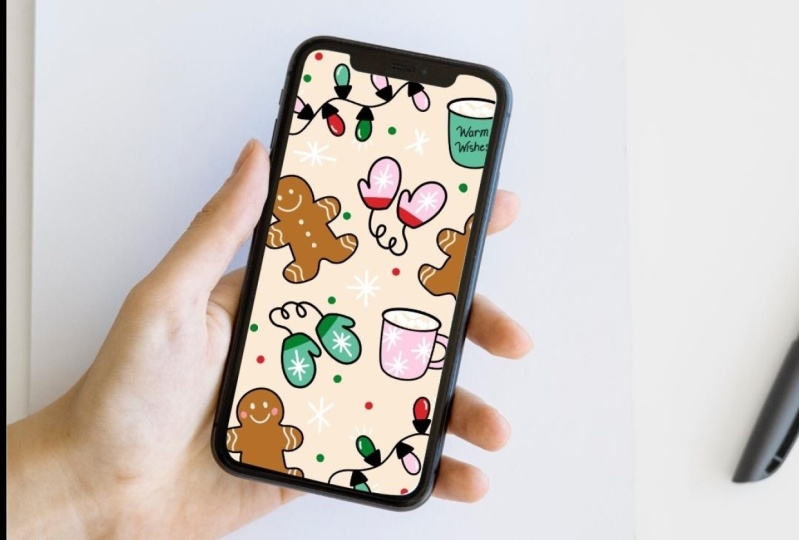
2. Class Project: The project for this
class is to make a phone background
using your doodles. While I don't care to stand
out of the crowd too much, I do like my phone
to feel like me. I've heard people spend
up to an hour or more, I look at their phones
over 100 times per day. I'm sure you're not
too surprised about those numbers and I know
I have similar habits. Let's be sure that next
time you pick up your phone and makes you smile. To get started, we'll draw
some fun and simple doodles. We'll arrange them into a
layout that makes sense to you all the while making design
changes as we see fit. Who knows? Maybe you'll want to
make more than one or make something
that coordinates. Lastly, we'll export your
design to your camera roll. The mockup provided
will come in handy if you want an easy way to
share your work with others. I invite you to
share your project by uploading your design or the mockup in the
project gallery. Head to the Project
and Resources tab and click "Create Projects". You can add a cover image. This is the image or picture we will see in the
gallery view, a title and be sure to
upload an image to the project description area as well so we can see your work. Be proud of your new
skills, show them off. Also, be sure to check out
and download the resources. I've included the
mockup files there. Side-note, resources are
only visible on desktops, not on a mobile site. If you don't see
it on your phone, no worries, just look
for it on a computer. As a reminder, it takes
10 seconds of courage to share your work with
this wonderful community. We'd love to cheer you on
in your creative journey. Go grab your iPad and I'll
see you in the next lesson.
3. Why Affinity Designer?: [MUSIC] You may be wondering
why Affinity Designer? Here are few reasons why I
enjoy using Affinity Designer. Right after you download, you have access to over
100 plus vector brushes. I think this is incredible. I find almost any
brush that I need is already been preloaded
and ready to go for me. On the off chance that you can't find a brush that you want, you can always modify and change the brush settings
or you could go to a third-party
marketplace and buy and install new brushes. Another reason is the
flexibility you have in working with the Designer persona
or in the Pixel persona. When working in
the Pixel persona, you also have access to a large
library of pixel brushes. I think you'll be able to find
the brush are looking for between pixel and
vector personas. You can also import and open Illustrator and
Photoshop files by going to open and
locating them on your iCloud drive
or on your iPad. Affinity makes it easy to export your project by offering
many different file types. This is so you can easily move the project
made in infinity into other programs like Procreate or Photoshop
and Illustrator. The export persona,
in my opinion, has just about anything
you could imagine. Expert persona has a lot of potential different
files to export in, including JPEGs, PDF, and SVGs. The options by default tend to work really well
for my projects. However, by just playing around and modifying
a few of these, I bet you can find the export
you need for your project. Another great tool in Affinity Designer,
the Assets library. You can save your own assets and make your own categories, use what you already have. You can go back and reuse
these motifs over and over again by having them saved in
your own personal library. Affinity is a single purchase
model which I really enjoy. It's one less thing to have
to worry about month-to-month and you won't ever
miss out on updates. I'm sure you'll
find some reasons why you enjoy using Designer. I'll see you in the next lesson!
4. Getting Set Up: [MUSIC] Let's spend a
few minutes looking around Affinity Designer
and getting set up. In the newest version, V2, the interface has
been completely redesigned and I think
it looks really nice. Once you tap on
the designer icon, there's options to
close all documents, to check for updates,
import content. The Live Doc section
is where we're going to be working
most of the time. New and Document. There's lots of options that
they've added here that are preset, pre-filled, ready-to-go, print-ready options,
press-ready, photos for web and even different devices,
and architectural. You want to open a
document you have from your iCloud Drive
or on your iPad. There's also an area for
templates and samples. I think the Help
is really helpful. They have a great search bar here where you can just type in anything that you're
looking for and you'll be able to get resources
to help you. That's really nice to
have built into the app. Then I didn't want to spend a
few minutes on Preferences. Under General, I like to
save to my iCloud Drive. If you prefer to
save on your iPad, this is where you would
make that change. I also like to
look at the tools. Under Tools, I toggle on allow canvas
rotation in all tools. This allows me to rotate my canvas as I'm
working so it won't be stuck in one vertical
or horizontal orientation. I also look at the
pencil settings and make sure to toggle on
enable double tap. With this double-tap action, I have set to undo. If you have another
preference that you prefer, this is where you
would change that. Once you're happy with
your preferences, go ahead and tap
"Done", and then we'll set up our new document. We're going to tap New and
go to our Web section, though it's a little ways down. We have a social media story
post which is going to be perfect for our
phone background. Our page width is
already at 1,080, our page height is at 1,920. I want to bump up
this DPI to 300. Everything else is
set and ready to go. We're in pixels, we
have our color format. All we need to do is tap "Okay".
5. Pen Tool: Let's start when looking
at the pen tool. I'm back in the
document that we've created and I'm going
to select the pen tool. The pen tool is on
the left-hand side, 1, 2, 3, 4, 5 down. We need to add a stroke and
possibly a fill to the pen. To do this, we're going
to select our colors. I'm going to go ahead and
choose black for both. Both these circles should
be completely filled with black and then the point size. In order to show the stroke, we're going to need to toggle on the second
option which is a stroke, and then the width is set
automatically to 0.20. I find that a little
small for I like to work with
something around two, one, or sometimes even three. Let's start with two. Now that we have a black
stroke we're added two point, we should be able to use
our pen tool to draw. Another way you could do this
is on the left-hand side, you can change the
width as well. And then once you're
happy with that, I'm going to change my back
to two but I wanted to let you know that there are
two places you can do that. We're going to start
with the pen mode. We're not going to
be able to just to draw like we would with a brush, just a paper or pencil just
to draw a squiggly line, instead, we're going to lay
down individual points. When we tap on our screen, it creates a point, also creating a node which we can come back and change later. I have my first point right here and then when I
tap again it's going to connect between the two points that I tapped on the screen. This is my first line
that I laid down and you can see it's a
pretty straight line. If we don't do any modification
with our node here, it will continue with
the straight line. We're going to connect each node as we lay down a new point
as we tap with our pencil. However, if we wanted
to add a curve because the pen tool is not only great for
straight lines, it's also great for building curves and that's a
little different. What we're going to
do for a curve is really lay down our first node. Hang on. I need to actually
double tap to close this. Now this will not continue to
connect between each point. Now that this is closed, I can tap over here
and we're going to start working on a new shape. I'll lay down my first point and tap to create
my second point, but this time I'm going
to leave my pencil on the screen and I'm going to
drag down with my pencil. You can see as I'm
dragging down, it's creating a curve. Now if I move over to the right, the curve is going to move on the line more to make
a C-shape curve. These blue lines that we have here that
we're dragging out, we're moving up and
down or left and right, these are called handles. The handles will be what allows
you to create the curves. Once you're happy
with your curve you can lift your pencil off and add a new point. Since we're still working with this we haven't doubled tapped, when we lay down our next point it's going to connect the two. This is automatically predicted. It's tried to emulate
what curve I want next. If I wanted this
that would be great. If not then go ahead
and tap again on that last node, don't lift off, keep your pencil on the screen, and then you can drag
these handles to modify the curve to exactly
where you want it to be. You tap again, again, and here, last time
to close the shape. The node that we created they're white inside with
a blue outline. Note that I want to close
actually this red one. It's blue but it
has a red outline. I'm going to double tap and now the center is white which
means I've closed the shape. Now when I go to lay
down my next point, they're not going
to be connected. I'll be starting on a new shape. The next mode is smart mode. Smart mode is a little
bit more user-friendly, a little bit more intuitive
than the pen mode. The smart mode, I find
is really helpful to lay down a few more
points but it will automatically
create those curves for you by laying
down more points it will create more
curves which in turn makes the work
a little bit easier. Smart mode tries to get some
of those curves built in for you and then you
can always go back and modify them as you need. The next mode is
the polygon mode. It makes polygons
easier for you. Again, you're to
lay down at points, it'll connect between the
two and you will have a straight closed figure also known as the
polygon in no time. This is nice for
creating shapes quickly. When you're finished
make sure you double-tap so that
you close the shape. Right now I have a
white, I have a red, so I don't want to double
tap to make sure that I don't continue with
that next point. Having those be connected, I want to make sure
that they're closed so I have two different triangles. The last is line mode. Line mode makes, as the name says, a line. It actually makes
a line segment. When you tap between
the two nodes here, you don't have to
close every time. It's only going to
connect two nodes. Now when I tap again, they haven't connected I
have two separate lines. I didn't double-tap there. If you have a design that
you're working on say a star or a snowflake, this line mode of the
pen become in handy. We'll look more at the pen
tool in the next lesson, I'll see you there.
6. Gingerbread Cookie Pen Tool Practice: Now that we're familiar
with the pen tool, let's practice by
tracing around a shape. I'm going to go ahead and clear
my Canvas and to do that, I'm going to select
the top curve and I'm going to use my Command
Control to select Shift. With Shift selected, now I can tap on the
bottom layer and it will select all the layers between the top and the bottom. I can tap "Delete" and
they will all be deleted at the same time and
tap to deselect Shift. We're going to use a picture
from a stock studio. Affinity has a stock studio built-in underneath
the Assets panel, you can use Pexels or Pixabay. These are both stock
sites that are great for finding
resource pictures. Let's find a picture that
we can trace to help us get some of these curves and lines
down with the pencil tool. We can choose between
Pexels or Pixabay. I'm going to start with pexels and I might tap to "Search" I'm going to use my keyboard
and type in gingerbread. I'm looking for a
gingerbread picture that has a few different cookies
and they're mostly black. It looks like this
one will do here. I'm going to long
press on the picture, drag to my Canvas, and then the picture will load. It looks like the
picture is pretty large and that's okay. We're just going to go ahead and size this down a little bit. Making sure we have our
move tool selected, I'm going to drag the top
right-hand node down and then I'm going to drag the
picture over a little bit until I can get it on my screen. It looks like these
two right there in the middle will fit. Then I'll just tap
to "Deselect". Now, what we can
see on our Canvas, these two gingerbread cookies. These are the two that we can trace to practice
using the pen tool. Let's select the pen tool. We want to make sure that
we have a stroke black and that we have
at least one point but two or three would work out. Then we'll start tracing. Let's start with the
pen and pen mode. I'm going to start right here at the base of the
arm and the head, I'm going to tap about
halfway trying to make the curve here that it's right on the outline of that cookie. You can see the further
I drag the handle, the higher the curve
get has more of an arc. I'm going to tap to
the other arm here and it's a little too
much of a curve there. However, we can come
back and modify that in just a few minutes after
we close the shape. Let's go ahead and make our way all the way around the cookie and then we'll come back and make some more
fine-tuned adjustments. I'm tapping maybe 2-3
times per curve here. Find the least amount of
tapping to work best for me. If I tap too many times, then I really get a little
bit more work in the end because I have to
come back in and make some really fine
adjustments with the node tool, trying to create curves
with the least amount of points seems to work
pretty well from my line. Look up here. We obviously have a couple of points that we need to fix and we can do that easily
with the node tool. The node tool is
right underneath the Move tool and work at
a tap on our close figure and now we have all the
nodes that we can adjust. I'm going to actually
work on this. I know right there was a
little off, this as well. We can add a node by
tapping on the blue line. All the nodes have
handles as well. They will change based
off direction that you pull them or if you want
them to be a little shorter. This needed to move in now since I have the
three nodes moving really in a nice
smooth shape there, that's one reason why
I liked to lay down as few nodes as possible. I know might adding nodes when I come back to
make these adjustments but to begin with, working with the pen tool, I think it's just helpful
to try to lay down the least amount of
points possible. See how we're looking I'm pretty happy with that. If I wanted to seal out the
gingerbread cookie behind it, I'll go to my Layers panel
and beside the image, I'm going to toggle
off the image. I'm going to can do the same thing with the second cookie. I like to really have more than one more
tip to work with. For the second cookie, let's use the smart pen mode
and see how that works. A lot of times these tools just take a little time practice
getting used to them and then you will find which mode you
prefer to work in. With the smart mode tool, I do find that putting nodes are little closer
together as you trace around is helpful
if you want this to be done a little
bit more for you. The smart mode might be a really good work
choice for you. I know a lot of people when
they're using the pen tool, they're actually building
shapes just by free hands. That's really a good
use for the pen mode. The smart mode might
be a better option. Let me deselect. Here we're doing all right. I'm going to turn off the visibility layer
of the image here. As you can see, they
look pretty similar. This one isn't as smooth. What I want to do is I want to select with the Move tool, I'm going to double-tap
to select the node tool. You can see all of the
points that I laid down. I'm going to tap this
button on the top bar. It looks like a
little squiggly line and this is to smooth. This will help some of
those rough places and I just tap it a couple times
to see what it looks like. These look like
two cute cookies. I'm going to tap
on the second one and rotate just a little bit. They're a little more wide. There you have it. We have used the pen
tool with the pen mode and the smart mode to trace
our gingerbread cookies. We'll add some fill and
color in the next lesson, I'll see you there.
7. Import Color Palettes: Now that we've gotten a little practice
with the pen tool, and we have our
gingerbread cookies, let's add some color. I have four color palettes for you in the
resources section, make sure that you've
downloaded those. After you download them, we're going to go into
the color studio, toggle to switches, and then these are the color palettes that
come with designer. Now, I already have
all four installed, but I want to go ahead and
show you how you would import a color palettes
I've provided. Under the swatches panel, go ahead and tap on the
three horizontal line. Import palette as
application palette. The application
palette, that means that this part will
be available in any document that you open
within Affinity Designer. Then you'll select one of
the four color palettes, and it will automatically
fill with the color palette. I already have a Winter 1, and went ahead and
added a Winter 12. Winter 1 and Winter
12 are the same, it's just a second copy of
the first Winter 1 palette. You'll go ahead and
do that for all four of the color palettes, and then choose
which color palette you would like to work in. I'm going to be working
in Winter one today. However, choose whatever
palette works best for you.
8. Gingerbread Cookie Fill and Details: With our pelletes installed. Let's go ahead and add a fill and some fun details to
our gingerbread cookies. I'm going make sure my
Move tool selected. Then I'm going to tap on her
first gingerbread cookie. The stroke right now is black,
which I'm going to leave, but I am going to
change the fill color to this lighter brown or
maybe the darker brown. I like the darker
brown actually, I'll do the same for
the second cookie. Now, if you are happy
with the stroke, you can leave it
as a black stroke. However, if you'd like to
change the width of the stroke, you can go ahead and tap on the two PT
there with a stroke. You can slide the width
slider up and down. You want to change the color. You can go ahead and
tap through to add some different colors
to the stroke. I think I'm going to go ahead and keep mine for
the time being. But go ahead and select one
that works best for you. Let's add some fun details
using the vector brush. The vector brush is
under the pen tool and actually part
of the pencil tool. When you tap on pencil, you'll see pencil
or vector brush. If you don't get that, then just try pressing a little bit longer
on the pencil icon and it'll bring up
the menu for you. I'm going to tap vector brush. Then we need to go ahead and add a color stroke
and a point size. I like to work over here
on this right hand panel, you can also make
your adjustments here with the sliders or at the top, whichever one you
prefer to work in. I'd like to go in and change
my stroke back to that 2.0. Then I'm going to
change my stroke and fill to this
off white color. Add some cute eyes here
and a smiley face. As you can see, the
vector brush picks up a lot of pressure and sensitivity
within the stroke. If you want to, you could even use the
node tool to go in and clean this up
just a little bit. The interior, you can tap
on the node at the end, adjust the handle, we've got a little cleaner. Do the same with the other side. You can also, and this would be a good time to use
the smoothing. Next, I'm going to add
some squiggly line details on each of the arms and legs for the
gingerbread cookie. You can see actually going over the black stroke and
that's intentional. I'll show you in just a minute why I'm not spending
too much time being too particular about
the details here. Last but not least how
about a few, cute little, but now our squiggly stripes that we have on
the arms and legs, I'm going to group
those together. I'm going to tap my top layer for one of the squiggles and you can always turn
on and off to make sure you're selecting
what you think you are. Then I'm going to hold the Command Control Tab Shift
defined the bottom layer, It looks like this will be
at now the group together. When I turned them off, all
the squiggly lines should be grouped together so
there'll be visible or not. Deselect my shift key here. Now, I'm going to
take this group and drag it on top of the
gingerbread with a fill. I think it might be this
one, but let's see. Nope, that's the one beside it. This is the one that
we've been working on. A lot of times to find things, I just toggle them on
or off real quickly, now I'm going to drag this group all the way down to the bottom. If you watch now,
the white lines, they're almost like they've been drawn behind the black stroke. The curve of the
cookie with the fill and the stroke acts as a mask. I do want to go ahead and
select everything else as well. I'm going to select
that shift key again, find this last group. Then I'm going to drag this
down to the curve group here. Everything should be
grouped together. We'll do the same steps
with the second cookie, maybe adding just a little
different details here. But I do want to go ahead
and still have that white and the two point
stroke selected. This was on the group that was on the gingerbread
cookie to the left. I'm going to undo, I'm going to select
the other cookie now and then I'll start
drawing on this. Layers are kind of like
sandwiches so essentially, the curve here is
the bottom layer. Now I'm adding the filler
elements that would be between the two
pieces of bread, i guess you could say this
curve is the bottom layer and then everything else
is going to be drawn are added on top of
that piece of bread. Another option you have if you don't want to
go back and clean up, I'm just going to toggle
this off for a moment. Is you can use the pen tool, the pen tool, and
then smart mode. You can add a couple
dots like that. That looks like I have
a brown stroke there. There's the off-white stroke or I'll just been
too that you wanted. You could also use the pin mode and just do one time
at the left side and one time at the
right, not lifting up. Then you could draw
a smiley face there with the handle and be
very nice and smooth. That would work as well,
that's another option. If you don't want to
have to take the time to go in with the node tool to clean up the
start and the stop. I'm going to add some
squiggles again. Still on the pen tool there. Let me go ahead and switch
back to the vector brush. You can also use the pen tool for this if you wanted as well. I do like the vector
brush when I don't have to necessarily
clean up the end. They're going to get
maxed in just a moment. Here, three buttons. For this one, I am going to use this lightest pink here to
add a little bit rosy cheek. Perfect. Now we need to group
our squiggles together, I'm going to select
the top layer again, using my Command Control
to select, Shift, select the last curve, group together, and
deselect the shift. Now I know that the
other cookie is here. I'm going to make sure
to turn on and off. Here's my group of squiggles. I'm going to drag, hold the pencil on the
screen for just a moment. Then drag down to the curve. Now it should be below
the curve group. Now, these were actually
grouped together as well. I'll go back and grab
the other element. If this command
control situation isn't quite working for you, you can always
swipe to the right. That will also select
a layer for you. Once you have them all selected, then you'll drag them. Normally show you, I am
nine layer selected here, It'll show you how
many you're dragging, then you can move
that below the curve. That's another way
to go about it. We have some gingerbread cookies and they are looking
pretty sweet. I'll see you in the next lesson.
9. Saving Assets: Let's go ahead and save
in our asset library so that you can come back and use them in future projects. The asset library is on
the right-hand side, and it's going to
be about four icons down past the color and stroke. The assets are arranged by
categories and subcategories. To begin with, we need
to add a category. The side assets here
to the right are the three horizontal lines
that we're going to tap and then add category. This will be the
overarching main category so I'm going to title
this winter phone since I'll be using
these elements to make your winter phone
background and tap "Okay." Now that we have the
name of the folder, almost like a filing
cabinet type system, we need to add a subcategory. Once you add a subcategory, it'll automatically
name this as asset. You can leave this as
asset that's totally fine. However, if you want to
organize a little bit more, you could rename
the subcategory. It would be something
like gingerbread, and then you would
rename each section going forward as snowflakes, hot cocoa, something like that. Or if you just want it to be in one big group under
winter phone, then you can leave it as asset. To add your assets, make sure you have the
move tool selected and then we're going to
tap our first cookie. I want to go back
and double-check and just make sure that I am going to be selecting all the
elements from each cookie, which it looks
like we are great. I have this first
gingerbread cookie selected. I'm going to go back to
assets, to the right, I have my hamburger menu, I'm going to tap and add
asset from selection. Add the cookie that
we've selected to your subcategory
under winter phone. I'll do the same thing for the next gingerbread
cookie tap to select hamburger menu, add asset from selection. Now we have two cookies that
we can use anytime we want. They are saved just
like this ready to go for future projects. I'll see you in the next lesson.
10. Pencil Tool: Next up is the pencil tool. The pencil tool is helpful in creating a hand-drawn
look and feel, and you can vary the
line width as well. This helps achieve
a hand-drawn look. As you draw, the
nodes are created. The pencil tool is a little more intuitive than the pen tool. We've really done a lot of work already by learning how
to use the pen tool. The pencil tool will seem pretty effortless
and user-friendly. The pencil tool is on the left-hand side
under the pen tool, I want to make sure that I have a black stroke and
a two-point width. You'll notice that
the pencil tool acts more like a pencil. We're not creating
each node instead, as we draw, dropping
those nodes for us. Once we have a line drawn, we can use the same
features from the pen tool, like the node tool to come in and just make some of
those fine adjustments that we know how to make. Now, we can also go
back to the width and slide the slider
for the width here. If you want to change that, if it's too small
or if it's too big, you could do that once
it's selected as well. We also have some differences
here with the brushes. We can use a brush
default, automatic, pressure, meaning the
pressure sensitivity of the brush, or none. I often find myself
working with none. However, play around with
these and make sure that that's what you think works
best for you as well. We also have two options in stabilizers to achieve
an even smoother feel. The rope stabilizer
drags the pencil behind, making it really great
for tight corners. You'll see as I'm drawing, there's a rope and front and this helps get in some of
those smaller details. Now, your rope, if you want it to be
even further out, you can drag the slider, the length of the
rope will increase. Now you can see there's quite
a bit of difference between where my Apple pencil is
in the actual line itself or if you want it to
be less of a rope, you could decrease the length. Other stabilizer is
a window stabilizer. A window stabilizer is
pretty fluid and elastic. Really great for curves, maybe even creating spirals. The window stabilizer I have
selected and now as draw, it helps even more in
the smooth circles. You can see the nodes
are added automatically, which allows you
to still go back and make those minor changes. To be honest with
the pencil tool, I tend to use none
and no stabilizer. I know I make a little bit of work for myself by doing that. You might really consider playing around with the rope and window stabilizer and trying to get familiar
with those to begin with, which would save you some time. I did want to show you one
more thing on the pencil tool. With our colors selected, we have a stroke of black. I'm going to add a fill. Let's do this green. Now, this is what I had
selected just a moment ago. Those concave section
have been filled in. As you draw, I'm going
to de-select this. It will fill in automatically
those areas between. This is very handy. It does take a little
getting used to when you're drawing with it but we're going to look
at this a little bit more when we draw in future lessons. I'll see you there.
11. String of Lights: Now that we're familiar
with the pencil tool, let's draw a fun
string of lights. I'm going to go ahead and select all of these elements that we were using
to practice with the pencil tool and delete them. Now we have another clean canvas to start our string of lights. We can start with the
vector brush tool. Make sure that is selected. I'm going to make sure
that I have a black stroke at two point. This will just be a string. We'll do a little curve, a little squiggle, and
maybe another curve here. I'll take my node tool, and do a little tuning. Make this a little bit smoother. If you really liked
the vector brush but you don't want to come back and fix all these
nodes at the end, I just actually take
this one and delete it, and that'll give you
a nice clean start. That's a little bit faster than actually going and
taking the time to fiddle and faddle with
the ends of the line. This one actually
looks pretty good. I'm going to leave one. Now we have our string. To make these sockets, let's go ahead and
use the pencil tool, but let's use the pencil
tool with the fill. Now I'm going to have
the black stroke and the black fill. This will make a solid shape. It's almost like we're
making a trapezoid. It's an upside-down
trapezoid though. I'm going to start by
drawing in at an angle, over, back out at an angle, and then across to
where I started. I do want to close this shape. I'm going to grab that node tool and I'm going to grab this node, drag it on top, so it
will close for me. Do a little smoothing, corner. There we go. This looks a little rough. This is not perfect and
it's not really meant to be perfect with a hand-drawn
doodle type of feel, but it's definitely getting
the point across that this is a socket that the light
bulb are going to be in. We can go ahead and duplicate the socket and add a few more down the string have lots
of lights and colors. Let's select the socket here. You could also go
to the layers menu and make sure that
it's selected. Then we're going to duplicate. I'm going to do a three-finger
swipe down, duplicate, and then move this socket over and get it lined up. We'll do the same thing. You can also use a
one-finger long press to get the same quick menu here
and you can duplicate. When you duplicate sometimes it's good to try
to predict where you want it based off of
what you've done previously. In this case it's okay
because I know where it's at. I can just drag it back
to the string here and then arrange it
where I want it to be. Just an FYI sometimes
it'll actually duplicate it off of your canvas. If that's the case then
you might want to go over to the Layers panel and start tapping each layer and selecting and
turning them on and off so you can find it. If not then it's not there, it's just that you
can't really see it because it's actually duplicated
it off of the canvas. We have three on the top here, let's go ahead and
duplicate again. I think I'm going to add
one more to the top here and then we'll add
some two bottom. I'm going to select, one
finger press, "Duplicate", raise and repeat until you get as many sockets as you
want on your string. I'm going to try to go for
about eight here I think. However, if you want to
add more, go for it. You are welcome to
have as many fun, festive, bright
lights as you want. Conversely if you just want
to have a few, go for a few. This is yours, so do
what you want with it. It looks like this didn't
duplicate, did it? That's okay. We tap back, long finger
press, "Duplicate". Let's go ahead and group
these sockets together. I'm going to use my
"Command Control", tap and select "Shift". Tap my first layer, tap my bottom layer,
group them together. Turn on and off to make sure
I've got everything I wanted and then deselect my "Shift". I actually want this
to be in one group. I'm going to drag the group
sockets to the curve. Now the group is
underneath the curve. When I turn on and
off the curve, the sockets are now included. The lights we can draw with
the pencil tool as well. Make sure we have the
pencil tool selected. We want a black stroke and then you can give your lights any color
fill that you want. I'm going to be using
this pink to start with. I'm going to start by drawing
the shape of the bulb and then the fill will
come right as I'm drawing because it's going to fill
in that concave section. If you wanted you could draw
a little skinnier maybe with a point,
something like that. You can also do more of a
round bulb, that would be fun. Decide what sort of
light shape you want and then you can
delete those curves that aren't working for you. I'm actually just
deleting the whole thing, so two-finger tap to undo that. I think I'm actually
going to redraw and start with a little
bit more pointed shape. Grab that node tool
out just a little bit. I try not to grab the node
tool every time however, I'm a little bit of a
imperfect perfectionist if there's such a thing though sometimes I just
can't help myself and I need to go back in and just change
that a little bit. We have the light on
top of the strings which are also on
top of the sockets. The lights need to be
behind the socket. I'm going to drag this curve
below the last socket. Now, it looks like it's just coming from behind not
on top of the socket. I'm going to duplicate
all my lights and move them and get them
into the correct position, and then I'll come back
and add some color. There's lots of options here. You could do a pattern of sorts. Oops, I need to select it. Double-tap if you're
not in to that group. You'll have to go
down into the light. One tap will give you the group and two will get you into
the socket or the lights. It looks like this
little guy moves. I'm going to tap again
to get into that group and move the socket there
back to the light bulb, and duplicate it again. With the lights you can
use more than one color. You could do the same color. I'm going to go for a pattern. It looks like our lights
are going to overlap there, which I'm not really
feeling that. We have a couple of options. What I can do now is I'm going
to tap into the sockets. I have the socket selected. I'm going to hold down my finger and I'm also going
to select the curve. This will select both the socket and the curve of the
light bulb here. Now I'm just going
to drag it over and try to arrange
it a little bit so maybe they don't overlap. That looks pretty good there. You could do the same
thing for this guy. Now I just need to do a tap. I'm going to tap the socket, tap the light bulb
with my finger on the screen to select
them at the same time, and maybe you just move
him over just a tiny bit. That looks good, I'm
happy with that. Now, we're going to
select each light and color according to your
palette, to your preferences. I have this first one selected and I'm going to
leave it as the pink. I'll select the second one, red. I'm just going to go up
my color palette here. Let's see how the brown. I think I'll go back to the pink and then this last
one will be the red. Now we have a fun set
of colored lights. I do want to add one
last little detail. Let's use the vector brush with a white stroke to add just
a little bit of detail. For a highlight or shining
off of the lights here, just give it a little
something else. I don't prefer a ton of
detail in my doodle work. If you do though, you could go ahead and go back and add some details
on the sockets here. You could also add a
little bit of a glow, some lines, maybe
some squiggles, or something to show that the
lights are shining as well. I'm happy with how my
lights turned out, so I'm going to save
them as an asset. Tap over to my asset studio, and then I'm going to make sure my move tool is selected
and select the light. I want to double-check
on my layers menu. If I were to turn off this
group I get everything. Well, close. It looks like the only things
that weren't included in the group are the white
details that I did at the end. I'm just going to drag each
layer over to the right, I going to hold. Now I have the seven
in the red circle, drag to the group. Now they are the highest object. They are definitely
above the whites here, and that's what I wanted. Up here's my group. Turn those off, turn it back on, and
they're all together. Perfect. Back to my asset
studio, move tool, select your lights,
hamburger menu, "Add Asset from Selection", and now you should see
your lights appear there. If you want you could go ahead
and duplicate this white. Drag it down, and just
do a quick recoloring if you want it and then
save it as another asset. I need to tap to
get into the group and then tap again
to find the light. Now with my color palette, maybe I just want to
do a pink and red. I could do a pink,
back and forth. Then I could go back and
using the same steps, turn them on and off, head over to the asset studio and save "Asset From Selection". Now I have two different
strands of lights and two different colors. I'll see you in the next lesson.
12. Mug: Let's get to work on our
coffee or hot cocoa mug. To start with, let's
hide these elements that we've already created. Just a little sign note here, if you are a fan of it, just stay in group or curve, you can go into each layer here by selecting the layer and then the three dots to the
right tapping on group and this will allow you
to rename the groups. If you would like to
keep each layer labeled, this is a great way to do that. It really is helpful
on the long run to be able to come back
and not have to guess. Let's get to work make sure
you have pencil selected, I want a black stroke, I'm going to use this
pink color to make base, bottom and the front
of our coffee mug. Now this is really
going to be a U-shape, almost with a flat bottom, back up to the top and then for the handle we're
going to make a C. We're actually going to draw
all the outline of the C so that we can use the fill
feature of our pencil here. I'm going to draw a little
ways away from the mug, I don't want to draw right on
top of the mug necessarily but just a little beside it. Start to the side, draw my C. Then we go up, back around to make the
curve back around to where I started so actually
closing that shape. I didn't close mine all the way, so I'm going to
use that node tool and g back in and
get that closed. Now I have a C that will
work as the handle. With the move tool selected
I'm going to slide this over best I can, and then I'll need to resize it. It's a little too big
now which is okay. Bring this up just a little bit. Let's see if I can barely
nudge it over there. Now what I need to do is make these little adjustments our node tool to make this
look like it's one line. That I wasn't drawing
on top or beside, but that it was just one line. That looks pretty good. It's still a little big. I think I'm just going to
bring it in just a little bit. Let's work on the top of the
coffee mug now where you're actually going to see and
don't forget the marshmallows. Let's start with a shape. Actually let's go over
here to our rectangle. If you tap on that
bottom corner, you can see there's
a little tiny arrow that will give you more options. Now I'm going to tap on ellipse and I can still use the same
colors that I have here. However, I'm going
to start drawing, and I'm going to go up here. If you keep it down, it's going to look
a little flatter, you draw up, it's
going to give it a little bit more depth
so something like that. The move tool, I'm
going to slide it over and into place. Although I want this to
be just a little bit more of a stronger presence, so I'm gong to give it
a three-point width. Perfect. I do want the inside of
the mug to be white. I don't really like
this pink film, I want this to be white. We have the top showing
the inside of the mug. This is where we need
to add our fun detail. I'm going to use my pencil tool again with the stroke and fill. Just to note too,
this is the stroke here for the black
and this is the fill. The fill will pull up
colors or swatches. On the colors, there is a color picker tool
so if you have a document where you are working
with other colors, you could use the color picker. I'm going to go to my swatches and pick this lovely
light brown color and start working on
filling in the hot beverage that we have inside. This has a three-point stroke, which is a little much so
I'm actually going to go to my stroke and turn this off because I don't want to have
a black stroke on this part. I just want to have the
details that the coffee there is sitting
right inside the cup. I'm going to go to my node tool, make some little
adjustments here to get as much of the node lined up as possible with the bottom and drag this one out
just a little bit. I could have spent
a lot of time being very precise in drawing this or I can go back
with the node tool and make these fine
tuned adjustments, which is what I
really prefer to do. I found I was really
spending a lot of time going back and drawing and
redrawing and redrawing. Now this node tool I feel like it gives me
enough flexibility that I don't have to
continue going back and again to draw. With the move tool selected, I'm actually going to make
this just a little bit taller, a little bit wider. I have a gap here that I'm
not really liking so again, I'm going to take the node tool, double tap, drag this
down just a little bit. Take this and just as gauche, I could spend a lot
of time going back and making all these, but just go ahead and make
what feels right for you and the fill that you're trying
to evoke from this style. Let's add some
cute marshmallows. I do want to have a white
stroke and a white film, help me get marshmallow
shape that I want. Since it's a pretty
large at three point and it's working
with a small area. It's really helpful
to see exactly what they're going to look like and it helps me make them a
little bit more to begin with. I'm not going to go back
into that node tool and just work with
these as they are. I'm just drawing a few here. Select the move tool and start arranging them so that they're
overlapping a little bit and they're melting and
the part of that a lot of us really enjoy with
our hot chocolate. Now, I have five drawn here. I could continue drawing them, or I want to just go ahead and start duplicating elements. If you do find yourself
wanting to duplicate, just to be sure that
you change them up just a little bit so
maybe you rotate here. You can go to the top here
and flip horizontal or flip vertical and that will help it look like it's a new element, not that it's just
been duplicated. Although you do save some time by duplicating some elements. This is what I was
talking about earlier. See, it's actually gone
off of my motif here. It's not necessarily
off the Canvas, but it's hard to find so that sometimes you might
just have to search for them. They are there,
they're just maybe not where you thought they would be. We have a lot of
marshmallows there, they're a little small so
I am going to go ahead and select all of them
with my Command Control, Shift, group them together. Now I'm going to drag them out to make them a
little bit larger. I don't want them to be on
the white necessarily maybe not get them too much
larger, something like that.
13. Mug Decoration: Let's use the pencil tool to write a sweet short
message on the front, maybe something
like warm wishes, stay cozy, maybe two words, three at the most. I'm going to bring my width
down quite a bit to one. Now I'm just going to use the pencil like it is
a pencil on paper. If you don't like that, just double-tap and go back. Group them together
so that I can go back and make some quick changes. Maybe I want the width to be just a little bit
more, maybe at two. I want to change the color. I can go back and change
at the same time. It looks like white might
be the best option. I'll keep it at white. I want it to rotate
just a little bit. You could do that. This is an option that
you can add some text. Another option would be
to draw some snowflakes or some other motifs. This group is warm wishes. I can go ahead and click on the three dots and rename this. I'm going to toggle that off. Now I'm going to
use the pen tool on the line mode to
make some snowflakes. I'm going to group this together as I work just by
dragging to the right. Normally, if I just
have a couple of things that I want to grab together, maybe 10 or less, I'll just swipe to the right. If I have a lot then I'll
use that Command control. Move it over just a little bit and then back to the pen tool and make just a few
more quick snowflakes. I'm going to have some
of these snowflakes hang over the end so that
I can use a mask again so that it looks like
they're going to be wrapping around the
side just a little bit. I'm going to go ahead and select all three snowflakes and I'm going to drag
all three of them. We'll wait until I
get my red three down to the coffee mug itself. Now you can see again, you're wrapping around the
edges just a little bit. Now that we have our
coffee mug made, I want to go ahead and
group everything together. I'm going to swipe to the right, select all the layers, and then group them together. Now I'll toggle on and
off just to check. Head over to your Assets studio, add asset from selection. Now we have a couple of
different motifs to choose from. I'll see you in the next
lesson to make our last one.
14. Pair of Mittens: [MUSIC] Let's work on
some cute mittens. I have hidden the mug layer. I've turned off the visibility, I did rename it mug. Now for the mittens, let's use the pencil tool again. I want a black stroke
with a pink fill. Then we're going to
draw one mitten. We're going to draw with
the thumb to the left here, then a little curve
back and around, then a little curve again, to where we started. I want to add a band of color at the bottom
like a color block. I'm going to go back
to my color studio, choose the red color. We'll choose red for both
the stroke and the fill, then I'm going to
draw a rectangle on top of the mitten all the way down to cover bottom
side of the mitten. Doesn't have to be
perfect because we're actually
going to drag this down to the mitten
to create that. Sometimes if you drag it under, then the element will
be below like I did. But then if you
drag it again and try to get it right
on top of that curve, then you'll be able to use
it like a masking feature. I want this to be a little
straighter across the bottom, so I'm going to drag
this down a little bit. There we go. Now I
have one mitten. Let's go ahead and
duplicate our mitten here. The move tool selected. I'm going to drag it
over just to arrange them a little bit of an angle. I'd like to draw with
the vector brush, a string to connect the two. For the string, I would like
it to be below the mittens. I'm going to drag that layer
below both of the mittens. Now, I'm going to add one
little detail to each mitten, which is going to
be a snowflake. I'm going to grab my
pen tool, line again, and then one larger
snowflake here. There we go. Like that. I'm going
to group my four lines together and change
the color to white. Then, with my move tool, just to give it a
little resizing. I'm going to duplicate and
drag over to the next mitten. We have two groups, we have our two mittens, and
we have our string. Swipe to the right to
select all of those. I'm going to group
them together. I can go to my asset studio then add asset from selection. Now, we have a couple of
different elements we can use for our phone
background. I'll see you there.
15. Winter Phone Background: You have quite a
few asset saved, so let's use those to create
your phone background. I have hidden the visibility of the mittens layer
and renamed it. We don't actually have a
background that we can chain. To do that, we're going
to create a rectangle. Lots of other shapes
to choose from, but we just need a
rectangle right now. Then, we're going to drag
it out a little over and down around all
four sides overlaps, and this will be our background. Now, we can change this
rectangle to be any color that we want for our background. I'm going to go ahead and keep it at this light
brown color to start with, but I might change it later on. I do want to drag the rectangle
underneath my elements that I already have
in my layers panel, so that the background is
below the other elements, and the elements that we've
created will be sitting on top of the rectangle. Let's turn on some
of these layers. There's our gingerbread
cookies and we can move them, and arrange them
now in a design, or pattern that you
like for your phone. If you want to create
a foe seamless repeat then your motifs can hang over the edge of the canvas
just a little bit. That will give the illusion that could be a seamless repeat. You could also keep
everything on your board, and that will be
perfectly fine too. If you don't want dang off
the edges, that's okay. It doesn't have to. It does look like more of
a pattern when they do. But again, this is
your phone background, so make it exactly the
way that you want it. But these little lights
down here on the corner, move up the
gingerbread man here. See what else we have? We have another set of light, which I'm not sure I'm going
to use those right now, so I'm going to turn those off. Let's turn on the mug layer, and see where we
want to arrange. Down here in-between the
gingerbread cookies, be great, and our mittens. Mittens are a little large, so I'm going to bring them down. Now, if you notice, the outline is getting
a little large and it's not matching the
stroke from the other motifs. I'm going to go over
to our panel here, and drag the width down to 2.0. There we go. Now, let me go to my Asset
Menu and choose some more. This is everything I had that
was hidden on our Canvas. Now, I'm going to
be working from Asset Studio to bring
in some more motifs. I'm going to long
press on the line, and they should do
this little wiggle, and then, you should
be able to see them as you're dragging it over
inside my blue circle. I see the lights and
then once I release my pencil there on my
canvas ready to be used. You can come to the
Transform Studio here to flip and rotate. I was saying earlier that
just were quotation, and a little flip makes it
feel like a different motif. This is another place where
you could do that as well compared to using the
toolbar at the top. I'm going to put my little
lights up here again. I think that'll
look really cute. How about another
pair of mittens? I'm going to hold, bring it over to my
canvas and release. Oh, yeah, these guys
were a little big, so let me delete
that and instead, let's duplicate the mittens I
already have on our canvas. There we go. Now that I have my
motifs arranged where I want them
for my background, let's add some snowflakes
with pen tool, and the line mode selected. Remember this will
make line segments, so we don't need to close
or finish anything, because we are connecting
two points ever at a time. This makes it really easy. Some of them I'm
using three lines, some I'm using four, just want to make them
a little different. Also filling up just
some of this space, while also trying
to balance it out, and make it feel a little
bit more evenly distributed. Next, I'm going to go
to the vector brush. I'm going to increase my stroke quite a bit here because, what I'm going to
use this for now, let's start with 10 and
see how that works. What I'm going to use the
Vector Rushmore are some dots. I'm going to group these
together in just a moment, but if you're not particularly
thrilled with the size, or even the color, some of my dots are going to
hang off the Canvas as well. Then, we can go ahead and make those changes
in just a moment. Okay, so on the Layers Panel, I'm going to select the first
curve my Command Control, Shift is selected, the last dot there
grouped together. Now, they're grouped, we
can turn them on or off. We can select them
with the move tool, and we can change
their color as well. This will be the stroke color, so that brown, that looks nice and works well with the
gingerbread cookies. The pink is a little light. Have a lot of pink
already, red, that's nice. I think I'm going to go with
little darker brown there, and they are a little too big. I wanted them to be just
a little bit smaller, so they're not as prominent. Let's go with a
four point instead. Now, I'm going to go back
and add a few more details, a little bit more embellishment. Feel free to do as much
as little as you want, and then, I will see
you in the next lesson.
16. Export: Congratulations. You have just created a fun
unique phone background. Let's export this and get it
saved to your camera roll. Tap on the "Designer" icon
at the top left-hand corner and tap on "Export". In the Export persona, tap on the "Hamburger" menu. Tap "Export". Now we have Export
selected as JPEG. If it's not selected go
ahead and tap on that. Then the filename, go
ahead and rename that. Your design will be
automatically saved to iCloud if you selected that at the
beginning of the class. I'm going to go
ahead and save mine to iCloud in my
Skillshare folder. Now this will be available
when you go into your files, you can find your exported JPEG. It should appear under Recents, and you can tap that to make sure that it has been exported. Then in the top
right-hand corner, click the "Share" button and
you'll want to save image. This will save the image
to your camera roll. On an iPhone, you're
going to need your image saved to your camera roll so then you can add
it as wallpaper. Once you have your
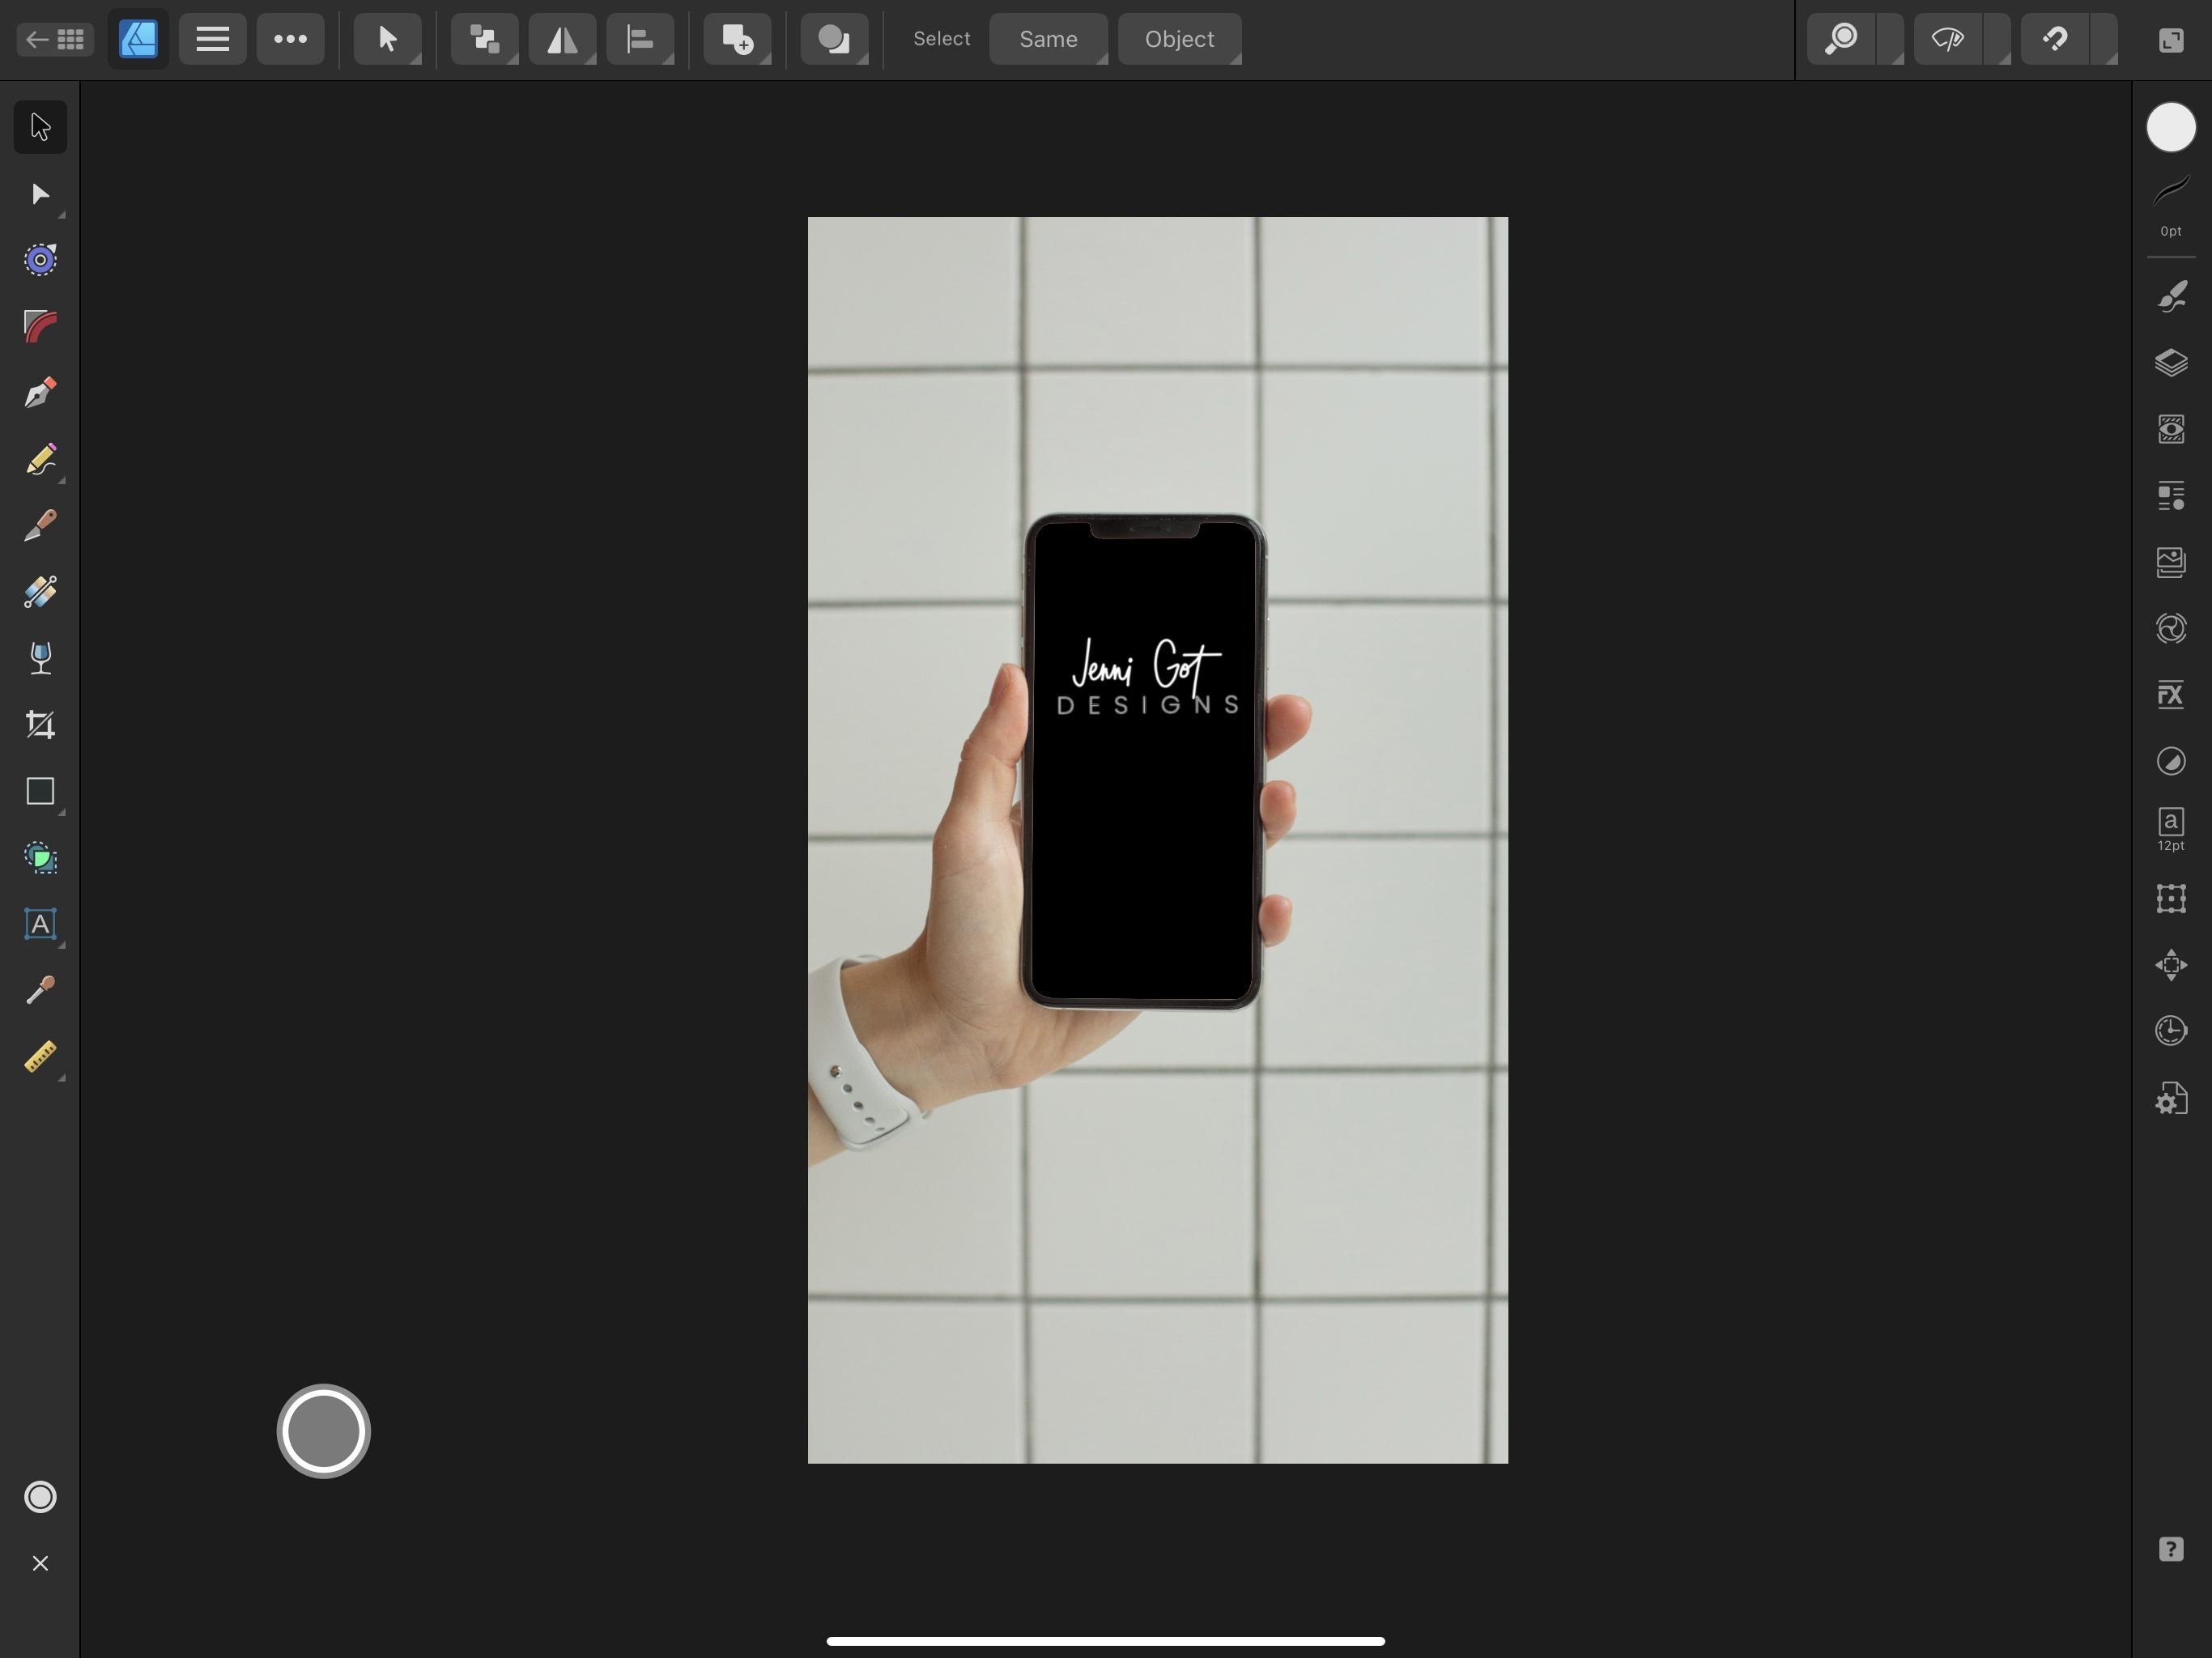
design exported and saved to your camera roll, will add it to a mockup. I'll see you there.
17. Phone Mockup: [MUSIC] Last but not least, let's add your
design to a mock-up to take it to the next level. I've included several
different mock-ups in the resources section. They should look
something like this. Mock-up number one. Mock-up number two, three, and four. Make sure you have already
downloaded those and save them to your
iCloud or your iPad. Open the mock-up that
you would like to use. I'm going to duplicate mine first before I use the mock-up. I'm going to go ahead and use this tile mock-up number two. Let's swipe to the left, and this gives me an option to duplicate, which I will tap. Now I have a copy. I'm going to use the copy. In case I accidentally mess up anything or make a mistake, I can always come
back to the original. The mock-up will
open and then you'll need to go ahead and
access the layers panel. If everything
closed, that's okay, just go to an open
as much as you can. Phone 2, then expand this layer and then
drag photo here. This is where you want
your photo to be. However, let's place
your image first. Hamburger menu to the right
of the designer icon, place. We're going to place from files. Now I have winter
phone and my recent. Let's try to place your image. I'm going to drag just
from the top corner to the right-hand corner to
drag and place the image. It's at the very top. Let's drag this
winter phone layer to the drag photo here layer. Now it should be
inside that phone. There's actually
a rectangle there that acts as this mask. Now we can resign and make sure we have all of
the rectangle covered. You could then center it just like that with
the snapping tool on. This is your own winter
background in a phone mock-up. We'll follow the
same steps to export once you move over to
the export persona, and then you will
most likely want to export this as a JPEG as well, especially if you're
going to want to share. I really hope you enjoy
using the mock-ups that I've provided in
Affinity Designer. There are other
programs you can use to create more complex mock-ups. However, I thought
it'd be nice to show that Affinity
Designer can also be used to create simple mock-ups like we're using in this class. I'll see you in the next lesson.
18. Thank You: That's a wrap. Thank you for joining
me and for allowing me to be part of your
creative journey. Now, you are familiar
with quite a few tools and some of my most
used features. You know how to use the pen, pencil, and vector brushes
when you need them. Being able to have
multiple tools in your back pocket
will come in handy. My hope is you feel comfortable with them so you can continue learning how they
best work for you. Remember to upload your markup in the class project gallery so we can cheer you on. I can't wait to see them. If you have any questions, please be brave and leave
them in discussion area, as I'm sure others may
have a similar question. Feel free to share the one
you made in this class with your friends
or on social media. Tag me @jenni_got so I
can share them as well. This program is quite robust, so I recommend checking out the Affinity Designer
site as well for updates. Lastly, I'd also like to
encourage you to leave feedback. Feedback is critical to
being an effective teacher and I'm always looking
for ways to improve. Again, I appreciate
you being here and wish you the best in
your creative endeavors.
 Jennifer Gottleber, surface pattern designer + iPad art