Transcripts
1. Introduction: [MUSIC] Do you love flowers? Are you inspired by nature and do you enjoy working
on your iPad? If so, you're in the right
place and if you're a little unsure or maybe feeling
overwhelmed, it's okay. You're in the right place. I'm an elementary
school teacher, turned, self-taught, creative. I left the classroom in 2020 and found myself at home
with a lot of time, a set of watercolor paints, and a Skillshare membership. I taught myself how to make seamless repeat patterns
and affinity designs. Since then, my designs has been selected for
journal covers, printed on poly mailers, and I have fabric sold
through Spoonflower and other sites for small makers
and businesses to use. I hope to encourage you
on your creative journey. From Day 1, I knew I wanted to include
flowers in my work. It looks so simple. However, I really
struggled with them. I thought that the viewer
really needed lots of realistic information to
see the flower as a flower. However, it turns out
that we actually needs much less information
than I thought they did. Having come to this conclusion, I knew I needed to
try the two together. A flat vector field with
simple line-drawn flowers. I created this class
because I wanted to share a workflow I recently
discovered using masks. I decided to narrow
the field and only include birth
month flowers. There's thousands of
flowers to choose from, which is great but also
overwhelming at the same time. Plus birth month flowers
have special meanings, which I think make
bouquets really neat. I decided to also use reference images for
this class to make sure the class is accessible to all levels,
especially beginners. Affinity Designer is
my go-to program. I work in at almost
every single day and I'm always learning new ways
to work in the program. I've created over 100 patterns
and countless motifs. I hope it becomes a program
you enjoy working in as well. Now let's get started by
looking at the class project.
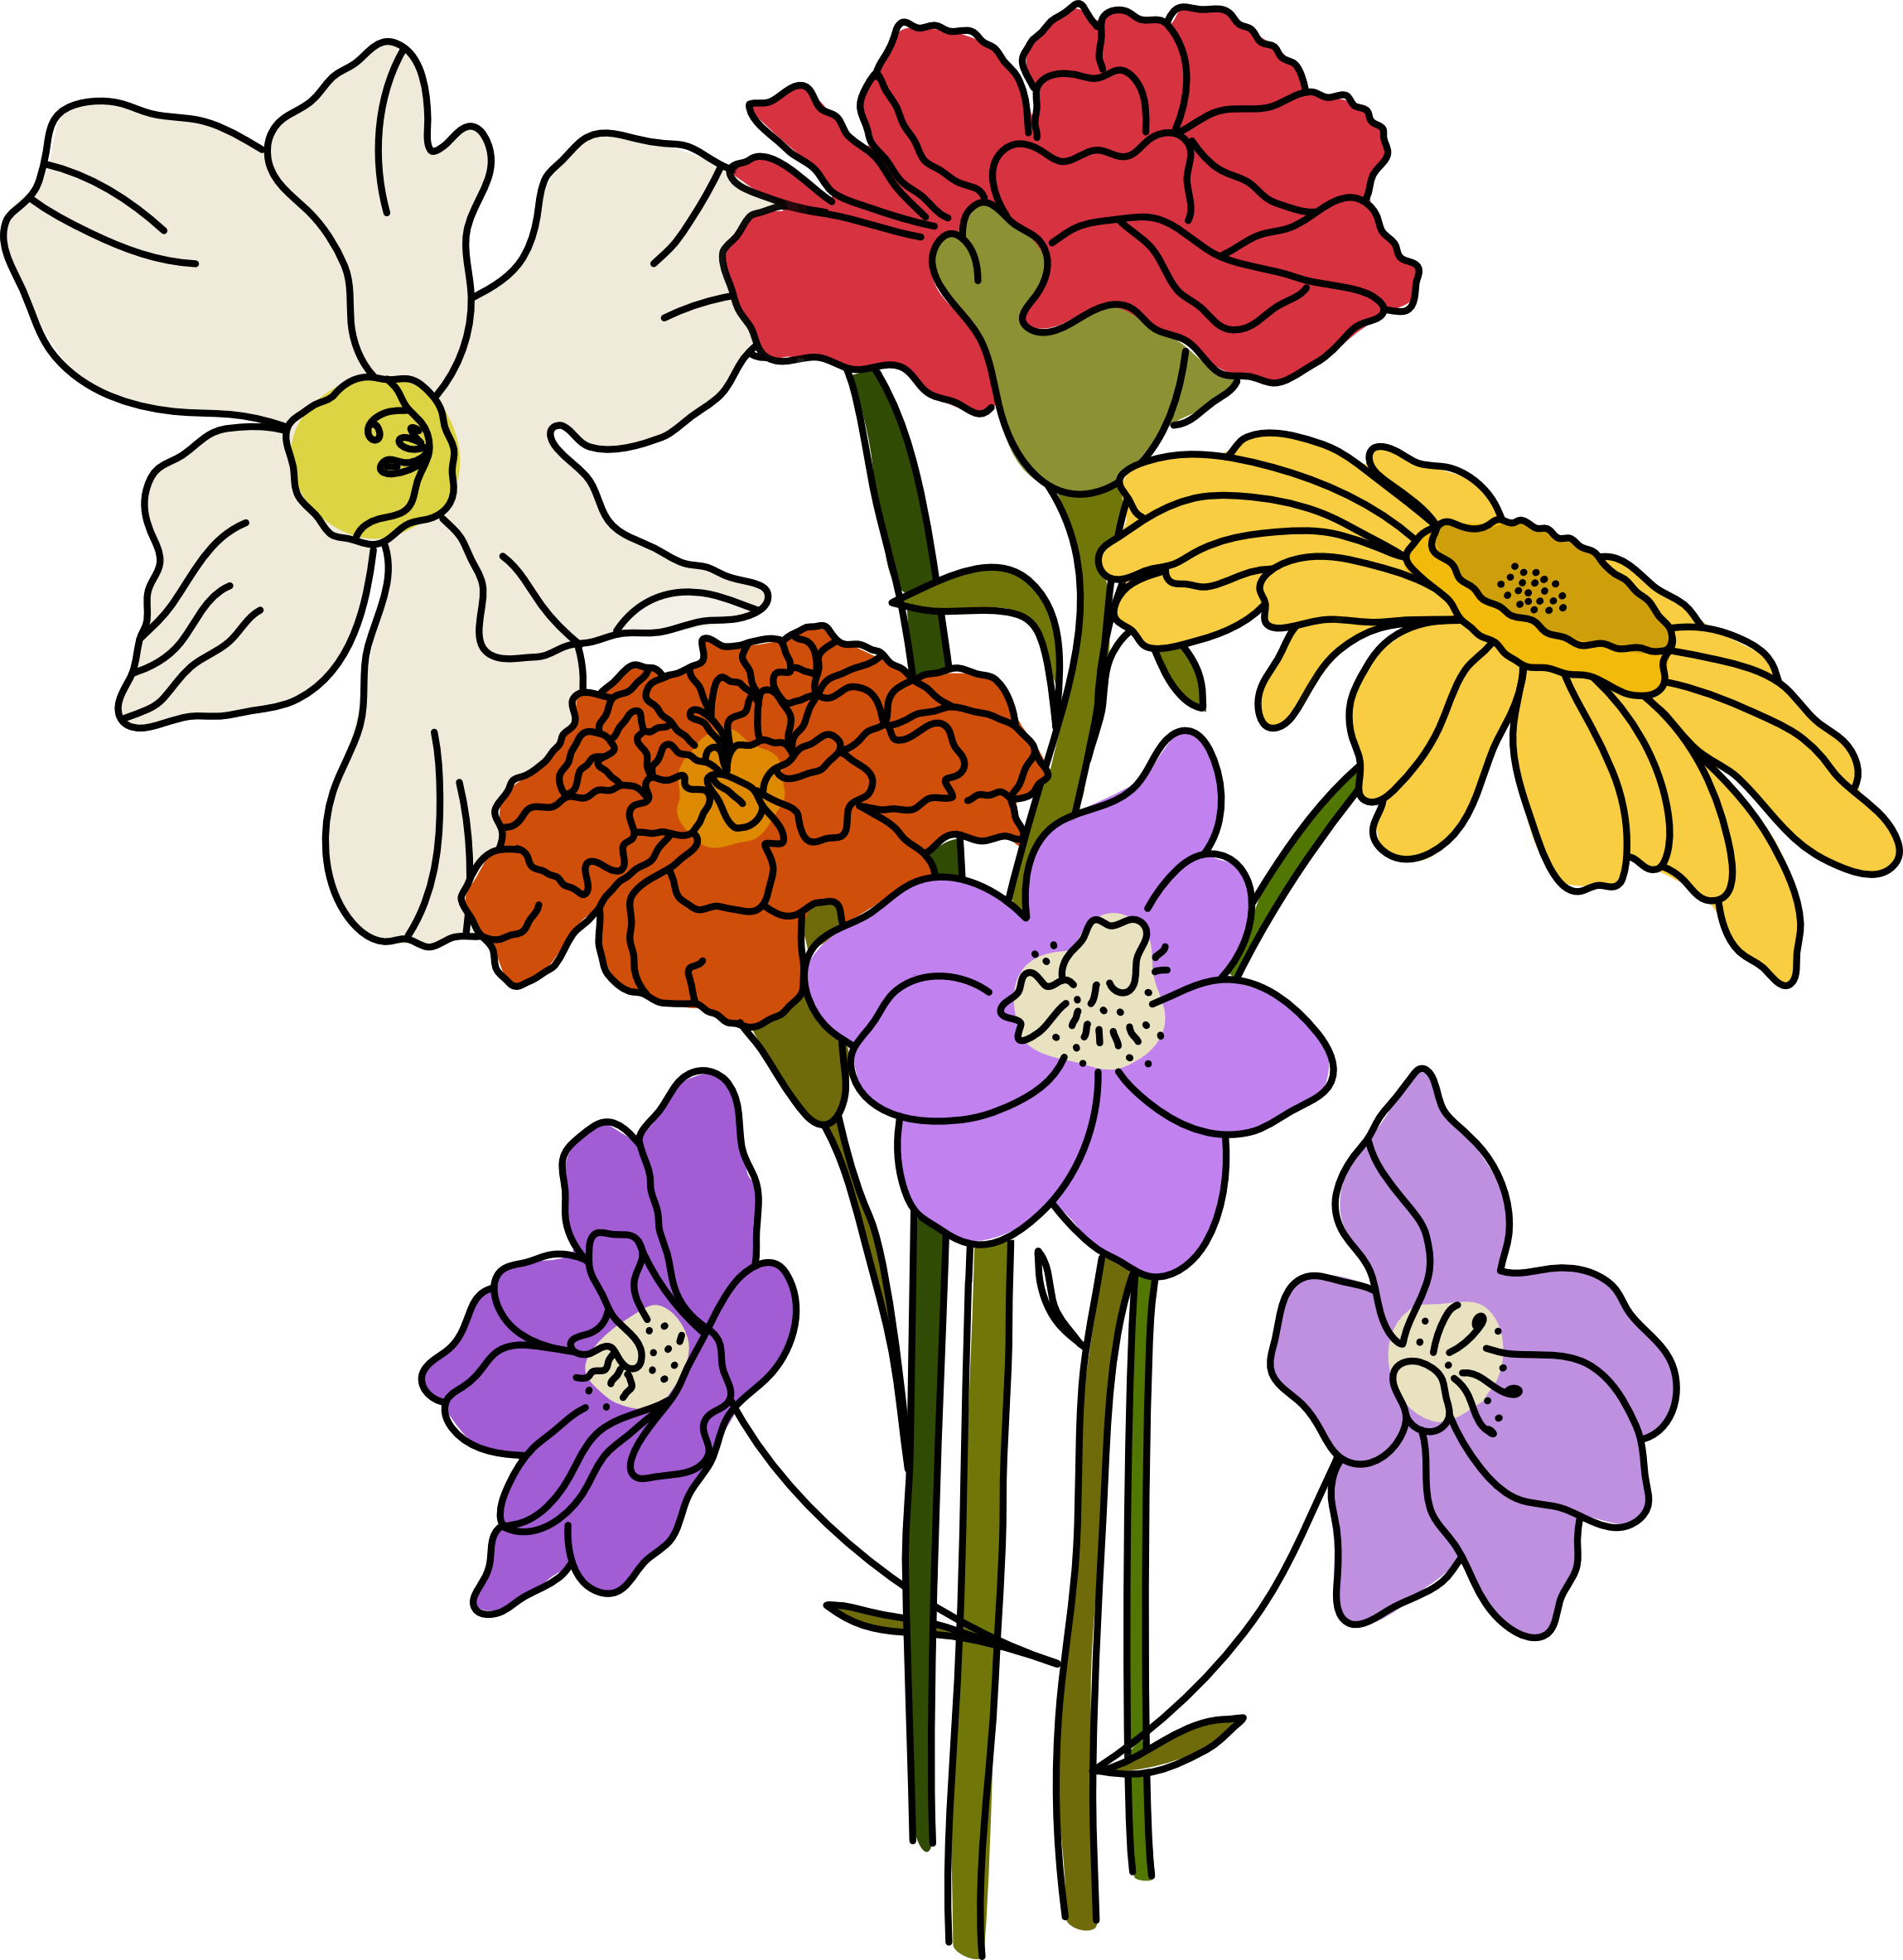
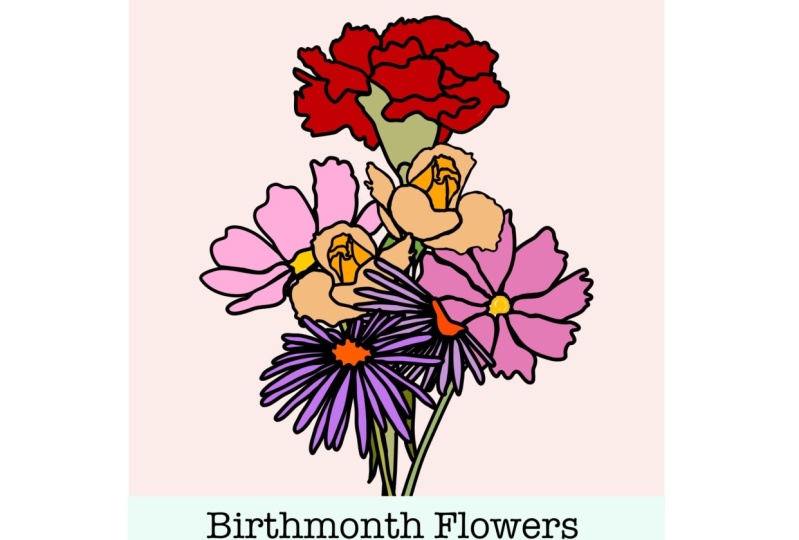
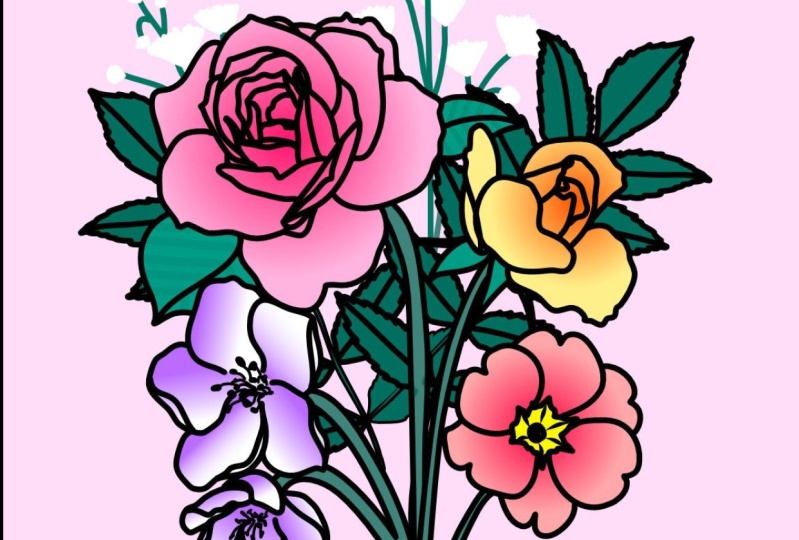
2. Class Project: [MUSIC] In this
class, we'll create a root 20 line drawn
flowers for our bouquets. A birth month bouquet,
is a special arrangement only using flowers that symbolize the month that each person from a group
or family were born in. For example if you have a group
with a birthday in April, June, and August, those are the three flowers you would use. Each month except for November, has two flowers to choose from [MUSIC] If you already know the month
for your group or family, please feel free to skip around and go straight
to those videos. We'll work in a
non-destructive workflow, meaning that we're just
going to temporarily erase or hide parts
of our drawings, so you always have your
original to go back to. Plus, we're going to
save each flower as an asset so by the
end of this class, you will have a large library
of flowers to choose from. I can't wait to
see your bouquets. To get started we'll take a quick tour around Designer 2, and look at some of the
tools we'll be using. We'll also look at our working
document and make sure we have our reference images
set and ready to go. If you'd like to add some
color behind your line work we'll also look at ways that
you can incorporate color. There's no pressure
to add color though, as black and white
is always in style. Your bouquets are
going to be gorgeous. I just know it and
I can't wait to see them in the
projects gallery. Be sure to upload your
project by heading to the project and
resources tab, clicking, Create, Project and uploading an image to the project
description of your, bouquet. Also, be sure to check out
and download the resources. Resources are only
visible on a desktop, so you won't see them on a
mobile site like your phone. Head to a computer and then make sure to check out
those resources. As a reminder, takes 10 seconds the courage
to share your work with this wonderful community we
would love to cheer you on. Now, go grab your iPad and I'll meet you in the next lesson.
3. Set Up & Tips: [MUSIC] A few tips before we get started to
open or import my document. I can go to Open, Import Document and then I need to find the
Birth Month Flowers Gallery.aftemplate on my
iPad and tap that to open. Since this is a template, you could also go to the templates and then
you should be able to find possibly in your
recent the template for the birth month
flowers as well. We'll use the art boards
by turning on each layer. We'll have a reference image
and some colors that I've already selected from the
reference images for you. You want to use these colors. They're already
here, ready to go. If not, if you want to
grab your own, feel free. By tapping on the layers menu, we have January toggled on and then I'm going to
open the layers panel. You can see I've already
done a few drawings in here. I have a few layers that you
might not have just yet. But this is our reference
image for our carnations, which you can turn on
or off and these are colors that I've
selected already. Then we can close January
and toggle on February. We'll go month by month, turning each of these on, showing the reference
image and some color. Let's take a quick tour of
our Designer 2 interface. As always, there's
the question mark in the bottom right-hand
corner which provides a lot of helpful information
about some of our tools, our studios, and then
our information for the middle and the
top for our toolbar. We'll be using a lot
of the pencil tool. That is on our left-hand side. We're also going to be using our color studio quite often. There's a black circle here, which will allow you
to change the colors. You can switch between swatches. If you already imported maybe your bouquet 1 and your
bouquet 2 swatches, this is where you
can find those. If you tap on colors, you can use the color wheel. This is how I really
prefer to pick colors. You can slide the wheel
around the outside. Then there's also a
dot in the middle. Grab that or tap. You can change the intensity of the color you've
selected on the outside. To the right of the color
dot is a paint bucket with a little paint
overflowing and this is the option to use fill. You tap, Use Fill. Now you have an option
for your fill color. This could be the same or different from
your stroke color. Let me change this to
quite a different color. Our first color is
for our stroke, which will be the line
that we're working with. The second dot is for the fill. This will be the
inside the painting, if you will, of the lines. You can also work over here on the right-hand side
from our top color dot, you can select the same options, stroke, and then our fill. Let's look at the
pencil tool with our stroke and our fill
selected for just a moment. As you're drawing, you
can see that we have a red stroke and a yellow fill. I wanted to change
the fill color. I can, so I can come and slide the outer wheel or tap in the middle and change
my stroke color. I can also change the
width of my stroke. Underneath the Color Studio
is the Stroke Studio. On the Stroke Studio, this slider for the width will allow you to change the
width of your stroke. Alternatively, you can also use the slider on the
left-hand side. A lot of the tools are in two
places and you'll just have to figure out which place
really works best for you. As you change through
different tools, you'll notice the toolbar
at the top changes. This toolbar is specific for the tool that you have selected. I do want to mention that you
can use different brushes. If you have your
line selected here, you can choose a
different brush to see what that might look like. I tend to use more of a
monoweight fill in my work. However, I have
used the solid pen with pressure and
pressure and opacity. Another brush I like
is the brush pen 01, 2 or 3, I tend to stay
in the pen section. However, find something that works for you and your style. Next, let's look at
the Stock Studio. The Stock Studio is on
the right-hand side. It looks like two pictures
on top of each other. The Stock Studio is where I've found all of our
reference images. I've used either Pixabay, Pexels or I did use Unsplash for a few stock reference
images as well. Once you open your Stock Studio, you can type in the flower or whatever
you're looking for, and a tap show keyboard. You'll see lots of
beautiful images come up that you can use. If you find one that you like, then you can go ahead and do a long finger hold
on the screen. It should wiggle a little
bit and then you can drag it over to where you would like
the reference image to be. Once you've dragged
it to where you like, you can re-size it, making sure you have
the Move tool selected. I like to look for images that
have more than one angle. This is a really great
example because it actually has a side angle, has a top angle, has one, again from
a different side. This is also from
a top side angle. I look for the angles and
then I also look to see if the flowers are maybe
more open or closed. I did find there were some times when I wanted to
double-check that the reference image
flower was actually the flower that I
was searching for. To use Siri to help us double-check our
reference images, I'm going to select my image. Tap on the three
horizontal lines. Tap Export. I want to only export
the selection only. Under area, I'm going
to select Selection only and should be
our reference image, and change the name. Tap Okay. You can save this
wherever you would like. Next, find the
image on your iPad. Mine is in my files
under Recent, you may need to look in
your iCloud Drive or On My iPad depending on where you decided to save your image. Tap my carnation to open. Then you'll see on the
top right hand there's little eye with a circle
and like a magical star. Let's tap on that eye. It should bring up some results. Now, Siri is telling us
that this is a carnation, is also telling us that it's
a type of flowering plants, and then we have
similar web images. This is a great way
to check to see that the reference image
you're using is actually the flower
you think it is. Now let's take a look
at the Assets Studio. Assets is above
the Stock Studio, has four little lines and
then a square and a circle. I'm going to tap on
Assets and it'll open to the last assets library
that you have open, tap the top three horizontal
lines and add category. The category will be the name of all of the flowers
we are making. I'm going to type in birth, month, flowers. Tap, Okay. It told me I have a Birth Month Flowers library
already. That's okay. I'm going to type in
birth month flowers, Skillshare, and tap Okay. Now we have a category named Birth Month Flowers Skillshare, tap back on the three
horizontal lines, and let's add a sub category. I'm going to divide my birth
month flowers by month. Now I have a subcategory
named Assets. I want to change the
name Assets to January. Tap on the three
horizontal lines, and then rename sub category. In just a few quick tips, if you know exactly what months you want to
use in your bouquet, then feel free to just
go ahead and turn those on and skip around to the
flowers that you need. If you'd like to build a
gallery of all 12 months, then follow along
with the class as we'll go in order
throughout the year. By the way, if you're mostly interested in building bouquets, be sure to check
out the lesson on bouquet building using masks. This is where the
real magic happens. We have a little bit
of work to do first, building out our
gallery of flowers. We have a lot of
flowers to get through, so hang in there because I promise it's going to
be worth it in the end. When we start applying those layer masks
and clipping masks, we'll see magic happening. I hope you are able
to download and open the working file. If you're running into an issue, let me know in the
discussion area, [MUSIC] I'll do my
best to get you up and running as quickly as possible. I'll meet you in the
next lesson to get started on January's flowers.
4. January: Carnation & Snowdrop: [MUSIC] Open our January groups. We have our reference
image first and I want to go ahead and
see that on my artboards. I'm going to tap this
light gray circle to toggle on the visibility. We are actually going to
trace on top of this image. I'm going to lower the opacity
by clicking or tapping on the three dots and sliding this opacity
slider to about 50%. It doesn't have to be exact, just somewhere in the middle. Now, let's create
a new vector layer and this is layer that we
want to do our drawing on, which is above our
reference image. Select the Pencil Tool. And let's make sure that
we give our pencil tool a black stroke and we
can start tracing. I'm going to use the
carnation in the middle. I really like its
shape and how it's open just a little bit more than the ones to the
left and the right. Feel free to use any
image that you want. I normally start by looking
for some simple shapes. So this looks like
a U-shape here. Then I am going to
start with some petals. So this petal here, it looks like it's actually
folding out a little bit. So I'm going to try to
capture that shape. We have another petal
peeking out from behind here and then we have a pedal on the backside and
even further back. I like to work symmetrically so I'm going to go ahead
and go to the left side now and capture
that same feeling that the petals are coming out and they're a little
further back than the others. What this flat style, we're not necessarily trying to get every single tiny detail. As you'll notice, I
didn't actually go back and draw any of
these shadowed areas. So for now, I'm just going
to go ahead and ignore them. I might come back in a few minutes and add
in a few more details, but for now, less is
more in the flat style. This petal here,
it looks like it's folded out a little bit. I'm really not liking the way that I started my line there. So I'm going to go
to the "Node Tool", tap on the last node, and then I'm going to
drop this down a little bit to make it a
little smoother. Back to the Pencil Tool. Here's some of those
shadowed areas again. So for the time being, I am just going to ignore those. I might, let's see, add in a little here to
make it look like there's a separate petal than one in front and then one
in the behind. I do want to add this line here to separate the
petals. Like that. Let's go back over to the left. This will mimic the right
where they're going to be out and swooping up a little bit. Let's start this guy here, I'm not liking how I
started that either so let's grab that node tool
and go clean that up. Back to the Pencil Tool. So these petals in the
back they're a little bit more forward facing,
if you will. They're little simpler to draw. I do like to start
in the front and work my way to the back. Let's turn off our
reference image and see what our flower looks like. I'm liking the fields
so far the only thing is I have a little
disconnect here, so this line is not in
line with the others. Let's see what we
can do about that, there's this one
coming from over here. There it is. Happier with that. One little area up here, I wanted to clean up as well. Let's turn our reference
image back on and we'll go ahead and draw in our stem. So our stem, we just
want to go ahead and get a good feel for the shape and the size of
the stem at this point. When we get into building our bouquets and future lessons, we may or may not
really need the stem. So I'm not going to
worry about it too much. I just want to make
sure that I have a general idea for what
it does look like in case I decide that I want
a shorter stem or a longer stem in my bouquet. Lots of zooming out, lots of zooming in and turning on and off your
reference image to make sure that it's evoking
the feel that you want. I'm happy with this. I think it gives the reader enough information
that it's a carnation, that it has lots of
folds and petals. I do see one little
area I'm going to fix on the stem here. That looks even better. Now we're going to
save as an asset, head over to your
Layers panel again. Make sure you have your layer
selected minus layer 245. You want. You can go ahead
and group these together might make it a little bit
easier for the future. Then we need to change
the stroke to white. The stroke is changed to
white because when we go into our assets and
just a few moments, our assets are shown
on a black background. So it's hard to see
the black stroke on the black background. We already have our birth
month flowers category on our first
subcategory, January. So we're going to tap on
the three horizontal lines. Tap "Add Asset From Selection". Now, you should be able to see your white carnation on
the black background. Once you have your assets
saved, head back over, and let's change that
stroke back to black. Now that are carnation
is finished. I'm going to show you
January's secondary flower , the snowdrop. [MUSIC] Snowdrop is the
white drooping flower you see here. But don't worry if you have any questions about
what I'm doing I'm always available for questions and the discussion section. Enjoy, and I'll see you in
the next lesson. [MUSIC]
5. February: Violet & Primrose: Lets start on our
February art board. Go ahead and open
your layers panel. Expand your February group and turn on your reference image. Select the reference image, tap on the three dots, and let's lower
the opacity again. Tap on the plus sign
and add a vector layer. Double-check to make
sure that we're on the vector layer above
the reference image. Let's tap our pencil
with that, activate it, and add a black stroke, zoom in and start on our petals. The violet has five
overlapping petals. Instead of drawing
each one separately, I'm going to draw the
beginning of each one starting at the center
and working my way out. Then I'll come back and
connect them in a few moment. Now that I have the basic
shape of all the petals, I'm going to add a few little
connecting lines here to connect to the center
of the flower. We also have some anthers
here that we need to draw. I'm going to try to get some
of these anthers to show some movement just by adding some straight and
almost curved lines there. Then at the end, I'm going to draw some longer
ones with more of a rounded almost a C-shape or
like a bean shape. Trying to make these
look a little different than the other ones that
you've already drawn. If you need to draw
maybe a little outside or above the
reference image, that's okay. Just remember we
just wanted to give the idea that there's
something here. Actually connect these to
looked funky like they're just floating out there in space and we give them
little connection. Actually, let me use my node tool to connect this just a little
bit more. There we go. We definitely have a
lighter variation here so starting at the base
of the petal and working our way out,
it gets darker. Then we also have a lot
of lines on each petal. For my flat style that I
like not as much detail, I'm just going to do maybe
two or three on each petal. Feel free to do more if
you want more detail. I'm just trying to keep
the consistency between the flowers for each
month, similar as well. I don't want one
month to have a lot, a lot of detail and for another month
and not to have much. That's what I'm
also thinking about why only drawing three, maybe four of these lines. Only thing that I'm wondering, is if we could come in and add any work on the
ends of the petals. I don't have a lot of
folds to work with, so that's not going to help us. I think I'm actually
just going to go ahead and leave this
as it is though. Next, we want to add a stem. Since this is from
the top looking down, I'm going to just imagine
and envision that we have a stem that's
coming down and then curves a little bit. I'm actually going to make my curve up and
down to the right. I like to start in the
middle where I think the stem would actually
be starting at one and draw and it's like I'm outside of the petal and then pick up with my
pencil work there. That's grouping down is one way you could go
about it with your stem. Another way you could do
this is to have the stem come out down to the left here. I might try that to see
what it looks like. There we go.
Something like that. Or you might even want to have the stem coming down completely. I'm going to give myself a
little bit more room here. I'm going to head
to my layers panel and move this up
just a little bit. Then the other option is
that it would be coming from the backside,
almost straight down, but with a little
curve because as we know nothing's really
perfect in nature. I'm liking the way this feels so it would be something
like the flowers standing but then it's drooped over just a little
bit from the top. But then you can see the
front of the flower. I like that so I
think I'm going to go ahead and stay with that. I have everything grouped
on the same layer. I'm going to save
as an asset now. I'm going to select my layer, change my stroke to white, come over to my assets. I need to make a new
subcategory for February. Tapping on the three
lines beside assets, then tap add sub category. Now it's labeled assets, I'm going to tap on the
three lines to the right of assets and rename subcategory. I tap the three lines again
and add asset from selection. Back to my stroke, change this back
to black and now we have our violet saved. Here is the quick time lapse of the secondary flower for
February, the primrose. Enjoy, and I'll see you in
the next lesson. [MUSIC]
6. March: Daffodil & Jonquil: Let's start on our
March, our board. We're going to find our
reference image and open that. There are daffodils. Let's lower the opacity just a little bit to
make it easier to trace and add a
new vector layer. Make sure we have our
pencil tool selected. Add a black stroke and
let's get started. I'm looking for a
daffodil that has a side view or the side angle. This little guy here
should do the trick. Even though he's covered up, this bottom petal's
covered up a little bit, I'm just going to go ahead
and add it in as best I think and we'll make it work. So again, I start just
looking for some of those basic shapes
of the petals. It's going to be a little bit shorter
because it's behind. Here we go around. Daffodils are the
perfect sign of spring, this bright yellow color. I think they're
just a great way to say the sun is shining. In the inside here, we're going to need to
make this a little jagged. Just wiggle your pencil back and forth to
get some of those. We're actually going
to have a fold right here because
this is going to make a cup in the middle. We want to make
sure we get that. Then we are going to
have some anthers. They're a little hard to see. But if you zoom out, you
might be able to see them better on a different daffodil and that'll help give you
a little perspective. They're either going to be dots or they're just going to
be long lines like this. You can see where they
have a longer line there. I'm going to make mine
a mix of the two. I'm just going to make a
couple of little long lines. To make dots, I find it easier to turn off
my stabilizer and just say no stabilizer for a few minutes and then turn my
stabilizer back on. Let's see how this looks. Zoom out, turn off
my reference image. This looks a little on the
short side [LAUGHTER] to me. I'm going to select
my node tool. I do want to drag this
out just a little bit. Just to give it a little
more of a petal shape. We go back in and add a stem. Since this flower is
facing to the right, the stem would be from behind here to the left
just a little bit. You can see this one droops to the side and this one as well
in the background, it goes up and over. I do want to make sure
that that is portrayed. It'd be something
like starting here at the base, coming down. Let's start there, that was like this. Let's see. I am going to move this
line in a little bit. You can see the
daffodils have a lot of these long leaves that look
like swords or something. If we wanted, we could
go ahead and add in a few of those just to
help us remember, especially when we start
adding them to the bouquet. Just a long leaf, something like that,
might look nice. Then turn off our reference
image layer again. We have our daffodil. Going to select the daffodil. I want to group
everything together, make it a little bit easier. Picture, change the
stroke color to white. If you wanted, you could
also change it just to a different color like blue is one of those quick colors
that always comes up, then you add it to your assets. We're going to need
a new subcategory. Add subcategory with assets
as our new subcategory. We're going to tap
on the three lines, "Rename Subcategory", March. Then "Add Asset From Selection" The blue
shows up really well. If you want to do
that, that would be an alternative to white. I'm going to go ahead
and change my back to the black stroke. We have our March primary
flower, the daffodil. Now with our daffodil finished, I'm going to show you
March's secondary flower, the Jonquil in a
quick time-lapse. This one is really similar to daffodil as it's in
the same family. Enjoy, and I'll see you in
the next lesson. [MUSIC]
7. April: Daisy & Sweet Pea: Start on our April art board and open our reference image. Once we have it open, be sure to lower the opacity
and make a new vector layer. Make sure I'm on that
new vector layer, the pencil tool is selected with a black stroke and we
can start tracing. I'm going to start with
the outer petals here, and then we'll move to
this lovely bouquet of florets in the middle. We are going to simplify
it quite a bit, but I think you'll still
get the impression that this is two flowers in one, the tiny florets in the middle and the
lovely white petals. I tried to add in
any extra curves and wiggles when I can. Just find it looks
a little bit more natural when it's
not super smooth. You may consider trying
that in your work too. We have a lot of shadows in the petals here and the creases. I'm not going to include those just because we're
trying to go for that simple flat style. I will show a few that are
overlapping like that. They were pretty close together, so I just included
those to make sure that the viewer knows there
are lots of tiny petals here. Starting from the same point is helpful and then
overlapping the line. It can also help to vary the width a little
bit if you're using a brush that doesn't have pressure sensitivities
like I am. I do like a mono weight feel. However, it is nice to add
in just the illusion of a little line width
variation from time to time. Here are our petals. Let's start in this beautiful
bouquet in the middle. I go ahead and trace
around the outside, adding as many little
wiggles as I can, connecting the petals to
the florets, if possible. Clean that up just a little bit. This is where I started in
that same general area, so we have a lot overlapping. Then I'm going to add another
layer here to our floret. You can really see that it has dimension, it
has depth here. We have a lot of yellow,
darker areas here. So for those darker areas, I'm going to turn off
my rope stabilizer so I can make some dots. I add some very
simple elements here. Let's add the stem. The stem is pretty straight, and so I'm going to
give it a little bit of a curve instead. Normally, the stem will be coming down straight like this, but I'm going to give it just
a little curve and then go back to where it ends right
here in this picture. I'm going to start right. Trying to envision
where it would come from the base of the flower. We'll just add a little curve, something like that.
I think it will work. Select that last line, move it in a little bit closer. You want it with the
node tool selected. You could smooth or go in and make those adjustments
with a node selected. I think I really
liked this daisy, so let's turn off
our reference image. Now, we have everything on the same
layer. That's always good. Going to group this together. Change the stroke to any color that you
want other than black. Go ahead and head to
our Assets Studio and make a new sub category. So we're going to add sub
category down the bottom titled assets, rename to April. Then Add Asset From Selection. There's our daisy,
change my back to black. We have our April
flower, a daisy. The secondary flower for
April is a sweet pea. So here's a quick time
lapse of that flower, and I'll see you in the
next lesson. [MUSIC]
8. May: Lily of the Valley & Hawthorn: Let's get into our
main artboard and turn on our reference image. Bring down the opacity, add a new vector layer, and let's get to work. I am going to try to get
more than one flower here, as they are together
on one stem. They're more a group
than a single arm. To do this, I'm just
going to try to maintain their
position if they're in front or behind
another flower. I'm going to draw
the flower that's on top first and then I'll fill in with the flowers
that are behind. Get my node tool, clean
this up just a little bit. I don't have my stabilizer on, so I'm going to go ahead
and put that back on. This will be behind the stem, so I'm not going
to draw that part. I used to not draw
with the stabilizer. I would draw with no
stabilizer and none, but as I've worked in infinity, I've come to realize that the rope stabilizer
actually save you a lot of time and it tends to have a cleaner start than
without the stabilizer. When I draw without
the stabilizer, I get this little loop or a hook when I started drawing and now
with the stabilizer, you can tell it starts just as a nice curve without that loop. If you haven't been
drawing with a stabilizer, I highly suggest you check
them out and see if there's one that you can work with. Flowers look nice. Let's go ahead and
work on the stem. The stem again, let's try to start with the pieces of the
stem that are on top, filling in from behind
after I've drawn those. This is why I need to
have my stabilizer on. I need to clean this. It's fine. I'll make it move a
little point like that. Back to the stem, I'm going to take the node
tool here and just extend this as compared to
drawing a new line. Back to the pencil, some of these stems. This flower is actually looping around and
over the front, so that's why I'm going to
go ahead and draw this line across the stem to show that it's coming from behind as
compared to in front. Then I'll come back
and clean that up. A node tool, my handy friend here. Try to zoom in as much as
you can to see your work, but sometimes I don't do
that as much as I should. Let's turn off our
reference image. See how it's looking, that looks really
nice. I like that. Let's go back to our layer,
group them together. I'm going to select
with my move tool, change the stroke color. You probably know where
we're headed from here, to our Assets Studio. Let's get that
subcategory for May renamed and add asset
from selection. Switch back to black. There is our lily of the valley. Up next is the Hawthorn
maze secondary flower. I'll draw that and speed
it up for you and then I'll meet you in the
next lesson. [MUSIC]
9. June: Rose & Honeysuckle: [MUSIC] We'll grab our
reference image, turn it on, lower the opacity, add that new vector layer, grab our pencil,
and get started. I'm going to start
in the center, in the middle of the rows. The rows is pretty tightly
packed to begin with, and then it opens up, it gets a little bit looser. Some of these petals, they just seem to end,
they just disappear. We're going to have to
make some decisions here. This petal here, it
just disappears. I'm going to see
what it looks like, if I go ahead and extend,
I don't like that, those looks too jagged, see if I extend that out
to this middle petal. Then bring this
petal down around. I want to keep them smaller
looking in a little tighter. This one just disappears too. I'm going to have to
bring this back down. See how that looks. That one disappeared as well. I'm just going to end it there. The line was a
little too straight, redraw it on a curve there. I grab my node tool, clean this up just a tad. Other places I noticed
that I could clean up. This petal here is folded out. I just want to make sure
that I draw this line underneath to
represent the fold. It's a bowl shape and then it's also folded out
just a little bit. When you're working with
flowers like this that are well-known and popular, you do want to spend a few
extra minutes to make sure that you have all the lines and enough curves that
it's going to read correctly since everybody
knows what this looks like. If it's missing any part, it's going to be
very easy to see. So just spend an extra few
minutes trying to make sure you've added enough detail. I really want to add
some more on that petal. But I think I'm going
to leave it for now. Again, just adding some waves, some zigzags, so it's
not super, super smooth. Let's see what this looks like without the reference image on. It's reading like a rose to me. I don't really feel like there's too many places where I
can add any more detail. I noticed that this rose
has a stem in the image. I think what I'm going to do, I'm going to come over
here and actually copy this stem and move it over
to the rows that I've drawn. Tap the screen, tap
the second line, and now you'll be able to
move both at the same time. I'm going to move
them over here. Let's see how that looks. Great, except one
is not too black. Turn off our reference image. That worked pretty
well, actually. I like that. Let's group
our rose together. I'm going to move it
up just a little bit, change the stroke to white. You know what's coming
next in our Assets Studio. We are going to add a subcategory and rename
the subcategory June. Looks like you already
have a rose in here. So I'm going to add a second
rose from my selection. Change the stroke back to black. There we have our flower
for June, a lovely rose. [MUSIC] The secondary flower
for June is honeysuckle. I'll draw that, skit it up, and I'll see you in the
next lesson. [MUSIC]
10. July: Larkspur & Water Lily: [MUSIC] Go ahead and turn
on your reference image. Make sure the opacity is a
little bit lower than 100, somewhere in the 50s to 60s. Add a new vector layer. Make sure your pencil is
selected with a black stroke. Since this flower has a lot
of blooms off of one stem, I'm going to increase the
size of the reference image. That looks a little
bit better and let's start working on
this top flower. Feel free to increase the
size of any reference image. I haven't emphasized
the order so that they fit nicely on our board. If you're having a hard
time getting in with the pencil tool and getting
some of the details, then I would
recommend blowing up, sizing out your reference image that your stroke looks
a little smaller, even though you haven't changed
it but it's just because your reference image
is much larger. Draw some squiggly lines again, add bit at each end, and maybe a few dots. Looks like I didn't
have my stabilizer on so I'm going
to turn that back on and head over
to my node tool, do a little cleaning up. If you do have a panel that overlaps like this,
if you want to, you can go ahead and
draw that shadow line there because that'll
help to show the overlap. Let's move to the second flower. This one's facing up
and to the right. It looks like we have
a back pedal here. Get that to show between the two petals that we've already drawn
on the flower. Here's another shading
with that overlap, the shadows, I'm going to
go ahead and include that. In the middle here I'm
just trying to capture some basic shapes, and a few squiggles lines. The last flower here
is on the left, facing up and towards the left. Lots of detail here in the center that I don't
want to leave out, but I also don't want to
make it too detailed. Remember with the flat style, we want to simplify
as much as possible, well trying to give the viewer enough information to
make out the flower. We're definitely going
to know that we have something going on
here in the middle, and once we come back with a few of our lines
and squiggles, I think we should be about done. One was really a mirror time
[LAUGHTER] and a few dots. I like the dots because they do show a little detail
without being too much. Let's turn off our
reference image and see how everything
is looking. Looks like I wasn't on my layer, so let me select
the first curve, the last dot I put
down, my command, control me a tap, and then the
Shift key, which is above. Scroll down to the last curve, group together, and then
I can deselect shift. Let's go ahead and add our stem. I'll turn back on our
reference image and grab my pencil tool
to add our stem. We're going to use
the main stem here, along with this
little stem here. We can't see the stem for
the flower on the left, so I'm just going to
freehand that stem in. I'm going to turn off my
reference image to draw in the next stem and I think
I actually want to move this flower up to give the
stem a little bit more room. I'll tap and tap again to
get into the flower layer, move it up and over
just a little bit, grab my pencil tool again and now just a simple stem like we had in
the left-hand side, I think will look really nice. The Black stroke. When the flower's finished, be sure to change
the stroke color to something other than black and save as an asset
for July. [MUSIC]
11. August: Gladiolus & Poppy: [MUSIC] Let's open our
August reference image. This cloud Eolas is a
nice red, orange color. They come in lots of
different colors, pink, white, yellow, and purple. Remember, feel free to grab any reference image
that you like. Grab this one because I do
like the way the flowers are facing and how they're a
little bit less open on top. Lower the opacity. Add a new vector layer
and get started. I'm going to start with
this largest bloom here. Again, since this has
multiple blooms on one stem, I went ahead and resized the reference image to make
it a little bit larger. Also zoomed in quite a bit
to try to get this jagged, and a little too jagged there. Let me zoom that line
some. There we go. I'll clean this up a little bit. You can tell I did use a little artistic decision-making
there and decided to go ahead and
make this look like two. Now, when I have
the node tool, I think I'm just going
to make it look a little bit wider, not it's too separate,
anthers there. Pretty sure those are what
they're called, anthers. Pretty strong. I
might need to come back and change
those in a minute. We'll see. With a new flower, I do try to remember to
start a new vector layer. This one has, it looks
like three petals. There's one that's
in front here, one that's in back. I'm just going to connect
this to the base right here, where it's going to
connect to the stem. We have three petals that
are going to fold out. As I'm drawing, I
tried to really look at the petals and
see what they're doing. Helps me to get an
idea of the shape I'm going for as compared to just drawing a bunch
of squiggly lines. If you take note of what petal and the shape
that you're going for, I'll make it feel
like you're not just drawing squiggly lines. Also, the more observant you are and the more you notice, the easier and faster it
will become to draw these. Eventually, even need
a reference image, will just be able to draw them. I think I'm going
to leave this open. Let's take a look without our reference image
and see what we think. Without the stem,
they're a little hard to make out as flowers. Let's go back in
and add our stem. I think I might actually
add a third bloom. This one on the top here, that's just so many folds and
it's not really open yet. I think that might add a lot. Let's add that to go edit. Tend to follow one line
and then go back and add a second lines to show
that it's a fold. Let's finish up the stem
here. How it's looking. I think I might just
extend this line here. There we go. Grab that
last node, bringing out. Tap on line, add in a curve. I think I can match pretty well. That's another option too with
your stems so that you can always bring out the last node. Just bring it straight out, and then tap on that line and create the curve that
you're looking for. Now that we have
our flowers done, let's go back and
add some detail. I'm going to turn my
reference image back on. Grab my pencil tool. Then looking at the granulous, I see there's a lot of curves and some petals that I
can add some folds to. Maybe something like this Just to give it a
little movement. One's a big one there. I'm just trying to look at
the direction the petals are curving to determine
what line I'd like to draw. Let's turn off our
reference image and see how this is looking now. I really like the way
this turned out now. I feel like it was just missing a little bit and those
subtle lines give the impression of some of the movement and the
folding of the petals. [MUSIC] Sure to save as
an asset and remember to change your stroke color to another color other than black. It'll be easier to see in
your Asset Studio. [MUSIC]
12. September: Aster & Morning Glory: [MUSIC] Reference image. Open, go ahead and lower the opacity. Add a new vector layer. So you have a black stroke. I'm on the right layer this time and we're going to start. I think this one just
pops out immediately because one very large and two, it's on the top of the group, so I'm able to see
most of the petals. I'll start with the outer
petals and then we'll make our way to the florets
in the middle. When I draw a petal
that's behind, if I can, I tried to start right
at a node, right here. If I grab that node, you can go ahead and
change this back to black. Have a nice clean start
where you don't have to go back in and clean up
with the node tool. I found that to be helpful. Also giving yourself a
little bit more room than you think you need
can be helpful. Starting your line a little bit earlier to a little bit
more room to play with. So this time I'm going to grab this node here, starting there. If I can get a clean
start to my line. We come around to the
back of the flower here the petals are going
to get shorter. So its actually going to
go behind little bit. Asters are found in many colors. They were actually inspiration from artists such as van Gogh, Monet and for poets
such as Robert Frost. Looks like I got all the petals. Let me turn off the
reference image. Looks about right without
that floret in the middle. For the florets, I'm
going to go ahead and make the outline first, ring to connect the
petals if I can. If they're not long enough
or if they're too short, I'll come back with
the node tool and just a minute and grab those. I'll move these nodes
to the line that I just drew for the Floret outline. You want to draw your outline
first and have all of these neat, you can. They all don't have
to meet either. You can leave some that
are a little open. I just don't like them
to go over the line. If you want to leave
them open, go for it. Let's extend this one. I think just to even
it out a little bit. Just going to freehand
it and a little shape here that give it
the impression that there's another petal
dripping back down and back. We are going to
simplify these shapes by turning off stabilizer
and making some U shapes. Try to vary the size and the
position that they're at. So it doesn't look too perfect. I want it to look
a little imperfect like it would be
found in nature. As I get further to the back, they're going to become
less overuse smaller. Just more of a curve line. Let's add the stem. The stem would be a little
straight in real life, but I'm going to
give mine just a little curve and
that'll help when we go to build our bouquets
and a little bit. To extend mine there, we give it a little curve. I have another stray mark
here. I'm going to delete. Group this together. Move it up just a little bit. Change the stroke
color to white. You know where
we're headed here, a subcategory and
we're going to save this as a new asset. Once your list gets
a little longer, make sure you scroll
down and you'll see your new subcategory
for September. Change your stroke
back to black. There is our lovely aster. September secondary flower
is the Morning Glory. I'll draw that and I'll see you in the next lesson [MUSIC].
13. October: Marigold & Cosmo: Just like with the rose,
I like to start in the middle and look for those petal shapes
where I can get them and then work my way out. It can be tricky in
the middle here, just like with the rose so
try to do the best you can. Remember, you can always go
back and add more detail. I find it a little bit
easier to go back and add than it is to
try to take away. You might end up
with this open space here in the middle,
and that's okay. Now that I have most of
the center taken care of, I'm just going to start on the left and work my way around. The idea that we're trying to
convey here is that we have a lot of petals that are
tightly packed together. They do have that
wavy or jagged edge. Start back on the
right-hand side and work my way
around to the front, around to the back again. Marigolds are most commonly known for their
bright orange blooms, although they also bloom in
shades of white and yellow. It's hard to make out here, so I'm just going to do
the best I can adding in many wiggles as I can trying to get the shape to match with the
petals so I can see. Think of the folds here really are a bit
of a mind teaser, it really makes you think
about what you're doing. Not sure if that's a fold
or not but I'm going to take it as one for now
and we'll see how it looks. Second thought, I don't think
that's going to be a fold, so I'm going to come back and
take this out real quick. Also, if you have time, I do encourage you
to go back and trace over your first tracing, as every time you trace, it'll get a little bit further removed from the
reference image, so it will become even
more unique to you. Let's see how we're looking, I'm going to go back
in and see if there is any places where I
could add some details, maybe like here,
there's this fold. There is a lot going on. Like I said earlier, when I turned off
my reference image, it looks a little land, so that's why I
want to go back in and add a few more details. I really want this to be a fold, but I think it's just
a color of variation. Keep coming back to
it and looking at it, and I've decided I'm
going to leave it alone, and then come back
and look at it again. Let's try and see what
this looks like now. We have added some more
detail I think helped. I'm pretty happy with this. Go ahead and save as an asset. We'll need a new subcategory. Here's our marigold for October. I sized it down a little bit so that it'll
be more consistent with the sizes of the flowers
we've been drawing already. I'm going to take a few
minutes and draw the cosmos, one of my favorite flowers and I will see you in the
next lesson. [MUSIC]
14. November: Chrysanthemum: [MUSIC] In this lesson
we are going to draw a chrysanthemum for
November's flower. Say that 10 times fast. Mums are symbols of loyalty,
friendship, and joy. I have my mum open, I've dropped my opacity and
I'm ready to start drawing. I am going to resize this to
make it a little bit larger. We're going to start in the
center with the yellow. Just make almost like a bean
type shape in the middle. I'm going to turn
off my stabilizer. Since this is so tightly packed, I'm just going to use
dots to represent all of the petals we see
here that haven't opened and bloomed yet then I'll turn my stabilizer
back on to Rope Stabilizer. I want to make
some C shapes here and just some curves to start to show that we have some
taller wider petals here. Mostly Cs to start with, and as we get a
little further out, start more of like
a teardrop almost. An open teardrop, something like this to show that they're a
little taller and wider. I'm just going to work my
way all the way around. Then we'll start getting
some really tall ones towards the edge. You may need to start making some just artistic
decisions and taking the liberty to draw where you might not be
able to see exactly. But again, just gives the idea that there's
a lot going on here. I think it gets a little
bit simpler as you start working your
way out a little bit. So don't get too worried about the inside there that's
really densely packed. You can always go back
and add in more if you feel like you didn't add
enough to begin with. Zoom out and see
how we're looking. I can see that there is a
lot in the middle and we're starting to get less as
we move further out. You are going to see a lot of shadows and for the most part I am going to just
disregard those. However, I do want to try to get these petals that
have started to open but there's still folded
with this secondary line. The mum is the only flower
we have for November, which is a good thing
because it's going to take just a little bit
longer than some of the other flowers that
we've drawn or that you might have selected
from other months to draw. I think it's well worth it
once we get finished though. If you see you're close
to an edge and you just want to go ahead and
get those outer petals, go ahead and grab them or you can keep working
your way around. I always think it's pretty exciting once you can
see those outer petals, so I go ahead and grab them knowing that that
section is complete. Some of these outer
petals you can really see some of these
creased fold lines. I just like to go and
just a little bit to show those creases. Looks like we are
almost all the way back around to where we started. All right, let's turn off our reference image
and see what we have. It looks like we
have a gorgeous mum. We will need a stem. Let's go ahead and
draw that in now. We'll be coming from
the center here. I like to add a
little curve just to make it seem like
it's part of nature, that it's not 100
percent perfect. [MUSIC] This is our one and
only flower for November. Be sure to save it
as an asset and I'll meet you in the next lesson.
15. December: Paperwhite Narcissus & Holly: December's flower, the
Paperwhite Narcissus. It may look familiar as it's
in the daffodil family. Let's get started. I have
my reference image already. I'm going to size this up. Bring down the opacity, add the new layer,
hence get started. I'm going to go
ahead and start in the center so that we
get our shapes there. Then I'll start with each petal. This one's going to be behind, so I'm going to do the
petal next to it first. I'm trying to work from
forwards and then backwards, it's a little bit easier. Few lines here to show
detail on the petals. Then let's add the stem. You're doing these in order
and coming off over November. It's a nice little break from
what we're just working on. I think I do want to go back and add a little bit of detail
on the other petals. Just to add a little movement, see how that looks. I like that. Let's go ahead and group everything together. Change our stroke color. You know what to do
with our subcategory. We'll save this as
December asset. That's a wrap on our flowers
with December's Paperwhite. [MUSIC] December secondary
flower is Holly, with its iconic red berries. I'll draw that. I'll see you in a few minutes in the
next lesson. [MUSIC]
16. Foliage examples: If you decide to use
foliage in your bouquets, there's a couple of ways
you can go about it. I have some reference images that are included
in the resources that you can use so we'll walk
through those now quickly. First up is something like this. This is from a picture
of babies breath. I had to enlarge it quite
a bit and as you can see, there's lots of other
places I could go to get some movement and some different shapes,
with some foliage. You can also use some
leaves like these. The one I cared for the
most was in the middle. However, feel free to use all three of these if you like, the shape of those leaves. I also have some eucalyptus. This one I got a
little creative with. As you can see,
some of the leaves are on their side and
they're pretty flat. They just look like
circles really so I took this leaf that I had drawn
here and duplicated it, moved up here, resized
it just a tiny bit. That might be something you
want to consider as well, that once you have a
leaf shape traced, you could duplicate it and move it around to
different areas. [MUSIC] Here are
a few examples of foliage you could use
for your project. You don't have to
use any foliage. It's totally up to you.
17. Gallery: [MUSIC] Well, let's
take a few moments to build out our gallery. Our gallery was designed to me, a one-page quick reference
to help you remember exactly what you have
saved as assets. Go ahead and find the month and the flower you'd like
to insert and insert. Remember we saved this
with a white stroke, so we'll need to
change it to a color so that we can see it
a little bit better. You can move it to where you
like and change the color. I'm going to use my
color picker to use the colors that are
on each artboard. Feel free to use
whatever colors you want and if you'd like
to change the stroke, you can go to the width slider
and slide this up or down. The smaller, the more
delicate it looks. A little bit wider
looks nice as well. I think 1.5 will work there. I did want to mention that once you've inserted your asset, you're only really
going to be able to change the stroke color. If you go to add film, something like this will happen. We actually have a lot
of different shapes and concave curves which are trying to be filled
using our fill. For now, stick to changing the stroke color and
having a solid outline. If once you add color to your flowers and
save them as assets, then you can drag them over and start changing the colors. But for now, we'll just stick to a nice line illustration. I'm going to go ahead and work
my way through my gallery, inserting my assets and
changing the colors. [MUSIC] If you'd like to flip your flowers, you can come to the
bar at the top. There's a triangle. Underneath, you have
the option to flip horizontal or to flip vertical. Those might be
helpful when you're trying to look for a
placement for each flower. I have a feeling your
gallery looks fantastic. I can't wait to see it. If you would post your gallery with your bouquet
in the project, I cannot wait to see them. They will make my day.
18. Layer Clipping: [MUSIC] I'm going
to add a rectangle and a circle to a new
art board I have open, for a quick demonstration of
how layer clipping works. Layer clipping is
essentially placing an object inside another, I want to place this ellipse, the circle inside the rectangle. I'm going to select
the layer and drag on top of the object that I
want it to be clipped to, once I release the
circle is going to be clipped to the rectangle, and it's going to show the
boundaries of the rectangle. I have the ellipse or
the circle selected, so now with my move
tool selected, I can move the
ellipse and it will stay inside the boundaries
of the rectangle. I can also resize while
it's clipped as well, let's try it the other way now. I'm going to drag my circle
above the rectangle, so again they're
just two objects on top overlapping each other. I'm going to drag the
rectangle to the circle now. Now the rectangle is
clipped to the circle. Once I have the circle selected, I can move both objects
at the same time, or I want to come and
just move the rectangle, you position it so it's more, half and half there, I can also come and just
change colors quickly. Here's an example of
some foliage that I have created using
layer clipping, so you can see on
each leaf there's a subtle shifts in
color and the greens, and I did that using
layer clipping. Wanted to show you
each leaf here, if I turn on and off each leaf, you'll see that looking down
here on this bottom leaf, I have one object that has
been clipped to the leaf. These are overlapping, just like with our circle
and our rectangle, and it takes the shape of
the object it's clipped to. I've done that for each
leaf and see the one above also has an object
clipped to the layer, so you can see how
you could do this. Couldn't grab the leaf
asset that I have saved, let's change the
stroke color to black, we would over just a tiny bit and now we'll need to
add our first green color. Going to come to
my Color Studio, to my Swatches, and choose a green
that you like from bouquet 1 or bouquet 2, I'll go with bouquet 2. I'm just going to pick
this darker green shade here using the pencil tool, I'm going to add a
new vector layer, drag this layer
below our line-work, below the group and pencil tool going to
add some rough color, making sure that this color
is behind the line work, use my fill, fill is the paint bucket here
and tap to use fill or not. Now we have the same color, green on each leaf. I'm going to draw above
my green leaf color now, a new vector layer in a
different shade of green. But for now, I'm going to
use gray just to make sure that it's easy to see and I'm going to draw an object that's overlapping the leaf already. I'm going to come
all the way out and around to make sure
that it overlaps. Now we have the gray
overlapping the green. What we can do now is, we can drag this curve layer
to our green color layer. Let's select the curve, drag down so it's on top, you'll see it's blue on top
of that layer and release. Now we have the curve
with our green color. However, we haven't clipped
it to leaf just yet, we're not entirely
sure which leaf it is because right now
they all look the same. I'm just going to do
a little turning on and turning off to see which leaf I have overlapped with ding ding ding which
is this one and the bottom. I need to select the
gray part that I want to overlap with, the green curve. I know my leaf is all
the way at the bottom, so I'm going to drag
it so it's on top of this leaf on the
bottom and release. Now this gray part has been clipped to the green color
that I added previously. Let me undo that real
quick, show you again, selected the gray curve
that's overlapping, I know this bottom curve is the leaf that I want
it to be clipped to, so I'm going to tap and
hold the gray curve, drag down so it's on
top of the leaf that I want it to be clipped
to and release. Now this gray part
is automatically clipped to the green color. As you can see, I
have a little green, that's actually showing here, so I want to talk about why
we have that real quickly. When I filled in my shapes, I think I actually had a
stroke and a color, a fill. When you're filling
in your shapes, you really don't
want this stroke, or you'll get some of these almost like a border or
an outline sometimes, so we really just want a fill. What I can do is just drag out some of my
nodes here to fill in my shape since it'll be a little bit
smaller without that stroke. We can come in and
change the gray to a green to add some
color variation, and I don't want a
stroke on this either, I just want a fill. Let me change this back, now on our gray
overlapping part, we could change our
color and play with the opacity sum just to
add a subtle color shift. We could also go ahead and
change the blend bonds. Tapping through starting
on normal to darken, multiply, which I really like, and then bringing
down the opacity. That's really subtle
looking there, we'd have to do this
with each curve. The way that I like to do
this is to go ahead and draw all of my overlapping
elements first, and then drag them down and find which leaf we
want to clip them to. I'm going to make sure I
have gray selected again, and I'm going to draw those
overlapping curves again. This one's actually
on top of my layers, so I want to drag this one down with the group here
to be below the curve. So now we have our curve layers again that we need to find
the matching leaf form. Now that I have all my gray
leaves that are overlapping, I'm going to drag
the gray curves to the layer with the green. As you can tell,
not a lot happened. Now we need to find
the corresponding leaf it needs to be clipped to. I drag the layer to the first green leaf and see we have one
that was clipped. Let's go ahead and
find that one, looks like it's going to
be this first one here. Now we need to take the curves that I
haven't been clipped, I'm going to select those. The second, third,
fourth, fifth, and sixth. All six of those I need to
drag down to the next leaf. Should see a five and a
red circle dragged down to the next green leaf curve
layer release and now we have quite a few looks like because I didn't actually
get them onto the leaf, they're below the
curve layer and they're not clipped
because they're coming off of the green leaves. Let me try that again, right on top and now we have
one that state. Let's see, looks like
it's this first one, I'm turning on and off, so I'm going to grab
the second, third, fourth, and the fifth layer, hold down my pencil, I
should have four layers now, I'll drag below to
the next curve. Let's see which one it is, it looks like it's this
one, so I'm going to take the second, the third, and the fourth curve, drag the three layers down
to the next green leaf. I need to take the
second and the third, drag those down
to the next leaf, it looks like I should
only have one left to drag down to the
next green layer, and now they're all clipped. I can select all of my gray overlapping layers and change the color, at the same time, I can
change the blend modes, bringing down the
opacity again to give a little difference
in the color there. You can also go into
each layer and just select one at a time and
maybe play with the opacity, bring one up, tap on another
layer that you've clipped, maybe bring it
down a little bit, just to add a little variation. I think that looks really
nice in your [MUSIC] leaves just to give a
little subtle detail without drawing attention away
from your flowers. [MUSIC]
19. Layer Mask: [MUSIC] Layer masking is a
non-destructive workflow that allows you to reveal a part of a layer while the rest of the layer
remains hidden or masked. I have two of our flowers
that I brought in; the rose and the hawthorn. I want to essentially erase part of the rose,
but not permanently. In case I want or need to bring those parts
of the rose back, it's a great alternative to
erasing, which is permanent. Let's look at how you
would add a layer mask. I'm actually going to switch
to the pixel persona. In the pixel persona, I'm going to choose
the layer that I want to apply
the layer mask to. In this case, this is the rose. I want the rose stem to
be behind the hawthorn, and then I want the
hawthorn flower to be in front of the rose petal. I'm going to hide
part of the rose. With the rose selected, I'm going to choose the eraser. The erase brush is the
third brush from the top. Now, I'm going to erase
part of the rose. There we have it. That part of the stem of the
rose is now hiding. We've applied a layer mask. You saw the assistant popped up on my screen to tell me that it added something for me
automatically, that was great. This is the mask here, this white box and the black. Black conceals. The part that I'm actually
concealing is in black, and then the white reveals. That's what's being shown. If I were to turn off the
visibility of my masking layer, then what I've
erased comes back. I always have this
option to keep my mask on or to take it off. I'm either hiding part of
the rose, or revealing. I still want to be working
on this mask layer because I have a little
bit more to hide. We come down to the
stem again and erase. I like to really zoom
in and make sure that I erased every pixel, every part here of the stem. Also, I'm going to need to
erase part of the stem here. I want the rose to be
behind the hawthorn. If it's hard to tell what
line you should be erasing exactly as to which lines on the rose and which
lines on the hawthorn, you can go back to the designer
persona and either lower the opacity on one of the flowers or change
the stroke color. It makes it a little
bit more obvious. Now the hawthorn is in blue, the rose is in black. I'm going to switch back
to my pixel persona. Want to be on my mask layer. The erase brush selected. Now this will be a little
simpler because I can see what part of the rose is overlapping
with the hawthorn. I'm noticing now as I've changed the color that I
really like to have the rose behind the hawthorn, so I'm going to drag that below. See how this end of my line
definitely shows each pixel. Because we're working
in the pixel persona, I want to make sure that
this black line is perfectly smooth and it lines up flush
with [MUSIC] the blue line, which is going to be
really hard to do. That's why I dragged the
rose below the hawthorn, and it just hides that part so it makes it a
little bit easier.
20. First Bouquet Masking Part 1: [MUSIC] We're going
to add three flowers. First is the violet. Next, I'm going to
grab our aster, September, and let's grab
our mum for November. Looks like I have the violet
and aster on the same layer, drag one out from the other. I'm going to group
each layer and rename, I'm going to tap
on the three dots, tap Group, and then I can enter the
name of the new layer, this is the mum. I'll do the same thing
for the other two layers. Now I'm going to decide what stroke size I want
for all of my flowers. I want it to be consistent, so I'm going to try three,
two-and-a-half or two. I think three should be fine, so I'm not going to worry
too much about size right now because I
can always size up. I do need to worry
about where I want to arrange and how I want to
arrange these flowers. So one tool that's
going to come in handy as this flip horizontal, right now, this mum is
leaning more to the right. If I were to flip horizontal, it'll now lean to the left. That tool is very nice to
use when you're trying to figure out what arrangement you want with your flowers. I am looking for a
little overlap here. I feel like an overlap
really gives more of a real life appearance. Because we all know
what a bouquet, there's so many things
going on that there are stems and petals and
different parts overlapping. I want to try and go
ahead and get that in my illustration as well. Right now we have a whole
lot of black lines going on. I'm going to re-color
some of these. Just do whatever color
you have available, the blue, and then we'll
leave that as the black. Now it's a little easier
to see that I have some orange and the
blue overlapping. I have a little of the blue and black
overlapping, but not much. That'll help me as I'm trying to find an arrangement that works. I'm also looking at the stems. I want the stems to come
to a meeting place, a common ground here, so they are all
close to each other. They could be tied up with
ribbon or with string. That'll work for now, I do want to go ahead
and use my node tool to make my stems a
little bit longer, and to bring them down to about the same length doesn't
have to be perfect. I do want them to be a
little closer in length. Now, let's switch to
the pixel persona. We can start masking some
of our overlapping areas. Let's start with the mum. So I have my mum layer selected and I'm going to select
the eraser brush tool. Now I can come in and
erase the orange. This yellow orange color is
what I want to be erasing. It's going to
temporarily hide for me. Now the aster will
be in front of it, will look like it's in
front of because it's overlapping on top of the mum. Then this doesn't have to be exact because we are going to change the
stroke back to black. Once all of these
lines are black, the same color, you won't notice where they
start and where they stop. I think I'm going to leave
this little overlap here. I'll come back in
just a minute with aster and take off that blue, hide that blue part. Then do I want the aster to
be behind the mum petals? I think I do. I'll come back because
what I need to hide is that blue part. Right now the only thing I can hide because I have a layer selected for the mum
is any of the orange. We'll leave that for now. Then I'll switch over
to the aster layer. I still have my erase
brush selected, and now I'm going to erase
the blue that's between the orange lines that was so tiny right there that it's really not going
to be noticeable, so I'm just going to go
ahead and mask that as well. I like to work almost
shape to shape, so within this first petal. I erase just the line
that was on the left. Move down to the
next petal and erase that line that was in
the left side as well. Now I'm to these bottom petals, I'm going to erase
left side again, all the way down, and let's see. The black one is the violet, so the violet can be behind and the aster can be in front, so that'll work pretty well. I changed my mind on this part, so I'm going to go
back to the mum layer. To go to the mask layer, I need to toggle the layer open, tap on mask, make sure my
eraser brush is selected. Then I'm going to erase that
overlapping with the blue. Next we can head to our violet
layer and start masking. I want the violet
to be behind aster, the aster is in blue, the violet is black, so I'm going to mask
out, it's black here. I'll actually take
it all the way down. We'll switch back over to
the designer persona with the node tool selected,
and this violet, I'm going to go ahead and bring up stem just a little bit, and let's change
all of our layers back to the same stroke. So add a black stroke to all of them to see how it's looking. I can see right away, I forgot to mask an area here. It looks like it's wining from behind and front and behind, which is not what
I was going for. I'm going to go back
to the pixel persona. Tap on the aster layer, toggle that open tap mask, erase, then I'm going
to erase this stem. Part of that used to be
that orange and the blue, now it's all the same strokes, we can't tell where it
starts and where it stops. Our flowers look pretty nice. Let's go ahead and
add in some foliage. I'm going to switch back
to the designer persona. Select the pencil, and I can either draw freehand some foliage or I can
add in some assets. Let's add in some assets first.
21. First Bouquet Masking Part 2: [MUSIC] Scroll down to my
foliage and add the eucalyptus. I saved these as assets
and have them ready to go. Also going to grab
some baby's breath. Going to duplicate the baby's
breath by holding down with one finger on the
screen to get my quick menu. T hen I can tap, "Duplicate" then Move
tool selected, drag over. I'll flip that to make it
look a little bit different. Resize it just a little bit. Next, I'm going to
use the Pencil tool to freehand some foliage. I have a big opening
here in the center, almost to the left. A little something here
could also be nice, and then there's a little
empty space here as well. I'm looking to just fill
out the arrangement. I had my auto close on, so I'm going to turn that off, show you what it does
in just a moment. Now I'm going to
enable auto-close. Is to the right of our
stroke and our fill, and with auto-close enabled, it will auto-close
the shape for you. I didn't actually close that. I can show you again, it automatically closes to that node that you
first started drawing. I like to turn this on when
I'm drawing my leaves. However, just make sure that
you remember to turn it off. I know whatever I draw
here is could be hidden behind the aster and the violet, so I just skipped that area and went down to
add that last leaf. There you go. Turn
off your auto-close. This is also helping to fill
out the stem area because I would like to put
a little ribbon or some twine on the bottom here. Auto close on, just going to draw a different shape
now, little point. I tend to keep my foliage
pretty simple as I really want the flowers to shine through and be the stars of the show. Let's turn off, deselect our
auto-close and try one more, right over here to the left. I think this will balance
us out a little bit. Tap "Auto Close" to select. I'm going to go
in and add all of my foliage elements
into the same group, especially the ones
that I did by hand, with my Command Controller,
I enabled "Shift". I tapped the first
and the bottom layer, grouped those together, and now I can turn on
and off my foliage. Drag my foliage
below the flowers., Then I'm going to switch
to the pixel persona to start masking some
of our foliage. Let's start with the hand-drawn
foliage that I have. Before I get started, if you wanted to go ahead and change the color
of your foliage, you could select that at
the designer persona, go ahead and change each layer. That would make it a
little bit easier to work with when we switch back
to the pixel persona. Actually, I want to make both of those blue because they're the baby's breath and
then our eucalyptus. Switching back to the
pixel persona now, I have this orange group, which is the free-hand
drawings I've done, which I'm going to mask. If you want to adjust the
size of your erase brush, you can do that
easily down here by sliding the width slider. The stem is going to show
through the aster petals. I'm just going to
work from petal to petal erasing the
lines that are between the petal line and the leaving what would be
shown behind the petals. It's peeking through, so I'm going to leave this. This is one of the
petal shapes though, so between this
line and this line, I'm going to erase. There's also another petal, so I'm going to erase. Here, this is an open
space between petals. If you accidentally mask something that you
don't want to mask. Like I went too far on
this yellow line here. I'm going to select
the Paint Brush, make sure I have a
white stroke and fill, and then I can paint over
the part that I just erased. A lot of times it
comes in a little lighter at the first pass, so if you'll paint
over it again, and it should be that
same color as the rest. That's a way to reveal part of your mask if
you've accidentally hidden too much and then just switch back over
to the erase brush. I'm going to work
on the next layer, which is blue baby's breath. Then I do need to
extend the stem. I'm going to switch back
to the designer persona, grab my Node tool, I'll add a little curve to
that and make sure it's not hidden behind anything else, at the bottom here the
stem shows a little bit. Grab the other baby's breath. Now that I extended those stems, I need to go back and mask
out any parts that would be showing through our outline. I want the stems to be behind
the flowers, not in front. Looks like all the blue
is now behind the black. Then our last group
is this eucalyptus. This is a petal here, so I'm going to make sure
to mask out eucalyptus. Another petal. Then we have some petals here. This is actually going to
be really hard to see. I might just go ahead and
mask this out as well. I left this little part
of the stem so I could extend down with
the other stems. Perfect. I'm actually going to mask this in just a minute, so it's okay that it's
a little wonky there. I'm going to switch back
over to the Pixel persona. I want to make sure
I'm on my mask layer. I have my Eucalyptus selected. I've toggled it open
on my Mask layer. Now I can mask away part of the stem that I just extended. Let's take one final pass here before we start
adding some color. I can see I missed some yellow here in
front of this aster. I'm going to go back
to the Pixel persona, select the yellow freehand
drawing mask layer and erase. Not seeing anything
else right now, but that doesn't mean that we can't go [MUSIC]
back and grab something if we see it
in just a few minutes. In our next lesson we'll add some color. I'll see you there.
22. First Bouquet Flower Color Part 1: [MUSIC] I'm going to
select all of my layers, and change the stroke to black. Let's start with our aster. I want to go ahead and actually
grab the purple that I had on my art board before. I have saved a file that
shows the images and color. I saved just this art
board and I exported it. Now, I'm just going to put it
here as reference so that I can come back and
use it for colors. Again, this is the art
board that we were using on our working document. I exported Art board 1
and saved it to my iPad. Then I tapped the
three lines and place to place from files or if you saved it as a photo
from your photos. Now I'm going to color grab the purple to start
with, for the asters. Grab a mid tone here. Using the pencil tool. The purple selected, going
to start adding some color. This is actually
above our line work, which I would really like it
to be below our line work. I'm going to drag
this curve below. Then keep working. Just on adding a rough color. This point, it doesn't
have to be perfect. We can come back in
with our node tool. Now that I have my color
roughly filled in, I'm going to select
the node tool and make some fine tuning
adjustments to make sure that the color
isn't coming out from behind my black stroke. There are lots of
different styles here. If you want it to
show a little bit behind or from behind, your black stroke, go for it. Or if you want it to be
a little bit more of a cleaner in the
lines type fill, just make sure that
your blue line, tends to be on top
of the black line. It doesn't have to be
perfectly centered, but it does need to
be on the black line. Tap the purple area that
you've just colored. Select the nodes
that are hanging over where you can see the color peeking out from the black, and just drag them
in a tiny bit. You want a new node, just tap on your line. If you have a lot of nodes
together like I did here, you can always tap One
and delete it as well. You do see some of
the eucalyptus that I need to mask in just a minute, so I'll go back and do that when I'm finished
with my color. Next, I need to grab some color for the
middle of our aster. You can either go straight to the reference image here
and grab some colors, or if you want, you
could use the dots that are already color-grabbed
for you to decide. Don't want that,
do I. I'm going to de-select the orange color now. We'll go on with our
pencil tool and fill in. Drag our curve layer
down to above. Our purple petals are
grouped with purple petals. Now we can do the same
thing with our node tool. Our aster has some yellow and
purple group this together. Start on our next flower. Let's add a new vector layer, and drag your vector
layer to the bottom. Below are aster flower and
actually above the image, if you've placed that now
there should be an image. We have our mum. Let's grab a color for our mum. We're on the bottom layer
and we will trace the order. The outline of the mum didn't quite zoom out enough, so I wasn't able to grab
those bottom petals, but I'll fix it with
the node tool here. I'm noticing again
on the eucalyptus, I need to go back and
mask some of that. This isn't looking very
nice there either, so I might need to go back and the white paintbrush add back part of that stem
from the eucalyptus. We'll have to see what that
looks like in just a minute. Since this layer is behind
or below the aster layer, I could just paint
right below that, I didn't have to worry
about those curves there. It looks like I've made it
all the way around our mum. Going to go to the pixel layer, select the eucalyptus
mask layer, the erase brush mask out
this overlap that I forgot.
23. First Bouquet Flower Color Part 2: I'm going to add a
new vector layer, [MUSIC] drag to the bottom, and then select my
color for our violet. I think I'll go for a pretty
dark purple here since we already have the lighter
purple and the aster. Seeing one spot, I
need to touch up here, so I'll do that
in just a minute. Another option you
have when you're coloring is you can actually move the stroke line a little
bit if that's helpful. There's our violet. I'm going to go back to
purple aster, fix that. I also noticed that I forgot
to add a lighter color. The middle of the merm. I'll do that in just a moment. Then I'm going to add a little
detail to our violet here. Looking at our reference image, the violet has
almost like a white, a very light center that
fades to the darker purple. I'm going to try to relay
that same type of fill. I have light purple for
my stroke and fill. Just going to draw
a wavy circle. You could do each pedal more detailed if you want,
something like this. Also convey that same feeling
that we're looking for. Just drop the opacity
a little bit. Let's head back over
to the merm and add a little detail on our merm. Look at our reference image, our merm has a darker red in the center where it's
very tightly packed. The density is greater there
and a tiny bit of yellow. You can choose to
keep the yellow or just add the darker red. Let's see what it looks like. Here's where we're talking about that very tightly packed area. Going to add a new
layer above our color. Let's change the bloom mode
to multiply our red color. We can see right away
what we're laying down is a very dark red. Going back to our layer, we can drop the opacity sun to create just a darker
shade of our red. While we're at it,
let's go ahead and add a little detail to our aster. Looking at our reference image, the asters have some bolts, completes almost on each petal. It has a darker and
a lighter area. Going to add a new layer
above the color purple. Drag between the
yellow and the purple. We change my blend
mode to multiply. Grab the purple color. We're going to drop that opacity down in
just a few minutes. You could add as few or as
many lines as you'd like here. I have my stroke and my fill, so it makes for a little
rounded curve if you want that. If you just went straight and
you'll just need a stroke. If you wanted to go
even further down. Something like that
could look nice. You could also leave
this off if you want. You also don't have to add this. If you'd like to just keep
the one purple color. Making sure I have
the layer selected. When to drop the opacity down. Thirty percent looks
about where I like it, so you can see it, but
it's not super prominent. [MUSIC] Now we have all three of our
flowers colored. We're going to add some
color to our foliage and also a ribbon or a piece
of twine to the bouquet.
24. Second Bouquet Masking Part 1: [MUSIC] Let's start by
grabbing some of our assets. I'd like to use the
carnation for January. How about the daisy from April, the miracle from October, paperwhite from December
and let's grab one more. This one will have five. Let's go for a summer birthday, how about the
Hawthorne from July? Move Tool selected, I'm
going to select all of the flowers and try to
come to a common width. That looks good for all of them. That was 1.9, 2. Three is a little heavy feeling, so I'm going to go back to two. We'll start arranging them. I don't want the paperwhite
to be in the back. It will look larger, daisy. Carnation could also be in the back maybe in front of
or behind the carnation. I'm looking at some
overlaps here already. I have a little with
paperwhite and the carnation. I don't have anything
with the daisy yet. You want to change the colors, we can change that now to
make it a little bit easier. The yellow and the green, I have some overlap. A little bit on the
stem there as well. The carnation, I know
I'm going to need to add a stem because it doesn't
have much of a stem. Maybe it could fit under the paperwhite
just a little bit. Then the Hawthorne, let's see, the Hawthorne has stream. Maybe something in the
front and center here. Bring my daisy up a little bit. Since we're not going to have
any foliage on this one, I want to make sure that the arrangement is
already pretty balanced. It's already following
some symmetry with the marigold and the daisy and the
Hawthorne centers here with the stream
in the front. Marigold would go behind
the Hawthorne, the stem. The daisy will go
behind the Hawthorne. It's like the carnation
will go behind the daisy. Paperwhite will go behind
everything as well. Let's rearrange our layers
and see what we can get. Hawthorne will be in front, paperwhite will be all
the way in the back and I'll drag that to
the bottom of my layers. Carnation will be in
front of the paperwhite. I'm going to go ahead and add
the stem to the marigold. Although I think I'm
actually going to close this, the stem, the carnation, I'll draw
a stem that curves down. Go back and grab my nodes
and do a little fixing here. Remember, most of
this is going to be behind that Hawthorne, so I'm not overly concerned with how it looks
behind that Hawthorne, knowing I'm going to mask out most of that in
just a few minutes. My main concern is
what's going to be showing from below and
above the hawthorn. You go ahead and change
those to the same color. Grab the paperwhite, nodes, drag those down.
25. Second Bouquet Masking Part 2: [MUSIC] The daisy
which is in purple, add a little curve to
the daisy as well. It has always lots of playing with the
nodes to begin with. I'm happy with that. Let's
go ahead and start masking, we switch over to
our pixel mode. I'm going to start
with the flower in the back of paper white. Grab the erase brush and start
erasing the yellow lines. The paper weights all
the way in the back, so it's going to go
behind the Hawthorne. Moving on to the carnation
and tap the carnation layer, make sure you have
the eraser brush. The carnation will
be behind the daisy. I need to erase, temporarily hide the green. Going through the purple. Noticed I accidentally erased part of the green stem here. I'm going to tap back
to my paintbrush tool. Make sure I have white selected. Then I can add back that green. Sometimes it takes a couple
of passes, couple of strokes. I have two pixel that
wasn't quite getting there. Let me see if I can
get back in it again. There we go. Sometimes
just switching back over to the erase brush and then back to the paintbrush can help. I know I'm going to
be masking out this purple in just a moment too. I just want to make sure
they have all the green masked from behind it as well. The green will be
behind the purple. Let's go to our next
layer, the daisy. Daisy will be behind
the Hawthorne, mask out the purple
into the orange. There's some of
that green that I didn't get just a moment ago. Tried to get all
but I miss some, so I'll have to go back and
get that in just a minute. Didn't erase too
much of my purple, so I'm going to grab my
paintbrush, paint this back. I'm going to stay
with the purple for just a minute because
it looks like we're just about done
masking the daisy. Before I forget, I want to go back to the carnation layer, tap on the mask layer, and grab the green
parts that I missed. It looks like that purple
didn't stay for some reasons. Let me go back to the daisy
mask layer and paintbrush. Paint this back on. The Hawthorne's and orange here, I'm going to mask out
any of the red that crosses through the
orange outline. It looks like we have
our masking complete. Make some final
last-minute looks here. For now, it looks really
nice, as we know, we can always go
back and mask out more or paint more
back if we need to. I'll see you in the next
lesson to add some color.
27. Exporting and Resizing: [MUSIC] Before we wrap up,
let's spend a few minutes looking at how to
export our bouquets. Right now, I don't
want to export this entire artboard
because I'd have the white background behind it. I need to group my
bouquet together, I'm going to select Shift, the top layer is selected. I'm going to grab the
bottom layer to select All, tap "Group", de-select my Shift. Now, I can turn on or
off just my bouquet. With my bouquets selected, now, I can drag up the
corners to resize. I can also come to
Transform and type in a width and a height. If you know exactly that you
want a 2000 by 2000 pixel, then you have exactly
a 2000 by 2000 pixel. Also, if you tap on the "Width", if you're working maybe with a principal and you
want this to be an 8.5 by 11 then tap over
where this says pixels, px, tap over to the right to inches and then
type in your 11. Now, this would be sized for
an 8.5 by 11 inch document. To export as an 8.5 by 11 inch, I want to make sure
with my move tool I have my bouquets selected, I'll tap on the three
horizontal lines, Export. My last setting that I used
was JPEG, which is great. That's going to include the
white background as well. If you don't want a background, then you'll want
to select PNG as the background will
then be transparent. I'm going to select
JPEG, rename. On my Area, I need to
select Selection Area. I like to preview
just to make sure I'm saving what I
think I'm saving. Then you can tap "Okay" to find where you want to
save this on your iPad. If you'd like to export
your bouquet with a color behind it, you could add a rectangle. I'm drawing out the rectangle, starting in the top
left-hand corner and then dragging out and down. Come to Transform, if
you'd like to make sure that it's 8.5 by 11. Now you have a
colored background, or you can select your bouquet, drag it to your rectangle
on your layers panel. You may need to make sure that your bouquet group is
above the rectangle group. Then from there you can
also resize if you wanted. This is the same
thing I have for the string I'm actually going to change this just to make
it a little bit lighter. Almost a white there. To export both the background of the rectangle and the group, we'll need to group
these together and then we can export
like we did before making sure that we change
the Area to Selection Area [MUSIC] and then tapping "Okay" to save
that to your iPad. I'll see you in the next
lesson to wrap up this class.
28. Thank You: [MUSIC] Thank you
for joining me. You have an incredible
library of flour assets, and a couple of
bouquets, I hope. You know how to use layer
clipping and layer masks to give your bouquets
and work some depth. I hope you continue
working with these tools, making more bouquets, and refining your unique style. Remember to upload your
beautiful bouquet to the project gallery so
that we can cheer you on. If you have any a-ha moments or any celebration that
you'd like to share, leave those in the
discussion area, and I'd love to start
a conversation with you and other students. Please, feel free to share your work on social
media as well. Tag me @jenni_got and I'll be sure to share
your beautiful work. Lastly, I do want to encourage
you to leave feedback. I really appreciate
students taking the time to let me know what they really
liked with the class, and also what I
could improve on. Feedback is critical to
being an effective teacher, and I want to be the best
teacher I can be for you. Congratulations on
completing this class. Thank you for choosing
me to learn from. I can't wait to see
your beautiful work. Thank you for being
here. [MUSIC]
 Jennifer Gottleber, surface pattern designer + iPad art