Transcripts
1. Introduction: Hi, welcome to my sewing
room here in Lima, Peru. I am so happy to be here and teach you a
new sewing class. I will be talking about
fabric applicants. Have you heard of fabric
applicants before? And you know that you can
create your own fabric, replicate and embroider it onto many different
sewing projects. I personally love to make fabric applications to decorate
things like pillow cases. They will runners, T-Shirts, fabric, gift bags in
so many other thing. My name is Isabelle wilder. I am an Ecuadorian
American artists leaving here in Lima, Peru. I have a degree in
fashion design, and I have been so even
for a very long time, sees my very first
sewing project. I have not stopped sewing. I relieve sewing
is for everyone. My family and I move around the world and my sewing
room come with us. I've have had many different so in rooms
around the world. In this class, I will
be teaching you how to use zigzag
stitches to em bro, they're at Christmas fabric. I will also be teaching
you how to work with an idea or an inspiration and create a pattern for your application and
how to embroider it onto fabric gift bag that you will get
something like this. So in class is not difficult. And I believe I saw in
beginner can come in and start sewing or for an
advance or experience. So it will be a really
fun project to make. At the end of this class, you will feel confident
to create a new fabric, advocate using your
own ideas and using all of the tips and techniques I have been
teaching you here. You can use these
fabric applicator to decorate so many things. Just think unimagined of all
of the projects you can make in all of the sewing gifts you could be creating
this holiday season. Let's get sewing.
2. Class Project: Welcome to my class. The project for this class
is to make a holiday, give back, decorate it
with fabric application. You will learn to make
these hanging ornaments. To decorate a drawstring bag that you will also get to make. This is such a
rewarding project. You will learn different tips and techniques about fabric. Application, is starting
to work with an idea. How to draft a pattern, how to prepare the fabrics
for the application, how to cut it, and how to embroider it. We will need fabrics,
interfacing. Wonder on there. A sewing machine was exact
stitches in an iron. At the end of this class, you will feel
confident to create your own fabric applicants to decorate a piece of fabric
and create beautiful. So in projects, I would be so
happy to see your projects. Please share it in the project
and resources gallery. I will be the first
one to cheer you on. And I'm here to answer any
questions you might have. If you can't make a big bag, perhaps you could make a tiny bag with one
Christmas ornament. Let's get going. Let's go find some nice fabrics.
3. Materials: Let's go and find out all you
need to start this project. For this project, you will need three different kinds of brains. They can be cotton
like a quarter, and a base fabric
in a solid color, that can be a linen or cotton. We would also need interfacing. Interfacing, light interfacing
and wander under is a few simple web that is
really, really wonderful. Thread in different colors. I like polyester thread, ribbons, different
colors, sizes, textures. Some embellishments
are optional. Light tiny buttons
sequences to decorate your ornaments, pins,
fabric scissors, rotary cutter is optional to a roller and a fabric
pencil or fabric marker. Agreed Matt is optional aim we will also need a safety pin. I recommend solid colors
for your base fabric. In fabrics with prints. For the applicants, the base fabric can be
a soft linen or cotton. I am using light colors
for my base fabric. So the application, we pop against the light
color of the bag. For the Apple case, I recommend small prints. Any colors you like. This is the part I enjoy. The most big enough
fabric prints. And I hope you enjoyed it too. You can choose a color scheme
or mix different colors. You can do a fuzzy cat where you cut around a specific
motif or design. In this case, it could be in
the center of the ornament. What is nice about
this project is that you can use
your fabric scraps. Don't we all have them. This is the perfect
opportunity to use them. You will also need paper
to draw your ideas. Eraser papers, Caesar's pen or pencil in more paper
to draft the bag. Interfacing and wonder on there. I am using a live view
civil interfacing goal. Be ELF there, T6. It is a light interfacing. Very light, has a rough side, and that's the side
with the glue. This interfacing
will be fused with an iron pieces of fabric
for the applicants. We will talk more about
this in the next lessons. Next is wonder. I wonder if you have no
hair of this material. It is really wonderful. I use it a lot in solving. It can be purchased on a roll in Amazon or by the ER
and the fabric store. He has a paper psi and psi with the glue in
the form of a web. This is what will be
melted by the heat of the iron onto the fabrics
for the application. If you would like to
decorate the ornaments, you can add tiny bows in tiny buttons in the
middle of the bugs. Very important is to have a sewing machine with
zigzag stitches. Unless we will need an iron. In the next lesson, we're going to talk
about ideas and how you can turn those ideas into
real sewing project.
4. Inspiration and Ideas: Inspiration is everywhere in ideas can come from inspiration. Walking around an idea. Let your imagination go to
magical places, can use them. So to translate those ideas into a real project
is making magic. When I lived in Vietnam, I found beautiful
fabric bags that had designs embroider
on the front. Those were luxury bags or
laundry bags because they had tiny embroider
and bras, panties. So cute. Inspired by the Vietnamese back. I had the idea that I
could replicate the bag using fabric applicants to give my knees and
new laundry bag. So I got to work by putting
my ideas into motion, by drawing them in my
sketchbook infant, they're creating
little paper patterns. And then my fabric applicants. When you have an idea, I suggest you put it
on a piece of paper, or even better, have a
sketchbook for all your ideas. Draw your ideas and write any detail you think you
would like to have in there, right, the date
and place as well. You will see how helpful
it is to draw your ideas. Do not think that you draw. It needs to be
perfect. Just draw. The more you do it, the
better you will get a drawing in a
writing, your ideas. I encourage you to start now. In this class, I will
teach you how to make a Christmas
ornament application. But if you do not want to
make it Christmas fabric, think of any other things too, we like to create. Perhaps a flower,
to decorate, a bag, or a pillowcase, or letters, to make a pretty banner. Explore your ideas and
make them a reality. Through sewing, you can do it. Started sketching your ideas. In the next lesson, we will start working in
drafting our draw stream back. Let's get going.
5. Drafting and Cutting the Bag: Go and start drafting our bag. Cotton rectangle, 13
" wide by 18.5 tall. You can also use a fat quarter
to make a drawstring bag. The ornaments might
be slightly smaller. For this size. We need two iron, our fabric. You can cut this back in two weeks when your paper
pattern on top of your fabric, place it in place, holding it with pins all around, then trace around it. This pattern includes
similar ones. The second way to do it is
using weights instead of pins. These are fabric weights and they will hold your
paper pattern in place and you trace around and cut with scissors
or a rotary cutter. You can remove your
paper pattern, place your weights back
on top of the fabric. And using a ruler
in a rotary cutter in great Matt or cutting mat. You can start cutting or use
scissors to cut all around. Another way, I draft this bag
is directly on the fabric, just creating my rectangle
directly on the fabric. I use two layers of fabric in. Sometimes I just put
one seam on one side, the other one is folded. This is another way
to cut a rectangle. Instead of creating
a paper pattern. Draft a rectangle
directly on the fabric, and then cut it using your
rotary cutter or scissors. Now we have CAD, two bags, one using a paper pattern, and the other one was drafted
directly on the fabric. You can choose any way
you would like to work, to catch your back. When you're carrying your back, you can decide if you
want to scenes in your bag with two seems to have two openings
for your reruns. Another way to do it is just with one seam on
one of the sides. In this way, you have one
opening for your ramen. Another way to cut this bag is without a seam at the bottom. Something I would
like to talk about is about washing and
drying your fabrics. In general, if you're
making garments, then you need to watch and dry your fabrics before
starting to sell. But for projects that probably
will not be washed dry, then it is okay not to send
them to the laundry room. In the next lesson, we'll start drafting
our lives, right.
6. Drafting an Applique : In this lesson, I
will teach you how to draft a paper pattern for
a fabric application. In this case, it will be for a Christmas ornament
application. I thought it would be
fun to decorate a gift back with nice hanging
Christmas ornaments. But I also thought making a Christmas tree
applicant will be nice. That is, when you go
to your sketch book and start drawing your ideas, a narrowing your ideas. To choose one design
or two or more. You will be deciding what to do. If you do not wish
to do the ornaments, applicants feel free to create
anything you would like. I will also guide you along the way with tips and
techniques that you can use in the future for any fabric application
you would like to design. I had used the ornaments
application to decorate a pillowcase
that I use on Christmas. Now, bring one of the panels
of the gift pack that you cut out and think how big you would like
the ornaments to be. The shapes were doing this
class are just circles. I usually use things I
have handy on my table. There are circles
like a tiny ball, this pool of ribbon, etc. Now on paper, trace
those shapes around. Now, you can cut these shapes. You will have your paper
pattern for your ornaments. We will be using a full
circle by just so you know, you can explore more and they sacred circle into pieces so you can use more than one fabric on each order me,
let me explain. Here is your circle. You can divide it in the middle. So you could use two
different fabrics. Think of this part like you are designing each of the ornaments. You can also divide
the circle length wise in three sections. Each of these pieces
become a pattern piece. In this class, we will keep
it simple so we can focus on learning about the construction
of a fabric applications. Remember to add any
important details to your new paper
pieces or patterns, like the direction in
what they're gonna go. In the next lesson, we will be preparing the
fabrics for the applicants.
7. Cutting the Fabric, Interfacing and Wonder Under: In this lesson, I will
teach you how to prepare the fabrics for the application and how to cut the interfacing. And they wonder on there too. So if our application, you need to prepare
first the fabrics for the applicant and also your base fabric where the
applicant will be stitched on. But we will talk about that
later in another lesson. So why do we need interfacing? And also wonder under
the interface scene will give more body and
instability to the cotton, making it easier to embroider. The wonder on there is
the glue that will be fused to the fabric
and interfacing. So we can glued this
application anywhere on our base fabric and it will not fall out or move while
we embroider it. It is a very helpful tool to make it easier to
show their replicate. But if you do not
find wonder under, you can use graph glue to secure your applications
before embroidery. Adhesives for applicants can be paper bag, spray adhesive, or a craft blue, less iron, the
fabrics for the case. There are many ways to cut and prepare the materials
for the applicants. The more you practice you
will find your own way. But here it is a way that I
think will be easier for you. Bring your circle
ornament patterns and place them over
a piece of paper. Now, draw a rectangle around it, leaving around half
inch space around. Do this for each
circle you will use, or each pattern
piece you will use. These rectangles are your
patterns to cut the fabric, the interfacing in the Wonder
under placed a rectangle on any side of the fabric
because we will not add any seam allowances, mark around and cut it using
a rotary cutter or scissors. Repeat for each
of the ornaments. If you're doing three
lucky mind design or more depending
how your design is. Now, let's repeat the same
with the interfacing, but we need to cut two
for each ornament. I will explain later why. Bring your interfacing
and use the rectangle traces in CAD two pieces
for each ornament. Remember that the rectangles
do not have to be perfect. So you can double
the interfacing to cut the pieces
faster if you want. Next, let's scat d1 there under. Remember, the wonder older
is a few simple web. When you mark these usual
market on the papers psi. Then again, use the rectangle
and mark all around. But this time we will make
this rectangle an eighth of an inch shorter,
smaller, all around. I will explain why. Later, cut it. Then you will have all
of your pieces cut out. Let's recap this. You have one piece of fabric, one piece of interfacing
for the application. Another piece of
interfacing that will go on the base fabric. And one piece of
one they're under. This is all the pieces
for one ornaments. So you're gonna pull
your fabric facing down. The next is gonna
go the interfacing. Next. They wonder under with the glue side down,
over the interfacing. I call these a
little sandwich of fabrics interfaces
and one there under. In the next lesson, we will fuse the interfacing
and they wonder on there. And also we will cut
the fabric. Applicants.
8. Fusing and Cutting the Appliques : In this lesson, we will
fuse all our pieces. That is gluing the interfacing
anyone they're on there. And also we will cut
the application. To recap, we now have caught all the pieces
for our application. We have one fabric to interfacing
in, one under, under. For each of our
ornaments or design. Plays one of your fabric
pieces within rise side down, the wrong side of the
fabric facing you. Place the interfacing on top of the wrong
side of your fabric. The rough side of the interfacing will be
touching your fabric. Now, give it a good Press with
this theme is even better. You will know the interfacing is fused by holding
the fabric piece and touching it and they feed the interface and
does not move away. It is fused, completely. Placed the wonder on there
on top of the interfacing, the glue webbing goes down in the papers side
will be facing you. Remember, papers side up, then give it a good
Press with the iron and the steam on
top of the paper. Get the corner of the
wonder on their paper, and start peeling it as
you would with a sticker. Sometimes you will feel
that it's not coming out. That means that you need
to come back in Ireland there again to fuse
it one more time. Then try it again. Pull the coordinate. And if you still feel that
is they saying stack, then iron it one more time, just in the part where
it's not fuse correctly. Then pull the paper while
still had any will come out. Really quick. Repeat with the other
application pieces. So now the glue of the wonder on there is on the back
of your fabrics. Your fabrics are
prepared and we're ready to start carrying
the application. Place the pattern on
top of the fabric, on any side of the
fabric will be fine. Something to remember is that because we're working
with a circle, you can place this paper
pattern anywhere in the fabric. In this case, I am
folding the circle, the paper pattern circle in half so I can align this line, weight the lines of the
print of the fabric. Now, trace around. Now you can cut your
fors fabric application. Another way to cat is
with a clear template, especially if you want to do something called bossy cutting. When you select a design off your fabric to be
in a special place, like say, the center
of these ornaments. Trace around and
then just cut it. Now you did with the
other fabric application. Now you will have a beautiful
fabric application. Your three fabric
applications are ready done. They look pretty. Now. They are ready to be
fused and the fabric, they have glue on the back. I like to call these
fabrics thicker. Just as a reminder about the direction of the fabrics when you're cutting a project, always remember
to check in which direction your motifs are going. Because this is a circle, it doesn't really matter. But it's nice just
to double-check. The three pieces of interfacing will be used in the next lesson. Great work. You have now your fabric
application ready. In the next lesson, I will do a review
about zigzag speeches.
9. Zig Zag Stitches: In this lesson, I will show you the stitches of a
sewing machine. I will not go in
depth for each stage. This is just a review. I will mainly talk
about zigzags, features and how you
can adjust them to get a nice embroidery speech
to do your application. Here to sewing machines. One is computerize on the right, and this one on the left is a traditional regular machine. It has a straight
stitch and the zigzag. You control the width of it
with the knob underneath. And also you can adjust the
length by moving the knob. My other machine has a screen where I can see all the
stitches dyad select. It has as tray stage a zigzag. Many other kinds of stitches. This is a sapphire, A350 Husker Varna Viking. This is a really nice machine. Any also has a panel with a
lot of embroidery stitches. I'm going to concentrate
about zigzag stitches. For this, we need to
see the settings for the length of this
stage, changing it. So it will make it tighter. And the width also changing it. So it will make it
smaller or taller. So you just need to
play around with these settings and adjusting them until you find the
one that you like best. I use, one for the length
and three for the width. I'm gonna do a
little sample here. So I can show you. I used the same width for this sample and only
adjusted the lamp. So the smaller the number
for the length goes, the tighter your stitch will be. Do a little practice so you can adjust the settings of
the length and the width. This one, the length is three
and the width was four. For the second one. The length was in one end, the width was in for. Here is a little mock-up I
created to test stitches. I kept the land the same at one and change the
width from three, going down to one. Then change the land
from one, going up 23. You can see that it's
getting more open. When there's THE so pane you can see the edge of the fabric. Another way to
embroider is by hand. So you have different ways to embroider the same
fabric application. An application can
be stitch using fine zigzag stitch,
satin stitch, blanket stitch, blind him, is traced it hence stage
and needle turn hand. Stabilizer is the
material used to add to the base fabric where the
applicant will be embroider. If this is your first time
using zigzag to embroider. Take your time practicing adjusting the stitch
length and width. Take all the time you
need and just practice.
10. Placing the Appliques and Ribbons: In this lesson, we
will learn how to place the fabric application in our base fabric and also adding the ribbon to
our fabric applicants. Now, the ribbons, It's
a moment to play. Just have fun playing
into different ribbons. Then we will use
one of the sides of the bag and
then start placing the case where we
will think we would like them to be placed. Everyone's too. And then once you decide the
placement that you like, then start painting the
ribbon to the application. For now, it's just the
ribbon to the application. Then we have to think about the similar
ones at the bottom, the back, and also on the sides. So you know where to
put the applicants. In here. You can choose any placement. You can put them close together, one higher than the other. And just a game play around. You can use even spacing
or an even spacing. Just remember not to put the applicants so
close to the bottom, are so close to the sizing. When we know where we
want the applicants, you can pin them in place. So we can take them
to the ironing board. Next. It will be two iron and fusing them
to the base fabric. If you don't have
one there under, you can use craft glue to glue the applicant
on the base fabric, cut the extra pieces of ribbon, and then remove the pins that were holding
your application. And press with an
iron in with steam. Until the application is fused. You can check the edge of the application to see
if a fuse correctly, the ribbon will be covered
under the application. The application are now
fuse in the fabric. In, at this moment, they're ready to be embroider. But now we're going to work a little bit with the ribbons. We need to just pin
them in place and think if we're going to leave
them long or follow them. So it will follow the folded edge that the bag
is going to have at the top. For another bag I made, I added a different
fabric on the top. So the Romans were
cut in the scene. We need to mark
two-and-a-half from the top edge. We're
going to mark it. I'm using a piece of soap as lever is a great
thing to use to mark on fabrics because he
disappears with this theme of the iron or the heat of the iron in this line is where we're
gonna fall the top edge. So now you can decide if you would
like to have the Ravens short to be at the same
place where we're gonna. So the channel for the ribbon
of the drawstring bag. So this moment, think about
how would you like to do it if you would like for
the ribbons to be short. And then you can cut them
accordingly or leave them long, so they will go all the
way to the top of the bag. Now, draw a straight
line at the top. And we're going to
base that line. I'm going to keep my lines, my ribbons long all the
way to the top edge. Now I'm going to
pin them in place. And I place my
pins horizontally. We will use the three
extra pieces of interfacing to place them on
the back of the application. Do that for these
three applicants, infuse them with the iron. Now we are ready to
embroider the applicants. Great job. We're getting
closer to embroider there, our fabric applicants. Let's see you in
the next lesson.
11. Embroidering the Appliques: In this lesson, we will pick
the colors for your threads. I use polyester thread, but I like to use
different kinds of colors. So this is a really
fun part for me. And I hope you enjoy to peeking out the threats to
embroider your applicants. Have fun picking out colors
to embroider your applicants. This is definitely one of my favorite parts,
choosing the colors. Let's practice a little bit. Embroidering. In a little mock-up. Use a piece of fabric
similar to what your base fabric will be and
what your applicant will be. I will suggest to
interface these pieces. You're going to start by putting your needle down and then aligning the middle of your presser foot with the
edge of your fabric applicant. And start stitching. Remember in previous lessons you practice the zigzag stitching. So now you can use it to practice with
these little mock-up. With your hands. You got your fabric. You don't push or pull it, just get it when necessary. At the end, when you're
finished stitching. We're gonna do a back stitch
to secure the stitches. Go ahead and practice these two. Now we're ready to embroider. We pick a setting
for our stitch. And then we start embroidering. Putting the needle down first. And we're going to
start where the ribbon starts with a needle down. Right there at the
edge of the applicant. I lead the pressure food
down and start stitching. I do a backstage also
at the beginning. And just start stitching. This teaching is gonna be right on the edge of the fabric. If this is your first
time doing this, just take your time. And if you cannot do it right
on the edge, do not worry. Just keeps, keeps
teaching and trying. Guide with your hands, the fabric, and move
it when necessary. To go around the circle. And every time you move, your needle has to go down. Keep, stay down
through the fabrics. While you move your project. In that way, you're
sure that this stage, we'll continue where he was. And just keep going around. We not rush. Take your time and check the stitches to
see how they're looking. Then when we meet
at the other end, we're going to do a back
stitch to secure our stitches. This stage, this part, the end and the beginning
of the embroidery, is gonna be hidden by the little bow if you
decide to put one. So now we're done and you have your first fabric
applicant embroider. Continue with the other two. Once you're done embroidering, iron them very well. Now it's time to
work and finished the ribbons using
craft glue with dab, a little bit of glue in
the back of the ribbon. That way we keep the
ribbon in place and we make sure is in a straight line. Do the same with
the other ravens. At the glue. Inputted securely on the fabric. I is still pin the ribbons. And I placed the pains horizontally so I
can So over to them. When you're ready to
stitch the Ravens is start where the rubber meets
the fabric applicants. And you work your way to
the top edge of the bag. This is how I do it
with this tray stage. And I put my needle down
right at the beginning. That's how I usually
start a project. Always the needle down
before it starts. So we do a backstage
and then keeps going all the way to the top
edge of the back and tried to keep the stage right there next to the
edge of the ribbon. And then continue sewing
all the way to the end. Because the pins are
placed horizontally. There is no problem
sowing over them. That's why I like to place
them horizontally so I don't worry about taking
them out while I'm sewing. Now, you're ribbons and
your applicants are ready. We just need to cut threads, hanging threads, and also
give it a good Press. Don't forget to always
press your projects. Everything is stitch nicely. And remember, you could have
left the rebrand shorter. The tiny boats can be stitched before or after
closing the back. It's easier if you do it
before the bag is closed. Make your tiny bows and
stitch them by hand. Then when you have them ready, you can play with them
and move them around to find the way you would
like them to go. In after that when you're ready. They can be stitched. It is just a stitch by hand. And if you're working
with the bag that is being shown
already on the sides, then you just have
to hold the bag like I'm doing right
now in the video. You put your hand between
the opening of the bag. But if you saw the bows before
the bag is sewn together, then it's a little bit
easier because you're just working with one panel. So you can see the
back of the pack and then trim the legs of your bows. Wonderful job. In the next lesson, I will teach you how to
sew the drawstring bag. But for now, take time and enjoy all the work
you've done so far.
12. Sewing the Bag: In this lesson, I'm going
to teach you how to sew the drawstring
bag or gift bag. Let's get going. Before we close the bag, we can remove the
interfacing on the bag. But this is optional. I like to do it. Next, we need to finish the scenes in all three
sides of the panels. Also, we need to square of this rectangle in case he has moved or shift during
the swallowing process. So we place it on a great man and start aligning with
the lines of the mat. And we're going
to cut around it. So we will have a
nice even rectangle. And we need to do that
with the second piece too. So you can put the
piece down and then put the other one
on top and carried. Now that we have our rectangle, nice and even, we can
finish all three sides. We can use a surgery
if you have one. But if you don't, you can
finish the scene by folding it and doing as six sag
bear or a stray stage. Now we're going to mark
the seam allowance or the stitching line at
a quarter of an inch. Next, we have to think about
how we're going to show it. We're going to start at the top, go down, turn in the
corner, turn again. And so all the way to the other side, we're
going to start. So when the back is starting on the right side
and the top of the bag, we start with a backstage and we're using a
straight stitch. We saw. And when we get to the corner, we put the needle down and
turn our back so we can, so the bottom line. And we continue to solve. And we get to the other end
or the other coordinate. And again, put the needle
down and turn your fabric. Here. I am finishing the edge
of the bottom seam. In these seams are together. The sides seams are finished separately because we
will need to open. The size seems. So we can create
the drawstring bag, the channel for the ribbon. We're going to iron. Now. We are going to press
our size scenes. Start opening the seams. We really nails in irony. If you don't have
a Taylor's ham, you can create your own by folding or rolling
a piece of fabric. And then using it like
you would a Taylor's him, open the seams with your
nails and press it very well. This is important to open. The size seems. Here you can see the
size seems open. And now we're going
to turn the bag. And in the coordinators, to pull the corner better, you can use a thick
needle or a pin, or you can put a
pencil on there and carefully push the corner. Remember too, so your
label and one of the sides and gave a good Press. We're going to work
on the top now. We're going to follow the basting line that we
did in the lesson before. Fall on that line towards
the inside of the bag. And press it very nicely. So you crease the top. Very nice. Now we're going to mark a half an
inch from the top edge. And we're gonna fall on that new line also towards
the inside of the bag. Do these all around
the top of the bag. Creasing a line there, making sure your
size seams are open. Press. And now our top edge is all folded and is
ready to be stage. We just need to mark the line. Where were we? We stated we market a
one and three-quarters. And I the market on the
right side of the fabric. Because I like to so with the Rifai right side of
the fabric facing me. But you can do it from
the other side too. Before we sell, we
got to make again sure your side seams are open. This is gonna be, you're gonna understand why
when we pass the ribbon, you can use pins
all around to hold the edge of the back and
start sewing on the line. You can also follow
your plate of your sewing machine to make sure you're going
on a straight line. Now we have our
first top stitch. You can look in the back. And if some places it
looks a little wonky. Don't worry, as long as the
seam is caught, you are fine. Now, we have to mark a half an inch up
from that top stitch. This measurement
has to be enough for your Raven to go through. So you can make it bigger or smaller depending on what
kind of read when you have. And also the folded edge that we did on the
bag is optional. The measurement that I gave you, you can make it wider. Now we're going to stitch
on their new line. This is our second stage. We remove now the base
thing and also press again. Now the bag is almost ready to pass the rerun
through the channel. The bag is almost done. In the next lesson, I will teach you how to do
the closure with the ribbon.
13. Finishing the Bag: We are so close to the end. In this lesson, we will
do the ribbon and I will also teach you how you can finish the same bag
in different way. Now, we need to do the openings for the
ribbon to go through. We're gonna go to
the side seams in between the top stitching
where we created a channel, we're going to clip
those stitches. The size seems only between
the two top stitches. In that way, we have an opening there and we can fit
the ribbon through it. This bag has two openings, but you can make a bag
with just one opening. Now we're going to
get ready to pass the ribbon or tape
with a safety pin. Just the safety pin in the
coordinator of your tape. Close it, then start feeding it through the
opening we just did. At the start. It could get caught by just working with your
fingers to go through. You can also make
the channel wider. If you want the ribbon to have
more space to go through. And then pull it
through the others, through the other opening. And we have to repeat the
same in the other side. So let's do the
other side again. Sometimes your tape or your safety pin can be
caught in the sizing. This is why the size seems must be open in the sewing process. When you are closing the bag. But with the CSER, you can help the
safety pin glide under the Caesar in case
you have this problem. Now, your bag has the raven. And you can do the closure. You can put your tapes together in one
naught and that's how you can finish
them together. Or if you want, you can do them one
by one individually. I decided to keep mine separate. And then I just did
some bows on each side. But if you want, you
can bring the tape around and do just
one bow on the side. Length of your tape is up to you how long
you want it to be. Now your bag is ready. I would like to show
you how you can finish a drawstring bag
in a different way. This one, I put a piece of fabric with a nice
brain on the top. And I left just one
opening on the side. The one that I did
for the class has two openings where the
channel goes for the raven. Another way to finish
your back is if you add lining to the top edge, the bag or this one. I also put a different
kind of fabric on the top, but also put a different
kind of fabric for the back. And this one here also has a nice contrasting
color and the top. What I did different with
this one is that I did not add similar
ones on the bottom. So you can see that you
can make the same bag, but Fincher in a different way. You could also add a piece here or also put a
longer piece here. So you have a piece going
all the way to here and your drawstring
can be in the middle. So these are the different ways you can work with the
same kind of back. In the next lesson, I will talk about
how you can use fabric replicates in
others, so in projects. And also, I will talk a little
bit about sewing journey.
14. Fabric Appliques in Future Projects and Sewing Journaling: I will show you a few
of my own designs. The paper pattern
pieces that I have created in the
finished projects. I have a special project I
made for my sewing room. And these applicants
were all sewn by hand. At the time, I didn't
have my sewing machine. We were in transition
from the US to Peru. So in the hotel, I started drawing a
little sewing machine because we were in quarantine for 15
days in a hotel and I was going a little
bit crazy without sewing. So I created all
of these species. Here is the little
sewing machine where my son saw me working in the individual pieces
because I start to just working in sewing them
in pieces of fabric. He told me that I should make a banner and that's
how these started. So you can draw, designs, any ideas on paper
and put them on fabric and use fabric
replicating next to stitch them. Projects that I have
made in the past with fabric applicants are binaries. This is something you
can definitely do. All you need is to have a
printer find a nice fun. Print your letter and the
right size for your banner, and apply the
techniques I show you here to create a fabric. I have a tradition to make
my boys birthdays, t-shirts. I decorate their t-shirts with applicants for their
eighth birthday they want to pick and choose. So I made a little Pikachu replicate that are
not really cute. Then for their ninth birthday, it was fortnight inspire, and he has a lot of letters. My other son wanted
the Fortnite bus. The balloon was
really fun to make. And also the bus. For the bus, I used a drawing as a guide to
make the application. This one's really fun to do. I use fabric markers
to color the bus. Then I have these fall leaves that I designed around
five years ago. I wanted to make a
pillowcase with them. So I cut these
applications in different, with different fabrics
that had some prints too. And I really like
how it turned out the project ID not
embroider these. I just stitch them in the
middle for the stems and hang them from a ribbon to look like they were hanging
leaves like a banner. It was a really fun
project to make. Also, I have a little leaf that I just scattered
around the fabric, made a pillowcase at
these embroider, these, these leaves with six
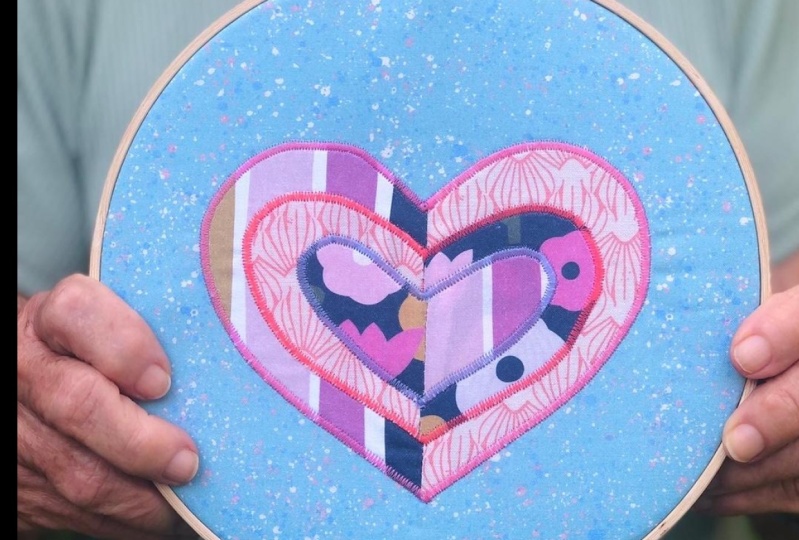
and then I have a heart. In all of my slides for this
class are also applications. So in journaling, this is
something that I recommend. You do. I, I just started doing it out of feeling that sometimes
I make a project. I saw something. When I want to make it a game. I have forgotten
some of the details. So I recommend you start one now and just have fun is a
really nice thing to do. I hope you start sewing
with applicants. Give it a try, have fun, and start creating
your own design.
15. Thank you and Let's Keep Sewing!: Congratulations for giving
yourself time to learn. So in project, in this class, we learned about
fabric application. How to work with an idea, how to draft a pattern
for the application, how to prepare the fabrics, cut them, and embroider thing. We also learned about
sewing a drawstring bag. And also how we can use
fabric replicates in future projects or design a drawstring bag
in different ways. Also, I show you a
little bit about sewing, journaling, and how that
is very important too. So future projects, it's like
a resource that you will go back to look at it and help you remember how you create it. And so a project sewing
is magical for me. Seeing how something can come
to live out of our hands in our imagination is also
healing to ourselves. I love to share and teach about sewing and how
wonderful it is. I also believe sewing
connects people. I have created many
sewing projects for home. And I hope one day my kids
will pass them to their kids. We love to see your projects. Please share it by uploading it in the Project
and Resources tab. Go to the button that says
Create and follow the steps. If you did not have
time to make a big bag, remember that you can
make a small bag like this one and add one
Christmas ornament. I would love to see
what you create. If you have a question, please feel free to contact me. Find me on Instagram at Gypsy Taylor or Pinterest
at Gypsy Taylor. And if you share your work in social media, please tag me. I would love to share your
work all my social media page. And also tag Skillshare as well. This is my first
Skillshare class. Please leave a review, a more classes coming up. Thanks so much for
joining this class. I hope you enjoy each of
the lessons in this class will inspire you to keep
sewing or start sewing.
 Isabel Wilder, Designer, Artist, Maker, Etsy seller