Transcripts
1. Start Sewing Intro: Are you drawn to cute
or beautiful fabrics and would love to learn how
to sew up some projects? Join me as we go over
the basics of sewing. I'll guide you through
setting up your machine, your threads, fabric, and some simple
stitching. I'm Joe. I've been sewing for
over 30 years and teaching sewing for
quite a few years. I've learned to sew
from my mom who was also our town's kits
consult teacher. My favorite things
to sew are clothes, though I can never
resist a cute bag, zipper pouch, pillowcase, stuffed animal, or a fun scarf. Once you've learned
basic sewing skills, you'll have the confidence and skills to start
sewing many items. I made this class with the complete beginner in
mind for someone who has never sewn or even taken their sewing machine
out of the box. If you're like me, when
learning something new, it's always helpful
to see someone do it slowly and you
can follow along. We will go over how to plug your chords
into your machine, how to get your thread ready, I have a little surprise
to show you in that part, and cut your fabric. Then we're on to the fun
part; sewing some lines. These sewing lines will be your foundation skills for most of your sewing. That's it. By the end of this class, you'll have two
pieces of fabric sewn together and we'll see how it is the start of sewing more. Let's grab our fabric and supplies and meet up
in the first lesson.
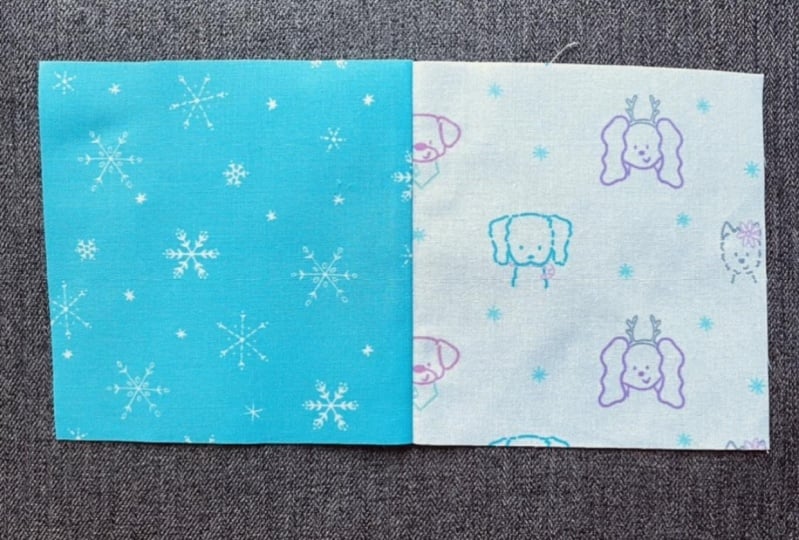
2. Project Start Sewing: The project for
today's class is this, two pieces of fabric sewn together down the side
to create a seam. This seam project is the
main foundation for sewing. You will find seams on all
your clothing, quilts, and many items, so it is a great
skill for beginners. A quick tip is to get comfortable sewing some
practice lines first, your project will be completed
in the sew a seam lesson. Be sure to upload
a few photos so we can gush over it in
the project gallery. I'm excited to see your project and which fabric you choose. See you in the next lesson.
3. Supplies and Materials: Let's go over everything
you'll need today. First off, is a cotton fabric
enough that you can cut 6, 6 to 8 inch squares, a spool of thread, or with a light gray it blends, goes well with the fabric. An empty or a full
bobbin thread. I go with plastic. I had a sewing machine tech tell me that plastic is better because the metal that comes
with them can wear away the parts of your
sewing machine. Sharp scissors. You'll notice
I label mine fabric only, so everyone in the house knows. [NOISE] Pins. [NOISE] These are just a
straight pin with a head. Or you can use sewing clips too. [NOISE] A ruler. Just the basic school
ruler will do. [NOISE] A pen. [NOISE] This one
is a friction pen. It's erasable on paper, and on fabric when you use it, you can erase it with an iron. Sometimes though
it can leave a bit of a color left behind, so just do a test
if you use those. [NOISE] A sewing pen, this one washes out with water
and this side is air air. If you're doing a long project, you'd want the washout. If you're doing a
project that afternoon, something short and
you're not too worried, you can go with
the air erasable. [NOISE] Today I'm using
a sharpie pen just so that you can see
my lines easily and that's fine for
you for today too. Our next lesson is
cutting fabric, so you'll need your
scissors ruler and a pen.
4. Cutting Fabric: If you have a rotary cutter, go ahead and skip to the
rotary cutter bonus section. It's at the end of all the
lessons in this class. If not, we are cutting with
our scissors, ruler and pen. We're going to mark six inches, then we're going to
go in six inches, put a dot, and go in
from the top six inches. Put a dot. We're going to go down six inches
and see how close. That'll end up perfect.
We're going to draw a line, just connect our dots. You need to do this six times so that you
have six squares. I'm going to go ahead
and cut this out. Here we go. Yeah,
once you have six, I will meet you in the next lesson and we'll
set up our sewing machines.
5. Setting Up Your Machine: Your sewing machine will
come with two chords. This one is your power
cord. Just match it up. [NOISE] Plug it in. This is your on-off switch. [NOISE] Then we have this weird-looking thing and
this is your foot pedal. You'll place this
part on the floor and this part will plug into the
side way of your machine. This little part here is the side flywheel
and it will make your needle here go
up and down manually, whereas, the foot pedal makes it go up and
down automatically. We'll talk about this part here later when we
start sewing our lines. Next, we will wind a bobbin.
6. Wind A Bobbin: We're going to put
our spool of thread into our machine to
wind our bobbin. When you do it, this little
ridge at the bottom is meant to stop your spool
of thread from unraveling. So when you put it into your machine you want
it to the right, you don't want it catching or messing it from this side
when it's coming off, so we're going to
put it that way. [NOISE] We have a
little thread stopper , your spool stopper. I don't put it really
tight, I could have it a little bit loose. Now we're going to go
through this guide, and around this
little tension disk. Goes to that guide, because it will be
clockwise around that disk, underneath this little guide,
we'll catch it in there. Then we're just going
to put our thread, there should be a little hole
right next to the center, so you're going to put your
thread from the inside, coming up and out that hole. You should have
your tail on top of your bobbin and your thread
going into it there. Then we're going to put onto
this little piece here, and there's a little
notch that will line up with the notch in there, so I place it on and I just
turn it till it clicks down. Then to disengage your needle, we're going to [NOISE]
push that over, so then all the other
parts of the machine aren't working, just this part. We're going to hold this
thread and step on our pedal. [NOISE] Once you
have a good start, you can grab your scissors and just trim that little tail off. [NOISE] Keep going
and wind your bobbin, I don't know, till
it's a quarter inch from the edge or a millimeter. You just don't want it to
start falling off this edge. You'll see when you start to get close to the edge, to just stop. So go ahead and
wind your bobbing. Our next step will be
threading our machine. [NOISE]
7. Thread Your Machine: We're threading our
machine and now, for that little surprise I was talking about at the beginning. This is variegated
thread, it's my favorite. This one goes red
to a little bit of orange, yellow, green, blue. I have this one and I have this rainbow that
has purple in it. [NOISE] I'll show
you a few more. [NOISE] I have this
pretty blues and greens, and kind of a melanie pinks, and purples, and
yellows, and orange. Today, I guess we'll go
with the classic rainbow [NOISE]. We'll thread our
machine with this. On this one here, there's a little slit cut into
it on the bottom, so you want that
against the back there. We'll just have a little
slit, just harder to see. There's my slit.
I'm going to put it that way onto the back. I'm going to stop
around loosely and I'm going to take it
through this guide again around this one. The other way, we're going
to go counterclockwise now. Of course your machine will likely be different.
This is a Pfaff. Just look at your
guide, it'll show you. In my mom's old machine, this part opened up and it had a little map of
how they do open it so you'll be able to find
that with your machine. Then we're going to go down to the left side of this
little disk here, and then down
underneath and back up. Now we came up to the left side and then we're
going to take it around to the right and it'll go into the little eye in that
piece and back down. To recap, from the top angle, so we went down the
left side of that desk, went down here, back up
onto the other side of this and hooked it into that
eye and then came back down. I'm going to go, kind
of like flossing your teeth into
that little part. Then I'm going to use my
wheel to get my needle up [NOISE] so now I can
thread it and this piece here pushes down and there's a little metal piece that
goes through the eye of the needle so that
it's easy to thread. I just go like this, [NOISE] and catch it in there
and it threads my needle for me or you can just eyeball
it and do it that way too. [NOISE] I have a bobbin in here, so I'm going to take it out
and pretend that's not there. [NOISE] Some will have the bobbin case on the
top, some underneath. Again, you might
have to look at your manual or if it comes with a video so we're going to
take our little bobbin piece. You'll see this little slit, I hope you can see, goes in there so I'm
going to place my bobbin, this would be counterclockwise
into it so that this slit and the thread goes with and in
the same direction. Then I'm going to
pull it down through that little metal
piece, and that's it. Then I pull this up, and place it in. I want to have it
in the right place, that piece will click down. If it doesn't make sense, I don't know, it
won't click down. Just line it up so that clicks down and that might take some playing with. Then I'm going to take
my wheel on the side, put my needle down and it'll catch
that bobbin thread and bring it up to the top. I just pull that out, then I have my two threads above and they're ready
to go so I'll close this back up [NOISE] and we are ready to grab two fabric pieces and
get ready to sew.
8. Sew Practice Lines: Hey, we're going to get
ready to sew lines. I have two pieces
of fabric here. I have the right sides together, and I think for
drawing my lines, I'm going to draw them
on the back side, will just be easier
to see for this. We call us a fabric sandwich. I'll draw one line here, nice straight line, I'm
going to try a curve. Let's do zigzag. Of course you can do as
many of these as you want. You could draw lines the
other direction after, you can draw them beside,
they can overlap. Whenever you think
is fun, for sure, it'll take more than
just this for practice, so just keep going until you feel comfortable
with your machine. [NOISE] I've got my
fabric I'll need to go. Here's going to line it up
where I think the needle will start on the line, and I have a presser foot here, low presser foot lever, to put that down, until
it's size and tight. When I'm not sewing, it'll always be up. Make sure your presser foot's
down, nice and tight there. Then you'll use that wheel on the side we talked
about earlier. Put your needle down and
see if it's starting where you want it to start to line up. You can do one stitch. Now, I take my threads, and move them to the
back and you can lift your presser foot up a teeny
bit to get it back there. Sewing over your tails, I'm going to place my
hands on the side, and I want to be in
front of the needle , just to the side. I don't want to be
pulling my fabric. I don't want to be pushing it, to slightly guiding it here. I'm going to step
on my pedal and start sewing on this line. [NOISE] Stop when you get to the edge, move your foot right
off your pedal. You don't want to
accidentally step on it when you're touching your fabric. You're going to lift
your presser foot up, and give it a little tag, if it doesn't come out easy, you just need to turn
your wheel a little, so that your needle
is up all the way. If your needle is
not up all the way, it won't [NOISE] let you
just pull the thread. You might have a little side
cutter on your machine. If not, just use your
scissors and cut your thread. You should have a nice line. Now, we're going to
do the curved line, I'm not starting straight
like I did the other one. I'm going to start
going with my line. I'm going to turn
it to the side, and use my wheel to line
that first stitch up. Looks good. My tail is behind
from when I put it in. I'm ready to just
start slowly sewing. Now, I'm just going to guide
it a little to the right, to just follow that curve. Not pulling really hard. If the curve is
getting away from you, you can put your needle down, lift up your presser foot, and give it a little turn so
you're going straight again. [NOISE] Curves would take
a lot of practice. We've got straight line a curve. Now, we're going to do a zigzag. We're going to line
up our beginning, make sure our threads
around it the way. I'm going to sew, I'm just
going to take it back there. [NOISE] When I get really close to that point,
I'm going to stop. Take my foot off the pedal, lift up my presser foot, turn it, so that I'm going
straight with the line again. [NOISE] Not my corners, I'm going to lift up
the presser foot, turn it and keep sewing. [NOISE] Those are practice lines. Next we are going to sew a seam.
9. Sew A Seam: I've got my two fabric
pieces to sew seam. What I'm going to want to do is sandwich the right
sides together. We have the backside
on the front, a backside on the back. What we're going to do, and you'll probably do
this on a table, but you'll line up your edge, so it's nice and straight, and then you can
pin it or clip it. I'll do one of
each. That's going to keep it nice and
straight how you want it. On this today, we're going
to sew a half inch seam, just looks nice and big
and you can see it. If you look on your
sewing machine, there should be a guide
with all the numbers, so we'll go to 1/2 or
you could choose any. You could do a
quarter-inch, whichever. Just make sure you
stay on the same one. What you can do is put a tape line, if you
have painter's tape. You can tape it on there. I'm going to find my 1/2 inch,
I'm going to line it up. [NOISE] I have this lined up where I'm starting and my side edge lined
up on the 1/2. If I was doing a
seam in quilting, I would not backstitch. But if I was doing a seam on a pillowcase or a
scrunchy or a scarf, something that I'm
going flip inside out, I would backstitch. Pretty much everything
I can think of right now other than quilting,
you would backstitch. What backstitch is, is you don't do a
couple of stitches. Then there'll be a button, this one looks like
a little U-turn, so you push that [NOISE] and then your stitch
we'll go backwards. Then to end that and
keep going forwards, you'll push it again, and your stitching goes
forwards again. You do that at the beginning of your sewing and at the end. Now, we're back to our 1/2 guide and I'll just start
going slowly. Before I get to my clip, I just want to pause
and take it out. [NOISE] I'll keep going, keeping that 1/2 inch
guide even there. [NOISE] Then coming
up to my pin again, so I'm going to take it out. [NOISE] I'm going to
go almost to the end, [NOISE] then I'm going to
hit my backstitch button, go back a couple of
stitches, push it again. [NOISE] That looks nice, so now we have a seam. You can open up your fabric. I have two pieces sewn together. Now, you can see
here seem bubbles, so what we're going
to do is head over to our iron station and
give that a nice press. Open up and just
press that seam. Makes it flat. There we
go. That seems ready too.
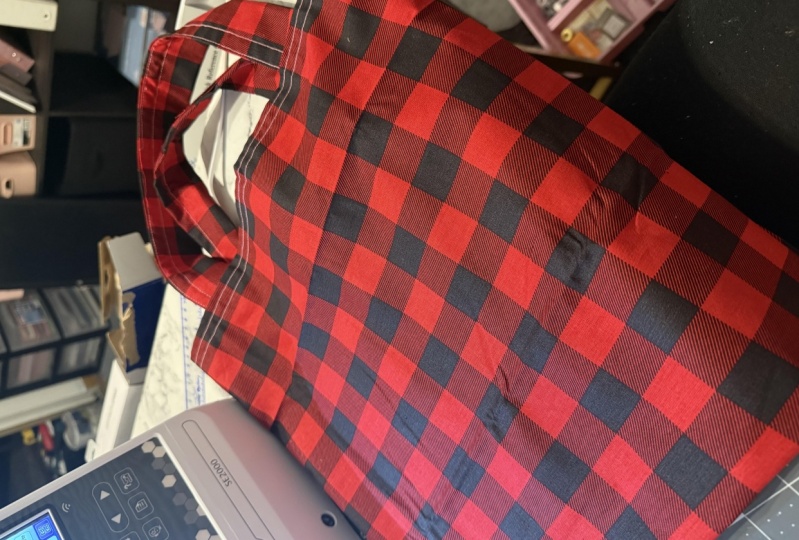
10. Sew A Corner: We're going to saw a corner. Like last time we'll have
our right sides together, wrong side on the front, wrong side on the
back so they are not the right side
inside the sandwich. You can pin it if you like. Now, we're going to do a corner. We're going to saw
along the side, along the bottom, and we might as well go
back up the other side. Then you could see
what a pillowcase or a tote bag would be like. I think I'm going to do a 3/8. We're going to start here. I'm going to put my needle in. I'm going to saw two
stitches, back stitch. [NOISE] Push it
again, go forward. [NOISE] Pause. Take
up out my pin. [NOISE] I'm going to slow down when I start to
get close to this corner. It's a fun guessing game. You're going to guess when I'm 3/8ths of an
inch from the end, that's when I'd want to turn. Sometimes you get it right, sometimes you don't, know
no big deal for this. [NOISE] I'm going to go one more stitch and then I'm going to take my
foot off the pedal, lift up my presser foot, turn it, put my
presser foot dip down. I'm pretty close,
I'd call that a win. I'm going to keep going. [NOISE] Maybe one more. Then I'm going to turn it. I should tell you too, if I
have my needle down engaged, then when I turn it, it's
easier to keep my spot. [NOISE] I take this out. It's not coming out,
so that means I need to lift my
needle a little bit, and then it lets it go. [NOISE] We have our
three sides done. What we can do, let's take it and
flip it inside out. That makes a very
cute little bag, that's my handle on it. You see if it was bigger, it could be the start
of a pillowcase, the start of a bag. Next, we are going to
learn how to do the hem.
11. Sew A Hem : I need a half-inch hem on this. I have a little
trucks, I flip it over and to do a half-folded
will actually go an inch, will always double what
we want our hem to be. [NOISE] Align that. We have an inch and we
want a half-inch hem, so we going to fold it
in half and iron that. [NOISE] Press that for a second, [NOISE] a half-inch crest, and then we're going to
give it another fold until the edge is
nice and finished. [NOISE] We're ready
to go sew it. [NOISE] We have our hem, now we're going to sew it. I can see my line there. I'm going to sew it on, I think three-eighths will
be good for those turn. [NOISE] Go ahead and do a couple of stitches [NOISE] and the backstitch [NOISE]. Backstitch again [NOISE]. Backstitch again. [NOISE] Take a look at this
[NOISE] Those are hem, it's all hemmed in the back.
12. Thank You: I'm sure you're seeing how your new foundational
sewing skills will help you create many items. Thank you so much for
joining me today and I hope this is the beginning
of your love of sewing.
13. Bonus Rotary Cutting: For our fabric cutting, we have our cutting mat. This one is a 24
inch by 36 inch, and it's a wonderful size. We have a ruler. This
one is 6.5 by 24. This handle I just got recently. I used it for years
and years without, but I just find it. It makes it nice, keeps my fingers out of the way, and a Rotary cutter. Push this down [NOISE]
to put the blade out, [NOISE] pop that
to put it back in. First, we're just going to
get a straight edge before we start measuring and
cutting our squares. I'm going to put my blade down, it's going to line
it up on the edge. Just gentle pressure [NOISE]. Just go along the
edge of the ruler, and now see my
fabric comes apart, so I'm not using this
one, so I'm just going to set it to the side. Now here's the trick. I want to use six-inch squares, but I'm not going to
cut it from this side. I'm actually going
to flip it over, and cut it from the other side. On my ruler, do the six inches. If you look on your
ruler, it's clear, and you can line up your fabric
perfectly onto that line. I'll do that on this edge, and then that'll give
me the six inches here. That looks perfect, so then I'm going to put a
little pressure on my ruler, and then just cut
alongside [NOISE]. In this case, I'm not
going to need that, so I'll set it to the side too. Now if it was a long
piece of fabric, we'd have a great big strip, and we just keep cutting,
cutting, cutting. This one is smaller, so we'll
just do a couple of cuts. If it was a really long piece, we could fold it in half and
do our cuts to save time. I want six inches by six inches. I'm just going to line
it up here again. There we go, that's six inches. [NOISE] I just cut it, and I just move along, but
I'm just going to move the fabric from now because
it's easier with the camera. I'm just going to line
up that edge again. That one is not six inches, so it wouldn't be used
if it was a project. My one tip with a Rotary
cutter is if you're cutting, and it's missing little pieces, and you find yourself going
over it a second time, it's time to change
to the blade, and you just need a sharper one, and it'll be back to [NOISE]
flawless cutting [NOISE].
 Jo Simpson, Fabric Designer & Sewing Teacher