Transcripts
1. Introduction to Bringing a Drawing to Life: Hello and welcome to my class. Bring a drawing to life. How does so accustomed creature from a children's drawing? My name is Andrea, and I am an artist and pattern designer and educator who's been crafting most of my life. I first learned how to turn a children's drawing into a stuffed animal as a gift I was making for my elementary school students and wanted to do something special at the end of a year and decided that this would be a fun way to honor their drawings, then give them something to help them remember here together. After making those for all those children, the whole process to serve exploded and I ended up making drawings come to life for my friends and family members and even turn it into a small business. I can't wait to share this process with you today. There's just something special about honoring a children's drawing and turning into something that they can hold in their own hands. When you're finished this course, U2 will be able to take a children's drawing and turn it into a stuffed animal, perhaps like this, like this, or like this. Before starting this class, it would be helpful if you have some basic knowledge of how to use a sewing machine and how to do hand stitching, because we'll use both to create your custom stuffed animal. Base class is perfect for anyone who has a child their life that they want to honor with a special gift or keeps sake. And who knows? Maybe the, It'll take off for you too, and you'll end up making stuffed animals for your families and friends as well. In our next lesson, I'm going to go through the class project. I'm going to show you a few examples of drawings that have been brought to life. And I'm also didn't give you some things to think about when choosing your drawing for your very first project. I can't wait to see you there.
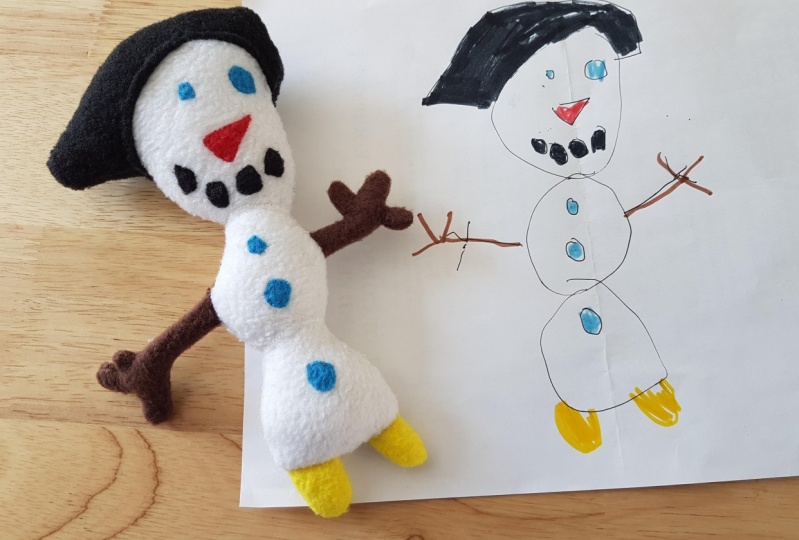
2. Class Project & Choosing a Drawing: Welcome back to bring a drawing to life. In this lesson, we're gonna talk about the class project. The class project, of course, is to take the children's drawing and turn it into a stuffed animal. Here are some examples of drawings and stuffed animals that I've created in the past. In this class, I'm going to make use of this drawing. This is a drawling that my friend's daughter drew for us and gave it to us for Christmas. And I'm going to surprise her by giving her a custom stuffed animal baseness drawing for her birthday as a present. When you choose your drawing for this class are a few things you want to look for. This is your very first ever time bringing a drawing to life. So you wanted to do the drawing that's not too tricky. Learn the basics first and then you can add onto it for a trickier drawing. If a child that you are working with has already drawn you a tricky drawing, perhaps draw yourself a simple one to start with, get the basics down and then apply that to creating a trickier drawing. When I look at this drawing, several things standout is making this an easy one to do is to begin our project. It has some large main body pieces, which I know I can turn out a fabric into the main body of the stuffed animal. It has arms and legs of a good size, so I know I can make those as well. And the hair is also a nice big size or perhaps the hat. And that makes it easy for me to turn into a fabric as well. All of the embellishment, the eyes, the nose, the mouth, the buttons are right on the fabric itself. So it'll be easy to cut it into small pieces and so on. Before I turn the stuffed animal together, the tricky part in this stuffed interval is going to be these narrow pieces of attachment here and here. But I can still work with those and I know I can make a sturdy. So take note when I'm done. So that makes this a good stuffed animal. What makes a drawing more difficult is when there are lots of extra pieces, lots of small extra pieces, or lots of details on the design itself. So take a look at this drawing. This is an example of a drawing that might be too difficult as a first drawing. Even that list sneak itself is not tricky. Trying to create a piece of clothing to fit the snake at the end, that part is more complicated. Here's another example of a drawing that would be a great drilling for a beginner. Once again, there are arms, legs, body parts, but everything is easy to cut out and make at a fabric. Everything that's embellished on the front is also easy to create into so on afterwards, as you can see in the finished Steffi, any drooling like this that you want to create in three dimensions is much more difficult. And you might want to wait to get some practice under your belt before you attempt it. You'll notice in this one that there are arms and legs, but they're attached right to the body. And this one had no other option but to be made in 3D. As you can see here. This stuffed animal was Superfund DMAIC fit, also super tricky. There are lots of small pieces that I had to figure it out. And I probably had five or six different prototypes before I came up with one that I like. This would be a great advanced project, but not so great as a beginner project. This last one is one of my all-time favorites. In fact, all the stuff in roles that I've created over the years, still my husband's favorite one. This one is a little more complicated and the others only because you'll see that some of the details go right off that main body. However, they're big enough that they can be created separately and then sewn on. So if you're drawing looks a bit like this, that's okay too. When I created my first study animals from drawings, I actually drew the drawings myself, sort of based on what my students were doing to give me an idea of what it would look like that way could practice the techniques before I actually had to use them on their drawings. So you may wanna do that for yourself if the drawing you have is overly complicated and you just want to get the skills down. Perhaps draw yourself a picture of some kind of monstrous beast that you'd like to bring to life and use that for this class to make your project. Then afterwards, you can use the same skills and tackle that more difficult drawing. I helped those tests will help you to pick out the perfect drawing for your first project. In our next lesson, we'll go through all of the materials that you'll need to take your drawing and turn it into a Steffi CSA.
3. Choosing Materials: Welcome back to bringing a drawing to life. In this lesson, we're gonna go through all the materials that you're going to need in order to take your drawing and turn it into a stuffed animal. I'm also going to go through some of the materials that I don't use so that you won't make the same mistakes that I did early on. So to begin with, the material that I love the most from making these creatures is fleece. This is polyester fleeces, that kind of fabric that you might have a warm jacket out of or a sweater. And one of the reasons why I like it for making such animals is because for one, it's super soft. So when you make your Steffi, it's going to be really nice and soft and squishy. And that's the kinda stuff animal that I like. Another reason why I like this fabric is because it's really easy to, so it's slightly stretchy and it doesn't fray. So it's great for the body of the animal, but it's also great for all those little pieces that we're going to. So on top, I don't have to worry about tucking in edges. It tells a pretty strong so I'm not worried about a child being able to pull on it and tear it. Um, and so, and it comes into great wide range of colors and even pattern. So it has been my go to fabric for study animals for a long time. And this is the one I'd recommend for your first project as well. So that's the first one. However, there are some others that I have used. The other fabric that I use in my stuffed animals is this, this is Woolf felt. So this is not the cheap acrylic stuff you might find at the Dollar Store, but this felt is actually made from wool, which gives it a nice durability and it doesn't pill. And the same way that, that cheaper acrylic stuff does. And I don't use this for the main body of a creature, but if the crew tourists small pieces such as an eye or nose or even let buttons on my snowman, I might use those instead. One of the problems with fleeces though, even though it's super soft and cuddly and wonderful in so many ways it is sometimes hard to cut it and get the definition of a shape when it's really, really, really small. And so when I have small pieces, I'll often use this for a more durable and for a better shape as well. There are a few other fabrics that I've used in the past for creating stuffed animals. And the other one is flannel flat or flannel. I use this when looking for a particular pattern. So again, as much as possible. I'm using fleas, it's such a great fabric. However, sometimes I've been tasked with a drawing that has a really busy pattern on the front, one that I know I can't recreate by sewing strips of fabric together myself. And in that case, I've gone out and looked for flannel or flat that has that pattern on it. For instance, this check pattern. This is another example of one that I've used a pattern fabric for. And then there is this one as well. And so in this case, the fabric. It was still nice and soft. It's still easy to, so the downside of using a flame or flat is it's not quite as durable as the fleece says. Another thing with lanolin is that it does fray. So it's not gonna be any good for using those small pieces that were in a, so on the front of our drawing, although you could use it for the main body. Again, if you're looking for some sort of busy pattern, soviet might be wondering about this kind of fabric, this fun fur fabric. And as fun as it is for a stuffed animal. And often we might see stepping animals that have more of a furry texture. That difficulty when using this kind of fabric for our project. That often the children have drawn wonderful details on the body of the animal itself. And with, for it's really difficult to, so the details on the fur and make it look good. Sometimes I can get lost and all the spring IS, and sometimes it just flattened out the fern, it doesn't look as well. So if you have a big furry body, there's nothing else on it, then go ahead. You can use some of this fun for and make it super fuzzy. But if you have a drawing like mine, where I have things on the front that I want to so on, then this is not going to be our best bet. This fabric here can also be helpful for making your creatures. This is monkey fabric. It's super soft on one side and it's shiny on the other side. And this would be wonderful for stuff these two, because it is just so soft and the nap that's the scary part is pretty small, so it's still okay for sewing on those details that we just talked about. The downside for using this fabric is it's a little bit trickier to work with because of that shiny backside, it tends to slip as you're sewing and it's also not easy to get a clean definition of a shape. However, if you have some of this at home and you want to put that in your project, it can be a good one as well. One of the fabrics that I don't ever use in my study our projects is cotton quilting. Cotton comes in a huge number of colors and patterns and, and it can be tempting to use, but it's not soft. And so when I'm making a stuffed animal, I really want something that I can cuddle and so I don't choose caught. And also because it has no stretch, especially if you're making circles, you can kinda get kinda lumps and bumps in your stuffed animal. And I don't like that look either. However, if you have some cotton you want to use and you want to try and put that into process. You can't just be aware of the downside, which is it won't be as soft and cuddly when you're dumb. Aside from fabric, you're going to need a few other materials to make your stuffed animal. With. The first one is staffing. Of course, you're gonna want to stuff your animal to make it stick for cuddly. And this is just polyester stuffing. You can find it at many places that sell fabric. And even though that bag might seem huge that you're buying, you actually use a lot more stuffing than you think to stuff even a small stuffed animal. So you're definitely going to need some of that. Another material you might want is some embroidery floss, if you're drawing, has small details such as a smile that's drawn with a marker or pencil, or even like little eyes or nose or any little details that are just kind of an outline. You don't want to cut out a huge, big chunky might want to embroider those pieces instead. And in that case, embroidery floss is going to come in handy as well as your embroidery skills. My drawing doesn't have any of those small ones. I won't be doing any embroidery for this project. What I will be doing for this product bot is using wire. This is just Chanel stems, sometimes called pipe cleaners. And if you look at my drawing, you'll see that I've got these long skinny arms which I am going to cut out a fabric and stuff. But I thought it'd be fun to put a wire in there as well to make them slightly bendy and hopefully help them to keep their shape a little better as well. You may not need these for your project, but I'm going to use them in mind. Of course, you're gonna need your sewing machine. You're going to need thread. You're going to need your hand sewing needles and a good pair of scissors. Those would be helpful to you as well. And for staffing, I like to have a chopstick that helps me too. You get slow stepping into small corners. So now it's time to gather your materials, make some decisions about which fabrics you want to use, what colors you need, how much of each fabric you need, and how do you know? Well, take a look at your drawing. So in this class I'm actually going to make a stuffed animal that's the same size as my drawing. And so it's really easy for me to tell how much of each fabric I need. I'm really just going to use some fabric scraps. If you wanted to make your setInterval a lot bigger, well, you would just need more fabric and it's totally possible. You just have to draw the pieces bigger in order for you to do that. So go out, get the fabric you need. And then in our next lesson, we'll start to figure out how to take this drawing and turn it into a sewing pattern that we can cut out and then get ready to sew or stuffed animal. See you in a bit.
4. Creating Pattern Pieces: Welcome back to bringing your drawing to life. In this lesson, we're gonna take our drawing and turn it into a sewing patterns so we can cut out our fabric. There are three ways to do this. The first way, the easiest way is to take your drawing to a photocopier and photocopy it a bunch of times. I copied my snowman drawing four times over so that I have lots to work with and cutting out the pieces. If you don't have access to a photocopier. And another thing you can do is to take your drying up to a window, put it against the window, another piece of paper or top and trace out all of the individual pieces. This takes a bit longer, but it's still easy to do and it still preserves the shape that the child has created. The third option is to take the drawing and hand-drawn each piece by itself. That doesn't process. I use, I'm trying to take a drawing that's this size and turning it into a stuffy that's this size. I actually take each piece and draw it out individually on paper and then cut them out. It's a little more time consuming though. And in this class we're in a crisis Steffi, that's the exact size of the stuff in the drawing. So I recommend that you do either photocopying or tracing using a window as a light source really helps you to see things more clearly as you're tracing them out. Once you have a few copies of your drawing, or if you tracings of your drawing, them are ready to cut out the pieces. All right, now that I have my drawing copied, I'm ready to start creating the pattern pieces. The first thing we're going to do is cut out all these little bits that are gonna go right on top. These are super easy because all I'm gonna do is cut them out just as they are. So grab your scissors and cut right in, right around those pieces. Try and turn them as close as you can, the edge, because these pieces, you're going to cut out exactly as they are drawn in the drawing. So if you have pieces on the top of your drawing, That's the first thing we're going to cut out from your very first copy. So go ahead and do that, and then we'll come back and do the next step. Okay? And as you can see, I've got all my little pieces cut out here. And now I'm ready to work on the main body pieces. For the main body pieces as I'm calling them out, I want to think about creating my seam allowance that mutated to make all the pieces bigger. So that when I so it's finished, it, it's going to be this exact size. So for this step, you're gonna wanna pencil and a ruler. I'm going to use my ruler to make a quarter inch seam allowance around all these shapes. So I just use my ruler. And I mark that seam allowance. Had a quarter of an inch all the way around the shape. I'm not going to worry about the fact that I'm drawing up here because that's why I made so many copies. And you see this little line here, I'm just going to keep the shape going around this way. I try and preserve the exact shape. But the child is drawn as they do this. Red or the feet. I'm gonna use a different drawing to cut those feet out. A different copy of the drawing, cut those vidoes. I'm not going to worry about them in this one. Here we go. And so what I'm actually gonna do when I cut it out, I'm going to cut it out along this dotted line, instead of cutting it out on the solid line. So I'm gonna do the same thing. I can't use this piece because I went right over it. I can do the same thing with this hair piece because I'm going to need that piece as well and they're miserly, get as much to the drawing as I can. So look at your drawing and do as many as you can't go around a quarter inch, make those shapes bigger. So I can do here and I do the hair, and actually I think that I do the arms as well because I can definitely fit them in. Here's the thing with the arms. These are super, super skinny. Now I could make them that skinny. I could make these out of wool. Wool felt that we talked about and sew them right around that wire that I was talking about in the materials and keep them super skinny. But I think I really want them to be soft. And so because I leave a little more room to stuff and to make them a teeny bit wider than they are in the dry. But you will still look like super skinny arms when I'm all done. But I just want a quarter inch on each side that would give me no room to stuff. There's no way that I could put some stuff in there. So when I do these arms, I'm actually going to make them a little bit bigger. So I might do three-eighths of an inch. Or I could even put this here. Yeah, They're gonna do three-eighths of an inch. So you see a lot of it when you're creating a drawing is kinda make some decisions at the time. Try and decide what's the best way to bring this to y. So I'm actually going to make these bigger than they actually are when I cut them out. But once you have all this sewn in and you turn it around, really, they're going to still be super space. If you only small pieces, you might want to do this same. You might want to make them a little bit bigger so that you have room to stuff them in the end. Okay, So go ahead, do the same thing with your drawing. A quarter inch around ALL as many of the main pieces as you can on that cut out. And then cut those pieces out and we'll meet back here. Okay, Now you can see that I have some of my pieces cut out. I have the hat, I have the bottom, and I have the arms. Notice why did the arms they went all the way around with my seam allowance. So make sure you did the same thing. Don't stop on the edge because you need that little bit to tuck in when you are creating and sewing your stuffed animal. So now I'm going to look for what am I still missing? Well, I need this middle piece and this head piece sinusoid do the same process on these two others. And I take my ruler and I do the quarter inch all around this one here. The quarter-inch all around this one here, cut them out and then I'll have all my pieces. So make sure you do the same thing with your drawing. Make sure you do quarter-inch around all the remaining pieces, get them all cut out. And then we'll be ready in the next lesson to cut out our fabric. See you there.
5. Cut the Fabric: All right, It is time to start cutting into our fabric. Are you getting excited about bringing your creature to life? For this lesson, you need to have your pattern pieces that you just cut out. You're going to want the fabric that you've picked out for creating your creature and all the colors and sizes that you need. You're also need a good pair of sharp scissors in order to cut the fabric. And you might also find it helpful to have pins or a fabric marker to keep the pattern pieces in place as you're cutting them out. So grab those things and let's get started. Okay, So I'm going to start by cutting out, by cutting out these main body pieces of the snowman. And I'm going to cut them out in this white fabric. So I have a fuzzy side down. So I'm gonna work on this flat piece because it's much easier to work with. And the fuzzy side. One thing to keep in mind is like cutting out my pieces. Actually need two of each of these main body pieces, one for the front and one for the back. And I want them to be mirror images. So I'm gonna cut them once this way and willing to flip it over and cut it once on the other side. So I might do the same thing with all three of these pieces. Cutting it First one way, then flipping it over and cutting on the other side. Now with these bigger pieces, I just use pins, Cy and a pan. This on here, here. And here. So hold onto the fabric so that it doesn't slide as I try and cut it. Once I've got it pin down. I'm going to choose carefully as I can to keep that shape. Cut around it. To be careful when you're cutting the fleece because it does stretch. So make sure that it's just lying nice and flat as you cut it out. So there's one debt and just so I don't forget, once I'm done, I can immediately flip that over. Painted over here to remind myself that I'm going to cut both sides. So Batson v might my B bodies. So go ahead if you've got a main body pieces here, I want to do the same thing, cut them once one way and once the other way. So to do that with these three, and then we'll come back here to look at the other pieces. As you can see, I've cut out my three main body pieces. And I check just to be sure that I've got a front and a back for both. Nothing worse than starting your project and finding out you need to recode a piece that you cut in correctly. Then to keep everything in order, like take the pattern pieces and I just stick them on top. And then I set them to the side. Okay, so now I'm going to go back and look at my drawing and see what else I need to cut a front and a back. So looking at this drawing, I have arms need a front and a back for I have legs and you'd front and back four and I have the hair then I need a front and a back for. So I'm gonna do this same process with each one. And I take out the fabric and lay it down, fuzzy slide down. And I'm going to cut out the shape. I'm going to turn them over and cut out a mirror image of the shape. A little trick that I sometimes use and I'm cutting out fabric and trying to get a mirror image is once I cut out one like I have here, I just turn the actual piece over. And especially this Maxwell both felt or fleece because it's going to stick to itself. And I use this as a pattern and that way I get two pieces that are exactly the same. You just be careful when you do this though, because when you cut it, you wanna make sure that you're only cutting the bottom piece and not cutting through the top piece as you go. So just now a little trick for you as you're going through. If you have tiny pieces like my little feet here that you know, you can't pin on, then this is where your fabric marker comes in handy. And I even used to sharp you and I don't have a fabric marker handy. So I cut these at a yellow. You really just need all scrap here. So take your piece late again, not in the fuzzy side. Fleece doesn't like Margaret to begin with, and especially not in the fuzzier side. And just use your marker to trace the shape on the fleece. And once you've traced around it, cut it out and don't forget, turn it around the other way before you do your second one. Okay, So you want to cut out all the other pieces for your project that requires a front and a back. And then we'll meet back here to talk about what to do about all these embellishments on the front of the creature itself. Okay, So now you should have a nice pile, a pattern pieces all cut out front and back THE ready to go. So I'm gonna stick those aside for now. And now we're going to concentrate in all these super tiny little pieces, the pieces on my picture that are on the front of the finished stuffy. So for the ys, I only need to cut out one of each scientists. So this right onto the fabric, right onto the front. And I don't need to repeat it on the back because of course the smile, the nose, the eyes are only on the front of a snowman, not on the back. So this time what we're going to cut out one. However, these pieces are super tiny. This is the time when if I had some wool felt and the right colors I might use Woolf felt just because it's easier to get an accurate cut than it is on the fleece. Here. Let me just again use some scraps here. I have some red fleece and I'm going to use for the nose. So once again, I could trace this out if I had a good fabric marker, but that's not going to work on the black. So honestly what I do here is I just take the pieces and I lay them online. And I do the very best I can going super slow. To keep the integrity of that shape. Just take your time. Go really, really slow and cut around. Here's one part of the smile done. So you're gonna do that with all your pieces in. Your pieces might be bigger than mine, in which case it'll be much easier to cut out. You can even use your pins to pin on the pattern piece if it's bigger, but mine are super tiny. So that's the last step for cutting out. So you're going to take all of those top embellishments, that one's going to be sewn right on top. Path them out. And then we'll be ready to sew. Can't wait to get started in sewing our creature.
6. Sewing Surface Embellishments: Are you ready to start selling? In this lesson we're going to hand so all of the features onto our stuffed animal for relief, that's going to be all of these features here, the eyes, the nose, the mouth, and the buttons. So to get started, you need to have your pattern pieces. You're also going to need some thread in the colors that you need for your creature. For me, that's black for the mouth, red for the nose, and blue for the eyes and buttons. And you're also going to want to have a hand sewing needle so that you can start sewing those pieces on. So grabbing materials and we'll get started. Okay, Let's start sewing. So I start with this bottom piece here, which is this piece here. And I want to make sure I grew up the top, because remember that we are showing these buttons onto the top layer. So I'm gonna put the bottom aside for now and just focus on the top. Then I need to find the shape that looks like this one, which is this guy right here. And I want to make sure I have it in the same spot that she has a drawing. So I've snipped, check that over a couple of times with my pattern piece to make sure I've got it in the right spot. I kinda feel that through and see if it's in the right spot. I think it is. So once I have it in the right spot, I'm ready to sew. And I already have my needle threaded and I've already tied a knot onto the end. So now being careful to leave that in the right spot, I'm going to bring my needle up from the bottom eighth of an inch along the edge and then go back down. And so I'm sewing just along the very edge. I want to stay somewhat close if I go too far away, like way over here and I'll leave a big hole in here, be easy for it to fall off. So I'm going to stay relatively close to my last stitch. So I go up and then back down. So I'm going to continue to do that all the way around until the whole piece is sewn down tight. Then at time naught on the back. Remember you won't see these knots because those will be inside your stuffy. And I'm ready to move on to the next one. So I do the same with all of the pieces. So my next one would be the middle. The back aside. Find the ray pieces. Take this and check again to make sure I have them in the right spot. Okay. And I just kinda maneuver them in the field and see if it's in the right spot, so it needs to be lower. And once I have them in the right spot, then I'm ready to sew them down just like I did this one. Then let me do the same thing for the face. So it's again, making sure I've got the right-side up a tip here. So do one piece at a time. If I've placed all of these on here at once and then try to sew them as I was trying to sell one the rest summer to fall off. So even though I'm showing you them all at once, even this one, I'm going to save this on first, then I become back and place this one and so that one on as well. All right, so then the same thing for the front. I'm going to place them in the right spots, so around each one. And then I'll be ready to so my pieces together. So you need to do the same thing. So you're going to sew all around all of your extra pieces until you have all of them. So NADH, and then we'll meet back here. Okay, So now you should have all of your embellishments, someone onto the front of your front pieces. Just like I have here. Now, if you do have any of those fine lines we talked about earlier, like in this drawing or in this one. This is the time when you might want to take out your embroidery floss and embroider those details on. I don't have any other features to add my creatures and now I'm ready to so the main body, so grab your pieces. In our next lesson, we will, so the main body together. See you there.
7. Sewing the Main Body: All right, Let's get sewing. So in this step we wanted to do is take several body pieces that end up with one main body piece. Now if your drawing is different than mine, if you're drawing only has one main body piece, then you can skip this lesson and move on to the next one. Some of the examples of those might be like this drawing or like this one. What we need to have is one main body piece that we're going to sew together. And then we'll be ready to add things like arms and legs. So if your drawing is like mine and has several pieces, you just sew together, That's what we're gonna do in this step. So I actually have 1234 pieces that I want to sew together as part of my main body. And these will be extras that will so on after. So I'm looking at how I'm gonna do this. I'm looking at my drawing and remember we talked about this way at the beginning about how these are really narrow, but I knew I can make them bigger. This is how I'm gonna do it. I'm actually going to, so this right on top of this one, we're going to so right here using my son shaking hands, digit 2 if I wanted to, but I'm going to so this right here to make this a wider piece, it also preserves the line to the child's drawn here. So that line is going to be like this line here. Then I'm going to do the same thing between the middle of the body and the head. So the same thing you can see how even on the child's drawing it's our lapped and overlap my seam allowance like this. So my next step is going to, so this bit here using white thread. Then I'm gonna so this bit here using white thread. And then I want to attach the hair and I'm just gonna do the same thing, interrelate right over top using that quarter inch seam allowance. And I'm going to sew right along the edge of the hair. Once I've done that in the front, I need to do this same thing on the back. So again, making sure I've got the right pieces in the right order. And this is for my pattern comes in handy again because of course I don't have to be backwards. This one. And let's say I can do to, to make sure I've got it right. It's laying it right on top. Here we go. The other one. And then flipping it back over so that they are mirror images of each other. Because in the end, I'm going to sew it together in a flip this on top of that. And so it, so now I'm ready to, so I'm going to so again, right here, right here. Oh, you're out here. And then the same thing on this side. Because I just noticed I got that backwards and make sure that one's on top. Make sure this one's on top. And I'm going to go, so here, here, here, it's really important when you do the back to make sure it's exactly the same as this. So before I sew it and check again, just to be sure it's an exactly the same space. And then I'm going to pin that there so that it doesn't move on me. And then I'll do the same thing when I do the head and when I do the hair. So do the same thing with yours. Decide how you're going to arrange your pieces and start sewing them together with the snowman, I'm showing you one way that you can so your pieces together for the main body, but you might have a slightly different arrangement of mine and you might want to use a different way. So if you look at this drawing and this drawing, there is a pattern right here. And so this is what I'm going to use that plan a lot. So if you're using a flat or another fabric, that phrase, you definitely can't use the sewing strategy, but you So on top of the other, or this will all fray and all eventually fall apart. Or even if I wasn't using phenol out, I've got a nice big area here. And so rather than putting one on top of the other like a day with my snowman, I'm actually going to so these right sides together, if your mother was selling at all, this is the way we so most items. So I'm gonna put those right side together. I'm going to start with a quarter inch seam allowance here. And then that will become my body peace. And those raw edges will be tucked on the inside. So if you have a similar piece or if you're using a fabric, that phrase, you're going to want to use that method first sewing instead. So either way, whichever way works best for your drawing. So you could either put them on top, like I did with my snowman or right sides together. So and then you'll have your PC or them. Of course you can do the same thing with the back so that you have two pieces that are mirror images of each other. And once you have the front and the back zone, we'll meet back here. Okay, so now I have two pieces that are mirror images of each other and that creates the entire body. So there's the front and there's the back. And you'll see that I can lay this on top of the front. And it's going to be a perfect fit for slowing together. In our next lesson, we're gonna so all of the outside pieces, arms, legs, wings, anything else that you have in your drawing that are going to be separate pieces that we're gonna so into you, the main body. So grab those pieces and I'll see you there.
8. Sewing it Together: Welcome back. In this lesson, we are going to attach our arms and legs and so our stuffed animal together. So you're going to eat all of your pieces. Some panned, a chopstick could be helpful in your knee, a little bit of your stuffing. All right, so once you have all your things gathered, we are going to lightly staff these arms and legs before we put them into our stuffed animal. So I'm going to start with my feet. I'm just in the gravel stuffing. And I can use the chopstick to help me to get it into that little space. Like so, be careful you don't overstep it. It'll be really hard to so especially on the part you're going to sew over. So I wanna stuff the bottom, but not stuff the top. These little tools can be helpful for stuffing as well. This is a medical tool, but it works great for stuffing small pieces. I was able to find a pair on eBay and you might as well. So to use those, I can describe the stuffing and that allows me to stick it right inside. But a chopstick works fairly well too. Okay, so I have those lightly stuffed. Now if you remember from the very beginning, I said I was going to stuff my little narrow arms with some wire because really they're too small to get stuffing in. I might be able to get a little tiny bit into the top. Like so. Maybe a little bit. If you have larger pieces, you're probably going to find this stuffing process to be much easier. Just to again, make sure you don't over stuff and leave room right here where we're going to sew it together. It gets to the top here. And so if my wire, I'm just going to stick, they're arrayed in. And you'll see how that's going to make it nice and bending. And then cut off the bottom. Healing. Do the same. This term. Stick to the top. Cut it off here. So once those are staffed and I'm ready to lay out my pieces for solving. So notice how I'm using the drawing here again for placement. So this foot belongs here and if I think about it when it comes out, it's going to come out this way. So I wanna make sure I've got it facing the right way. It's gonna go there. Go right here. And then for my picture, I've got the right arm on the right side here. Like so and like so. So this arm goes right here and this term goes right there. So now what I'm gonna do before I do anything else before I, So the main body part is I'm going to paste these on. You could do that with hand stitching or you could do that on your sewing machine. But you wanna make sure that these are tacked down so they're not going to run away on you when you are trying to. So I'm just going to grab some thread to tie a knot in the end. I'm just going to base these on here a little bit off the edge. They tend to want to slide. And that's what we're trying to avoid. We want to make sure that, whoops, you want to make sure that when we saw it in there, that it's going to get caught with the sewing stitches and not slip away because they do tend to want to slide to the inside. And then you turn your creature out and you discover they're not actually attached. And that's kind of a, a frustrating thing to happen. So I've got one on there. This one goes this way. Here. Do the same thing. And again, you could do this on the sewing machine as well. I find it just as easy to tack it down by hand, silly. Okay, so you're gonna do the same thing. Make sure you tack down all of your edges. I'm going to take down my legs and then we'll meet back here. Okay. Do you have your arms and legs tacked down? Now it's time to sandwich this together. And so it, So as I'm doing that, I'm going to think about where I want to stuff that creature. And I usually pick that based on a really large area. And so this is really small all the way around. So I think I'm going to stop this guy from the head down and it'll leave an open area on the top of his head. So to remind myself to leave a spot open, actually, I think I'm going to leave this spot here. When I pin it. I use two pins. And that reminds me, Hey start here and hey, stop here. And that'll give me a space to add this stuffing. And then other than that, I'm going to pin all the way around to hold it together. Fleece this kinda thick. And so sometimes when you're sewing it, I'll slide and you'll find that you don't get both sides evenly. So pinning can help. I just take the pins out just before so over it. Nice lung machine does not like to sew over pins and I don't think most machines do. K, When you get to the arms and legs, you really want to make sure that they're tucked into, you're not going to so over them. Kinda fold them in the middle. And when I saw those sections and just move them out of the way. It's one of the reasons why we make bigger pieces like the hair part of the main body because there's no way I could tuck that in here. Careful as I go around to make sure that I've got edges meeting exactly. I don't miss anything as a so you've clips. Clips are nice to use for this as well. Know though I have clips usually prefer pinned for a project this small. Right there I go. So I'm going to start here at the double pins here. And I get a so with a quarter inch seam allowance all the way around here, turn the corner to here, turn the corner, guard and turn around. Turn around. And here turned to get this. Turn here around the corner, around the corner. And then I will be ready to turn it inside out. So go ahead and so your creature all the way around the outside again, be really careful where you have your arms and legs folded. Make sure you don't. So over the arms and legs just go really slow and kind of push it out of the way as you go. And then we'll meet back here to turn bend side. All right. Are you ready for the big reveal? Me too. As I started turn this out, I realized that even though I left this nice hole for stepping up here, this isn't really narrow spot. It didn't give me enough room to get my arms and legs that so I just made another hole here. Just use my seam Ripper. And it made a little hole. So if that happened to YouTube having trouble turning it out of a spot, if you've got some mirror pieces, just open another spot, It's not a big deal or to so all those up when we're done. And then you're just kinda turn it inside out. I'm coming through here. Here's our other arm coming through here. It's going to help us turn it. This is where your chops that can come in handy again as well to help push things through a metal body. I just need to get this k. Here. Here is a little bit of maneuvering. Sure. Poke out any areas that need to be poked out. Acquiring their arms up and we're ready for stuffing. So take your animal, grab your stuffing. And I'll see you in the next lesson for stopping.
9. Stuffing: Okay, Are you ready to start? This is one of the most important parts in the process, are really good stuffing job gives me a nice finished product. Whereas if we rushing go too fast, we can get really lumpy stuffing, which is not what we want. So I'm going to grab some staffing. Once again, you might find it helpful to have a chopstick to help you push. If you've got tools. And since I have two holes, I'm actually going to use both of them. So the keyword stuffing is if you scrunch it up and push it too hard, it kinda balls up so you want to keep it nice and loose stuff. Since I have two holes the middle first, I was just going from the top. I want to stop stuff from bottom to top. And I'm going to meet in the middle here since I have the two stuffing holes. How heard you stuff him is totally up to you. Depends what you want. As a stuffy I like to stuff it really for me, the definition of the shape I'm looking for. As I said before, you'd be surprised how much stuffing, even a little stuffy like this was actually going to use. If I like him. Kinda stuffed full, which is what I'm going for here. You're going to be especially careful about anywhere where there's these joints here, makes sure that that's well stepped. Otherwise they'll get really floppy. And we don't want a floppy stuffy. I'm going to go from the top. And I'm just gonna keep stuffing till I'm happy with the way it looks. So grab your staffing, grab your stuffed animal and get stuffing. And once you're all stuffed up, I'll be back here. All right. So myself, the animals all stuffed. And hopefully yours is two. And we can see that it's taking shape and looking awful lot like the original drawing. So what we need to do now is just finish it up by sewing up the edges. So grab your needle and thread. And we will finish up in the next lesson.
10. Finishing: Okay, Are you ready for the last step? So all I need to do now is so up the holes we use for stuffing, I have to eat me. I only have one. And actually, before I do that, I can see I could use a little more stuff going on there. Hello piece and make sure it's stuffed out nicely. Then you're just going to sew up the edge though I like to start over here or this sewing finished to get that quarter inch seam when you put in your needle stuff, the stuffing Dan can think of that quarter inch theme. Pick up a little. And the other side, do the same thing. Pick up some from this side, and some from the other side. Syria, do that all the way around until your whole is finished. And then tie a knot in your thread. And then I like to take the not back down to this team, pull it tight. And then I'm gonna have to finish my other hole. If you only have one hole, once you do that, you are finished. So NSSO this up and I'll show you how I do that, not all right. I've got my edge all sewn up. Now there's lots of ways to make it not. This is the way I've always done it. So I just pick up tiny bit of fabric right on the inside and pull just a little loop. And I go through that loop, through and pull this tight. So now I've just got one more loop again. Make a small loop and do that one more time through the loop and pull tight so that tie voice may not and others lots of different ways. But then a tuck it in. I just put my needle right into that see push it quite far and Katarina come up and another scene. Here we go, pool at Tate and that should help hide the not in the seam there. Then this cut here. And there we go. So there's my one whole silence on up myself to have. So this one up you might have a second one to soap to Amy just had one. Well, so this app, and then we'll meet in the next lesson where we'll celebrate your success.
11. Celebrate: You've reached the end of the course. That means you should have a finished stuffed animal based on a children's drawing. I hope you, if there are a few small imperfections are mistakes in your work that you are remembering that this is all part of the learning process. You're really proud of the work that you've done. And I hope that the child you created the stuffed animal for appreciates the time and effort you put into acknowledging their artwork. Please post a picture of your finished product on your project page along with the original drawing too, so that I can see the work that you did and so can your classmates and we can all celebrate your success. I want to thank you for joining me in this class. It's been really fun to share this process with you and I hope you go out and make many more stuffed animals happy creating.
 Andrea Sabean, In love with all things crafty!