Transcripts
1. Intro: [MUSIC] Hi, I'm Luciana. I'm a professional designer, an architect, and a creator. I love designing my own
fabrics and then watching them come to life in
all my sewing projects. I love to teach
everything I know, so we can all learn and
get inspired by it all. Join me today in design
for beginners class, where we'll be sewing these
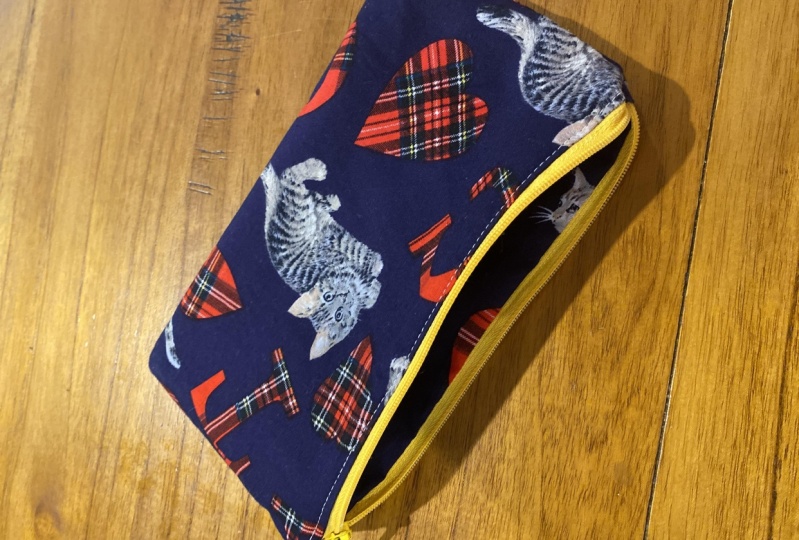
amazing zipper pouches. [MUSIC] We always start by learning all
the basics on how to sew a standard zipper pouch. I will explain in
detail how to attach the zipper including the
pull dots and the tag, so we have a perfect
finish for our pouch. I also uploaded all the
different free patterns, so it's easy for you, you can just only print them
and use it as a template. You're going to love making
all your zipper pouches. After you learn all the basics, you want to keep
making many more. That's why I decided to make different options and also
include them in this class. After you learn how to
do your standard one, it's super practical as well, you also will have the
different patterns to create these other designs and shapes. I mentioned before that I love
designing my own fabrics, but I also own my own
business in a stamp and scrapbook company
called Motion Crafts. My products heading feature in different major craft stores
throughout the US and I think different
shopping networks like HSN and Creative
Craft in England. It's been a very creative
and fun journey. I'm also a school flower
designer and one of my designs got selected to be in the upcoming school
flower packaging. That's very exciting. I love being part of
the creative community, that's why Skill Shan
school flower are such great platforms
to learn and connect. For this class, I
collaborated with two of my favorite designers
from school flower. Heather Dutton from
Hang Tight and Selma Cardoso who have such beautiful prints
and creative approach. I chose their beautiful
fabrics and combinations, that I'm going to be
sharing with you in this class in the different
pouches and projects. If you like this class, make sure to check out my other course
here in Skillshare, how to sew a zipper tote bag. They go so great together and there is
so much fun to make. I'm very excited for this class. Let's get started. [MUSIC]
2. Today's Project: We will start by then all the basics on how to sew a standard zipper pouch. I will explain in detail
how to attach the zipper, including the pull
dabs and the tab so we have a perfect
finish flower our pouch. I also have loaded all the
different free patterns, so it's easy for you. You can just only print them
and use this as a template. We will start by having
all the different panels that we need to create
our zipper pouch. We're going to start by
cutting the outside panels, the inside that is the lining fabric we're
going to be using, and the task for our zipper. Then we'll prepare
the zipper with a matching tab for
a nice finish. I will explain why using the right interfacing for
your pouch it's important. We will sew together the lining, the zipper, and the outer panel that's going to be the
front of our zipper pouch. Then we'll topstitch the front of our zipper pouch
for a nice finish. Once we have that pattern ready, it's like we're going to
do the same this time, also starting with aligning. Now when we add the zipper is everything that we
have attached already, and then the other front
of our zipper pouch. Once we have install our zipper, we will sew the size together to close and finish
our zipper pouch. You're going to love making
all your zipper pouches, so after you learn
all the basics, you want to keep
making many more. That's why I decided to make different shapes and
different designs like the ones I'm
showing you right here. You can mix and match
different fabrics, and then you can use
it for pencil pouch, or for makeup, different
things like that, and they make also a great gift.
3. Using the Free Template and Cutting the Fabric: In this lesson,
we're going to use our templates to cut our panels. You can use the little
square at the top to make sure that your template is
printed at the right scale. When you're printing
your template, make sure that you're
printing 100 percent. Don't scale it up or down. The seam allowance is already
included in your template. You can find and download your templates under
project and resources. I always like to
press my fabric so we can start with a
nice and flat panel. One thing that I really
like about having a template is that you can
really see where to place it, and you can center or
see where the elements of your fabric will be in
the front of your panel. Now we're going to
do the same for the fabric that's for
the lining of our pouch. I'm actually doing
individual panels here because in the
center of my fabric, the pattern doesn't
repeat exactly. But you can go ahead and fold your fabric and then just
use the template once. I'm using a special panel that
I printed specifically for the tote bag that's why the pattern didn't
repeat in the center. In the next lesson, we're going to put our
interface into our panels.
4. Interfacing: In this lesson,
we're going to iron our interfacing to our panels. You're going to notice that
one of the sides is texture, with these little dots and this is the part
that has the glue. The interfacing that
I'm using here is a Fusible Midweight
931TD Pellon. Here you can see me that I'm steaming
the interfacing. I'm not actually
putting the iron down to prevent the
glue from sticking. Remember that the textured
side is the one with the glue and we're
going to face it down straight on our panel. Here you can see
the importance of the interfacing and how it
gives structure to our pouch. Now we're ready to
do the same with our lining and we're going to be using this same interfacing. I like to cut our interfacing
a little bit smaller than the fabric so it doesn't stick to anything else at the panel. Finally, we're going to repeat the same step with our
last lining panel. In the next lesson, we're going to be
sewing the zipper tabs.
5. Zipper Tabs: In this lesson, we're going
to be sewing the zipper tabs. I cut a two-inch square
template so it's easier for us to cut the
tabs for our zipper. Also, we can use it later
in our future projects. The zipper is one inch smaller than the
width of our panels, so we have half an inch on each side for our
seam allowance. To start one, I fold
our tabs in half so we can have a line in the
center that we can use as a reference to fold the
other sides of the tabs. This is my new mini iron, and I love it because
it's perfect for small little projects
like this one. Besides, it's too adorable
so I had to buy it. I'm alternating between tabs because it's too hot to handle, so it's better to do it
one at a time like that. I like to place the tab right below this top part
from the zipper, so it's easier when
we're sewing and we don't hit our
needle in the stopper. The zipper that
I'm using here has thicker teeth so that's why
we can't just sew over it. Remember to use your
zipper foot for this part. Now we're ready to attach our zipper to our purse.
6. Sewing the Zipper: In this lesson, we're going to sew our
zipper to the panels. We're going to start with our lining with a pre-designed app, then we're going to
place our zipper in the center to make sure we have room for our seam
allowance that's about half an inch on each side. Then make sure to flip your front panel with
the previous side down. Before clipping
everything in place, make sure everything is aligned and now
we're ready to sew. To start sewing, I
move to the side, the pull tab of my zipper and I start sewing
right below it. If you want to be precise, you can measure to make sure that you have the
right seam allowance. I actually use the width of my zipper foot as a reference. I like to start
sewing right below up my zipper because this
way is easier just to sew all the way down and then you
don't have to struggle by moving your zipper away while the needle is
all the way down. Now we go back and it's easy for us to move
the zipper down. We make sure that everything is aligned and we sew again, making sure to backstitch at the beginning and at the end. Here, I went back just at
the bottom part to make sure that everything
was in a straight line. Now that we have our panels connected to the zipper, I like to do a topstitch. I made this stitch a
little bit longer, so it shows as a decoration
in the front of our pouch. Now we're basically going to repeat the same steps. We're going to start
with our lining panel, then we're going
to add the zipper except this time is the whole
panel that we just sewn, making sure that
we again center it and leave room on the sides
for our seam allowance. Finally, we're going to place our front panel with
the previous side down. This time we're going to start sewing at the top because our zipper
pull is at the bottom. We're going to start sewing and stop right before
our zipper pull. Remember to backstitch right at the end to secure
everything in place. Now you can go ahead and move the
zipper to this side, make sure that
everything is aligned, and keep sewing
all the way down, making sure to backstitch at the beginning and at the end. I like topstitching with
my regular zipper foot. Since we're switching
our zipper foot for a regular one right now, you can actually skip the previous step and topstitch both panels
at the same time. Well, congratulations. You just installed your zipper. You can see how easy it is
by following all the steps. Now we're ready to
close our pouch.
7. Closing the Pouch: In this lesson, we're
going to close the pouch. We're going to start
by facing together the front panels and
the lining panels. One very important step is to remember to
open the zipper, so we have room to reach inside the pouch once we're ready
to turn it right side out. Then we're going to push
the zipper tab towards the lining like you can
see me doing right here, making sure that the
seams are matching. We're going to do the same thing
on the other side, but take your time and make sure that your
seams are at line. Then just clip or pin everything around
and then we're going to leave a gap right in the
middle of our lining panels. I like to put two clips
as a reference so I can remember where to leave
the gap when I'm sewing. I like to start sewing in the right
corner so I can sew all the way around without stopping. Also, I'm using the edge of my
foot presser as a guide for my seam allowance. For this part, we're
going to make sure to sew just on the side
of our pull tabs, making sure that we don't
actually sew over them. It's important to remember to backstitch right
here at the end. Then we leave the gap, we backstitch again
and we finish sewing. Once we've finished sewing
all the way around, it's easier if we press now the seam allowance
for the next step. We're going to cut all four
corners to reduce the bulk, making sure that we don't
cut any of the stitches. In the next segment, we're going to turn our
zipper pouch right side out.
8. Turning Pouch Right Side Out: In this lesson,
we're going to turn our pouch right side out. The pull tabs can be
a little bit bulky, so try to find something to help you pull them
all the way out. Pressing the seems earlier makes it
easier for us now to close the gap when
everything is nice and flat. We're almost done. The last thing we need to do is close this gap here
in the lining, so press one more time, so everything is nice and ready.
9. Finishing Your Pouch: This is the last step. Let's finish our pouch. [MUSIC] I'm using a very small
seam allowance so try to put your needle
very close to the edge, making sure that you're
catching both fabrics. [MUSIC] Congratulations on finishing
your first zipper pouch. [MUSIC] I love how everything looks and
having the detail of the pool tabs gives us
such a nice finish. Have fun combining
your fabrics and I can't wait to see your
finished projects. They're so practical, and pretty that I think you're going to start making many more. Now that you know how to install the zipper and finish
your pull tabs, you're ready for the next
lesson where we're going to do a different zipper
pouch that has a flat base and it
can stand by itself. [MUSIC] I also have another class
where I teach you how to sew a zipper tote bag that goes
great with this zipper pouch. If you use the same fabrics, or similar combinations, they really look like a set, and they're so fun to make. [MUSIC]
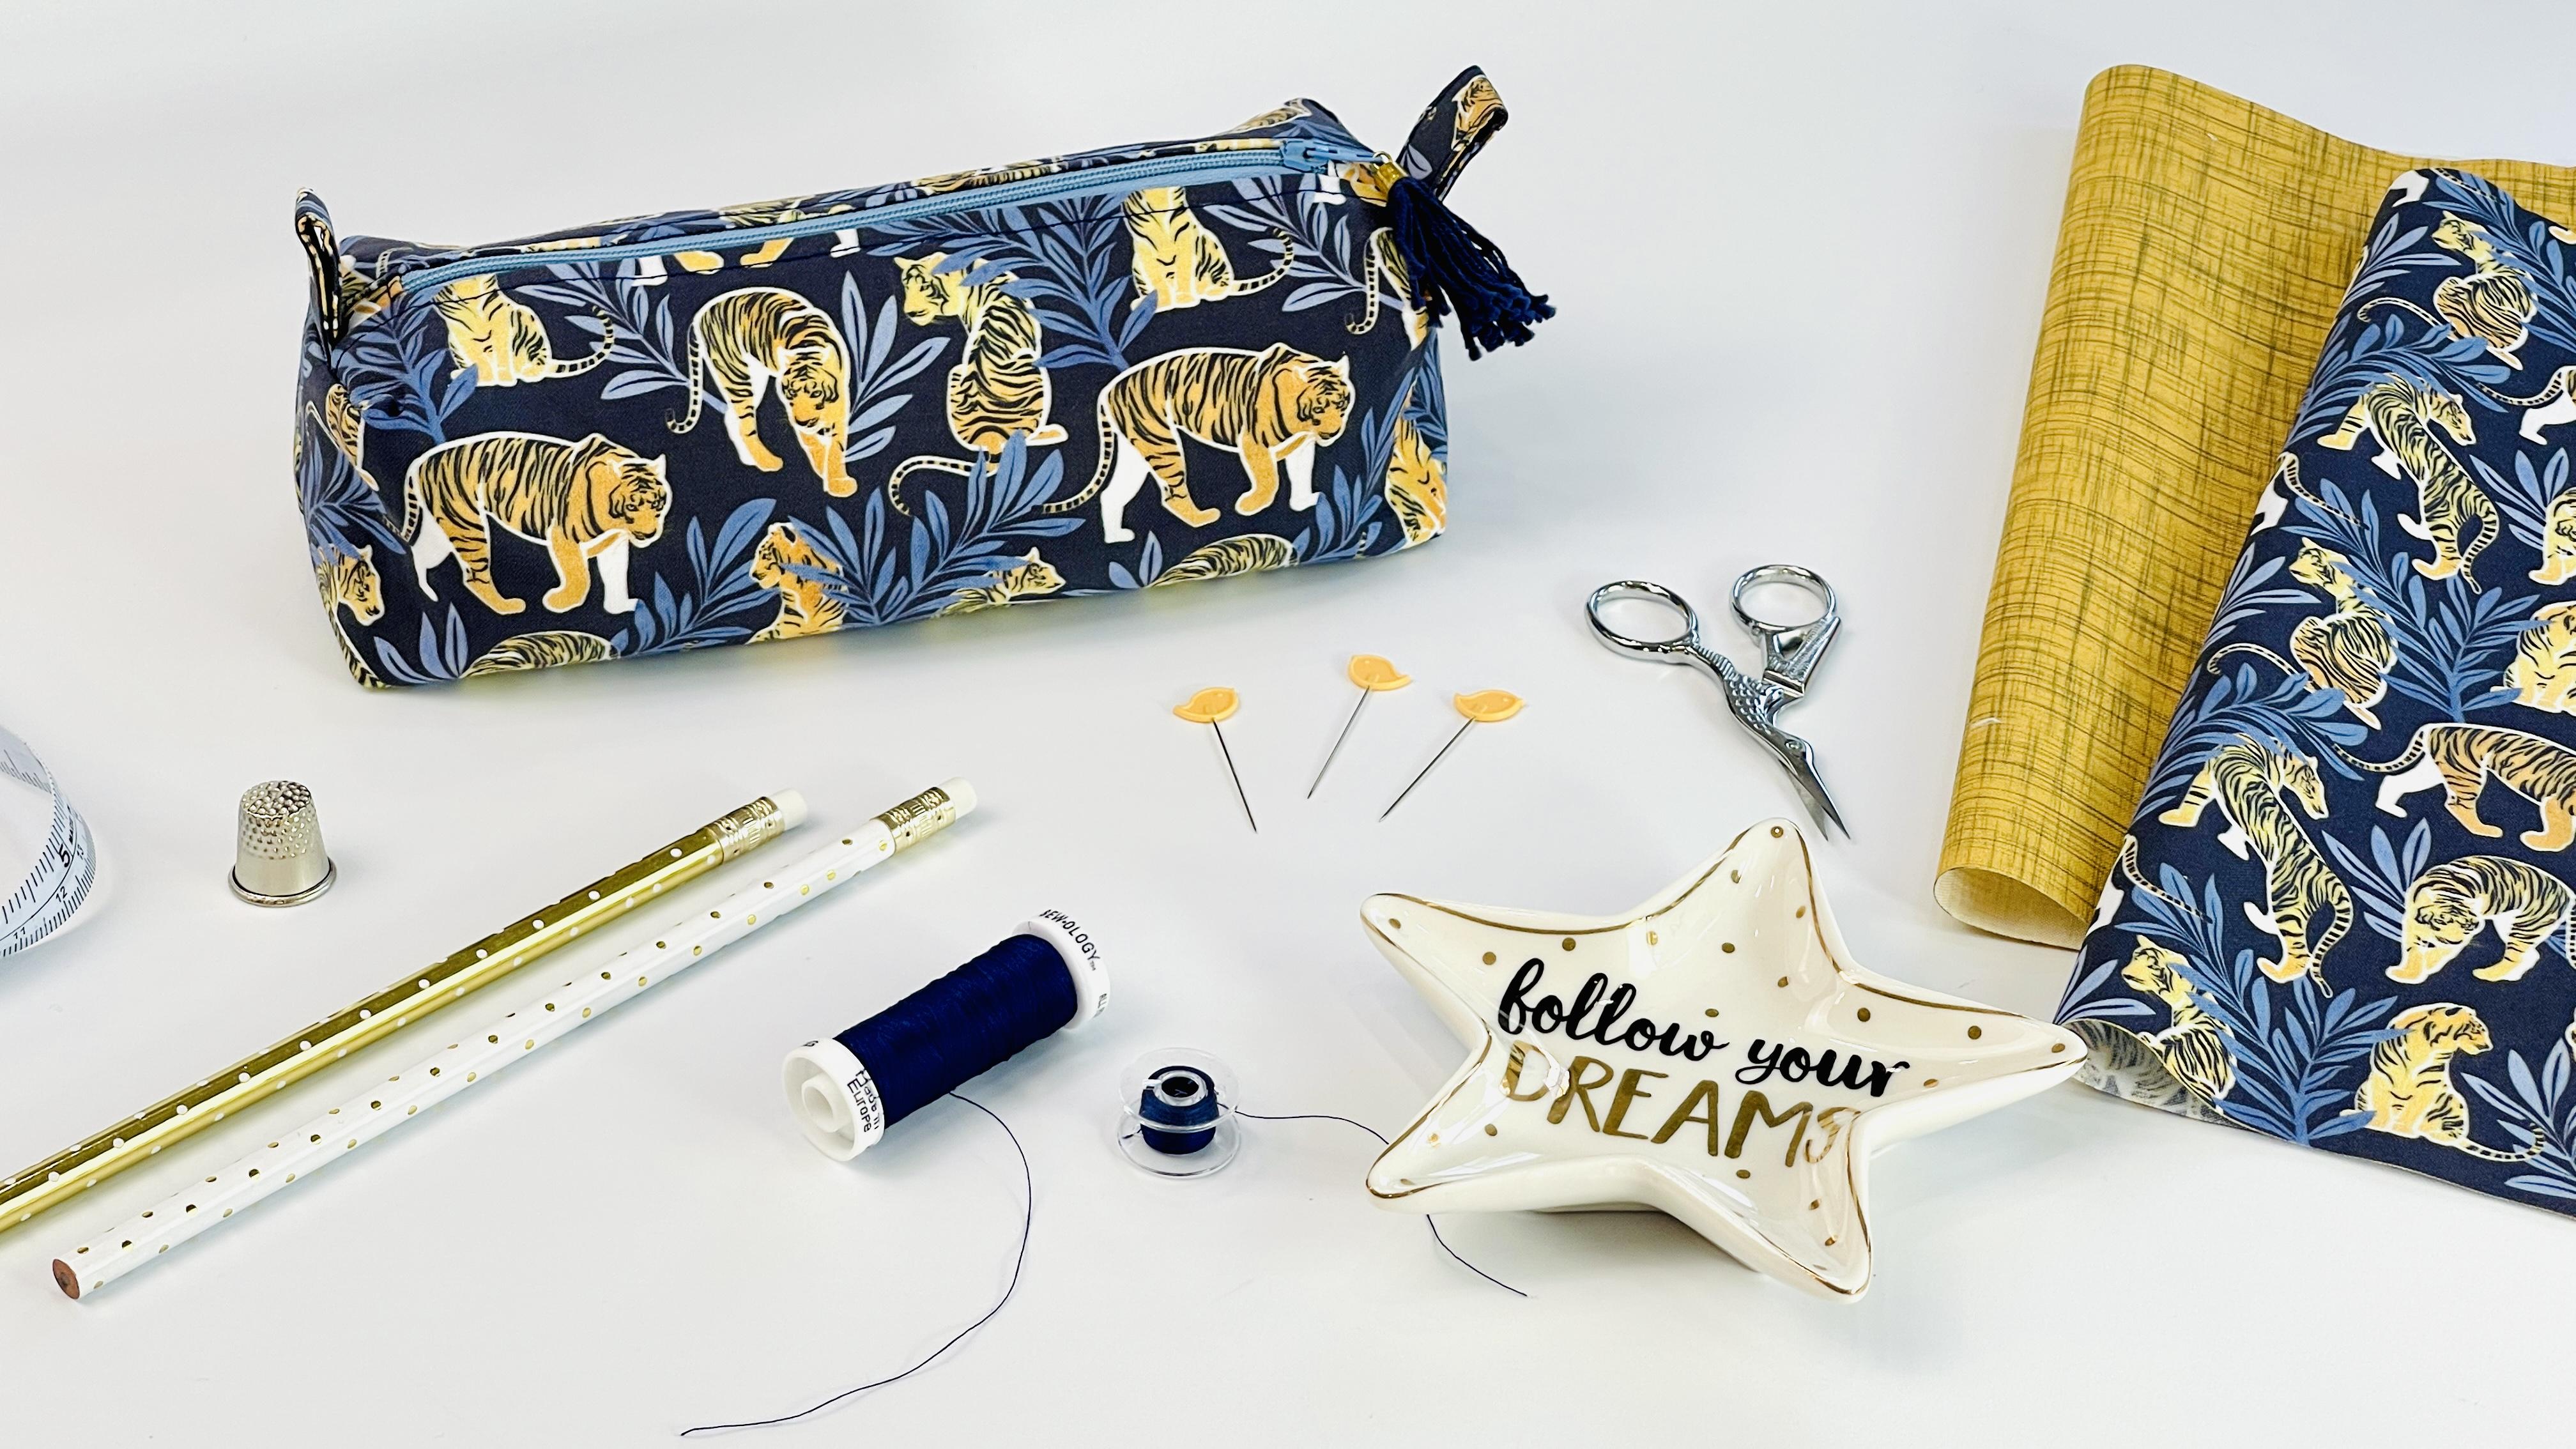
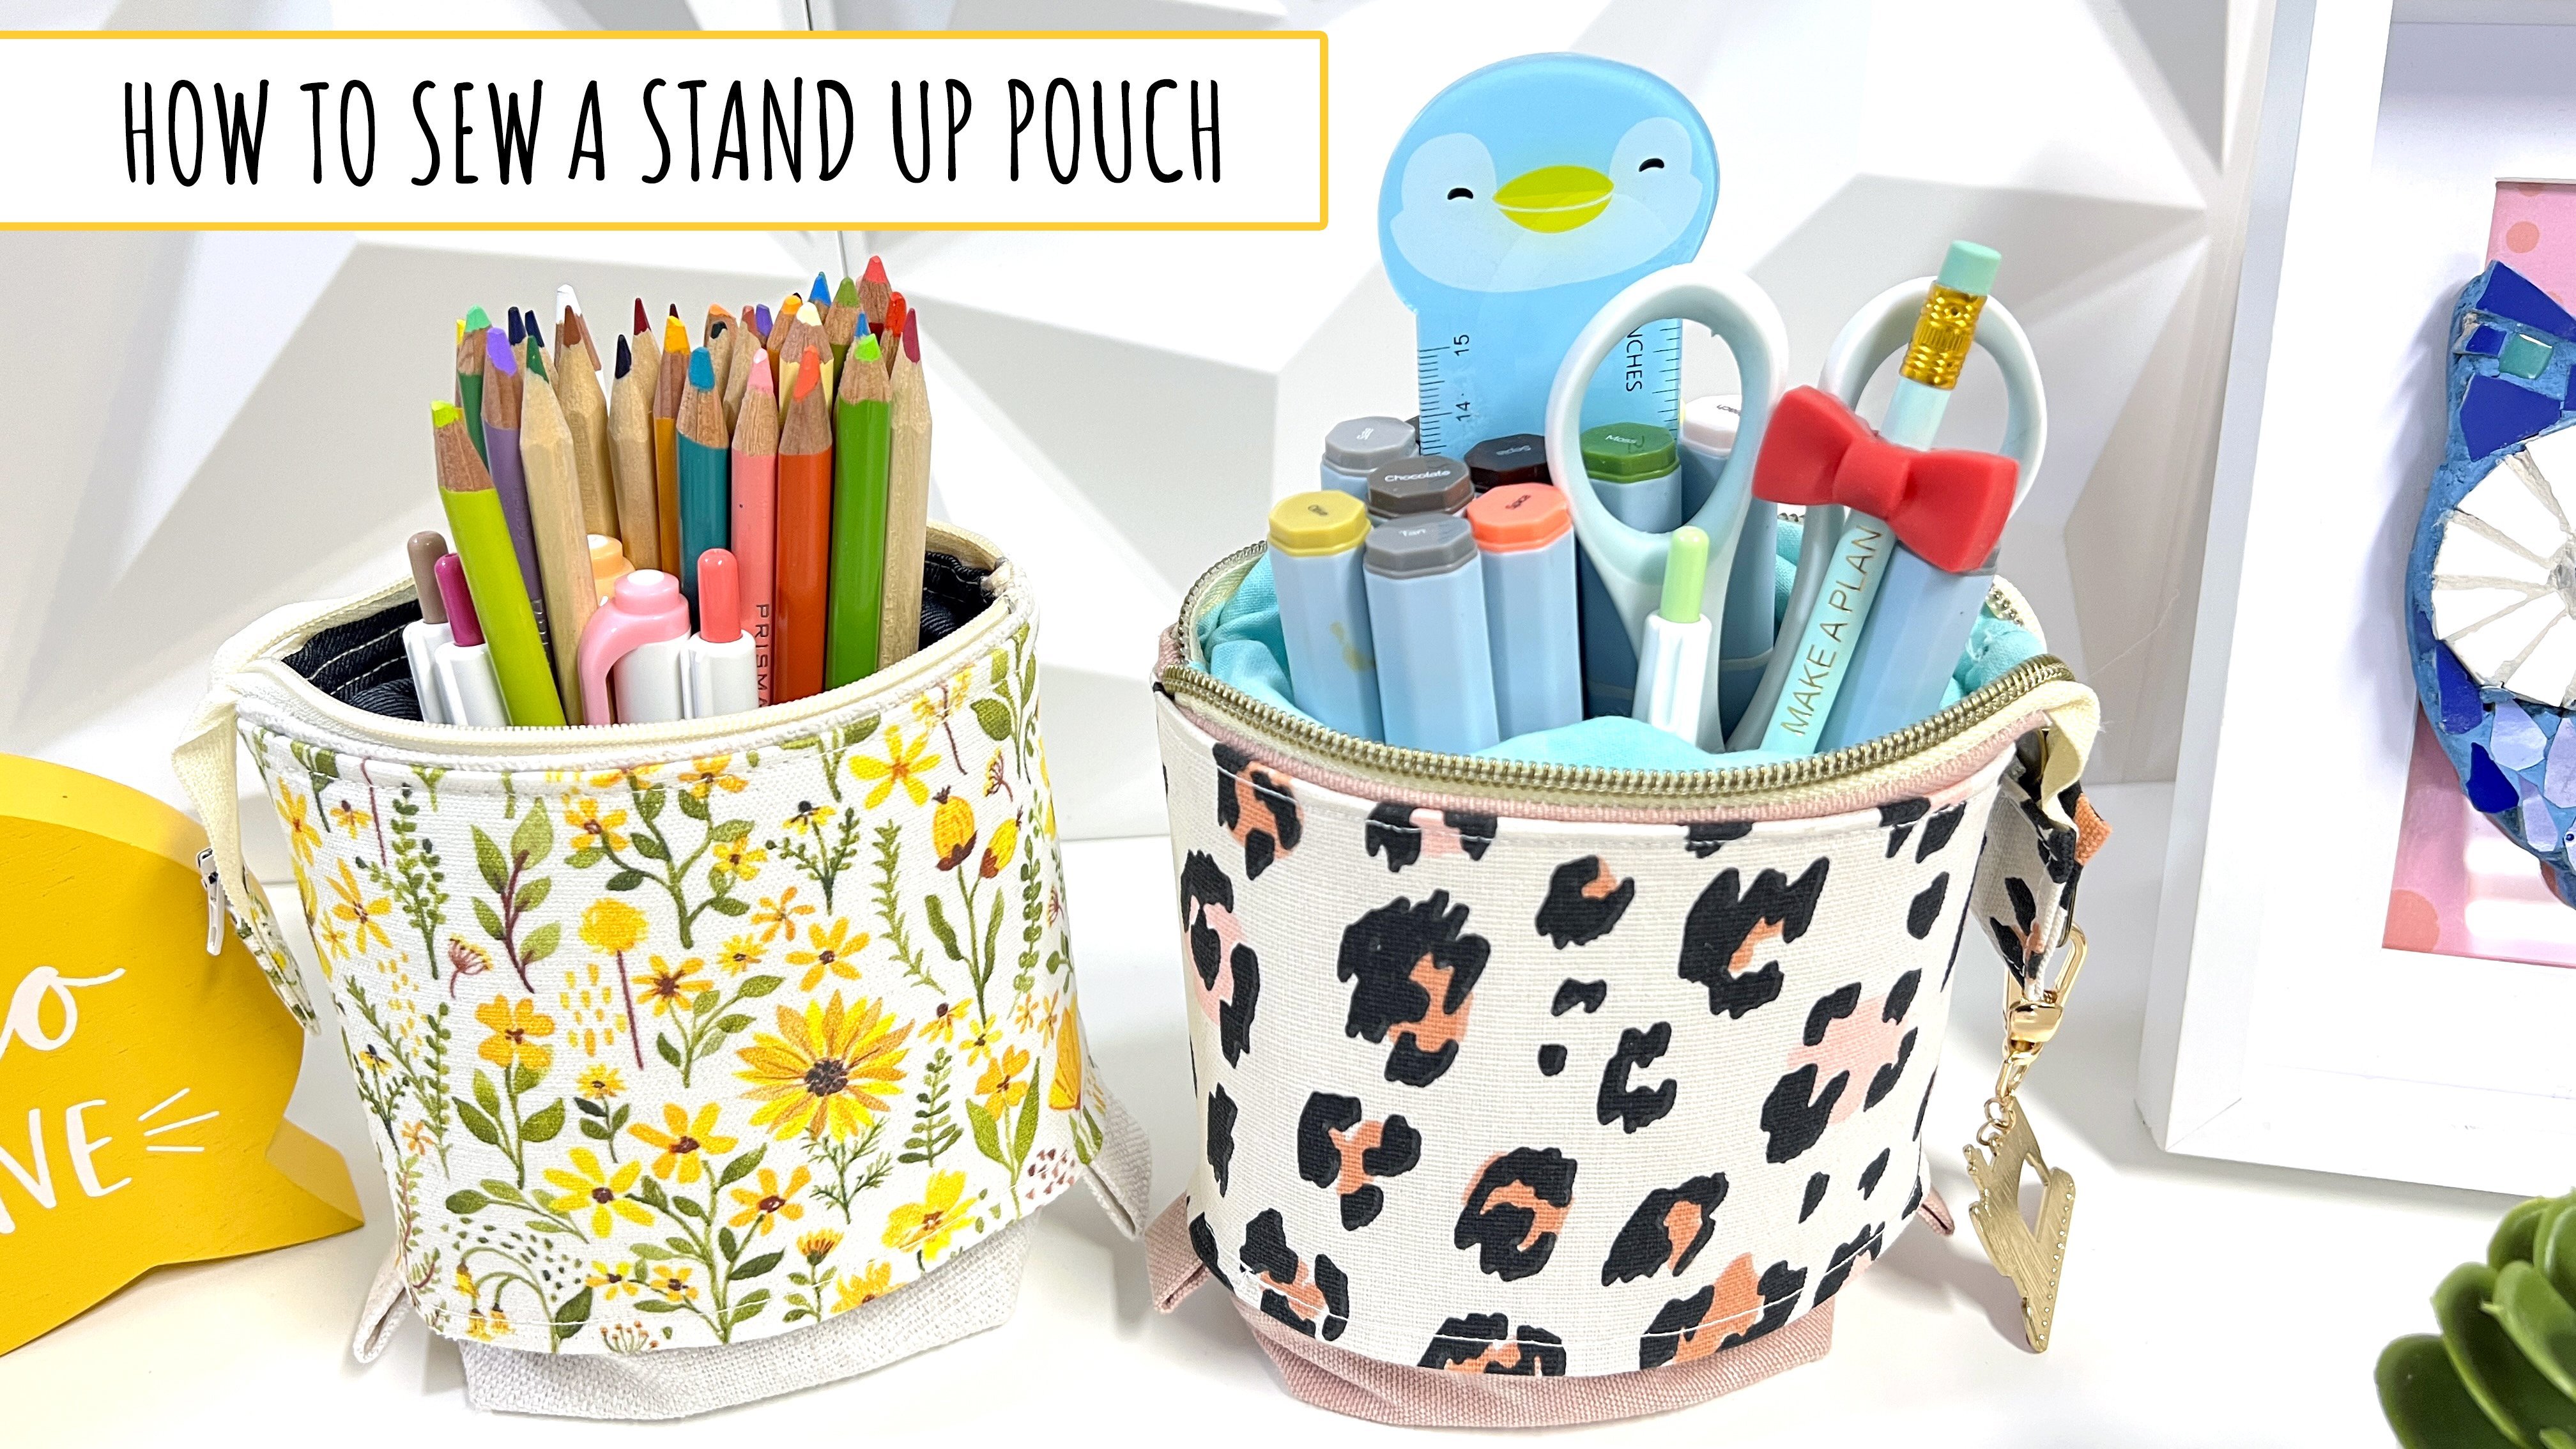
10. Intro Flat Bottom Zipper Pouch: In the next following segments, we're going to learn how to make these beautiful pouch
that has a flat bottom. I love it because it stands by itself and it's super
practical and roomy. These beautiful fabric
that I'm using is designed by Heather
Dutton from Hang Tight. She's one of my favorite
designers from Spoonflower. I love all the
pretty collections and fabrics that she has. In the next lesson, we're going to go
over the templates so we can start cutting our panels and start
sewing in our new pouch.
11. Flat Bottom Template 2 ways: [MUSIC] In this lesson, we're going to learn how
to use our templates for our flat bottom
zipper pouch. [MUSIC] I decided to create
two different options. The first one, the one that
I'm cutting right now, it's a little bit
easier because it's only one page and you place
it at the fold of the fabric. Also remember not to scale your file when
you're printing. I'm starting with
my front panel. That's 12 inches by 6 inches. Then we fold it
in half so we can place our template right
on the folded line. Then to cut the panel
for our lining, the interior of our pouch, we're going to repeat this step. You're going to
fold your fabric in half and use the template. For the second option, we're going to make a
straight line connecting the printed area and then
cut right along the outline. [MUSIC] Then we do the same
with the second one, making sure the line is straight and we go all
around the outline. I made this dark squares, so we can use this a reference to align our pattern pieces. Here, take your time, make sure that all the
squares are the lining. I'm using my clips
just to secure everything in place
and then rotate, go in the bottom and make sure those squares
align as well. [MUSIC] Now I'm just going to
use clear tape to secure everything in place and
finish the template. [MUSIC] The reason that I'm
adding the second option, is so we can use
this straight on the front of our
panel and we can see the elements or the
pattern of the fabric that we want to select for
the front of our pouch. [MUSIC] In the next lesson, we're going to use our
template to cut our panels.
12. Cutting the Panels : In this lesson, we're going
to cut all the panels that we need to make our pouch
using our template. [MUSIC] I decided to use
this template so I can place the elephant in the center of the
front panel and see exactly the elements of the fabric that are going
to be showing in my panel. [MUSIC] Once you have your first
panel of fabric ready, you can use this one
as your template. Face the pretty sides together, pin them in place, and then cut along. This way, you will know that
the panels match perfectly. [MUSIC] The square fabric that
I start with is 12 by 12 inches so by
cutting this in half, I have enough to cut
the two panels that I need for the interior of
the lining of my pouch. I'm showing you the different
ways that you can trace and cut your panels so
they match perfectly. This time what I did, I just place both fabrics facing the pretty side together, I pin them, and then I use the template to
trace my outline. You choose whatever
option fits best for you according to the fabric and the pattern that you have. In the next lesson,
we're going to put our interfacing on our panels.
13. Interfacing: [MUSIC] In this lesson, we're going to iron the
interfacing to our panels. For the outside panels, we're going to be using
Fusible Fleece from Pellon. If you pause your slide, you can see the style number
right here on the top-right. I like to use this
interfacing for this pouch because it gives him more
structure and more body. But if you still have some extra leftover from
the previous pouch, you can go ahead, and
use that one as well. [MUSIC] Remember that the texture
part is where the glue is. We're going to actually
put that one facing down, so it adheres to our panel. [MUSIC] For the interior panels, we're going to be using
a lighter interfacing. Thus the Pellon PLF B36. I'm going to leave the links for all the different
interfacing we're using here in the class under
the project and resources, so it's easier for
you to have access. But if you want to
go ahead and use the interfacing that you
used in the previous pouch, you can do that as well. Just remember to
put them in both, the outside panels and the
lining panels as well. [MUSIC] Now we're ready to start
pressing all our panels. Take your time and
make sure that your interfacing is sticking
perfectly to your panel. [MUSIC] Even though the interfacing
we're using for the lining is a
little bit lighter, you can see here by
comparing both panels, one without it, and the
other one that we just did. The difference that it makes
when it has an interface, and it gives it more body. That's why we use
interfacing for our pouches, to give it more structure. [MUSIC] Now that we have all
our four panels ready, we're ready to start
with our zipper tabs. [MUSIC]
14. Zipper Tabs: In this lesson, we're going
to sew the zipper tabs. We're going to use the
same two-inch square that we used for
our previous pouch. It's just easy to have it as a template so we can use
it for all the projects. [MUSIC] Once we have our
two-inch square, we're going to
fold it in half so we have a line in
the center that we can use as a reference to
fold the other two sides. [MUSIC] We're going to start
with a nine-inch zipper, but we're going to cut half
an inch on each side because our zipper needs to be one inch smaller than the
width of our panel. This is so we can have a half an inch seam
allowance on each side. [MUSIC] I don't recommend using your fabric scissors
to cut through zipper, I actually have a
specific scissors that I use only for
cutting zippers. [MUSIC] Our final zipper with zipper tabs will
be eight inches long. [MUSIC] I'm actually going to use a different color
zipper for this project. But because the zipper I'm
going to use is much longer, I wanted to show you
first how would you go about doing it with a
zipper that's nine inches. [MUSIC] Because I'm carrying my zipper, I don't have a stopper. So what I'm going
to do is choose a zigzag stitch and then zig-zag to close together and have a stopper
for my zipper. [MUSIC] In the next lesson, we're going to sew our
zipper to our panels. [MUSIC]
15. Sewing the Zipper: [MUSIC] In this lesson, we're going to sew our
zipper to our panels. To start, we're going
to find the center of our zipper and then the center of one of
our lining panels. [MUSIC] This way is easier for us
to have this same distance for our seam allowance
on each of these sides. I'm using a pen that
erases with water. That is actually
something that I really like using in my projects. We're going to face the
pretty size together. First, we have our
lining panel facing up, then the zipper, and then
our outer panel facing down. [NOISE] Now we're going
to sew along the edge. Remember to change your
presser foot for the zipper 1. Now we're going to start
sewing right below our zipper. [MUSIC] Remember
[NOISE] to back stitch at the beginning and at the end. [NOISE] Now we can go ahead and move our zipper down so we
can finish sewing. [NOISE] I like to overlap a little
bit when I finish on a back stitch just to make
sure we don't leave any gaps when we're
sewing our zipper. [MUSIC] Now we're basically going
to do the same steps. We're going to find the
center of our lining panel and the center of our zipper
so we can align it together. We're going to start with
our lining fabric facing up. Then we're going to
place our zipper, except this time is everything together that we just sewn. Finally our outer panel with
a pretty side facing down. [MUSIC] This time we're going to start sewing
right at the top and then we're going to stop
right before the zipper. [NOISE] Remember to back stitch, so we secure
everything in place. Now we're ready to move our
zipper up and out of the way. [MUSIC] Make sure the edges and the zipper are align. Now we're ready to
close and sew again. [NOISE] In the next lesson
we're going to go ahead and do the drop stitch. [MUSIC]
16. Topstitch: In this lesson,
we're going to sew the topstitch to our panels. [MUSIC] Now we're going to put back
our regular presser foot. I like to increase the
length to about four just to make it a little bit more
visible and decorative. When we do the topstitching, we're going to secure in place this little flap to have
a nice and flat finish. [MUSIC] I like to align the edge
of my presser foot with my zipper and then use that as a guide as I'm stitching
the topstitch. [MUSIC] Now we're ready to
close our pouch. [MUSIC]
17. Closing the Pouch: In this lesson, we're
going to close our pouch. To start, we're going to face the pretty sides together of our outer fabric and also we're going to face
together the two lining panels. One very important
step that we can't forget is to open up our zipper. Otherwise, we're
not going to have room to put our hand through, when we're trying to turn
our pouch right side out. We're going to start by
clipping in the middle and make sure to push your zipper
tabs towards the lining. Also makes sure to align
the seams at the same time. Before clipping the
bottom of our lining, I like pressing
the seam allowance so it's easier for us
in the next step when we're closing the lining to have the crease for us
to fold it inwards. I like to double clip or to put an extra pin so I
know where to start and stop sewing to leave our gap that is going to
be about four inches. This is so we have access to turn our pouch right side out. When we stopped sewing, make sure to leave your needle down so everything
stays in place. Then I like to use the edge of my presser foot as a guide
for my seam allowance, make sure to sew just right of your zipper tabs and
not to sew over them. Always remember to backstitch at the beginning and at the end. I'm going to start
sewing right on the crease that we've
pressed before. That's our seam
allowance and this is the side that we're going
to stop for our gap. Right here, remember
to backstitch again. We're going to leave our gap and start sewing right on our pin. In the next lesson, we're going to be squaring up the corners to make the
flat bottom for the pouch.
18. Squaring up the Base: [MUSIC] In this lesson, we're going to
square up the base. [MUSIC] One very important thing to do here when we're aligning
the corners is to make sure that our seams
are matching perfectly. Then we can mark
our seam allowance, so when we go to
the sewing machine, we have a guide that
we can follow and it's easier for us to have
all of them even. [MUSIC] Opening the seam
and making it flat, it makes it easier for us to go over it while we're sewing. [MUSIC] Remember to back-stitch at
the beginning and at the end. [NOISE] [MUSIC] Once we have all the
four corners closed, now we're going to turn
our pouch right inside out so we're ready to close the gap that we have
in our aligning. [MUSIC]
19. Finishing your Flat Bottom Zipper Pouch: [MUSIC] Congratulations. This is our last step. [MUSIC] Remember that we pressed
the seams before. This is why it makes
it so much easier right now just to
push them inwards, clip them, and we're ready
to seal our pouch close. [MUSIC] I like to get really close to the edge and then go
ahead and backstitch, seal, and backstitch again. [NOISE] I love how it's just adding the detail of the square base, makes it so roomy, and I love the idea that
it stands by itself. I also love the detail
of the zipper tabs. It gives it such a nice finish. [MUSIC] Well, congratulations on
finishing your pouch. I can't wait to see
your finished projects and the different fabrics that
you chose for your pouch. I wanted to add at least three different shapes of pouches, because once you
finish one and you get the idea on how to seal
the different steps, you really want to
make many more. I also have another class, how to seal a zipper tote bag that I think it goes
great with this one because you can use similar fabrics or
different combinations of the same fabrics. It looks like a combo or like a kit that
belongs together. [MUSIC] In the next few lessons, we're going to learn how to
make this beautiful pouch, the box zipper pouch. [MUSIC]
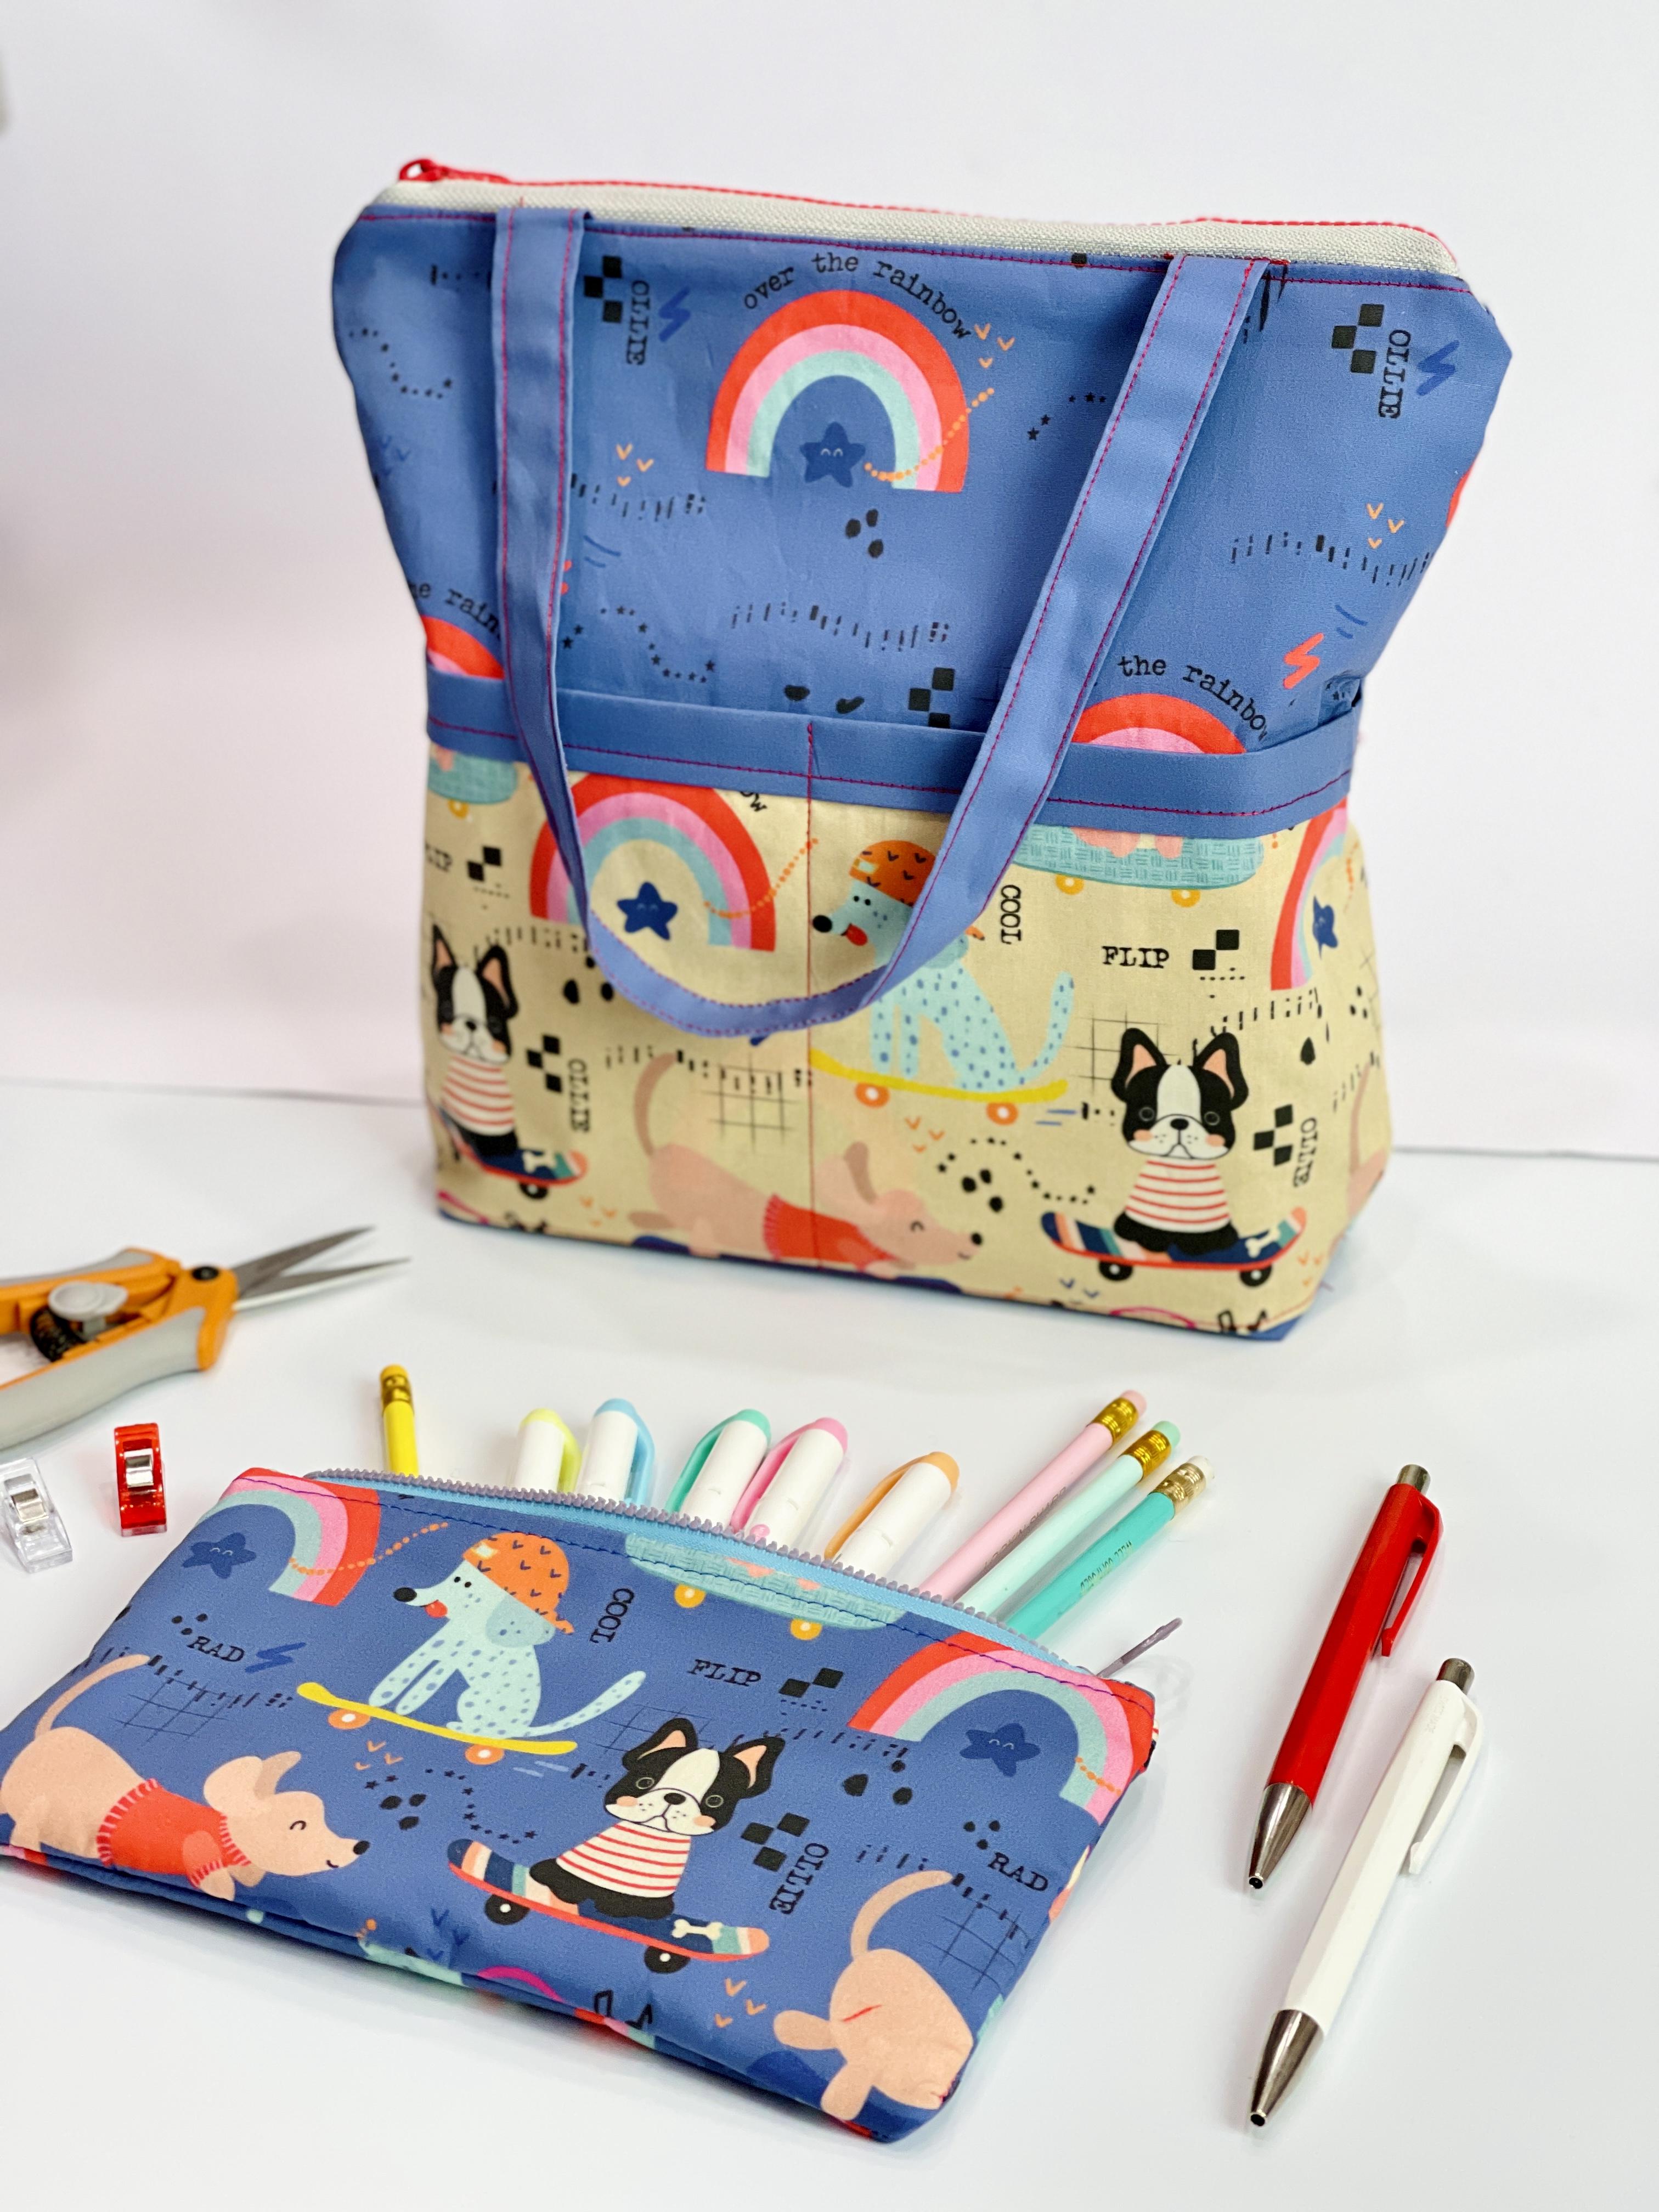
20. Intro - Box Zipper Pouch: [MUSIC] In the next following segments, we're going to learn how to make this beautiful box zipper pouch. I love it because you have so much space to put all
your markers and pens. I love all the little details
that makes it so pretty. These beautiful
fabrics belong to a collection from Selma Cardoso. She's one of my other
favorite designers from Spoonflower. I really love here
creative approach and all the fun elements that
she designs in every single of her fabrics. [MUSIC] In the next lesson,
we're going to go over our template so we can start carrying our panels to create these beautiful pouch. [MUSIC]
21. Template Box Pouch: [MUSIC] In this lesson, we're going to learn how to use the template for the
box zipper pouch. I designed this template
so it fits in one page. Now, remember not to scale it. I actually added some text boxes so you can verify
your dimensions. For this pouch, you only
need two 12-inch panels, one for the outside of our
pouch and one for the lining. We will cut them in half so we're ready to
use our template. [MUSIC] To use our template, we're going to fold
our fabric in half and then place the template on
the fold of the fabric. [MUSIC] Now we're going to
do the same thing. We're going to
fold our fabric in half and use our template, place it on the
fold of the fabric, and trace it around. Because we cut it in half
the actual panel that I'm using is six
inches by 12 inches. [MUSIC] Now we're going to repeat the
same steps for the lining. [MUSIC] In the next lesson, we're going to sew
the zipper tabs.
22. Zipper Tabs: [MUSIC] In this lesson, we're going to sew
the zipper tabs. For the zipper tabs, I'm going to use the same
two inch square template that I used for the
previous pouches. [MUSIC] We're going to start by folding
our tabs in half. We create a crease and
a line in the center, that we can use as
a reference so we can meet the other
sides to that line. [MUSIC] You can use any size
zipper that you have. We're going to cut
it to eight inches. [MUSIC] To keep my zipper together, I'm going to go ahead and zigzag at the top
and at the bottom, so it's easier for us when
we're sewing the tabs. [MUSIC] Once we've finished sewing, we're just going
to cut the excess to make it even with the zipper. [MUSIC] In the next lesson, we're going to be
sewing the pull tabs.
23. Pull Tabs: In this lesson, we're going
to sew the pull tabs. For the pull tabs,
we're going to cut two three inch squares. [MUSIC] We're going to start by
folding the fabric in half. We have a line in the
center that we can use as a reference to fold the other
sides and make them even. [MUSIC] Now, we're going to sew a
straight line on both sides. [MUSIC] [NOISE] This gives
them a nice finish and keeps everything together. [MUSIC] In the next lesson, we're going to sew the zipper. When we have all the
panels sewn together, we're going to add
our interfacing. In the previous pouches, we added the interfacing before sewing all
the panels together. But I wanted to show you the different ways
you can do it, and then you choose
your favorite. If you prefer to have
your interfacing before sewing the zipper, go ahead and press
your interface into your panels before
starting the next lesson. [MUSIC]
24. Sewing the Zipper: In this lesson, we're
going to sew the zipper. We're going to start with
our lining panel facing up, then we're going to
center our zipper, making sure that we have
the same distance on each side for our seam
allowance and finally, we're going to put our
outer fabric facing down. [MUSIC] Remember to change your presser foot to
your zipper foot. I like to start sewing
right below our zipper. So we can start sewing. Remember to back stitch. So all the way down
back stitch again. This way, we don't have to
worry about leaving the needle down and struggling to move
the zipper up or down. [NOISE] [MUSIC] Now we can
move our zipper down, close everything, making
sure that everything aligns again and start sewing
the little gap, making sure to back stitch at the beginning
and at the end. [MUSIC] [NOISE] I like to overlap
a little bit just to make sure that we don't leave a
little gap in our zipper. [MUSIC] Now we're going to
repeat the same steps. We're going to start
with our lining panel. Now we center our zipper, except this time it's the whole panel which
is sewn together. Remember to leave
the seam allowance to this side and finally, we're going to place our
outer fabric facing down. [MUSIC] This time we can start sew another top because our zipper
is at the bottom. So instead of going
all the way down, we're going to stop right before the zipper and back stitch. [MUSIC] [NOISE] Once we
move our zipper up, make sure that everything
is aligned and then close the gap back stitching at the beginning and at the end. [MUSIC] In the next lesson, we're going to sew
the top stitch.
25. Topstitch: [MUSIC] In this lesson, we're going to sew
the top stitch. Now we can go ahead and replace our standard
presser foot. For our top stitch, we remove all the
panels to the side. We're only sewing on top
of our outer fabric. [NOISE] To sew the top stitch, I like to align the edge
of my presser foot against the zipper and use that as
a guide as I'm sewing down. [NOISE] If you haven't pressed
the interfacing yet, that's what we're going
to do in the next lesson. [MUSIC]
26. Interfacing: [MUSIC] In this lesson, we're going to press the
interface into our panels. For the box zipper pouch,
we need structure. I love using the fusible fleece that I'm showing you here. This is same interfacing we
used for our previous pouch. Remember the side that has
the texture, that's the glue, and that's the one
we're going to press down towards our panel. I use the template to cut
around the interfacing, and I like cutting it
a little bit smaller, so it doesn't stick to
anything else but the panel. Here you can see the right panel has the
interfacing already, and the left one we
haven't done it yet. You can see the difference on the body and structure of it. [MUSIC] We're going to go ahead and do the
same thing and press our interfacing to the
other outer panel. [MUSIC] For the lining, we're going to use a
lighter interfacing. The Pellon PLFB36. This is same one
that we used for the previous pouch
lining as well. We're going to put the texture, like the leader dots down, and that's the part that
has the glue and we're going to press it against
our lining panel. [MUSIC] In the next lesson, we're ready to close our pouch. [MUSIC]
27. Closing the sides -Box Zipper Pouch: In this lesson,
we're going to close the sides of our pouch. The first step is to make
sure to open up our zipper, so we have room to
put our hand through when we're ready to turn
our pouch right side out. We're going to start
by facing together the lining with the lining and the outer panel
with the outer panel. To start clipping
everything in place, make sure to push the
zipper tab towards the lining and we're going to make sure that the
seams align as well. [MUSIC] We're going to do the
same with the other side, making sure that we push the zipper tab towards
the lining again. [MUSIC] Then we're going to go ahead
and clip all the way around. We're going to leave a gap
on the bottom of our lining so we have enough space
for turning the pouch. [MUSIC] To remember to leave a gap when I'm sewing, I like to double-click
or put an extra pin, so I know when to stop
and when to start again. Remember to set up the
length of your stage back to 2.5 because we added a longer stitch when we were
top-stitching the pouch. [MUSIC] Every time that
we're closing the sides, we're going to start and
finish with a backstitch. [MUSIC] Here I had to stop
and start again because I wasn't leaving
enough seam allowance. It's okay to stop, pause, rearrange things, and
then start sewing again. [MUSIC] That's why I like to have
a pin as a reference. Here is the lining and this is the gamble we have to
leave at the bottom. We're going to make sure
to backstitch when we finish sewing here at the
beginning of the gap. Remember to leave
a big enough gap so you can put
your hand through. You can leave a gap that's about four inches
or 10 centimeters, and that's going to be enough. [MUSIC] Now that we've finished
sewing the sides, we're ready to square
up the corners. [MUSIC]
28. Squaring Up the Corners: In this lesson,
we're going to seal the corners of our
box zipper pouch. Before clipping our corners, we're going to put
our pull tabs inside making sure they are together
with the outer fabric. In this step, it's
also important that we align all
these seams together. We're going to make sure
to align them so they meet perfectly together leaving
our pull tab in-between. Let's get a closer look of everything that we're
going to sew together. Open flat the seams
of your outer panel and place your pull tab in
the center of that seam. Make sure that your pull tab is inside together with
your outer fabric. Now grab your lining panels and make those
seams flat as well. We're going to align this seam with a seam from
the outer fabric. Once we clip
everything together, I would like to measure
about three inches. That's about 7.6 centimeter, so we have all this seams the same distance and all the corners are
the same measurement. It's important that we
remember to back-stitch at the beginning and at the end so our corners are nice and sturdy. It's going to be bulky going
through all these layers, so I would like to go slow. You can use your hand wheel
to go over the center part where the pull tab is to
help your sewing machine. Now we're ready to
do the same thing on the other side repeating
all the previous steps. We're going to make this
seam flat and we're going to put our pull tab inside, making sure that it matches
the outside fabric. Then we're going to
open up the seams for our lining fabric as well. We're going to
align the seam with the outer fabric leaving
the tab in-between. Then for the rest of
the corners is easier. We just make sure that we align the seams and we open up
the flaps of our seams. After sewing all the corners, this is how our pouch
looks right now. In the next lesson, we're ready to finish
our box zipper pouch and close the gap.
29. Finishing your Box Zipper Pouch: In this lesson, we're
going to close the gap and finish our box zipper pouch. [MUSIC] To close our gap, I'd like to do a very
small seam allowance and remember to backstitch at the beginning and at the end. [MUSIC] [NOISE] Congratulations
on finishing your box zipper pouch. I can't wait to see all
your beautiful pouches. Please don't forget to share
all your finished projects. I hope you really enjoy this
class and that you learn many different skills that you can apply in your
different sewing projects. Please let me know in the
comments which one was your favorite and how many are
you planning on making. [MUSIC] Have fun combining your fabrics, your zippers, and
you pull depths to make many more
zipper pouches. [MUSIC] If you like this class, please check out my other class, how to sell a zipper tote bag. You can use different
combinations of the same fabrics and they totally look like a
combo that comes together. [MUSIC] One thing that I really like about
this class is that you get three different options
for three different pouches. You're going to have a lot of fun making all these pouches and mixing and matching all
your fabrics for extra fun. [MUSIC]
30. Congratulations!: [MUSIC] Congratulations on finishing your beautiful zipper pouch. I hope you're as
excited as I am. They're so beautiful
and practical. I hope you had a lot
of fun in each of the steps and learned
a lot of new skills. Let me know which one
was your favorite. Today you learned so
many different skills that will help you in your
future sewing projects. If you liked this class, please make sure to check my other course
here in Skillshare, how to sew a zipper tool bag. They go so well together and
they're so much fun to make. Also, please make sure
to follow me so you get a notification every time that I upload a new class
or a new project. Please make sure to share
with us a picture of your final zipper pouch so
we can all get inspired. Thank you so much for
sharing this class with me. See you next class. [MUSIC]
 Luciana Caballero, designer+architect +creator +teacher