Transcripts
1. Selecting Complex Hair in Photoshop - Introduction: Hi there, My name is toluene and welcome to Photoshop selection m maximum Made Easy course. This course is for everyone who wants to learn how to select MAX and red hair in Adobe Photoshop. This is a budget based course, which means we are not going to go through every single two in every one of the two futures and settings. But you are going to do is we're going to set practical real-world examples and then lend it to send futures necessary to make complex is in Adobe Photoshop. Today, we are looking at cutting people out of their current background and pleasing them into a new bug. In particular, we are looking at selecting around hair because this can be a ninth May, I'm going to show you a couple twos and how you can use those in fiducial. We're also going to talk about what possible and what isn't possible, intensive selecting and giving people a new background. Also, we are going to develop our own background like this by using the action part in Adobe Photoshop to create this nice background. Now as you are watching these videos, you're going to see a probability is going to ask you, if you recommend this class to others, please. If you enjoyed the course and learning from it, would you do two things for me? Firstly, give it a timestamp and secondly, write just a few words about why you are enjoying the class. These recommendations help other students to see that this is a glass that V2 might enjoy and learn from. If you'd like to leave me a comment or a question, please do because I read and respond to all your comments and questions, I look at and respond to all of your projects class. If you are ready now let guessed that the making complex selection using selection and Maxine involving, Hey.
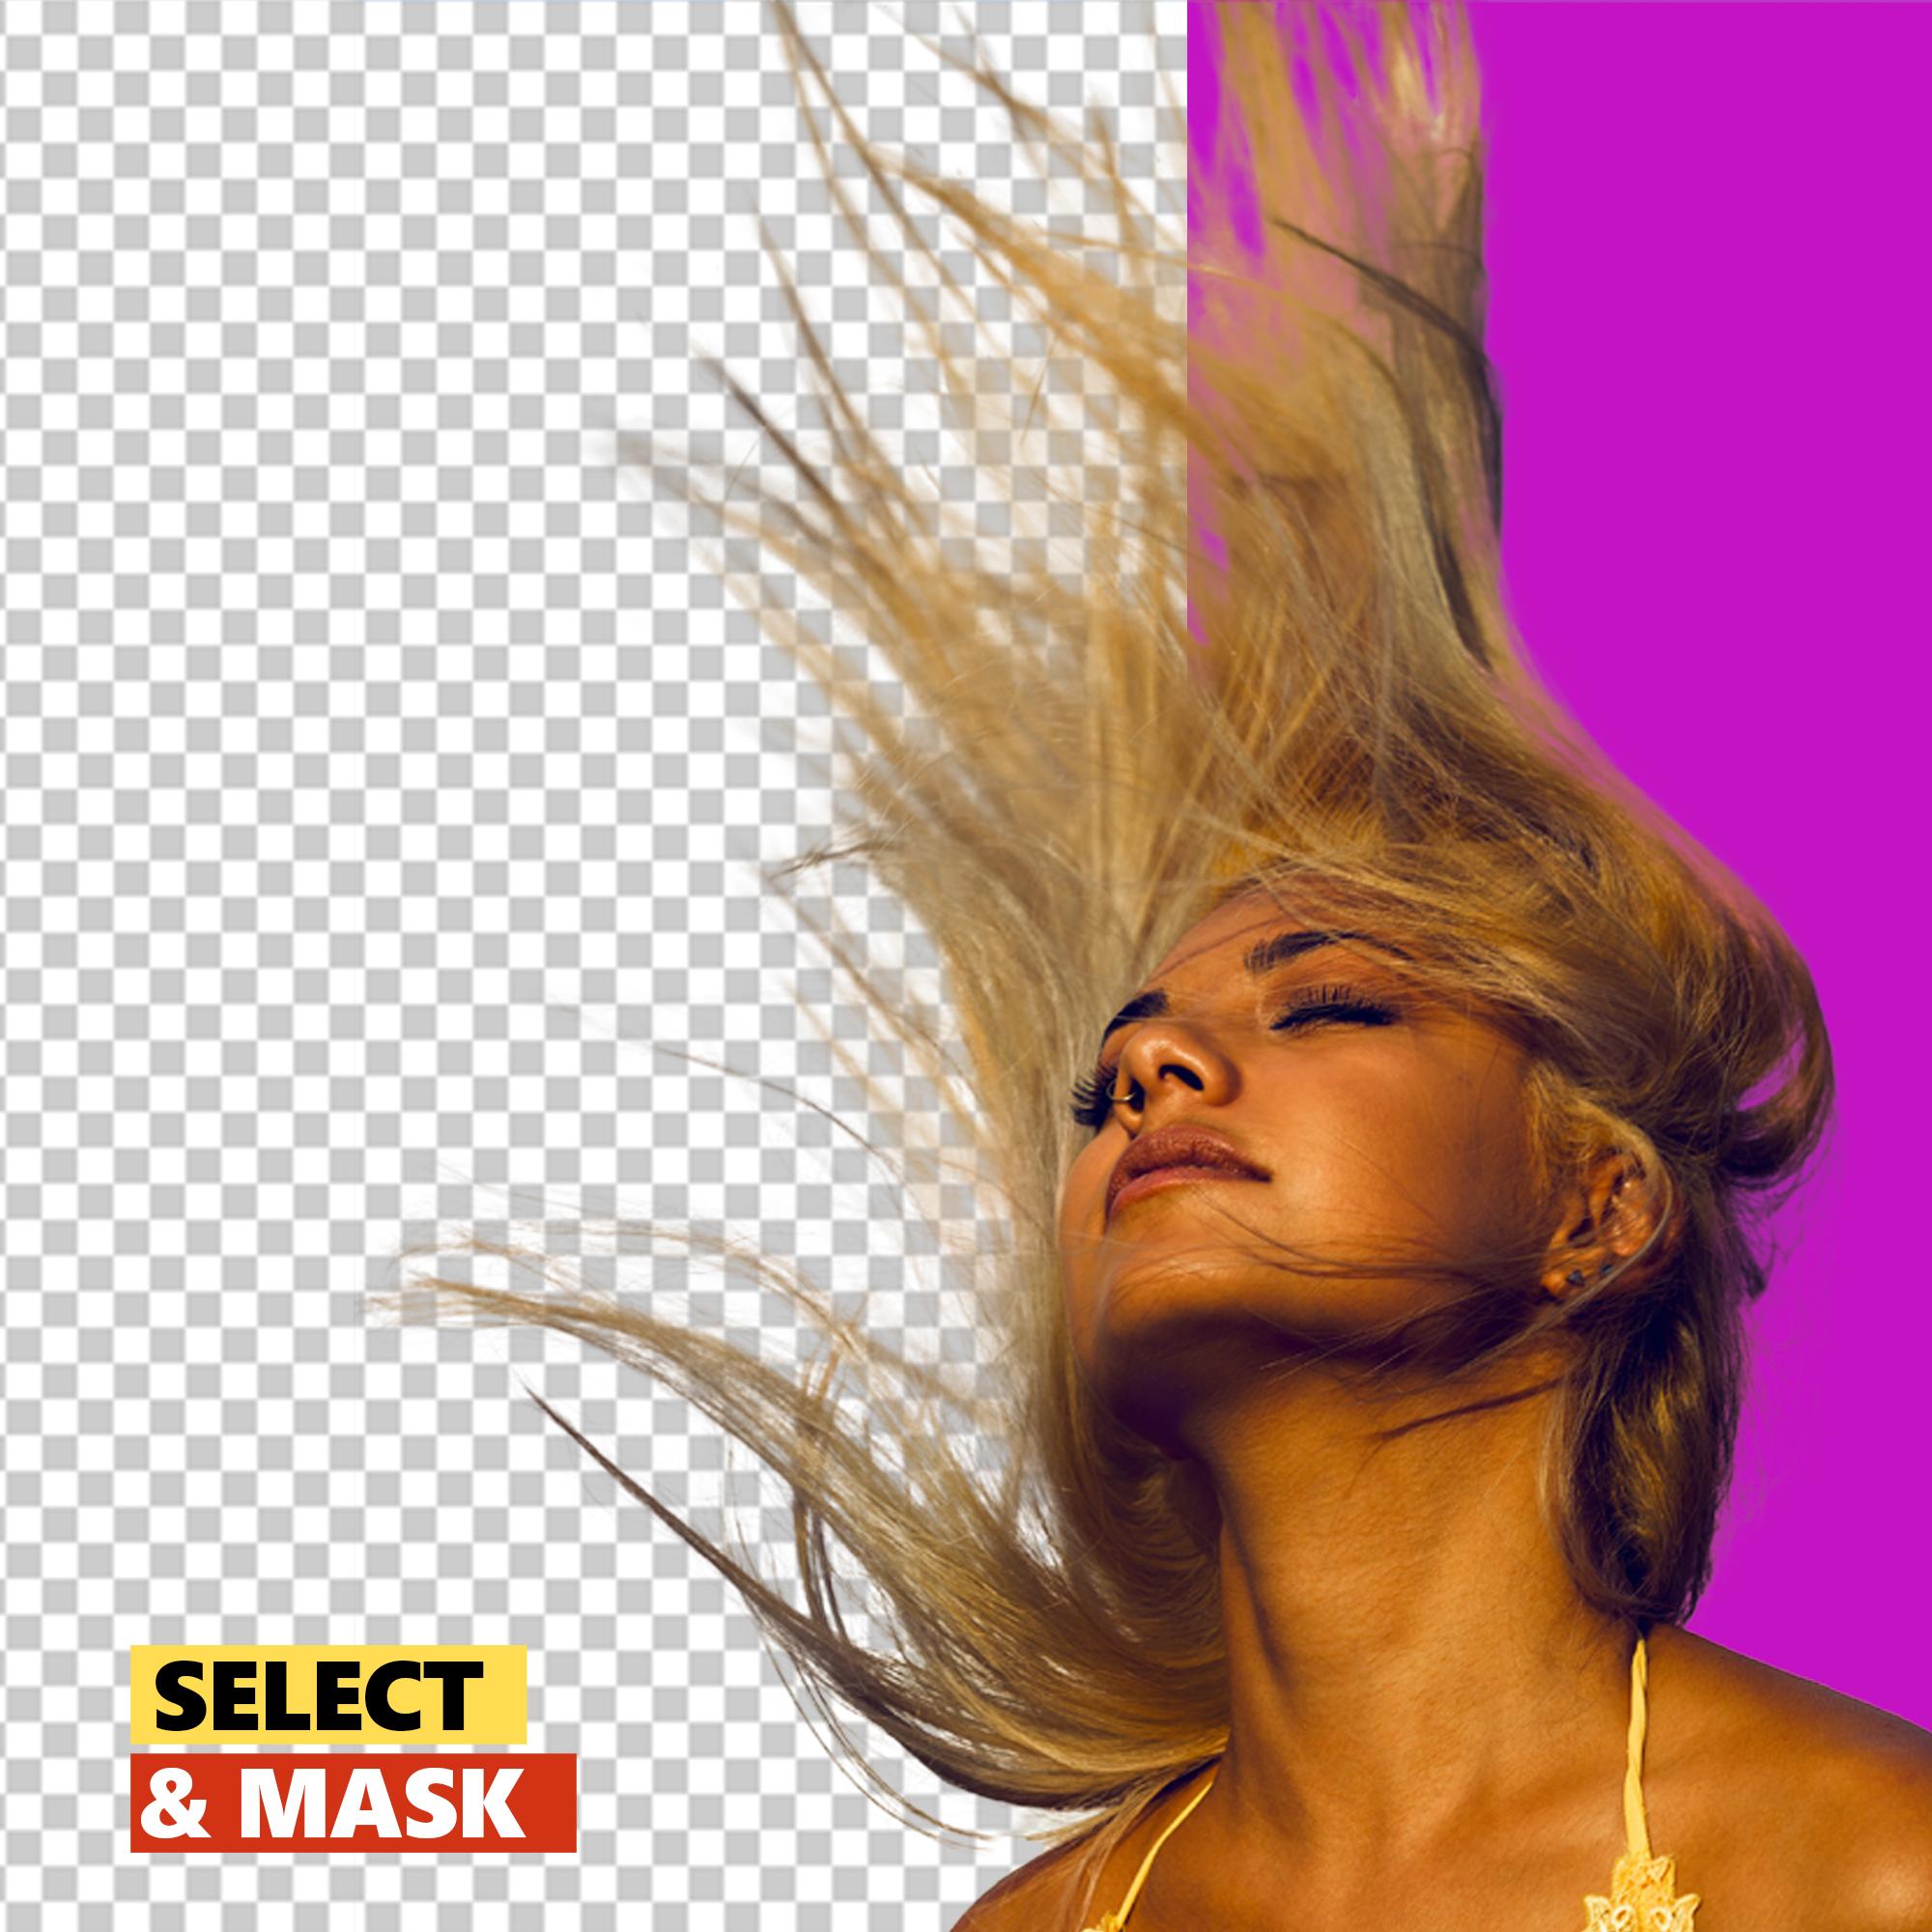
2. Part 1 Selecting images at websites: Before we get started working in Photoshop, like I downloaded from unsplash.com to use as example. But let's go to the images at a site hour or so and see which type of images that is going to help us in this project. And also pleased, as I said in the introduction, this is going to be included Base64. So you choose your own image at one of these sides, and you do own cutout, put it at a new background and share with me and a sample. So we as unsplash.com and you see here is the haircuts agree, so you can choose maybe carrier, then you're going to have these images. So you see Browse premium image on stock. I stopped in May. So this ones when we try to narrow, we are going to pitches that. So we'll try to avoid pitches in that. So as you are going to select an image to cut out and put a new bag I have to select an image. Diet can use because some of them will take ages before you can't do that. So I downloaded this image particular and use it here as an example. So you see this or is it, and this is how it tends out to either change the background too. Any Khurana, we wish to change this so we have gender violence in any bug and every VC chain to nano going to have much public alkene. So let's go to pixels.com and also see some hair. So you just come today, said batting and say forehead. And you're going to have these images to, ideally you are not going to choose an image like this, which is going to be very agile because there is a lot of color and the hair. And there is not enough contrast between the hair and the background. And if you are going to photograph someone which you change the buttons, the different ones, make sure you have enough contrast between the backbone and the image or the window in testing because something light is going to be the readily were cut out because there is a neutron, which means we can easily cut out movies when Implicit at the different bagger sampling. This is going to work fine because the image is quite crispy pigeon with a sharp image and above and is also lead. So you can go through and choose an image which you can work on. All right, so let's try this image that I did. So I'm going to click on it and I'll leave the link somewhere on the page so that I can dilute and follow along easily. Okay. Apart from this hour, tried to dilute one or two images which we are going to use in our example. So lemme go for something like this. So let's try to pick something which is going to be a little cheeky, little difficult to do. An image like this is going to be worked out. So let's try and dilute this parcel.
3. Part 2 Analyzing images and tools: All right, we are back in Photoshop and this is the phase image that we are going to work with. And this image was shot perfectly. The image is in focus and the background is out of focus through the early problem that you are going to have is whether it's wearing white and Batman is kind of y. So if you are making isolation, you have to be quite sure that we don't enter into this. So if you can check the edits that I did here, I didn't quite get the window Cl2. So we are going to be careful working with this one. And our second image, the image is shot quite well, but we are going to have a lot of public because the background is not neutral. It's kind of having a different calculus and working with many colleagues when cutting hair is going to be a lot of problem. But we are going to see what we can do because we want to solve public. And that's why we are trying to come out with these images. And the last one is going to be something that we can work with. We have a lot of hay here and this is going to be fun working with. And we have a neutral background. The images permanently in-focus and above line is quite okay. Today, Tuesday we are going to use is we're going to use the select and max. So any click on the selection to a new update, we are going to have the soliton max at the top here. So we are going to start typing in an SVD.
4. Part 3 Select and Mask in Photoshop I: All right, Welcome back to this video and we are going to look at how we can go about this image in Photoshop. So we're going to start by using the Quick Selection tool. So you can click, click, click any agree to have the option to select any of them. If you are using the put operation center like the CSAs and staff, we are now going to have all these options. And once we are going to do, if you are using later in life is CS5, you are not going to be able to agree that because this was put in front CS6 up to date and our b using the 2020 CC for this budget. So with the Quick Selection to start by making selection of the image. So I'm making sure that everything is perfectly selected. And let me go through here because not a lot of a selected, I want muslim the head to be selected. And also, if you're having problems dealing with this, just make sure that you have the plus sign is either edge, we have the minus end, we have the plus end. You have a new selection too. If you want this subclass, maybe you will use it to manage like if I stand like this and I want to undo that and just let the minus and brush over data and it is going to select backwards for me Sue, alternatively, if I'm on the plus and I hold down the Alt or Option on a Mac, I'm going to have the minus sign, which means I can drag back some of the hair through. I don't want that. Let me make that selection. I sue for me, we are going to select select a max at the top here. So you just click on it. Verified and Michelle, you are on the Quick Selection Tool. Because if we are on a different yellow go into Arabic. But if you're on the lawsuits, we are going to have this Latin Mass 2. Let's click on Select a max. So under Select and Mask, this is the interface that you are going to have. Here is the 2s that we are going to do the selection. And we have our property PAN-OS also at the right side. So you can also use the shoe original does P to toggle with the orange now and where you are with a new version of Photoshop CC 2020, Photoshop in refining hair. So you can just if you are using the litigation in kind just click on the file and see what happens. We have to jump is going to be able to find for you perfectly or not. But you will soon go back and do the normal, which says most of the video is not going to get a refined head to basic photoshop have in the elevation. And if it can also have day-to-day earlier version down to is going to be lines. So let's toggle with original. And after the physician did it best to kind of remove or the head. But let's go back onto, onto oogonia here on the view panel you can see view. So the view panel help you to go to the bug and I want to use or maybe on neon skin, like when we have a background to that one is going to show the image on the bandana we have value don't have, and we can select a matching which is going to show you the original bank on, hopefully is the current one that we were using. So renewal Valley, you can change environments in Canada you want. We also have on black. It was 15. We also have one black and white, which means it is going to show you that part of the selection that we have, we seen any place that you couldn't meet this lesson where you can just use the brush to here rich income price in that, please back. So let's sell it on overlay. And it'll also increase the opacity of the background or reduce the opacity of the background. So let's maintain it as 50. And also you can change the colors in a corollary or we want, so the example I pinch and click on, Okay. All right, so for VA, see that we have selection, Quick Selection 2. We have the refrain here, so this is what we are going to use. The shortcuts are so many click on R is going to select that one for you. And when you click on W is going to select that. Into for you, when a click on D is going to select the brush tool for you bury one day. If I select that. And we can use this place to increase or decrease the size of it unselects minus 1 to erase some parts back. And we're going to use the class, which means you want to remove some of the unwanted parts of the hair, the background that we don't want. And we can use this place to reduce the hardness of the brush to let you reduce it to maybe 90 and the size to it and increase the size of the brush. Or with I use the square brackets and a keyboard to increase or decrease the size of the brush. So you can zoom in. You don't have to zoom in to just zoom in a little bit and use the use the Refine Edge you to start brushing to the edges of the hair. And Photoshop is going to kind of remove oil on Ted part for us. So let's try see credential. Please look at this place for me and British or is going to do its best to move those, please, for us who's less toggle between Show original shortcut is P x2 before, after, before, after. So he just made sure that I just good to one by one. Don't overdo, just click it once and wait for it to load. Then you click on a nest and you read for each loop. And you're going to get the perfect solution that you wish to have. As you are not going to get all of them currently as you want to dance. Why we have the adult properties here, which is also going to help you to smooth the edges, feathered edge to, after this we are going to go to. So I'll quickly walk through the refined in combat, the hand tool to move around. So we just click N. We move around, hold the Shift key on the keyboard. And let's go back to our how to do that. Alright, so we are back in Photoshop and let's see what we can do. So incidentally, find a outdone, everything that we need to do, and there is nothing much. Again.
5. Part 4 Select and Mask in Photoshop II: In this video, we are going to try to do this one before we come to this one, which is going to be tough to do. So let's start with this. The easier one to pedestrian, let just select, select and max. And we didn't meet in this lesson. So all three are the entities that we are going to take the selection tool here. And we're going to make our selection to work. Footage of VSD is that it has hydatid pleased that we don't want in the place that we want to deplete the T1s when you select the scar tissue, the image. So this is the place that we want. And Edition or those please for us to calculate on before, after Ricardo's the increased capacity for that. So this was higher it was, And we have done this. This is how it was and we have done this too. Let me leave the passage some gray here through, I think we have selected or in places that we want N for mu, we are going to use our fine, hey, and the VMM, you are going to leave it on a valley which returns we choose the coronary want leverage, things like thing because ladies like pink too much. And I'm going to use the Refine, hey, and I'm going to just brush around this please, to refound that edges. You see how Photoshop is working, working magically for us. The Euler had worked for us. And please, if you see that some parts of the edges of the body islam sharp or is not worth that. Don't try to use the Silicon Macs. See that age is giving it a shallow depth of field that you don't want, that we can use other tools in Photoshop to do that. And we will try to use other tools to do rather than using the Refine head to do this. In this case, it did a pretty good job. I don't use the Refine here to find by D because it's mainly for finally, hey, let's verify it by this. So what you have to make sure is that all the places with the bank on perfectly removed. Otherwise, when you try to put renewed tried to cut it and put it at the different vanco. In other words, you have a blend because we don't want these are the different barebone. Thus why we are trained to move those parts from it. All right, So we, this one's less chain the paragons in black and see this image of a paper, leave it blank. The left tries to increase. This. N is wet phi relate to, let me use the ship edges to bring some of the edges incisor negative 10. Nsso, decontaminate colors and see the result. So you see that Patricia is trying to do It's Muslim best, but I'm not quite like an ITS, let me increase this one to a 100 percent or let me just select on the lamp here. So you see that these images selected perfectly just that it is not going to watch on a black background. To condemn the the currents option. Oh, decontaminated chemisorption in a, let me select this one. It's a new layer and click on, Okay, so this is what we cannot get. Let me change the background to a solid Carrara. Let's see the results. So there is the outcome of this image that we have cutouts using for the show and placing it at a different variable, X2. We can change the variables anything that we want. Again, to NA, paradigm we want and you see that it definitely fits. All right, so let's look at the last example which is going to be the tough one. And with that one too less or less, that by selecting the Quick Selection. So the pixels into selected. Then instead Silicon Macs at the top. And it is going to grouping in Photoshop for us, Any see that here is 10 out of blank. Capacity is a 100 percent. So that reduce the opacity and we tend to see the image. You use the Quick Selection Tool again. So since you are getting used in traditional, thus why we need again the images deselect as we are now selecting the image to just brush of the image and it is green. Just read these performance to easier. We have selected the images until our who they ought to bring their pilots. I don't want to select in. And I'll use the square bracket to reduce the size of the brush. Then let me zoom into our picked these two TAs Zoom to unless try to zoom in a bit. Then leg selection. All right, so one of the things that we can also do is construe to zoom in a 100 percent. Then from here, let's try to select the subjects. Say see that we have selected some data and this is what we cannot get. There was not enough contact within the bank. And the image does why we have levels of problems when trying to select this. Then from him we use our refined head Sue, which we have annual stats to find the head. So you click once you reach for voltage drops and then click another can you reach for its load? Let's see, before and after, before, after the less tried to sell it as much as we can. So this in which he says, I tried our best, Mary's still have some templates to work out. So let's try to shift the edges and see, is it a very steady shift in the areas we are tracing get some quality here. Let me try to reduce the need for digital is to do about this in the decontaminate colors we want like 15. All right, so I'm okay with this election is our click on Okay. To opinion new selection. They're out in the background. So when deceleration rates phi with a white background, but the selection wasn't maker really like when I face the date, it was fine. Those are key. Tls relation is very lucky than what we have been able to achieve right now. So I wanted to the challenge for you to also take the same image. I will leave the link somewhere here to dilute and try your own and sent to me and sends mu and a privilege and I do is coins all of the projects and in-house we show to me on social media, on Instagram, on parcel of creeds. All right, so in the next period you are going to create our own background and put our head in that lethal. You see that this image, we created a new background which you have please our image. So we are going to learn how to use an action-packed to create the simple buckle and please our image into that.
6. Part 5 Creating a Pattern : Up next we are going to look at how to create this simple vanco. So first of all, you go to File New. And we're going to work in pixels. So our change from limited to pixels. And I'll use 2000 pixels by 2000 pixels, leaving the resolution at 300 and click on create. A new canvas is going to obtain from me. And from here our gluco and a foreground color, select our black color. Then I'll use my paint bucket to hear is it so I'll select that people don't read any avenue opinion, just open data and select the Qin bucket to click ones on the document and fill with blood. Then from the outlet my brush to shut Cardi B, just click P and a keyboard. You have your brush. Then cylinders and reduce the size of the values in the square brackets, the left square bracket. And now start making some dots, invites our US widespread and x2. I can click here to select white or you can click here and select the right color. Then I'll start making some dots. But I don't want it this way. I wanted to shop and crispy so our eyes click and go to the general brushes. Then I want a very hard brush. So it sounds like this is our keys of our meat. And dots. Just make any dots that you can. So either experimentally, it's what we are doing to create some cuckoo Balkans for yourself. And this is something that I learned from someone. Skillshare, I really appreciate tanks out our lived in name stand where he sued or you can check out his videos. He teaches really cool things and I really like him a lot of isoform year. You click on the move to sue for me, we are going to create our action packed. So if you don't have the action around, go to window and we will select action. So window, a chain and we are going to have action. So here is mine. And I have it here x2, I can select this leads to obtain the whole action. And therefore we are going to create a new folder. To create a new folder and name this one. So let's N max action. Then click on Anki. And in the action I'm going to create a new document. So click create new machine. And this one is going to be S, M, which means select and max. And you see that it has started recording. So after you start making the alkene to the alkane is first of all go to Filter. Then Anna selects High Pass. And I will leave the high pass videos at six. Click on AKI. So this is what we are going to get them from the image. Selected adjustments and select threshold. And we are going to leave a trail shoe at 128. And you supposed to get something like this. If it all yourself like this, go back and redo the quizzes again. Then click on Alt key. So you see that this is what she identity, but largely you add another machine which is filter. Then we choose Blair. Hello, Jews died on bled and lay. I wanted blade like six. Then click on Anki. So we have created our machine. And when you are done, just click on the stop button here, click on that, and it is going to stop for us. So just select the shin and click on the continue to play. Yes, Click on the play. Any scenario starting getting some ships. You continue like that to get your designs ships. The ships started coming. So I was to click on the play. So it finish or complete filling the whole canvas for me. Alright, so this is the Pantheon that you have created in Photoshop. So from here, you see that this one is not sharp through we are going to sharpen it. So you go to Filter, then select shopping and select on Shapin max and increase the amount from 50 to 500. Then increase the threshold, maybe five, and increase the radios or through three Zara, is that getting sharper? Through a reduced light, change it to is AKI. So you see that we have a sub age of the antidiarrheal. Add a gradient map to it. So to add a gradient map, adjustment layers. Click on that and you see Gradient Map. Select that. And we are going to change the gradient colors. So let's choose something here. Let me check them, pinch our reach. So you just, as I went with the colors and see what looks fine for you. So I knew VI as by renting with this. So let me choose any random color through, let me choose underlie this. Then I can reduce the opacity of the gradient map here. So I can reduce the opacity to maybe 50. There. I don't have much of it's funky there for me. I can come in, please. My image. Alright, so you see that we created our old bag and you would have pleased our image. Here. I see, Let's try a new image. I hope you enjoyed this session.
7. Part 6 Project, let's sum up what we've learnt: I hope you've enjoyed the class and learn how to use the Select and Mask tool in Photoshop. Let's quickly run to what you did. Let's do a quick recap. So we started with central ideas with nothing and the backbone. Then we use the quick selection to make a selection around the images. And we selected, Select and Mask top and rented a refined edge area to refine the hair of the English. Then after I regretted this person background using an Action Pack and created these to place our subject in its. Your project is to take an image and Kanban board implicit at a different button. And you can use the image that I use to experiment with or the luteal only made very assigned as you mentioned, area. Make sure you pick something that is more complex in econ, Spiderman suit I, you get the understanding of how to use desolated max to information to make and dreaded hair and pleased that a new ban on with Harvey problem. And as you're watching this video, are going to see upon which you assume if you recommend this class to another student, please enzyme as if you are enjoying and learning from the class. And also give this video a thumbs up and write just in few words why you are enjoying the class. These recommendations help others to anti, see that there is a client that lead to mind, enjoy, and find it useful. Thank you for joining this course and hope to see you in the next one until next time. Peace.
 Solomon Opoku Afriyie, Graphic Designer