Transcripts
1. Part 1. Introduction: Hi day. Today we are going to
cover everything that you need to know about the
Pen tool in Photoshop, especially if you're a beginner. This course is for you from
what does depend to making the most complex election and many other application
in Photoshop. In this course, we
will be sure that you get up and running with it too. But before we do anything, I want you to remember
the letter P. I'm going to flash it on the
screen so you don't forget it. This is the most
important later, if once and then depend too. I don't want you to
click on the pen to radio mouse on the tablet
and a pen to ever, please use the
shortcut P enough for a flashing LED, guessed that it.
2. Part 2. What is the Pen Tool: So what is the pen tool? The pen to allow you
to draw two points, point a and point B. Let me turn this on point a and point B and allow you to
draw a line between them. This link on which g, this line can be TIF. That's all it is. This is the fundamental
of the pen tool. We can extend it to create complex part and so
on and so forth. What is path and sheep? We will get to that. But we
need to remember one thing, anything that you do
with a pen to a vector, it is layer as it is a vector. What is the difference
between a vector and raster? Here
is the difference. A vector is based on
mathematical formula. Arrest that is Bs on Faisal's. Again, a vector is based
on mathematical formulas. Errata is based on Thasos. The picture that you
take with your camera is arrested because it
made up of tiny pixels. When you bought your camera, they might have said to you, That's your camera
is to form a gap exists of 15 megapixels, which means the peaches
you take gridded contain 24 million pixels, consists of 15 million pixels. Now, what is pixels? Small squares with
color information, smoke squares with
color information, the combined together
to give you the image. What is a vector? A vector is in a graphic
which is based on mathematical formula
and not on pixels. For example, a simple
mathematical formula like y equals x, determined a straight
diagonal line, which is 45 degrees. No matter how much you zoom in, it will never lead. Why? Because it is made up of pixels. Let me illustrate. Suppose, let me hide this. So suppose you select
your custom shape, and then you select initiatives. So let me open up this. Then. Oop my legacy. If you are using the latest
Photoshop and you don't have this legacy shape and mol. Don't worry, go to window, let me click on the
Move to go to Window. And then state for shapes. You are going to find
it somewhere here. Here is it, click on it. And you are going to have it
open somewhere here for you. Then you see these three dots. Just click on that. You are going to
have this new tab. We are going to see
legacy shipping more. Click on that. And it is going to add the
legacy shape demo for you. When I open it, you
can see it from here. So let me go back
to here, my shift, select the custom
shape to click here and open the legacy
does have one more. You can isolate
it and delete it. Let's go. Then let me
be all the shapes. By the way, we are just going to select any shape that you want. And illustrator 3D. Let me select this. And then I'll click
and drag in Photoshop. You can hold down the Shift
key to keep it in proportion. And boom, we are going to
have a sheet with Karla. We deceived because see, when we look at the options
at the top here you can see fill stroke over here. We don't want us to
look for this one, so we'll click on this
and select new Carla. And boom, we are going
to move this to form it. And boom, we have RC. And also if you wanted
to change the color, you can't double-click here. And you select maybe let's
choose black for this one. So if we want to change
the color of this shape, you can see the thumbnail here so we can click
on the thumbnail, double-click on it, and
we can change the color. Let's choose black
for this click on, say this one is a vector. We can make it as
big as we want to. Let me make it bigger. What are the key drag, and it will drag
from the center. Click on Control or Command Zero to fit
everything into screen. Or you can use
Control or Command Minus to zoom in and zoom out. Let me zoom in Control
Plus to zoom in. So Control Plus to zoom in. I see that this
one is very sharp. It hasn't been translated
as TO very self. How we look at it is
very sharp, alright? Now if you make it smaller, just like this, let
me make it smaller. Make it smaller. Then hit Enter. Then Control Z for
the free transform. Free transform allows you to transform your Shift to
make it bigger or smaller. When you go to Edit, you are going to see free
transform over here. And you can see the
shortcut is Control T. When I zoom in, again, make it
bigger as you want. Click on Enter and X2 meat. And you can see that
this one has not been isolated y because
this is a vector. You can do this again
and again and again, and it will always
be very sharp. But this does not happen to raster images because they
are made up of Bezos. Once you make them
smaller dependence of down onto those Bezos. And once you make it bigger, it kind of mixes up. Remember, this canvas
is made up of bristles. So if you zoom in, it is going to peacefully. So let me zoom me. And you are going to see that
the simple start too late because the canvas that we are working with is
made up of Pesos. Now let's do the same thing. Delete this one. So I'll select this one, click on the Delete key, and then select my
custom shipped to again, select a C. We are
going to use this one. And then from here
with this one, we are going to change
from shape over here. So you can see Shea, let's let pixels, so I will
select pixels instead. So the first one was she,
there were episodes. Add a new layer. So I'll click on this plus to add a new layer. Here. Is it? You add a
new layer over here. Then with my shape selected, I'm going to draw another. I see this one is
made up of pixels, so let us see the difference. With this one. I make it bigger. You can see it start
to miss up a little, but it's too sharp. Do you can see this
one is too sharp. Contrast to fit
everything into screen. Control T for transform. And once I make it smaller, very small, hits
the antique key. Then let's make it bigger again. So I'll click and
make it bigger. You can see boom. You can see that it starts
to lose some information. That is the difference
between a vector and raster. Indeed, for me, you
can see that there's, the image has lost
all the details. It's totally crazy. I have a loop is very crazy. It has lost all the details. You need to know is that everything that
you do with a pen to a vector is a vector. Alright?
3. Part 3. What is Path and Shape: Now, how do we use the pen tool? It's pretty simple. Use the letter P. Don't forget about the letter
P is the shortcut for the pen to press the letter P on your
keyboard like this. Second, Let's watch.
You want to do, do you want to make a path or
you want to make a C shape? And this is part. That's
what you want to make. Either a part or what are those we will
get to that it later. First let us understand
what is path SLI, a vector line with no thickness. Again, iPad is the line, vector line with no thickness. If you want to make a path like this and you save it as image, it won't show up. You can add thickness to it. You can convert it into shay selection or do a lot
of things we did is took an ad this simple
but just a path is a vector line
with no thickness. All right, how to
make a straight path? It very simple. Click one, click to click again. And it, this way
you can be path. And one of the greatest
thing about using the pen tool is that
you can't go back. By clicking the unto. You can see that you'll
be able to go back. Just liked it does
amazing writes. A key. To make a
cave is very easy. Let's open up the points so
it becomes easy for you. Create a dossier. Then click and drag
to create a cave. You see this as a handle
and a 100 influences. Now, if you move the
handle this way, the handle, this will determine
the degree of the cave. Now what is degree? Degree is simple. 15 degree 30 degree, 45 degree, 90 degree,
0 degree, etcetera. All right, now, if you
make the handle longer, we will control the
intensity of the degree. Suppose this is the
degree we want. And if you make the
handler longer, we are changing the
intensity of it. This is we are changing
the degree of the k. We are going to change
the intensity of the degree by making
the handle longer. You get it right. Now, if you have a
look at the handle, it has two parts. This part and that part. This part influences
this gave and this part will influence
the upcoming k or k. All right, let me move
this one to the top. Let's all of them, and I'll move it to the middle. Red my pin, two
great adults here. Then click and drag
to create a cave. Then you can change
the intensity, move and within the cave. So this part is influencing this and this one will influence
the upcoming curves. When I click and drag, you can see this one is
influencing this one. All right. Now you can't, anytime
edited by holding Control or Command
key or Control key. And then you see
you can move it. I can even hold the control key, select this handle
and then move it. Just like this, pretty
much simple control key. Again, you can move this point, you can move this point. Let's go back. Let's understand one
more thing. Now. Instead of starting
with a point, we could have started
out with a straight. Are we? Okay? Let us go back. Instead of starting
with a point, if you add a movement
in the beginning, just click and drag. This one is going to
create the handle. Click and drag, and
it creates a handle. Then when you move forward, you click and drag
to create an order. Then you click and drag
to create another. And you say, where is this? When you click on Control or Command and you
click on the point, it review the handle. So you come here and
click on it and to view the handle missionary who the Control or Command key. And you can do
anything with it by holding the Control
or Command key. You click and drag to
influence the cave. All right, now what's happening is a cave is influenced by 200, so you can hold the
Control or Command to change the angle
of that cave. You can see it is influenced
with two handles. All right, From here, we can continue by
clicking and dragging. You can just click to
create the cave or wettest to click and drag and
then boom, we can end it. When you hold down the
Control or Command key, it takes you to the direct
solution to which you can use to change the position or
change the intensity of the K. Now why should we
use two handles? There are a lot of advantages of using two handles, all right.
4. Part 4. Tracing Shapes: Now if we want to
trace this circle, you know how to do with
the help of the pen to you click and
drag to make a cave. You click again and
drag to make a curve. Click again, drag
to make a curve, and then you can end it. Don't worry about this, we can edit it later. You can hold down the
Control or Command key and it will bring the
handles and boom, we can come through
this, all right. But at this time it
might not look wet. You let me turn this
on and look at this. You can see from
here is very sharp. If you want a smooth curve, you got to use two handles. And you can see
here is very sharp. Alright, so let me undo. Let's try again. Instead of starting
out with a point, our click and drag, and boom. I'll get two handles. And you can hold down the
Shift key to keep your handle. And then I'll click and
drag to bring out 200, and then click and drag
to introduce handles. And the paths will
be created for you. Click and drag. Then
from here we can end it. So let me turn off ellipse
or this seco and room. You can see this one is much smoother than the earlier one. Earlier one was sharp because of the point that we used by
instead this one is the sheep. So if we wanted to get a benefit smooth secco epiphysis, cave. Always use two handles, a set. If you want to make a corner, then you have to use a point. Alright.
5. Part 5. How to make a Complex Shape: Now that's echo was easy
editing have any sharp edge. How to make a complex like this? We are going to
make a complex IV with a corner. All right. So first of all, make a point here
where the help of your pen to click
on the letter D, then make a point here. You can use Control minus M Control Plus to zoom
in and zoom out, or just use Control minus or Control Plus to
zoom in and zoom out. Now let's click here, click and drag to
make a point here, you see is very crazy, right? So it's very difficult to make a point this corner
because of the interval. Let's click at the middle
click and make a point here. Then we can click here, and then we can get a cave. As you already know, to edit this one who would
under control or the command key to
control this cave. We can also hold the control
key to control this one. You can see this
one is a corner. Click. Once you can see this handle has
influences this gap. Alright? Now there are two
things that we can do here. We can move the handle and
we can delete the handles. So lucky to move
the handle here. So what you need to do, hold on the Alt key or Option
key on the Mac. Click and drag the handle
to move this cave. And you can see just like this, you have been able
to influence that Kp to get this night shift
that we are looking for. From here, we can continue
creating the handle. So let's go click an end
if we have just ended. But you can see our path
is not kept anymore, is a straight line. We can still continue to
make this one a cave. Just hold down the Alt key, which will open the
Convert Point two. That from year with a conveyed pointing to
when we click and drag, it is going to
introduce a new handle. When the new 100 introduce, just like we have. Then you click on the Alt
key to control the handle. Just click, remove
your hand from the Alt key and
click on it again. And then from here we can control only one
side of the handle. Therefore here we can
hold the Control key, click on the point, and then it is
going to introduce a handle for that corner. And from here we can
hold the Control key or the Alt key to control
this handle as well. You can see it's very simple. Just control it within
the control key. And then if we want to
open up the handle, just do Control key. And then we are going
to have these handles and we can control it from here. This is very, very easy. We just have to understand
the principles. If we want to be a 100 that
you have already created, just hold down the
Control key, click on it. It is going to open
those hundreds for you. And then from there we can
control the handle as we want. And also you can see
at the top you have the add or delete points. When you click on the Middle, see it at a point, and then we can hold the
control key to move that point. Anyway, we want to move
the point to, all right? I hope this is very,
very understandable. If want to move the point, make sure you hold
down the Control key so that we can toggle Gene where we want to move the point to where the Convert Point
to help you to add a point, we move a point and
also introduces handle decided basic
things you can do with it. So you need to know from here is that
hood or the Alt key, it opens up the converts point to Convert Point tool will
help you to ban handles, remove handles, and bring back. Just like this,
click and drag and this case I just click
and then come here. When I hold down the Alt key, it opens up the
Convert Point two. When I left and drag this
one brings me handles. I can bend the handle
holding the ALT key, and I can also
remove the handle. Visually have to add
or delete selected. When you have this, you see minus when I click, it, moves the handout, Alright.
6. Part 6. Tracing a Heart: Now let's take the game
to the very next level. Let's trace this hats known. Usually when we
are making a hats, what we do is we make
one side of it and we flipped us try to make
it totally symmetrical. But in this case, just for educational
purposes and just to lend, we're going to
trace the WHO hats, going to trace the whole hertz. Okay. I'm going to show you two or three weeks on
how to do this. First of all, we
can make a points. We can click and
drag to make a cave. Anyway, there we go, is fine. Then when you come here
you click and drag. Make a curve. Click and drag. And don't worry about this, you can edit it later. Then this one, I will
not click and drag. I'll just click because I
want it to be cave nest. I'll click and drag. Click and drag to make a cave. Boom. This one, I'll just
click and I'll get this. All right, so to edit it, hood under Control key, click on a point to
bring back the handles. Then we can control it. So just control it. But for this one we need
to break the handle. To break the handle, hold on Alt key, click and drag to
break the handle. And then we can hold down the
Control key to control it. Just like this. Select in this points and
then control dot one. And boom, we can also
control this one. Let me hide this
one for you to see. This one where you can
trees, these hats. All right. Here we could have created a handle and then we
create another one here. But what do we need to do? Get this right is to
break the handle, to break the 100 hertz c0. Do we need to use the Alt key? Down the Alt key. Then you click and drag
to break the handle. You click and drag
to break the handle. Then from here you can hold down the Control key to control it. Alright? Then maybe we made this
point and we don't want it. How can we remove this? Make sure you have the
add and delete selected. Click on it, and this is
going to delete that one. If we wanted to take one
thing away from this video, please just pick this. The less than a point, the Beta. Less than the points, the Beta. So always make
sure you finish up your tracing with
very less a point, which will give you a
very smooth curve, sheep, alright, so we cannot, and it's over here. Click and then end. It's been, we need
to break this one. Hold on the Alt key. Then we can break the
handle, put on a coin, True, bring behind those, and then we can
control this one. And boom, we can
remove this one. Then delete it. You can see how much we
are getting from here. Alright, so please, if you
wanted to make a perfect she finds make epiphysis using the pen to always
remember the lesser, the sheet, the Beta. Alright, let's check from
here. Let me hide this. And boom, Let's see
how very smooth It is here that we
have a point here. You can see how very
disturbing it is. It is not sharp and
it is not crispy. All right, Let's try another. We, let me delete this, click and drag this
into the beam. Then, then on the hats. We could have also
started with two points to click and drag to
start with two points. Then hold down the
Alt key and break it. So boom, we have
something like this. Alright, so this
undue influence, this cave and this
handle, this game. Let SPSS what I'm talking about. When I click and drag, this handle is
influencing this one. Just like this. And
then outcome and click. Just once. Boom, outcome and
click here, make a cave. We can edit this one later. We can end here so
you can see how the first handle is influencing
what I was talking about. And from here, hold down the
Control key, click on this, and then we can't control it, make it longer, so it's
covers everything. So let me make this
a handle also. Very long. You can get the profits
and always you can come back and then edit it. As I said earlier. You can just edit it. Our key. Normally, when you hold down
the Control key to edit it, you can see its effect
both sides will. If you want to affect
only one side, you just have to hold
down the Alt key. And the earth Q will just come through only one side for you. Alright, can I show you my favorite part when it comes
to the use of the pen too. All right, I hope this one
will be useful to you. When you click. Don't make indicative. Click again. Just click where you
think a point will be. Click where you think a
point is going to be. Then click another here, and let's end it with this. Do you remember the
function of the Earth key, the key bands removes
and bring those. We are going to hold
on the Alt key, click and drag to bring
the handles and boom, leave it, would it again. And then we are
going to break it. Leave it, read it again, and break this point and
move this one as well. Then we are going to bring back this a handles
hold on the Alt key, click and drag, leave it. Would the Earth key again, and then we can control it. The last one, the same thing. Hold on the Alt key, click and drag to
bring the handles. You see we drag it below, plus c2e, just ten it. And boom, we have it. And you can hold down the Control key to
influence this sheet. Influence this gave an
influence on caves as well. I hope this was useful. Let's move to the next one.
7. Part 7. Assignment - Treace a Heart: Hi, Today we are going to use this as our first assignment. We are going to be
the same thing. Then CVD, me to see
how far you have come. See you in the next one solution, we are going to use the pen
tool as you always know, what is the shortcut P, click on the p, and then you are going to have
the paint to n. Once we are going to meet is
we are making a path apart. You will start with
a points just click. Then we are going to make another kVA click and
drag to make a cave. Then I'll click and drag
to make another caveat. Okay, So this will
introduce new handles, click and drag to make
another cave here. Then I can hold down my control
key to control this one. Then create another Kavya, and then I can
create another kVA. But you can see this handle has influenced this one to my sue, the Alt key or Control key. And we are going to
certain days handle. Then we can zoom in. Then we can create
another one here. Okay? Let's create
another one here. So let's see, let's see. Create a productive. With this one. We need
to break the handle. So to break the handle
hood or the Alt key, click and drag to break the handle and make
the handler sorta. Let's make this under sorta
holding down the Shift key. Or you can also use the
Control key if you want, then you are going to
meet this one here again. I'm going to control this
one to fit my imperfection. And it's alright. And you can also bring back
the handle and control it. From here, you can take
your time and adjust these points and make sure everything is perfect
before you shared with me. Here is the solution
to the assignment. When you are done, you can
click on the hats, high days. And from here you can click
on shape. At the top here. You click on Shea, make the shape for you, then select the
move to over here. So you click on this and
you select outside womb. This is the sheet that
we have greeted with a pen to see we
can share with me. Go to File, Save As. And we're going to save
this one as a JPEG. So let me save as a copy here. Save as a JPEG, choose a location
where you want to save it. And let's see. Click on that, save it. And if one to keep
the PAs default to, you can go to File Save As. Then we can leave this one. With this one, we are
going to choose PSD file. Click on C. And boom, you are going to have
the PSD file as well. So that's it for the
assignment Z you in the next complex
selection using depends.
8. Part 8. The Pen Tool Family: Now let me introduce you
to the pen to family. If you are using the
paint to this edit tools, you'll be using alongside it. The first one is
appended to itself, which you have used. The next one is the
Free Transform tool. Let me tell you, you
will never use it. So this one, what do
we use these to do is that maybe you want to make
a path around the shape. So you need to do is to draw really free form to
around the shape. At the end of the day,
it is going to give you that she barely have been
using a pencil to do, but it is not a great. Maybe you are using the
pen with a tablet which is going to help you
achieve your papers. But to be frank with you, you will never use
these to arise. So next is the add
anchor point to the Add Anchor Point to help you to add a
point to a shape. Then from there you
can control it. Thus simply what
does it help you to add an anchor point n? You can control it from. The opposite side is
delete anchor point to the delete anchor points to help you
to delete a point. When you select the point, if you just click and
then you can delete it. Alright, so that's all. It is. Just a later point
and delete it. Now, the other one is the Convert Point to
convert point to, let us say I have this shape and then I don't
have any handles. So I want to introduce
a new handle. The periphery to you is
the Convert Point two. So you just have to
click on it, read it. And it is going to
help you introduce the handle that
simply what it is. Will it help to
introduce a handles? It helps to control handles. It brake handles. Maybe you have a cave and you want to turn
it into a corner. It is the Convert Point to which you are going
to use to do that. So we did Convert Point tool. You just click on a
corner to make it a cave or you just
tend to be a corner. So it introduces, it, break condos and it
paints, handles. It does what the Convert
Point tool does. So you literally have to know what's the Convert
Point tool does. And you don't have to
even come and click on Convert Point tool
by clicking on the paint to Sulla
it view audit tools. And then you select the
Convert Point tool. You just have to
click on your odds key on the keyboard so that
you have access to convey, point to, and boom from. You are going to make
changes to your shape. All right? Also the Kavita 0.3 help
you to move or pointing. So maybe you have this point. You can click on it and move it to where you want it to be. And you can also use it
to create a new point, like using the Add
Anchor Point to give me that pen tools will
help you to add a new anchor points
where you can use that to introduce a
new point as well. And also the calculator point
tools will help you too. Draw a nice sheet. When you are drawing the shape, it will help you
to trace the shape according to how you want it. That one is going to be
in a different video. That's where we are going to
dive deep using the pen too.
9. Part 9. Pen Tool Family Alternatives: So just how to assess these. Add anchor point and
delete anchor point. If you want to add
an anchor point, make sure you have
your pen to select it. And at the top here you
can see ad or lead. So we can use this one
to add anchor points, and you can use
this one to delete anchor points to
make sure you have the wet path selected MSI hood now the
control or command, if you're using a
Mac and click on it, click on the pattern,
it is going to make sure it is selected. So this one makes sure that
you have the path selected. Then when you come close to it, see how it tends to plus, that means we can
add an anchor point. So let me add one here. Boom. If you want to delete,
you don't have to assess the Delete Anchor Point
says to add slides delete. So if you're able to have, when I come close
to this, just see, it tends to M minus that means I can delete that one also
Zoo when I click over it, Italy that and go point. Let me try again. So to add an anchor
point to your backpack, just click here,
there is no point. Then if you want to
remove that path, just have overdub lease, it turns into a minus and then you click to
move that path. Remove this, remove this, and that's how it works.
10. Part 10. The Curvature Pen Tool: Now, let us blow more on
what's the Cayuga pen too? When you click and you
drag open the pen tool, you're going to see
that k bigger than two reductive paint to let
us say we have this shape. We have this nine sheep. And then we can use the
pen tool and then use the techniques that
we have lengths you click and drag to create a cave. Then you break their points. You create a cave, then you make your path
according to how you want it. Then down the control key
to bring back the handles. Then we can come through
the handles just like this. When we use the pen to this, the result that you
are going to get. Let me delete this path. So good path tab, click and drag this
one to the beam. All right, so for
me, instead of using the pen tool to make the
path around the sheep, we are going to use
the same pen x2. By this time we are just
going to create points. That point, and at that point, so you just click
where you think Definitely It's
going to be a point. And then we have
our sheep already. So this is where the
caveat point to come in. With the help of
the cavea pen tool. You click and hold
and depend too. And it is going to
open the family. Then you are going to see the
cavea paint to select that. And then without one, when you come near to
where there is a path, going to get this plus symbol. So when I click and drag it, it's going to create this shape. I'll just click and
drag with a caveat to, and boom, I'm going
to get my effect. So this is a very simple way to ease or help you
speed up your selection. Everyday activity of paint
to you are good to go. So I really love this
path visibility mice. So if learn to master or
improve your Pen tool skills, you definitely have to be
used in the cavea, tend to. All right, so let's
try the next one. I'll hide this one. Click this work path and
put it in the dustbin. Ben, let's say we have this Sacco with the
help of that bend too, willing to create a point. It I think definitely there
is going to be a point. Then from here icon
and then click, select my kVp up into the air. When I come here to
please lie this, I'll click and drag. See how very easy and simple
it is to use the pen tool. You click and drag and position and bring
this one in position. So we won't do bring
this one in position. All right, so let me turn
this one off and see how more accurately
this you can see. More and more agree
that we have VA. Okay, let me delete this path, this work path, and then
let's try the next one. So the subsequent
value is going to be for your own assignments. So let's try this
one with this one. Instead of using the Pen tool. Click and drag this shape. So let us see you click
you drag to create this. If you hold the Alt key and then you click and drag to
have something like this, then going to break the handle. So I'll click this. Pin two is here to
save you more time. Let us go back. Undo, undo. Let's say I have a point here. I know definitely I
will have a point here. Click another point here, and then I'll end it. Then I'll go and select
the cavea pin to know. I'll just click and drag
this one in position. Click and drag this
one in position. And then you click and
drag this one in position. Like I said earlier, if you want to make
every size selection or a precise shape, then you have to go
for a lesser point. The lesser the points, the more accurate your cave, your shape is going to be. Alright, so we can see
really help of day. We got pen too. We have achieved this one. Just a second. Let me repeat any of the shape. You can go and try
this one on your own. All right, So from here, let me go to the path and
let me delete this band die. We have, we are going to use this one as your assignment and really help of your pen to end the caveat pen to come out
with a precise election. Then I want to see
your final results somewhere on the page. Just share with me.
11. Part 11. Where to Locate Path: Now you must be thinking, whatever we do with a bend
to doesn't show up in Lear. Why? Because after
all, it's a path. So it doesn't show up in layers. Instead it shows up
on the path tab. This case, this one that
we drew here was in here. Let me draw this
one for you to see. So let me draw this and it
can't find it under layers. But when you go to the path, you're going to see Webpack. Create a new layer, click on the plus, and then let's
create another one. And then boom, we are going
to see different one. Then let me make another
one for you to see. And we have another path. So if you want to
read the other one, just click on it and it's
going to review some B2C, whereas APAC just
go to the park fab. Boom, when you
click on the path, it is going to review itself. And later you can
convert it into shape. You can fill it, whatever
you want to do with it. You can do with it and thanks, you must be thinking, read it apart goo. It's not lost is
available on the path. If you want to assess it, you just have to toggle between the layers tab in the past. And you are going
to see because I'm paying when you
are using the path and then you click on the
Control and click and outside, you might not be seeing the path and you must
be thinking it is lost. It is not lost. If you want to assess it, just toggle between
the layers and the path tab and add the path. We are going to see the
other part that you have me. So when you click on this, but it's going to show, when you click on that one, it is going to show itself. Okay, so now let's
try this example. Let me draw this path. Let me close this one. And if you wanted to break
it down the Control key, and we can hold down the
Alt key and break this one. All right, This is a verifying
key, drawing, alright? If you want to fill this one, you can choose from
here, select she. It'll fill it for you. You can go to effects, solid color and you click it. And I want to fill it for you. You can feel your path to
become a sheep like this. What is the difference between, but in sheep Is apart with Phil. All right, path. There is nothing in it. By the sea. We have a fill
or we have a color in it. That is the difference. Alright? But the interesting
part is used to see the path after you
filled it with a color. When you go to the path tab, we are going to see color
field which ship path, and you will still
have the right path. So let me turn off
the color fill and still you are going to
see the red path or by day. All right, So with this one, we can also do it in
other way around. When you select the Pen tool. At the top here, Michelle, you have Shifts selected instead
of acidity different CA, we have shape and
fats and episodes is grayed out because the pen
tool doesn't deal with pixels. You can insulate
cheap street away. When you start, it
automatically start to fill it. It is IDA is delayed path. Then you make your path, you click on Solid
Color and fill it. Is that you can go straight
to insulate shape over here. And when you drill
to make your path, it is going to turn into a she.
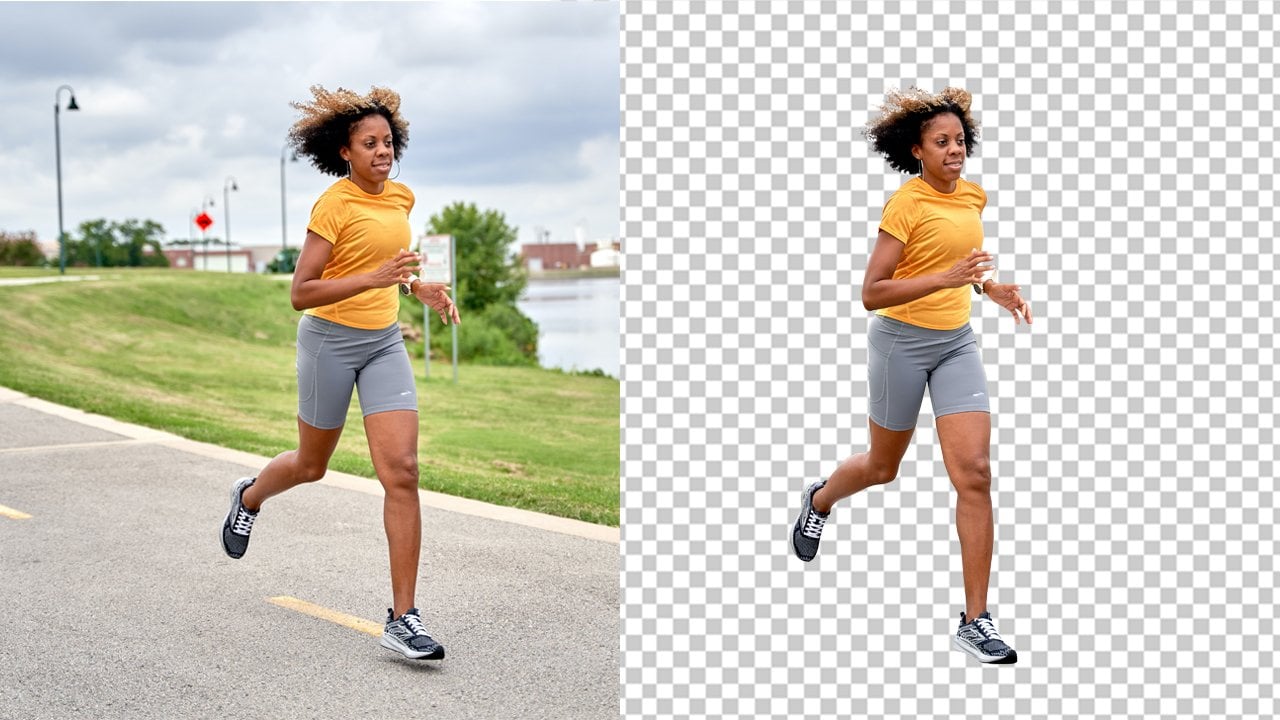
12. Part 12. Application of the Pen Tool (Make Precise Selection): Now what is the
application of depend too? Believe me, there are so many application that
is beyond this video, from making a simple
shape to accomplish sheep for selection and
so on and so forth. Adobe Illustrator has a pin
to any drains off to a, also has the pen to assume anything that
you can do with a pen to. That is why it is available
on all these applications. Now if we want to make
a precise lesson, if you have had edges, if we are dealing with the hair, then I will commend you to
use the select MAX XP is to remove background if the
image have a hey, all right? Okay, so if you have a
hard against lightest one, wanted to make precise
selection around this, then append Xun is the
right to go with over here. Alright, so if we
want to know some of the applications
of the pen too, I think we have already gone through, but
let me show you. So I made this path. Let me remove from SHE to path. Then let me draw this path. When you right-click,
you are going to see you can create
a vector mask. You can delete the path. You can create a custom sheep. You can make a
selection out of this. So when you click
Make Selection, click on OR gate is going
to make a selection. All right, let me right-click create
the victim axis is z, that it marks that area. It hide the other path, NEC. You just have these, but these are some of the
applications that we can do. Or you can toggle
with the pen tool. Let's try to make this in. Select your paint to
remember the letter P to zoom in like
I have done here, you can hold down Option
on your PC or Mac, and then use your mouse to zoom in and zoom
out when you zoom. Let's start from here. Remember, we can start with a point and then
we can continue. But from what you have
been to let us start with two points or 200 to our click and drag to
bring two handouts. We are making a precise
selection around this click and drag
angle is created. Those two Massu, who
down the Alt key or Control key to
shutting the handle. Okay. We are okay with it. Next click and drag
to make your sheet. And we can also
control this one. So to control it down the
control key to control it. Let me click and drag. Click and drag over here. If you didn't get the
positioning right, Don't worry, Don't undo, just move it, hold down the Control key or
command key to move it. And then I'll click and
drag to make this path. Here is three, so
it's very easy. And boom, we have a caveat x2. It will click and drag
to make that cave. Then from here, let me
break the handle to break the handle
down the Alt key, and break the handle. The Alt key, break the
handle into the handle, and it controls the handle. Alright, so does the
functioning of the Alt key. Click and drag to
make your path. Just like this click and drag. We can toggle with this one, hold down the Alt
key or Control key, them awake, and
then you continue. So click and drag. Click and drag. Click and drag to
make your selection. I'll click here and drag
and there's two max PCA. And then bend this one in. Just like that. Click and drag to
create your path. Straight lines. You
don't need to worry. Go up to the edge and
click over the two. Great for you. We can click to create
a point and drag to create or bring the handles to click and drag
to bring this one. Click and drag to
bring this one also. This one in this
hand is too much, so I'll hold down the Alt
key, certain the handle. Then, boom. I recommend to you
if you want to make a precise selection, just like I'm doing, make sure you use the pen tool. Then you take your
time to go through. If you wanted to become
comfortable using the pen to please practice, practice, practice because it is prejudice that is going
to make you benefits. So you will click and drag to bring this one to
the edge of your shape. I think we have a problem here. So click on the Control
key and then this one. Then let's shorten
this is too long. Then also, let me sort in this one as well who
hadn't done the Alt key? And boom, we have
made our selection. Next. We are going to make a
selection around this one. So you can see at the top
here, make a selection. We can make a selection here. Click on okay. And selection is going to
be made around the can. For me, we can duplicate that layer to have it
on a different layer. And then we can apply
a background to eighth later due to duplicate that layer control plus G plus
G to make that duplicate. And when I hide this layer, you can see that we have made
a very precise selection. Then from here, let
me add a background. So go to FX, click on Solid Color and then you choose a
color you want. And then you click
on OK to apply. And boom, we are going to see the object against
the background. This is one of the main
application of the paint to remove backgrounds
of an object. Let's see, this was before. Then. Let's add this one. And boom. You can see this one
is very perfect. And if you didn't
get anything right, you can always go
back and you draw. Maybe here was to my x2. Let me click and make
the correct path. All right, click may decorate, but there are new align, just close it and click
at the end to close it. Then when you click
on selection, click on Alt key, and you can't click on the Delete key to
delete that layer, but make sure you have that
layer selected over here. The layer is selected, click on Delete key and boom, it is going to
remove that area for us control to fit
everything into screen. Now, our next assignment is to also remove the
background of this. I have done this small one. Yours is too the way
the big the big bottle. Then you share with
us for everyone to see how far you have come. All right, next one. Let's go to the
next application.
13. Part 13. Part 13. Adobe AI Selection against Pen Tool Selection: Now let's look at
another application of paint to this one too. We can see that the edges
of the image is not crispy, is not sharp, so you
can use them in-built. We move back or selection to remove that
background for you. But in this case, since here is not sharp, when you use that,
it is going to make the selection not
properly cutouts. If wanted to get a properly
cutouts with an image, with a play around the
image or the edges. Then I recommend to you
to use the pen tool. And as I was talking earlier, if you have a complexity, this one is normally
accomplished. So when you use the pen tool
is going to be an ideal. Let me illustrate this
one for you to see. Let unlock this one. Click on this. You can click and drag this
one to the beam, and it will remove that. Then with this one selected, go to Window, then
say four properties. Click on the Properties and then you are going
to have this one. Click. And then you are
going to see quick axiom. You see Remove Background.
Click on this. We failed that load. Photoshop is going to remove the background for
you just in a minute. Yes, we worry, too
happy and boom, the background is you move
and it added a layer max. If you don't know
what Leo Marx is, our tackle that one in a
different codes as well. Alright, so we can
verify from here that the selection
that was made around these images is
very poor because the immediacy crispy
and it didn't have a hat against here
was a little bit or k, But here is not. For the hair. Very lucky. Let me add a background for UTC. Goods I just meant
add a solid color. Let's choose something like red. Click on, Okay, then I'll click and drag this layer beneath
the image and boom, you can see some of the image
is being cut out as well. Was okay for the selection. But wasn't because let me toggle between these because he
didn't have hard edges. To make this right. Use the pen tool. I'm going to use the
pen to here for you to see the outcome that we
will get using the pinch. First of all, it will
start from here. I'll click and drag
to bring the handles. Then click and drag to
bring the next handles. Click and drag. Just like what you have
learned throughout, is the same thing that I
am applying over here. You click and drag quickly. I'm going to walk through
this and when I'm done, I will share with you
the final outcome. To conclude. And boom, to finish. In here, come true
to fit everything to screen and left-click
on the selection. Click on, Okay, then let's
duplicate this layer. Control G. Control G to
duplicate the layer. And boom, let me hide this
one and see the difference. Well, this one is
very much okay than the earlier one because I
compare this with this one. Let me turn this one off. This was the first one. You see. Here is not sharp. Some of the
information is carried out by c. This one is very sharp. It keeps all the information and you can see
everything is very key. The first one, all right, so that's the difference
between using depends and also using Adobe to mix
the election in Photoshop. If you have had, then I can tell you that when
you go with the other VEI is going to make a very
precise selection for you. On the other hand, if you have
an image creates rough h, then the pain too
is what you should consider in making
that selection. For this video, let's look at our assignment for
this budget as well.
14. Part 14. Frequently Asked Question on Pen Tool: Now, one of the most
question that we get a lot is suppose you
are using a pen to click on P. And let's say
we are using a pen to draw a path just like this and maybe hold down the Control or the Alt click somewhere else. How to continue on this? So maybe you have
selected a different to how do you continue
on this path? Just click on P, Make sure you
have the pen to select it. Then when you hover over this, let me have over this. And when you reach
the last point, you see it shows us symbol. Does the connect symbol click on it and it is going to
bring back the handles, or it is going to connect
you back to the path. Then from here, we can continue
the path just like this, and then we n. And then from here we can
end the path. All right.
15. Part 15. Project Work: Now we're going to use the pen tool to make
a selection around this image using the techniques that we have linked earlier. Alright, so first of all, I'm willing to do
it automatically by using the Adobe says a to
remove the background. And then from yet you
will see the different. Your part is going
to use the pen to make a precise selection, to make a precise selection
around the sheet. Then then you are done. You share with me so that I
can see what you were able to come out with this
opinion in Photoshop. First of all, our click on
the image to unlock it. Let me undo control Z to undo, or I'll just click
and drag this image into the b that we
can find over here. So that is the b. Then for me, well today windows
tab over here, so here the Windows
tab click on it. And then we're going to
set four properties. Click on it. And you are
going to have this panel. Yes, use this as glue down and you're going to see
Remove Background over here. Then I'm going to click on this. Evidence is going
to use sleep at figure intelligence to move
their background for us. And your part is work
on this as a homework, not really a homework
for you to practice, whereas you have length. And then when you get a
precise relation that we want, you share with us so that we will be able to know
how far you have come. All right. Let me go debug on to View. And then you will
see the difference. Additional paths, youth,
it Adobe says A2, move the back one for, let me zoom in to Zoom
mean Control plus, or Command plus to zoom in. And you can see from here that the selection that came out wasn't precise because we
have some Hitler's year. It is not sharp, it is not crispy. What we are going to use to make this selection and
make it very crisp. The US we wanted is
to use the pen tool. We are going to use the
technique that you have linked earlier to complete this
blue yet, all right.
16. Part 16. Recap: No, I know that this was a lot of information
for you to take in, but i then it all boils down to one thing, practice,
practice, practice. You have to practice, practice, practice until you
get your hands on it. Alright, now, just
a quick recap. What does depend to? Depend to allow you
to draw two points, point a and point B. Alright? That's all it is. That link and be a cave. That line can be line. Alright? Then to allow you
to draw two things. But what is a path? A path is a vector line
with new techniques, whereas a sheep is
a part with a few. Anything that you do
the pinned to a vector, not errors that you do
with append to a vector. Not errata sheet,
again is a path with a few they see is at the lowest level while
the path is at the top. All right. She is an alias tab while
the path is the path. What advice I've
taught the initial, remember again P, again
and again and again. Remember they said gut, that is the shortcut for
depends with the lipid P. Always remember this shortcut. If you wanted to become a
master, use the pencil. Then AS or the Alt
or Option key. What does it do? The up key into disuse handle. It leads handle. The handle. When you hover over
the anchor point, it convert it into
a convict point. Alright, so here is
the Convert Point to cover up an anchor point. It converted into
a convenient point to it introduces believes, handle, it, Beth, handle. All right. There is the
controller command key that is used to edit a path. All right, click on a point. You can edit the handle. You can do what ever you want using the Control
or the Command key. Alright, so that's it for the append to this
course or very helpful to help you introduce you to start using depend too, as you move your journey in
learning Adobe Photoshop. This is going to be it. Don't forget to
continue progressing. And also misery. Come around to check out my other courses
that I have around. Thank you very much for
joining me on this section. See you in the list costs. All right.
 Solomon Opoku Afriyie, Graphic Designer