Transcripts
1. Introduction: Hi there, my name is Solomon. And in this class I'm
going to show you how to move backwards
in Photoshop. This class is meant for
beginners and dummies. I'm going to go slow and
deliver all the information. Soda vehicle full alone. In fact, there is
a lot of ways of removing backgrounds
in Photoshop. What I'm going to show you is a technique that
works in most cases. And if it doesn't,
only need to do is to fine tune your image
a little fresh. Keeping in mind
there is a lot of ways of moving
backwards in fiducial. I'm just showing you
a technique that I think works in most cases, and it's actually very simple. Let me show you how to
do that before the FEC, anything that you like or teaches you something
in this class. We will do two things for me. Firstly, give this
class a timestamp. Secondly, write just in few ways why you are
enjoying the class. These recommendations help other students to
see that this is a class B too might
enjoy and learn from. If you'd like to
leave me a comment or a question, please do so. I read and respond to all your comments
and your questions. And I look out and respond
to all your class projects.
2. Part 1. Resources files: If you want to grab
this technique in the same for two data,
I'm going to use, use the link provided
somewhere on the page too diluted and
follow along easily. And also you can restate
unspliced.com is see that I visit a sprite.com
to dilute this in registry, can visit unsplash.com
to dilute this images. But I will leave a link
somewhere on the page for you to dilute them very easily. These are the images that
we are going to work rate. And what we are going
to do is to remove backgrounds of these images.
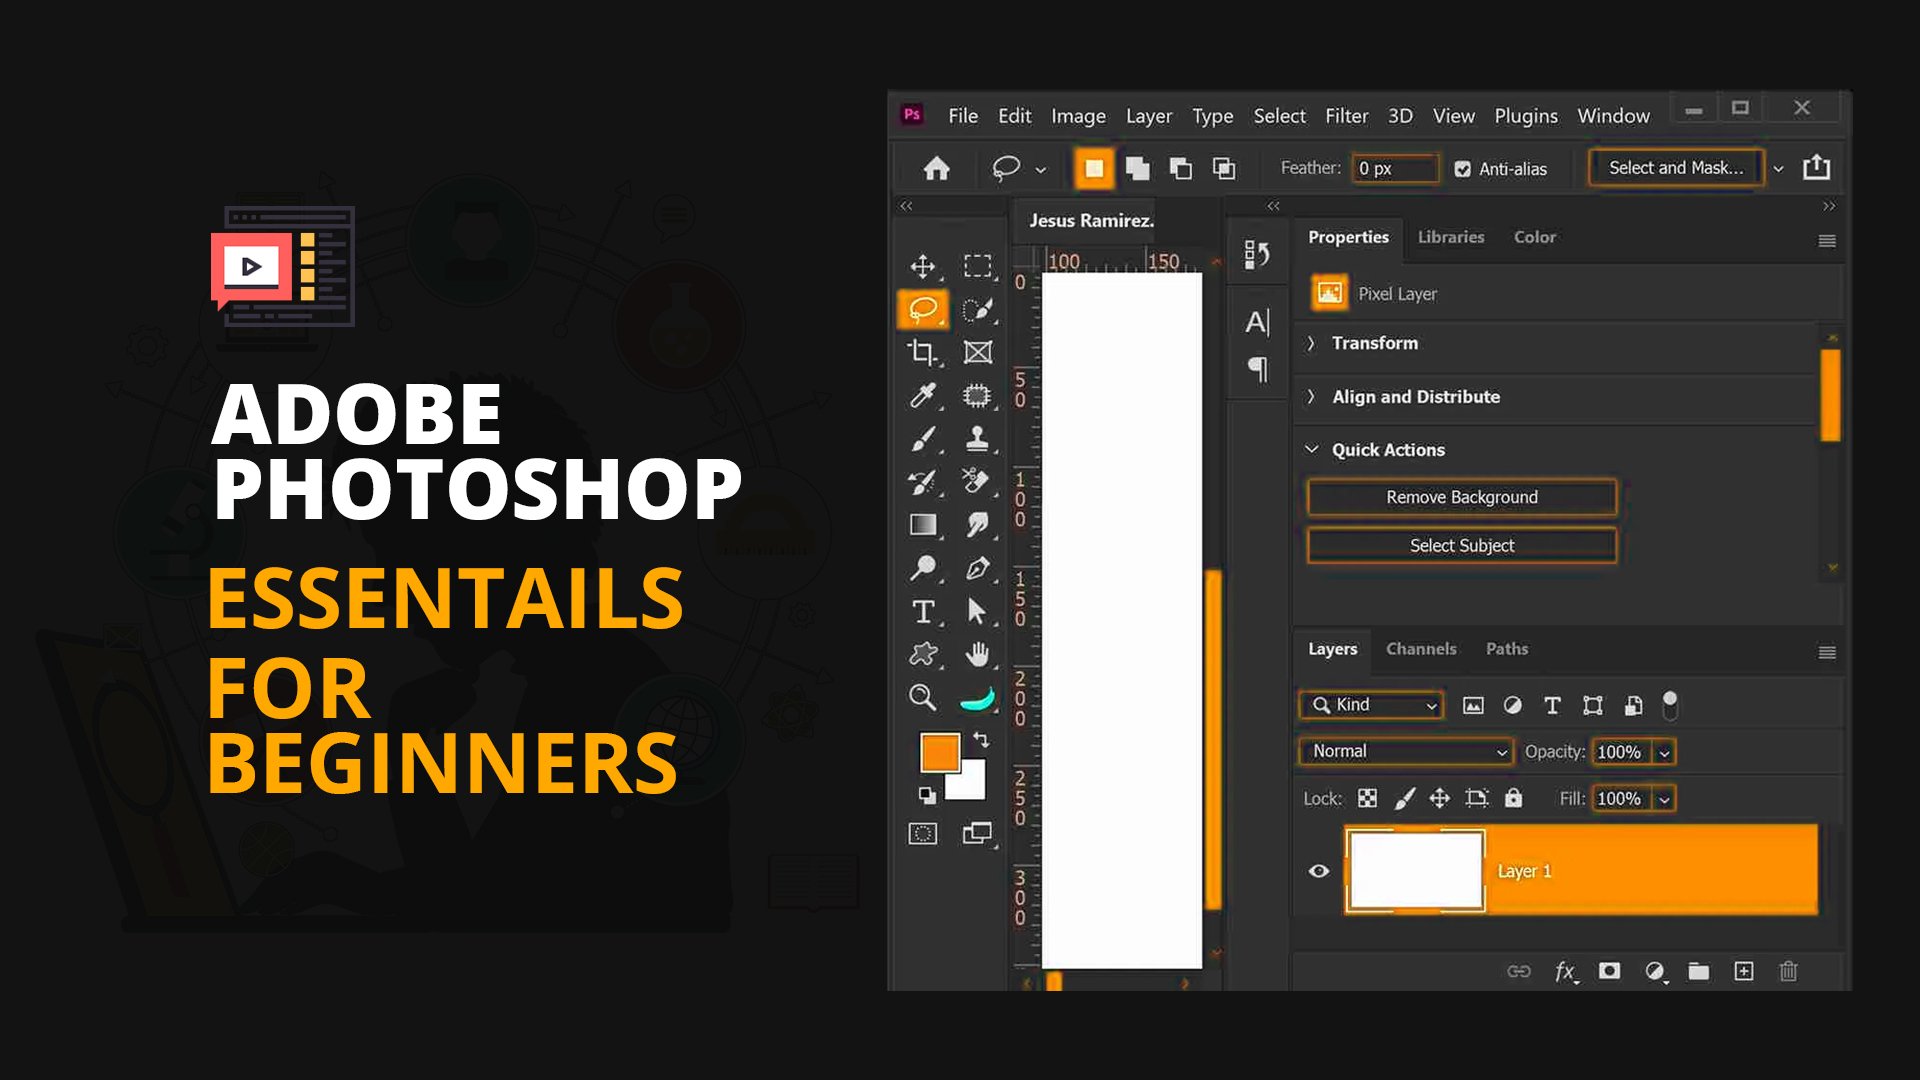
3. Part 2. Select and Mask Workspace Interface: The first is to actually open up the image in
Photoshop like this, you select your image,
click and drag, hover over Photoshop
and then leave it. And it's going to appear
in footage off for you. So I'm going to use
this image from here. All you need to do is to go
to Select and select a max, this dedicated USB
Ethiopia to make precise. And Maxine, the left-hand
side is c, is a tuba, which is also fine in the web love Photoshop interface that allows you to make
selection at distillation, Zoom and also pan
around your image. Above that is an option, but this gives you more settings for
currently selected two. Onto the right, you see
I just above properties, these control can further
funding your max or selection.
4. Part 3. Select and Mask Tools and Panels Explained: By default on their
properties panel, you'll be on the
onion skin mood. And the transparency
will be at 50 percent. In my case is 20 percent, and then transfer it to allow
you to see that we have selected up against
the original image. In this case, we
don't have anything selected through the
original image is viewed as 20 percent since my eyes at 20 percent once we
start selecting for it. And when you use the Quick
Selection Tool, I've seen, you see the selected
style will be viewed at a 100 percent up against the original
image background which will be viewed at
20 percent are yours, will be viewed at 50 percent depending on the percentage
that you have here. In fact, there is a
lot of ways of making installation and Maxine in the
select and mask workspace, you can start by using
the Quick Selection 2, as we have already used, and you click and drag over the areas that
you want to select. And photoshop automatically
define the edges and select the e-mail that you
reach towards the light. And also you can use
the zoom tool is here. You can click on that
and you can zoom around and you can click on the hand to move your documents are wrong. And also when you are selecting
with the quick selection to a new selected and we
want to bring that area in, is that when we are
making the selection is on the Add Selection. So we can also subtract
from the selection. So when we click on
that, and let's zoom in. Then on the Quick Selection
2 minus on the top. And we can also subtract the selection that
we don't want. That's one way of
making selection in the selected max workspace.
5. Part 4. Using Adobe Ai to Select Subject: If you are working on a
newer version of Photoshop, like Photoshop 2020 or 2021, like using the photo
joke 22 right now, you can click on this
select subjects over here. And Photoshop will use
artificial intelligence, known as Adobe sense to make the selection around
the image for you. So right up here you can
see select subjects. So when you click on it in
Photoshop for dental me, this or discard your
current selection. Do you want to continue? Yes. And it is going to use the AI to make the
selection for me. Alright, so for me our
double-click on the Hangzhou to view the image as a 100
percent or to fit the screen. So you can see Photoshop
did a fantastic job. It took only one click. Any crazy Photoshop is able to make the selection
around the edges. So let me zoom in and see that the selection
may not be perfect, but we can fed up
fine tune this to get the preferred result
that we are looking for. Also assign this. I want to show you a tool that will allow
you to do this in an inmate that has two or more subjects and
you only want to keep one. So let me switch this one to a different image and then we will come back and
continue from here.
6. Part 5. Using Adobe Ai to Select Image that has more than one Subject: In this image we have
more than one Soviet, about eight to ten people. And if we click on
Select Subject, Photoshop is going to select are the main subject that is
CCA buy we don't want that, so we will use the object
selection to click on that and make sure that
the mode is set to lasso. And then we are going to
make a very loose selection. So maybe you want to
select only this woman. So you have to do is to make a very loose selection
around it in the footage. And we're going to use eight
at Fisher in Delegate suits. The latest update for you
and all you have to do is to just wait patiently
for it to finish. If you have image with
more than one subject, then use the object
selection tool to select the main subjects. And if the image has
only one subject, then click on the
Select Subject button to make the selection for you. So right here we can see that the image is being
selected for us, and that is the power of artificial intelligence
in Adobe Photoshop. Back to our original image. Again, our click on
Select Subjects and Photoshop is going to use it
artificially intelligent, deselect the subject for me, this automatically generated
selections are not perfect. They require some
fine tuning z2. Let's work on that next.
7. Part 6. Refine your Selection: I'm going to select
the zoom tool and then I'll zoom
into the shoe. And normally it is a shoe or the fourth day we have problem when we use this type of selection to really
help of the Zoom, to use Zoom and you consider part of the flow is
being selected so we can increase the transparency up to maybe 60 percent Sudan. We will see the barcode EBIT up against the original enrich. So for me, when it is down, you can see a lot of
the background image, but we want to see the image more than
the background in B. So in this case we are going to see the areas that
we don't want, but it is part of
the installation. For me, we can define it and therefore we
have a couple ways of adding or removing
a die we don't want. We can start by using the
Quick Selection Tool, everyday quick
selection to select it. You can see this is a
very tried to pin it to add the areas that
we don't want back. Or if you want this
eraser can just click and drag and it is going
to add these areas. All right, so Control Z to undo. So for me with the installation
to selected at the top, you can see we
have them plus and the minus will
click on the minus. End with the mind is
when we click and drag is going to deselect
the selection. And you can use the
square brackets when a keyword to
either increase the size of the selection
or decrease its size. So we can use this to fine-tune
the age of the shoes, so we'd have rights
to select it. We can also paint with a minus, and it is going to erase the part that we
don't want through the Quick Selection
to the Bryce to iterate the scene or it's
performed the same thing here. So we just have to choose between them
which one you like. I think the price is
working more than the Quick Selection Tool
that I was using a media. Some part of the issue here
is come to our click on the class to bring
those areas back. Alright, and we can also use the shortcut
on your keyboard, also on Windows Option on
the Mac to erase the parts. And you can see that
when I click on the odd, it changes from a plus. So you see this one has an a plus when it is on the plaza
and I click on the odd, it comes to the minus 3. Can click on that to
increase your workflow. And you can click and
hold on the Space bar. And you see that it
turns into a hand. You can use this one to
pan around your image. I'm not going to spend
much time here fine tuning this because this
video will be two lungs, but please make sure
you spend much time on your project to
get a good result, to make sure you
spend a lot of time on your project to bring all the details that you need to bring together good selection
that you are looking for.
8. Part 7. Refine the Mask Edge with Global Refinement Sliders: But I'm going to do now is
to fix them, muster out, double-click on the hand to fit the screen so that I can
see the entire image. So what I mean by Max day, this is a relatively
company layer marks in a non-destructive way
of hiding pieces too. I want to adjust the
edges of the MAC Sudan. They don't look Jackie blurry or have any unprofessional
look through there, you can get a better
car out in this by now we have the global
refinements like this. We can see some with the
feta contrast and shift. These ladies will conclude
the edges of your max. And I knew if you're
just starting out, you might not know
what dummies who screw up and that view our
select black and whites. So this is how our
max looks like with maximize reviews and black
conceals hey, images, right? Because we want to keep, hey, so what I'm going
to do is to remove our jag is in this max Sudan, we have a better car out. So under the global refinements, our stairway, the smooth
by, first of all, let me zoom in and you kind of see the image is not smooth. And we can also find some
unprofessional Luke over here. Sseuda right here
means that it's going to use a recurrent branch 2 and then brush over this lease minus
elected us on obscene. When you select a plus, it means you want
to add up please. We'll just clear this place. So our ad you to spend some thing to fine
tune your maxilla. You get a good cut outs. So you have to use the
Brush tool to remove are there on that but from your
MCS varied a good verify, make our inquiry this smooth. And then lifo, what
is going to happen? You can see that the edges
now looks smoother than the elaboration or because of one-click by dragging
this mudslides. And we can also
increase feather, but FedEx simply means
blurring and we don't want to blend it in some
instances, you may need that. So let me increase this
slider and let's see. So you can see that the ages of the images blade and
we don't want that some instance you
would like to increase the feather to have
bled around your image. Then I'll increase
the contrast later so the contrast slider will fit and make the edges sharper. So we're going to shift age sometimes when you
create a selection in Mencius and fringes on the edges which was
not cut out was week. So you can see the edges
into reduce those fingers. So let me go to View and turn this one on
black and non-black. We are going to see this image against black by
Misha to increase the opacity slider over here to view that
black 100 percent. So we can see this image up
against a black background. Alright? Alright, so with the help of your zoom to see
many Zoom meeting, you guys see that we have some more professional look on the edges of the selection. So what do we do to erase
these fringes is to, is to shift the edges into, let me drag this ship edges later are the weights
may be negative. So our sieve the edges light as E and it'll prevent
those for engine. So you can see this is after, and this was before. So you can see before Androids, It's really add
something to this. And it's very cool when
you apply this technique. But something too,
when you see that the fringes or this
on professionals are two magic and easily pick the branch 2 and paints
with maintenance to erase those unprofessional in your max and again in
your previous events, electron more time
than I am 21 in this more details will
make a big changes. Our double-click on
the 12 to fit to screen so that I can
see the entire image.
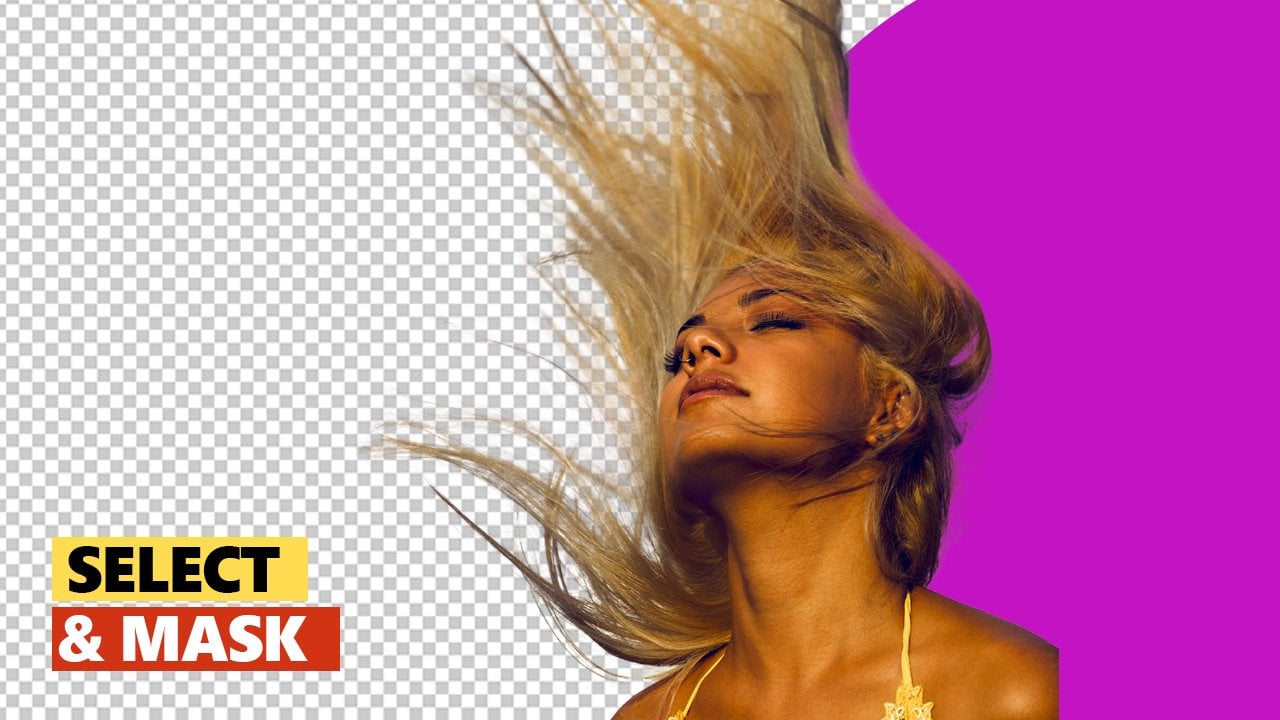
9. Part 8. Refine the Hair: So first step is usually for
selecting the entire body. And then the second
step is for the, hey, my opinion is you
get better results when you separate
the two selection. So let me show you how to continue doing the
second adjustments. So our drag the
slider down and under outputs are willing to
double-click and open the outputs. And then I will change
the output from selection to layer max. Then click on AKI and Photoshop
who moved apart by using a layer mask to a layer max is on the strategy we
hide emphasis in. Otherwise you can always come back and bring back
results that you hide. Also the soliton Maxwell
species can edit layer masks. So what I'm going
to do now is to go back to the
Select and Mask 03. We can see this layer are
measured at this one is active, so we can say counter is active. When you see the white
line is on the thumbnail, then go to Window and
then look for properties. You can find Properties. Click on that. And with
the layer mask selected, you have an option
to select and max. So click on that area, going to do the second step by refining the head of this image. And what I'm going to
do now is first of all, I'll click on the Zoom too. And I'm going to
zoom into the head. And I'll use this, this terrifying have price
to our click on that. Then I'll use the square
bracket on my keyboard to either increase the
price or reduce the price. And when the price
rises down and I price over this pleases, you can see we have some blue behaves when I
click and drag over it. Photoshop is going to
analyze the place and remove those pharyngitis
or those things that we have the
tightest not copy. So you can see Photoshop
has done it pastes. And also if you are
using a newer version of Photoshop like ion 2022, you can find on the
top refined has, when you click on that, Photoshop is going
to analyze the hair, remove any unprofessional
from the head, and we are going to
get better carve out some time and thus were
sometimes doesn't ask for. So if the result is
not appealing to you, then you can go back ME
use their fine hair brush. In this case, it didn't
work like I wanted to do. And I'm going to
use the Refine him, I solved, refine
these edges back out. Just click and drag
these places to move any unprofessional
from this IGS. And the reason I'm making
all these adjustments on a separate steps and not on the original I just meant is
that the global refinement, I just mean do not affect
do not affect the hay, the smoothie in the contrast, the Shift Edge were intended for the age around her
body and the edges, hey, hey, with very different. So usually when I
get a good result, if I use the same technique for good firewood lines
to secrete them Zoo now, I can just focus on the hair and all that I
need to do is to simply continue painting and
Photoshop who analyze the NBN will move in their own profession
from the hair for me. So you can pick your time. So you can take your time
on your own project to move all these things to get a better result because of
time seek our posterior. And then, and then
continuing the class.
10. Part 9. Add a New Solid Color Background: For me, what I'm going to do is that I can pick up my price. Here is my rise to and then
we add feature selected. I can paint any place that
I think it should come in. And if I'm satisfied
with everything, then I'm going to scroll down outputs layer mass
and click on AKI. So you can see that
the changes that we applied to the max that
we already created. Therefore here, good, I
just made then our add a new solid color and I'll choose any current
tsunami, choose gray. I'm just choosing a backbone and it doesn't matter
the Canada you choose. And then for me, I'm going
to drag this layer beneath the image and our
double-click on the hand to view the
image a 100 percent. So when I zoom in, you can see we have some
unprofessional over here. And if you see any on prophecy
or you need to do is to select your max and
then select your brush. So the rise is also here, and you can use the square
brackets either increase the price or reduce the
price, ended up pins. You see that I painted black. So black is highly, and I can also switch to right. Make sure your opacity
flow is 100 percent. And beings that back in. Click on the Hand tool
to view a 100 percent.
11. Part 10. Refine the Mask with the Brush Tool: For me, I'm going to zoom
in and like our scene, we can see some
imperfection in our max. Thus, AKI, you can
always paint back those areas with a brush to
add or subtract to your max, y to add, black to subtract. Let me show you how that works. So for me, our zoom
in and you can see we have some
imperfection over here. Imperfection over here. So we are going to
try to move this one. So with the mask selected, then I'll select my
brush to over here. Then I'll reduce the
size of the price. And we can also use
the property panel. If you don't have yours go to window and you see property and we can sort of decrease
the density sooner. I we can view this one
against the original bug life if he can't tell the difference between the image
and the background. So it is part of the bankers
who are trying to remove these imperfections
through our change the foreground color to black. And then our mean, this one with black
energy is going to move this imperfection that we had
over here changed to right, and let me print
some poison of ITA. It was carve out so there
are good on mine speeds, but to sue around the
document and see whether we have any imperfection
that I would like to bring to read my brush. Let me take black and
let's see this place. We have some imperfection, enrich our lives to bring in. So let me paint with white. And you can see how
amazing this encourages the any place that we
issue count Readings. And we are going to simply
get it if you make a mistake, Control Z to undo. And this is going
to help you make a better car out
there for me remember to increase your density
slider back to a 100 percent. So we have this one against
the background are we have.
12. Part 11. The Remove Background Button: I want to pinpoint that there
is a future in Photoshop that allows you to make
a max really quickly. That I didn't talk about. But I want to pinpoint it
outs noun how it works. But first I need to delete
my Maxwell right-click and you will see
Delete layer max. I will delete that an hour. How my image back like as
human isolates my window and then I look out for
properties, click on that. And then when I move
this group but down, you can see Remove Background. Click on that. Photoshop will use this theme, artificial intelligence
inside the selector, maximum ISPs to
analyze the image, make a selection,
create layer max, or in one go. Right now that the
barber has been removed with the help of
the Remove Background. Let me take the zoom
tool and let me zoom in. And you can see that
Photoshop also did a best by moving the background
like they seem to die. We take over the select
and max rate speeds. The reason why I didn't
use this one as a start, because when you do this, you have to assume, go back to the select
and mask workspace to move this one professionals
from your image. So you also have this at your
fingertips if you need it. Our ISO for me are good
to edit on to edit, undo, go back to my image
that I've been editing. Then let me zoom in to see
whether this one is it, okay, this is the image
that I've been editing. What we are going to talk
about now is to replace the background with an image to our select the background layer. Then I'll go to File and Place Embedded and our C Please
embedded. Click on that. Then you go and look for a job document or
a resource files are and you select die
in May and it's going to place it in Photoshop fast. So our click on place and our weight for the
image to lose our ISO, we have our background here. Then I'll click to resize
it to fit the canvas. And then I'll click on the commit changes
to save the changes. And this is how our bag looks
and fits with our image. So for those of you who are
a little more advanced, you know that there is a
missing few things here, like shadows, highlights,
color matching, and etc. Those things are at finance classes which
are going to come on you is please be sure to always come back and
check under class, but I have a new tutorial
for you to watch or not.
13. Part 12. Final Words and Class Project: Thank you very much
for being with me from the beginning of the course
are the way to the end. And please, your
project is going to visit unspliced.com to download one of these images of how leave a link to these
images to download. And you can use this
one in your projects or you can use the same image
that I use ou our live. This somewhere on the
page where you can learn. You can work on it
as your project. And please, when you attend our live to see the result I get. So please make sure you
share your project with us. And everyone on the page
is going to say yes or opinion on what you are
able to come out with. Please. I have a bug on here. Our love you to put your
car out on this bug, count a, share it in the
project description. Thank you once again, my name is Lama until
next time, peace.
 Solomon Opoku Afriyie, Graphic Designer