Transcripts
1. Class Introduction: Hi, everybody. Welcome
to this class on how to create seamless scallop
patterns in Procreate. My name is R Hari.
I'm a digital artist. In this class, you'll
be learning step by step how to create
a seamless pattern, how to create templates
required to create them. We'll go kind of starting from brainstorming and
sketching your ideas to creating a final output
and even go through a few bonus lessons onto how to create a seamless brush
or how to use position, scale, and colors to create or repurpose your main design
into multiple variations. This class is designed with
beginners keeping in mind, so it's very easy
step by step process. You need not worry,
even if you don't have any experience on kind
of digital illustration. Everything you need in this
class is just an iPad, just an Apple
pencil and an iPad. And any iPad version
is fine until unless the Procreate
version is working. In terms of the class project, what you're expected to do is create a seamless
scallop pattern, which you can use it for
digital prints or even to be printed on and print on demand websites
and merchandises. I'm so excited to share
everything I know about creating scallop seamless
patterns in Procreate. I'll meet you in the
class section below.
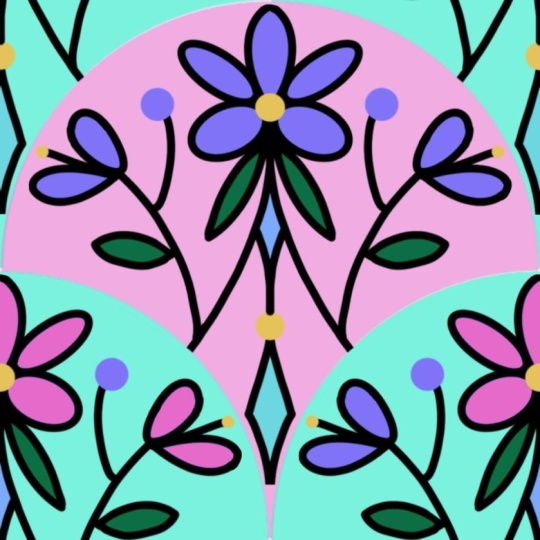
2. Understanding Seamless Patterns: How Pattern Tiles Work: Welcome to the first
lesson. In this lesson, we'll talk about how a
seamless pattern functions in the first place or
what is a seamless style. So on the screen, what you see, this is actually called
a seamless style, okay? And how it functions is because the top and the bottom
part should be similar. In a similar fashion, then the right and the left
part should be similar. See that here we have
taken a square canvas, but it is the best or the ideal way to create
a seamless pattern. But in this class,
we'll see even in the coming lessons
that how to create a seamless pattern
with different types of your canvas sizes
and shapes, right? But to start off with,
we'll start off with square to design entire pattern. So to test this particular seamless pattern or
the pattern tile, we duplicate this layer. We'll just kind of run
through as quickly, but the entire idea of
this lesson is for you to understand what is
the pattern tile and what is a seamless patterns, how does it function, right? So we have duplicated
this layer, we'll select both or we can
duplicate it four times, select all the four and
reduce the size by half. So in my case, the entire canvas size
is thousand by 1,000, so I'll make it
500 by 500, right? There's one tip, which is when you're kind of resizing
things in your canvas, ensure that you don't tap on the screen once you want
to come out of the tool. Because what would happen is there'll be a slight movement of pixels in your particular
canvas for the design. So to come out of this stool, you can either press
the layers icon or the tap the actions mark. In this case, we'll
go for the layers. Don't tap it twice, and you
can come out out of it, or select any one layer and move the particular
layer towards the right, ensure the snapping is on. Ensure the magnetics and
snapping are always on. Now, move it towards your right. You will see the
half flower becomes a full flower in
the center, right? In a similar fashion, we'll move one more layer
to the bottom. Ensure it snaps right on place. S, this is a line
where it's supposed to be meeting the two
pattern tiles, but it doesn't appear to be so because it's
seamless in nature. We'll complete the
other aspect also. Other layer, we'll
move it diagonally and ensure it snaps in the
right place, right? So you can see that the pattern tile borders are not visible. This entire pattern tile
became seamless in nature. We can always multiply
it in multiple ways now. We can combine all the four
layers, again, duplicate it. We can repeat the same thing
for N number of times. I'm just rushing
through in this lesson, but we'll kind of dig deep into these aspects step by step
in the lessons below. Fine. So if you see here, there is no line separating both these pattern tiles.
That's the orall idea. Even if you combine both
these things duplicator and place it just underneath
to complete the canvas, you'll see that the
entire single tile, your ideal single tile which you design was only this part. Right? But here you won't be able to see it
because everything is seamless and there is no very hard edges for
you to identify. That's the overall idea of a seamless pattern
and the pattern tile. So in the next lesson,
we will actually create a custom actions template and create a guide to design
scallop patterns.
3. Building Your Procreate Template for Seamless Design: So in this lesson,
we'll start off with creating a custom
actions template and creating a outer sketch onto how a scallop needs to be there
as a template again, right? So to kind of start off with tap the plus icon on the
top right hand corner. Go to the new Canvas. Now it's ideal,
as I mentioned in the previous lesson
that we go with the square shape because it's easy for us to start off with. But for seamless
patterns, it's ideal. But again, you can create multiple sizes of
different shapes. For that, we will look at
that particular aspect in the bonus section
in our class. But here we'll go
with square aspect. Again, for the square, you need to have at
least 100 layers. That's kind of kind of actually convenient amount
for you to work with. So in this case, we'll go by thousand by 1,000. You will see the
number of layers automatically changes, right? If you increase the canvas size, and the layers will
reduce based on your RAM. So if you have an iPad pro
or iPad with a bigger RAM, then you can go with
a bigger canvas size. But ideally, minimum
is something which I always mention is
thousand by thousand. When it comes to DPI,
300 is better because if in case you would want to print your designs
out in the future, then 300 DPI will keep your kind of intricate
designs intact. And the maximum layers
you can't change it, it depends on the canvas size. In terms of the color profile
here, to start off with, we can go with RGB because mostly we'll be
focusing on kind of digital medium and publish
it on the screens. But if in case you're going to print it out in the future, CMYK is the best option. But here we'll
start off with RGB, but if in case you
want to change the template or the file or
the pattern file to CMYK, you can always do so using Photoshop or even in Procreate. Right. Once you're done,
you can tap the check mark. You got the canvas right now. So we'll fill this up
with a dark color. In this case, we'll take gray, track and drop it on the canvas. We'll go at it step by step. This is a process of creating the custom actions
template, right? Now, reduce the size by half. Remember the canvas
size is 1,000 by 1,000 so we'll
reduce it by half, which is 500 by 500. Again, to come out, you can tap the same actions
menu or the layers. Now, using two fingers, swipe the layer to the right, so it becomes Alpha lock, right? And then tap the image of the particular layer
and tap Select. You will see that
every single corner other than the square
is being shaded, which means that the top
left hand corner square is being selected, right? Now in this option, there's something called
save and load, right? Tap that save and load
and add the plus mark. Okay, so kind of kind of the whole selection one is the top left hand corner square. Now you can come out
of the selection. Now move the square
towards the right, ensure the snapping
and magnetics are on. Again, we'll repeat
the same thing, select the layer, select, save and load, and tap
it for selection two, which means the top left hand
corner is selection one. Top right hand corner
is selection two. We'll continue the same for
the selection three and four, which is bottom right
and bottom left. Okay, so come out again, move the square to
the bottom right. Again, tap the layers icon, select, save and load and add one more selection,
which is selection three. We'll do the same for
the fourth selection. Move the square
towards your left, ensure the snapping
and magnetics are on. Select, save and load,
and selection four. Okay. Now you have
four selections, which has been saved
up in the back end of your Procreate with four different corners
of your canvas. Now we don't need this
particular square now, so we will delete it off. So the customs axring or the background template is ready for us in this
particular canvas. Now we'll create a template or a background for our scallop
patterns. How do we do that? Is you can choose
the monoline brush, which is under the
kind of calligraphy, kind of, actually
the whole brush set. Create a circle,
ensure the layer is on It need not be a perfect
circle, just a rough circle. And don't lift your
Apple pencil, hold it, so it becomes almost a circle. Now using the other finger tap on the screen or on the canvas, you will see it becomes
an exact circle, and extend it as big as you can. And then leave both
the hands at once. To just cross check, you can see here it
comes as a circle. You can change it to ellipse if you want to,
but in this case, we'll go with circle. Okay. Now move. Now kind of tap the actions icon and extend
it or fit it to the canvas. You'll see our circle,
which is exactly around is fit for
the entire canvas. We'll fill this up
with the same color. Once you drop it, stay there and try to decrease or
increase the threshold, to its maximum, okay? And then once this is done, you have a dark
circle in the center. Duplicate this layer,
and one layer, move it to the bottom corner. Bottom left hand corner. Yes, once that is
done, duplicate that particular small arc, tap the actions icon, flip it horizontally,
and move it towards the bottom,
right hand corner. And now combine both these arcs. You will see a small bottom half of the scallop pattern, right? So in this case, what
we need is the circle. Right? We have the semicircle
which is already there, and we have this
particular shape from this layer which
is there, okay? This one, this
layer. So we need to remove this aspect
from the circle. Okay? So how do we do that? First, we have to select
the arch shaped shapes. Then we'll go to
the circle layer and then erase it from there. So how do you do? Again, the same function
using two fingers, swipe from the left towards
the right in that layer, which has the shape and then select it by tapping the layer. Once this part is selected, go to the circle layer, tap eraser, ensure its largest size, and
start erasing it. You might not see it exactly, but if you decrease the opacity, you'll exactly see
what it is all about. Once that is done, you can
delete the top layer and you will see this scallop shape
ready for us as a template. If needed, you can reduce
the opacity of it. Again, this is just a template
on which you can draw so that you don't cross the
borders of a scallop design. Just to test the seamlessness
of this particular shape, you can duplicate it and you can use one
which is on the top. Okay? Uh, to duplicate
it once more, select both, reduce
the size by half. Select one of those,
move it to the right. Again, combine both, duplicate
it, move it to the bottom. Yes. So you will see that
it creates let's let's say, kind of a positive and the
negative scallops seamlessly. So that's the
overall idea for us. So in this lesson, we have
learned how to create a custom actions
template and create a background shape for our scallop on which we can brainstorm and
sketch our idea. The next lesson,
we will start with brainstorming the
idea for our scallop, and then we will
ink it together.
4. Sketching & Brainstorming Your Scallop Pattern Ideas: Now, welcome to Lesson three, where we'll be, uh, brainstorming few ideas and trying to sketch out a
particular design and then see and test the
template which we've already done in the previous lesson and see the seamlessness of it. Okay? So first, you can open the template which
you've already created. You can choose a
pencil or a brush. Uh, you can either go for the whole the kind
of sketching section, there is actually six P
pencil which you can choose, or you can choose a pencil
which is just underneath it. Both are default brushes which are available in Procreate so everybody
will have it. In my case, I'll go
with the pencil. Ensure I choose a new layer. In my case, I'll go with black. Yeah, this is good enough
for brainstorming. So before we sketch out or even tap our pencil on the iPad, I'll just describe two
different distinct types of styles which we can
create in scallop designs. Okay? One is open design, the other one is closed design. Okay? What are the
difference first? Okay, let's say this is
our outer background or outline of a scallop pattern. Let's say you have a pattern, which exactly resembles in a
way the particular outline. Okay? There is an exact
semicircle out there, and there is actually even
lines underneath here. Okay. And by looking at
individual piece, you can clearly see that it's a part of a
scallop patterns. Okay. Then it is called a
closed scallop patterns. Okay? In other case, let's say there is a
particular pattern. Let's say floral in
this case, Okay? So we have a central bead, we have a beautiful
single main petal and then we have
secondary petals. Let's say we have small
kind of tertiary petal. We have a very slight
kind of bud underneath. Okay, so this is pattern, which we have creates
a kind of design. In this case, if you see if
you remove the backdrop, you won't know it's a part
of a scallop pattern, right? But, for example,
if you duplicate it multiple times and, you know, arrange it in a particular way, how scallops are
usually arranged, okay? For example, yeah. Right? If you look at this, if you combine multiple
pieces of this, then only look like
a scallop patterns. But if you just remove
the entire thing and just see one single tile, it won't resemble like a scallop pattern, without the template. But if you see the
closed pattern, okay, immediately, it kind of resembles a scallop pattern. That's the overall idea between a closed pattern and
open scallop pat. Okay? So in this case, we'll start off with
brainstorming session now. So we have seen about the difference between the
open and the closed pattern, and there are in terms of the position of the
scallop pattern, there are two major
components, okay? The first one is the
internal component. What you're designing here in this area which
we have sketched. Okay? And the second area is external component,
this particular area. Right? The main idea the main reason why we are
dividing such is because, uh, it'll determine if it's a closed or open
scallop pattern. That's the overall idea. Okay? So we'll start
off with designing. Um, in this case,
we'll have a semi open and a semi closed where
instead of a line, we'll have a series of
mini vertical lines. So in a way it gives
a border visually. But if you see in reality, it's actually an
open border, right? Perfect. So we'll start
off at sketching, um, and one more thing, you can switch on the drawing assist.
Now how do you do this? Go to the uh, actige menu and
then go to Canvas. There's something
called drawing guide. Okay? The third in the list, switch it on and then
edit the drawing guide. For the last option, there's something called
symmetry, right? Go to symmetry options, sure there is
vertical symmetry on. Okay? And once
you're okay with it, you can increase or decrease
the thickness of the guide. You always keep it to around
60-70. That's good enough. And opacity also you can
increase or reduce it. Again, even that I keep it around around 60 to 70,
so that's good enough. In terms of the
drawing guide, also, you can change the
color of it. Okay. Sometimes if you're
drawing it in a kind of black canvas
or a black template, it's better to go with
the lighter colors. In this case, since we
have the white, uh, canvas and the gray
colored template, we'll go with a black
colored, grid line. Okay? Once everything is set, you can tap the tick mark on
the top right hand corner. Now, what is the difference is, if you draw one section, automatically, the other
section will be replicated. So you have to do only
half the job, right? Perfect. So now
we'll start off with sketching out our
brainstorm pattern. So as we've discussed before, the outer exterior design, we'll have vertical
lines like this. Then we can add on one. Actually, this looks good,
right? This looks good. So what we could do is, uh, we can start off with a line. So in this case, there'll
be a small block, which will be solid, okay? And then we can reduce the visual strength and
then again, create a block. All right, so this looks good. Now we can create one more arch and might be a central small
flower, not necessarily big. Yeah, this is good enough.
It's not very big, though. Here, we can have a semicircular
kind of concert ric, which goes down the line. Yeah. And here, Okay, so this particular arch, we can do it in a kind
of alternative fashion. So on the top, there is
darker patch, right. So here we'll have this
patch as darker one, and the rest will have
the vertical lines continuing, right? And we can have this
entire circular pattern, like a beads or a beadwork continuing
throughout the pattern. You can vary the thickness of it while we're doing the
kind of the final sketch. But now this is good
enough. I think we have to change this
particular aspect. Again, this is a
brainstorming session, so I would want you
also to try out different aspects of
this whole design. There is no one right
thing for patterns. Okay, it depends
on what are things you're taking
inspiration from, right? So our outer exterior
design is good enough. The internal part
is good enough. We are working on
the transitionary aspect of our own design. Can create one arch, can create one more arch. You can have dark circles like this instead
of a hollow ones. Yeah, so this is good enough. If we want to also, we can
have some flares here. We can work that out on the uh when we want to increase the textures
and all those things, then we can enhance
the overall design. But this is actually
a basic first sketch which we have for
our scallop pattern. Now, it's always better
to test it if it works in a seamless fashion when you are
brainstorming it itself. So for that, what
you have to do is you go to the corners of
this particular template, especially here,
make a small mark. Okay. M right? So you can either do this. And this is the best
option to do also because it'll be almost hidden
and it won't be visible. So if you tap the move icon, the entire canvas should be
selected, you can see that. But if it's not happening
here if you see on the top, is a small block, so you need
to draw something there, very small mark, which
is hardly visible. That'll be good enough. Right? Perfect. So now what we
do is we will kind of, like, hide the
background template. We'll duplicate the sketch, ensure the main sketch is
being renamed to original Sketch. Then we'll
hide it or unsee it. Then we'll duplicate the ones which we already have copied. Again, how you have seen
in a particular thing. Okay, so before that, we need
to only duplicate it once, then hide the one which
is in the bottom. The top one, what do
you do with that is? You select that
particular layer. Remember when we are
doing the custom actions when we were doing this, go for save and
load, selection one. When you do this, you will
see automatically that the top left hand corner
square is being faded out, and the other three squares
are being graded out, which means that we are working now on the top left hand square. So once it is selected, go to the M option and then flip it horizontally once and then
flip it vertically once. Right? Once you're done, you can tap the move icon and
come out of the tool. I will continue the same with the other three selections
also, go to the layers, select, save and load, selection two, now flip it
vertically and horizontally. Same again, select, save
and load, selection three. Move it first horizontally
and then vertically. Again, for the last selection, save and load selection four, flip it horizontally first,
and then vertically. Once this is done, flip the
entire thing vertically once. This is our second layer
of our pattern tile. So when you unhide the one
which is already there, you will see this is
our pattern tile, which we have to see if it works well when we are doing it
in a seamless pattern. Always, I would say, duplicate both the layers, keep them separate because if in case you want to change
any color, you can do so. Okay. And if possible,
select both, kind of select one
pair and group them and rename it
as trial sketch. Once after that is done, move it just about the original
sketch and hide it again. Now, these two layers which we already have, combine them both, duplicate it, select them, and then the typical
seamless thing which we do, would have to do that now. Select the second layer,
move it towards the right. You will see that there is
no seamless line in between. If this particular drawing guide is disturbing you, then
you can unhide it. Then combine them both, duplicate it, bring
it to the bottom. This is our seamless
pattern now, okay? Again duplicate it. We're trying with a second
layer so that we can see on a longer or kind of larger
perspective how it looks. This whole aspect of
creating a seamless layer, we have already seen it, so I'm just kind of
brushing it through. Yes. So this is our
seamless pattern or a basic sketch
which we have done, and we're testing it
for seamless patterns. Okay? Now, this is a single
colored layer, right. We'll actually
even try out doing with two colors in this
stage itself because we have to see how
it functions when we are increasing the number
of colors which we use. So we'll rename it as
style one or color one. And hide it first. Then we'll go to the trial
sketch which we had. Select the one. You can select one
of the other layers, Alpha locket pitches using both fingers, swipe
it towards the right. Now, choose the color. Since we already have
red in the center, we can have something
with the green. So it becomes
complimentary in nature. Select the color and then go to the layer again and tab fill. Okay, so our outer
scallop pattern has been changed in terms
of the color, right? Now combine both these things. To combine shortcut is just to pinch both
these layers, right? Now duplicate it again, select both the layers. Reduce the size by half, select one layer, and
move it to the right. Again, select both, duplicate
Can you see a difference? So basically one line is red,
the other line is green. Again, the other line is red,
the other line is green. That's how we have created our
seamless pattern now here. Duplicate it again, select both, reduce the size by half. Select one of those layers,
move it to the right. Combine them both, duplicate it, and place them right underneath. Now we have two layers right now or two styles or two colors
which we have created. Color two, right? So if you see we have
created one which is fully red in nature
or red in color, and the other one
is red and green. Okay? In this case, yes, there are two horizontal
strips of red and green, but we can also alternate
it in multiple ways. But this is just to test it
how the entire pattern works. Okay? So in the next lesson, we'll create a final sketch
out of this brainstorm idea, and then we'll dig deep
into adding on more colors.
5. Design Variations: Two Creative Scallop Styles to Explore: So as a bonus lesson after
the brainstorming session, I'm going to give
you a few ideas for our exterior and
interior designs so that you can have a browse through
the entire video now, and then you can even sketch
out your own ideas, right? So this is a basic pattern
or basic template. You can see I've already created multiple. These
are for interiors. This is for an exterior, this
completely organic shape, which we can use
for scallop also. Again, these things are not kind of traditional
scallop patterns, but we are trying to find
you things and bring in other aspect into the
scallop or fish patterns. It's actually internal design. This is like, people who love buildings,
architecture, and history. They might even like this
more. This is like an arch. So the number of things
you can try out. It just needs to have this, um, shape, like an arch, not necessarily an
exact semicircle. All right. So this was a small bonus
video which I wanted to put in so that you can see that multiple
designs can be done. It's not necessary that you need to follow the entire semicircle, if you kind of
sketch it out and if you're able to arrange
it in a particular way, which will be looking at into which will be looking at
into the coming lessons, you'll be able to see
that we are easily able to arrange things
in a particular way, which resembles a
scallop patterns.
6. Linework, Coloring & Applying the Seamless Template: Okay, so welcome to
this lesson where we'll be kind of inking the sketch which we have done in the previous lesson. So
we'll start off with this. I want you to open the
template which we already have and this sketch which we have done in the
previous lesson. Now, create a new layer
on top of your sketch. If you need to, you
can even reduce opacity of your original sketch. Now, ensure the
drawing guide is on or the drawing assist is on in that layer where you're
drawing the sketch, or you're trying to
create a final sketch. Okay? You can choose
a black color, um, for your brush. So if you're not able
to find exact black, you can just double tap on any bottom left hand
corner of the color wheel. So it naturally goes to the
darkest shade of black there. Right? Once you've done this, you can just kind of test it out if the symmetry is working out. Ensure the brush is monoline. In this case, it's
pencil, so we'll move back to calligraphy
and monoline, reduce the size.
Yes, it's working. Just for your reference, it's better if you switch
on the drawing guide. So it's visible
where the exact kind of symmetry line or
mirror line is, okay. So we'll start off the center. Again, just for your reference, it's actually a sketching, but we need not completely copy what we have done in the
brainstorming session, okay? We can slightly
change based on how your ideas kind of
improvise eventually. We can actually darken this particular
outline a bit more. You see that I don't use a bigger sized brush because
it becomes monotonous. So in this shape, if you see the bottom half is thicker
and the top part is thinner. And if I use a brush which
is of a thicker size, I won't be able to
get that variation. We'll start with the petals
now. This looks good. Yeah, this looks good. Again, we can increase certain aspects. So in this case, I'm
going to increase the thickness of the
petals top part like this, this and this so that we can see a variation in
the design itself. You can fill this whole thing. Yeah, good. I can see that there's a bit of line
weight difference, which gives more
interest to the design. It's also good enough. Perfect. Now, we can continue the same thing with
other aspects also. We can complete the semicircular
aspects here first. Now we'll go with the
semicircular arch. Okay. I don't want to increase the thickness
of this particular arch because I don't want it
to be a focus point. I want the flow to
be a focus point and the outer exterior design. So this particular
arch in the center is just a transitionary
area, right? So I can increase
the dots so that we can just tap
and get dot here. Instead of redrawing
the entire thing. We'll reduce the size now. We'll actually start off with these petals or in
a way, pebbles. Again, one advantage we will
have as a new B or in a way, doing it with a pen is we'll have the
slight imperfections. So if you see here, you know, this particular aspect, yes, we can use the eraser
and erase it off. But it's good because what will happen is
if you're doing it in software which is
extremely vectorized and every single imperfection of yours is being corrected
automatically. I look too perfect, right? So in this case, we
won't have that problem. So it's good if you are
doing slight mistakes in terms of your pen strokes,
that's totally fine. If the line weights are not
consistent, that's fine. Don't try to overcomplicate your design because when we create a seamless
pattern out of it, one thing which
shines is the rhythm, not necessarily the line weights of a single individual element. How the entire design flows with its counterpart
is what is more important than that slight line
weight difference which you identify when you zoom in at least 100 X, right? We complete out
blocks like this. Yeah, perfect. So I'll increase the brush size to do
these vertical lines. Compared to
brainstorming session, I'm doing it a bit
thicker because in a way, I want to lean this whole
design towards more of a closed scallop pattern rather than open
scallop patterns. So the boundaries are bit
set and clear, right? So once this is done, as I mentioned, if you want to test the seamless
nature of it, you need to create or, uh, kind of bring it in into the
customs action template. So for that, we need to
mark the four corners. Slight mark is good enough. Yes. So there is actually an alternative
to do this thing. What you could do is you
can create a new layer, fill it up with a plain color, and group both these things and then implement the
custom actions template. That also can be done, but that's an extra work which is not much of a
difference, right? So that's why we are taking
a shortcut like this by creating a small
mark on four corners. Because that'll be highly
invisible or negligible. Even if you're printing
out on a larger scale, it'll be kind of mostly negligible because this is
just a small pattern tile, which will be repeated
throughout, right? So once we have this, we can hide the sketch which is behind
or even we can even hide, um, the structure which we
have of a scallop pattern. Now, duplicate this, rename
the bottom layer as central. And rename the top
layer as exterior. Now duplicate the
exterior layer, hide the central layer. And hide the exterior
layer one also. The reason is because
we are having a copy of everything so that whatever
we are working on, eventually we can bring
them into the main copy. Now for the exterior layer which we have, in a similar fashion, how we have done for the
brainstorming session, same like that,
select the layer. Save and load, selection one, flip it horizontally
and vertically. Right? We'll do the same
thing for the others also. Save and load, selection two, flip it horizontally
and vertically. Save and load, selection three,
horizontal and vertical. And finally, for the bottom left hand square, selection four. Flipping it horizontally
and vertically. Then flip the entire
thing vertically once. Okay? This is the exterior tile. When we actually switch
on the central tile, you will see the entire pattern which comes up out
for us, right? We can duplicate it once again. We can duplicate the
exterior also once again. Then combine one copy of
both and keep it on the top, and then hide our copies, which we can keep it
for the reserve, right? Now, we will test
the final copy. We'll rename it as final
copy. The final tile. Okay, we'll rename it. We can duplicate it, select both and test for
seamless nature now, reduce it by half, and show
it snaps on the place, select the other layer,
move it to the right, combine both, duplicate
the entire thing, and bring it to the bottom. We'll do it once again to
see the overall picture. Duplicate it. Move
it to the bottom. Now if you want, you can hide the drawing guide so that
it's clearly visible. So this is our final pattern, the final sketch which we have after a
brainstorming session. And if in case we need also, we can add more colors to this. Okay? We can add more colors,
different colors to it, which we'll be looking
at which you'll be looking at in the coming
session or coming lesson. Okay? So once we have
this kind of tested, you can zoom in and
see if there is any issue in terms of the um, you know, how the pattern has been going in terms of the
seamless nature of it. Once everything looks good for you then you can
save the final tile, as your pattern tile
which you have right now. Okay. So whatever we are playing eventually in terms of
colors, in terms of position, in terms of size,
everything we'll be working on the final
pattern tile from this lesson.
7. Scaling Up: Creating Larger Pattern Layouts & Variations: To so in this lesson, since we already have
built our pattern tile, we will try to repurpose it and create
templates around it. Okay? So in this class, in this lesson specifically, we'll create templates
to repurpose the main pattern tile which
we already have designed. Okay, the final pattern tile which you can see on the screen. Okay? So how do we do this
mainly with two things. One is by changing the
size of the canvas, okay? So the entire shape of the tile changes and the
pattern also visually changes. And the second aspect is
bringing in multiplabilty, okay, in terms of the
color styles. Okay? So both will look
into it step by step. So this is the pattern tile which we already have right now. Yes. So I wanted to remove all the layers which you
have apart from this one. Okay? Now, reduce the
size by half for safety. Go to the Actions menu. There's something
called crop and resize under Canvas, right? Go to that, tap it, then go to settings, then
change the settings too. You'll be reducing one dimension by one third or one
fourth in a way. Okay? So thousand by 750. Right? So canvas
becomes almost like, uh, let's say, kind
of stretched canvas. Okay. So with this particular
pattern tile which we have, we will change the dimension, go to free form, and then snap it to the canvas which
we have right now. Okay, so ensure it's covered
in all the directions. It goes point to point. Once this is done, this
is the second type. The first one is the square canvas which we
have done, right, where the entire thing
which were copied in seamless fashion and saw
how the pattern would be. This is the second
style. So duplicate it. Combine both, and
now go to uniform, reduce the size by half. Then we have to kind of like
we are kind of testing out the seamless nature
of this, right? Again, duplicate it, bring
it down. Duplicate it. Right? So if you see
the pattern difference, how different the pattern is, there's a slight difference, right, in terms of the
height of the pattern. Okay? If you want more, you can even reduce
it by let's say 600. So it'll be like 1,000 pixels by 600 pixels in terms
of the canvas size. Okay? Now we have
seen a square canvas. Now we have seen
thousand by s 50 canvas. Now we look at the vertical
canvas. We'll duplicate. We will see just for
you to show me this. Can you see a difference
of both these things? The first one is being
squished vertically. The second one is the
original pattern. Okay, we'll duplicate
this once again. We'll create a vertical
pattern out of this. How do we do this?
Remove all the layers except your main tile. Okay, once that is done, reduce the size by half. Now go to actions, go to crop and resize. Now you are changing the
vertical dimensions, right? So you reduce the
vertical by 600. 600 is very small, so we'll change it to 750. Okay, now resize
that pattern tile which we have for this
particular canvas. Ensure it's in free form mode. Okay, so this is a final pattern tile which
we have right now. Okay? Once we have the
pattern tile right now, either you can go to the
square canvas once again, o or you can try the seamless
nature in this itself. We'll try to do it in this
itself, duplicate both. Select both, sorry, uniform, reduce the size by
half, select one, move it to the
right, merge both, duplicate them, and move
them to the bottom. S, can you see a difference? This entire pattern
seems like in terms of it's actually taller compared to other
patterns which we have done, just because we have changed the canvas or the size
or the pattern tile. Can you see the difference?
So within a moment of time, we had one pattern tile, okay? So we have created one
with the square canvas, and we have created
a square canvas or square pattern tile. Then we have reduced
the height of it and then created
a horizontal nature, which you see in the first file. And then we have reduced the
kind of vertical height, and then we had done something for the second pattern, right? So these are the three
tiles which we can do to repurpose a pattern tile in terms of the size
and the canvas size. Okay? Now, what
we'll be doing is we'll alter the colors.
That's very important. So we'll go for the oganal
file This is a final sketch. We'll remove the drawing
sketch if in case we have, we'll keep the central original, which is very, very important. Now, what is the idea behind what we'll be
doing for the colors? For example, we'll create
a template out of it first and show the
drawing guide is on. Yes. So now,
duplicate this layer. Select both, reduce
the size by half, select one, move it to the
side. Again, duplicate it. Combine these both, duplicate it and bring it to the bottom. Now you will see this whole
pattern is also seamless. You can copy these four and take it somewhere else.
Okay? Understood. So what we'll be doing
with this is imagine we have four different or five different designs
of scallop patterns. Okay, so we'll be pasting one here. This is second design. One here, second design here, third, fourth, fifth. All right. And remember that we talked
in the first lesson itself, how a seamless
pattern functions. So the one which is
on the left hand side should continue on
the right hand side. So let's say we have, um, let's say design six here. So six will be here also. Okay, we have design seven. If it's in the corner, then it'll continue
in all the corners. You have to remember
that. So it's seven here, seven here and seven here. And if it's in the top, then it'll be in
the bottom also. So let's say you have eight unique designs
of scallop patterns, you can combine them into
this one particular template. And when you make this
particular tile seamless, you will see actually
a tile which has variety in its own self compared to one single
scallop pattern. Okay? So now we will do
three variations of this, okay, using two colors and then four colors,
and then more than that. Okay? So first, we'll go to the original
tile, we'll duplicate. Okay. And we'll
change the color. Like for that first, make sure it's kind of like the
whole alpha lock is on. It's in the two fingers,
wipe it towards the right. Then you can change the color. In this case, I'll go for green. Now, remember what
I mentioned you that this half and this
half are same, right? So if you color it here
like this, All right. And if you don't
color the top part, then what will happen is
when you make it seamless, the bottom half will remain black. So you have
to do that also. Okay, so this is one
of the pattern tile. You know what happens if
you duplicate this, right? So this one layer will be black, and the other layer will be
cream. We'll try it out. We don't have to
assume anything here. We'll try it out once again. Half, move it to the right, combine them both, duplicate it again, move it to the bottom. Right? Can you see this?
So one line is black, other line is green, and it keeps on continuing
in a similar fashion. Okay? Now, this is one particular style
which I mentioned. And second one, let's assume we are creating that
tile which we have. Okay. And we are creating multiple colors out of
it. We're duplicating it. And then we'll alpha lock it and fill this
with complete green. Next one, we'll fill
this with complete, let's say, yellow, a darker
shade of yellow in a And the third one, we will
fill it up with pink. I'm choosing a random colors
only for you to understand that we can create multiple
variations of a single piece. If you have one
pattern tile ready, then you can always repurpose
it using the size of it, using the position
of it, and using the colors of it, right? Again, duplicate the layer. Now here we'll have
something in a bluish shade. Fill it up, right? So we have four colors
ready right now, can remove the alpha
log for everything, and we will try to arrange it in that particular
template which we have in the bottom, right? So we'll reduce the size of
all the um patterns by half. Now that is done. We'll
try to arrange it now. Green color will be
there where it is. Yellow will bring it
to the side here. Pink will try to bring it to the bottom and green
will duplicate it. We'll do eight colors, actually. We'll try out eight
colors. That'll be a good trial, right? So again, we'll alpha lock it. We'll create light
blue color for that. Fill layer. Now
that's light blue. We'll bring it here
in the center. That's good. What
is remaining now? Dark blue is remaining. We'll bring it here. Perfect. Now we have five
different colors of scallops. Now we need three more. Okay. Wear three more. One here in the sides, one in the top and bottom,
and one for the corners. Okay? For the corns,
we'll go with black. Okay? Do we have it right now, the black color main pal? Yeah. So we'll duplicate the
blue, that's totally fine. We'll alpha lock it. We'll
fill it up with black color. Remember for you to position that particular black colour
scallop in four corners, you need four copies of it. So we'll duplicate it
and create four copies. I'll select one. We'll move
it to the bottom here. That's good. We'll
select one more. No, we were planning
for the corners, right? Okay, so we'll take
it to the corner. Yes, one corner is done. This one we'll take it to
this next corner. Perfect. The other corner is done.
The top two corners are remaining. We'll
complete that. Perfect. And the last corner, which is a top left
hand corner, Perfect. Now we have two more designs required to combine
the black completely. And then we'll duplicate
the blue Alpha locket, which color is remaining right now in terms of
the major shades. We can have um, maybe red, red is in there, so we'll have red
there, fill it up, now move it and show you duplicate it
because you need two copies, one for the top and
one for the bottom. One for the bottom, and the
other for the top. Perfect. That is done. And then for both the sides
you need, right? So again, we'll duplicate it. We'll duplicate the
blue, Alpha locket. What is the color
which we can choose? I do something like gray, right? No, but the problem is
the entire thing will look like almost like
black and gray, right? So we'll choose something like pink has been
chosen already. Red is there, green, there are two shades.
Orange isn't there. We'll go for orange. Perfect.
Go for orange, fill it up. Again, since we need
it for the sides, again, create two copies. Then move it to the right. Then we'll do the same
for the other side also. Perfect. Okay? The orange
is not very vibrant, so we'll change the shade of it. We'll make it more brighter. Yeah, this would be good. Perfect. So we will hide the template which we
had right at the bottom. Okay, we'll combine
all the layers of this particular scallop
style. All right. So we have nothing
in the screen except the types of scallops
which we have created just by
changing the color. Have you seen the magic here. We changed the size
of the scallop, kind of the whole pattern tile, and we created multiple designs. Here we are changing the color, and just we are doing
the basic colors. Let's imagine you
add you kind of add more integrities to the central scallop,
which is here. Or you can add, let's say, different opacity styles to different scallops in
this particular tile, and then you combine them
in multiple ways, right? So first, we have to test this particular tile
which we have created. So always, as I tell you, duplicate the main layer. Don't work on the
main layer, okay? So duplicate it and hide it. And then when you're working, use those layers to test
the seamless nature. Beautiful, right? It feels like our entire
palette is filled with colors. So beautiful, right?
And it doesn't feel like there's some
kind of repetition. It feels like it's
been done organically. Again, we'll test it once again, duplicate it, reduce it by half. Select one layer,
move it to the side, combine the both, duplicate it, and move it to the bottom. Perfect. This is this
entire template. So you can see that o there's
a kind of continuation. You can't see any line where the pattern
has been cut, right? So this is our entire final. It's a bonus pattern which
we have created. Okay? So the entire thing doesn't
follow a certain template, but somehow it feels rhythmic
just because we have created similar color
styles of a same design. Okay. And if you want
to add in more, uh, let's say, visual
intrigue to it, can add some background color. Okay? You see that here, it's just a white
background, right? But let's assume you have, let's say, a sandal
color background, okay? And, yeah. Or if you add some kind of shade, Okay, going from one uh kind of side of a canvas
to another, like a gradient. That'll be far more
beautiful. Okay? If you add gauge and blur to it. Wow. Can you see this? If you just remove
the background, it looks very bland,
simple pattern. But if you switch
on the background, it feels like there's a depth to the particular
pattern, right? And this is just a
background color. If you add in shadows or highlights in certain
aspects of your design, then the pattern
itself will enhance the overall picture of what
you're trying to create. Perfect. So we have
come to almost end of the class where you have
learned how to first of all, how to create a pattern
template and then brainstorm the idea and then kind of line the idea and
create more colors out of it. Then in this lesson,
we have created multiple templates,
to be precise, exactly six by
changing the size of the entire canvas or by changing the color of the
individual paletteye. Okay. Now we have two more bonus
lessons which we have for you. One is how to recreate multiple design styles using
the palette unit tile. Okay? That will be looking
in the first bonus. And in the second bonus, we'll be looking into how to create a pattern
brush out of it. So that if in case you
want to create this as a pattern brush which
is completely seamless, you need not do it
every single time. You can have a brush
which has been created, and the entire background
is done for you. I'll see you in the next
lesson, which is bonus fill.
8. Advanced Bonus: Pattern Variations & Creating a Seamless Brush in Procreate: Okay, so welcome to the first
bonus lesson of this class. So in this lesson, what
we'll be doing is we'll be using the pattern
tile which we have, which you can see on
the screen and try to repurpose it just by positioning
it in a different way. Okay? What I mean
by saying that is, let's say you have a
pattern tile right now. Okay, instead of
placing just seamlessly in a similar fashion
next to each other, you'll be placing one on
top of each other, okay? Or you'll be placing in a circular pattern and create
an interest around it. Okay, that's the overall idea. So we'll kind of
look at it first. Okay? So first, template
which you have. Again, as I mentioned, always in the previous lesson
delete all the other let's say the
original scratch or the basic template pattern
which you had, everything. Just keep the main tile
which you see on the screen. The main unit, I say, main unit, it is the one which is the base of everything
which we are doing. These two needs to be having. Now, using the unit
which you have, duplicate it first or duplicate multiple
times and then reduce the size by half or even
smaller if you want to. Yeah, here, the size
is not the aspect. It's about the thought
process of how you are positioning
each pattern unit. Okay. Now select one, clip it vertically
and move it down. You can see these two points
merge in one point, right? That's actually a
validation for you. If you need so also, if you don't want that much
gap in between, you can reduce the size
by moving it on top. Right? Once you have this, combine both these
things, duplicate it. Move it to one corner.
Ensure it's in the center. If it's snaps, it's good. Yeah. This is in the
center now. We'll move it. We'll move actually one layer which you have
duplicated to the side. Ensure it snaps,
it's very important. Gain duplicate it.
Move it to the side. An duplicate it,
move it to the side. If it doesn't fit, that's fine. As of now, what you could do
is you can delete it off, actually. You can delete it off. You can just have
three. Okay, and try to resize it for
the entire canvas. That's good enough,
right? Sure again, it's in the center. So this is your seamless
strip, which we call it us. Okay? When I say seamless
strip, what does it mean? Let's say we duplicate it. And in this case,
if we duplicate it, we'll be duplicating it and create only or
kind of multiply it only in one
direction like this. So you get a strip of a design. Okay? Not necessarily seamless
in every single direction, but a strip of a design, okay? And we can actually add
on certain things to it. What it does is, let's say you have a design
right now like this, okay? Move it to the center. Now this is one strip
design which we have. Now, how do we multiply
multiple designs out of this? Again, duplicate the
main unit which you had. Okay? Or you can
just take the unit. Uh you just want one unit
out of all these things, okay? So arrase everything. Just keep one unit. Sorry, I didn't switch
off the drawing assist. Okay. Once that is done, move this new kind of
unit which you had here. If you want, you can
switch off the snapping. Okay. Duplicate it. Move it to the next panel
like this, similar way. Right? You continue like this. If you don't want the last one, you can just erase it off. Okay, once you have
two layers like this, combine these four, duplicate it once again
and place it on top of this duplicate it once again, move it on top like this
and erase the last one. Do you see we are
just building up on one single design. That's it. We have one single base design, and we're just building
it on top of it. Okay. And if you want, you can copy the same
thing from the top and kind of bring it to the
bottom also if it's required. If it's not, you find this
design is good enough, you can just go
with this, right? So this is the final
design which we have. And, um, actually,
you can even fill this up with some other
design which you have, okay? Or you can bring in
multiple colors to it. So this is one style of just positioning it
in a different way. Okay? This is actually
a strip style design. Now, what we will do we combine all these
things to save it off. It looks beautiful,
right? That's good. Now we will again duplicate the original one,
reduce the size. Now we will arrange
it in a circular way, okay? So we'll duplicate this. Flip it vertically,
bring it to the down. Okay, once that is done, have a copy always,
duplicate it. Flip it by 45 degree. This is almost like a mandala, but you have not
designed a mandala. You have just designed
one single panel unit. And you can see position kind of actually just the positioning
it in different ways. You're creating a
seamless strip and you're creating even a circular
mandala, right? So this is like a mandala design which you usually see online, and we can do it Procreate, but just because we have already designed one panel really well or one pattern tile really well can
multiply it like this. Right? This is actually
in the circular fashion. I can combine it and
save it for later. Now, in terms of the brush, there's actually a second bonus, which we combined in
the same bonus lesson. The second bonus
is we are creating a seamless brush so that if in case you want to create a
seamless pattern in future, the brush is already ready, so you don't have
to import the image and create a seamless
accordingly. You can just brush it out.
How do you do this right now? First, ensure all the other
layers are switched off. Go to the main central layer, which has both the first phase and the second
phase of the panel. This is your complete
panel, right? You need to have this. Now, Alpha locket, which
is by two fingers, wipe it to the right
and then select it. Okay. And then something
called copy all. Okay? By three fingers, if you swipe down, you'll
get that option, copy all. Once this is copied and
is it in a dashboard. Now, go to the brush icon. Now, you can go to any regular brushes
which you already have. I would always recommend go to the regular brush instead
of starting something from the new because
you might not know the many intricacies
of the brushes, right? So to start off
with, it's better. You take up something
which is already existing. So go to the monorail brush, duplicated by swiping
from right to left. Once you have it, tap
that monoline two, which is your own trial brush. Okay? Now, go to the green, which is the fifth option, tap the green
source, tap import. There's something called
paste, paste it here. The entire thing is dark Okay, there's a small mistake
from my side then. 1 second. Okay. So
remove the Alpha lock. Now copy and paste it. Okay? Copy all. Now go for the monorail. Import, paste. Yes. So
now we have this, right. If you use double tap and press it here,
it'll be inverted. Okay? This is actually
two types of brushes. One is, let's say, in a way, positive brush, and the other one
is negative brush. We'll look into both
of these things. Remember this aspect of double tapping when we're
importing the green. Okay? In this case,
we double tap, and the one which
we have already drawn is in the black color. Okay? Now press tick mark. And then in terms of scale,
you can work it out. So if you Yeah, if you go to Apple Pencil, go to Apple Pencil and
reduce opacity to zero, ensure it is there
and go to properties, and you can change the
maximum size of it. Even the green, you
can change the scale of it. All right? So right? So if you draw it like this, you will see the
pattern coming up. Right? Now, if you
go to green again, double tap it, then
again, check mark. Now if you draw, you will see the actual
pattern which we have, which is important
for us, right? Ensure it's kind of
texturized, not moving. That's very important.
Again, as I mentioned, you can increase the scale
or decrease the scale. Always recommend something
20-30, which is good enough. Properties, just to check everything is there,
everything is right. Now, if you go to
about the brush, you can change the
name of the brush. Okay? So you can
change the name. If in case you create your own, then you can even
write your own name and kind of make a
signature out there, right? Once that is done,
let's check mark. Now go to a new layer, go for black in terms of
brush and test it out. I see. So within a fraction of time, we have a complete seamless
pattern just by a brush. Okay, because we have stored or we have actually feeded the green or the pattern tile which we have as a brush green, right? And you can do it from
multiple colors if let's say you choose
a maroon color, then you can just draw
it out like this. You can reduce the
brush size also. And if in case you feel that the whole grain scale
is huge, then again, go to the brush, go
to the monoline two, and go to the grain which you already had and
reduce the scale of it. Okay? So you will
see a change now. We'll create a new layer,
and if you draw it out here, if you compare it with
the previous one, Can you see a difference? It's actually a huge grain
which we had previously, and now we have a smaller grain. So it's totally up to you. It's actually a trial and
error aspect where you try out different sizes of the grains and see which works
well for your design. But if in case you
want to change, also, I've shown how to change
it in the brush setting, so it's easy to do within
a fraction of moment.
9. Class Project: So we have come to the end of this class where you have
learned so many things. We'll first recap
everything we have learned and we'll go into
the class project section. Firstly, we have learned
how a seamless pattern functions and how to create
a custom actions template, and how to create
a basic framework to create a scallop pattern. The following that,
we created we actually went through
the brainstorming session where we sketched out, uh, the entire scallop pattern. We have talked about open and closed scallop
patterns also. And then we have implemented the template which
we have created ourselves into the brainstorming sketch
for the scallop pattern. And after that, we
finalized our pattern, we inked it, and we created
multiple templates, three templates with different
sizes, one is square, horizontal and vertical, and then three different templates
for different colors. Okay, two colors where one
entire row is one color, the other row is other color and having eight colors
in one single pattern. And then finally, as a bonus,
we have learned two things. First is how to use kind of positioning to create
multiple designs, like a strip
seamless pattern or, let's say, pattern mandala. And then as a second bonus, we even learned how to
create a seamless brush in procreate using the pattern tile design
which we already design. So I hope you understand
every single aspect and went through the entire
lesson step by step. As part of class project, we'll be going through the same thing which we've already done. Okay? As you can
see on the screen, we'll first brainstorm
what we have learned on. You create your own design, not necessarily the one which
we've already done. And then, second, you
finalize the sketch and ink it in the black and white and create a
pattern tile out of. And then the third, which is on the top right hand
corner on the screen, you create a seamless pattern with that particular
pattern tile. And then finally,
which you should be posting in the kind
of project section, is you create multiple colored
kind of pattern tile like this so that it can be implemented and there's
variety in the patterns. I hope you enjoyed
the entire class, and I'll really
appreciate you posting your final patterns in the downloadable or
the project section. I'll be very happy to
give my feedback or comments on that
particular design and even your colleagues. And I'll meet you in the next class where
we'll be talking about different kinds of
surface patterns, specifically Chevron patterns.
 Srihari Muralidhar